buttons NISSAN QUEST 1997 V40 / 1.G Owners Manual
[x] Cancel search | Manufacturer: NISSAN, Model Year: 1997, Model line: QUEST, Model: NISSAN QUEST 1997 V40 / 1.GPages: 247, PDF Size: 2.01 MB
Page 29 of 247
CAUTION
cRemove water drops, snow, ice or
sand from the sunroof before
opening.
cDo not place any heavy object on the
sunroof or surrounding area.
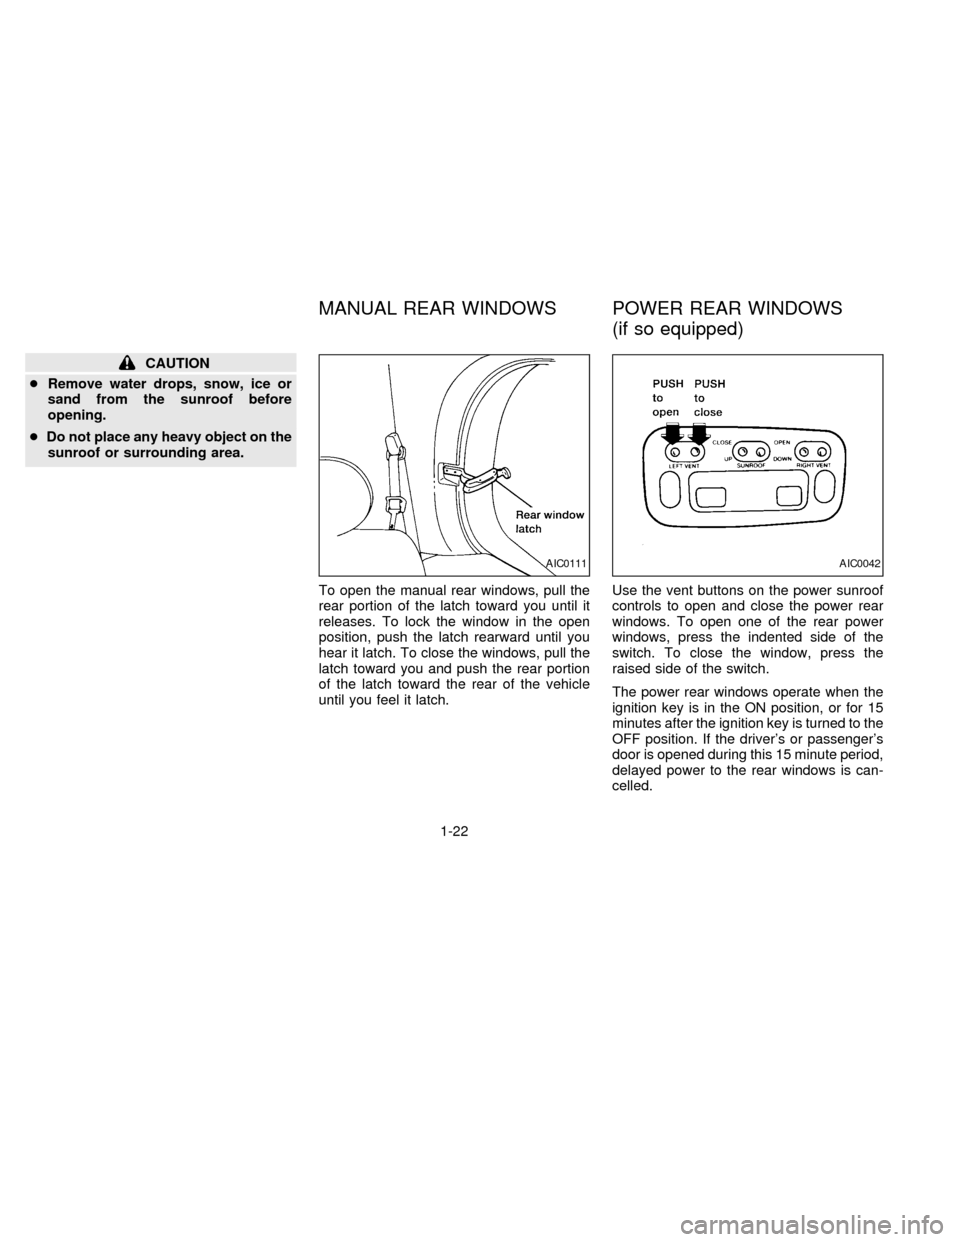
To open the manual rear windows, pull the
rear portion of the latch toward you until it
releases. To lock the window in the open
position, push the latch rearward until you
hear it latch. To close the windows, pull the
latch toward you and push the rear portion
of the latch toward the rear of the vehicle
until you feel it latch.Use the vent buttons on the power sunroof
controls to open and close the power rear
windows. To open one of the rear power
windows, press the indented side of the
switch. To close the window, press the
raised side of the switch.
The power rear windows operate when the
ignition key is in the ON position, or for 15
minutes after the ignition key is turned to the
OFF position. If the driver's or passenger's
door is opened during this 15 minute period,
delayed power to the rear windows is can-
celled.
AIC0111AIC0042
MANUAL REAR WINDOWS POWER REAR WINDOWS
(if so equipped)
1-22
ZX
Page 114 of 247

3Heater, air conditioner and audio system
Ventilators ..............................................................3-2
Heater and air conditioner (manual) ......................3-3
Controls ..................................................................3-3
Heater operation ....................................................3-4
Air conditioner operation ........................................3-5
Air flow charts.........................................................3-7
Heater and air conditioner (automatic) (if so
equipped) .............................................................3-10
Automatic operation .............................................3-11
Air control buttons ................................................3-11
Air conditioner and air recirculation .....................3-12
English/metric mode .............................................3-12
Rear seat heater and air conditioner (if so
equipped) .............................................................3-13Controls ................................................................3-13
Audio system ........................................................3-14
AM-FM radio with cassette player .......................3-14
Tuning
..................................................................3-16
Adjusting tone quality ...........................................3-17
Cassette tape operations .....................................3-18
Antenna ................................................................3-20
Compact disc (CD) player (if so equipped) .........3-21
Steering wheel controls ........................................3-23
Rear audio controls ..............................................3-24
CB radio or car phone..........................................3-25
ZX
Page 116 of 247
WARNING
cThe air conditioner cooling function
operates only when the engine is
running.
cDo not leave children, unreliable
adults, or pets alone in your vehicle.
On hot, sunny days, temperatures in
a closed vehicle could quickly be-
come high enough to cause severe
or possibly fatal injuries to people or
animals.
cDo not use the recirculation mode
for long periods as it may cause the
interior air to become stale and the
windows to fog up.
cPositioning of the heater and air con-
ditioner controls should not be done
while driving, in order that full atten-
tion may be given to the driving
operation.
CONTROLS
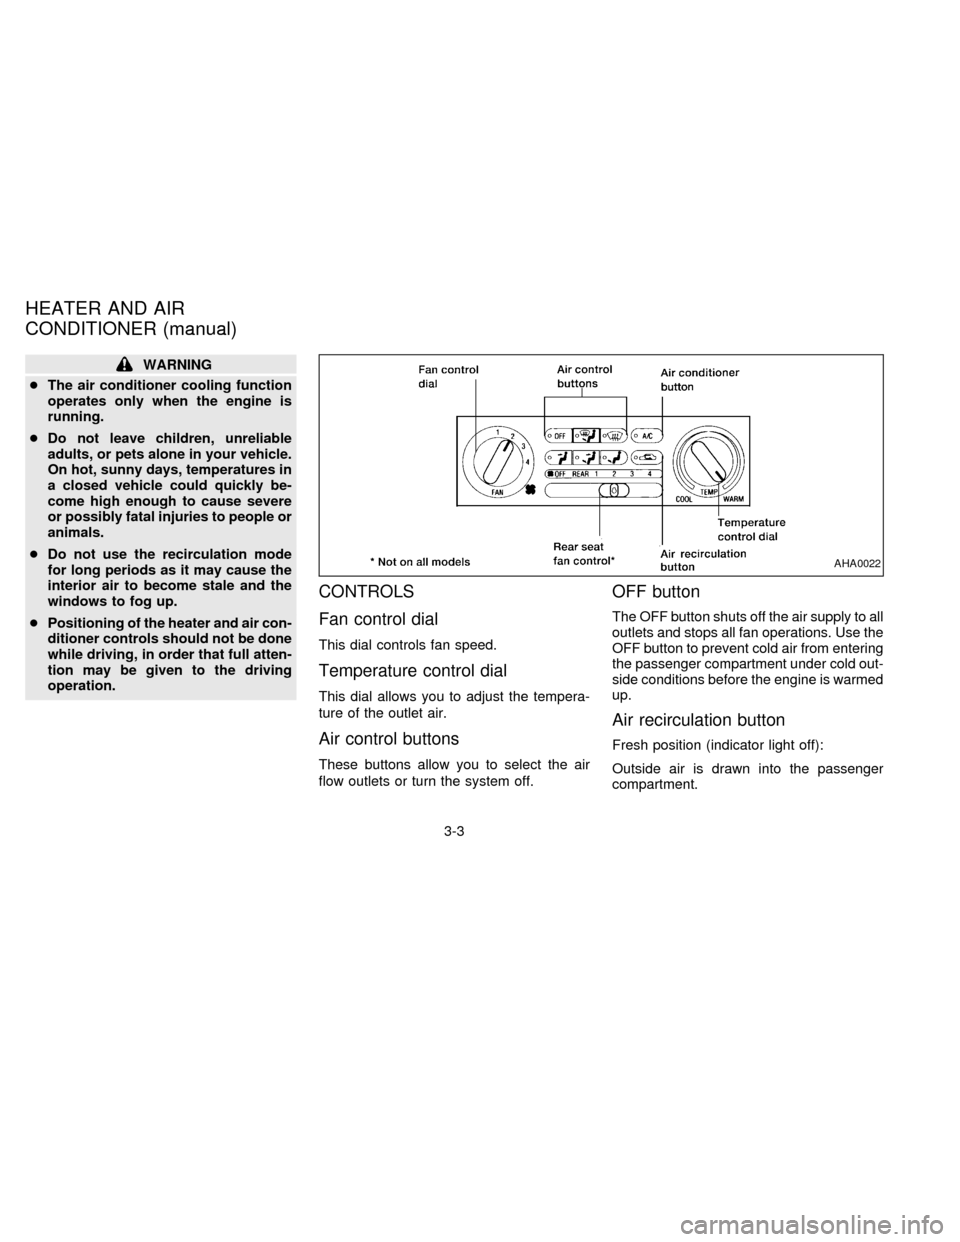
Fan control dial
This dial controls fan speed.
Temperature control dial
This dial allows you to adjust the tempera-
ture of the outlet air.
Air control buttons
These buttons allow you to select the air
flow outlets or turn the system off.
OFF button
The OFF button shuts off the air supply to all
outlets and stops all fan operations. Use the
OFF button to prevent cold air from entering
the passenger compartment under cold out-
side conditions before the engine is warmed
up.
Air recirculation button
Fresh position (indicator light off):
Outside air is drawn into the passenger
compartment.
AHA0022
HEATER AND AIR
CONDITIONER (manual)
3-3
ZX
Page 118 of 247

override the automatic dehumidifying
which occurs when
is selected.
Operating Tips
Clear snow and ice from the wiper
blades and air inlet in front of the wind-
shield. This improves defrosting/
defogging operation.
Bi-level heating/cooling
The bi-level mode directs air to the side and
center vents and to the floor outlets.
Bi-level is also a cooling mode when high
sun load conditions are present with cool
temperatures.
With the A/C system in operation, this mode
can be used to cool the passenger's or
driver's feet under high temperature condi-
tions.
With the A/C system in operation under high
temperature conditions, improved cooling
can be obtained by pushing the recirculation
button to the on position.
Push the air recirculation button to the off
position when heating is required.
1. Push the
button in.2. Turn the fan control dial to the desired
position.
3. Move the temperature control dial to the
desired position.
Heating and defogging
This mode heats the interior and defogs the
windshield.
1. Push the
button in.
2. Turn the fan control dial to the desired
position.
3. Move the temperature control dial to the
desired position.
When the
button is pushed, the air
recirculate mode automatically turns off.
Outside air is drawn into the passenger
compartment to improve the defogging
performance.
Operating tips
cClear snow and ice from the wiper
blades and air inlet in front of the
windshield. This improves heater op-
eration.
cTo defog the side windows more effec-
tively when in bi-level or ventilationmode, close the center vent and direct
the side vents toward the side windows.
cA slight delay may be experienced when
changing air control buttons. This is not a
problem, it is only the system motors and
solenoids switching from one outlet to
another.
AIR CONDITIONER OPERATION
Start the engine, move the fan control dial to
the desired (1 to 4) position, and select an
air control button before pushing in the air
conditioner button to activate the air condi-
tioner. When the air conditioner is on, cool-
ing and dehumidifying functions are added
to the system operation.
The air conditioner cooling function op-
erates only when the engine is running.
NOTE: When switching air flow outlets, the
A/C system remains activated unless the
A/C button is pressed again to turn it off.
The indicator light on the A/C button re-
mains illuminated unless the button is
pressed to turn it off, or the OFF air control
button is pressed.
Cooling
This mode is used to cool and dehumidify.
3-5
ZX
Page 123 of 247
WARNING
cThe air conditioner cooling function
operates only when the engine is
running.
cDo not leave children, unreliable
adults, or pets alone in your vehicle.
On hot, sunny days, temperatures in
a closed vehicle could quickly be-
come high enough to cause severe
or possibly fatal injuries to people or
animals.cDo not use the recirculation mode
for long periods as it may cause the
interior air to become stale and the
windows to fog up.
cPositioning of the heater and air con-
ditioner controls should not be done
while driving, in order that full atten-
tion may be given to the driving
operation.
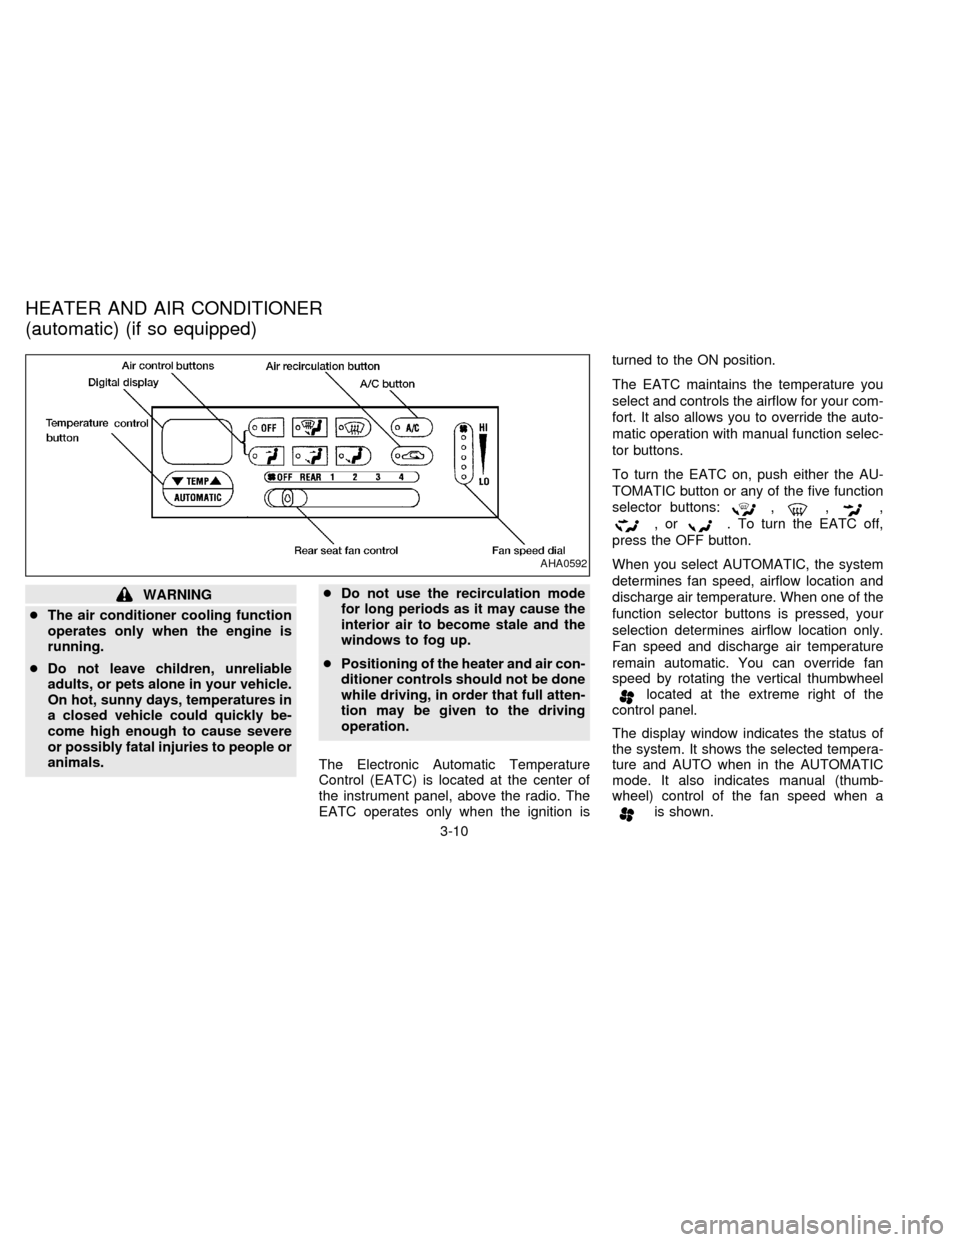
The Electronic Automatic Temperature
Control (EATC) is located at the center of
the instrument panel, above the radio. The
EATC operates only when the ignition isturned to the ON position.
The EATC maintains the temperature you
select and controls the airflow for your com-
fort. It also allows you to override the auto-
matic operation with manual function selec-
tor buttons.
To turn the EATC on, push either the AU-
TOMATIC button or any of the five function
selector buttons:
,,,
,or. To turn the EATC off,
press the OFF button.
When you select AUTOMATIC, the system
determines fan speed, airflow location and
discharge air temperature. When one of the
function selector buttons is pressed, your
selection determines airflow location only.
Fan speed and discharge air temperature
remain automatic. You can override fan
speed by rotating the vertical thumbwheel
located at the extreme right of the
control panel.
The display window indicates the status of
the system. It shows the selected tempera-
ture and AUTO when in the AUTOMATIC
mode. It also indicates manual (thumb-
wheel) control of the fan speed when a
is shown.
AHA0592
HEATER AND AIR CONDITIONER
(automatic) (if so equipped)
3-10
ZX
Page 124 of 247

AUTOMATIC OPERATION
Push the AUTOMATIC button and select
the desired temperature. The selected tem-
perature and AUTO show in the display
window. The EATC heats or cools to
achieve the set temperature.
When in AUTOMATIC and weather condi-
tions require heat, air is sent to the floor.
However, a feature is included in the EATC
to prevent blowing cold air to the floor if the
engine coolant is not warm enough to allow
heating. In three or four minutes the fan
speed gradually increases and airflow
changes to the floor.
If unique conditions exist, such as window
fogging, the five override buttons allow spe-
cific airflow selection. The thumbwheel al-
lows you to adjust the fan speed to suit your
needs.
Temperature selection
TheTEMPbutton on the left
side of the control panel is for temperature
selection. The
side lowers the set
temperature, and theside raises the
set temperature. Press and hold either side
of the button to rapidly change the tempera-
ture setting in one degree increments toeither 65ÉF (18ÉC) or 85ÉF (29ÉC). If you
want continuous maximum cooling, push
the
side of the TEMP button until
60ÉF (16ÉC) shows in the display window.
The EATC cools at maximum and disre-
gards the 60ÉF (16ÉC) setting until a warmer
temperature is selected. If you want con-
tinuous maximum heating, push the
side of the TEMP button until 90ÉF
(32ÉC) shows in the display window. The
EATC provides maximum heat regardless
of the 90ÉF (32ÉC) setting until a cooler
temperature is selected.
Fan speed and thumbwheel
Your EATC automatically adjusts the fan
speed to the existing conditions. To control
the fan speed yourself, use the thumbwheel
located at the extreme right side of the
EATC control panel. Using the thumbwheel
cancels the automatic fan speed control,
and causes a
to appear in the display
window. Rotate the thumbwheel up for HI
speeds and down for LO speeds.
To return to auto fan control, press the
AUTOMATIC button.
AIR CONTROL BUTTONS
Your EATC has five buttons which allow youto make special selections. The buttons are
grouped in the middle of the EATC panel
and allow you to determine airflow location.
Pressing any of the air control buttons
changes airflow location only, and does not
affect the ability of the system to control
temperature or fan speed. Return to fully
automatic operation by pushing the AUTO-
MATIC button.
Push this button for airflow to the floor and
windshield at the same time. Thein-
dicator light comes on, and the display
window shows the set temperature.
Press this button to obtain maximum airflow
to the windshield. Adjust the temperature
setting as required for defrosting. The
indicator light comes on, and the
display window shows the set temperature.
When the outside temperature is about
50ÉF (10ÉC) or above, the air is dehumidi-
fied to prevent window fogging.
Push this button to select airflow through
the instrument panel registers. The
indicator light comes on, and the
display window shows the set temperature.
3-11
ZX
Page 125 of 247

The EATC heats the air if the selected
temperature is warmer than the outside air
coming into the vehicle. However, the air is
not cooled regardless of the temperature
setting.
Push this button to get air from the floor and
instrument panel registers at the same time.
The
indicator light comes on and the
display window shows the set temperature.
Depending on the selected temperature, the
air is automatically heated or cooled.
Push this button to direct airflow to the floor.
Theindicator light comes on, and the
display window shows the set temperature.
The air cannot be cooled in the
mode, only heated.
AIR CONDITIONER AND AIR RE-
CIRCULATION
Activate the air conditioner in any of the
override modes listed above by pressing the
A/C button. The A/C indicator light comes
on to verify activation, and cooled air flows
from the vents. Fan speed continues to be
controlled by the EATC unless the fan
speed thumbwheel is used to override.Press the
button to choose air recir-
culation. In this mode the EATC system
recirculates the air inside the vehicle rather
than drawing air from outside. Use this
mode together with the air conditioner to
rapidly cool the inside of the vehicle, or to
dehumidify the air inside the vehicle.
ENGLISH/METRIC MODE
Switch from English to metric temperature
display by simultaneously pressing the
and A/C buttons and holding the
thumbwheel in upper position (HI) for one
second.
AHA762
3-12
ZX
Page 129 of 247
TUNING
WARNING
The radio should not be tuned while
driving in order that full attention may
be given to the driving operation.
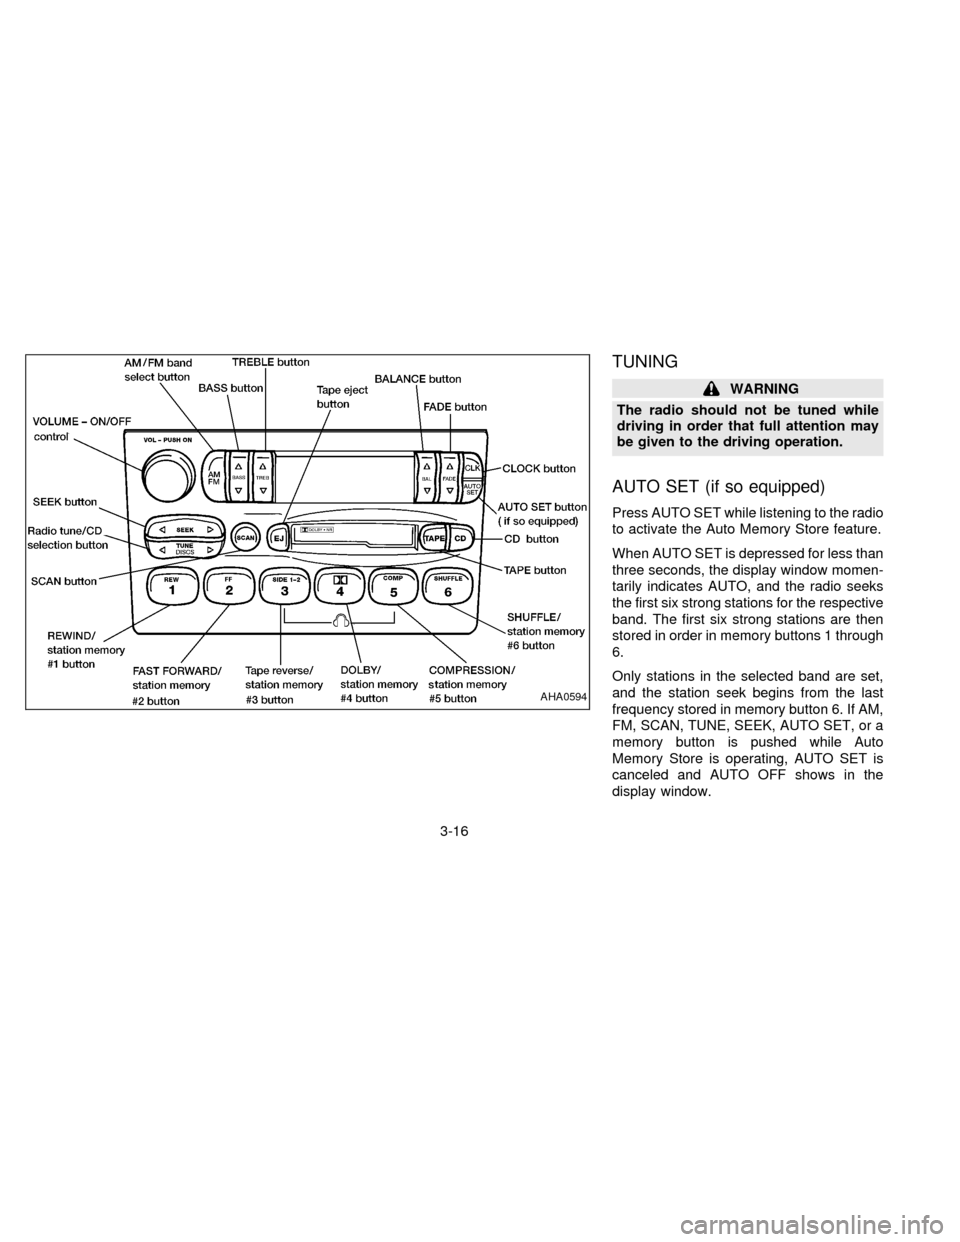
AUTO SET (if so equipped)
Press AUTO SET while listening to the radio
to activate the Auto Memory Store feature.
When AUTO SET is depressed for less than
three seconds, the display window momen-
tarily indicates AUTO, and the radio seeks
the first six strong stations for the respective
band. The first six strong stations are then
stored in order in memory buttons 1 through
6.
Only stations in the selected band are set,
and the station seek begins from the last
frequency stored in memory button 6. If AM,
FM, SCAN, TUNE, SEEK, AUTO SET, or a
memory button is pushed while Auto
Memory Store is operating, AUTO SET is
canceled and AUTO OFF shows in the
display window.
AHA0594
3-16
ZX
Page 130 of 247

SEEK tuning
This feature on your radio allows you to
automatically select strong frequency sta-
tions up or down the frequency band. Press
SEEK
to select the next strong sta-
tion up the frequency band. Press SEEK
to select the next strong station down
the frequency band. To change frequencies
quickly, press and hold either side of the
SEEK button.
SCAN tuning
Push SCAN to enter the scan tuning mode.
The radio searches up the frequency band,
stopping and playing each strong frequency
station for five seconds. This continues until
the SCAN button is pushed a second time
or a different tuning function is selected.
The AM or FM1 or FM2 symbol in the
display window flashes while each station is
being played.
AM/FM
Press the AM/FM button to select the de-
sired band: AM, FM1, or FM2. The stereo
indicator shows in the display window dur-
ing FM stereo reception. When the stereo
broadcast signal is weak, the radio auto-matically changes from stereo to monaural
reception.
Station memory operations
Your radio comes equipped with six
memory buttons, which are used to preset
up to six AM stations and 12 FM stations.
NOTE: If the vehicle's battery is discon-
nected, the memory buttons need to be
reset.
To set the memory buttons:
1. Select the desired band (AM, FM1, or
FM2) by pressing the AM/FM button.
2. Tune to the desired frequency.
3. Press one of the memory buttons and
hold the button in. The sound mutes out
for about two seconds, then returns. That
station is now held in memory on that
button.
Repeat the three steps above for each
memory button you want to set.
The memory buttons also control the rear
audio controls. Push memory buttons 3 and
5 simultaneously to turn the rear audio
controls on. Push them again to turn the
rear audio controls off. A headphone sym-bol appears in the display window when the
rear controls are activated.
ADJUSTING TONE QUALITY
BASS
Bass control allows you to adjust the lower,
bass frequencies to your preference.
Push the BASS button either
or; BASS and the setting indicator bar
appear in the display window. Pressing the
BASS button either
orin-
creases or decreases the level of bass, as
indicated by the number of bar segments
showing in the display window.
Following bass adjustment, the display win-
dow shows the current setting for three
seconds, then returns to the display prior to
adjustment.
TREB
Treble control allows you to adjust the
higher, treble frequencies to your prefer-
ence.
Push the TREB button either
or; TREB and the setting indicator bar
appear in the display window. Pressing the
TREB button either
orin-
3-17
ZX
Page 134 of 247

COMPACT DISC (CD) PLAYER
(if so equipped)
NOTE: Audio control features include com-
mand buttons for CD players which can be
installed as optional equipment to upgrade
the audio system. A CD player is not in-
cluded with this system, but can be pur-
chased as an option at any time. Consult
with your NISSAN dealer for feature avail-
ability.
The compact disc player consists of two
main components, the 6 CD magazine and
the CD changer. Both components are lo-cated on the center instrument panel con-
sole, below the ashtray.How to load the CD magazine
To load the magazine with CDs, first push
the
button on the CD changer to eject
the magazine, then remove the magazine
from the changer. The inside of the CD
magazine contains six shelves, one for
each CD to be loaded. Carefully slide a CD
(label side up) onto one of the shelves and
push it in. Repeat as desired, loading up to
six CDs.
CD magazine insert
Once the desired number of CDs are loaded
into the magazine, insert the magazine back
into the CD changer.
With the ignition switch OFF, the CD maga-
zine loads into the CD changer. Once the
ignition switch is turned to ACC or ON, the
audio system returns to its previous mode.
With the ignition switch in the ACC or ON
position, the CD magazine loads into the
CD changer and begins play with disc 1,
track 1.
CD player controls
BASS, TREB, BAL, AND FADE
The bass, treble, balance, and fader con-
trols for the CD player are the same as
those for the radio and cassette tape player.
Refer to the ``Adjusting tone quality'' section
for operating instructions on these controls.
CD
Push this button to switch from radio or tape
mode to CD mode. CD play begins auto-
matically if at least one disc is loaded in the
magazine. The display window shows the
AHA0597
3-21
ZX