remove seats NISSAN QUEST 1997 V40 / 1.G Owners Manual
[x] Cancel search | Manufacturer: NISSAN, Model Year: 1997, Model line: QUEST, Model: NISSAN QUEST 1997 V40 / 1.GPages: 247, PDF Size: 2.01 MB
Page 48 of 247

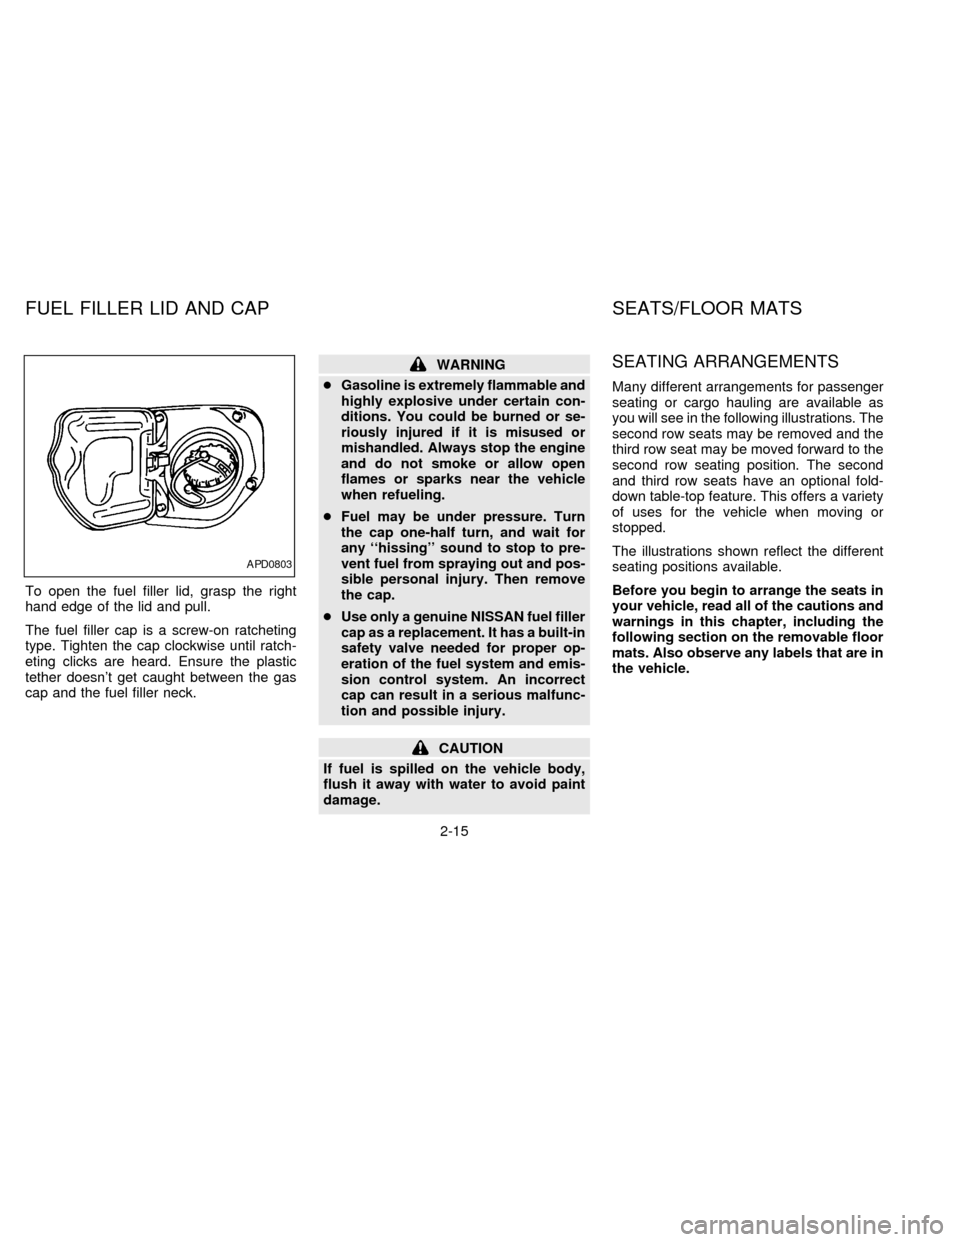
To open the fuel filler lid, grasp the right
hand edge of the lid and pull.
The fuel filler cap is a screw-on ratcheting
type. Tighten the cap clockwise until ratch-
eting clicks are heard. Ensure the plastic
tether doesn't get caught between the gas
cap and the fuel filler neck.
WARNING
cGasoline is extremely flammable and
highly explosive under certain con-
ditions. You could be burned or se-
riously injured if it is misused or
mishandled. Always stop the engine
and do not smoke or allow open
flames or sparks near the vehicle
when refueling.
cFuel may be under pressure. Turn
the cap one-half turn, and wait for
any ``hissing'' sound to stop to pre-
vent fuel from spraying out and pos-
sible personal injury. Then remove
the cap.
cUse only a genuine NISSAN fuel filler
cap as a replacement. It has a built-in
safety valve needed for proper op-
eration of the fuel system and emis-
sion control system. An incorrect
cap can result in a serious malfunc-
tion and possible injury.
CAUTION
If fuel is spilled on the vehicle body,
flush it away with water to avoid paint
damage.
SEATING ARRANGEMENTS
Many different arrangements for passenger
seating or cargo hauling are available as
you will see in the following illustrations. The
second row seats may be removed and the
third row seat may be moved forward to the
second row seating position. The second
and third row seats have an optional fold-
down table-top feature. This offers a variety
of uses for the vehicle when moving or
stopped.
The illustrations shown reflect the different
seating positions available.
Before you begin to arrange the seats in
your vehicle, read all of the cautions and
warnings in this chapter, including the
following section on the removable floor
mats. Also observe any labels that are in
the vehicle.
APD0803
FUEL FILLER LID AND CAP SEATS/FLOOR MATS
2-15
ZX
Page 55 of 247

If a considerable amount of cargo area
room is needed, the seat cushion of the
three-passenger sliding bench seat can be
flipped up and the seat can be moved up to
storage position #2, just behind the second
row seat.When maximum cargo area is needed and
there are no rear seat passengers, the
second row seat can be removed and the
three-passenger sliding bench seat can be
moved up to storage position #1, just behind
the front seats.The second row bench seat can be folded
down to serve as a tabletop for passengers
sitting in the three-passenger bench seat.
APD0043APD0049APD0044
2-22
ZX
Page 56 of 247

The second and third row bench seats can
be folded down to tabletops.To increase cargo area space, the second
row bench seat can be removed and the
three-passenger sliding seat can be moved
up to the second row position.The third seat can be folded down into a
tabletop.
APD0045APD0046APD0047
2-23
ZX
Page 57 of 247

With the third seat folded down and the
second seat removed, cargo can be placed
in between the front seats and the third row
seat.People should not be allowed to
ride in areas meant for cargo. Passen-
gers should always be properly re-
strained in seat belts.The second row seat can be folded down
and the third row seat can be moved just
behind it in a storage position.WITH SECOND ROW BUCKET
SEATS
The normal seating arrangement for seven
passengers is with the three-passenger
bench seat in seating position #1. This
provides more leg room for the passengers
sitting in the third row.
APD0048APD0050APD0128
2-24
ZX
Page 58 of 247

When one passenger in the three-
passenger bench seat would like more leg
room, one of the second row bucket seats
can be removed.When more cargo area room is necessary,
the three-passenger sliding bench seat can
be moved to seating position #2. This seat-
ing arrangement provides less leg room for
third row passengers, but more cargo area
room.If passengers in the three-passenger bench
seat would like more leg room, both second
row bucket seats can be removed.The
floor area should never be used by pas-
sengers. Passengers should always be
properly restrained by seat belts.
APD0052APD0127APD0053
2-25
ZX
Page 65 of 247

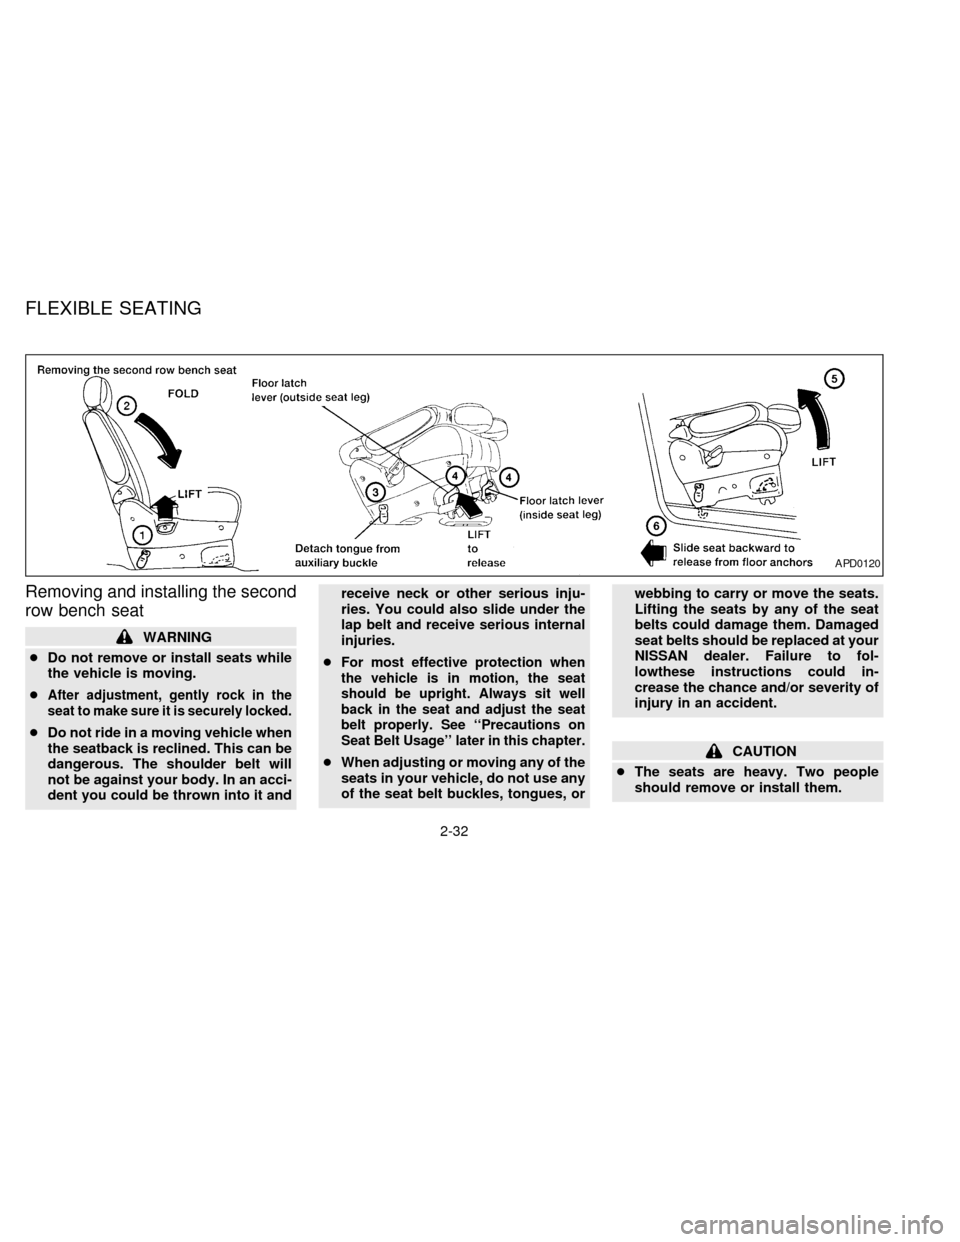
Removing and installing the second
row bench seat
WARNING
cDo not remove or install seats while
the vehicle is moving.
c
After adjustment, gently rock in the
seat to make sure it is securely locked.
cDo not ride in a moving vehicle when
the seatback is reclined. This can be
dangerous. The shoulder belt will
not be against your body. In an acci-
dent you could be thrown into it andreceive neck or other serious inju-
ries. You could also slide under the
lap belt and receive serious internal
injuries.
c
For most effective protection when
the vehicle is in motion, the seat
should be upright. Always sit well
back in the seat and adjust the seat
belt properly. See ``Precautions on
Seat Belt Usage'' later in this chapter.
cWhen adjusting or moving any of the
seats in your vehicle, do not use any
of the seat belt buckles, tongues, orwebbing to carry or move the seats.
Lifting the seats by any of the seat
belts could damage them. Damaged
seat belts should be replaced at your
NISSAN dealer. Failure to fol-
lowthese instructions could in-
crease the chance and/or severity of
injury in an accident.CAUTION
cThe seats are heavy. Two people
should remove or install them.
APD0120
FLEXIBLE SEATING
2-32
ZX
Page 66 of 247

cDo not sit in seats that have been
removed from the vehicle. They may
tip over and you could be injured.
1. Lift up the recliner lever.
2. Fold the seatback fully forward.
3. Detach the single window tongue from
the auxiliary buckle mounted to the side
of the seat and store the tongue out of
the way. (For detailed information, see
``Two buckle seat belt system for the
second row bench seat'' later in this
section.)
4. Unlock the seat legs at the two front floor
latch levers.
5. Lift the front of the seat.
6. Slide it rearward off the rear anchor
positions.
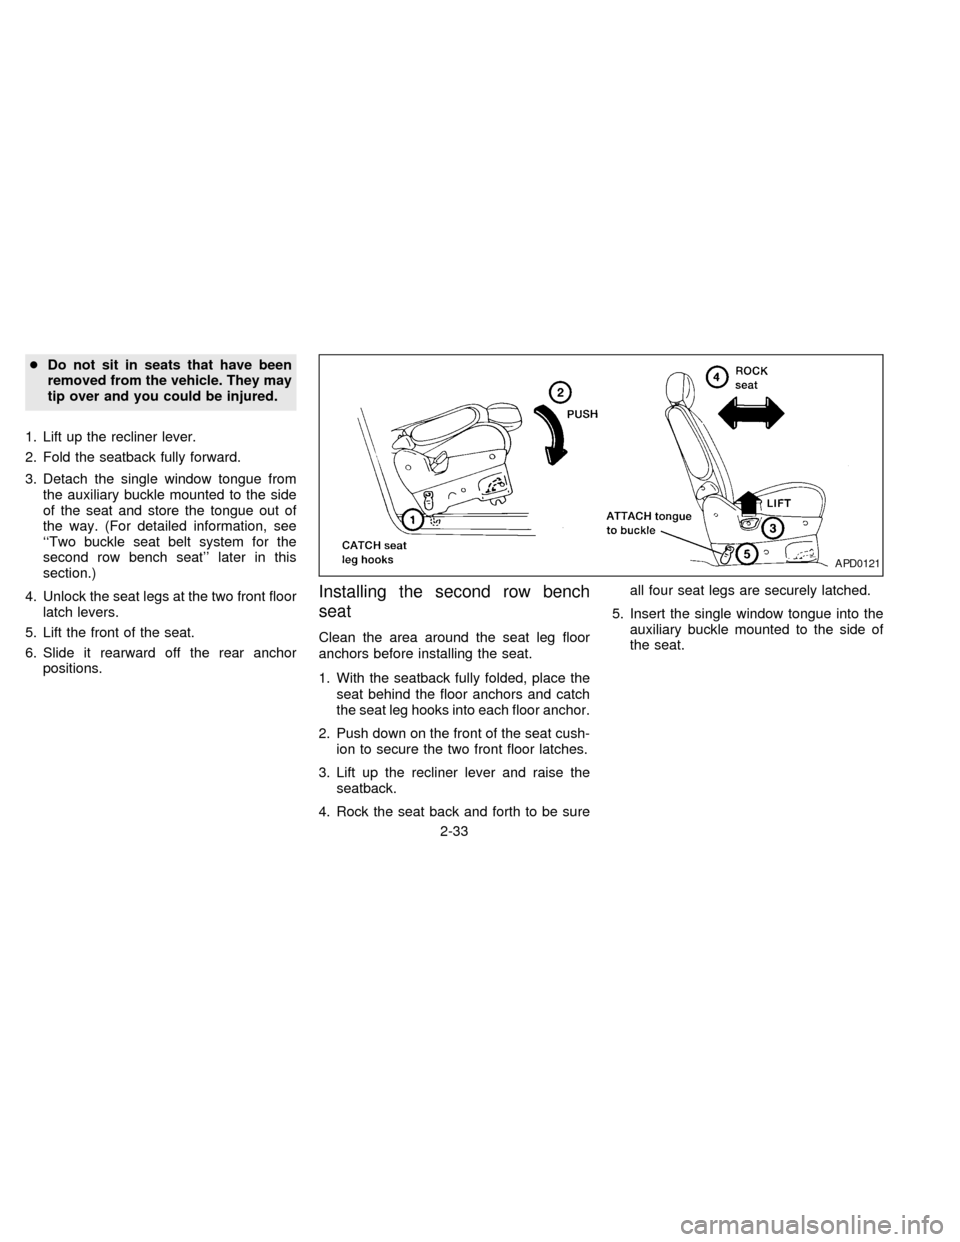
Installing the second row bench
seat
Clean the area around the seat leg floor
anchors before installing the seat.
1. With the seatback fully folded, place the
seat behind the floor anchors and catch
the seat leg hooks into each floor anchor.
2. Push down on the front of the seat cush-
ion to secure the two front floor latches.
3. Lift up the recliner lever and raise the
seatback.
4. Rock the seat back and forth to be sureall four seat legs are securely latched.
5. Insert the single window tongue into the
auxiliary buckle mounted to the side of
the seat.
APD0121
2-33
ZX
Page 67 of 247

Removing second row bucket seats
WARNING
cDo not remove or install seats while
the vehicle is moving.
cAfter adjustment, gently rock in the
seat to make sure it is securely
locked.
cDo not ride in a moving vehicle when
the seatback is reclined. This can be
dangerous. The shoulder belt will
not be against your body. In an acci-
dent you could be thrown into it andreceive neck or other serious inju-
ries. You could also slide under the
lap belt and receive serious internal
injuries.
cFor most effective protection when
the vehicle is in motion, the seat
should be upright. Always sit well
back in the seat and adjust the seat
belt properly. See ``Precautions on
Seat Belt Usage'' later in this
chapter.
cWhen adjusting or moving any of the
seats in your vehicle, do not use any
of the seat belt buckles, tongues, or
webbing to carry or move the seats.
Lifting the seats by any of the seat
belts could damage them. Damaged
seat belts should be replaced at your
NISSAN dealer. Failure to follow
these instructions could increase
the chance and/or severity of injury
in an accident.
CAUTION
cThe seats are heavy. Two people
should remove or install them.cDo not sit in seats that have been
removed from the vehicle. They may
tip over and you could be injured.
1. Lift the recliner lever.
2. Fold the seatback fully forward.
APD0072
2-34
ZX
Page 74 of 247

do not stack anything in the cargo
area higher than the seatbacks.
cIt is extremely dangerous to ride in a
cargo area inside of a vehicle. In a
collision, people riding in these ar-
eas are more likely to be seriously
injured or killed.
cDo not allow people to ride in any
area of your vehicle that is not
equipped with seats and seat belts.
cBe sure everyone in your vehicle is
in a seat and using a seat belt
properly.
cBe sure to replace and reposition
floor mats as discussed in ``Floor
mat positioning'' in this section.
cThe three-passenger sliding bench
seat is not intended to be removed
from the vehicle by consumers.
However, if it must be removed, have
a qualified person remove it. That
person should refer to the instruc-
tions in the Service Manual. When
seat is reinstalled, the attaching
bolts must be tightened to the appro-
priate torque specifications. Failureto follow these instructions could
increase the chance and/or severity
of injury in an accident.
Cleaning the seat tracks
The seat tracks for the three-passenger
sliding bench seat should be cleaned peri-
odically with a high-powered vacuum
cleaner. If the seat tracks become dirty it
may reduce the ability to slide the seat. A
wet cleansing agent may be used if neces-
sary, but the seat tracks must be thoroughly
dried.
Use a cloth wrapped around a screwdriver
(or similar object) to clean the seat tracks.
Do not use your fingers to clean debris from
the tracks.
Do not apply any type of lubricant to the
seat tracks.
CAUTION
Never insert fingers into the seat track
rails. The rails may be sharp and could
cause injury.
2-41
ZX
Page 99 of 247

INSTALLATION ON SECOND
ROW BENCH OR BUCKET SEAT
A child restraint with a top tether strap may
be placed on the second row bench or
bucket seats. Once the child restraint is
properly secured to the seat (see ``Installa-
tion at second and third row outboard posi-
tions'' earlier in this section), follow the
directions below to attach the tether strap to
the third row lap/shoulder belt tongue lo-
cated on the same side of the vehicle as the
child restraint.
Tethering to lap/shoulder belt
tongue
To attach a tether strap to a third row
lap/shoulder belt:
1. Route the tether strap under the head
restraint and between the head restraint
supports.
2. Hook the tether strap into the large hole
on the tongue of the third row
lap/shoulder belt (located near the upper
and lower rear corners of the vehicle).
3. Adjust the tether strap until the hook is
about one foot behind the seatback.4. Pull on the third row shoulder belt until all
of the belt is fully extended and a click is
heard. At this time, the belt retractor is in
the automatic locking mode (child re-
straint mode). (The lap/shoulder belt re-
verts back to emergency locking mode
when it is disconnected from the tether
strap and fully retracted.)
5. Allow the belt to retract. A clicking sound
is heard as the belt retracts. This indi-
cates that the retractor is in the automatic
locking mode. Tighten the tether strap
and remove any slack.
APD0832APD0833APD0834
2-66
ZX