key NISSAN QUEST 1999 V41 / 2.G Owner's Guide
[x] Cancel search | Manufacturer: NISSAN, Model Year: 1999, Model line: QUEST, Model: NISSAN QUEST 1999 V41 / 2.GPages: 286, PDF Size: 2.46 MB
Page 183 of 286
once. The O/D OFF indicator light
illuminates at this time. When cruis-
ing at a low speed or climbing a
gentle slope, you may feel uncom-
fortable shift shocks as the transmis-
sion shifts between 3rd gear and
overdrive repeatedly. In this case,
press the overdrive switch.
When driving conditions change, press the
overdrive switch to turn the overdrive on.
The O/D OFF indicator light goes out.
Remember not to drive at high speeds for
extended periods of time with the O/D OFF
light illuminated. This reduces the fuel
economy.1. Apply the parking brake.
2. Move the selector lever to P (Park) or N
(Neutral) (P is recommended).
The shift selector lever cannot be
moved out of P and into any of the
other gear positions under the follow-
ing conditions:
cThe ignition key is turned to the
OFF position.
cThe ignition key is turned to the ON
position without depressing the
foot brake pedal.
The starter will not operate if the shift
selector lever is in one of the driving
positions.
3. Crank the enginewith your foot off the
accelerator pedalby turning the ignition
key to START. Release the key when the
engine starts. If the engine starts, but
fails to run, repeat the above procedure.
Ð If the engine is very hard to start in
extremely cold or hot weather, de-
press the accelerator pedal to the
floor and hold it to help start the
engine.Ð In the summer, when restarting the
engine within 30 minutes after it has
been stopped, keep the accelerator
pedal slightly depressed while start-
ing.
CAUTION
Do not operate the starter for more than
15 seconds at a time. If the engine does
not start, turn the key off and wait 10
seconds before cranking again, other-
wise the starter could be damaged.
4. Warm-up
Allow the engine to idle for at least 30
seconds after starting. Drive at moderate
speeds for a short distance first, espe-
cially in cold weather.
STARTING THE ENGINE
5-8Starting and driving
ZX
Page 188 of 286
WARNING
Do not park the vehicle over flammable
materials such as dry grass, waste pa-
per or rags. They may ignite and cause
a fire.
1. Firmly apply the parking brake.
2. Move the selector lever to the P (Park)
position.WARNING
cSafe parking procedures require that
both the parking brake be set and
the transmission placed into P (Park)
position. Failure to do so could
cause the vehicle to move unexpect-
edly or roll away and result in an
accident. Make sure the shift lever
has been pushed up as far as it can
go and cannot be moved without
pulling it towards you.
cNever leave the engine running while
the vehicle is unattended.c
Do not leave children unattended in-
side the vehicle. They could unknow-
ingly activate switches or controls.
Unattended children could become
involved in serious accidents.
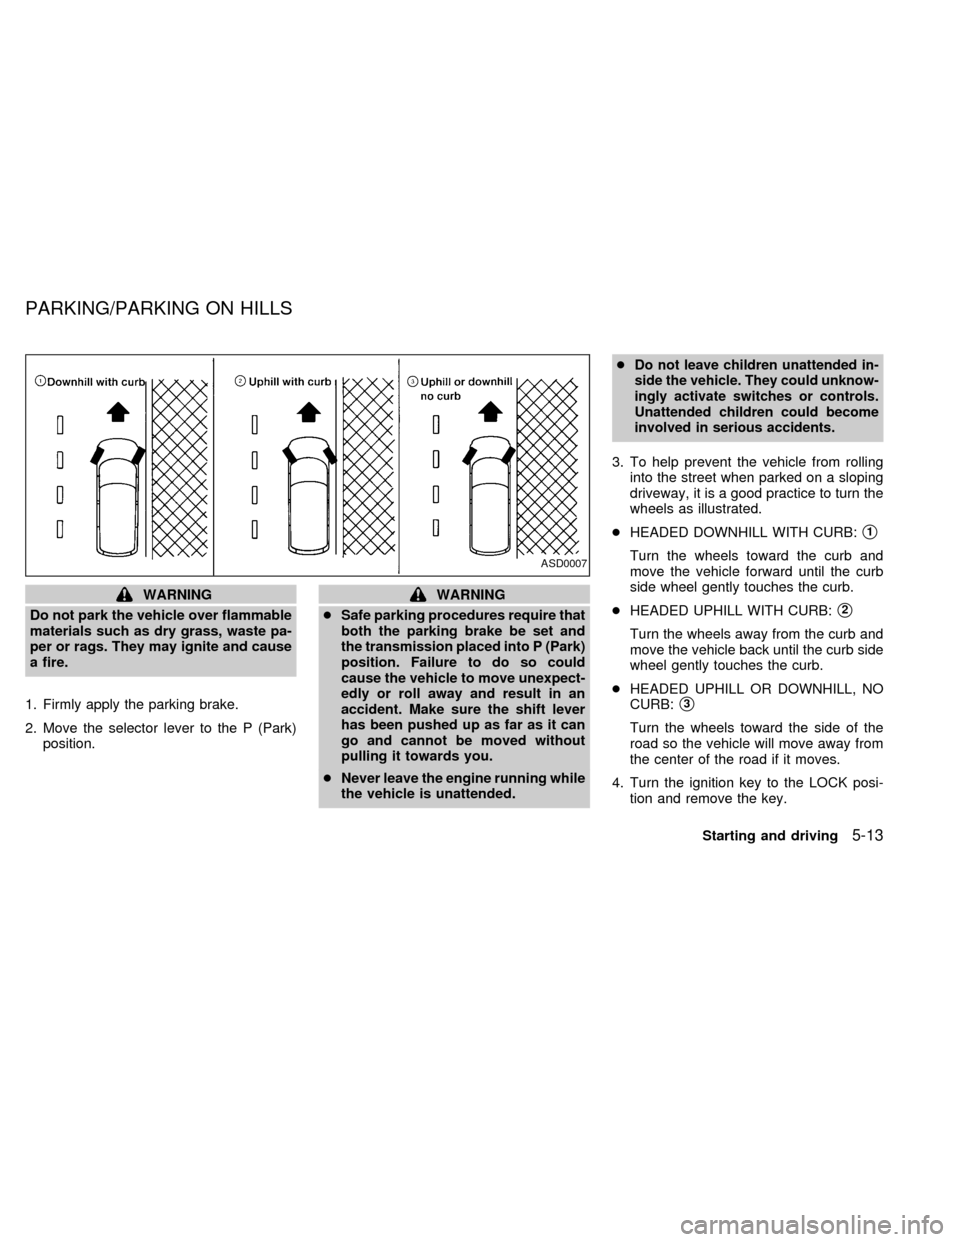
3. To help prevent the vehicle from rolling
into the street when parked on a sloping
driveway, it is a good practice to turn the
wheels as illustrated.
cHEADED DOWNHILL WITH CURB:
s1
Turn the wheels toward the curb and
move the vehicle forward until the curb
side wheel gently touches the curb.
cHEADED UPHILL WITH CURB:
s2
Turn the wheels away from the curb and
move the vehicle back until the curb side
wheel gently touches the curb.
cHEADED UPHILL OR DOWNHILL, NO
CURB:
s3
Turn the wheels toward the side of the
road so the vehicle will move away from
the center of the road if it moves.
4. Turn the ignition key to the LOCK posi-
tion and remove the key.
ASD0007
PARKING/PARKING ON HILLS
Starting and driving5-13
ZX
Page 191 of 286
cWhen installing a spare tire, make
sure it is the proper size and type as
specified on the tire placard. For tire
placard location information, refer to
``Tire placard'' in the Owner's
Manual index.
cRefer to ``Wheels and tires'' in the
``Do-it-yourself'' section of this
manual.Freeing a frozen door lock
To prevent a door lock from freezing, apply
de-icer or glycerin through the key hole. If
the lock becomes frozen, heat the key be-
fore inserting it in the key hole.
Anti-freeze
In the winter, when it is anticipated that the
temperature will drop below 32ÉF (0ÉC),
check the anti-freeze (ethylene glycol base)
to assure proper winter protection. For de-
tails, see ``Engine cooling system'' in the
``Do-it-yourself'' section of this manual.
Battery
If the battery is not fully charged during
extremely cold weather conditions, the bat-
tery fluid may freeze and damage the bat-
tery. To maintain maximum efficiency, the
battery should be checked regularly. For
details, see ``Battery'' in the ``Do-it-yourself''
section of this manual.
Draining of coolant water
If the vehicle is to be left outside without
anti-freeze, drain the cooling system by
opening the drain valves located under the
radiator and on the engine block. Refillbefore operating the vehicle. See ``Chang-
ing engine coolant'' in the ``Do-it-yourself''
section of this manual.
Tire equipment
1. SUMMER tires are of a tread design to
provide superior performance on dry
pavement. However, the performance of
these tires is substantially reduced in
snowy and icy conditions. If you operate
your vehicle on snowy or icy roads, NIS-
SAN recommends using MUD & SNOW
or ALL SEASON tires on all four wheels.
Please consult your NISSAN dealer for
the tire type, size, speed rating and avail-
ability information.
2.
For additional traction on icy roads, stud-
ded tires may be used. However, some
Canadian provinces and U.S. states pro-
hibit their use. Check local, state and pro-
vincial laws before installing studded tires.
Skid and traction capabilities of studded
snow tires, on wet or dry surfaces, may
be poorer than that of non-studded snow
tires.
3. Tire chains may be used. Make sure they
are of proper size for the tires on your
vehicle and are installed according to the
COLD WEATHER DRIVING
5-16Starting and driving
ZX
Page 202 of 286
Always follow the instructions below.
Failure to do so could result in damage
to the charging system and cause per-
sonal injury.
1. If the booster battery is in another ve-
hicle, position the two vehicles to bring
their batteries close to each other.
Do not allow the two vehicles to touch.
2. Apply the parking brake. Move the gear-
shift lever to the P (Park) position. Switch
off all unnecessary electrical systems
(lights, heater, air conditioner, etc.).3. Remove vent caps on the battery (if so
equipped). Cover the battery with an old
cloth to reduce explosion hazard.
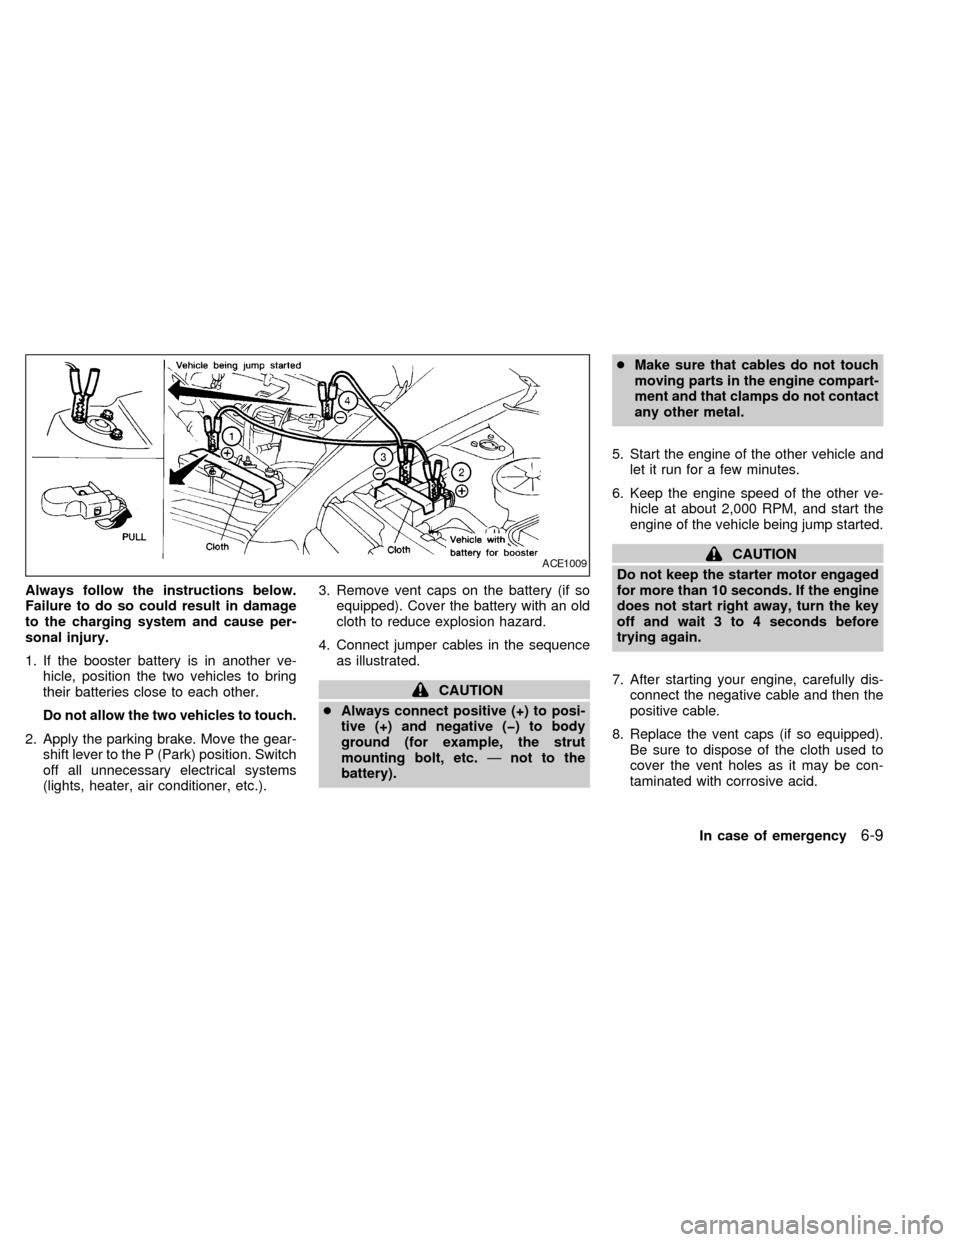
4. Connect jumper cables in the sequence
as illustrated.
CAUTION
cAlways connect positive (+) to posi-
tive (+) and negative (þ) to body
ground (for example, the strut
mounting bolt, etc.Ðnot to the
battery).cMake sure that cables do not touch
moving parts in the engine compart-
ment and that clamps do not contact
any other metal.
5. Start the engine of the other vehicle and
let it run for a few minutes.
6. Keep the engine speed of the other ve-
hicle at about 2,000 RPM, and start the
engine of the vehicle being jump started.
CAUTION
Do not keep the starter motor engaged
for more than 10 seconds. If the engine
does not start right away, turn the key
off and wait 3 to 4 seconds before
trying again.
7. After starting your engine, carefully dis-
connect the negative cable and then the
positive cable.
8. Replace the vent caps (if so equipped).
Be sure to dispose of the cloth used to
cover the vent holes as it may be con-
taminated with corrosive acid.ACE1009
In case of emergency6-9
ZX
Page 204 of 286
WARNING
cBe careful not to allow your hands,
hair or clothing to come into contact
with, or to get caught in, the running
fan, belts, or motor fan.
c
The fan motor may start at any time
when the coolant temperature is high.
7. After the engine cools down completely,
check the coolant level in the reservoir
tank with the engine running. Add coolant
to the reservoir tank, if necessary. Have
your vehicle repaired at an authorized
NISSAN dealer.
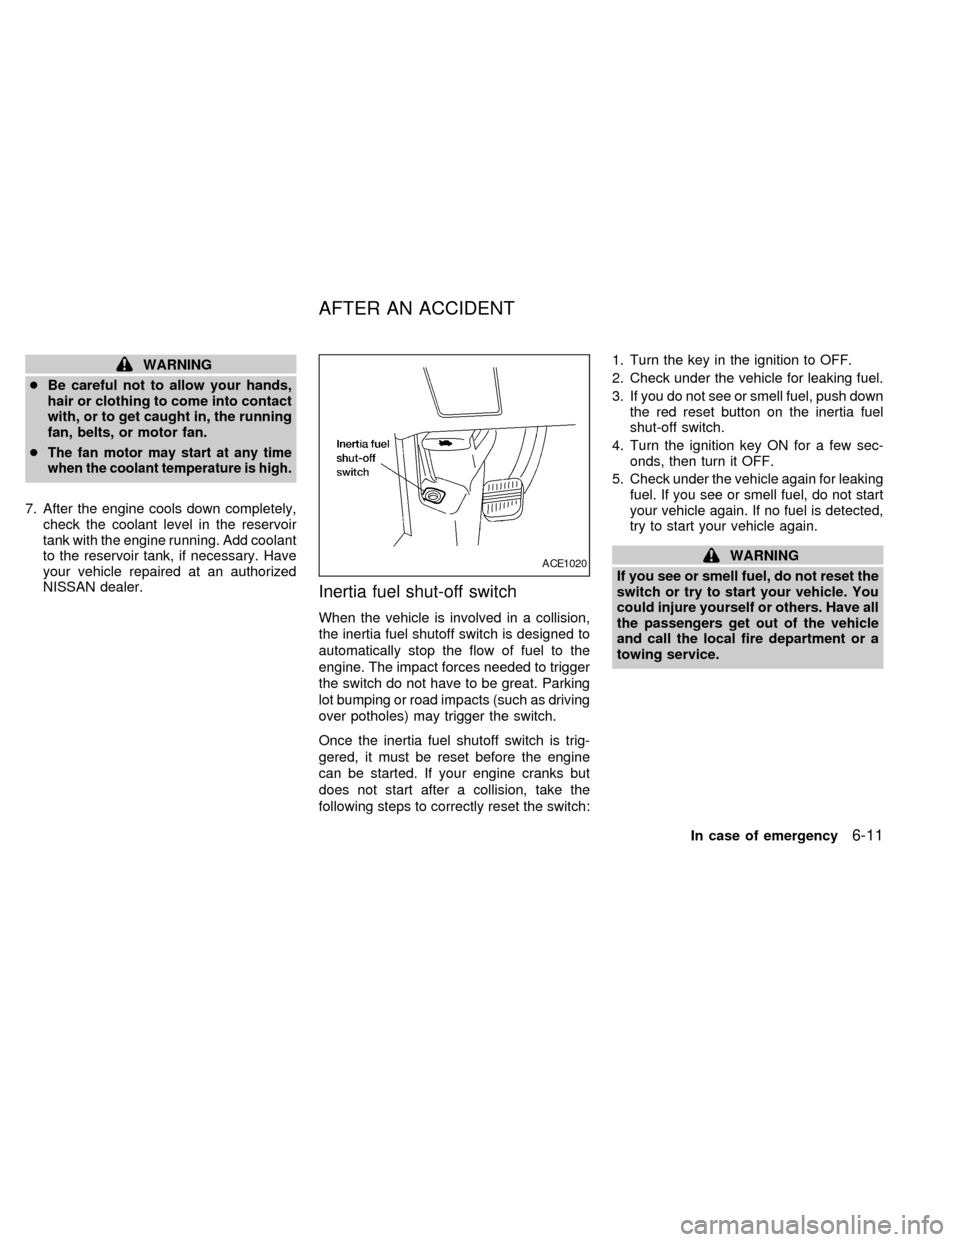
Inertia fuel shut-off switch
When the vehicle is involved in a collision,
the inertia fuel shutoff switch is designed to
automatically stop the flow of fuel to the
engine. The impact forces needed to trigger
the switch do not have to be great. Parking
lot bumping or road impacts (such as driving
over potholes) may trigger the switch.
Once the inertia fuel shutoff switch is trig-
gered, it must be reset before the engine
can be started. If your engine cranks but
does not start after a collision, take the
following steps to correctly reset the switch:1. Turn the key in the ignition to OFF.
2. Check under the vehicle for leaking fuel.
3. If you do not see or smell fuel, push down
the red reset button on the inertia fuel
shut-off switch.
4. Turn the ignition key ON for a few sec-
onds, then turn it OFF.
5. Check under the vehicle again for leaking
fuel. If you see or smell fuel, do not start
your vehicle again. If no fuel is detected,
try to start your vehicle again.
WARNING
If you see or smell fuel, do not reset the
switch or try to start your vehicle. You
could injure yourself or others. Have all
the passengers get out of the vehicle
and call the local fire department or a
towing service.ACE1020
AFTER AN ACCIDENT
In case of emergency6-11
ZX
Page 205 of 286
When towing your vehicle, U.S. States, Ca-
nadian Provinces and local regulations for
towing must be followed. Incorrect towing
equipment could damage your vehicle.
Towing instructions are available from an
authorized NISSAN dealer. Local service
operators are generally familiar with the
applicable laws and procedures for towing.
To assure proper towing and to prevent
accidental damage to your vehicle, NISSAN
recommends that you have a service opera-
tor tow your vehicle. It is advisable to have
the service operator carefully read the fol-
lowing precautions.
WARNING
cNever ride in a vehicle that is being
towed.
cNever get under your vehicle after it
has been lifted by a tow truck.
CAUTION
cWhen towing, make sure that the
transmission, axles, steering system
and powertrain are in working con-
dition. If any unit is damaged, dollies
must be used.
cNever use a tow bar that attaches to
the bumper when you tow your ve-
hicle. It may damage the bumper and
cause damage to the transmission.
cWhen towing with the front wheels
on dollies:
Turn the ignition key to the OFF
position and secure the steering
wheel in a straight-ahead position
with a rope or similar device. Never
place the ignition key in the LOCK
position. This will result in damage
to the steering lock mechanism.
Move the gearshift lever to the N
(Neutral) position.
cWhen towing with the rear wheels on
the ground, release the parking
brake.
cAttach safety chains for all towing.
TOW TRUCK TOWING
6-12In case of emergency
ZX
Page 215 of 286
When performing any inspection or mainte-
nance work on your vehicle, always take
care to prevent serious accidental injury to
yourself or damage to the vehicle. The
following are general precautions which
should be closely observed.
WARNING
cPark the vehicle on a level surface,
apply the parking brake securely and
block the wheels to prevent the ve-
hicle from moving. Move the gear-
shift lever to N (neutral).
cBe sure the ignition key is OFF when
performing any replacement or re-
pair.
c
Be sure to turn the ignition key to the
OFF or LOCK position. When the igni-
tion key is in the ON or ACC position,
the cooling fan may start to operate
suddenly even when the engine is not
running. To avoid injury always dis-
connect the negative battery cable
before working near the fan.
cIf you must work with the engine run-
ning, keep your hands, clothing, hair
and tools away from moving fans,
belts and any other moving parts.
cIt is advisable to remove ties and any
jewelry, such as rings, watches, etc.
before working on your vehicle.
cAlways wear eye protection when-
ever you work on your vehicle.
cIf you must run the engine in an
enclosed space such as a garage, be
sure there is proper ventilation for
exhaust gases.
cNever get under the vehicle while it
is supported only by a jack. If it is
necessary to work under the vehicle,
support it with safety stands.
cKeep smoking materials, flame and
sparks away from fuel and the bat-
tery.
cOn gasoline engine models with the
multiport fuel injection (MFI) system,
the fuel filter or fuel lines should be
serviced by an authorized NISSAN
dealer because the fuel lines are
under high pressure even when the
engine is off.CAUTION
cDo not work under the hood while
the engine is hot. Turn off the engine
and wait until it cools down.
cNever connect or disconnect either
the battery or any transistorized
component connector while the igni-
tion is ON.
cAvoid contact with used engine oil.
Improperly disposed motor oil and/
or other vehicle fluids can hurt the
environment. Always conform to lo-
cal regulations for disposal of ve-
hicle fluid.
This ``Do-it-yourself'' section gives instruc-
tions regarding only those items which are
relatively easy for an owner to perform.
You should be aware that incomplete or
improper servicing may result in operating
difficulties or excessive emissions, and
could affect your warranty coverage.If in
doubt about any servicing, have it done
by an authorized NISSAN dealer.
MAINTENANCE
PRECAUTIONS
8-2Do-it-yourself
ZX
Page 225 of 286
JUMP STARTING
If jump starting is necessary, see the ``In
case of emergency'' section. If the engine
does not start by jump starting, the battery
may have to be replaced. Contact an autho-
rized NISSAN dealer.
WARNING
Be sure the ignition key is OFF. The
engine could rotate unexpectedly.
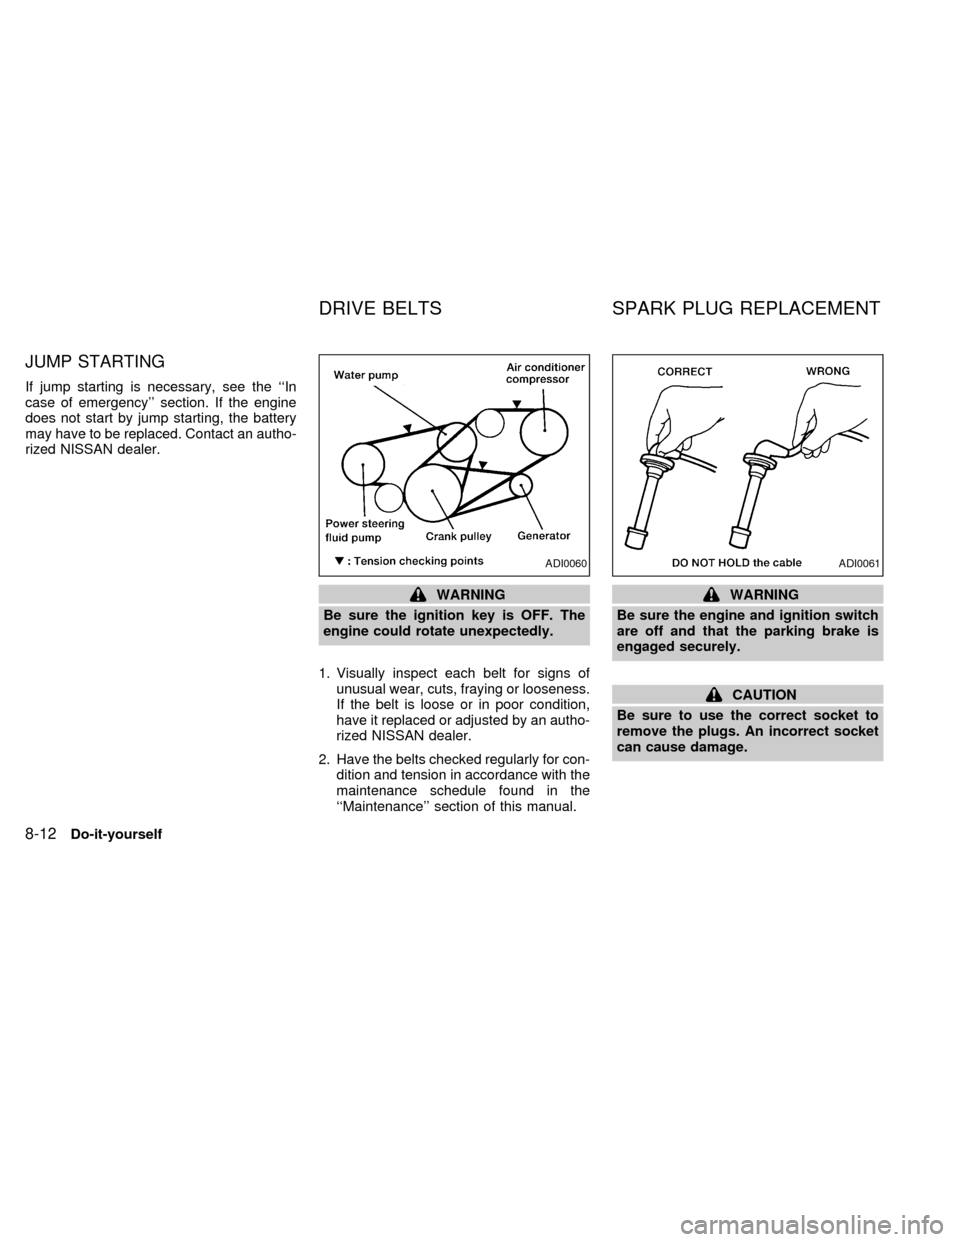
1. Visually inspect each belt for signs of
unusual wear, cuts, fraying or looseness.
If the belt is loose or in poor condition,
have it replaced or adjusted by an autho-
rized NISSAN dealer.
2. Have the belts checked regularly for con-
dition and tension in accordance with the
maintenance schedule found in the
``Maintenance'' section of this manual.WARNING
Be sure the engine and ignition switch
are off and that the parking brake is
engaged securely.
CAUTION
Be sure to use the correct socket to
remove the plugs. An incorrect socket
can cause damage.
ADI0060ADI0061
DRIVE BELTS SPARK PLUG REPLACEMENT
8-12Do-it-yourself
ZX
Page 234 of 286
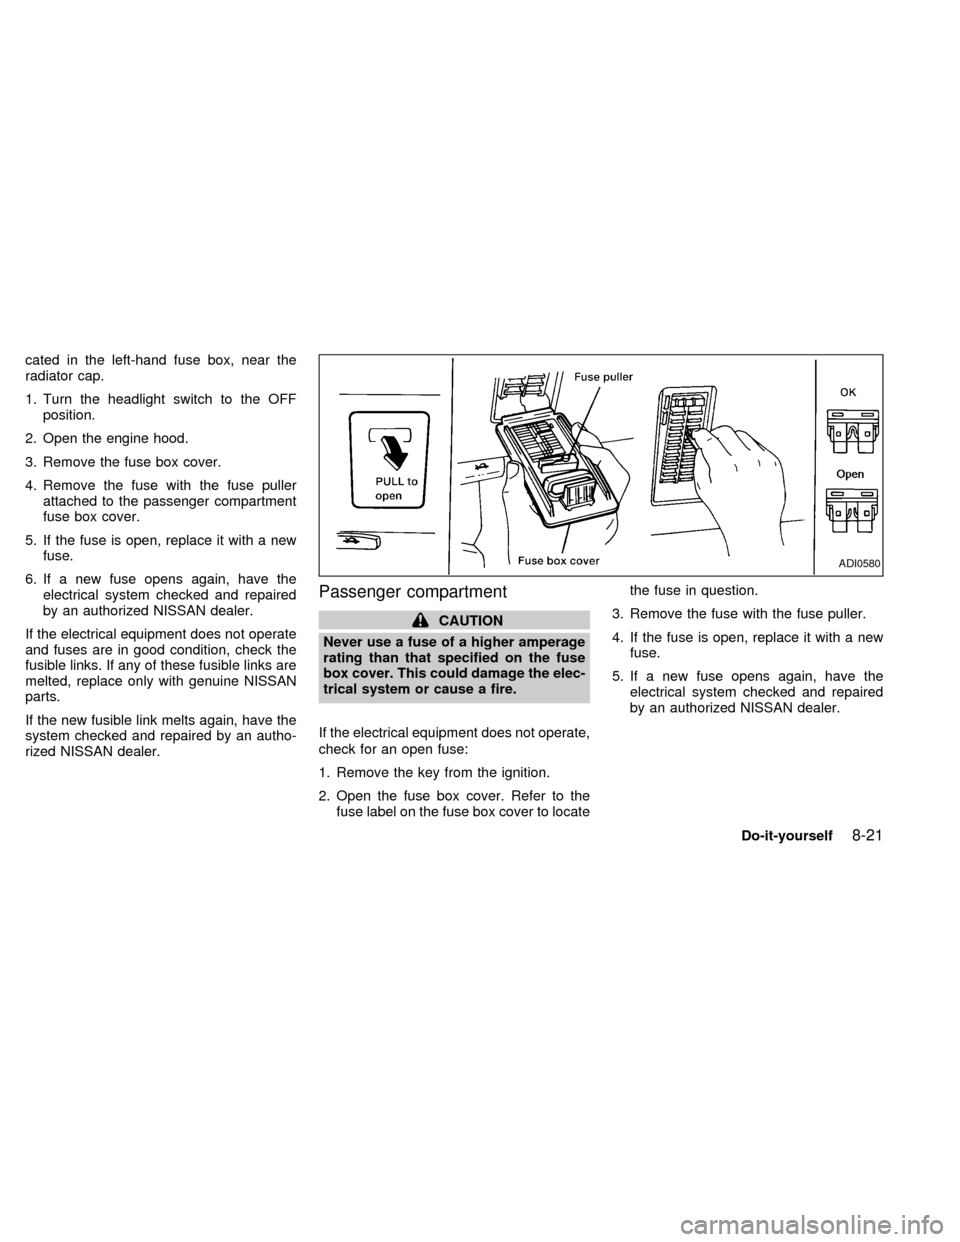
cated in the left-hand fuse box, near the
radiator cap.
1. Turn the headlight switch to the OFF
position.
2. Open the engine hood.
3. Remove the fuse box cover.
4. Remove the fuse with the fuse puller
attached to the passenger compartment
fuse box cover.
5. If the fuse is open, replace it with a new
fuse.
6. If a new fuse opens again, have the
electrical system checked and repaired
by an authorized NISSAN dealer.
If the electrical equipment does not operate
and fuses are in good condition, check the
fusible links. If any of these fusible links are
melted, replace only with genuine NISSAN
parts.
If the new fusible link melts again, have the
system checked and repaired by an autho-
rized NISSAN dealer.
Passenger compartment
CAUTION
Never use a fuse of a higher amperage
rating than that specified on the fuse
box cover. This could damage the elec-
trical system or cause a fire.
If the electrical equipment does not operate,
check for an open fuse:
1. Remove the key from the ignition.
2. Open the fuse box cover. Refer to the
fuse label on the fuse box cover to locatethe fuse in question.
3. Remove the fuse with the fuse puller.
4. If the fuse is open, replace it with a new
fuse.
5. If a new fuse opens again, have the
electrical system checked and repaired
by an authorized NISSAN dealer.
ADI0580
Do-it-yourself8-21
ZX
Page 282 of 286

G
Gauge
Engine coolant temperature gauge ........ 2-4
Fuel gauge.............................................. 2-5
Odometer ................................................ 2-4
Speedometer .......................................... 2-4
Tachometer............................................. 2-4
Trip odometer ......................................... 2-4
General maintenance .................................. 9-2
Glove box................................................... 3-13
H
Hazard warning flasher switch .................. 2-16
Head restraints ............................................ 1-6
Headlight control switch............................. 2-13
Headlights .................................................. 8-22
Heater
Heater and air conditioner (automatic)
(if so equipped)..................................... 4-11
Heater and air conditioner (manual)....... 4-3
Rear seat air conditioner ...................... 4-14
Homelink Transceiver
Integrated HomeLinkTUniversal
Transceiver (If so equipped) ................ 2-27
Hood release ............................................. 3-12I
Ignition switch .............................................. 5-4
Important vehicle information label.......... 10-10
Increasing fuel economy............................ 5-12
Indicator lights and chimes (See warning/
indicator lights and chimes) ......................... 2-6
Inertial fuel shut off switch ......................... 6-11
Inside mirror ............................................... 3-24
Instrument brightness control .................... 2-16
Integrated child safety seats...................... 1-61
Integrated HomeLinkTUniversal Transceiver
(If so equipped).......................................... 2-27
Interior lights .............................................. 2-24
J
Jump starting ...................................... 6-8, 8-12
K
Key ............................................................... 3-2
Keyless entry system (See multi-remote
control system) ............................................ 3-9
L
Labels
Air conditioner specification label ....... 10-11
Emission control information label...... 10-10Engine serial number ......................... 10-10
F.M.V.S.S. certification label .............. 10-10
Vehicle identification number (VIN) ...... 10-9
Vehicle identification number (VIN)
plate ...................................................... 10-9
Warning labels (for SRS) ..................... 1-24
License plate
Installing the license plate .................. 10-11
Light
Air bag warning light............................. 1-24
Brake light (See stop light) ................... 8-23
Bulb check/instrument panel .................. 2-6
Bulb replacement.................................. 8-23
Cornering light ...................................... 2-15
Headlight control switch ....................... 2-13
Headlights ............................................. 8-22
Interior lights ......................................... 2-24
Light bulbs ............................................ 8-22
Luggage compartment lights ................ 2-24
Map lights ............................................. 2-25
Warning/indicator lights and chimes ...... 2-6
Lock
Child safety sliding door lock ................. 3-6
Door locks............................................... 3-2
Fuel filler lid lock opener lever ............. 3-20
Power door lock...................................... 3-7
Rear door lock ...................................... 3-15
Luggage compartment lights ..................... 2-24
Luggage rack ............................................. 3-19
Luggage (See vehicle loading
information ............................................... 10-12
11-3
ZX