ECO mode NISSAN QUEST 2004 V42 / 3.G User Guide
[x] Cancel search | Manufacturer: NISSAN, Model Year: 2004, Model line: QUEST, Model: NISSAN QUEST 2004 V42 / 3.GPages: 320, PDF Size: 5.6 MB
Page 158 of 320

The screen will change to “CONFIRM DISPLAY
OFF YES or NO”.
If YES key is selected using the joystick, the
screen will turn off after a 2 beep sound and
approximately 1 second.
To turn on the screen, push the“SETTING”, trip
control, air conditioner (except rear window de-
fogger button) or audio button.
Language
The language can be changed to “English” or
“Français” using the joystick.
Beep set
If the beep set “OFF” key is selected using the
joystick, the beep sound will not operate (except
some caution beep sounds) .
Service alert
If the service alert “ON” key is selected, the
information will be displayed when the engine oil
and the tire rotation periods reach the preset
driving distance.
Personalized settings menu
You can set the following electronic systems
operating conditions using the joystick.Slide back DR (driver’s) seat on exit:
The driver’s seat automatically moves back and
returns to the original position for exceptional
ease of exit and entry.
Remote unlock door logic:
This option allows you to select which doors will
unlock first during an unlocking operation:
Only the driver’s doorÃ!All the doors
Horn chirp with remote:
This option allows you to select the horn chirp
mode that occurs when the LOCK or UNLOCK
button on the keyfob is pressed.
NOTE:
If you change the horn beep or the lamp
flash feature with the keyfob, the mode will
not be changed with the display. Use the
keyfob to return to the previous mode and
re-enable the display control.
Lamps flash with remote:
This option allows you to select the hazard indi-
cator flash mode that occurs when the LOCK or
UNLOCK button on the keyfob is pressed.NOTE:
If you change the horn beep or the lamp
flash feature with the keyfob, the mode will
not be changed with the display. Use the
keyfob to return to the previous mode and
re-enable the display control.
Auto relock time:
This option allows you to set the length of time
before the doors lock with the auto re-lock func-
tion.
Auto headlamp sensitivity:
This option allows you to set the sensitivity of the
autolights.
Auto headlamp off delay:
This option allows you to select the length of time
before the autolights turn off.
Speed sensing wiper interval:
This option allows you to turn on or turn off the
driving speed dependent intermittent wiper func-
tion.
Confirm reset settings:
This option allows you to reset all options to their
default settings.
4-6Display screen, heater, air conditioner and audio systems
ZREVIEW COPY:Ð2004 Quest(van)
Owners Manual(owners)ÐUSA English(nna)
10/08/03Ðtbrooks
X
Page 161 of 320

HOW TO USE JOYSTICK AND
“ENTER” BUTTON
Choose an item on the display using the joystick
and push the“ENTER”button for operation.
HOW TO USE “PREV” BUTTON
This button has two functions.
cGo back to the previous display (cancel) .
If you touch“PREV”button during setup, the
setup will be canceled and/or the display will
return to the previous screen.
cFinish setup.
If you touch this button after the setup is com-
pleted, the setup will start over, and the display
will return to the climate control or audio mode
and Navigation screen.
SETTING UP THE START-UP
SCREEN
When you turn the ignition key to ACC or ON, the
SYSTEM START-UP warning is displayed on the
screen. Read the warning and select the “I
AGREE” (English) or “ENTER” (Français) key
then push the“ENTER”button.
If you do not push the“ENTER”button, the
Navigation system will not proceed to the next
step display.If you do not touch the button or screen key for
more than 1 minute on the TRIP, SETTING or
START-UP screen, the screen will change to
TRIP screen automatically.
To proceed to the next step, refer to the separate
Navigation System Owner’s Manual.
HOW TO USE THE “TRIP” BUTTON
When the“TRIP”button is pushed, the following
modes will display on the screen.
Warning message (if there are any)!TRIP 1
(Elapsed Time, Driving Distance, Average
Speed)!TRIP 2!FUEL ECONOMY (Average
Fuel Economy, Distance to Empty)!MAINTE-
NANCE (Engine Oil, Tire Rotation)!OFF.
LHA0263
Display screen, heater, air conditioner and audio systems4-9
ZREVIEW COPY:Ð2004 Quest(van)
Owners Manual(owners)ÐUSA English(nna)
10/08/03Ðtbrooks
X
Page 164 of 320

HOW TO USE THE “SETTING”
BUTTON
The SETTING screen will appear when the
“SETTING”button is pushed.
Display settings
The DISPLAY SETTINGS screen will appear af-
ter pushing the“SETTING”button, selecting
“Display”key and pushing the“ENTER”but-
ton.
Brightness/Contrast/Map Background:
To adjust the brightness and contrast of the
screen, select the“Brightness/contrast”keyand push the“ENTER”button. You can then use
the joystick to adjust the brightness to Darker or
Brighter and the contrast to Lower or Higher. For
information on Map Background, please refer to
the separate Navigation System Owner’s
Manual.
Display Off:
To turn off the screen, push the“SETTING”
button and select the“Display”key and“Dis-
play Off”key. The indicator of the“Display
Off”will turn to amber. When any mode button is
pushed with the screen off, the screen turns on
for further operation. The screen will turn off
automatically 5 seconds after the operation is
finished on the map display in the Audio, HVAC
(Heater and air conditioner) , SETTING or VE-
HICLE INFO modes.
To turn on the screen, push the“SETTING”
button and select the“Display”key and“Dis-
play Off”key, then set the screen to on by
pushing the“ENTER”button.
Setting Audio or HVAC display:
Choose the“Audio”or“HVAC”(Heater and air
conditioner) key to be displayed at the bottom, by
using the joystick. The audio or HVAC setting
condition will normally appear on the screen. To
return to the setting screen, push the“SET-
TING”button or“PREV”button.
Vehicle electronic systems
The VEHICLE ELECTRONIC SYSTEMS screen
will appear when selecting the“Vehicle Elec-
tronic Systems”key with the joystick and push-
ing the“ENTER”button.
To set the various electronic systems operating
conditions, select the applicable item using the
joystick, and push the“ENTER”button. The
indicator light, box at left of selected item, alter-
nately turns on and off each time the“ENTER”
button is pressed.
Indicator light is illuminated — ON
LHA0268LHA0382
4-12Display screen, heater, air conditioner and audio systems
ZREVIEW COPY:Ð2004 Quest(van)
Owners Manual(owners)ÐUSA English(nna)
10/08/03Ðtbrooks
X
Page 169 of 320
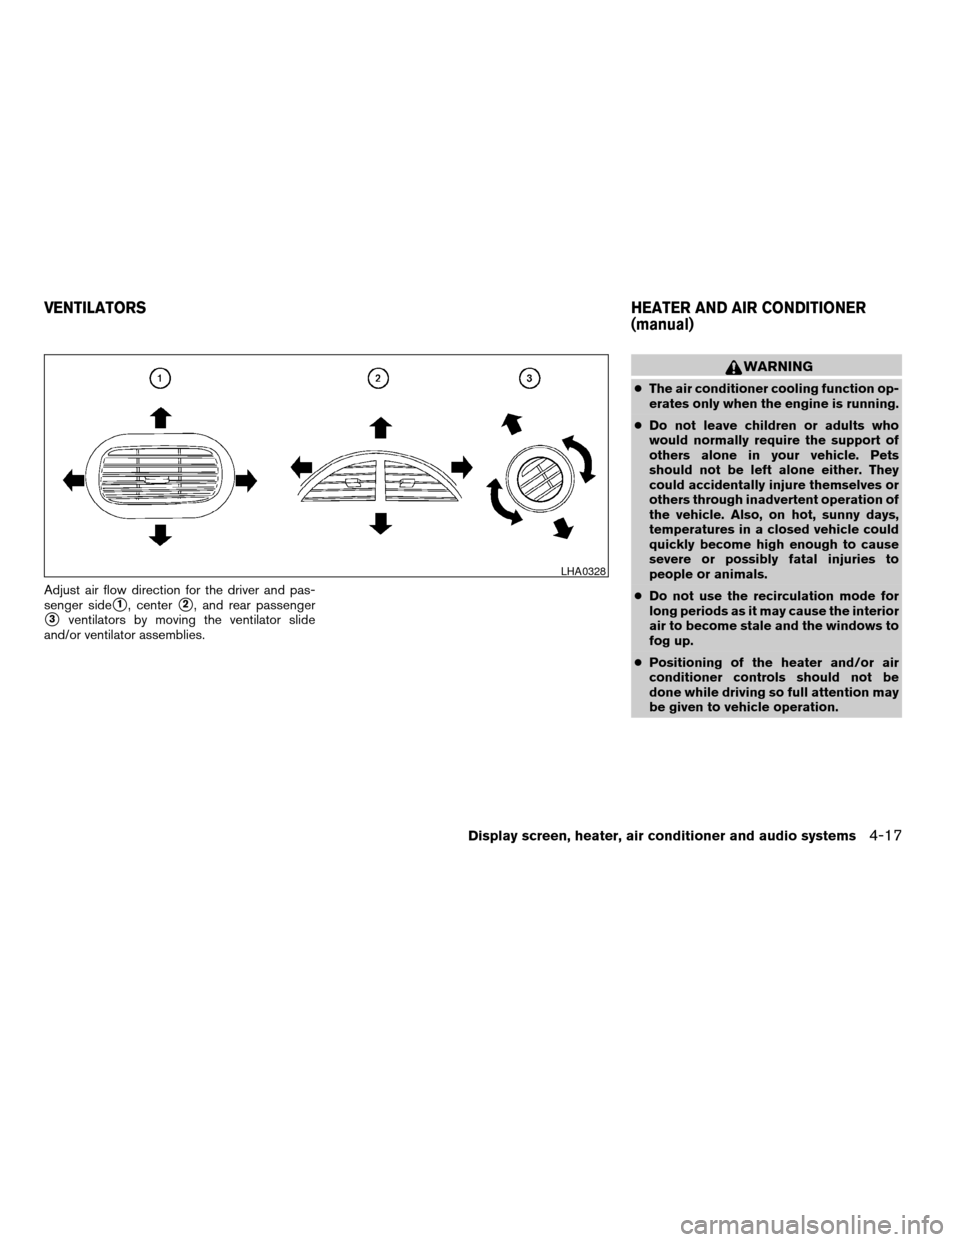
Adjust air flow direction for the driver and pas-
senger side
s1, centers2, and rear passenger
s3ventilators by moving the ventilator slide
and/or ventilator assemblies.
WARNING
cThe air conditioner cooling function op-
erates only when the engine is running.
cDo not leave children or adults who
would normally require the support of
others alone in your vehicle. Pets
should not be left alone either. They
could accidentally injure themselves or
others through inadvertent operation of
the vehicle. Also, on hot, sunny days,
temperatures in a closed vehicle could
quickly become high enough to cause
severe or possibly fatal injuries to
people or animals.
cDo not use the recirculation mode for
long periods as it may cause the interior
air to become stale and the windows to
fog up.
cPositioning of the heater and/or air
conditioner controls should not be
done while driving so full attention may
be given to vehicle operation.
LHA0328
VENTILATORSHEATER AND AIR CONDITIONER
(manual)
Display screen, heater, air conditioner and audio systems4-17
ZREVIEW COPY:Ð2004 Quest(van)
Owners Manual(owners)ÐUSA English(nna)
10/08/03Ðtbrooks
X
Page 179 of 320
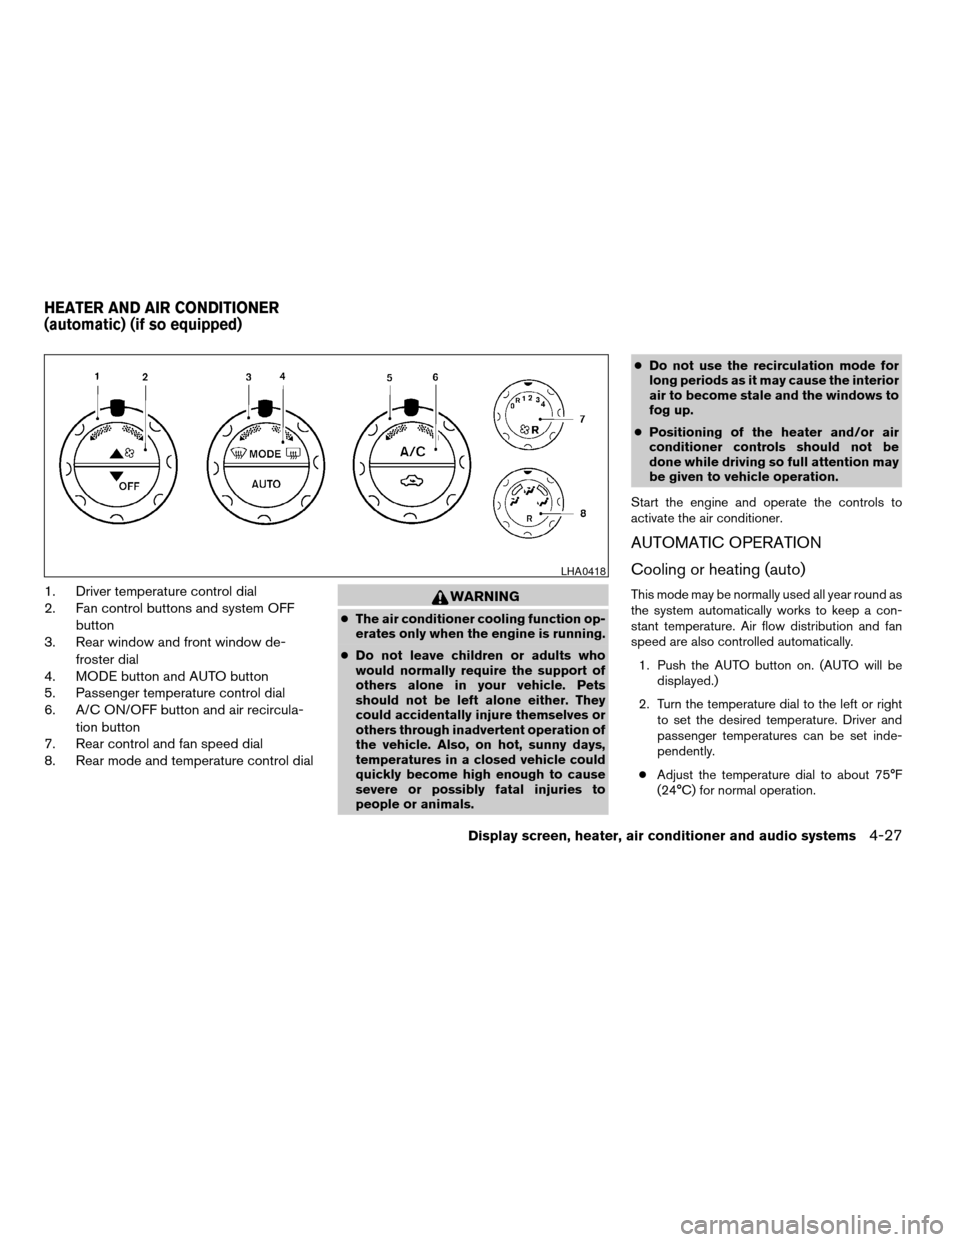
1. Driver temperature control dial
2. Fan control buttons and system OFF
button
3. Rear window and front window de-
froster dial
4. MODE button and AUTO button
5. Passenger temperature control dial
6. A/C ON/OFF button and air recircula-
tion button
7. Rear control and fan speed dial
8. Rear mode and temperature control dialWARNING
cThe air conditioner cooling function op-
erates only when the engine is running.
cDo not leave children or adults who
would normally require the support of
others alone in your vehicle. Pets
should not be left alone either. They
could accidentally injure themselves or
others through inadvertent operation of
the vehicle. Also, on hot, sunny days,
temperatures in a closed vehicle could
quickly become high enough to cause
severe or possibly fatal injuries to
people or animals.cDo not use the recirculation mode for
long periods as it may cause the interior
air to become stale and the windows to
fog up.
cPositioning of the heater and/or air
conditioner controls should not be
done while driving so full attention may
be given to vehicle operation.
Start the engine and operate the controls to
activate the air conditioner.
AUTOMATIC OPERATION
Cooling or heating (auto)
This mode may be normally used all year round as
the system automatically works to keep a con-
stant temperature. Air flow distribution and fan
speed are also controlled automatically.
1. Push the AUTO button on. (AUTO will be
displayed.)
2. Turn the temperature dial to the left or right
to set the desired temperature. Driver and
passenger temperatures can be set inde-
pendently.
cAdjust the temperature dial to about 75°F
(24°C) for normal operation.
LHA0418
HEATER AND AIR CONDITIONER
(automatic) (if so equipped)
Display screen, heater, air conditioner and audio systems4-27
ZREVIEW COPY:Ð2004 Quest(van)
Owners Manual(owners)ÐUSA English(nna)
10/08/03Ðtbrooks
X
Page 182 of 320
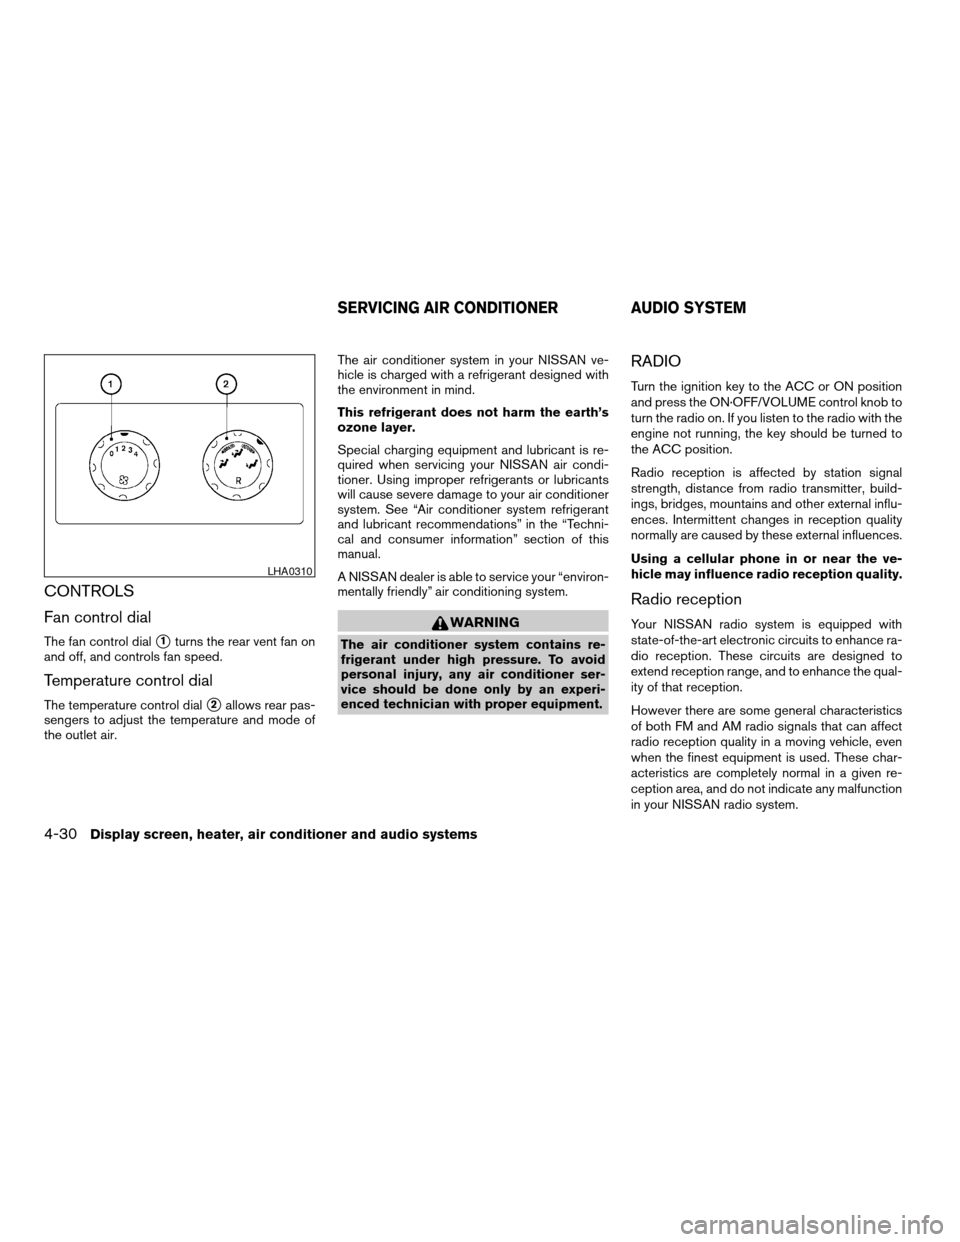
CONTROLS
Fan control dial
The fan control dials1turns the rear vent fan on
and off, and controls fan speed.
Temperature control dial
The temperature control dials2allows rear pas-
sengers to adjust the temperature and mode of
the outlet air.The air conditioner system in your NISSAN ve-
hicle is charged with a refrigerant designed with
the environment in mind.
This refrigerant does not harm the earth’s
ozone layer.
Special charging equipment and lubricant is re-
quired when servicing your NISSAN air condi-
tioner. Using improper refrigerants or lubricants
will cause severe damage to your air conditioner
system. See “Air conditioner system refrigerant
and lubricant recommendations” in the “Techni-
cal and consumer information” section of this
manual.
A NISSAN dealer is able to service your “environ-
mentally friendly” air conditioning system.
WARNING
The air conditioner system contains re-
frigerant under high pressure. To avoid
personal injury, any air conditioner ser-
vice should be done only by an experi-
enced technician with proper equipment.
RADIO
Turn the ignition key to the ACC or ON position
and press the ON·OFF/VOLUME control knob to
turn the radio on. If you listen to the radio with the
engine not running, the key should be turned to
the ACC position.
Radio reception is affected by station signal
strength, distance from radio transmitter, build-
ings, bridges, mountains and other external influ-
ences. Intermittent changes in reception quality
normally are caused by these external influences.
Using a cellular phone in or near the ve-
hicle may influence radio reception quality.
Radio reception
Your NISSAN radio system is equipped with
state-of-the-art electronic circuits to enhance ra-
dio reception. These circuits are designed to
extend reception range, and to enhance the qual-
ity of that reception.
However there are some general characteristics
of both FM and AM radio signals that can affect
radio reception quality in a moving vehicle, even
when the finest equipment is used. These char-
acteristics are completely normal in a given re-
ception area, and do not indicate any malfunction
in your NISSAN radio system.
LHA0310
SERVICING AIR CONDITIONER AUDIO SYSTEM
4-30Display screen, heater, air conditioner and audio systems
ZREVIEW COPY:Ð2004 Quest(van)
Owners Manual(owners)ÐUSA English(nna)
10/08/03Ðtbrooks
X
Page 187 of 320

Audio main operation
ON·OFF/Volume control:
Turn the ignition key to ACC or ON, and then
push the ON·OFF/Volume control knob while the
system is off to call up the mode (radio or CD)
which was playing immediately before the system
was turned off.
To turn the system off, press the ON·OFF/Volume
control knob.
Turn the ON·OFF/Volume control knob to adjust
the volume.
This vehicle has speed sensitive control volume
(SSV) for audio. The audio volume changes as
the driving speed changes.
AUDIO knob (BASS, TREBLE, FADE, BAL-
ANCE and SSV):
Press the AUDIO knob to change the mode as
follows:
BASS!TREBLE!FADE!BALANCE!
SSV
To adjust Bass, Treble, Fade and Balance, press
the AUDIO knob until the desired mode appears
in the display. Turn the Tuning knob to adjust
Bass and Treble to the desired level. You can also
use the Tuning knob to adjust Fader and Balance
modes. Fader adjusts the sound level betweenthe front and rear speakers and Balance adjusts
the sound between the right and left speakers.
To change the SSV mode to OFF, LOW, MID or
HIGH, turn the Tuning knob to the right or left.
Once you have adjusted the sound quality to the
desired level, press the AUDIO knob repeatedly
until the radio or CD display reappears. Other-
wise, the radio or CD display will automatically
reappear after about 10 seconds.
Display CD text:
To change the text displayed while playing a CD,
press the AUDIO knob until “Display Mode” ap-
pears.
Turn the Tuning knob within 2 seconds. The text
will change as follows:
Track numberÃ!Track titleÃ!Disc titleÃ!
Track number
Display satellite radio text (if so equipped):
To change the text displayed while listening to
satellite radio, press the AUDIO knob until “Dis-
play Mode” appears.
Turn the Tuning knob within 2 seconds. The text
will change as follows:
Channel numberÃ!Channel nameÃ!Artist
Ã!TitleÃ!Channel numberPause/mute button:
To mute or pause the audio sound, push the
PAUSE/MUTE button.
To release the mute or pause, push the button
again.
FM/AM/SAT radio operation
FM/AM/SAT band select:
Pushing the FM-AM or SAT radio select button
will change the band as follows:
AMÃ!FM or SAT (Satellite- if so equipped)
When FM-AM or SAT radio select button is
pushed while the ignition switch is in the ACC or
ON, the radio will come on at the station last
played.
The last station played will also come on when
the ON·OFF/Volume control knob is depressed
to ON.
No satellite radio reception is available and “NO
SAT” is displayed when the SAT button is
pressed unless optional satellite receiver and
antenna are installed (retrofit unavailable with-
outh factory satellite radio pre-wiring) , and an
XMTor SIRIUS™ satellite radio service subscrip-
tion is active.
If a compact disc is playing when the FM-AM or
SAT radio select button is pushed, the compact
Display screen, heater, air conditioner and audio systems4-35
ZREVIEW COPY:Ð2004 Quest(van)
Owners Manual(owners)ÐUSA English(nna)
10/08/03Ðtbrooks
X
Page 189 of 320
equipped) mode, the PTY name of the current
tuned station is displayed. During this time if the
PTY data code is zero or the data is unreadable,
the display will show NONE.
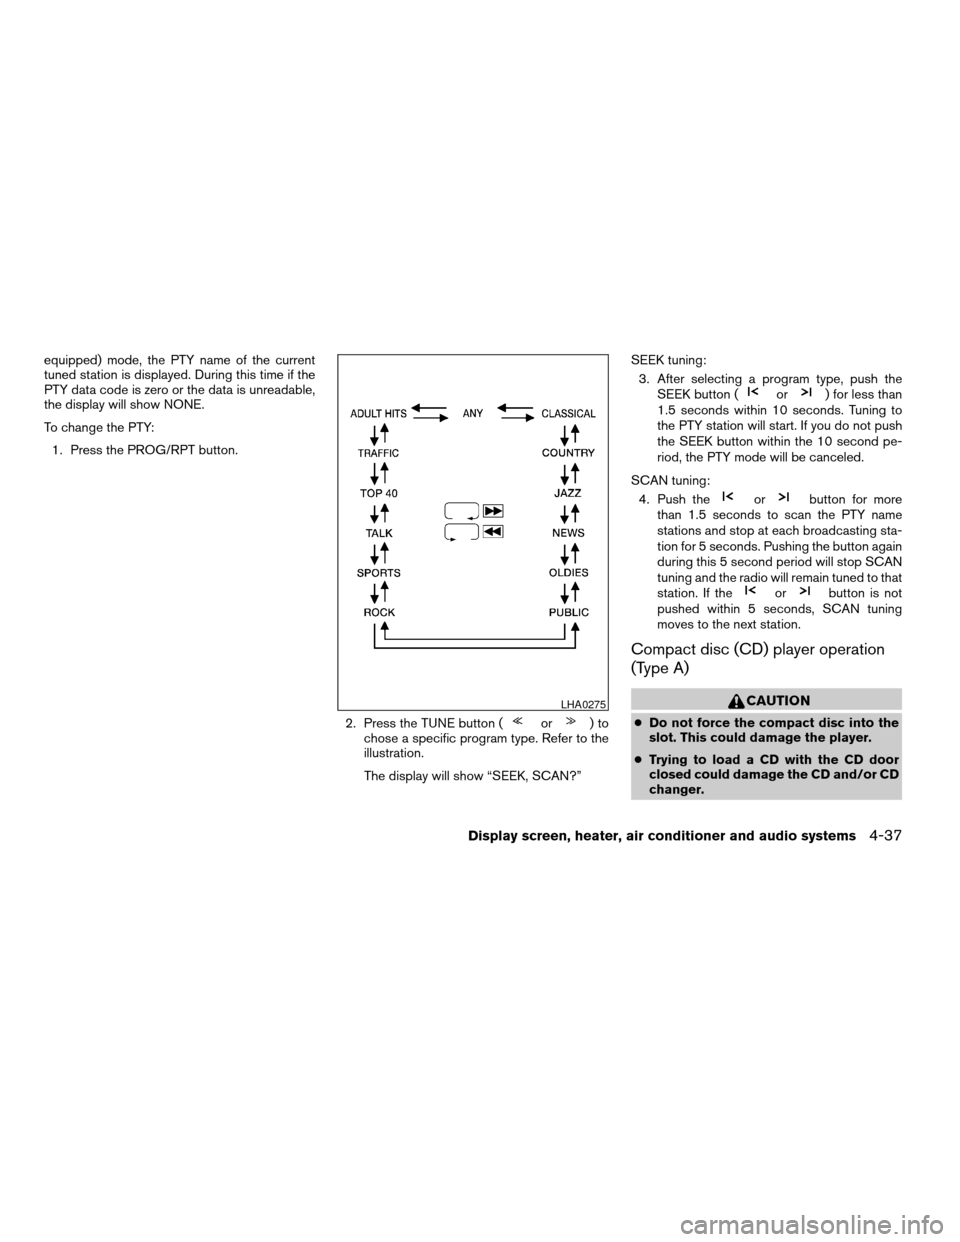
To change the PTY:
1. Press the PROG/RPT button.
2. Press the TUNE button (
or)to
chose a specific program type. Refer to the
illustration.
The display will show “SEEK, SCAN?”SEEK tuning:
3. After selecting a program type, push the
SEEK button (
or) for less than
1.5 seconds within 10 seconds. Tuning to
the PTY station will start. If you do not push
the SEEK button within the 10 second pe-
riod, the PTY mode will be canceled.
SCAN tuning:
4. Push the
orbutton for more
than 1.5 seconds to scan the PTY name
stations and stop at each broadcasting sta-
tion for 5 seconds. Pushing the button again
during this 5 second period will stop SCAN
tuning and the radio will remain tuned to that
station. If the
orbutton is not
pushed within 5 seconds, SCAN tuning
moves to the next station.
Compact disc (CD) player operation
(Type A)
CAUTION
cDo not force the compact disc into the
slot. This could damage the player.
cTrying to load a CD with the CD door
closed could damage the CD and/or CD
changer.
LHA0275
Display screen, heater, air conditioner and audio systems4-37
ZREVIEW COPY:Ð2004 Quest(van)
Owners Manual(owners)ÐUSA English(nna)
10/08/03Ðtbrooks
X
Page 193 of 320

CD CARE AND CLEANING
cHandle a CD by its edges. Do not bend the
disc. Never touch the surface of the disc.
cAlways place the discs in the storage case
when they are not being used.
c
To clean a disc, wipe the surface from the center
to the outer edge using a clean, soft cloth. Do
not wipe the disc using a circular motion.
cDo not use a conventional record cleaner or
alcohol intended for industrial use.
cA new disc may be rough on the inner and
outer edges. Remove the rough edges by
rubbing the inner and outer edges with the
side of a pen or pencil as illustrated.
1. Volume control switch
2. MODE select switch
3. POWER on/off switch
4. Tuning switch
STEERING WHEEL SWITCH FOR
AUDIO CONTROL (if so equipped)
The audio system can be operated using the
controls on the steering wheel.
POWER on/off switch
With the ignition key turned to the ACC or ON
position, push the POWER switch to turn the
audio system on or off.
MODE select switch
Push the mode select switch to change the mode
in the following sequence: AM, FM, SAT and CD.
Volume control switch
Push the volume control switch up or down to
increase or decrease the volume.
Tuning
Memory change (radio):
Push the tuning switch (
or) for less
than 1.5 seconds to change the radio frequency.
Seek tuning (radio):
Push the tuning switch (
or) for
more than 1.5 seconds to seek the next or previ-
ous radio station.
FF, REW:
Push the tuning switch (
or) for less
1.5 seconds to return to the beginning of the
present program or skip to the next program.
Push several times to skip back or skip through
programs.
To stop the FF or REW function, press the
orbutton for less than 1.5 seconds again.
LHA0049LHA0269
Display screen, heater, air conditioner and audio systems4-41
ZREVIEW COPY:Ð2004 Quest(van)
Owners Manual(owners)ÐUSA English(nna)
10/08/03Ðtbrooks
X
Page 194 of 320

When playing a CD in the CD changer (if so
equipped) , push the tuning switch (
or) for more than 1.5 seconds to change
between discs when multiple CDs are loaded.
1. VOL (volume) control button
2. MODE select button
3.
speaker control button
4. NEXT button
5. SEEK button
6. Headphone jacks7. Infrared headphone transmitter lens*
*Red transmitters will be visible when
infrared headphones are on.
LHA0322
4-42Display screen, heater, air conditioner and audio systems
ZREVIEW COPY:Ð2004 Quest(van)
Owners Manual(owners)ÐUSA English(nna)
10/08/03Ðtbrooks
X