spare wheel NISSAN QUEST 2008 V42 / 3.G User Guide
[x] Cancel search | Manufacturer: NISSAN, Model Year: 2008, Model line: QUEST, Model: NISSAN QUEST 2008 V42 / 3.GPages: 376, PDF Size: 5.21 MB
Page 282 of 376
Installing the spare tire
The spare tire is designed for emergency
use. See specific instructions under the
heading “Wheels and tires” in the “Mainte-
nance and do-it-yourself” section of this
manual.
1. Clean any mud or dirt from the surface be-
tween the wheel and hub.
2. Carefully put the spare tire on and tighten
the wheel nuts finger tight.
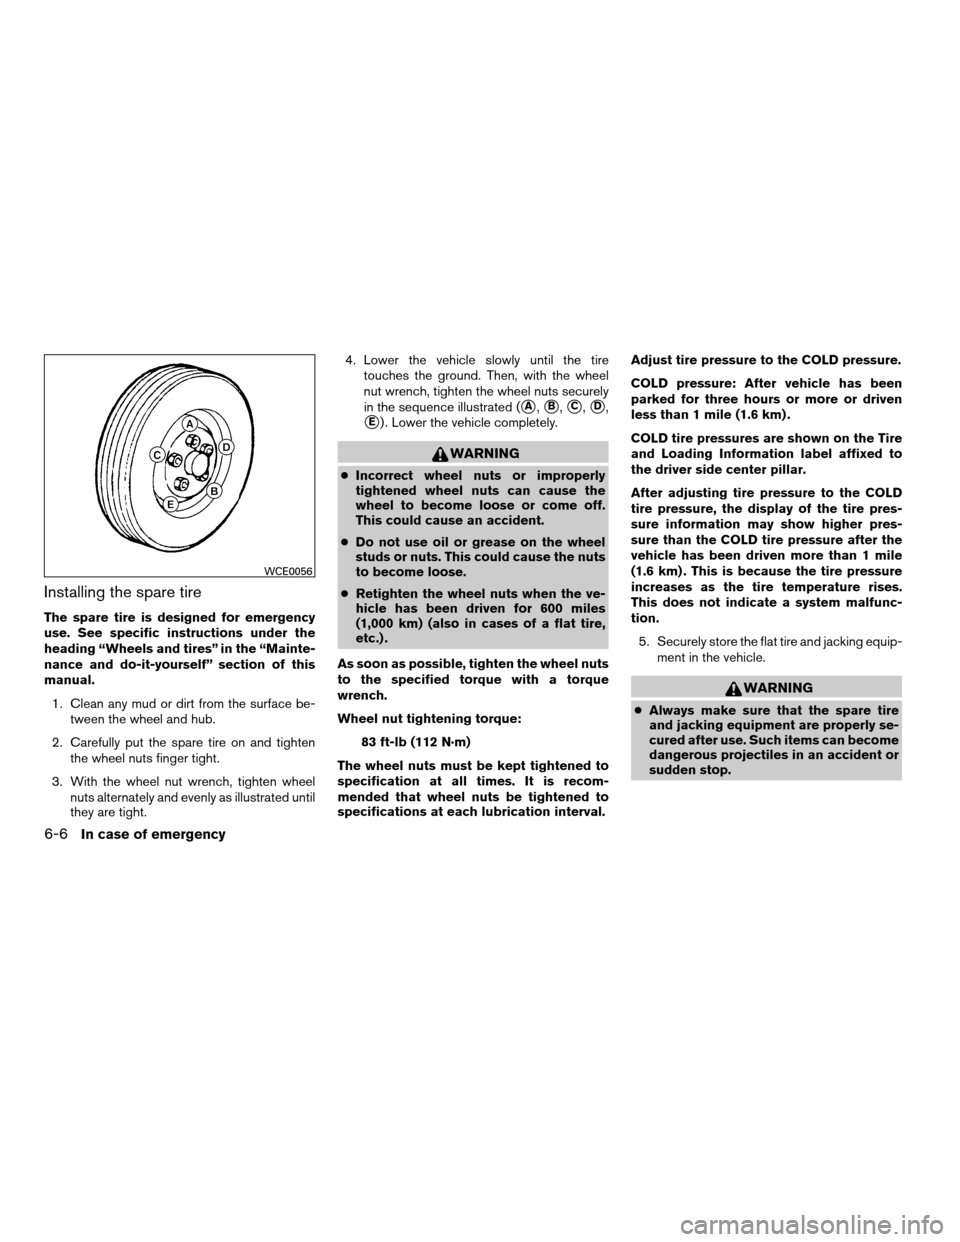
3. With the wheel nut wrench, tighten wheel
nuts alternately and evenly as illustrated until
they are tight.4. Lower the vehicle slowly until the tire
touches the ground. Then, with the wheel
nut wrench, tighten the wheel nuts securely
in the sequence illustrated (
sA,sB,sC,sD,
sE) . Lower the vehicle completely.
WARNING
cIncorrect wheel nuts or improperly
tightened wheel nuts can cause the
wheel to become loose or come off.
This could cause an accident.
cDo not use oil or grease on the wheel
studs or nuts. This could cause the nuts
to become loose.
cRetighten the wheel nuts when the ve-
hicle has been driven for 600 miles
(1,000 km) (also in cases of a flat tire,
etc.) .
As soon as possible, tighten the wheel nuts
to the specified torque with a torque
wrench.
Wheel nut tightening torque:
83 ft-lb (112 N·m)
The wheel nuts must be kept tightened to
specification at all times. It is recom-
mended that wheel nuts be tightened to
specifications at each lubrication interval.Adjust tire pressure to the COLD pressure.
COLD pressure: After vehicle has been
parked for three hours or more or driven
less than 1 mile (1.6 km) .
COLD tire pressures are shown on the Tire
and Loading Information label affixed to
the driver side center pillar.
After adjusting tire pressure to the COLD
tire pressure, the display of the tire pres-
sure information may show higher pres-
sure than the COLD tire pressure after the
vehicle has been driven more than 1 mile
(1.6 km) . This is because the tire pressure
increases as the tire temperature rises.
This does not indicate a system malfunc-
tion.
5. Securely store the flat tire and jacking equip-
ment in the vehicle.
WARNING
cAlways make sure that the spare tire
and jacking equipment are properly se-
cured after use. Such items can become
dangerous projectiles in an accident or
sudden stop.
WCE0056
6-6In case of emergency
ZREVIEW COPYÐ2008 Quest(van)
Owners ManualÐUSA_English(nna)
06/29/07Ðdebbie
X
Page 283 of 376
cThe spare tire is designed for emer-
gency use. See specific instructions un-
der the heading “Wheels and tires” in
the “Maintenance and do-it-yourself”
section of this manual.To start your engine with a booster battery, the
instructions and precautions below must be fol-
lowed.
WARNING
cIf done incorrectly, jump starting can
lead to a battery explosion, resulting in
severe injury or death. It could also
damage your vehicle.
cExplosive hydrogen gas is always
present in the vicinity of the battery.
Keep all sparks and flames away from
the battery.
cDo not allow battery fluid to come into
contact with eyes, skin, clothing or
painted surfaces. Battery fluid is a cor-
rosive sulfuric acid solution which can
cause severe burns. If the fluid should
come into contact with anything, imme-
diately flush the contacted area with
water.
cKeep battery out of the reach of
children.
cThe booster battery must be rated at 12
volts. Use of an improperly rated battery
can damage your vehicle.cWhenever working on or near a battery,
always wear suitable eye protectors (for
example, goggles or industrial safety
spectacles) and remove rings, metal
bands, or any other jewelry. Do not lean
over the battery when jump starting.
cDo not attempt to jump start a frozen
battery. It could explode and cause se-
rious injury.
cYour vehicle has an automatic engine
cooling fan. It could come on at any
time. Keep hands and other objects
away from it.
JUMP STARTING
In case of emergency6-7
ZREVIEW COPYÐ2008 Quest(van)
Owners ManualÐUSA_English(nna)
06/29/07Ðdebbie
X
Page 297 of 376

When driving in areas using road salt or other
corrosive materials, check lubrication frequently.
Lights*Clean the headlights on a regular basis.
Make sure that the headlights, stop lights, tail
lights, turn signal lights, and other lights are all
operating properly and installed securely. Also
check headlight aim.
Road wheel nuts (lug nuts)*When checking
the tires, make sure no wheel nuts are missing,
and check for any loose wheel nuts. Tighten if
necessary.
Tire rotation*Tires should be rotated every
7,500 miles (12,000 km) .
Tires*Check the pressure with a gauge often
and always prior to long distance trips. If neces-
sary, adjust the pressure in all tires, including the
spare, to the pressure specified. Check carefully
for damage, cuts or excessive wear.
Tire Pressure Monitoring System (TPMS)
transmitter componentsReplace the grom-
met seal, valve core and cap of the transmitter in
vehicles equipped with TPMS at tire replacement
when reaching the wear limit of the tires.
Wheel alignment and balanceIf the vehicle
should pull to either side while driving on a
straight and level road, or if you detect uneven or
abnormal tire wear, there may be a need for wheelalignment. If the steering wheel or seat vibrates at
normal highway speeds, wheel balancing may be
needed.
cFor additional information regarding tires,
refer to “Important Tire Safety Information”
(US) or “Tire Safety Information” (Canada) in
the Warranty Information Booklet .
WindshieldClean the windshield on a regular
basis. Check the windshield at least every six
months for cracks or other damage. Have a dam-
aged windshield repaired by a qualified repair
facility.
Windshield wiper blades*Check for cracks or
wear if they do not wipe properly.
Inside the vehicle
The maintenance items listed here should be
checked on a regular basis, such as when per-
forming periodic maintenance, cleaning the ve-
hicle, etc.
Additional information on the following
items with an “*” is found later in this sec-
tion.
Accelerator pedalCheck the pedal for smooth
operation and make sure the pedal does not bind
or require uneven effort. Keep the floor mat away
from the pedal.Automatic transmission P (Park) position
mechanismOn a fairly steep hill check that your
vehicle is held securely with the selector lever in
the P (Park) position without applying any brakes.
Brake pedalCheck the pedal for smooth opera-
tion. If the brake pedal suddenly goes down fur-
ther than normal, the pedal feels spongy or the
vehicle seems to take longer to stop, see a
NISSAN dealer immediately. Keep the floor mat
away from the pedal.
BrakesCheck that the brakes do not pull the
vehicle to one side when applied.
Parking brakeCheck the parking brake opera-
tion regularly. The vehicle should be securely held
on a fairly steep hill with only the parking brake
applied. If the parking brake needs adjustment,
see a NISSAN dealer.
SeatsCheck seat position controls such as seat
adjusters, seatback recliner, etc. to ensure they
operate smoothly and all latches lock securely in
every position. Check that the head restraints
move up and down smoothly and the locks (if so
equipped) hold securely in all latched positions.
Seat beltsCheck that all parts of the seat belt
system (for example, buckles, anchors, adjusters
and retractors) operate properly and smoothly,
and are installed securely. Check the belt web-
bing for cuts, fraying, wear or damage.
Maintenance and do-it-yourself8-3
ZREVIEW COPYÐ2008 Quest(van)
Owners ManualÐUSA_English(nna)
06/29/07Ðdebbie
X
Page 324 of 376

If you have a flat tire, see the “In case of
emergency” section of this manual.
TIRE PRESSURE
Tire Pressure Monitoring System
(TPMS)
This vehicle is equipped with the Tire
Pressure Monitoring System (TPMS) . It
monitors tire pressure of all tires except
the spare. When the low tire pressure
warning light is lit, one or more of your
tires is significantly under-inflated. If
equipped, the system also displays pres-sure of all tires (except the spare tire) on
the display screen by sending a signal
from a sensor that is installed in each
wheel.
The TPMS will activate only when the
vehicle is driven at speeds above 16 MPH
(25 km/h) . Also, this system may not de-
tect a sudden drop in tire pressure (for
example a flat tire while driving) .
For more details, refer to “Low tire pres-
sure warning light” in the “Instruments and
controls” section, “Tire pressure informa-
tion” in the “Display screen, heater, air
conditioner and audio and phone sys-
tems” section, “Tire Pressure Monitoring
System (TPMS)” in the “Starting and driv-
ing” section, and “Flat tire” in the “In case
of emergency” section.Tire inflation pressure
Check the tire pressures (including the
spare) often and always prior to long dis-
tance trips. The recommended tire pres-
sure specifications are shown on the
F.M.V.S.S./C.M.V.S.S. certification label
or the Tire and Loading Information labelunder the “Cold Tire Pressure” heading.
The Tire and Loading Information label is
affixed to the driver side center pillar. Tire
pressures should be checked regularly
because:
cMost tires naturally lose air over time.
cTires can lose air suddenly when
driven over potholes or other objects
or if the vehicle strikes a curb while
parking.
The tire pressures should be checked
when the tires are cold. The tires are
considered COLD after the vehicle has
been parked for 3 or more hours, or driven
less than 1 mile (1.6 km) at moderate
speeds.
Incorrect tire pressure, including un-
der inflation, may adversely affect
tire life and vehicle handling.
WDI0210
WHEELS AND TIRES
8-30Maintenance and do-it-yourself
ZREVIEW COPYÐ2008 Quest(van)
Owners ManualÐUSA_English(nna)
06/29/07Ðdebbie
X
Page 331 of 376

For additional traction on icy roads, studded tires
may be used. However, some U.S. states and
Canadian provinces prohibit their use. Check
local, state and provincial laws before installing
studded tires. Skid and traction capabilities of
studded snow tires on wet or dry surfaces may be
poorer than that of non-studded snow tires.
TIRE CHAINS
Use of tire chains may be prohibited according to
location. Check the local laws before installing
tire chains. When installing tire chains, make sure
they are the proper size for the tires on your
vehicle and are installed according to the chain
manufacturer’s suggestions.Use only SAE
class “S” chains.Class “S” chains are used on
vehicles with restricted tire to vehicle clearance.
Vehicles that can use Class “S” chains are de-
signed to meet the minimum clearances between
the tire and the closest vehicle suspension or
body component required to accommodate the
use of a winter traction device (tire chains or
cables) . The minimum clearances are determined
using the factory equipped tires. Other types may
damage your vehicle. Use chain tensioners when
recommended by the tire chain manufacturer to
ensure a tight fit. Loose end links of the tire chain
must be secured or removed to prevent the pos-
sibility of whipping action damage to the fenders
or underbody. If possible, avoid fully loading your
vehicle when using tire chains. In addition, driveat a reduced speed. Otherwise, your vehicle may
be damaged and/or vehicle handling and perfor-
mance may be adversely affected.
Tire chains must be installed only on the
front wheels and not on the rear wheels.
Never install tire chains on a TEMPORARY USE
ONLY spare tire.
Do not use tire chains on dry roads. Driving with
chains in such conditions can cause damage to
the various mechanisms of the vehicle due to
some overstress.
If your vehicle is equipped with the Michelin PAX
system, contact your NISSAN dealer for the tire
chains that will fit the PAX tire. The tire chain
selection is limited due to the PAX system tire
size.
CHANGING WHEELS AND TIRES
Tire rotation
NISSAN recommends rotating the tires
every 7,500 miles (12,000 km) .
See “Flat tire” in the “In case of emer-
gency” section of this manual for tire re-
placing procedures.
As soon as possible, tighten the
wheel nuts to the specified torque
with a torque wrench.
WDI0258
Maintenance and do-it-yourself8-37
ZREVIEW COPYÐ2008 Quest(van)
Owners ManualÐUSA_English(nna)
06/29/07Ðdebbie
X
Page 332 of 376
Wheel nut tightening torque:
83 ft-lb (112 N·m)
The wheel nuts must be kept tight-
ened to specifications at all times. It
is recommended that wheel nuts be
tightened to specification at each
tire rotation interval.
WARNING
cAfter rotating the tires, check and
adjust the tire pressure.
cRetighten the wheel nuts when
the vehicle has been driven for
600 miles (1,000 km) (also in
cases of a flat tire, etc.) .
cDo not include the spare tire in
the tire rotation.
cFor additional information re-
garding tires, refer to “Important
Tire Safety Information” (US) or
“Tire Safety Information”
(Canada) in the Warranty Infor-
mation Booklet.
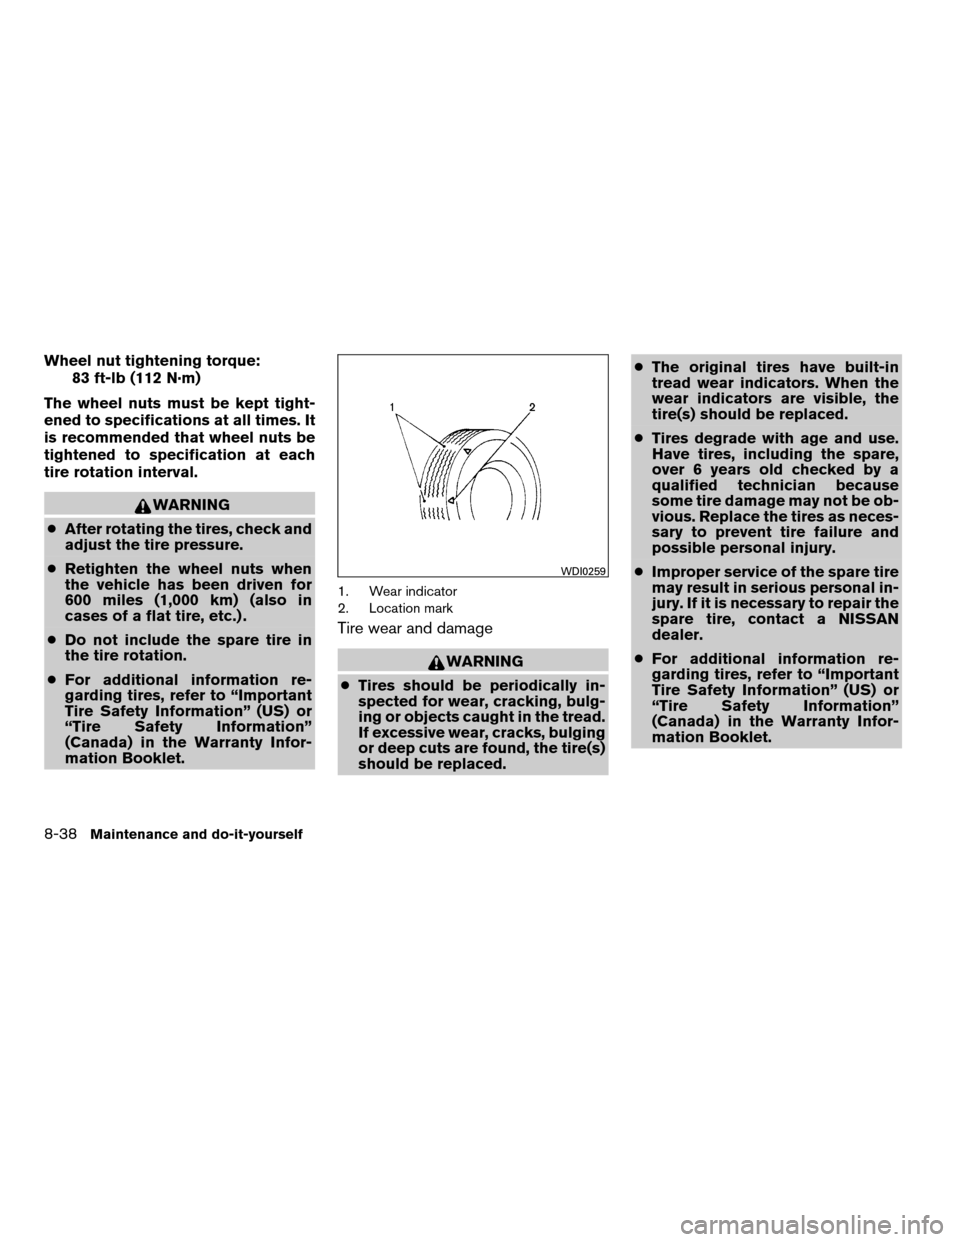
1. Wear indicator
2. Location mark
Tire wear and damage
WARNING
cTires should be periodically in-
spected for wear, cracking, bulg-
ing or objects caught in the tread.
If excessive wear, cracks, bulging
or deep cuts are found, the tire(s)
should be replaced.cThe original tires have built-in
tread wear indicators. When the
wear indicators are visible, the
tire(s) should be replaced.
cTires degrade with age and use.
Have tires, including the spare,
over 6 years old checked by a
qualified technician because
some tire damage may not be ob-
vious. Replace the tires as neces-
sary to prevent tire failure and
possible personal injury.
cImproper service of the spare tire
may result in serious personal in-
jury. If it is necessary to repair the
spare tire, contact a NISSAN
dealer.
cFor additional information re-
garding tires, refer to “Important
Tire Safety Information” (US) or
“Tire Safety Information”
(Canada) in the Warranty Infor-
mation Booklet.
WDI0259
8-38Maintenance and do-it-yourself
ZREVIEW COPYÐ2008 Quest(van)
Owners ManualÐUSA_English(nna)
06/29/07Ðdebbie
X
Page 333 of 376
Replacing wheels and tires
When replacing a tire, use the same size, tread
design, speed rating and load carrying capacity
as originally equipped. Recommended types and
sizes are shown in “Wheels and tires” in the
“Technical and consumer information” section of
this manual.
WARNING
cThe use of tires other than those recom-
mended or the mixed use of tires of
different brands, construction (bias,
bias-belted or radial) , or tread patterns
can adversely affect the ride, braking,
handling, ground clearance, body-to-
tire clearance, tire chain clearance,
speedometer calibration, headlight aim
and bumper height. Some of these ef-
fects may lead to accidents and could
result in serious personal injury.cIf the wheels are changed for any rea-
son, always replace with wheels which
have the same off-set dimension.
Wheels of a different off-set could
cause premature tire wear, degrade ve-
hicle handling characteristics and/or
interference with the brake
discs/drums. Such interference can
lead to decreased braking efficiency
and/or early brake pad/shoe wear. Re-
fer to “Wheels and tires” in the “Techni-
cal and consumer information” section
of this manual for wheel off-set
dimensions.
cWhen a spare tire is mounted or a wheel
is replaced, tire pressure will not be
indicated, the TPMS will not function
and the low tire pressure warning light
will flash for approximately 1 minute.
The light will remain on after 1 minute.
Contact your NISSAN dealer as soon as
possible for tire replacement and/or
system resetting.
cReplacing tires with those not originally
specified by NISSAN could affect the
proper operation of the TPMS.cDo not install a damaged or deformed
wheel or tire even if it has been re-
paired. Such wheels or tires could have
structural damage and could fail with-
out warning.
cThe use of retread tires is not
recommended.
cFor additional information regarding
tires, refer to “Important Tire Safety In-
formation” (US) or “Tire Safety Informa-
tion” (Canada) in the Warranty Informa-
tion Booklet.
Wheel balance
Unbalanced wheels may affect vehicle handling
and tire life. Even with regular use, wheels can get
out of balance. Therefore, they should be bal-
anced as required.
Wheel balance service should be per-
formed with the wheels off the vehicle.
Spin balancing the wheels on the vehicle
could lead to mechanical damage.
cFor additional information regarding
tires, refer to “Important Tire Safety
Information” (US) or “Tire Safety Infor-
mation” (Canada) in the Warranty In-
formation Booklet .
Maintenance and do-it-yourself8-39
ZREVIEW COPYÐ2008 Quest(van)
Owners ManualÐUSA_English(nna)
06/29/07Ðdebbie
X
Page 334 of 376
Care of wheels
cWash the wheels when washing the vehicle
to maintain their appearance.
cClean the inner side of the wheels when the
wheel is changed or the underside of the
vehicle is washed.
cDo not use abrasive cleaners when washing
the wheels.
cInspect wheel rims regularly for dents or
corrosion. Such damage may cause loss of
pressure or poor seal at the tire bead.
cNISSAN recommends waxing the road
wheels to protect against road salt in areas
where it is used during winter.
Spare tire (TEMPORARY USE ONLY
spare tire)
Observe the following precautions if the TEM-
PORARY USE ONLY spare tire must be used.
Otherwise, your vehicle could be damaged or
involved in an accident:
WARNING
cThe spare tire should be used for emer-
gency use only. It should be replaced
with the standard tire at the first oppor-
tunity to avoid possible tire or differen-
tial damage.
cDrive carefully while the TEMPORARY
USE ONLY spare tire is installed. Avoid
sharp turns and abrupt braking while
driving.
cPeriodically check spare tire inflation
pressure. Always keep the pressure of
the TEMPORARY USE ONLY spare tire
at 60 psi (420 kPa, 4.2 bar) .
cWith the TEMPORARY USE ONLY spare
tire installed do not drive the vehicle at
speeds faster than 50 MPH (80 km/h) .
cWhen driving on roads covered with
snow or ice, the TEMPORARY USE
ONLY spare tire should be used on the
rear wheels and the original tire used
on the front wheels (drive wheels) . Use
tire chains only on the front (original)
tires.cTire tread of the TEMPORARY USE
ONLY spare tire will wear at a faster rate
than the standard tire. Replace the
spare tire as soon as the tread wear
indicators appear.
cDo not use the spare tire on other
vehicles.
cDo not use more than one spare tire at
the same time.
cDo not tow a trailer when the TEMPO-
RARY USE ONLY spare tire is installed.
CAUTION
cDo not use tire chains on a TEMPO-
RARY USE ONLY spare tire. Tire chains
will not fit properly and may cause dam-
age to the vehicle.
cBecause the TEMPORARY USE ONLY
spare tire is smaller than the original
tire, ground clearance is reduced. To
avoid damage to the vehicle, do not
drive over obstacles. Also, do not drive
the vehicle through an automatic car
wash since it may get caught.
8-40Maintenance and do-it-yourself
ZREVIEW COPYÐ2008 Quest(van)
Owners ManualÐUSA_English(nna)
06/29/07Ðdebbie
X
Page 342 of 376

WHEELS AND TIRES
Wheels
16 x 6.5JJ
17 x 6.5JJ
Tires
P225/65R16
P225/60R17
Spare tire T135/80*16
Speed rating 16” H
17” H
*: “R” or “D” depending on tire manufacturer
DIMENSIONS AND WEIGHTS
Overall length in (mm) 204.13(5,185)
Overall width in (mm) 78.1 (1,983)
Overall height
with roof rack in (mm) 71.2 (1,809)
without roof rack in (mm) 70.0 (1,778)
Front Track in (mm) 67.32(1,710)
Rear Track in (mm) 67.32(1,710)
Wheelbase in (mm) 124.02(3,150)
Gross vehicle weight
ratinglb (kg)
See the “F.M.V.S.S./C.M.
V.S.S. certification label”
on the center pillar be-
tween the driver’s side
front and side doors. Gross axle weight rating
Front lb (kg)
Rear lb (kg)
9-8Technical and consumer information
ZREVIEW COPYÐ2008 Quest(van)
Owners ManualÐUSA_English(nna)
06/29/07Ðdebbie
X
Page 368 of 376

Security indicator light.............2-12
Security system (NISSAN vehicle immobilizer
system) , engine start.........2-15, 3-2, 5-7
Self-adjusting brakes..............8-20
Service manual order form...........9-27
Servicing air conditioner............4-43
Setting button...........4-5, 4-11, 4-22
Shift lock release................5-10
Shifting
Automatic transmission...........5-9
Shoulder belt height adjustment........1-24
Side air bag system (See supplemental side air
bag and curtain side-impact air bag system). .1-63
SkyView™ roof.................2-39
Sliding door
Manual sliding door.............3-5
Power sliding door..............3-6
Sliding door locks
Child safety sliding door locks........3-9
Sonar
Rear system.................5-21
Spark plug replacement............8-15
Speedometer...................2-4
SRS warning label...............1-66
Starting
Before starting the engine..........5-7
Jump starting.................6-7
Precautions when starting and driving . . .5-2
Push starting.................6-9
Starting the engine..............5-8
Startup screen.................4-18
Steering
Power steering fluid.............8-11
Power steering system...........5-17
Tilting steering wheel............3-21
Steering wheel audio control switch......4-62Stop light....................8-26
Storage.....................2-27
Storage bin............2-32, 2-35, 2-35
Storage tray...................2-27
Sun visors....................3-22
Sunglasses case................2-27
Sunglasses holder...............2-27
Sunroof (see Moonroof)............2-40
Supplemental air bag warning labels.....1-66
Supplemental air bag warning light . . .1-66, 2-10
Supplemental front impact air bag system . .1-59
Supplemental restraint system
Information and warning labels.......1-66
Precautions on supplemental restraint
system....................1-52
Supplemental restraint system
(Supplemental air bag system).........1-52
Supplemental side and curtain side-impact
air bag system..................1-63
Switch
Autolight switch...............2-19
Automatic power window switch.....2-38
Fog light switch...............2-22
Hazard warning flasher switch.......2-23
Headlight and turn signal switch......2-18
Headlight control switch..........2-18
Ignition switch................5-6
Lights on demand switch..........2-41
Main ON/OFF switch
(for power doors)...........3-6, 3-15
Overdrive switch..............5-11
Power door lock switch...........3-5
Rear sonar system off switch.......2-25
Rear window and outside mirror
defroster switch...............2-18Rear window wiper and washer
switches...................2-17
Traction control system (TCS) off
switch....................2-25
Turn signal switch..............2-22
Vehicle dynamic control (VDC) off
switch....................2-25
Windshield wiper and washer switch . . .2-16
T
Tachometer....................2-5
Temperature gauge
Engine coolant temperature gauge.....2-5
Theft (NISSAN vehicle immobilizer system) ,
engine start..............2-15, 3-2, 5-7
Third row bench seat adjustment.....1-7, 1-12
Three-way catalyst................5-2
Tilting steering wheel..............3-21
Tire
Flat tire....................6-2
Spare tire................6-3, 8-40
Tire chains..................8-37
Tire placard.................9-11
Tire pressure................8-30
Tire rotation.................8-37
Types of tires................8-36
Uniform tire quality grading.........9-23
Wheels and tires..............8-30
Wheel/tire size................9-8
Tire pressure
Low tire pressure warning light.......2-9
Tire pressure display........4-4, 4-11, 4-21
Tire Pressure Monitoring System (TPMS) . . .5-3
10-6
ZREVIEW COPYÐ2008 Quest(van)
Owners ManualÐUSA_English(nna)
06/29/07Ðdebbie
X