ignition NISSAN ROGUE 2008 1.G Service Manual
[x] Cancel search | Manufacturer: NISSAN, Model Year: 2008, Model line: ROGUE, Model: NISSAN ROGUE 2008 1.GPages: 309, PDF Size: 4.38 MB
Page 130 of 309
Black plate (132,1)
Model "S35-D" EDITED: 2007/ 12/ 19
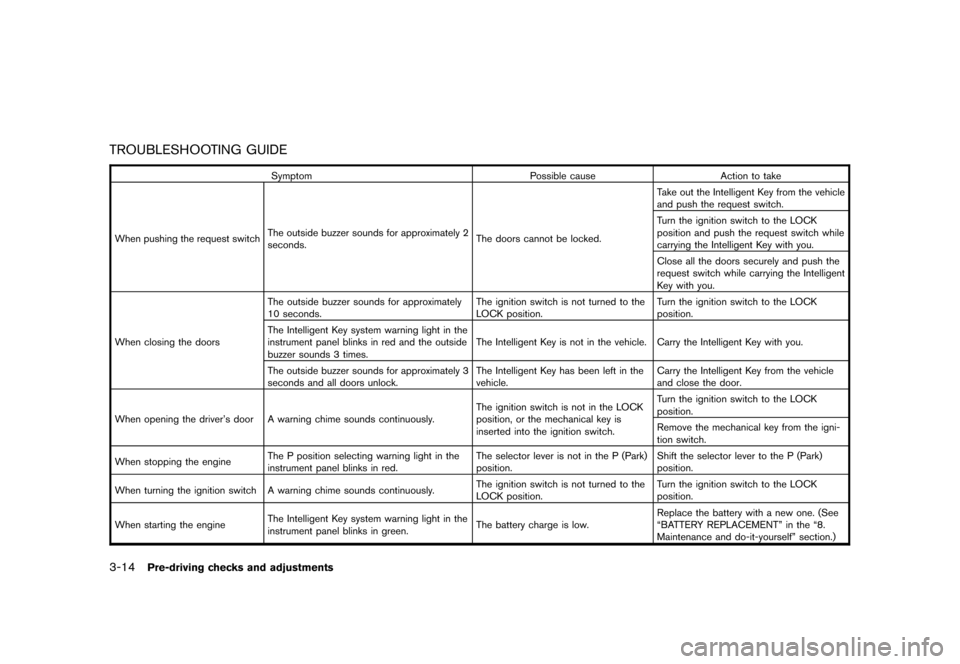
TROUBLESHOOTING GUIDE
Symptom Possible cause Action to take
When pushing the request switchThe outside buzzer sounds for approximately 2
seconds.The doors cannot be locked.Take out the Intelligent Key from the vehicle
and push the request switch.
Turn the ignition switch to the LOCK
position and push the request switch while
carrying the Intelligent Key with you.
Close all the doors securely and push the
request switch while carrying the Intelligent
Key with you.
When closing the doorsThe outside buzzer sounds for approximately
10 seconds.The ignition switch is not turned to the
LOCK position.Turn the ignition switch to the LOCK
position.
The Intelligent Key system warning light in the
instrument panel blinks in red and the outside
buzzer sounds 3 times.The Intelligent Key is not in the vehicle. Carry the Intelligent Key with you.
The outside buzzer sounds for approximately 3
seconds and all doors unlock.The Intelligent Key has been left in the
vehicle.Carry the Intelligent Key from the vehicle
and close the door.
When opening the driver’s door A warning chime sounds continuously.The ignition switch is not in the LOCK
position, or the mechanical key is
inserted into the ignition switch.Turn the ignition switch to the LOCK
position.
Remove the mechanical key from the igni-
tion switch.
When stopping the engineThe P position selecting warning light in the
instrument panel blinks in red.The selector lever is not in the P (Park)
position.Shift the selector lever to the P (Park)
position.
When turning the ignition switch A warning chime sounds continuously.The ignition switch is not turned to the
LOCK position.Turn the ignition switch to the LOCK
position.
When starting the engineThe Intelligent Key system warning light in the
instrument panel blinks in green.The battery charge is low.Replace the battery with a new one. (See
“BATTERY REPLACEMENT” in the “8.
Maintenance and do-it-yourself” section.)
3-14
Pre-driving checks and adjustments
Page 131 of 309
Black plate (133,1)
Model "S35-D" EDITED: 2007/ 12/ 19
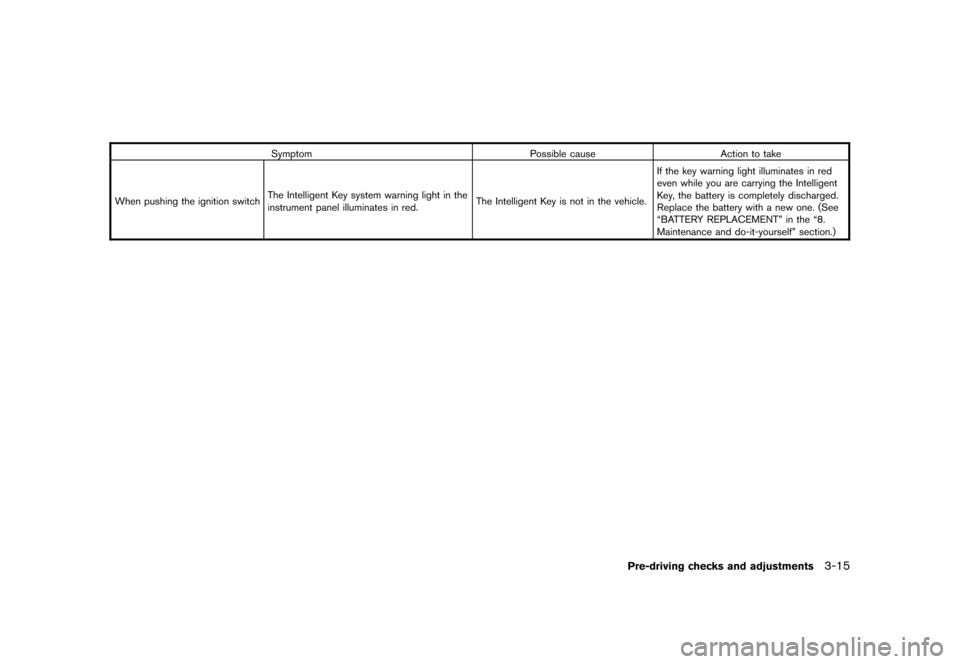
Symptom Possible cause Action to take
When pushing the ignition switchThe Intelligent Key system warning light in the
instrument panel illuminates in red.The Intelligent Key is not in the vehicle.If the key warning light illuminates in red
even while you are carrying the Intelligent
Key, the battery is completely discharged.
Replace the battery with a new one. (See
“BATTERY REPLACEMENT” in the “8.
Maintenance and do-it-yourself” section.)
Pre-driving checks and adjustments
3-15
Page 132 of 309
Black plate (134,1)
Model "S35-D" EDITED: 2007/ 12/ 19
HOW TO USE REMOTE KEYLESS
ENTRY FUNCTIONThe remote keyless entry function can operate
all door locks using the remote keyless entry
function of the Intelligent Key. The remote
keyless entry function can operate at a distance
of approximately 33 ft (10 m) from the vehicle.
(The operating distance depends upon the
conditions around the vehicle.)
The remote keyless entry function will not
operate:
.When the Intelligent Key is not within the
operational range.
.When the doors are open or not closed
securely.
.When the Intelligent Key battery is dis-
charged.
The remote keyless entry function can also
operate the vehicle alarm.
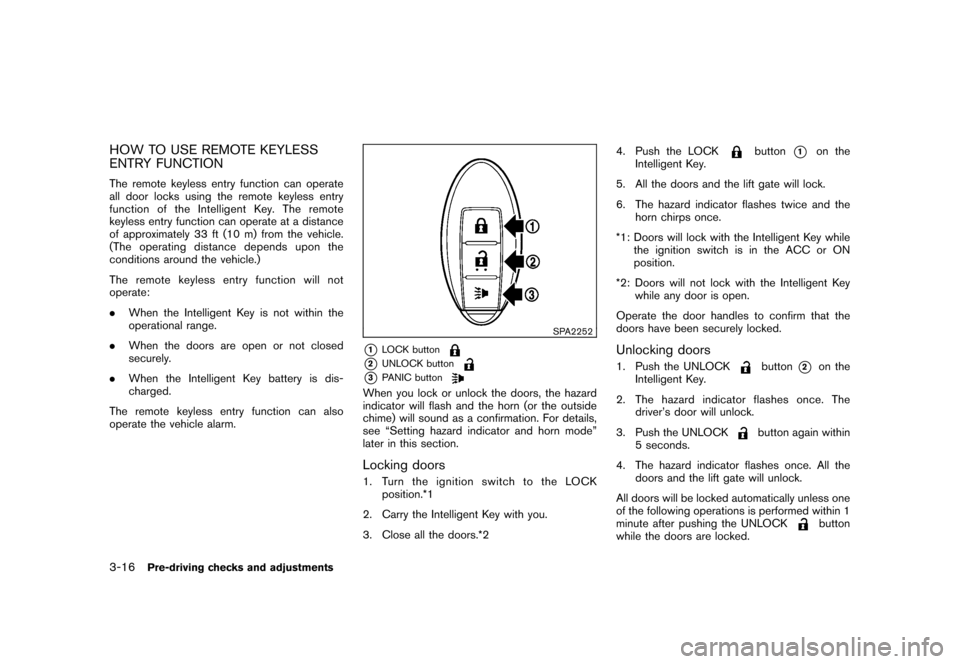
SPA2252
*1
LOCK button
*2
UNLOCK button
*3
PANIC button
When you lock or unlock the doors, the hazard
indicator will flash and the horn (or the outside
chime) will sound as a confirmation. For details,
see “Setting hazard indicator and horn mode”
later in this section.Locking doors1. Turn the ignition switch to the LOCK
position.*1
2. Carry the Intelligent Key with you.
3. Close all the doors.*24. Push the LOCK
button
*1
on the
Intelligent Key.
5. All the doors and the lift gate will lock.
6. The hazard indicator flashes twice and the
horn chirps once.
*1: Doors will lock with the Intelligent Key while
the ignition switch is in the ACC or ON
position.
*2: Doors will not lock with the Intelligent Key
while any door is open.
Operate the door handles to confirm that the
doors have been securely locked.
Unlocking doors1. Push the UNLOCK
button
*2
on the
Intelligent Key.
2. The hazard indicator flashes once. The
driver’s door will unlock.
3. Push the UNLOCK
button again within
5 seconds.
4. The hazard indicator flashes once. All the
doors and the lift gate will unlock.
All doors will be locked automatically unless one
of the following operations is performed within 1
minute after pushing the UNLOCK
button
while the doors are locked.
3-16
Pre-driving checks and adjustments
Page 133 of 309
Black plate (135,1)
Model "S35-D" EDITED: 2007/ 12/ 19
.Opening any doors.
.Pushing the ignition switch.
.Inserting the mechanical key into the ignition
switch.
During this 1-minute time period, if the UNLOCK
button is pushed, all doors will be locked
automatically after another 1 minute.
Using panic alarmIf you are near your vehicle and feel threatened,
you may activate the alarm to call attention as
follows:
1. Push the PANIC
button
*3
on the
Intelligent Key formore than 1 second.
2. The theft warning alarm and headlights will
stay on for 25 seconds.
3. The panic alarm stops when:
.It has run for 25 seconds, or
.Any of the buttons on the Intelligent Key
is pushed. (Note: Panic button must be
pushed for more than 1 second.)
Setting hazard indicator and horn modeThis vehicle is set in hazard indicator and horn
mode when you first receive the vehicle.
In hazard indicator and horn mode, when the
LOCK
button
*1
is pushed, the hazardindicator flashes twice and the horn chirps once.
When the UNLOCK
button
*2
is pushed,
the hazard indicator flashes once.
If horns are not necessary, the system can be
switched to the hazard indicator mode.
In hazard indicator mode, when the LOCK
button is pushed, the hazard indicator flashes
twice. When the UNLOCK
button is
pushed, neither the hazard indicator nor the
horn operates.
Pre-driving checks and adjustments
3-17
Page 140 of 309
Black plate (142,1)
Model "S35-D" EDITED: 2007/ 12/ 19
SPA1792
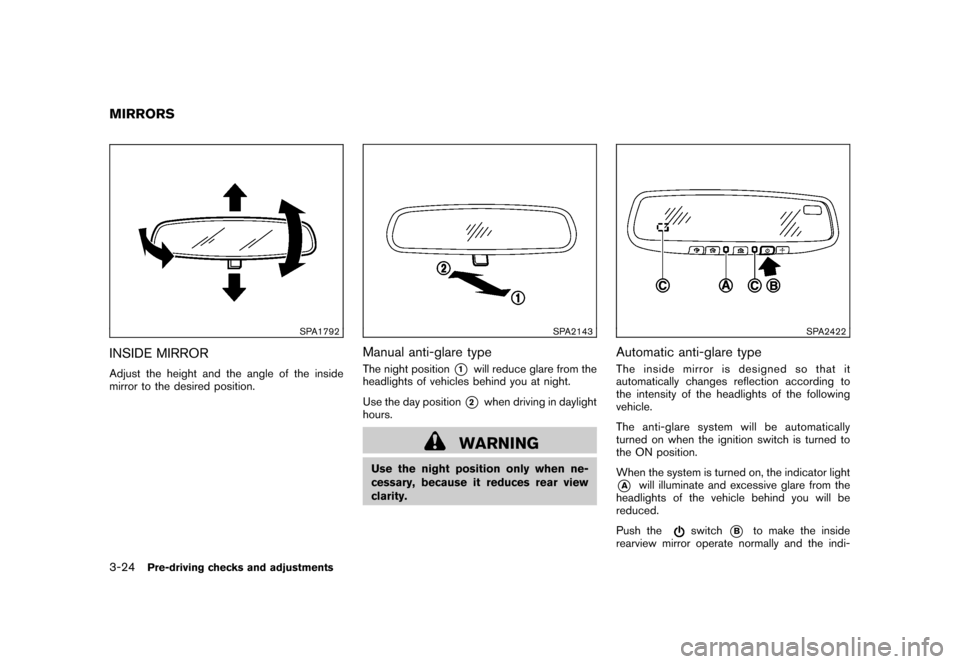
INSIDE MIRRORAdjust the height and the angle of the inside
mirror to the desired position.
SPA2143
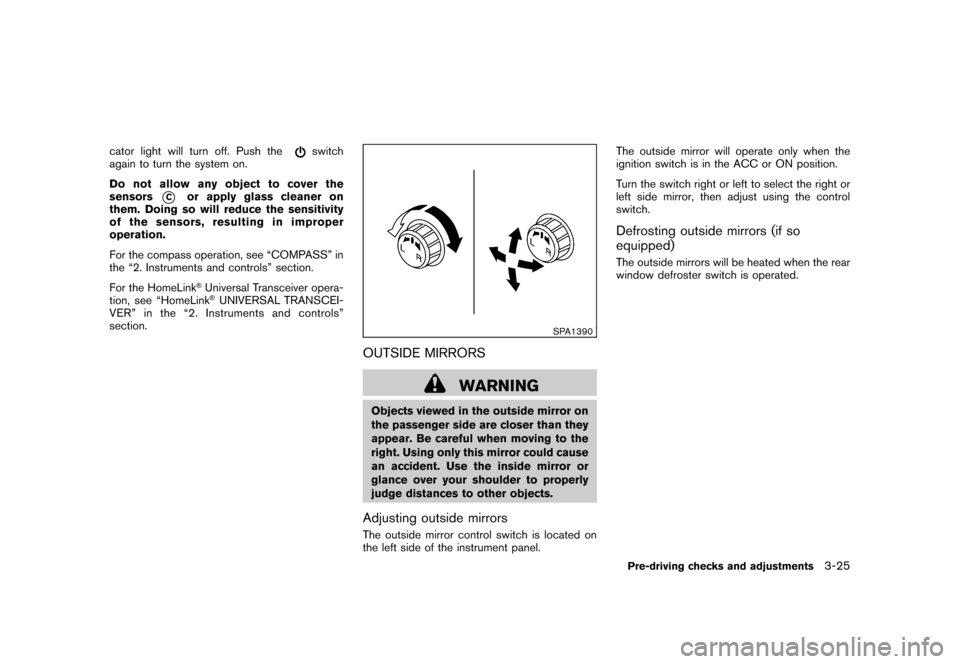
Manual anti-glare typeThe night position
*1
will reduce glare from the
headlights of vehicles behind you at night.
Use the day position*2
when driving in daylight
hours.
WARNING
Use the night position only when ne-
cessary, because it reduces rear view
clarity.
SPA2422
Automatic anti-glare typeThe inside mirror is designed so that it
automatically changes reflection according to
the intensity of the headlights of the following
vehicle.
The anti-glare system will be automatically
turned on when the ignition switch is turned to
the ON position.
When the system is turned on, the indicator light*A
will illuminate and excessive glare from the
headlights of the vehicle behind you will be
reduced.
Push the
switch
*B
to make the inside
rearview mirror operate normally and the indi-
MIRRORS3-24
Pre-driving checks and adjustments
Page 141 of 309
Black plate (143,1)
Model "S35-D" EDITED: 2007/ 12/ 19
cator light will turn off. Push the
switch
again to turn the system on.
Do not allow any object to cover the
sensors
*C
or apply glass cleaner on
them. Doing so will reduce the sensitivity
of the sensors, resulting in improper
operation.
For the compass operation, see “COMPASS” in
the “2. Instruments and controls” section.
For the HomeLink®Universal Transceiver opera-
tion, see “HomeLink®UNIVERSAL TRANSCEI-
VER” in the “2. Instruments and controls”
section.
SPA1390
OUTSIDE MIRRORS
WARNING
Objects viewed in the outside mirror on
the passenger side are closer than they
appear. Be careful when moving to the
right. Using only this mirror could cause
an accident. Use the inside mirror or
glance over your shoulder to properly
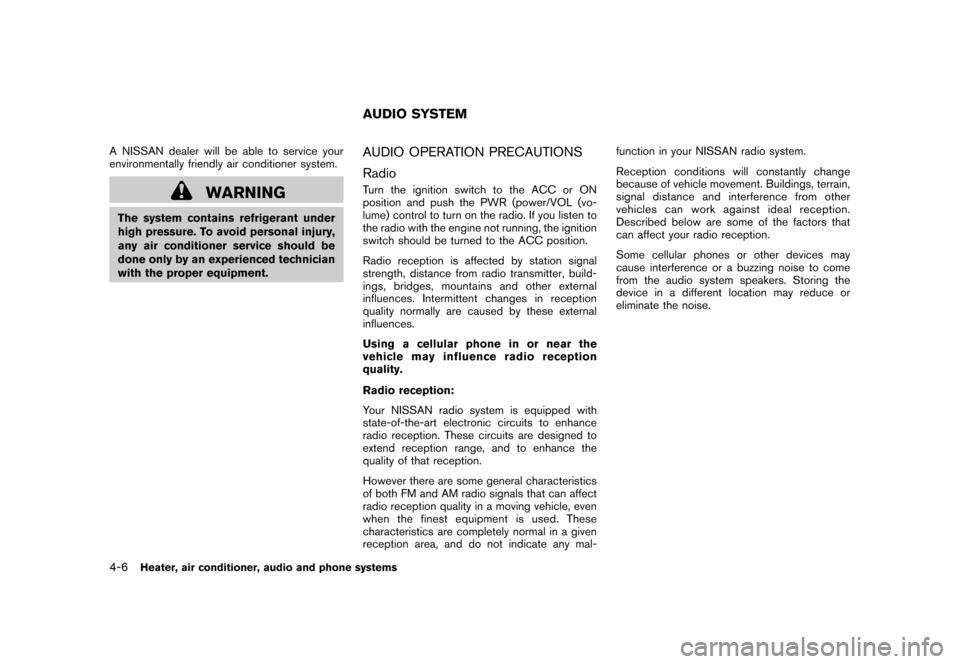
judge distances to other objects.Adjusting outside mirrorsThe outside mirror control switch is located on
the left side of the instrument panel.The outside mirror will operate only when the
ignition switch is in the ACC or ON position.
Turn the switch right or left to select the right or
left side mirror, then adjust using the control
switch.
Defrosting outside mirrors (if so
equipped)The outside mirrors will be heated when the rear
window defroster switch is operated.Pre-driving checks and adjustments
3-25
Page 148 of 309
Black plate (150,1)
Model "S35-D" EDITED: 2007/ 12/ 19
A NISSAN dealer will be able to service your
environmentally friendly air conditioner system.
WARNING
The system contains refrigerant under
high pressure. To avoid personal injury,
any air conditioner service should be
done only by an experienced technician
with the proper equipment.
AUDIO OPERATION PRECAUTIONS
RadioTurn the ignition switch to the ACC or ON
position and push the PWR (power/VOL (vo-
lume) control to turn on the radio. If you listen to
the radio with the engine not running, the ignition
switch should be turned to the ACC position.
Radio reception is affected by station signal
strength, distance from radio transmitter, build-
ings, bridges, mountains and other external
influences. Intermittent changes in reception
quality normally are caused by these external
influences.
Using a cellular phone in or near the
vehicle may influence radio reception
quality.
Radio reception:
Your NISSAN radio system is equipped with
state-of-the-art electronic circuits to enhance
radio reception. These circuits are designed to
extend reception range, and to enhance the
quality of that reception.
However there are some general characteristics
of both FM and AM radio signals that can affect
radio reception quality in a moving vehicle, even
when the finest equipment is used. These
characteristics are completely normal in a given
reception area, and do not indicate any mal-function in your NISSAN radio system.
Reception conditions will constantly change
because of vehicle movement. Buildings, terrain,
signal distance and interference from other
vehicles can work against ideal reception.
Described below are some of the factors that
can affect your radio reception.
Some cellular phones or other devices may
cause interference or a buzzing noise to come
from the audio system speakers. Storing the
device in a different location may reduce or
eliminate the noise.AUDIO SYSTEM
4-6
Heater, air conditioner, audio and phone systems
Page 155 of 309
Black plate (157,1)
Model "S35-D" EDITED: 2007/ 12/ 19
SAA1777
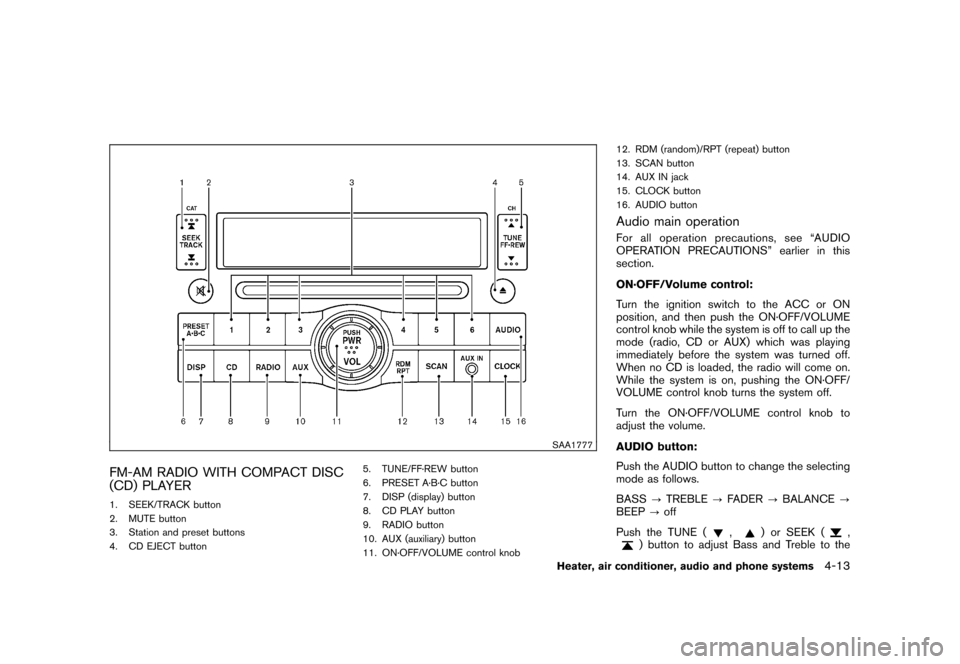
FM-AM RADIO WITH COMPACT DISC
(CD) PLAYER1. SEEK/TRACK button
2. MUTE button
3. Station and preset buttons
4. CD EJECT button5. TUNE/FF·REW button
6. PRESET A·B·C button
7. DISP (display) button
8. CD PLAY button
9. RADIO button
10. AUX (auxiliary) button
11. ON·OFF/VOLUME control knob12. RDM (random)/RPT (repeat) button
13. SCAN button
14. AUX IN jack
15. CLOCK button
16. AUDIO button
Audio main operationFor all operation precautions, see “AUDIO
OPERATION PRECAUTIONS” earlier in this
section.
ON·OFF/Volume control:
Turn the ignition switch to the ACC or ON
position, and then push the ON·OFF/VOLUME
control knob while the system is off to call up the
mode (radio, CD or AUX) which was playing
immediately before the system was turned off.
When no CD is loaded, the radio will come on.
While the system is on, pushing the ON·OFF/
VOLUME control knob turns the system off.
Turn the ON·OFF/VOLUME control knob to
adjust the volume.
AUDIO button:
Push the AUDIO button to change the selecting
mode as follows.
BASS?TREBLE?FADER?BALANCE?
BEEP?off
Push the TUNE (
,
) or SEEK (
,
) button to adjust Bass and Treble to the
Heater, air conditioner, audio and phone systems
4-13
Page 156 of 309
Black plate (158,1)
Model "S35-D" EDITED: 2007/ 12/ 19
desired level. Use the TUNE or SEEK button
also to adjust Fader or Balance modes. Fader
adjusts the sound level between the front and
rear speakers and Balance adjusts the sound
between the right and left speakers.
To turn the Beep sound off or on, push the
TUNE button until the desired mode is dis-
played. This turns on or off the beep sound when
audio buttons are pushed.
Once the sound quality is set to the desired
level, push the AUDIO button repeatedly until
the radio or CD display appears. After 10
seconds, the radio or CD display reappears.
MUTE button:
Push the
button to mute the audio sound.
Push thebutton again to release the mute.
CLOCK button:
Push the CLOCK button to turn on or off the
CLOCK display.
See “CLOCK” in the “2. Instruments and
controls” section for the detailed clock adjust-
ment operation.DISPLAY CHANGE:
This button will work during CD operation. (See
“CD PLAY INFORMATION” later in this section) .
Radio operation
RADIO (FM/AM) band select:
Pushing the RADIO band select button will
change the band as follows:
AM?FM?AM
When RADIO button is pushed while the
ignition switch is in the ACC or ON, the radio
will come on at the station last played.
The last station played will also come on when
the ON·OFF/VOL control knob is pushed to ON.
If a compact disc is playing when the RADIO
band select button is pushed, the compact disc
will automatically be turned off and the last radio
station played will come on.
The FM stereo indicator ST will glow during FM
stereo reception. When the stereo broadcast
signal is weak, the radio will automatically
change from stereo to monaural reception.
TUNE (Tuning):
Push the TUNE button
or
for manual
tuning. To move quickly through the channels,
push and hold either side of the TUNE button
down for more than 0.5 second.
SEEK tuning:
Push the SEEK button
or
to tune from
high to low or low to high frequencies and stops
at the next broadcasting station.
SCAN tuning:
Push the SCAN button to tune from low to high
frequencies and stops at each broadcasting
station for 5 seconds. Pushing the button again
during this 5 second period will stop SCAN
tuning and the radio will remain tuned to that
station.
If the SCAN button is not pushed within 5
seconds, SCAN tuning moves to the next
station.PRESET select:
Push the PRESET A·B·C button to go to the next
PRESET. After choosing from the PRESET A, B
or C, you can select the desired station pushing
the station preset buttons
to
.
to
Station memory operations:
18 stations can be set for PRESET A, B and C.
The PRESET A, B and C function allows you to
store a combination of FM and AM stations for
easy access.
1. Push the PRESET A·B·C button to change
4-14
Heater, air conditioner, audio and phone systems
Page 157 of 309
Black plate (159,1)
Model "S35-D" EDITED: 2007/ 12/ 19
between storage banks.
2. Tune to the desired station using the SEEK,
SCAN or TUNE button.
3. Push and hold any of the desired station
preset buttons (1-6) until a beep sound is
heard. (The radio mutes when the select
button is pushed.)
4. The station indicator will then come on and
the sound will resume. Memorizing is now
complete.
5. Other buttons can be set in the same
manner.
If the battery cable is disconnected, or if the fuse
opens, the radio memory will be erased. In that
case, reset the desired stations.
Compact Disc (CD) player operationTurn the ignition switch to the ACC or ON
position and insert the compact disc into the slot
with the label side facing up. The compact disc
will be guided automatically into the slot and
start playing.
After loading the disc, the number of tracks on
the disc will appear on the display.
If the radio is already operating, it will auto-
matically turn off and the compact disc will play.
If the system has been turned off while thecompact disc was playing, pushing the
ON·OFF/VOL control knob will start the com-
pact disc.
Do not use 3.1 in (8 cm) discs.
CD PLAY:
When the CD (CD play) button is pushed with
the system off and the compact disc loaded, the
system will turn on and the compact disc will
start to play.
When the CD button is pushed with the
compact disc loaded but the radio playing, the
radio will automatically be turned off and the
compact disc will start to play.CD PLAY INFORMATION:
When the DISP button is pushed for less than
1.5 seconds while the CD is being played, the
disc information display will change as follows:
When the DISP button is pushed for longer than
1.5 seconds, the disc information display will
change automatically in the above order.
FF (Fast Forward) , REW (Re-
wind):
When the(fast forward) or
(rewind)
button is pushed while the compact disc is
being played, the compact disc will play while
fast forwarding or rewinding. When the button is
released, the compact disc will return to normal
play speed.
APS (Automatic Program
Search) FF, APS REW/TRACK CHANGE:
When the(APS FF) button is pushed while
the compact disc is being played, the program
next to the present one will start to play from its
beginning. Push several times to skip through
programs. The compact disc will advance the
number of times the button is pushed. (When
the last program on the compact disc is skipped
through, the first program will be played.) When
the
(APS REW) button is pushed, the
program being played returns to its beginning.
Push several times to skip back through
programs. The compact disc will go back the
number of times the button is pushed.
SCAN tuning:
When the SCAN tuning button is pushed while
the CD is being played, the beginning of all the
tracks of CD will be played for 10 seconds in
Heater, air conditioner, audio and phone systems
4-15