buttons NISSAN ROGUE 2014 2.G Quick Reference Guide
[x] Cancel search | Manufacturer: NISSAN, Model Year: 2014, Model line: ROGUE, Model: NISSAN ROGUE 2014 2.GPages: 28, PDF Size: 2.11 MB
Page 17 of 28

15
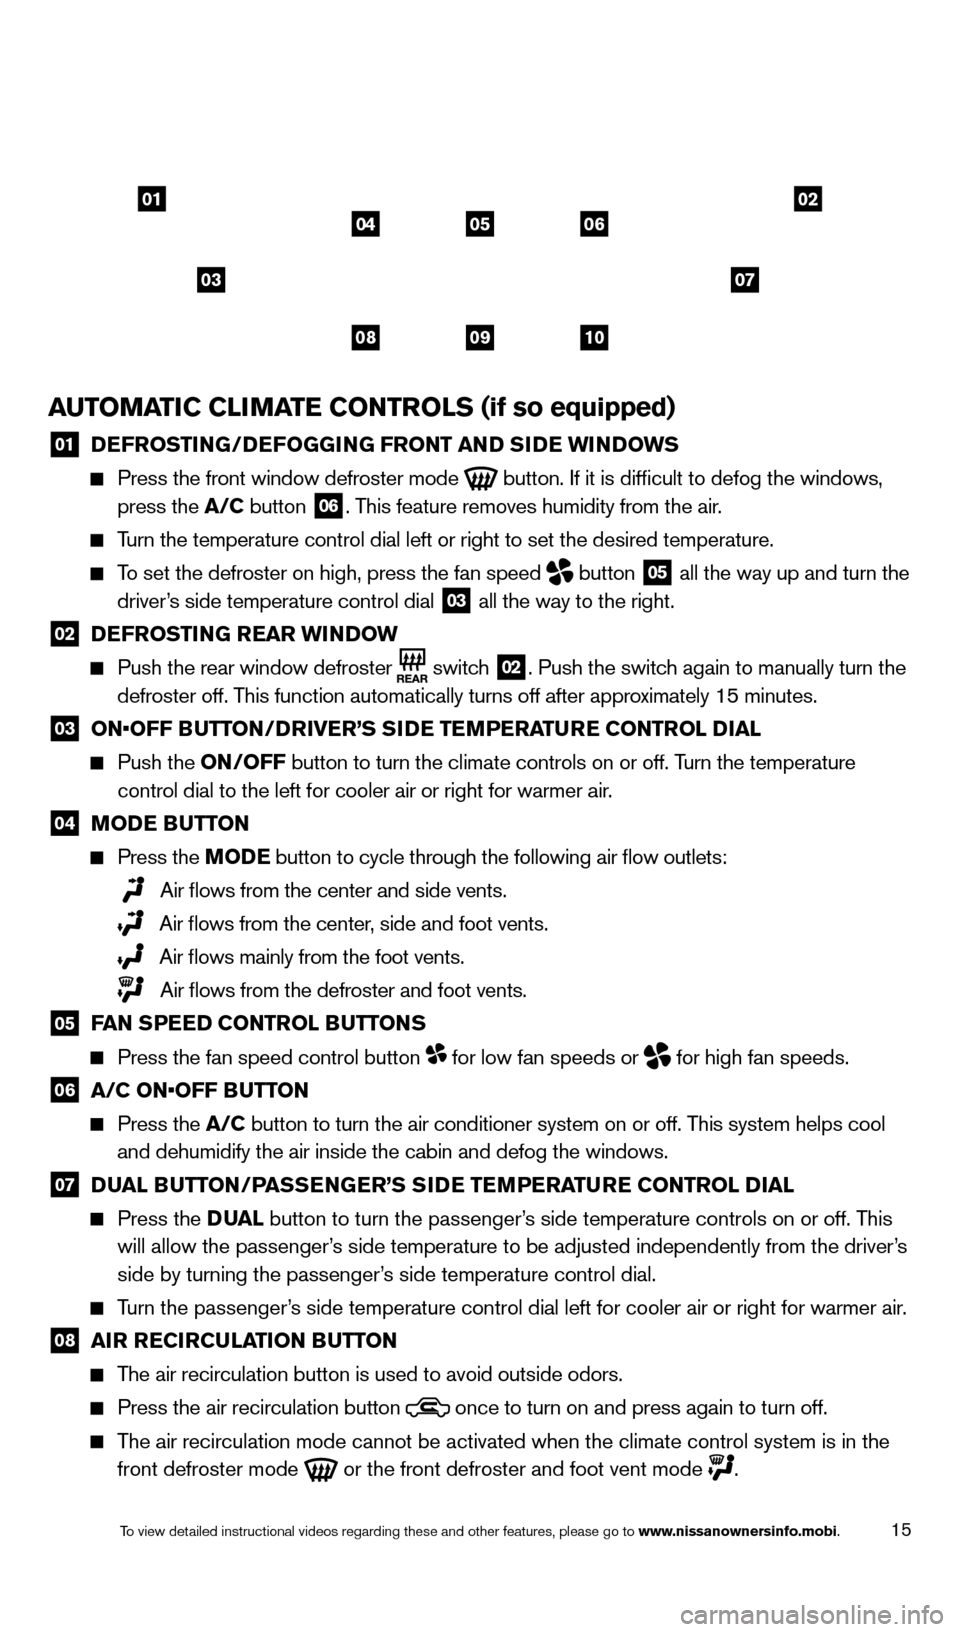
AUTOMATIC CLIMATE CONTROLS (if so equipped)
01 DEFROSTING/DEFOGGING FRONT AND SIDE WINDOWS Press the front window defroster mode
button. If it is difficult to defog the windows,
press the A/C button 06. This feature removes humidity from the air.
Turn the temperature control dial left or right to set the desired temper\
ature.
To set the defroster on high, press the fan speed
button
05 all the way up and turn the
driver’s side temperature control dial
03 all the way to the right.
02 DE FROSTING REAR WINDOW Push the rear window defroster
switch
02. Push the switch again to manually turn the
defroster off. This function automatically turns off after approximately 15 minutes.
03 ON•OFF B UTTON/DRIVER’S SIDE TEMPERATURE CONTROL DIAL Push the
ON/OFF button to turn the climate controls on or off. T urn the temperature
control dial to the left for cooler air or right for warmer air.
04 MODE BUTTON
Press the M ODE button to cycle through the following air flow outlets:
Air flows from the center and side vents.
Air flows from the center, side and foot vents.
Air flows mainly from the foot vents.
Air flows from the defroster and foot vents.
05 FAN SPEED CONTROL BUTTONS Press the fan speed control button for low fan speeds or
for high fan speeds.
06 A/C ON•OFF B UTTON Press the
A/C button to turn the air conditioner system on or off. This system helps cool
and dehumidify the air inside the cabin and defog the windows.
07 DU AL BUTTON/PASSENGER’S SIDE TEMPERATURE CONTROL DIAL Press the
D UA L button to turn the passenger’s side temperature controls on or off. This
will allow the passenger’s side temperature to be adjusted independently from the driver’s
side by turning the passenger’s side temperature control dial.
Turn the passenger’s side temperature control dial left for cooler air or right for warmer \
air.
08 AIR R ECIRCULATION BUTTON The air recirculation button is used to avoid outside odors.
Press the air recirculation button
once to turn on and press again to turn off.
The air recirculation mode cannot be activated when the climate control s\
ystem is in the
front defroster mode
or the front defroster and foot vent mode .
01
03
0205
09
04
08
06
10
07
1766904_14d_Rogue_QRG_062514.indd 156/25/14 3:29 PM
To view detailed instructional videos regarding these and other features, please go\
to www.nissanownersinfo.mobi.
Page 18 of 28

16
FIRST DRIVE FEATURES
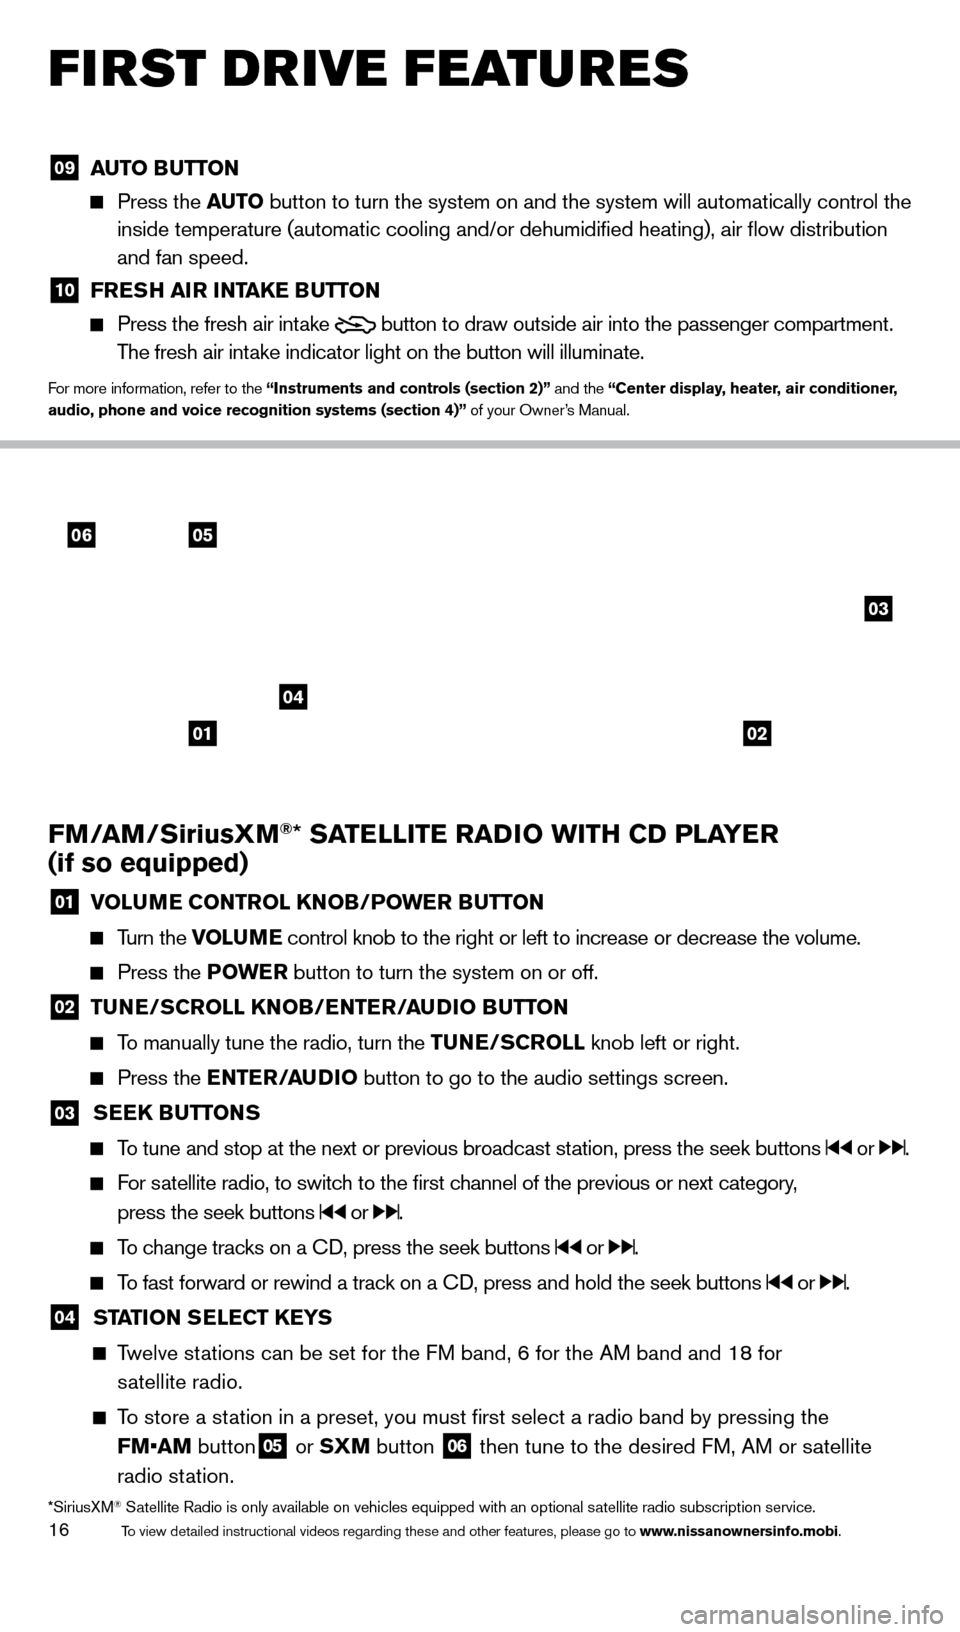
FM/AM/SiriusXM®* SATELLITE RADIO WITH CD PLAYER
(if so equipped)
01 VOLU ME CONTROL KNOB/POWER BUTTON
Turn the VOLUME control knob to the right or left to increase or decrease the volume.
Press the P
OWE R button to turn the system on or off.
02 TUNE/SCROLL KNOB/ENTER/AUDIO BUTTON
To manually tune the radio, turn the TUNE/SCROLL
knob left or right.
Press the ENTER/AUDIO button to go to the audio settings screen.
03 SEEK BUTTONS
To tune and stop at the next or previous broadcast station, press the seek buttons or .
For satellite radio, to switch to the first channel of the previous or next category,
press the seek buttons
or .
To change tracks on a CD, press the seek buttons or .
To fast forward or rewind a track on a CD, press and hold the seek buttons or .
04 STA TION SELECT KEYS
Twelve stations can be set for the FM band, 6 for the AM band and 18 for
s
atellite radio.
To store a station in a preset, you must first select a radio band by pressing the \
FM•AM button
05 or SXM button 06 then tune to the desired FM, AM or satellite
radio station.
*SiriusXM® Satellite Radio is only available on vehicles equipped with an optional s\
atellite radio subscription service.
06
04
03
05
0102
09 AUT O BUTTON Press the
AUT O button to turn the system on and the system will automatically control \
the
inside temperature (automatic cooling and/or dehumidified heating), \
air flow distribution
and fan speed.
10 FRE SH AIR INTAKE BUTTON Press the fresh air intake
button to draw outside air into the passenger compartment.
The fresh air intake indicator light on the button will illuminate.
For more information, refer to the “Instruments and controls (section 2)” and the “Center display, heater, air conditioner,
audio, phone and voice recognition systems (section 4)” of your Owner’s Manual.
1766904_14d_Rogue_QRG_062514.indd 166/25/14 3:29 PM
To view detailed instructional videos regarding these and other features, please go\
to www.nissanownersinfo.mobi.
Page 21 of 28

19
SYSTEM GUIDE
VEHICLE INFORMATION DISPLAY
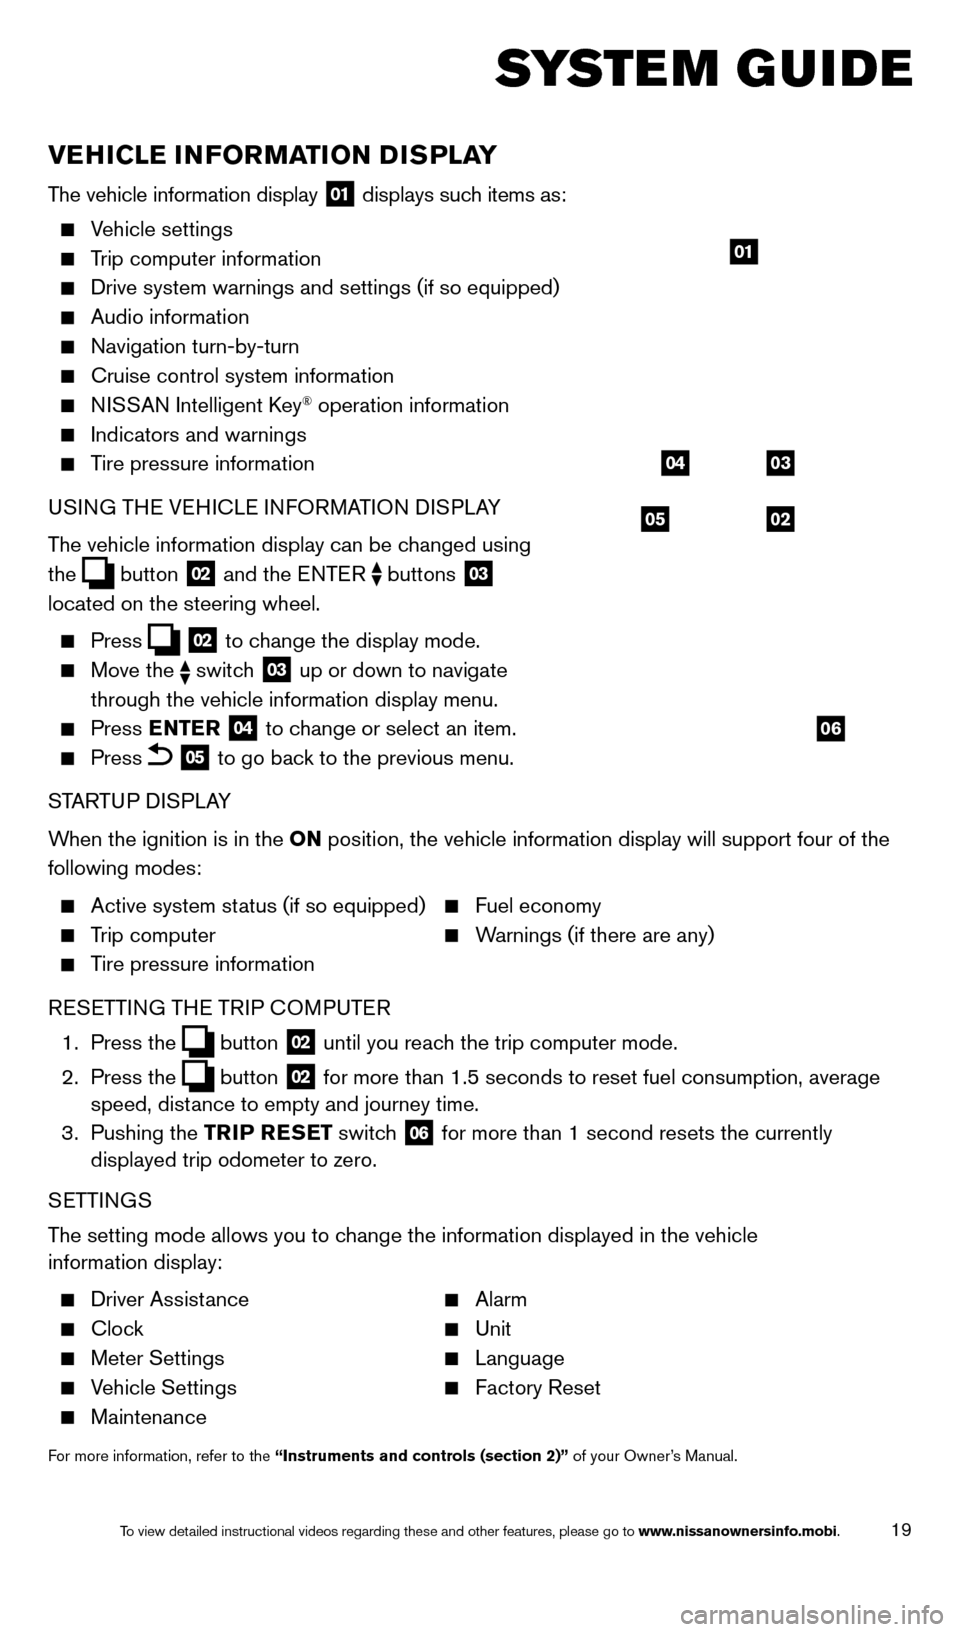
The vehicle information display 01 displays such items as:
Vehicle settings
Trip computer information
Drive system warnings and settings (if so equipped)
Audio information
Navigation turn-by-turn
Cruise control system information
NISSAN Intelligent Key® operation information
Indicators and warnings
Tire pressure information
USI NG THE VEHICLE INFORMATION DISPLAY
The vehicle information display can be changed using
the
button 02 and the ENTER buttons 03
located on the steering wheel.
Press 02 to change the display mode.
Move the switch 03 up or down to navigate
through the vehicle information display menu.
Press ENTER 04 to change or select an item.
Press 05 to go back to the previous menu.
STARTUP DISPLAY
When the ignition is in the ON position, the vehicle information display will support four of the
following modes:
Active system status (if so equipped) Fuel economy
Trip computer Warnings (if there are any)
Tire pressure information
R
ESETTING THE TRIP COMPUTER
1.
Press
the
button 02 until you reach the trip computer mode.
2.
Press
the
button 02 for more than 1.5 seconds to reset fuel consumption, average
speed, distance to empty and journey time.
3.
Pushing
the TRIP RESET switch
06 for more than 1 second resets the currently
displayed trip odometer to zero.
SETTINGS
The setting mode allows you to change the information displayed in the vehicle
information display:
Driver Assistance Alarm
Clock Unit
Meter Settings Language
Vehicle Settings Factory Reset
Maintenance
For more information, refer to the “Instruments and controls (section 2)” of your Owner’s Manual.
05
03
02
04
06
01
1766904_14d_Rogue_QRG_062514.indd 196/25/14 3:30 PM
To view detailed instructional videos regarding these and other features, please go\
to www.nissanownersinfo.mobi.
Page 26 of 28

24
SYSTEM GUIDE
HOMELINK® UNIVERSAL TRANSCEIVER (if so equipped)
The HomeLink® Universal Transceiver can learn and consolidate the functions of up to 3
different hand-held transmitters, operating items such as garage doors, property gates,
outdoor and indoor lights or alarm systems.
To program the HomeLink® Universal Transceiver:
• Position the handheld transceiver 1-3 in (26-
76 mm) away from the HomeLink surface,
keeping the HomeLink indicator light in view.
• Press and hold the desired HomeLink button and the handheld transmitter \
button
simultaneously until the HomeLink indicator light flashes slowly and then ra\
pidly
.
• Both buttons may be released when the indicator light flashes rapidly
.
To verify the programing is complete, press and hold the HomeLink button \
and observe the
indicator light:
• A solid, continuous light indicates the programing is complete and the H\
omeLink button
will activate your device.
• A blinking light that turns to a solid, continuous light after 2 seconds\
indicates additional
steps are required to complete the programing.
An additional person may make the remaining steps easier. T o complete the
programing process:
• At the receiver of the device that you are programing to the HomeLink bu\
tton, press
and release the learn or smart button (the name may vary by manufacture\
r
, but it is
usually located near where the hanging antenna wire is attached to the unit). You have
approximately 30 seconds to initiate the following step.
• Press and hold the programed HomeLink button for 2 seconds and release.
You may have to repeat the previous 2 steps up to 3 times to complete the\
programing
process. HomeLink should now activate your device.
For more information, refer to the “Instruments and controls (section 2)” of your Owner’s Manual, the HomeLink website at
www.homelink.com or call 1-800-355-3515.
HOMELINK
1766904_14d_Rogue_QRG_062514.indd 246/25/14 3:30 PM
To view detailed instructional videos regarding these and other features, please go\
to www.nissanownersinfo.mobi.