instrument panel NISSAN ROGUE 2015 2.G Quick Reference Guide
[x] Cancel search | Manufacturer: NISSAN, Model Year: 2015, Model line: ROGUE, Model: NISSAN ROGUE 2015 2.GPages: 32, PDF Size: 2.92 MB
Page 5 of 32
3
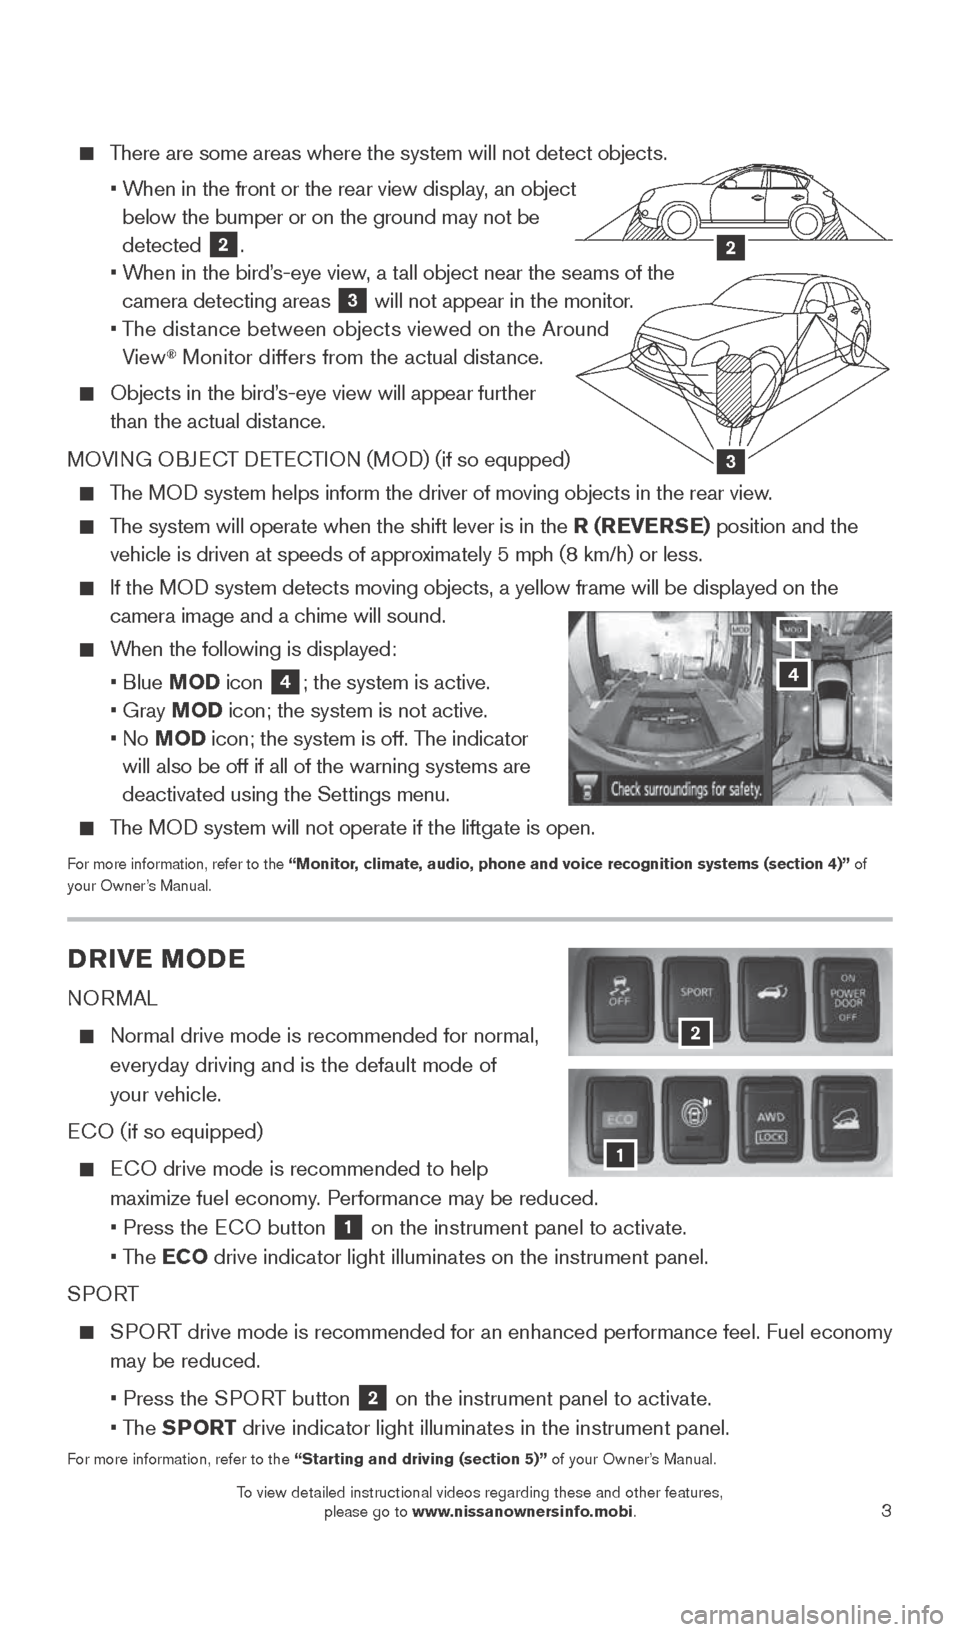
There are some areas where the system will not detect objects.
• When in the front or the rear view display, an object
below the bumper or on the ground may not be
detected
2.
• When in the bird’s-eye view, a tall object near the seams of the
camera detecting areas
3 will not appear in the monitor.
• The distance between objects viewed on the Around
View
® Monitor differs from the actual distance.
Objects in the bird’s-eye view will appear further
than the actual distance.
MOVING OBJECT DETECTION (MOD) (if so equpped)
The MOD system helps inform the driver of moving objects in the rear view.
The system will operate when the shift lever is in the R (REVERSE) position and the
vehicle is driven at speeds of approximately 5 mph (8 km/h) or less.
If the MOD system detects moving objects, a yellow frame will be displayed on the\
camera image and a chime will sound.
When the following is displayed:
• Blue MOD icon
4; the system is active.
• Gray MOD icon; the system is not active.
• No MOD icon; the system is off. The indicator
will also be off if all of the warning systems are
deactivated using the Settings menu.
The MOD system will not operate if the liftgate is open.
For more information, refer to the “Monitor, climate, audio, phone and voice recognition systems (section 4)” of
your Owner’s Manual.
3
2
DRIVE MODE
NORMAL
Normal drive mode is recommended for normal,
everyday driving and is the default mode of
your vehicle.
ECO (if so equipped)
ECO drive mode is recommended to help
maximize fuel economy. Performance may be reduced.
• Press the ECO button
1 on the instrument panel to activate.
• The ECO drive indicator light illuminates on the instrument panel.
SPORT
SPORT drive mode is recommended for an enhanced performance feel. Fuel econ\
omy
may be reduced.
• Press the SPORT button
2 on the instrument panel to activate.
• The SPORT drive indicator light illuminates in the instrument panel.
For more information, refer to the “Starting and driving (section 5)” of your Owner’s Manual.
2
1
4
1904704_15d_Rogue_QRG_031915.indd 33/19/15 1:21 PM
To view detailed instructional videos regarding these and other features, please go to www.nissanownersinfo.mobi.
To view detailed instructional videos regarding these and other features, please go to www.nissanownersinfo.mobi.
Page 6 of 32
4
LANE DEPARTURE WARNING (LDW) (if so equipped)
The LDW system helps alert the driver when the vehicle is traveling too close to
either the left or the right side of a traveling lane.
The system will operate when the vehicle is driven at speeds of approximately
45 mph (70 km/h) and above and only when the lane markings are clearly visible
on the road.
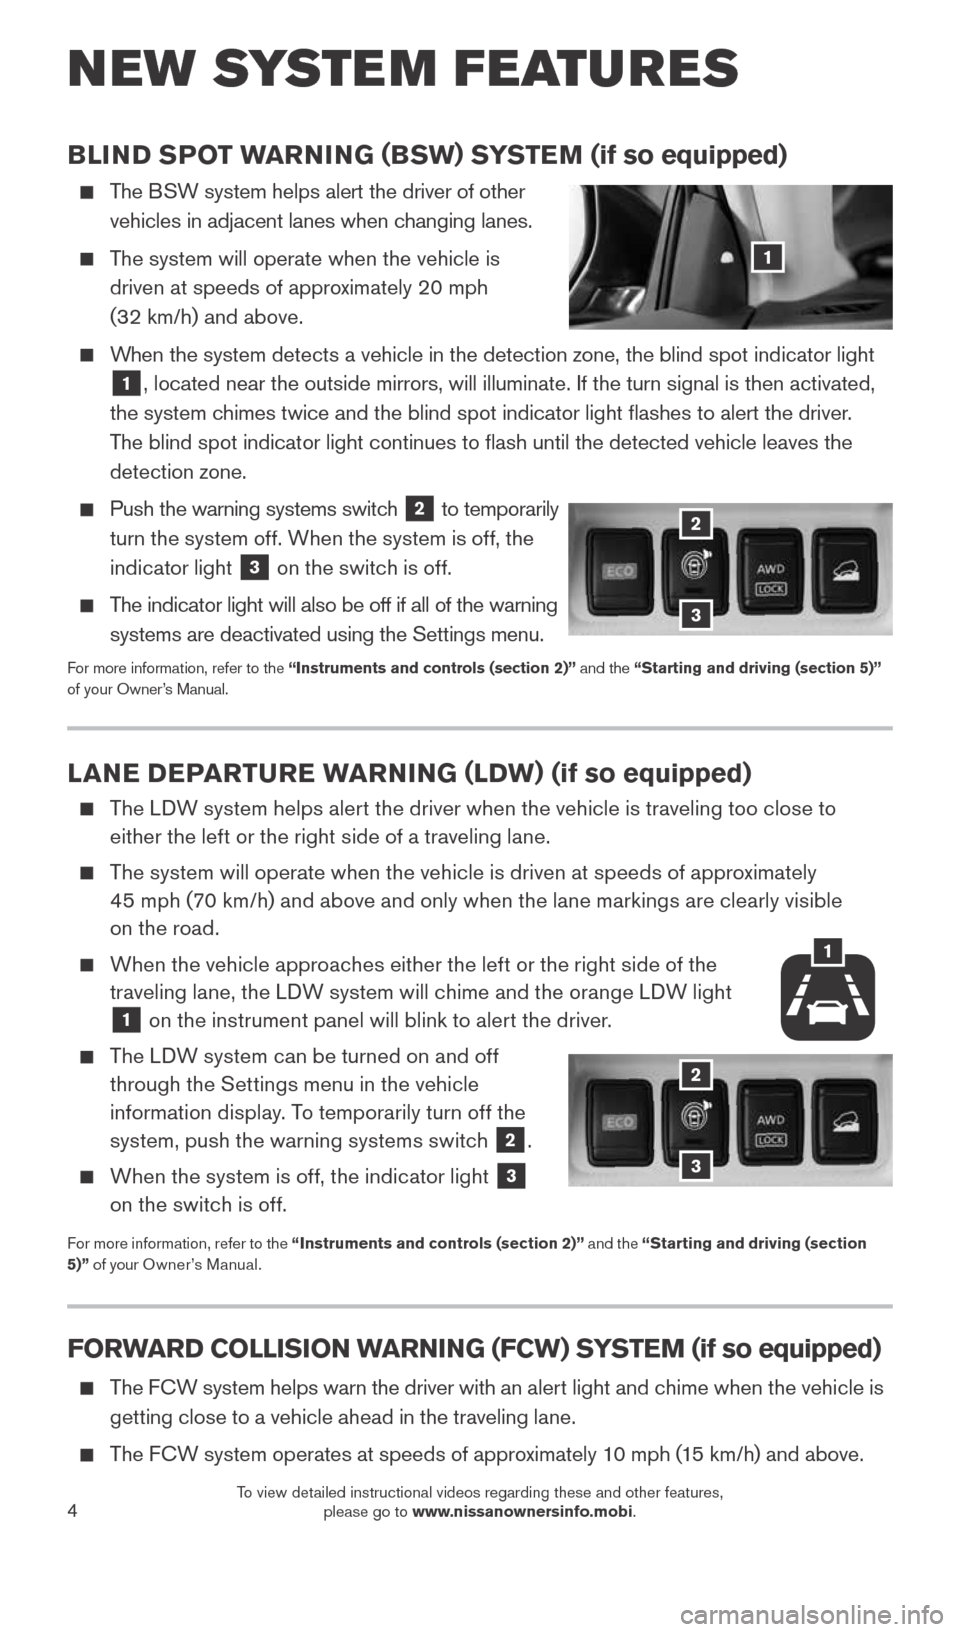
When the vehicle approaches either the left or the right side of the
traveling lane, the LDW system will chime and the orange LDW light
1 on the instrument panel will blink to alert the driver.
The LDW system can be turned on and off
through the Settings menu in the vehicle
information display. To temporarily turn off the
system, push the warning systems switch
2.
When the system is off, the indicator light
3
on the switch is off.
For more information, refer to the “Instruments and controls (section 2)” and the “Starting and driving (section
5)” of your Owner’s Manual.
BLIND SPOT WARNING (BSW) SYSTEM (if so equipped)
The BSW system helps alert the driver of other
vehicles in adjacent lanes when changing lanes.
The system will operate when the vehicle is
driven at speeds of approximately 20 mph
(32 km/h) and above.
When the system detects a vehicle in the detection zone, the blind spot i\
ndicator light
1, located near the outside mirrors, will illuminate. If the turn signal \
is then activated,
the system chimes twice and the blind spot indicator light flashes to alert the dr\
iver.
The blind spot indicator light continues to flash until the detected ve\
hicle leaves the
detection zone.
Push the warning systems switch
2 to temporarily
turn the system off. When the system is off, the
indicator light
3 on the switch is off.
The indicator light will also be off if all of the warning
systems are deactivated using the Settings menu.
For more information, refer to the “Instruments and controls (section 2)” and the “Starting and driving (section 5)”
of your Owner’s Manual.
NEW SYSTEM FEATURES
1
2
3
FORWARD COLLISION WARNING (FCW) SYSTEM (if so equipped)
The FCW system helps warn the driver with an aler t light and chime when the vehicle is
getting close to a vehicle ahead in the traveling lane.
The FCW system operates at speeds of approximately 10 mph (15 km/h) and above.
2
3
1
1904704_15d_Rogue_QRG_031915.indd 43/19/15 1:21 PM
To view detailed instructional videos regarding these and other features, please go to www.nissanownersinfo.mobi.
Page 10 of 32
8
LOOSE FUEL CAP
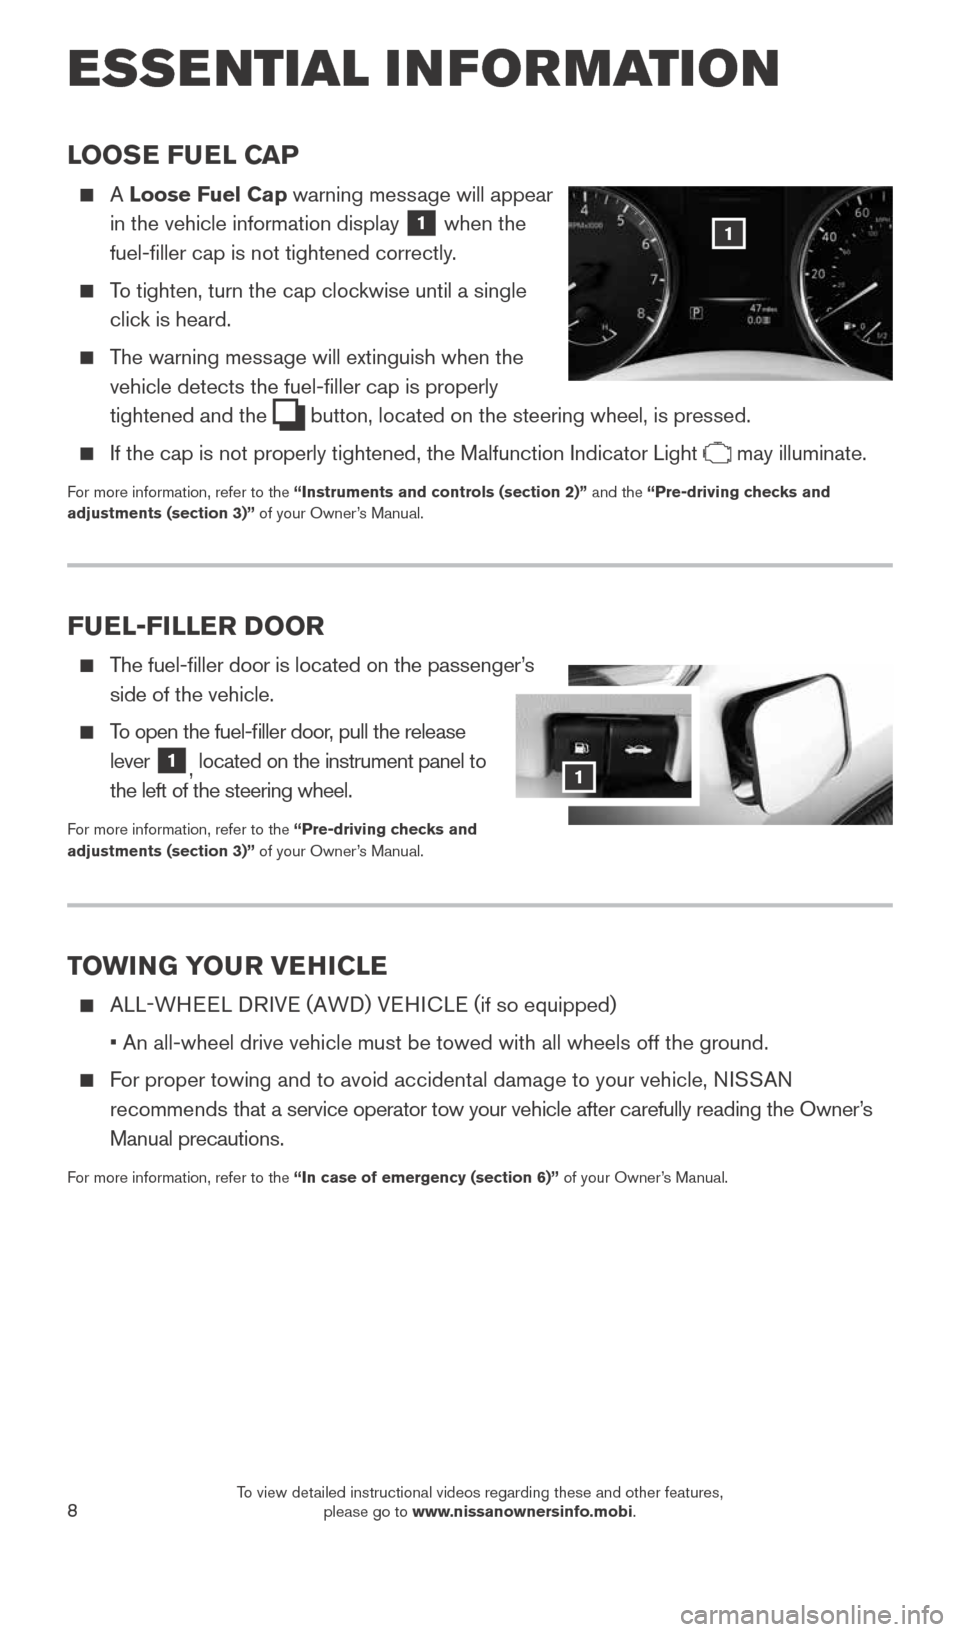
A Loose Fuel Cap warning message will appear
in the vehicle information display
1 when the
fuel-filler cap is not tightened correctly.
To tighten, turn the cap clockwise until a single
click is heard.
The warning message will extinguish when the
vehicle detects the fuel-filler cap is properly
tightened and the
button, located on the steering wheel, is pressed.
If the cap is not properly tightened, the Malfunction Indicator Light may illuminate.
For more information, refer to the “Instruments and controls (section 2)” and the “Pre-driving checks and
adjustments (section 3)” of your Owner’s Manual.
1
TOWING YOUR VEHICLE
ALL-WHEEL DRIVE (AWD) VEHICLE ( if so equipped)
• An all-wheel drive vehicle must be towed with all wheels off the gr\
ound.
For proper towing and to avoid accidental damage to your vehicle, NISSAN
recommends that a service operator tow your vehicle after carefully reading the Own\
er’s
Manual precautions.
For more information, refer to the “In case of emergency (section 6)” of your Owner’s Manual.
FUEL-FILLER DOOR
The fuel-filler door is located on the passenger’s
side of the vehicle.
To open the fuel-filler door, pull the release
lever
1, located on the instrument panel to
the left of the steering wheel.
For more information, refer to the “Pre-driving checks and
adjustments (section 3)” of your Owner’s Manual.
1
ESSE NTIAL I N FOR MATION
1904704_15d_Rogue_QRG_031915.indd 83/19/15 1:22 PM
To view detailed instructional videos regarding these and other features, please go to www.nissanownersinfo.mobi.
Page 14 of 32
12
POWER LIFTGATE (if so equipped)
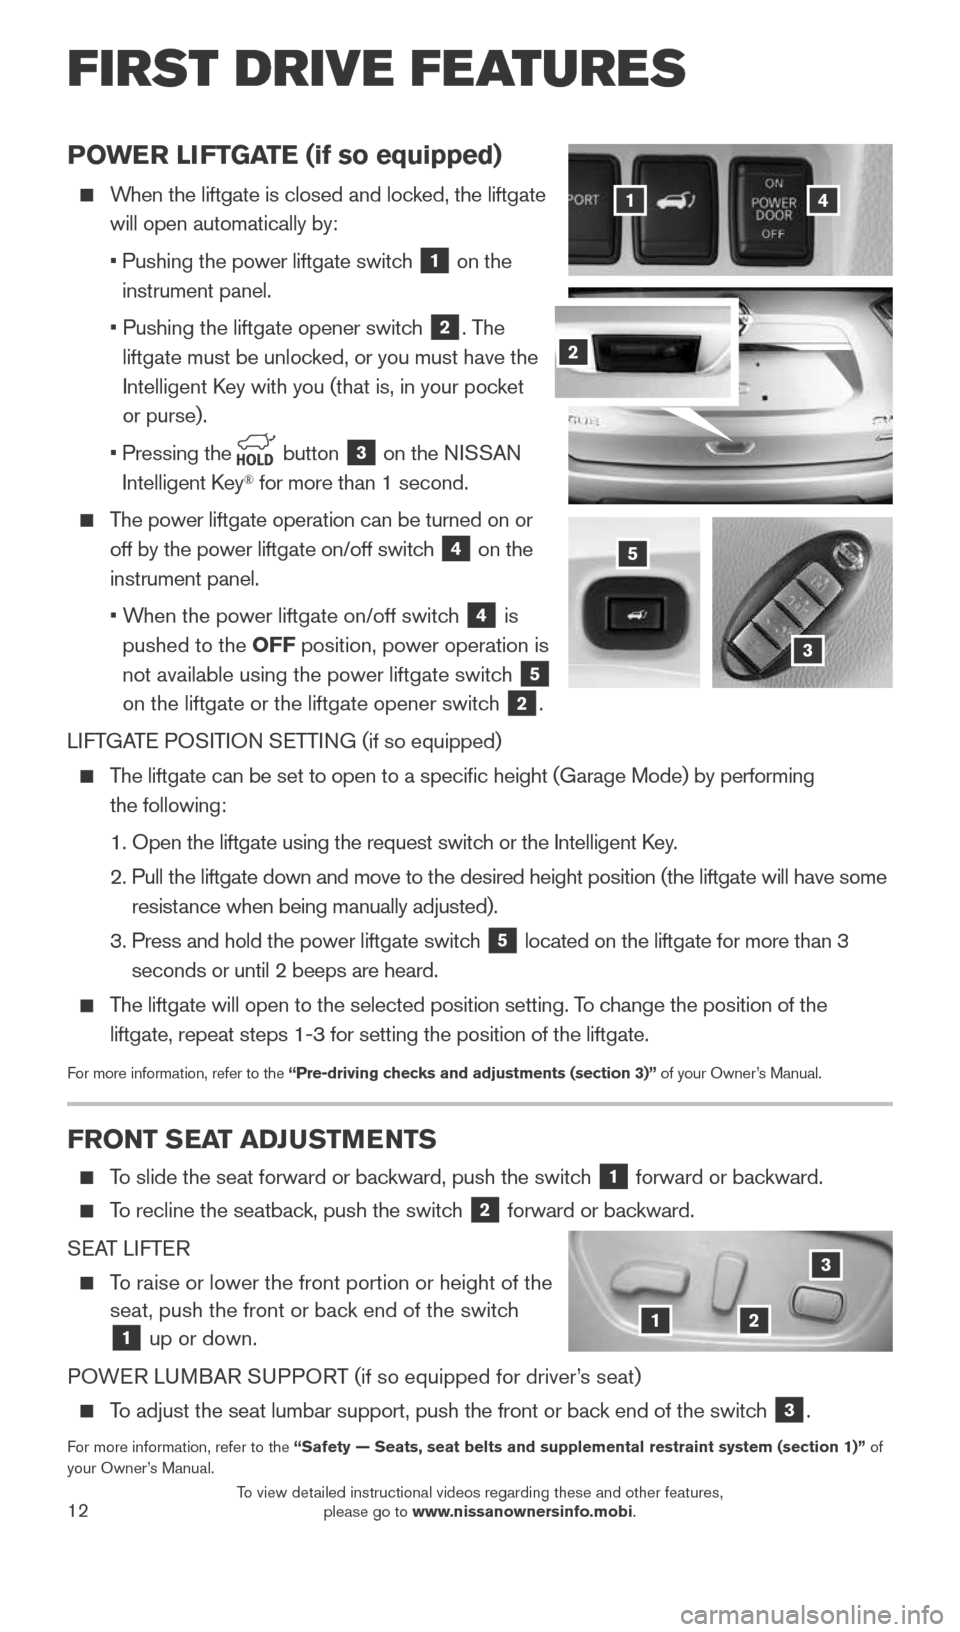
When the liftgate is closed and locked, the liftgate
will open automatically by:
• Pushing the power liftgate switch
1 on the
instrument panel.
• Pushing the liftgate opener switch
2. The
liftgate must be unlocked, or you must have the
Intelligent Key with you (that is, in your pocket
or purse).
• Pressing the
button 3 on the NISSAN
Intelligent Key® for more than 1 second.
The power liftgate operation can be turned on or
off by the power liftgate on/off switch
4 on the
instrument panel.
• When the power liftgate on/off switch
4 is
pushed to the OFF position, power operation is
not available using the power liftgate switch
5
on the liftgate or the liftgate opener switch
2.
LIFTGATE POSITION SETTING (if so equipped)
The liftgate can be set to open to a specific height (Garage Mode) by\
performing
the following:
1. Open the liftgate using the request switch or the Intelligent Key.
2. Pull the liftgate down and move to the desired height position (the lif\
tgate will have some
resistance when being manually adjusted).
3. Press and hold the power liftgate switch
5 located on the liftgate for more than 3
seconds or until 2 beeps are heard.
The liftgate will open to the selected position setting. To change the position of the
liftgate, repeat steps 1-3 for setting the position of the liftgate.
For more information, refer to the “Pre-driving checks and adjustments (section 3)” of your Owner’s Manual.
3
41
2
5
FRONT SEAT ADJUSTMENTS
To slide the seat forward or backward, push the switch 1 forward or backward.
To recline the seatback, push the switch 2 forward or backward.
SEAT LIFTER
To raise or lower the front portion or height of the
seat, push the front or back end of the switch
1 up or down.
POWER LUMBAR SUPPORT (if so equipped for driver’s seat)
To adjust the seat lumbar support, push the front or back end of the switch 3.
For more information, refer to the “Safety — Seats, seat belts and supplemental restraint system (se\
ction 1)” of
your Owner’s Manual.
12
3
FIRST DRIVE FEATURES
1904704_15d_Rogue_QRG_031915.indd 123/19/15 1:22 PM
To view detailed instructional videos regarding these and other features, please go to www.nissanownersinfo.mobi.
Page 16 of 32
14
HEADLIGHT CONTROL SWITCH
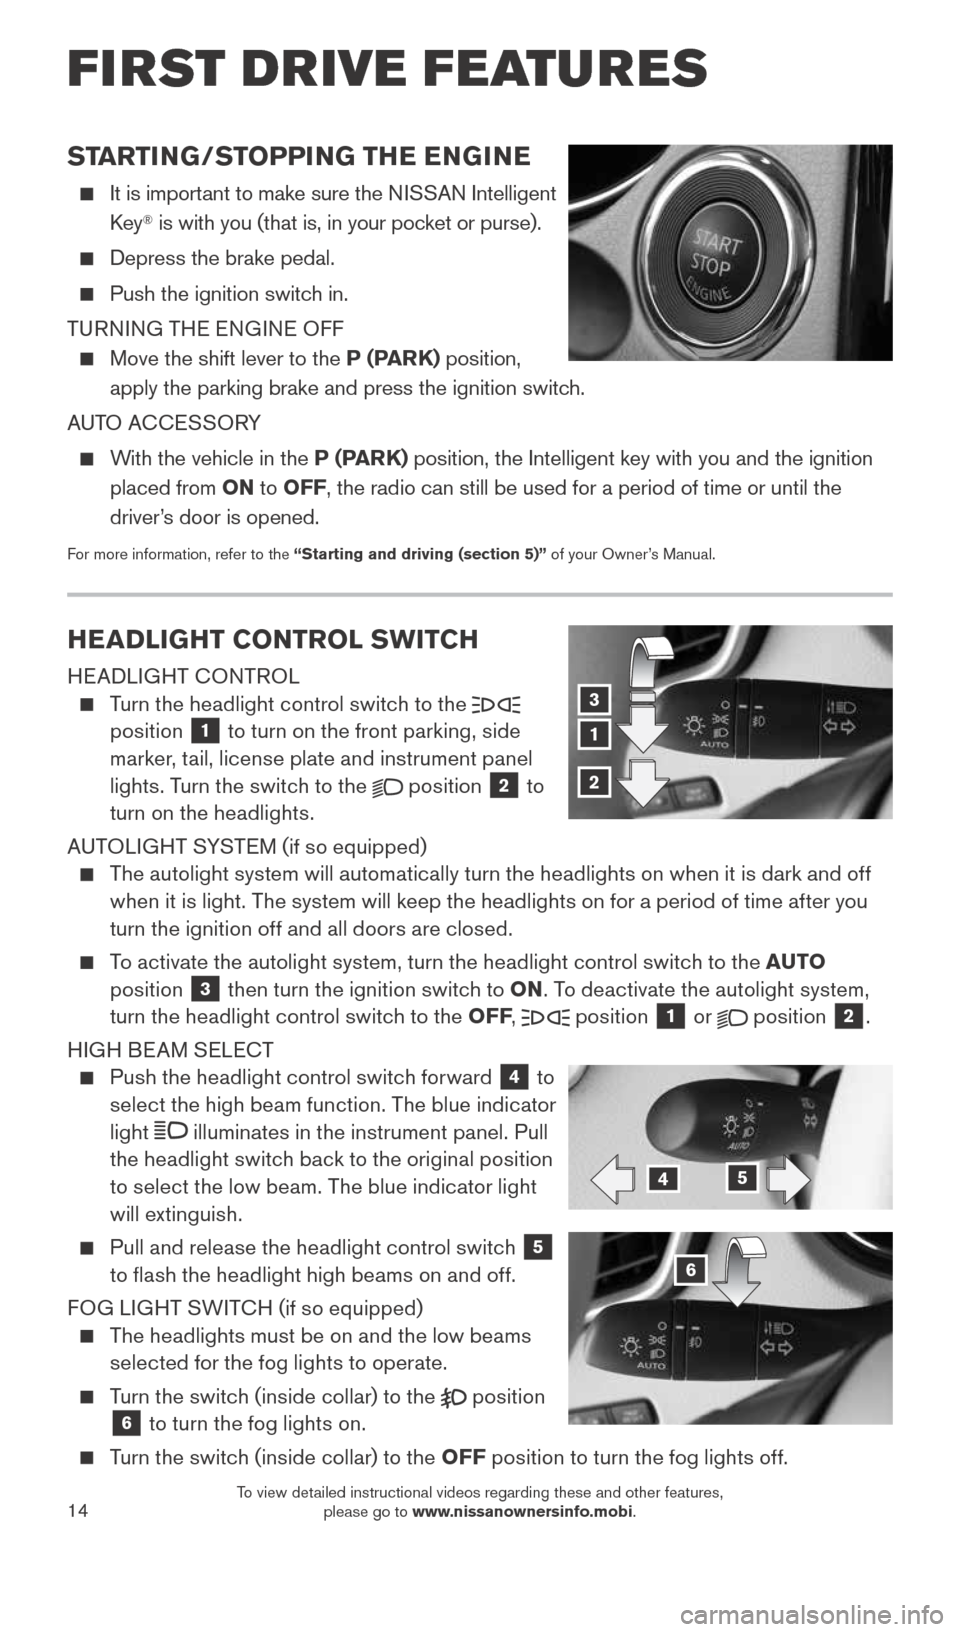
HEADLIGHT CONTROL
Turn the headlight control switch to the
position 1 to turn on the front parking, side
marker, tail, license plate and instrument panel
lights. Turn the switch to the
position 2 to
turn on the headlights.
AUTOLIGHT SYSTEM (if so equipped)
The autolight system will automatically turn the headlights on when it is dark and off
when it is light. The system will keep the headlights on for a period of time after you
turn the ignition off and all doors are closed.
To activate the autolight system, turn the headlight control switch to the AUTO
position 3 then turn the ignition switch to ON . To deactivate the autolight system,
turn the headlight control switch to the OFF ,
position
1 or
position 2.
HIGH BEAM SELECT
Push the headlight control switch forward 4 to
select the high beam function. The blue indicator
light
illuminates in the instrument panel. Pull
the headlight switch back to the original position
to select the low beam. The blue indicator light
will extinguish.
Pull and release the headlight control switch 5
to flash the headlight high beams on and off.
FOG LIGHT SWITCH (if so equipped)
The headlights must be on and the low beams
selected for the fog lights to operate.
Turn the switch (inside collar) to the
position 6 to turn the fog lights on.
Turn the switch (inside collar) to the OFF position to turn the fog lights off.
1
3
2
45
6
STARTING/STOPPING THE ENGINE
It is important to make sure the NISSAN Intelligent
Key® is with you (that is, in your pocket or purse).
Depress the brake pedal.
Push the ignition switch in.
TURNING THE ENGINE OFF
Move the shift lever to the P (PARK) position,
apply the parking brake and press the ignition switch.
AUTO ACCESSORY
With the vehicle in the P (PARK) position, the Intelligent key with you and the ignition
placed from ON to OFF, the radio can still be used for a period of time or until the
driver’s door is opened.
For more information, refer to the “Starting and driving (section 5)” of your Owner’s Manual.
FIRST DRIVE FEATURES
1904704_15d_Rogue_QRG_031915.indd 143/19/15 1:22 PM
To view detailed instructional videos regarding these and other features, please go to www.nissanownersinfo.mobi.
Page 20 of 32
18
CRUISE CONTROL
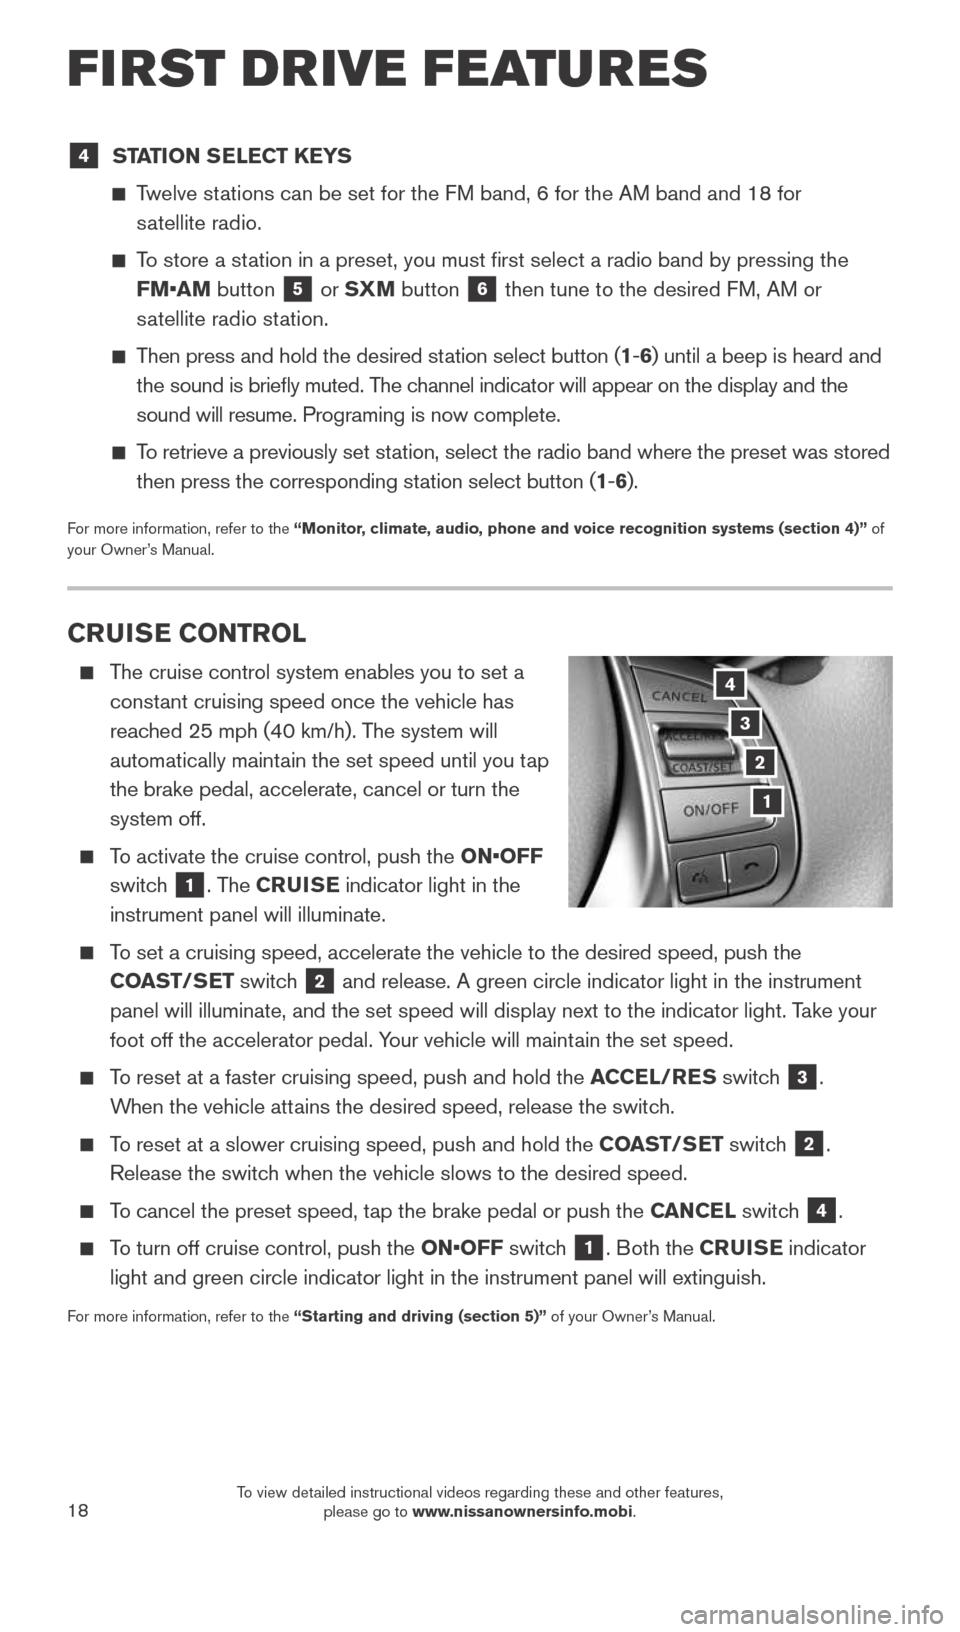
The cruise control system enables you to set a
constant cruising speed once the vehicle has
reached 25 mph (40 km/h). The system will
automatically maintain the set speed until you tap
the brake pedal, accelerate, cancel or turn the
system off.
To activate the cruise control, push the ON•OFF
switch
1. The CRUISE indicator light in the
instrument panel will illuminate.
To set a cruising speed, accelerate the vehicle to the desired speed, pus\
h the
COAST/SET switch
2 and release. A green circle indicator light in the instrument
panel will illuminate, and the set speed will display next to the indica\
tor light. Take your
foot off the accelerator pedal. Your vehicle will maintain the set speed.
To reset at a faster cruising speed, push and hold the ACCEL/RES switch 3.
When the vehicle attains the desired speed, release the switch.
To reset at a slower cruising speed, push and hold the COAST/SET switch 2.
Release the switch when the vehicle slows to the desired speed.
To cancel the preset speed, tap the brake pedal or push the CANCEL switch 4.
To turn off cruise control, push the ON•OFF switch 1. Both the CRUISE indicator
light and green circle indicator light in the instrument panel will exti\
nguish.
For more information, refer to the “Starting and driving (section 5)” of your Owner’s Manual.
3
2
1
4
4 STATION SELECT KEYS
Twelve stations can be set for the FM band, 6 for the AM band and 18 for
satellite radio.
To store a station in a preset, you must first select a radio band by pressing the \
FM•AM button
5 or SXM button 6 then tune to the desired FM, AM or
satellite radio station.
Then press and hold the desired station select button (1 -6 ) until a beep is heard and
the sound is briefly muted. The channel indicator will appear on the display and the
sound will resume. Programing is now complete.
To retrieve a previously set station, select the radio band where the preset was stored
then press the corresponding station select button (1 -6 ).
For more information, refer to the “Monitor, climate, audio, phone and voice recognition systems (section 4)” of
your Owner’s Manual.
FIRST DRIVE FEATURES
1904704_15d_Rogue_QRG_031915.indd 183/19/15 1:23 PM
To view detailed instructional videos regarding these and other features, please go to www.nissanownersinfo.mobi.
Page 26 of 32
24
SYSTEM GUIDE
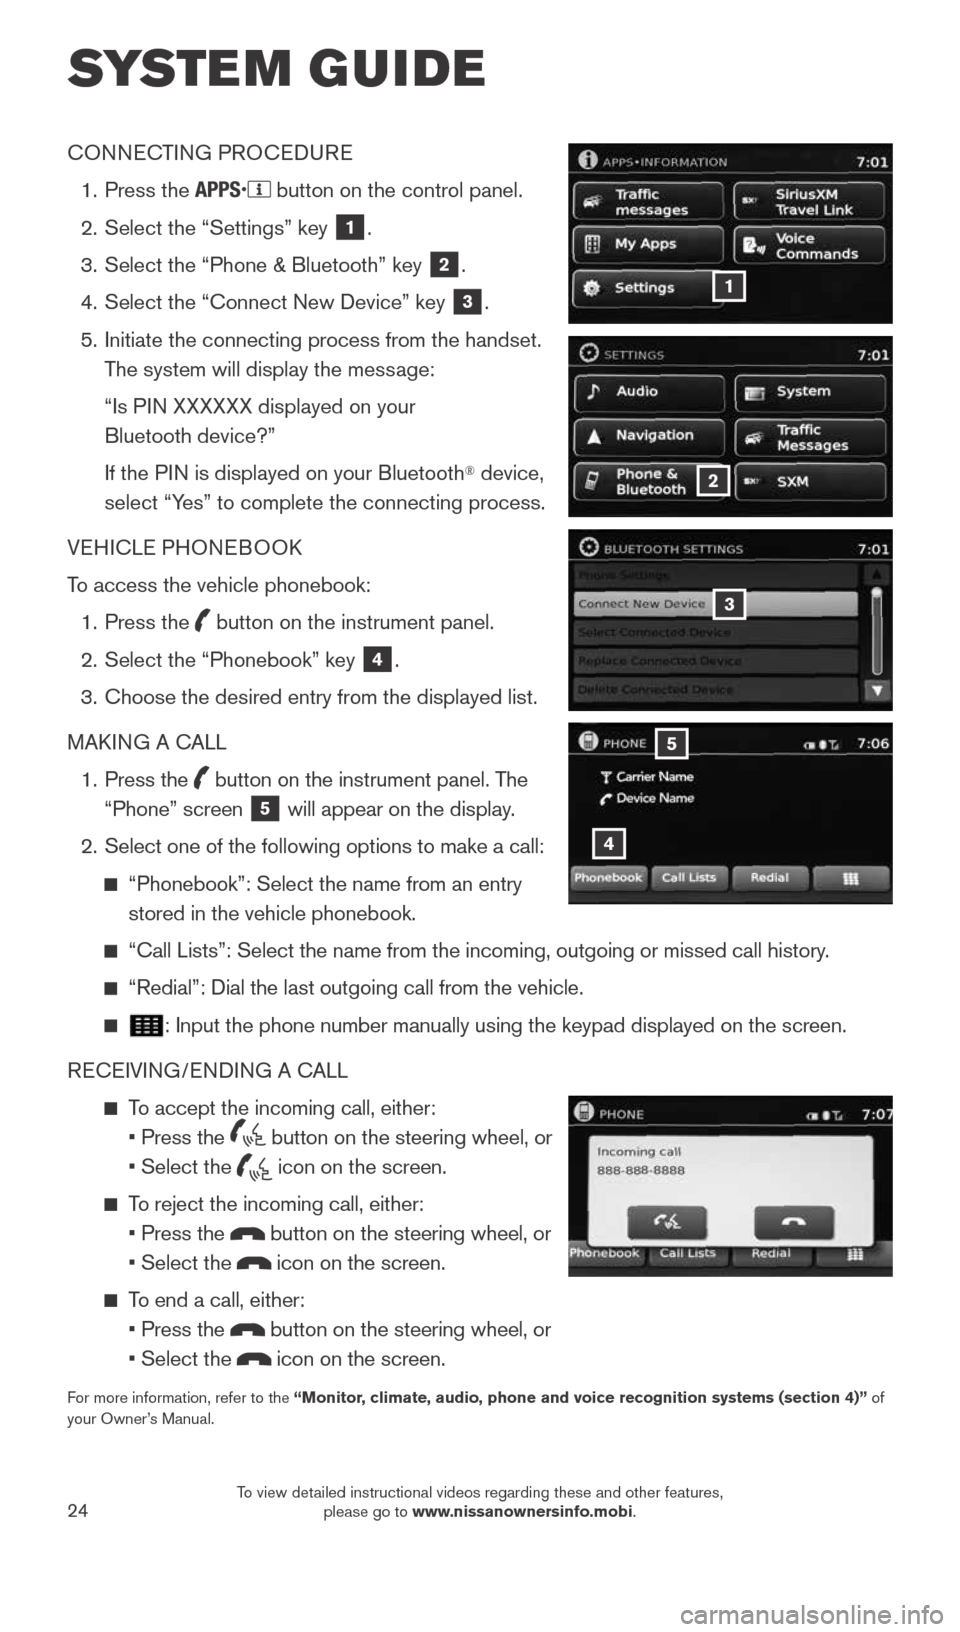
CONNECTING PROCEDURE
1. Press the
button on the control panel.
2. Select the “Settings” key
1.
3. Select the “Phone & Bluetooth” key
2.
4. Select the “Connect New Device” key
3.
5. Initiate the connecting process from the handset.
The system will display the message:
“Is PIN XXXXXX displayed on your
Bluetooth device?”
If the PIN is displayed on your Bluetooth
® device,
select “Yes” to complete the connecting process.
VEHICLE PHONEBOOK
To access the vehicle phonebook:
1. Press the
button on the instrument panel.
2. Select the “Phonebook” key
4.
3. Choose the desired entry from the displayed list.
MAKING A CALL
1. Press the
button on the instrument panel. The
“Phone” screen 5 will appear on the display.
2. Select one of the following options to make a call:
“Phonebook”: Select the name from an entry
stored in the vehicle phonebook.
“Call Lists”: Select the name from the incoming, outgoing or misse\
d call history.
“Redial”: Dial the last outgoing call from the vehicle.
: Input the phone number manually using the keypad displayed on the scree\
n.
RECEIVING/ENDING A CALL
To accept the incoming call, either:
• Press the
button on the steering wheel, or
• Select the
icon on the screen.
To reject the incoming call, either:
• Press the
button on the steering wheel, or
• Select the
icon on the screen.
To end a call, either:
• Press the
button on the steering wheel, or
• Select the
icon on the screen.
For more information, refer to the “Monitor, climate, audio, phone and voice recognition systems (section 4)” of
your Owner’s Manual.
4
5
3
2
1
1904704_15d_Rogue_QRG_031915.indd 243/19/15 1:23 PM
To view detailed instructional videos regarding these and other features, please go to www.nissanownersinfo.mobi.