key NISSAN ROGUE 2015 2.G Quick Reference Guide
[x] Cancel search | Manufacturer: NISSAN, Model Year: 2015, Model line: ROGUE, Model: NISSAN ROGUE 2015 2.GPages: 32, PDF Size: 2.92 MB
Page 3 of 32
TAB LE OF CONTE NTS
Please see your Owner’s Manual for important safety information and system operation limitations.
• A cellular telephone should not be used for any purpose while driving so\
full attention may be given
to vehicle operation.
• Always wear your seat belt.
• Supplemental air bags do not replace proper seat belt usage.
• Children 12 and under should always ride in the rear seat properly secured in child restraints or seat
belts according to their age and weight.
• Do not drink and drive.
For more information, refer to the “Safety –– Seats, seat belts and supplemental restraint system (section 1)”\
,
the “Monitor, climate, audio, phone and voice recognition systems (section 4)” and the “Starting and driving
(section 5)” of your Owner’s Manual.
Additional information about your vehicle is also available in your Owne\
r’s Manual, Navigation System
Owner’s Manual and at www.nissanusa.com.
NEW SYSTEM FEATURES Around View® Monitor with Moving Object Detection (MOD) (if so equipped) ............................. 2
Drive Mode ........................................................................\
.............................................................................. 3
Blind Spot Warning (BSW) System (if so equipped) ........................................................................\
... 4
Lane Departure Warning (LDW) (if so equipped) ........................................................................\
.......... 4
Forward Collision Warning (FCW) System (if so equipped) ............................................................... 4
Hill Start Assist (HSA) System ........................................................................\
........................................... 5
Hill Descent Control (HDC) System (if so equipped) ........................................................................\
...5
All-Wheel Drive (AWD) Indicator Light (if so equipped) ...................................................................... 5
SiriusXM Travel Link and SiriusXM Traffic (if so equipped) ................................................................ 6
ESSENTIAL INFORMATIONTire Pressure Monitoring System (TPMS) with Easy Fill Tire Alert .................................................... 7
Loose Fuel Cap ........................................................................\
...................................................................... 8
Fuel-filler Door ........................................................................\
........................................................................ 8
Towing Your Vehicle ........................................................................\
............................................................... 8
Outside Temperature Display ........................................................................\
.............................................. 9
Divide-N-Hide
® Floor (if so equipped) ........................................................................\
.............................. 9
Clock Set/Adjustment ........................................................................\
......................................................... 10
FIRST DRIVE FEATURESNISSAN Intelligent Key® System (if so equipped) ........................................................................\
....... 11
Power Liftgate (if so equipped) ........................................................................\
........................................ 12
Front Seat Adjustments ........................................................................\
...................................................... 12
2
ND Row Seats ........................................................................\
...................................................................... 13
3RD Row Seats (if so equipped) ........................................................................\
....................................... 13
Outside Mirror Control Switch ........................................................................\
.......................................... 13
Starting/Stopping the Engine ........................................................................\
........................................... 14
Headlight Control Switch ........................................................................\
................................................... 14
Windshield Wiper and Washer Switch ........................................................................\
........................... 15
Automatic Climate Controls (if so equipped) ........................................................................\
................ 16
FM/AM/SiriusXM
® Satellite Radio with CD Player (if so equipped) ............................................... 17
Cruise Control ........................................................................\
...................................................................... 18
USB (Universal Serial Bus) Connection Port/Aux Jack and iPod
® Interface ................................. 19
Power Panoramic Moonroof (if so equipped) ........................................................................\
............... 19
Center Console Storage Box ........................................................................\
............................................ 19
Tilt and Telescopic Steering Wheel Adjustments ........................................................................\
......... 19
SYSTEM GUIDEVehicle Information Display ........................................................................\
................................................20
NissanConnectSM Mobile Apps ........................................................................\
........................................ 21
Text Messaging (if so equipped) ........................................................................\
...................................... 21
Bluetooth
® Hands-free Phone System ........................................................................\
........................... 22
• System Operating Tips ........................................................................\
............................................... 22
Bluetooth
® System without Navigation (if so equipped) .................................................................... 22
Bluetooth® System with Navigation (if so equipped) ........................................................................\
.. 23
Navigation System (if so equipped) ........................................................................\
................................. 25
1904704_15d_Rogue_QRG_031915.indd 53/19/15 1:21 PM
Page 12 of 32
10
CLOCK SET/ADJUSTMENT
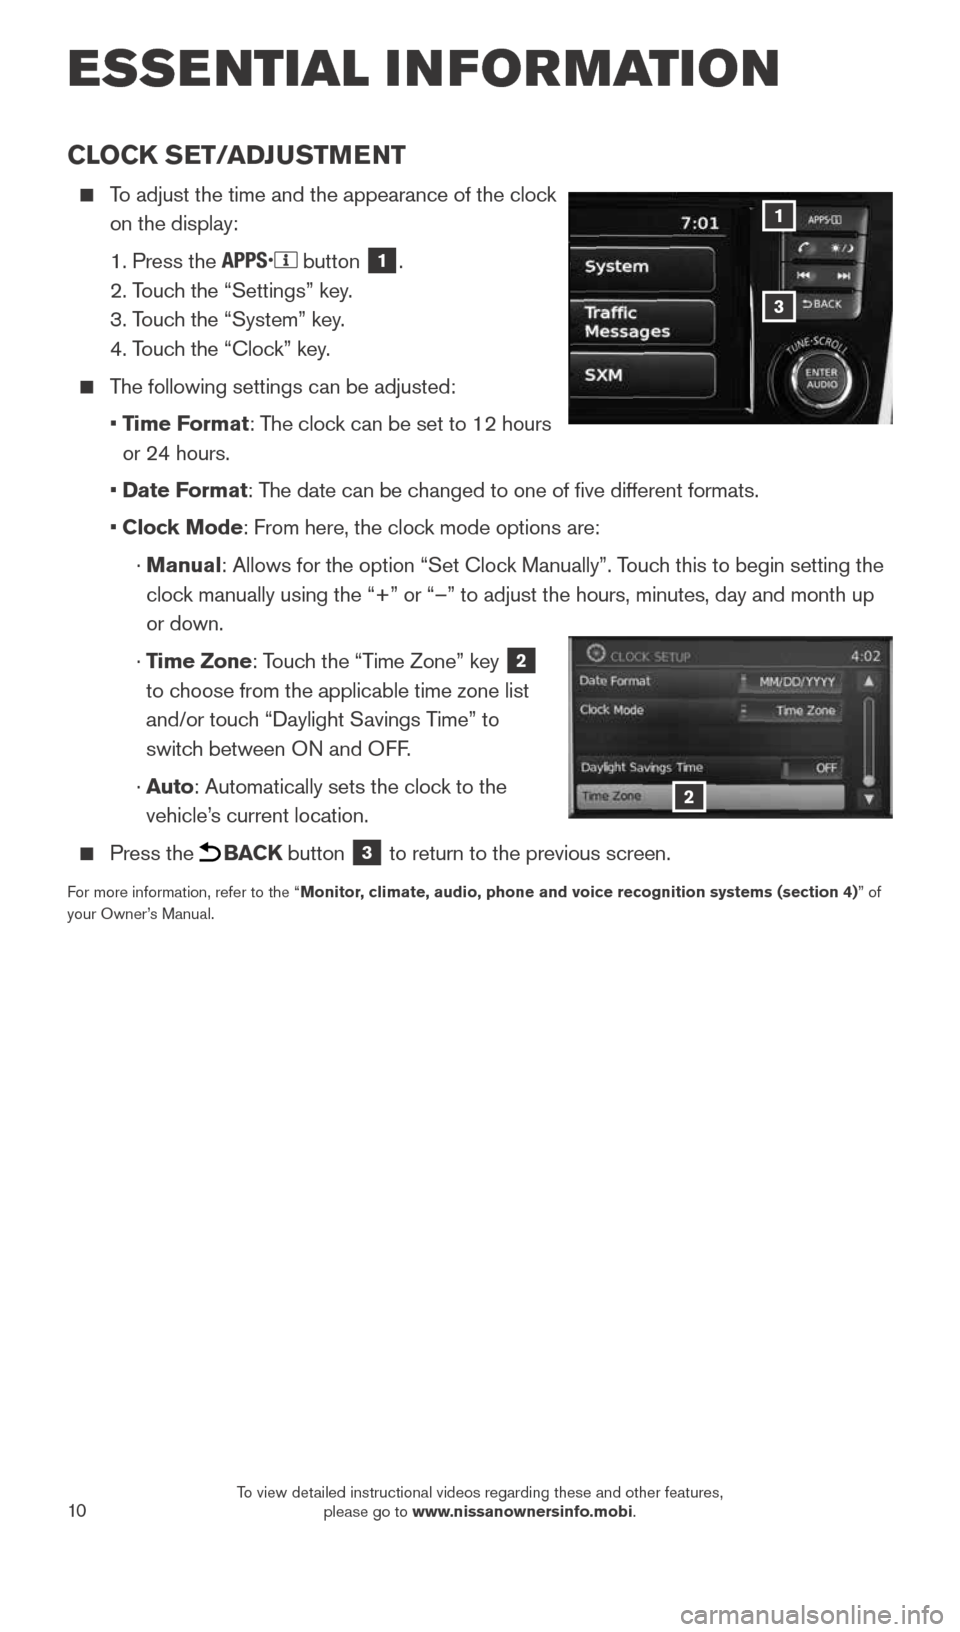
To adjust the time and the appearance of the clock
on the display:
1. Press the
button 1.
2. Touch the “Settings” key.
3. Touch the “System” key.
4. Touch the “Clock” key.
The following settings can be adjusted:
• Time Format: The clock can be set to 12 hours
or 24 hours.
• Date Format: The date can be changed to one of five different formats.
• Clock Mode: From here, the clock mode options are:
· Manual: Allows for the option “Set Clock Manually”. Touch this to begin setting the
clock manually using the “+” or “–” to adjust the hours, minu\
tes, day and month up
or down.
· Time Zone: Touch the “Time Zone” key
2
to choose from the applicable time zone list
and/or touch “Daylight Savings Time” to
switch between ON and OFF.
· Auto: Automatically sets the clock to the
vehicle’s current location.
Press the BACK button 3 to return to the previous screen.
For more information, refer to the “Monitor, climate, audio, phone and voice recognition systems (section 4) ” of
your Owner’s Manual.
3
1
2
ESSE NTIAL I N FOR MATION
1904704_15d_Rogue_QRG_031915.indd 103/19/15 1:22 PM
To view detailed instructional videos regarding these and other features, please go to www.nissanownersinfo.mobi.
Page 13 of 32
11
FIRST DRIVE FEATURES
NISSAN INTELLIGENT KEY® SYSTEM (if so equipped)
The NISSAN Intelligent Key® System allows you to lock
or unlock the vehicle, open your liftgate and start the
engine. It is important to make sure the Intelligent Key
is with you (that is, in your pocket or purse).
The operating range of the Intelligent Key is
within 31.5 in (80 cm) from each request switch.
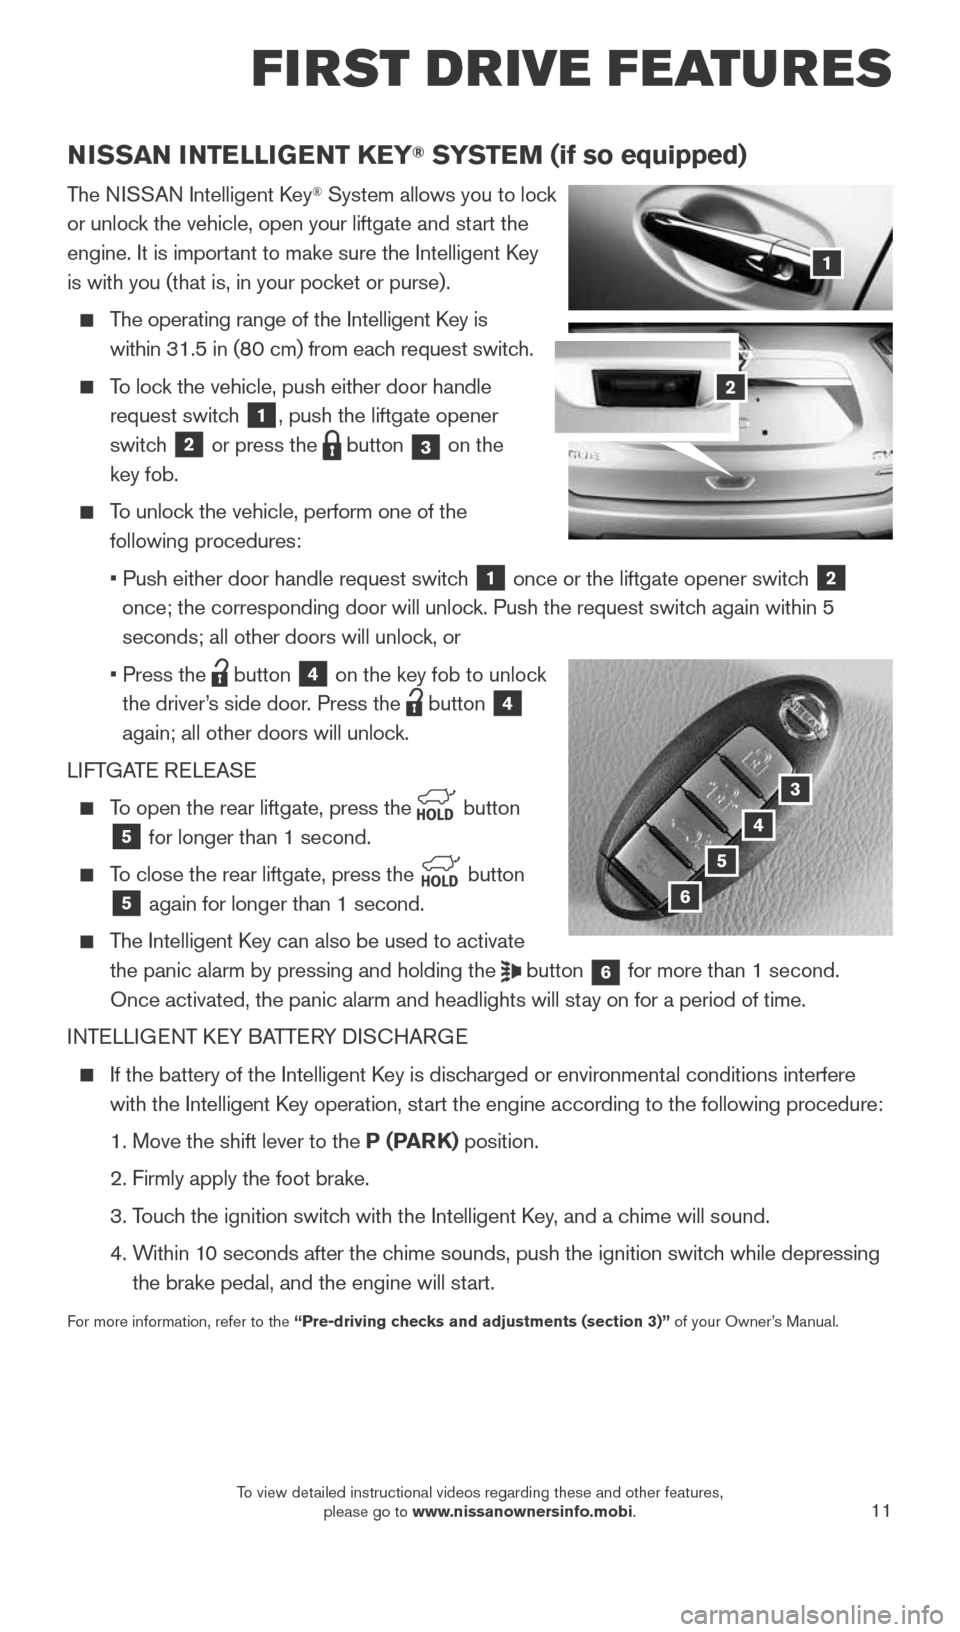
To lock the vehicle, push either door handle
request switch
1, push the liftgate opener
switch
2 or press the button 3 on the
key fob.
To unlock the vehicle, perform one of the
following procedures:
• Push either door handle request switch
1 once or the liftgate opener switch 2
once; the corresponding door will unlock. Push the request switch again within 5
seconds; all other doors will unlock, or
• Press the
button 4 on the key fob to unlock
the driver’s side door. Press the
button 4
again; all other doors will unlock.
LIFTGATE RELEASE
To open the rear liftgate, press the
button 5 for longer than 1 second.
To close the rear liftgate, press the
button 5 again for longer than 1 second.
The Intelligent Key can also be used to activate
the panic alarm by pressing and holding the
button 6 for more than 1 second.
Once activated, the panic alarm and headlights will stay on for a period of time.
INTELLIGENT KEY BATTERY DISCHARGE
If the battery of the Intelligent Key is discharged or environmental conditions interfere
with the Intelligent Key operation, start the engine according to the following procedure:
1. Move the shift lever to the P (PARK) position.
2. Firmly apply the foot brake.
3. Touch the ignition switch with the Intelligent Key, and a chime will sound.
4. Within 10 seconds after the chime sounds, push the ignition switch while depressing
the brake pedal, and the engine will start.
For more information, refer to the “Pre-driving checks and adjustments (section 3)” of your Owner’s Manual.
1
3
4
5
2
6
1904704_15d_Rogue_QRG_031915.indd 113/19/15 1:22 PM
To view detailed instructional videos regarding these and other features, please go to www.nissanownersinfo.mobi.
Page 14 of 32
12
POWER LIFTGATE (if so equipped)
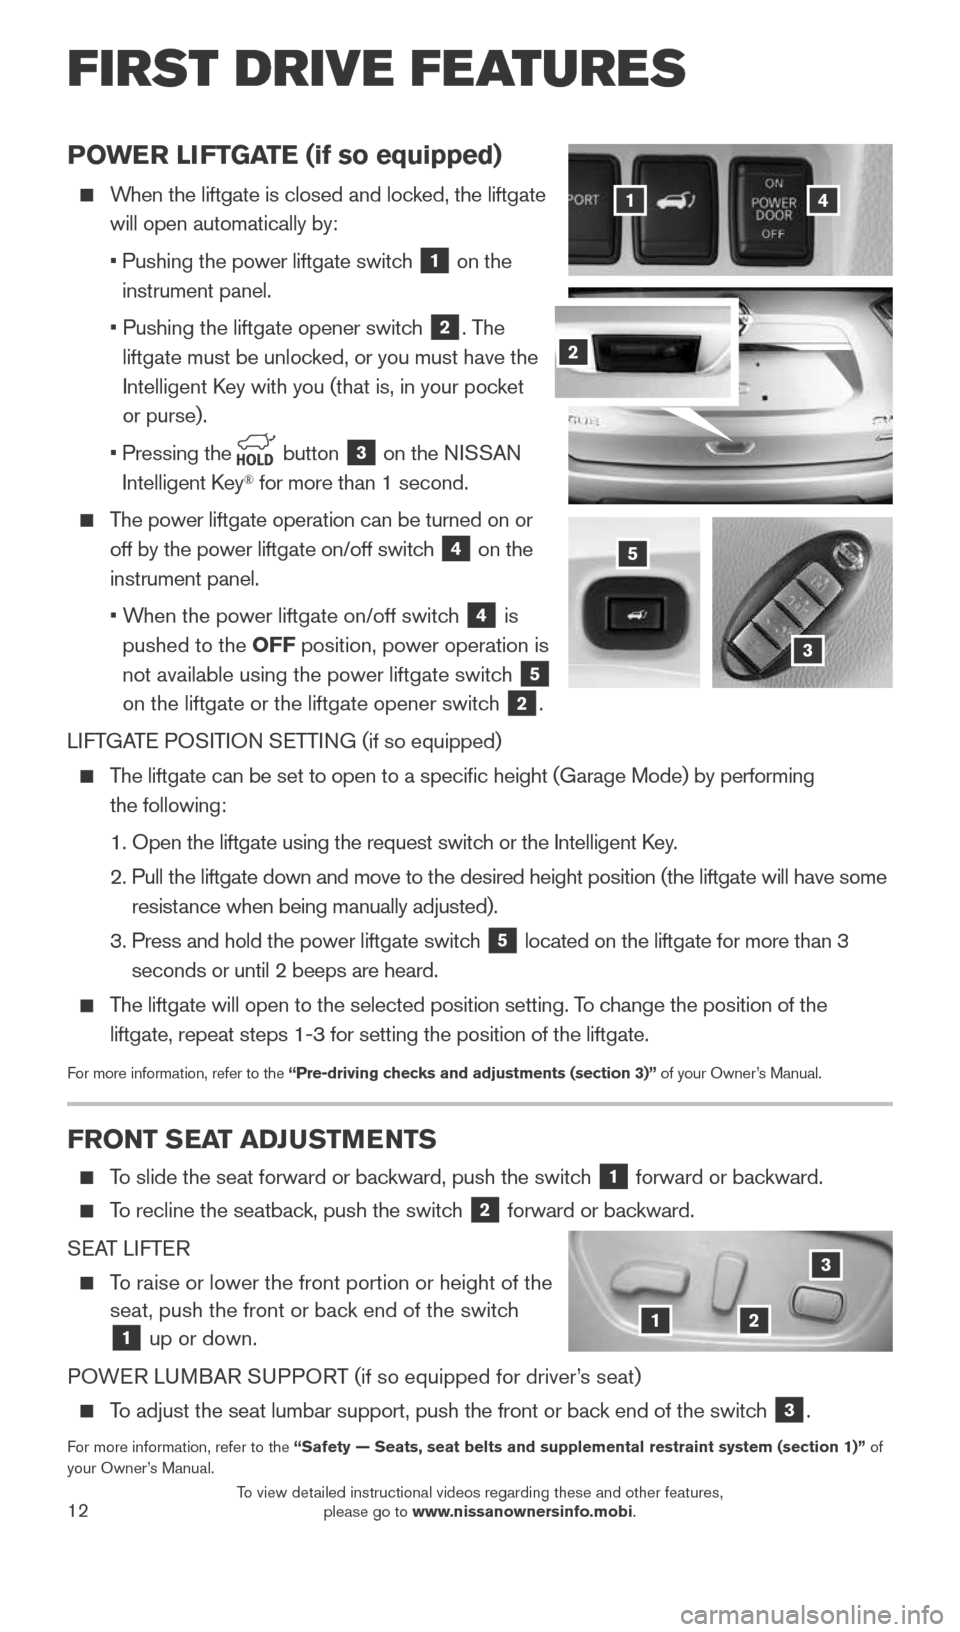
When the liftgate is closed and locked, the liftgate
will open automatically by:
• Pushing the power liftgate switch
1 on the
instrument panel.
• Pushing the liftgate opener switch
2. The
liftgate must be unlocked, or you must have the
Intelligent Key with you (that is, in your pocket
or purse).
• Pressing the
button 3 on the NISSAN
Intelligent Key® for more than 1 second.
The power liftgate operation can be turned on or
off by the power liftgate on/off switch
4 on the
instrument panel.
• When the power liftgate on/off switch
4 is
pushed to the OFF position, power operation is
not available using the power liftgate switch
5
on the liftgate or the liftgate opener switch
2.
LIFTGATE POSITION SETTING (if so equipped)
The liftgate can be set to open to a specific height (Garage Mode) by\
performing
the following:
1. Open the liftgate using the request switch or the Intelligent Key.
2. Pull the liftgate down and move to the desired height position (the lif\
tgate will have some
resistance when being manually adjusted).
3. Press and hold the power liftgate switch
5 located on the liftgate for more than 3
seconds or until 2 beeps are heard.
The liftgate will open to the selected position setting. To change the position of the
liftgate, repeat steps 1-3 for setting the position of the liftgate.
For more information, refer to the “Pre-driving checks and adjustments (section 3)” of your Owner’s Manual.
3
41
2
5
FRONT SEAT ADJUSTMENTS
To slide the seat forward or backward, push the switch 1 forward or backward.
To recline the seatback, push the switch 2 forward or backward.
SEAT LIFTER
To raise or lower the front portion or height of the
seat, push the front or back end of the switch
1 up or down.
POWER LUMBAR SUPPORT (if so equipped for driver’s seat)
To adjust the seat lumbar support, push the front or back end of the switch 3.
For more information, refer to the “Safety — Seats, seat belts and supplemental restraint system (se\
ction 1)” of
your Owner’s Manual.
12
3
FIRST DRIVE FEATURES
1904704_15d_Rogue_QRG_031915.indd 123/19/15 1:22 PM
To view detailed instructional videos regarding these and other features, please go to www.nissanownersinfo.mobi.
Page 16 of 32
14
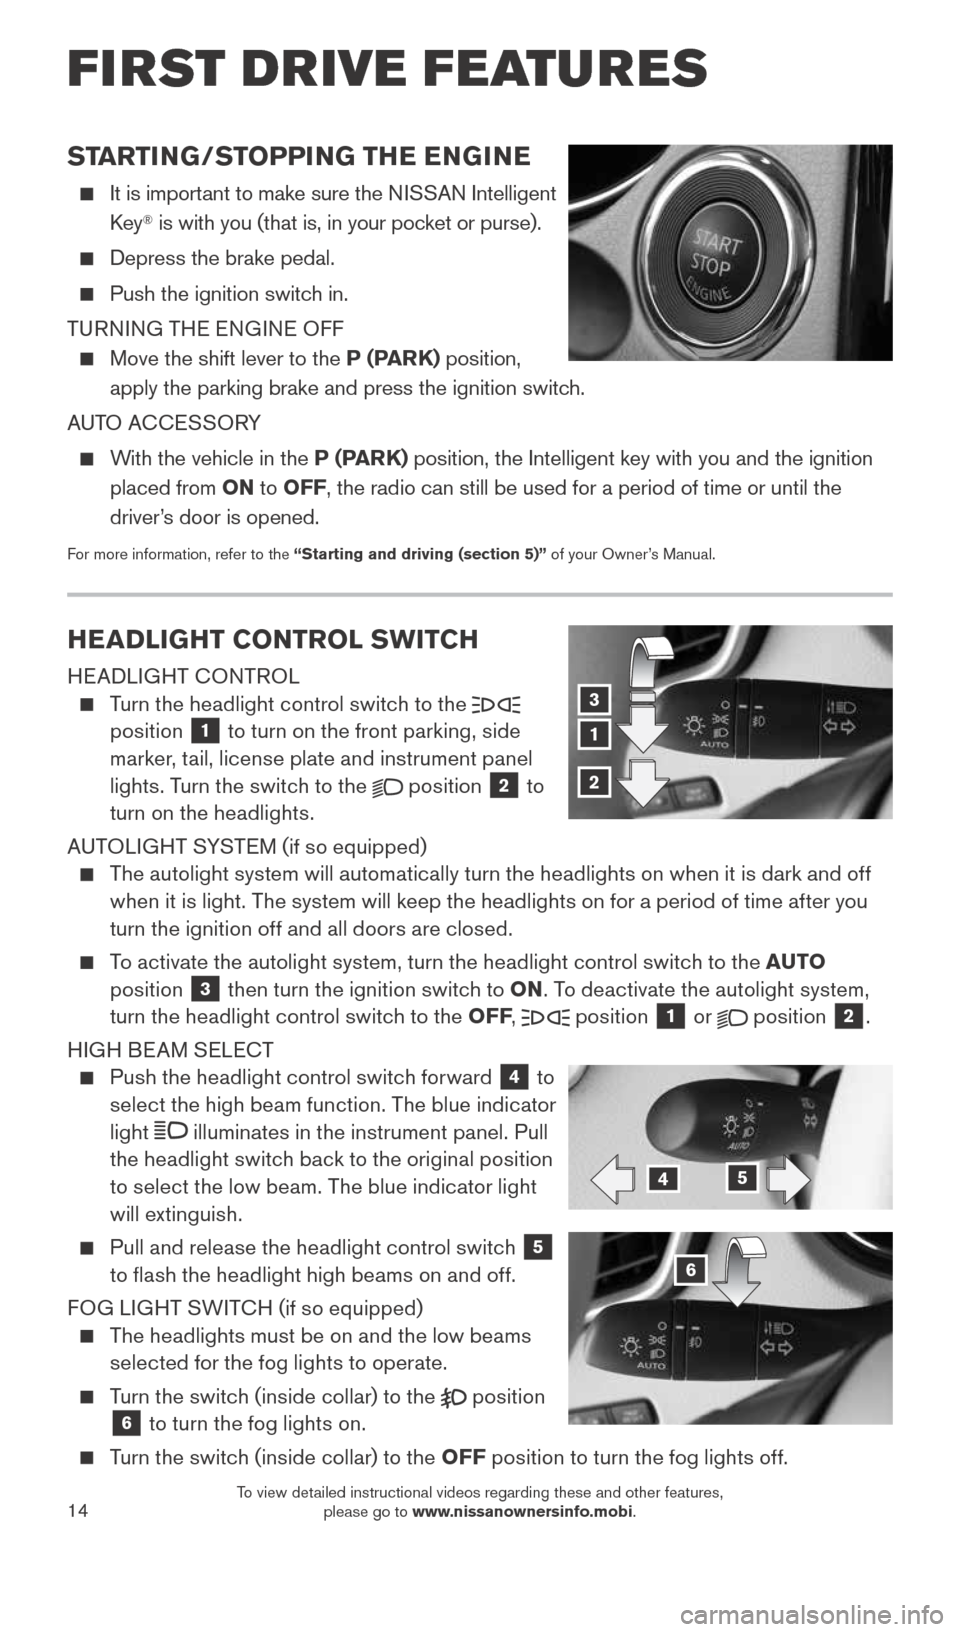
HEADLIGHT CONTROL SWITCH
HEADLIGHT CONTROL
Turn the headlight control switch to the
position 1 to turn on the front parking, side
marker, tail, license plate and instrument panel
lights. Turn the switch to the
position 2 to
turn on the headlights.
AUTOLIGHT SYSTEM (if so equipped)
The autolight system will automatically turn the headlights on when it is dark and off
when it is light. The system will keep the headlights on for a period of time after you
turn the ignition off and all doors are closed.
To activate the autolight system, turn the headlight control switch to the AUTO
position 3 then turn the ignition switch to ON . To deactivate the autolight system,
turn the headlight control switch to the OFF ,
position
1 or
position 2.
HIGH BEAM SELECT
Push the headlight control switch forward 4 to
select the high beam function. The blue indicator
light
illuminates in the instrument panel. Pull
the headlight switch back to the original position
to select the low beam. The blue indicator light
will extinguish.
Pull and release the headlight control switch 5
to flash the headlight high beams on and off.
FOG LIGHT SWITCH (if so equipped)
The headlights must be on and the low beams
selected for the fog lights to operate.
Turn the switch (inside collar) to the
position 6 to turn the fog lights on.
Turn the switch (inside collar) to the OFF position to turn the fog lights off.
1
3
2
45
6
STARTING/STOPPING THE ENGINE
It is important to make sure the NISSAN Intelligent
Key® is with you (that is, in your pocket or purse).
Depress the brake pedal.
Push the ignition switch in.
TURNING THE ENGINE OFF
Move the shift lever to the P (PARK) position,
apply the parking brake and press the ignition switch.
AUTO ACCESSORY
With the vehicle in the P (PARK) position, the Intelligent key with you and the ignition
placed from ON to OFF, the radio can still be used for a period of time or until the
driver’s door is opened.
For more information, refer to the “Starting and driving (section 5)” of your Owner’s Manual.
FIRST DRIVE FEATURES
1904704_15d_Rogue_QRG_031915.indd 143/19/15 1:22 PM
To view detailed instructional videos regarding these and other features, please go to www.nissanownersinfo.mobi.
Page 20 of 32
18
CRUISE CONTROL
The cruise control system enables you to set a
constant cruising speed once the vehicle has
reached 25 mph (40 km/h). The system will
automatically maintain the set speed until you tap
the brake pedal, accelerate, cancel or turn the
system off.
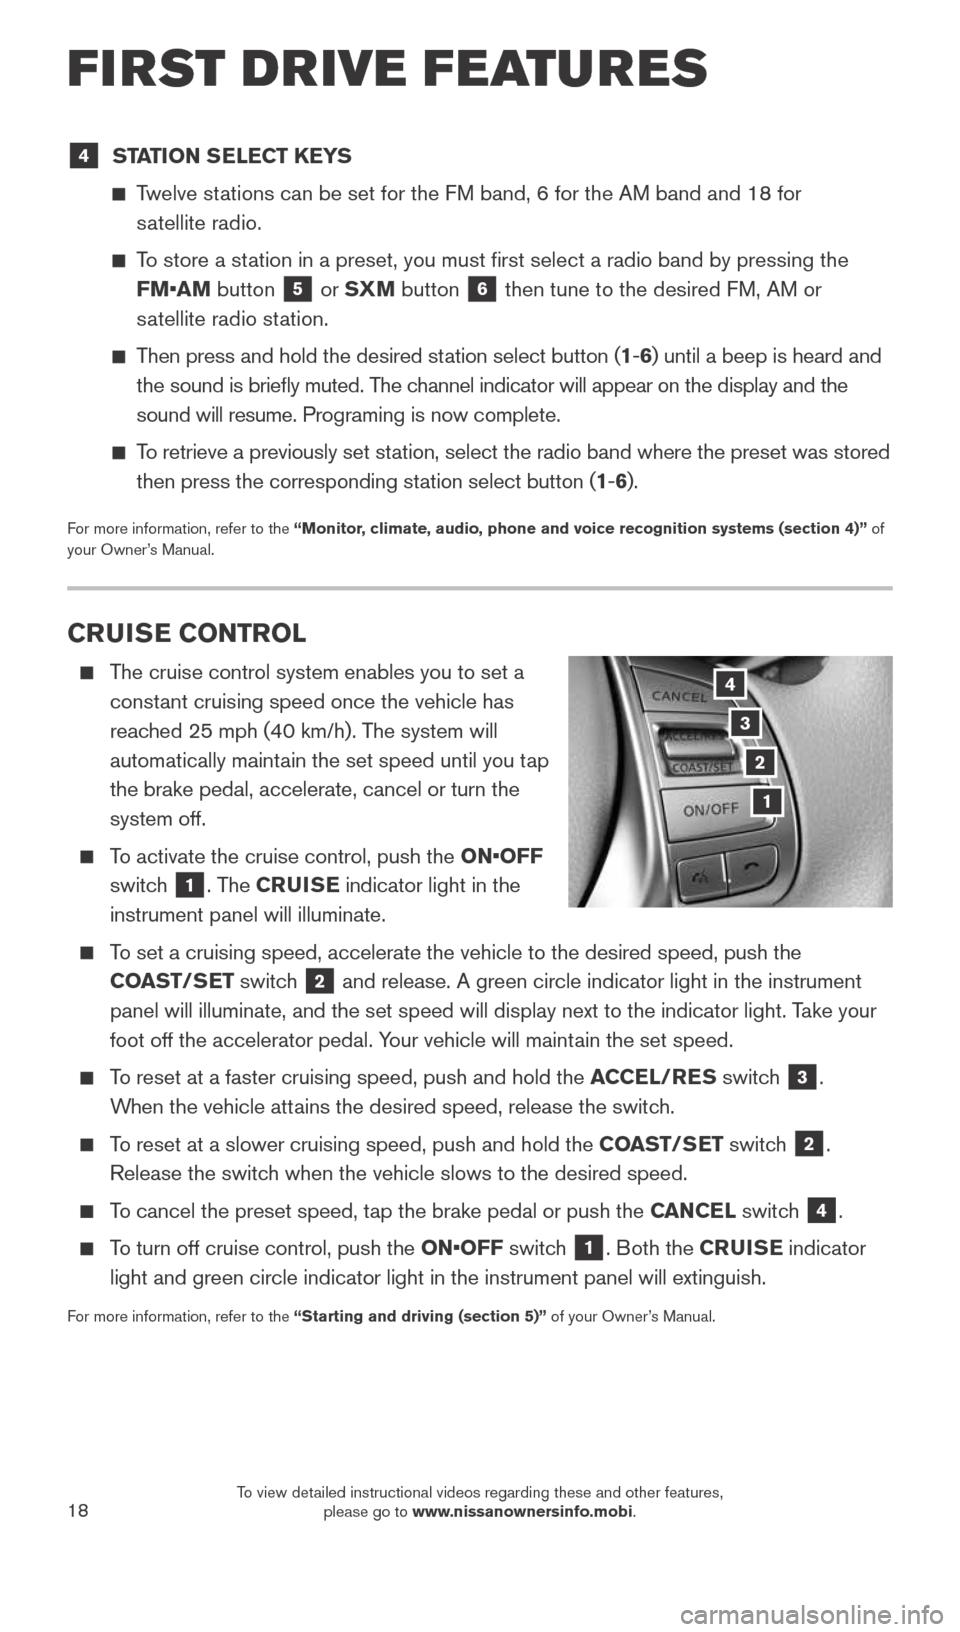
To activate the cruise control, push the ON•OFF
switch
1. The CRUISE indicator light in the
instrument panel will illuminate.
To set a cruising speed, accelerate the vehicle to the desired speed, pus\
h the
COAST/SET switch
2 and release. A green circle indicator light in the instrument
panel will illuminate, and the set speed will display next to the indica\
tor light. Take your
foot off the accelerator pedal. Your vehicle will maintain the set speed.
To reset at a faster cruising speed, push and hold the ACCEL/RES switch 3.
When the vehicle attains the desired speed, release the switch.
To reset at a slower cruising speed, push and hold the COAST/SET switch 2.
Release the switch when the vehicle slows to the desired speed.
To cancel the preset speed, tap the brake pedal or push the CANCEL switch 4.
To turn off cruise control, push the ON•OFF switch 1. Both the CRUISE indicator
light and green circle indicator light in the instrument panel will exti\
nguish.
For more information, refer to the “Starting and driving (section 5)” of your Owner’s Manual.
3
2
1
4
4 STATION SELECT KEYS
Twelve stations can be set for the FM band, 6 for the AM band and 18 for
satellite radio.
To store a station in a preset, you must first select a radio band by pressing the \
FM•AM button
5 or SXM button 6 then tune to the desired FM, AM or
satellite radio station.
Then press and hold the desired station select button (1 -6 ) until a beep is heard and
the sound is briefly muted. The channel indicator will appear on the display and the
sound will resume. Programing is now complete.
To retrieve a previously set station, select the radio band where the preset was stored
then press the corresponding station select button (1 -6 ).
For more information, refer to the “Monitor, climate, audio, phone and voice recognition systems (section 4)” of
your Owner’s Manual.
FIRST DRIVE FEATURES
1904704_15d_Rogue_QRG_031915.indd 183/19/15 1:23 PM
To view detailed instructional videos regarding these and other features, please go to www.nissanownersinfo.mobi.
Page 22 of 32
20
SYSTEM GUIDE
VEHICLE INFORMATION DISPLAY
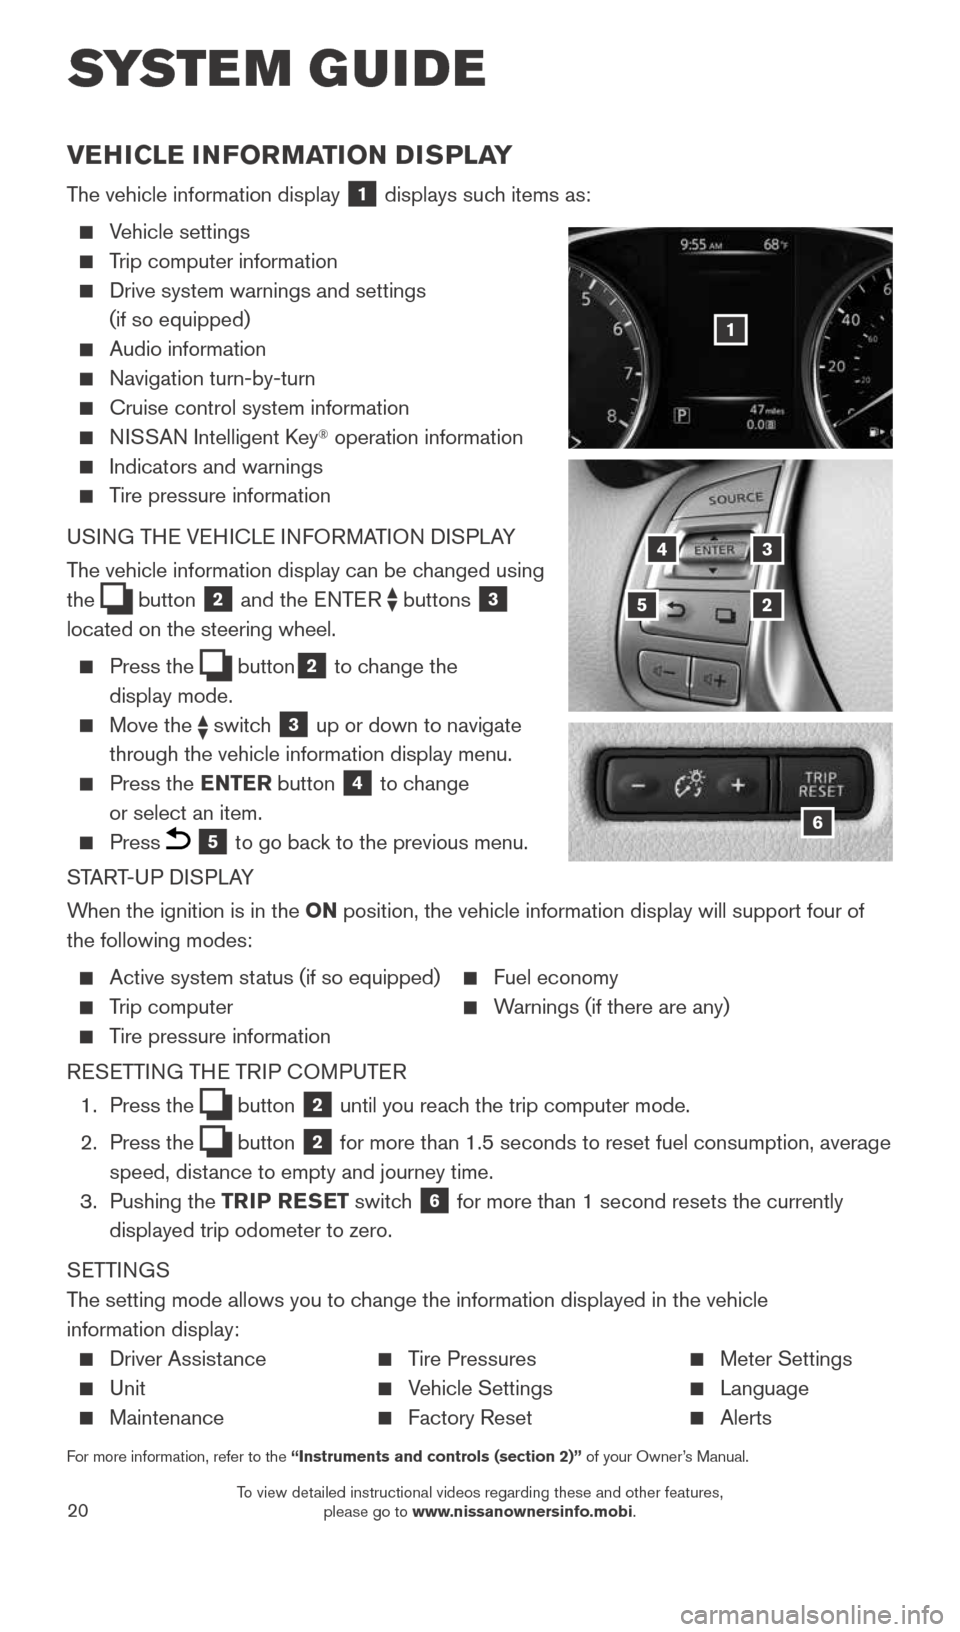
The vehicle information display 1 displays such items as:
Vehicle settings
Trip computer information
Drive system warnings and settings
(if so equipped)
Audio information
Navigation turn-by-turn
Cruise control system information
NISSAN Intelligent Key® operation information
Indicators and warnings
Tire pressure information
USING THE VEHICLE INFORMATION DISPLAY
The vehicle information display can be changed using
the
button 2 and the ENTER buttons 3
located on the steering wheel.
Press the button2 to change the
display mode.
Move the switch 3 up or down to navigate
through the vehicle information display menu.
Press the ENTER button 4 to change
or select an item.
Press 5 to go back to the previous menu.
START-UP DISPLAY
When the ignition is in the ON position, the vehicle information display will support four of
the following modes:
Active system status (if so equipped) Fuel economy
Trip computer Warnings (if there are any)
Tire pressure information
RESETTING THE TRIP COMPUTER
1. Press the
button 2 until you reach the trip computer mode.
2. Press the
button 2 for more than 1.5 seconds to reset fuel consumption, average
speed, distance to empty and journey time.
3. Pushing the TRIP RESET switch
6 for more than 1 second resets the currently
displayed trip odometer to zero.
SETTINGS
The setting mode allows you to change the information displayed in the vehicle
information display:
Driver Assistance Tire Pressures Meter Settings
Unit Vehicle Settings Language
Maintenance Factory Reset Alerts
For more information, refer to the “Instruments and controls (section 2)” of your Owner’s Manual.
5
3
2
4
6
1
1904704_15d_Rogue_QRG_031915.indd 203/19/15 1:23 PM
To view detailed instructional videos regarding these and other features, please go to www.nissanownersinfo.mobi.
Page 26 of 32
24
SYSTEM GUIDE
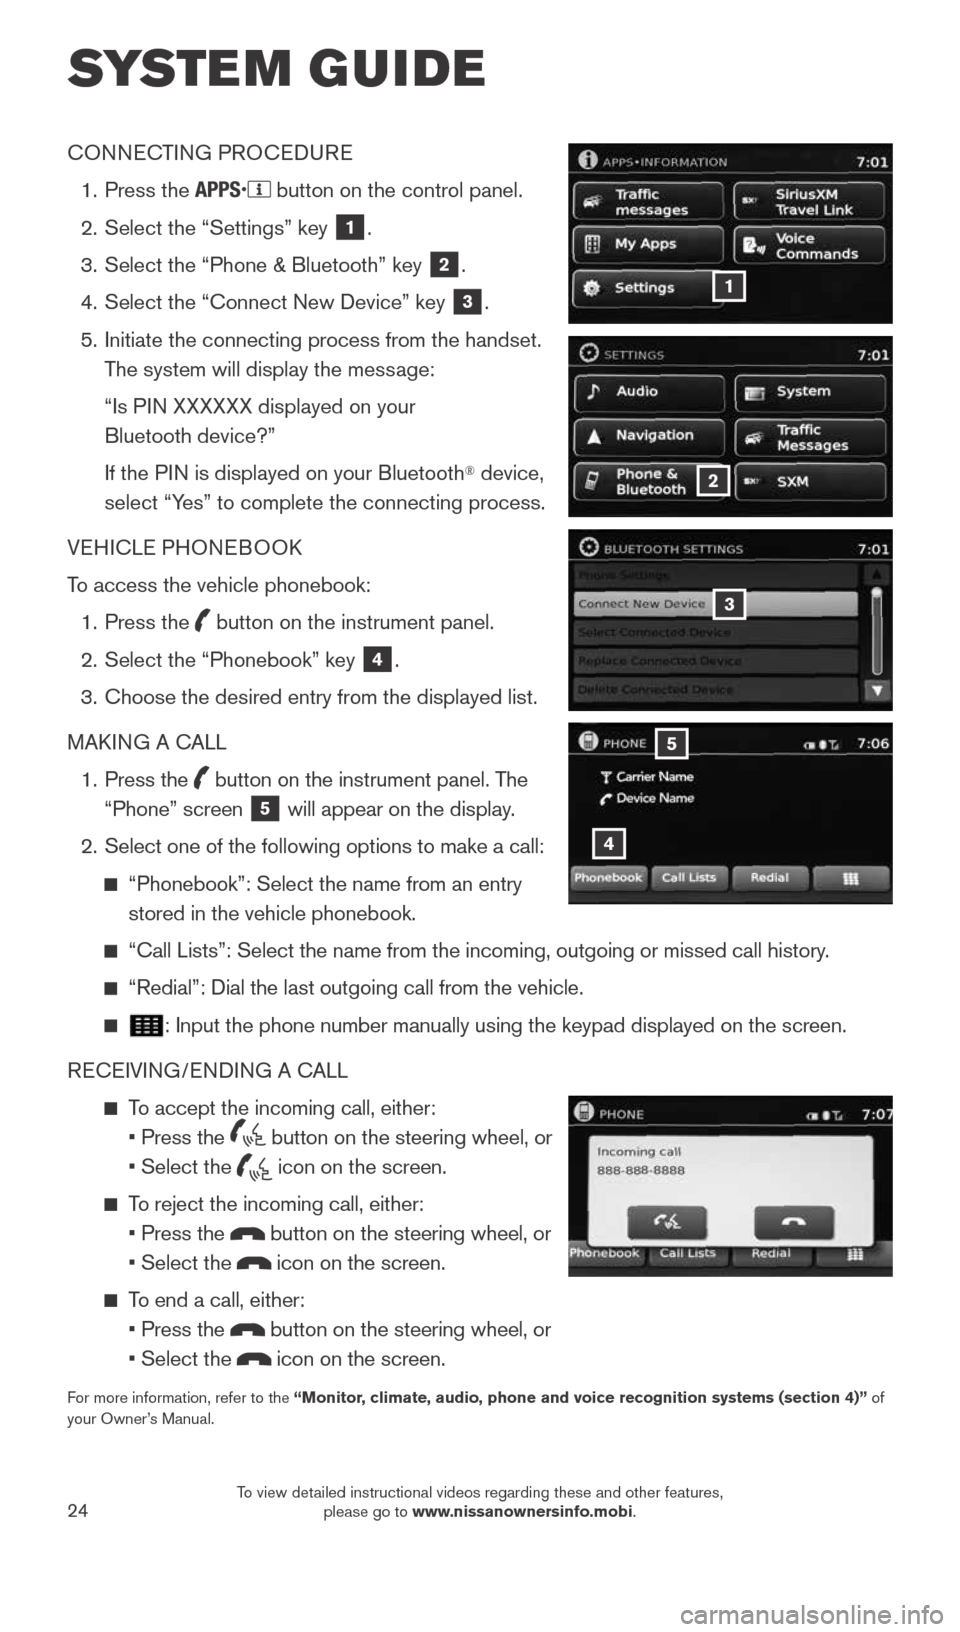
CONNECTING PROCEDURE
1. Press the
button on the control panel.
2. Select the “Settings” key
1.
3. Select the “Phone & Bluetooth” key
2.
4. Select the “Connect New Device” key
3.
5. Initiate the connecting process from the handset.
The system will display the message:
“Is PIN XXXXXX displayed on your
Bluetooth device?”
If the PIN is displayed on your Bluetooth
® device,
select “Yes” to complete the connecting process.
VEHICLE PHONEBOOK
To access the vehicle phonebook:
1. Press the
button on the instrument panel.
2. Select the “Phonebook” key
4.
3. Choose the desired entry from the displayed list.
MAKING A CALL
1. Press the
button on the instrument panel. The
“Phone” screen 5 will appear on the display.
2. Select one of the following options to make a call:
“Phonebook”: Select the name from an entry
stored in the vehicle phonebook.
“Call Lists”: Select the name from the incoming, outgoing or misse\
d call history.
“Redial”: Dial the last outgoing call from the vehicle.
: Input the phone number manually using the keypad displayed on the scree\
n.
RECEIVING/ENDING A CALL
To accept the incoming call, either:
• Press the
button on the steering wheel, or
• Select the
icon on the screen.
To reject the incoming call, either:
• Press the
button on the steering wheel, or
• Select the
icon on the screen.
To end a call, either:
• Press the
button on the steering wheel, or
• Select the
icon on the screen.
For more information, refer to the “Monitor, climate, audio, phone and voice recognition systems (section 4)” of
your Owner’s Manual.
4
5
3
2
1
1904704_15d_Rogue_QRG_031915.indd 243/19/15 1:23 PM
To view detailed instructional videos regarding these and other features, please go to www.nissanownersinfo.mobi.
Page 27 of 32
25
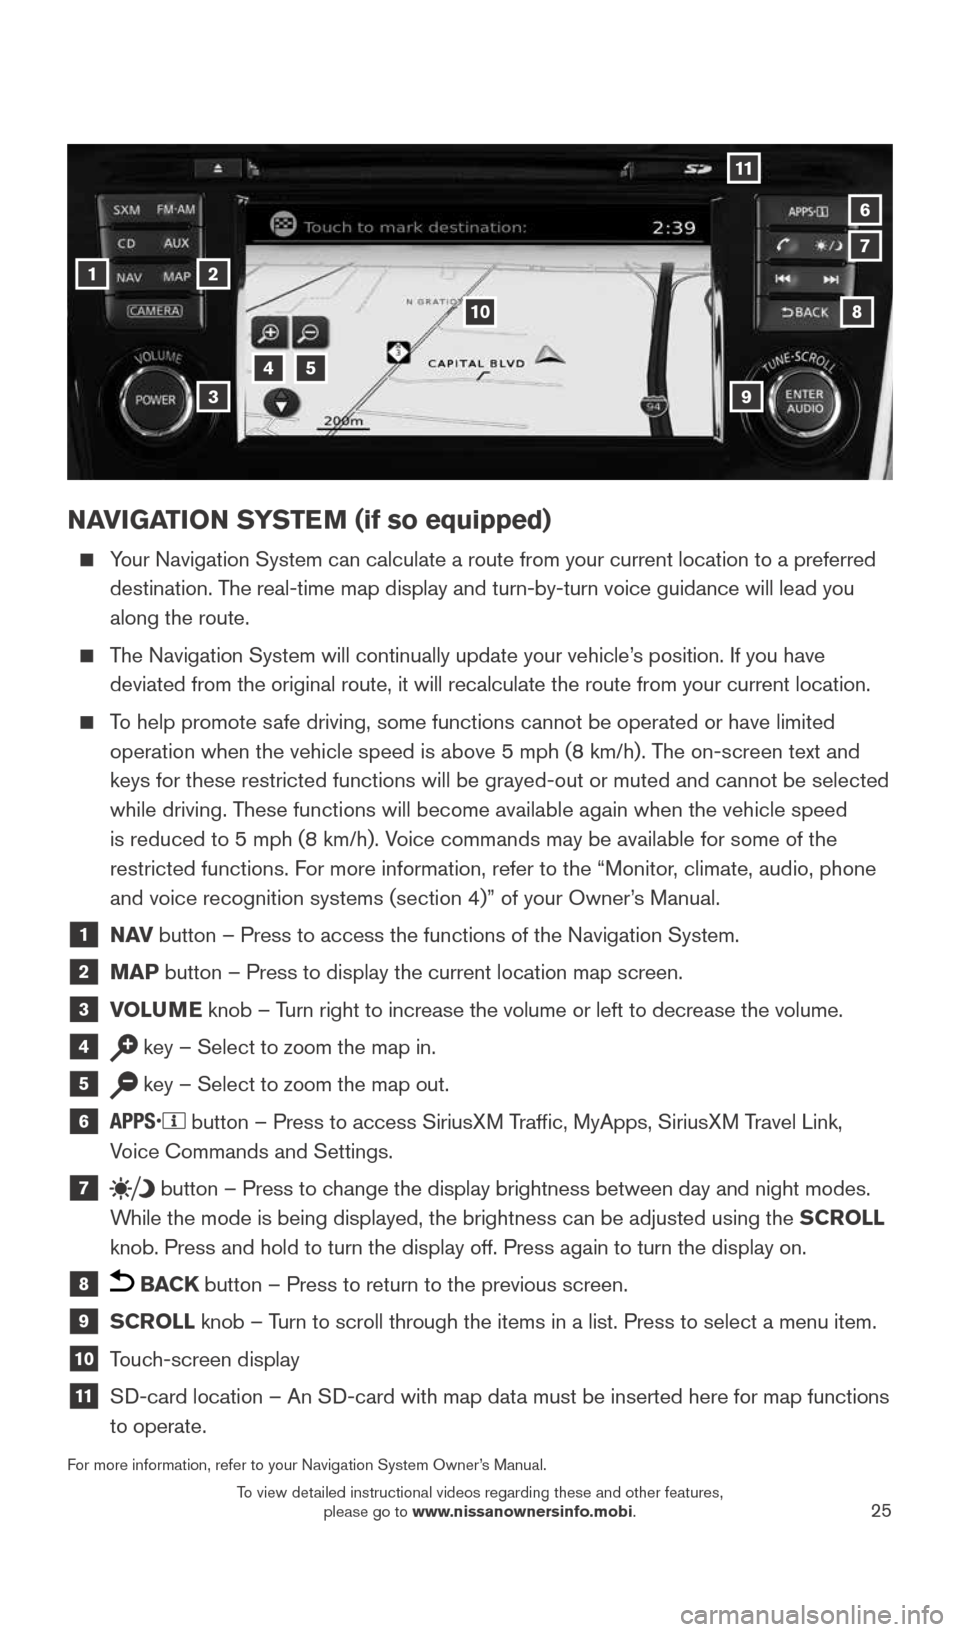
NAVIGATION SYSTEM (if so equipped)
Your Navigation System can calculate a route from your current location t\
o a preferred
destination. The real-time map display and turn-by-turn voice guidance will lead you
along the route.
The Navigation System will continually update your vehicle’s position. If you have
deviated from the original route, it will recalculate the route from you\
r current location.
To help promote safe driving, some functions cannot be operated or have limited
operation when the vehicle speed is above 5 mph (8 km/h). The on-screen text and
keys for these restricted functions will be grayed-out or muted and cann\
ot be selected
while driving. These functions will become available again when the vehicle speed
is reduced to 5 mph (8 km/h). Voice commands may be available for some of the
restricted functions. For more information, refer to the “Monitor, climate, audio, phone
and voice recognition systems (section 4)” of your Owner’s Manual.
1 N AV
button – Press to access the functions of the Navigation System.
2 MAP button – Press to display the current location map screen.
3 VOLUME knob – Turn right to increase the volume or left to decrease the volume.
4 key – Select to zoom the map in.
5 key – Select to zoom the map out.
6
button – Press to access SiriusXM Traffic, MyApps, SiriusXM Travel Link,
Voice Commands and Settings.
7 button
– Press to change the display brightness between day and night modes.
While the mode is being displayed, the brightness can be adjusted using t\
he SCROLL
knob. Press and hold to turn the display off. Press again to turn the di\
splay on.
8 BACK button – Press to return to the previous screen.
9 SCROLL knob – Turn to scroll through the items in a list. Press to select a menu item.
10 Touch-screen display
11 SD-card location – An SD-card with map data must be inserted here for map functions
to operate.
For more information, refer to your Navigation System Owner’s Manual.
1
11
4
7
108
2
39
5
6
1904704_15d_Rogue_QRG_031915.indd 253/19/15 1:23 PM
To view detailed instructional videos regarding these and other features, please go to www.nissanownersinfo.mobi.