display NISSAN ROGUE 2016 2.G Quick Reference Guide
[x] Cancel search | Manufacturer: NISSAN, Model Year: 2016, Model line: ROGUE, Model: NISSAN ROGUE 2016 2.GPages: 36, PDF Size: 2.72 MB
Page 2 of 36
*See your Owner’s Manual for information.
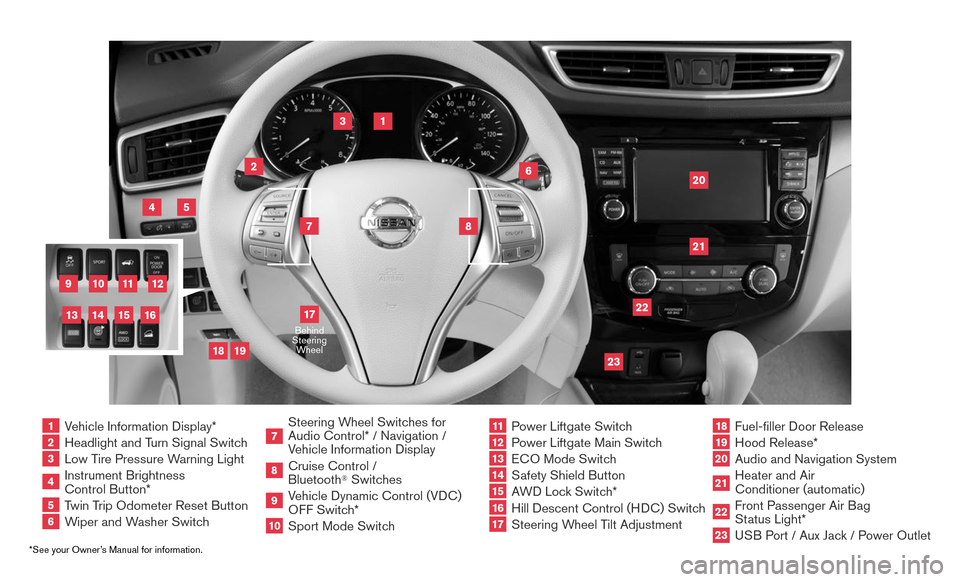
1 Vehicle Information Display*2 Headlight and Turn Signal Switch3 Low Tire Pressure Warning Light4 Instrument Brightness
Control Button*
5 Twin Trip Odometer Reset Button6 Wiper and Washer Switch
7 Steering W heel Switches for
Audio Control* / Navigation /
Vehicle Information Display
8 Cruise Control /
Bluetooth
® Switches
9 Vehicle Dynamic Control (VDC)
OFF Switch*
10
Sport Mode Switc h
11 Power Liftgate Switch
12
Power Liftgate Main Switch
13
ECO Mode Switch
14
Safety Shield Button
15
AWD Lock Switch*
16
Hill Descent Control (H DC) Switch
17
Steering Wheel Tilt Adjustment
18
Fuel-filler Door Release
19
Hood Release*
20
Audio and Navigation System
21
Heater and Air
Conditioner (automatic)
22
Front Passenger Air B ag
Status Light*
23
USB Port / Aux Jack / Power Outlet
1
3
4
20
17
5
6
19
18
2
7
8
22
23
21
10
11
12
9
15
14
13
16
Behind
Steering Wheel
Page 3 of 36
TAB LE OF CONTE NTS
Please see your Owner’s Manual for important safety information and system operation limitations.• A cellular telephone should not be used for any purpose while driving so\
full attention may be given
to vehicle operation.
• Always wear your seat belt.
• Supplemental air bags do not replace proper seat belt usage.
• Children 12 and under should always ride in the rear seat properly secur\
ed in c hild restraints or seat
belts according to their age and weight.
• Do not drink and drive.
For more information, refer to the “Safety — Seats, seat belts and supplemental restraint system (sectio\
n 1) ”,
the “Monitor, climate, audio, phone and voice recognition systems (section 4) ” and the “Starting and driving
(section 5)” of your Owner’s Manual.
Additional information about your vehicle is also available in your Owne\
r’s Manual, Navigation System Owner’s Manual and at www.NissanUSA.com.
NEW SYSTEM FEATURES NissanConnectSM Services (if so equipped) ...........................................2
Around View® Monitor with Moving Object Detection (MOD) (if so equipped)...............4
Drive Mode ......................................................................6
Blind Spot Warning (BSW) (if so equipped)...........................................6
Forward Emergency Braking (FEB) (if so equipped) ....................................7
Hill Start Assist (HSA).............................................................7
Hill Descent Control (HDC) (if so equipped)...........................................7
Siri® Eyes Free (if so equipped) .....................................................8
SiriusXM Travel Link and SiriusXM Traffic (if so equipped) ............................... 8
ESSENTIAL INFORMATIONTire Pressure Monitoring System (TPMS) with Easy Fill Tire Alert..........................9
Loose Fuel Cap and Fuel-filler Door.................................................10
Towing Your Vehicle ..............................................................10
Outside Temperature Display ......................................................11
Divide-N-Hide® Floor.............................................................11
Clock Set/Adjustment ............................................................12
FIRST DRIVE FEATURESNISSAN Intelligent Key® System (if so equipped) .....................................13
Power Liftgate (if so equipped).....................................................14
Outside Mirror Control Switch .....................................................15
Front Power Seat Adjustments (if so equipped) .......................................15
2ND Row Seats ..................................................................15
3RD Row Seats (if so equipped) ....................................................16
Starting/Stopping the Engine ......................................................16
Headlight Control Switch..........................................................17
Wiper and Washer Switch.........................................................18
Heater and Air Conditioner (automatic) (if so equipped) ................................19
FM/AM/SiriusXM® Satellite Radio with CD Player (if so equipped) .......................20
Cruise Control...................................................................21
USB (Universal Serial Bus) Connection Port/Aux Jack and iPod® Interface.................22
Power Panoramic Moonroof (if so equipped) .........................................22
Center Console Storage Box ......................................................22
Tilt and Telescopic Steering Wheel Adjustments ......................................23
SYSTEM GUIDEVehicle Information Display ........................................................24
NissanConnectSM Mobile Apps (if so equipped).......................................25
Hands-free Text Messaging Assistant (if so equipped) .................................25
Bluetooth® Hands-free Phone System...............................................26 • System Operating T ips........................................................26
Bluetooth® System without Navigation (if so equipped).................................27
Bluetooth® System with Navigation (if so equipped) ...................................28
Navigation System (if so equipped) .................................................30
HomeLink® Universal Transceiver ...................................................31
Page 6 of 36
4
NEW SYSTEM FEATURES
AROUND VIEW® MONITOR WITH MOVING OBJECT
DETECTION (MOD) (if so equipped)
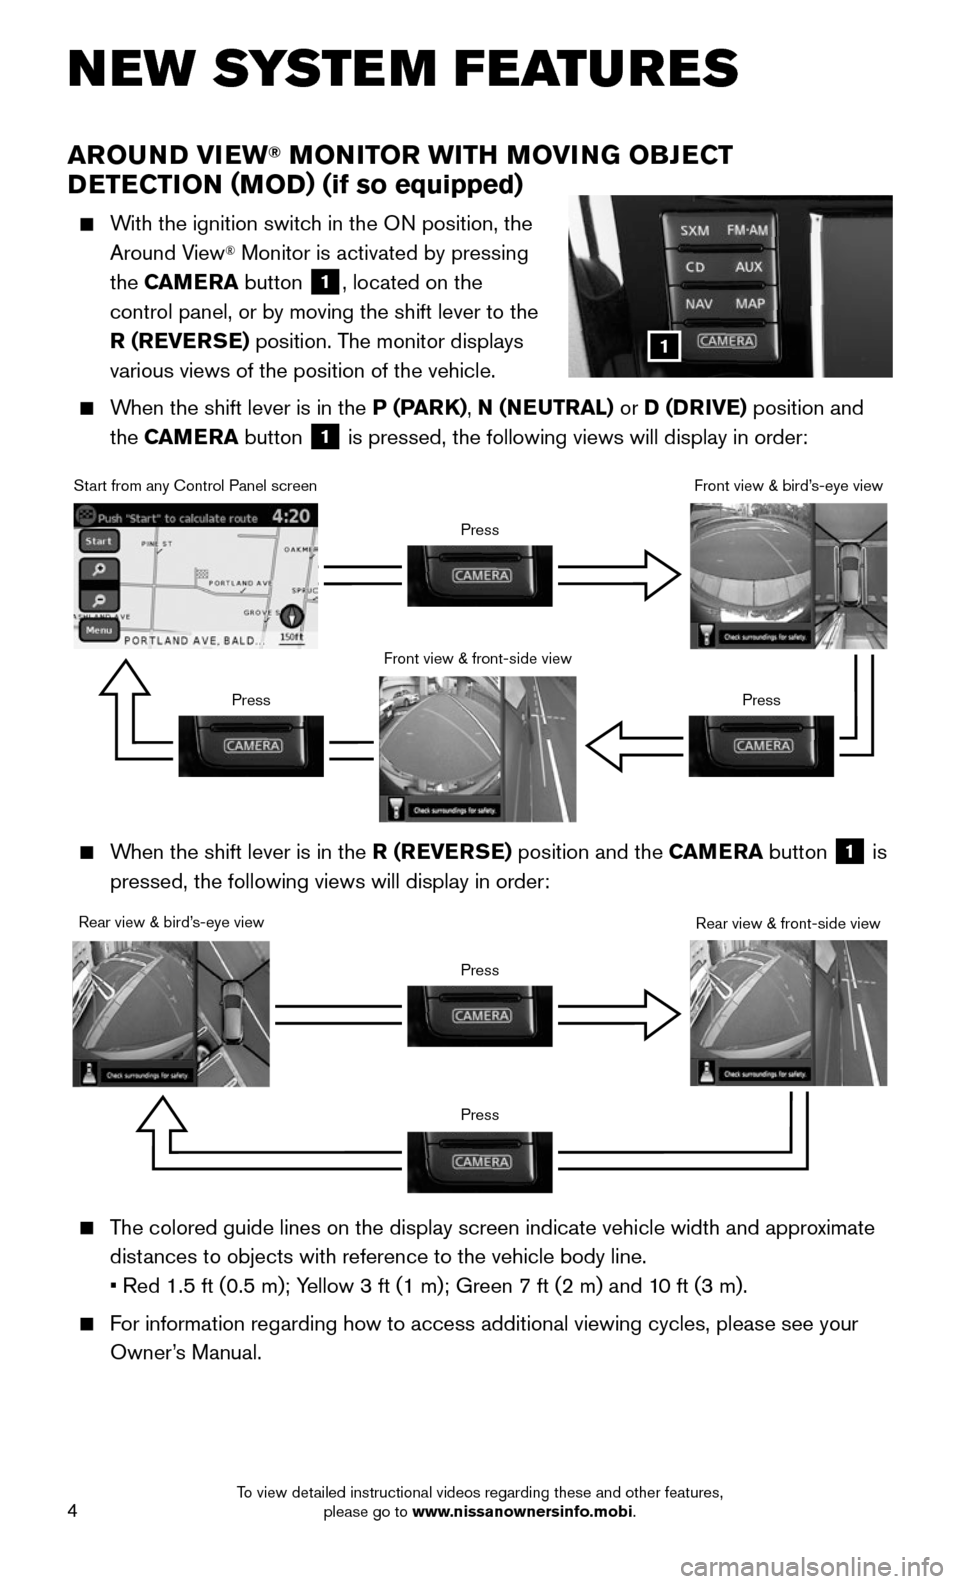
With the ignition switch in the ON position, the
Around View® Monitor is activated by pressing
the CAMERA button
1, located on the
control panel, or by moving the shift lever to the
R (REVERSE) position. The monitor displays
various views of the position of the vehicle.
When the shift lever is in the P (PARK), N (NEUTRAL) or D (DRIVE) position and
the CAMERA button
1 is pressed, the following views will display in order:
1
When the shift lever is in the R (REVERSE) position and the CAMERA button 1 is
pressed, the following views will display in order:
Start from any Control Panel screen
Rear view & bird’s-eye view Front view & front-side view
Press
Press
Press
Press
Front view & bird’s-eye view
Rear view & front-side view
The colored guide lines on the display screen indicate vehicle width and \
approximate
distances to objects with reference to the vehicle body line.
• Red 1.5 ft (0.5 m); Yellow 3 ft (1 m); Green 7 ft (2 m) and 10 ft (3 m).
For information regarding how to access additional viewing cycles, please\
see your
Owner’s Manual.
Press
To view detailed instructional videos regarding these and other features, please go to www.nissanownersinfo.mobi.
Page 7 of 36
5
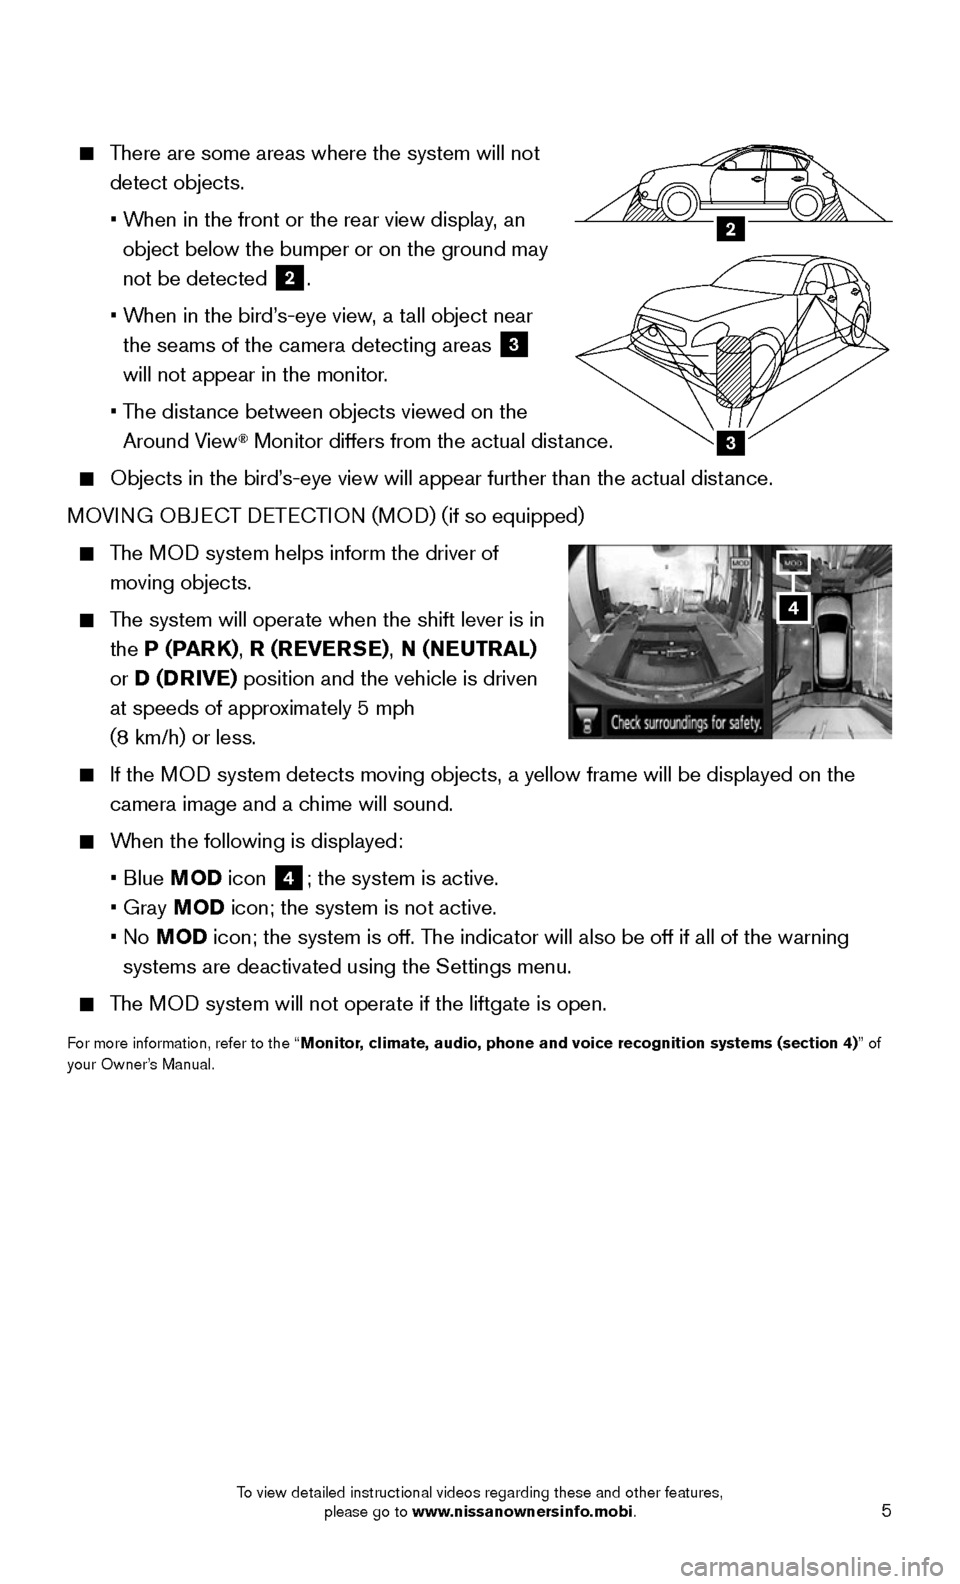
There are some areas where the system will not
detect objects.
• When in the front or the rear view display, an
object below the bumper or on the ground may
not be detected
2.
• When in the bird’s-eye view, a tall object near
the seams of the camera detecting areas 3
will not appear in the monitor.
• The distance between objects viewed on the
Around View® Monitor differs from the actual distance.
Objects in the bird’ s-eye view will appear further than the actual distance.
MOVING OBJECT DETECTION (MOD) (if so equipped)
The MOD system helps inform the driver of
moving objects.
The system will operate when the shift lever is in
the P (PARK), R (REVERSE), N (NEUTRAL)
or D (DRIVE) position and the vehicle is driven
at speeds of approximately 5 mph
(8 km/h) or less.
If the MOD system detects moving objects, a yellow frame will be displayed on the\
camera image and a chime will sound.
When the following is displayed:
• Blue MOD icon 4; the system is active.
• Gray MOD icon; the system is not active.
• No MOD icon; the system is off. The indicator will also be off if all of the warning
systems are deactivated using the Settings menu.
The MOD system will not operate if the liftgate is open.
For more information, refer to the “Monitor, climate, audio, phone and voice recognition systems (section 4) ” of
your Owner’s Manual.
4
3
2
To view detailed instructional videos regarding these and other features, please go to www.nissanownersinfo.mobi.
To view detailed instructional videos regarding these and other features, please go to www.nissanownersinfo.mobi.
Page 10 of 36
8
SIRI® EYES FREE1 (if so equipped)
If you have a compatible iPhone®,2 with Siri®, you can
link your iPhone® to the Siri® Eyes Free function in
your vehicle’s Bluetooth®,3 system.
If you have a compatible iPhone
® connected to the
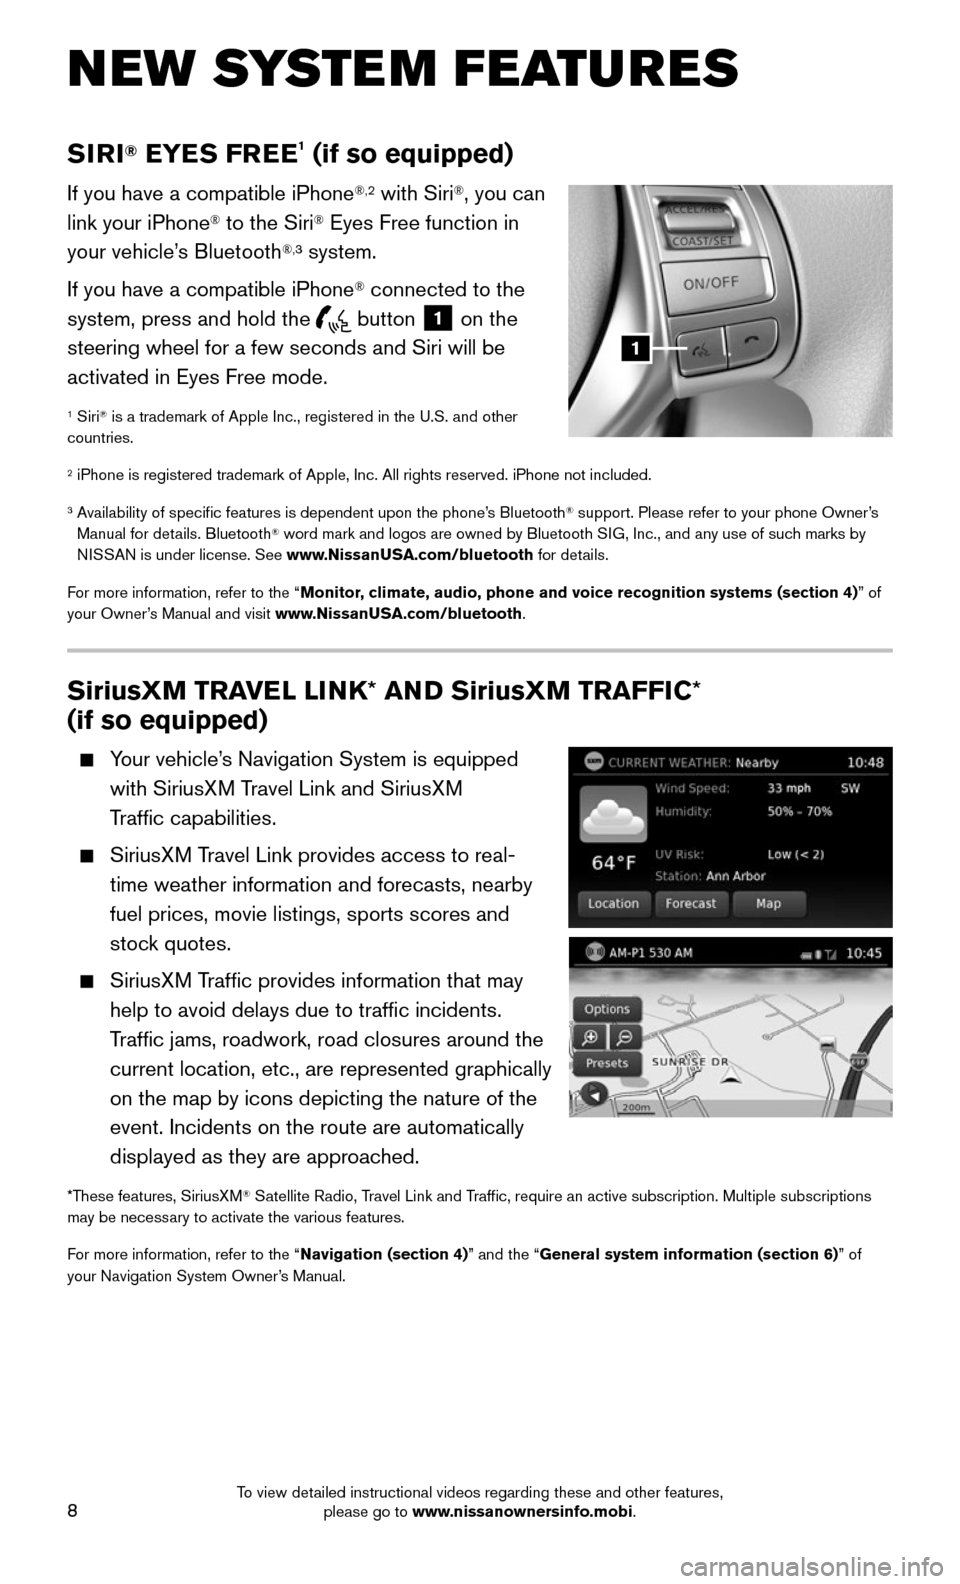
system, press and hold the
button 1 on the
steering wheel for a few seconds and Siri will be
activated in Eyes Free mode.
1 Siri® is a trademark of Apple Inc., registered in the U.S. and other
countries.
2 iPhone is registered trademark of Apple, Inc. All rights reserved. iPho\
ne not included.
3 Availability of specific features is dependent upon the phone’s Bluetooth® support. Please refer to your phone Owner’s
Manual for details. Bluetooth® word mark and logos are owned by Bluetooth SIG, Inc., and any use of such marks by
NISSAN is under license. See www.NissanUSA.com/bluetooth for details.
For more information, refer to the “Monitor, climate, audio, phone and voice recognition systems (section 4) ” of
your Owner’s Manual and visit www.NissanUSA.com/bluetooth.
NEW SYSTEM FEATURES
SiriusXM TRAVEL LINK* AND SiriusXM TRAFFIC*
(if so equipped)
Your vehicle’s Navigation System is equipped
with SiriusXM Travel Link and SiriusXM
Traffic capabilities.
SiriusXM Travel Link provides access to real-
time weather information and forecasts, nearby
fuel prices, movie listings, sports scores and
stock quotes.
SiriusXM Traffic provides information that may
help to avoid delays due to traffic incidents.
Traffic jams, roadwork, road closures around the
current location, etc., are represented graphically
on the map by icons depicting the nature of the
event. Incidents on the route are automatically
displayed as they are approached.
*These features, SiriusXM® Satellite Radio, Travel Link and Traffic, require an active subscription. Multiple subscriptions
may be necessary to activate the various features.
For more information, refer to the “Navigation (section 4)” and the “General system information (section 6)” of
your Navigation System Owner’s Manual.
1
To view detailed instructional videos regarding these and other features, please go to www.nissanownersinfo.mobi.
Page 11 of 36
9
ESSE NTIAL I N FOR MATION
TIRE PRESSURE MONITORING SYSTEM (TPMS)
WITH EASY FILL TIRE ALERT
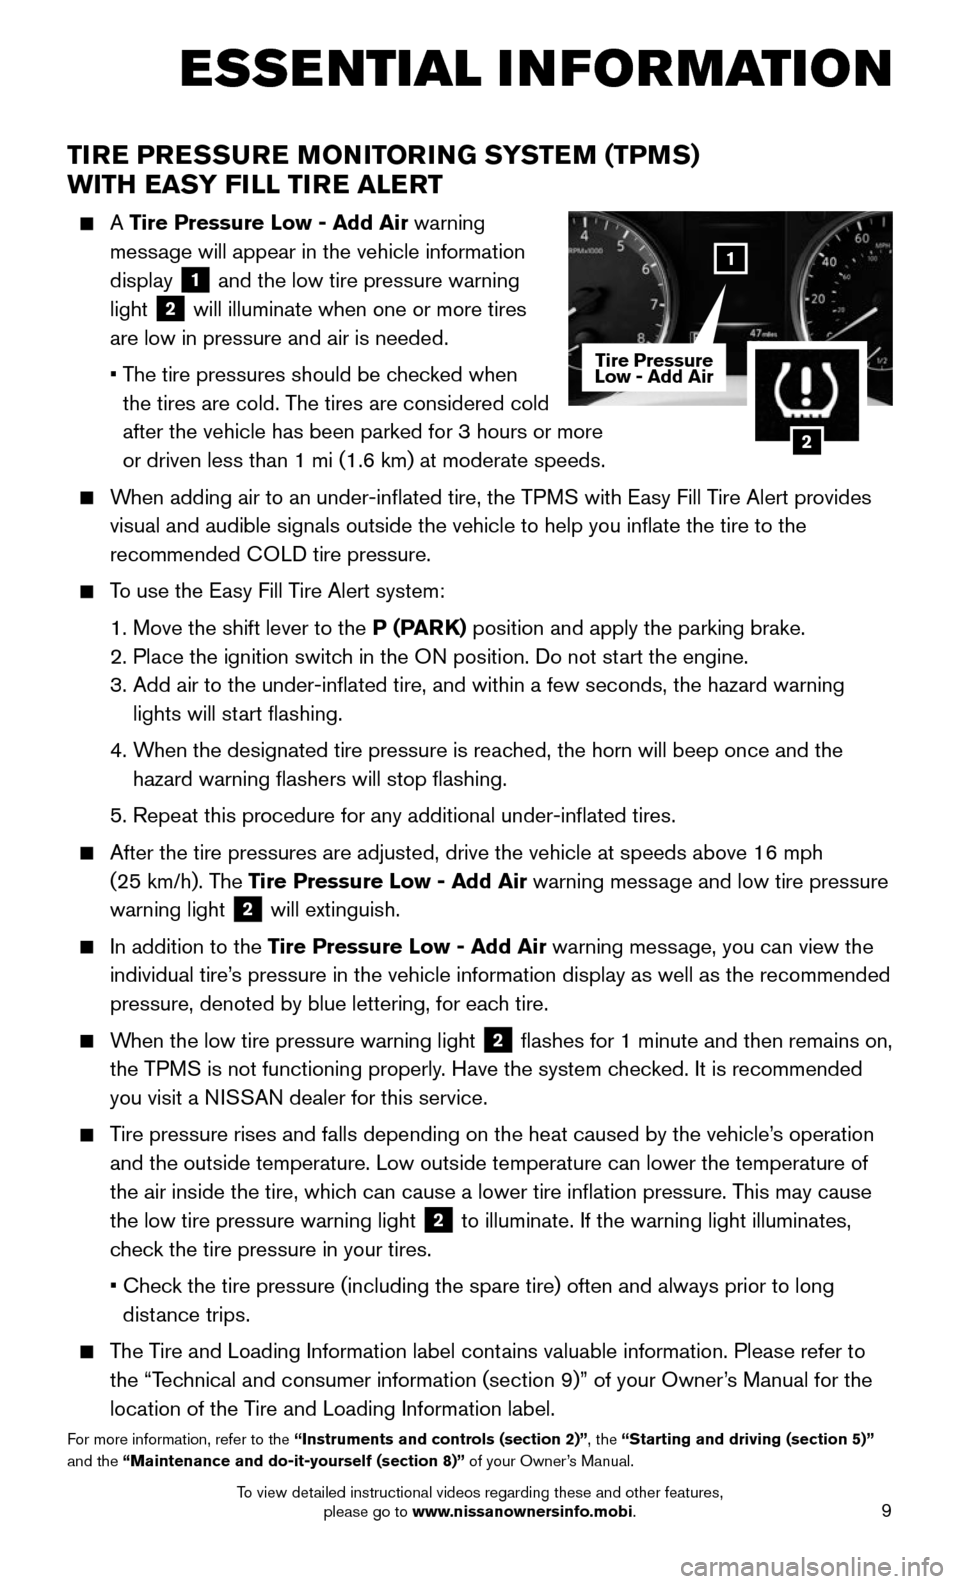
A Tire Pressure Low - Add Air warning
message will appear in the vehicle information
display
1 and the low tire pressure warning
light
2 will illuminate when one or more tires
are low in pressure and air is needed.
• The tire pressures should be checked when
the tires are cold. The tires are considered cold
after the vehicle has been parked for 3 hours or more
or driven less than 1 mi (1.6 km) at moderate speeds.
When adding air to an under-inflated tire, the TPMS with Easy Fill Tire Alert provides
visual and audible signals outside the vehicle to help you inflate the\
tire to the
recommended COLD tire pressure.
To use the Easy Fill Tire Alert system:
1. Move the shift lever to the P (PARK) position and apply the parking brake.
2. Place the ignition switc h in the ON position. Do not start the engine.
3. Add air to the under-inflated tire, and within a few seconds, the haza\
rd warning
lights will start flashing.
4. When the designated tire pressure is reached, the horn will beep once and the
hazard warning flashers will stop flashing.
5. Repeat this procedure for any additional under-inflated tires.
After the tire pressures are adjusted, drive the vehicle at speeds above\
16 mph
(25 km/h). The Tire Pressure Low - Add Air warning message and low tire pressure
warning light
2 will extinguish.
In addition to the Tire Pressure Low - Add Air warning message, you can view the
individual tire’s pressure in the vehicle information display as well as the recommended\
pressure, denoted by blue lettering, for each tire.
When the low tire pressure warning light 2 flashes for 1 minute and then remains on,
the TPMS is not functioning properly. Have the system checked. It is recommended
you visit a NISSAN dealer for this service.
Tire pressure rises and falls depending on the heat caused by the vehicle\
’s operation
and the outside temperature. Low outside temperature can lower the tempe\
rature of
the air inside the tire, which can cause a lower tire inflation pressure. This may cause
the low tire pressure warning light
2 to illuminate. If the warning light illuminates,
check the tire pressure in your tires.
• Check the tire pressure (including the spare tire) often and always prior \
to long
distance trips.
The Tire and Loading Information label contains valuable information. Please refer to
the “Technical and consumer information (section 9)” of your Owner’s Manual for the
location of the Tire and Loading Information label.
For more information, refer to the “Instruments and controls (section 2)”, the “Starting and driving (section 5)”
and the “Maintenance and do-it-yourself (section 8)” of your Owner’s Manual.
2
1
Tire Pressure
Low - Add Air
To view detailed instructional videos regarding these and other features, please go to www.nissanownersinfo.mobi.
Page 12 of 36
10
LOOSE FUEL CAP AND FUEL-FILLER DOOR
LOOSE FUEL CAP
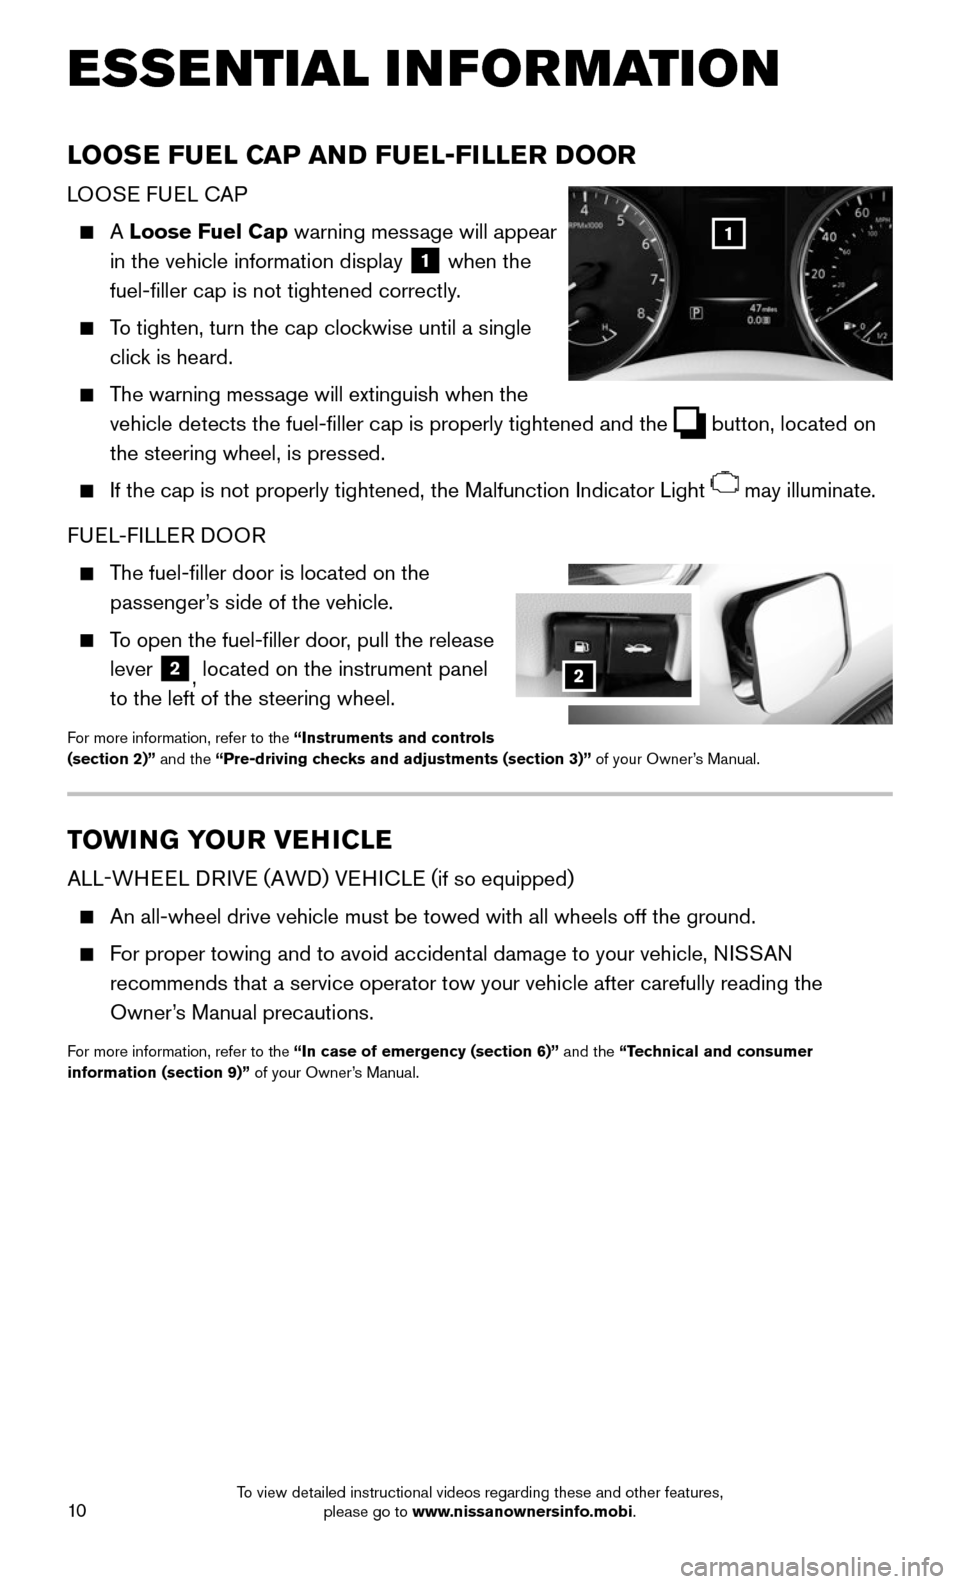
A Loose Fuel Cap warning message will appear
in the vehicle information display
1 when the
fuel-filler cap is not tightened correctly.
To tighten, turn the cap clockwise until a single
click is heard.
The warning message will extinguish when the
vehicle detects the fuel-filler cap is properly tightened and the button, located on
the steering wheel, is pressed.
If the cap is not properly tightened, the Malfunction Indicator Light may illuminate.
FUEL-FILLER DOOR
The fuel-filler door is located on the
passenger’s side of the vehicle.
To open the fuel-filler door, pull the release
lever 2, located on the instrument panel
to the left of the steering wheel.
For more information, refer to the “Instruments and controls
(section 2)” and the “Pre-driving checks and adjustments (section 3)” of your Owner’s Manual.
1
TOWING YOUR VEHICLE
ALL-WHEEL DRIVE (AWD) VEHICLE ( if so equipped)
An all-wheel drive vehicle must be towed with all wheels off the ground.\
For proper towing and to avoid accidental damage to your vehicle, NISSAN
recommends that a service operator tow your vehicle after carefully read\
ing the
Owner’s Manual precautions.
For more information, refer to the “In case of emergency (section 6)” and the “Technical and consumer
information (section 9)” of your Owner’s Manual.
2
ESSE NTIAL I N FOR MATION
To view detailed instructional videos regarding these and other features, please go to www.nissanownersinfo.mobi.
Page 13 of 36
11
OUTSIDE TEMPERATURE DISPLAY
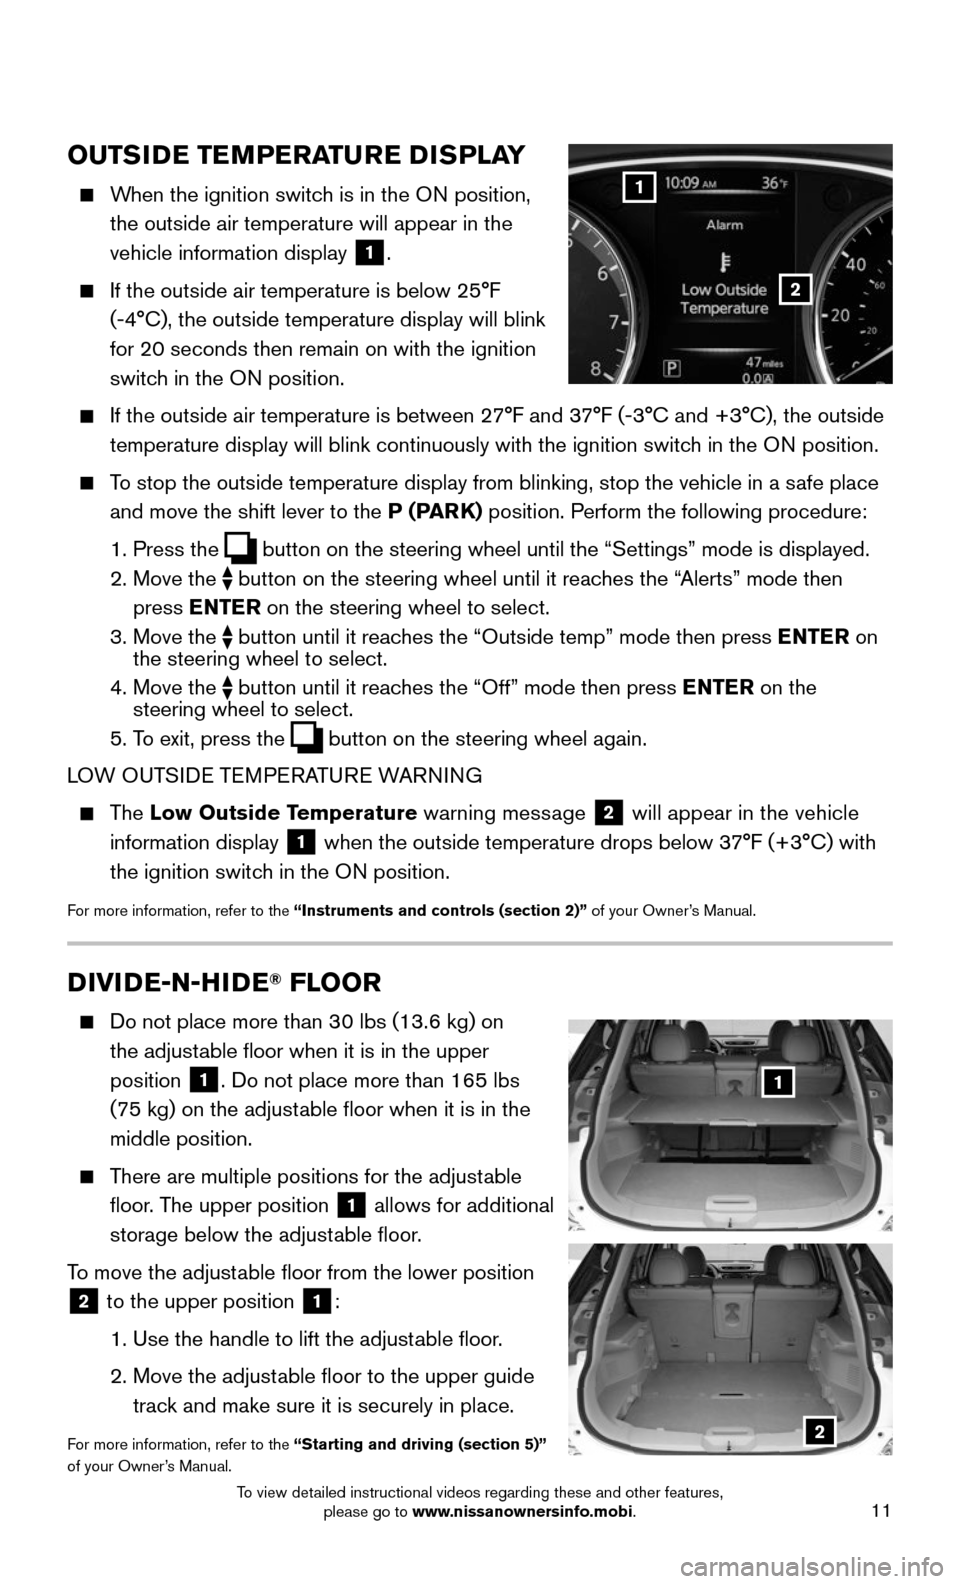
When the ignition switch is in the ON position,
the outside air temperature will appear in the
vehicle information display
1.
If the outside air temperature is below 25°F
(-4°C), the outside temperature display will blink
for 20 seconds then remain on with the ignition
switch in the ON position.
If the outside air temperature is between 2 7°F and 37°F (-3°C and +3°C), the outside
temperature display will blink continuously with the ignition switch in the ON position.
To stop the outside temperature display from blinking, stop the vehicle i\
n a safe place
and move the shift lever to the P (PARK) position. Perform the following procedure:
1. Press the button on the steering wheel until the “Settings” mode is display\
ed.
2. Move the button on the steering wheel until it reaches the “Alerts” mode then
press ENTER on the steering wheel to select.
3. Move the button until it reaches the “Outside temp” mode then press ENTER on
the steering wheel to select.
4. Move the button until it reaches the “Off” mode then press ENTER on the
steering wheel to select.
5. To exit, press the button on the steering wheel again.
LOW OUTSIDE TEMPERATURE WARNING
The Low Outside Temperature warning message 2 will appear in the vehicle
information display
1 when the outside temperature drops below 37°F (+3°C) with
the ignition switch in the ON position.
For more information, refer to the “Instruments and controls (section 2)” of your Owner’s Manual.
1
2
DIVIDE-N-HIDE® FLOOR
Do not place more than 3 0 lbs (13.6 kg) on
the adjustable floor when it is in the upper
position
1. Do not place more than 165 lbs
(75 kg) on the adjustable floor when it is in the
middle position.
There are multiple positions for the adjustable
floor. The upper position 1 allows for additional
storage below the adjustable floor.
To move the adjustable floor from the lower position
2 to the upper position 1:
1. Use the handle to lift the adjust able floor.
2. Move the adjust able floor to the upper guide
track and make sure it is securely in place.
For more information, refer to the “Starting and driving (section 5)”
of your Owner’s Manual.
1
2
To view detailed instructional videos regarding these and other features, please go to www.nissanownersinfo.mobi.
Page 14 of 36
12
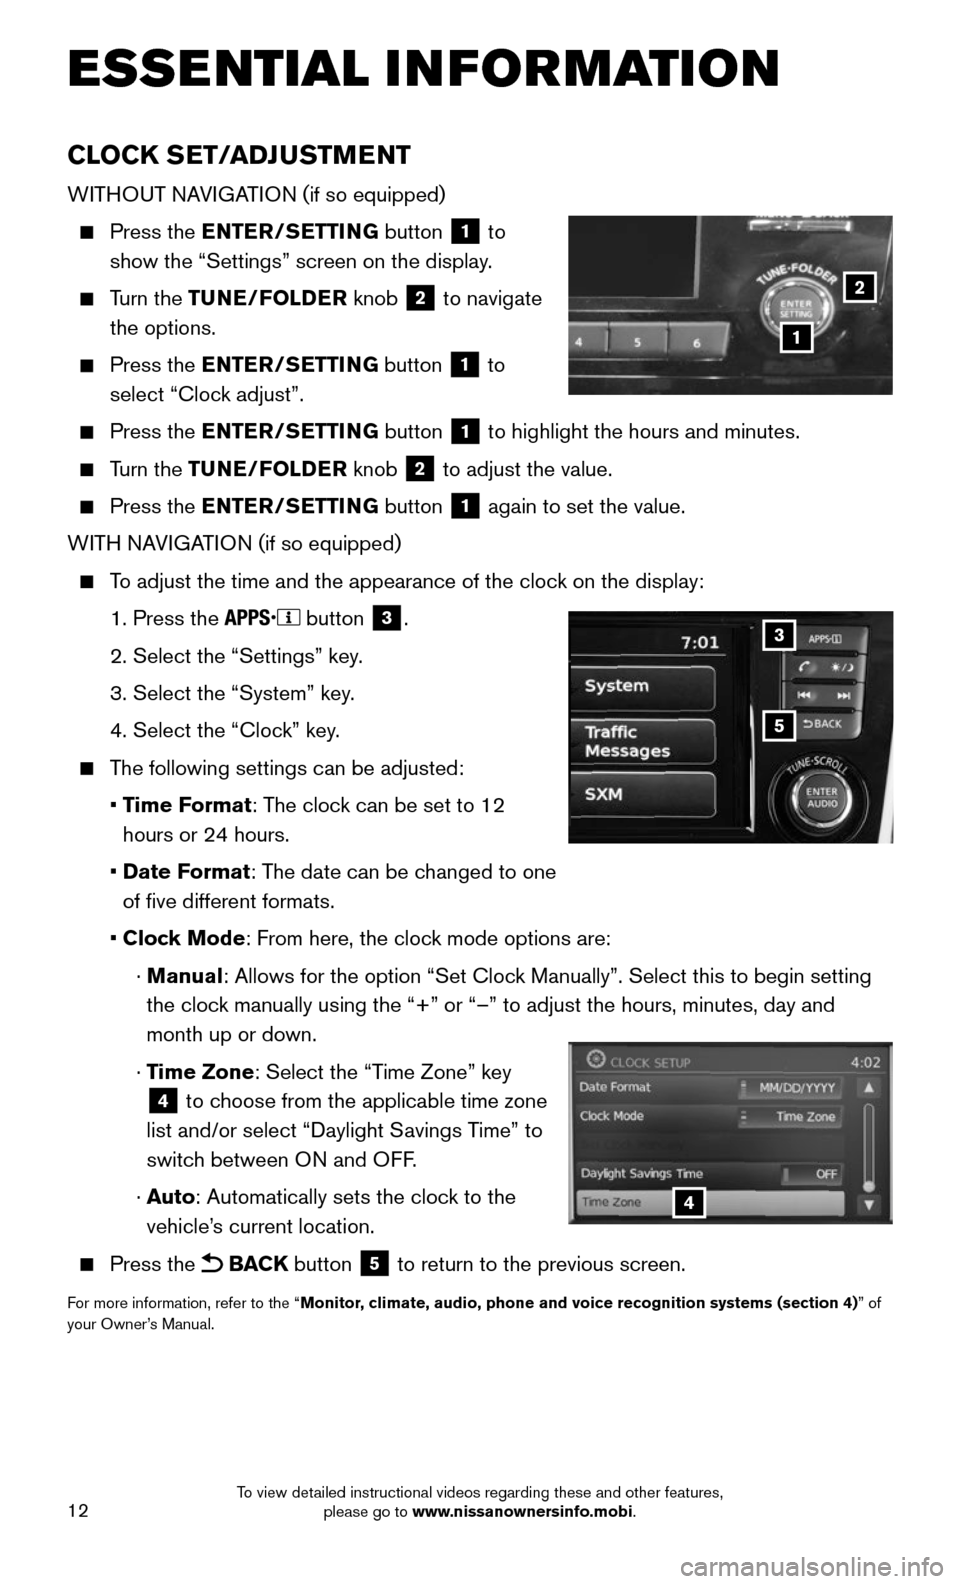
CLOCK SET/ADJUSTMENT
WITHOUT NAVIGATION (if so equipped)
Press the ENTER/SETTING button 1 to
show the “Settings” screen on the display.
Turn the TUNE/FOLDER knob 2 to navigate
the options.
Press the ENTER/SETTING button 1 to
select “Clock adjust”.
Press the ENTER/SETTING button 1 to highlight the hours and minutes.
Turn the TUNE/FOLDER knob 2 to adjust the value.
Press the ENTER/SETTING button 1 again to set the value.
WITH NAVIGATION (if so equipped)
To adjust the time and the appearance of the clock on the display:
1. Press the button 3.
2. Select the “Settings” key .
3. Select the “System” key.
4. Select the “Clock” key.
The following settings can be adjusted:
• Time Format: The clock can be set to 12
hours or 24 hours.
• Date Format: The date can be changed to one
of five different formats.
• Clock Mode: From here, the clock mode options are:
· Manual: Allows for the option “Set Clock Manually”. Select this to begin setting
the clock manually using the “+” or “–” to adjust the hours, minu\
tes, day and
month up or down.
· Time Zone: Select the “Time Zone” key
4 to choose from the applicable time zone
list and/or select “Daylight Savings Time” to
switch between ON and OFF.
· Auto: Automatically sets the clock to the
vehicle’s current location.
Press the BACK button 5 to return to the previous screen.
For more information, refer to the “Monitor, climate, audio, phone and voice recognition systems (section 4) ” of
your Owner’s Manual.
5
3
4
ESSE NTIAL I N FOR MATION
1
2
To view detailed instructional videos regarding these and other features, please go to www.nissanownersinfo.mobi.
Page 23 of 36
21
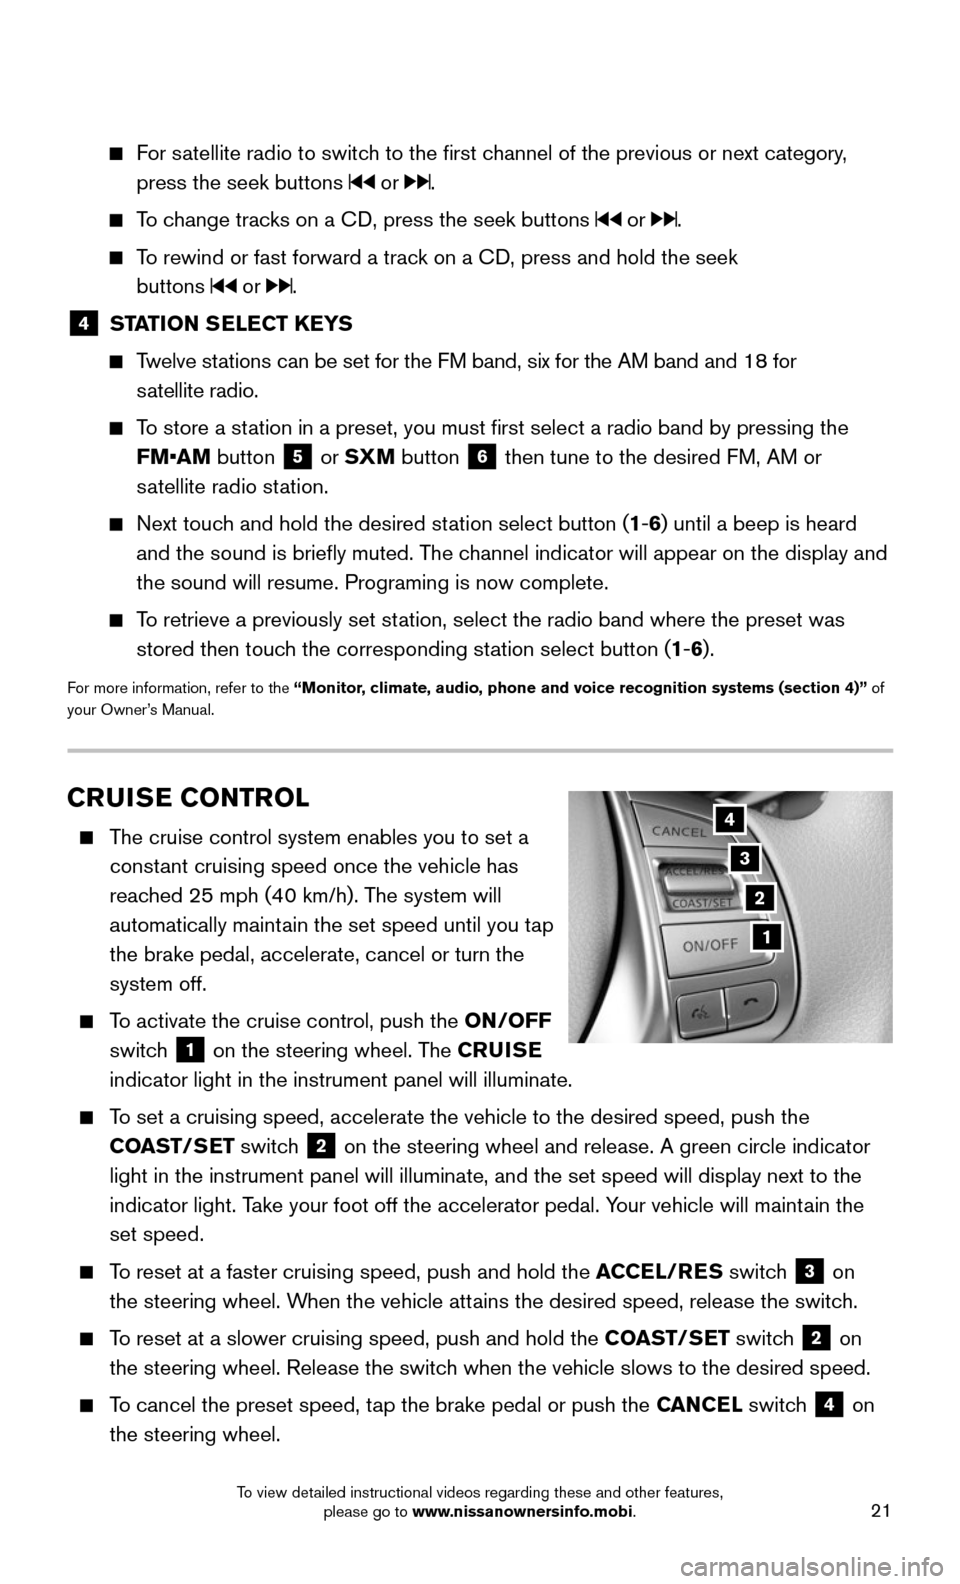
CRUISE CONTROL
The cruise control system enables you to set a
constant cruising speed once the vehicle has
reached 25 mph (40 km/h). The system will
automatically maintain the set speed until you tap
the brake pedal, accelerate, cancel or turn the
system off.
To activate the cruise control, push the ON/OFF
switch
1 on the steering wheel. The CRUISE
indicator light in the instrument panel will illuminate.
To set a cruising speed, accelerate the vehicle to the desired speed, pus\
h the
COAST/SET switch
2 on the steering wheel and release. A green circle indicator
light in the instrument panel will illuminate, and the set speed will di\
splay next to the
indicator light. Take your foot off the accelerator pedal. Your vehicle will maintain the
set speed.
To reset at a faster cruising speed, push and hold the ACCEL/RES switch 3 on
the steering wheel. When the vehicle attains the desired speed, release the switch.
To reset at a slower cruising speed, push and hold the COAST/SET switch 2 on
the steering wheel. Release the switch when the vehicle slows to the desired speed.
To cancel the preset speed, tap the brake pedal or push the CANCEL switch 4 on
the steering wheel.
3
2
1
4
For satellite radio to switch to the first channel of the previous or next category,
press the seek buttons or .
To change tracks on a CD, press the seek buttons or .
To rewind or fast forward a track on a CD, press and hold the seek
buttons
or .
4 STATION SELECT KEYS
Twelve stations can be set for the FM band, six for the AM band and 18 for
satellite radio.
To store a station in a preset, you must first select a radio band by pressing the \
FM•AM button
5 or SXM button 6 then tune to the desired FM, AM or
satellite radio station.
Next touch and hold the desired station select button (1-6) until a beep is heard
and the sound is briefly muted. The channel indicator will appear on the display and
the sound will resume. Programing is now complete.
To retrieve a previously set station, select the radio band where the preset was
stored then touch the corresponding station select button (1-6).
For more information, refer to the “Monitor, climate, audio, phone and voice recognition systems (section 4)” of
your Owner’s Manual.
To view detailed instructional videos regarding these and other features, please go to www.nissanownersinfo.mobi.