navigation system NISSAN ROGUE 2017 Owner´s Manual
[x] Cancel search | Manufacturer: NISSAN, Model Year: 2017, Model line: ROGUE, Model: NISSAN ROGUE 2017Pages: 554, PDF Size: 6.44 MB
Page 269 of 554
The current play pattern of the USB device is
displayed on the screen unless no pattern is
applied.
RPT (repeat) button
When the RPT (repeat) button is pressed while
an audio file on the USB device is playing, the
play pattern can be changed as follows:
1 Folder Repeat→1 Track Repeat →OFF
1 Track Repeat: the current track will be re-
peated.
1 Folder Repeat: the current folder will be re-
peated.
OFF: No repeat play pattern is applied. The indi-
cator on the display will turn off.
The current play pattern of the USB device is
displayed on the screen unless no pattern is
applied.
TUNE/SCROLL knob
If there are multiple folders with audio files on the
USB device, turn the TUNE/SCROLL knob to
change folders. Turn the knob to the left to skip
back a folder. Turn the knob to the right to skip
ahead a folder. If there is only one folder of audio
files on the USB device, turning the
TUNE/SCROLL knob in either direction will re-
turn to the first track on the USB device.
USB (Universal Serial Bus)
CONNECTION PORT (models with
Navigation System) (if so equipped)
Connecting a device to the USB
Connection Port
WARNING
Do not connect, disconnect, or operate the
USB device while driving. Doing so can be
a distraction. If distracted you could lose
control of your vehicle and cause an acci-
dent or serious injury.
CAUTION
● To avoid damage and loss of function
when using a USB device, note the fol-
lowing precautions.
● Do not force the USB device into the
USB port. Inserting the USB device
tilted or up-side-down into the port may
damage the port. Make sure that the
USB device is connected correctly into
the USB port.
● Do not grab the USB port cover (if so
equipped) when pulling the USB device
out of the port. This could damage the
port and the cover.
● Do not leave the USB cable in a place
where it can be pulled unintentionally.
Pulling the cable may damage the port.
For additional information, refer to your device
manufacturer’s owner information regarding the
proper use and care of the device.
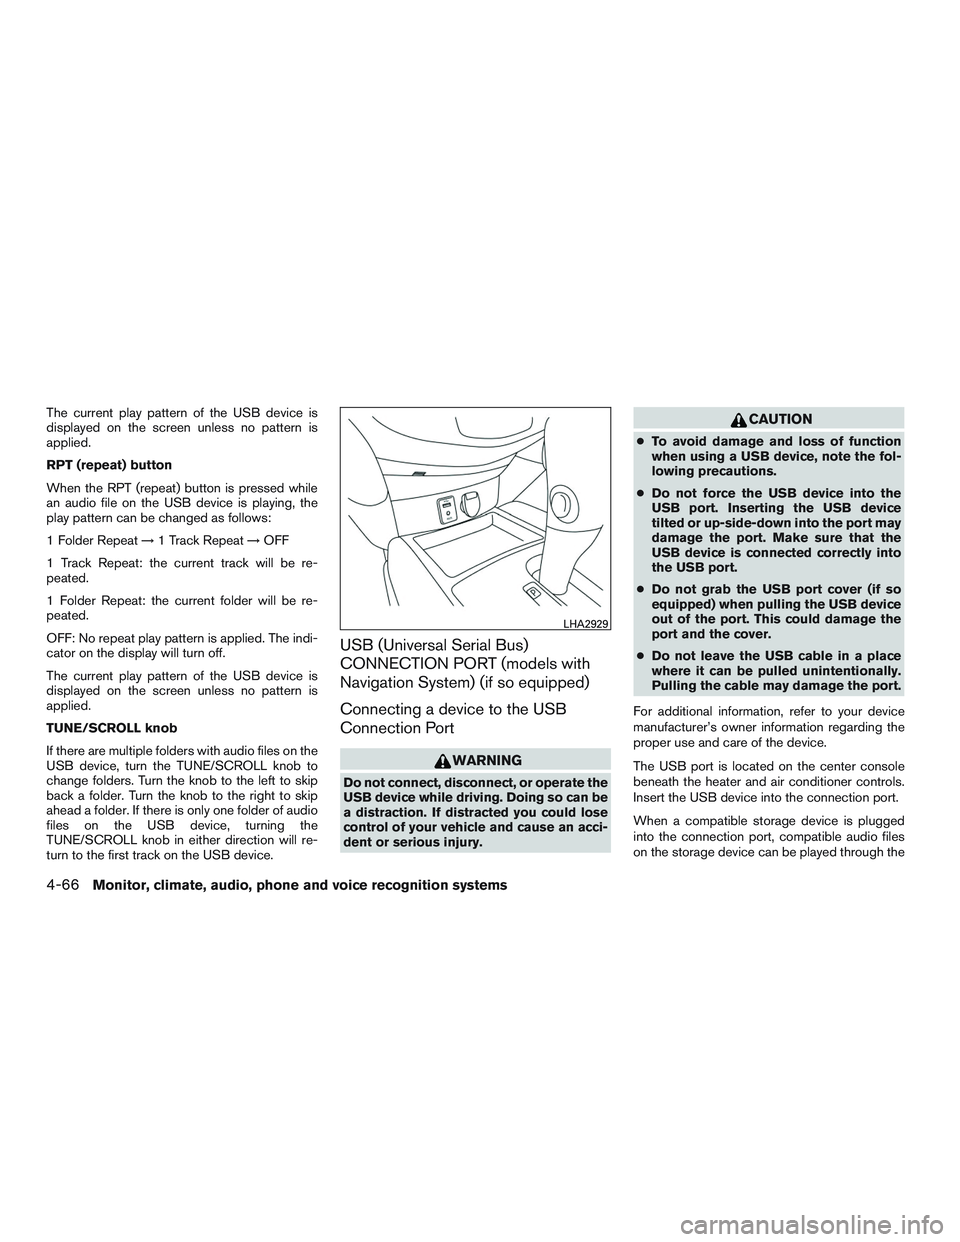
The USB port is located on the center console
beneath the heater and air conditioner controls.
Insert the USB device into the connection port.
When a compatible storage device is plugged
into the connection port, compatible audio files
on the storage device can be played through the
LHA2929
4-66Monitor, climate, audio, phone and voice recognition systems
Page 271 of 554
iPod®* PLAYER OPERATION
WITHOUT NAVIGATION SYSTEM (if
so equipped)
Connecting iPod®
WARNING
Do not connect, disconnect, or operate the
USB device while driving. Doing so can be
a distraction. If distracted you could lose
control of your vehicle and cause an acci-
dent or serious injury.
CAUTION
●Do not force the USB device into the
USB port. Inserting the USB device
tilted or up-side-down into the port may
damage the port. Make sure that the
USB device is connected correctly into
the USB port.
● Do not grab the USB port cover (if so
equipped) when pulling the USB device
out of the port. This could damage the
port and the cover.
● Do not leave the USB cable in a place
where it can be pulled unintentionally.
Pulling the cable may damage the port.
For additional information, refer to your device
manufacturer’s owner information regarding the
proper use and care of the device.
To connect an iPod® to the vehicle so that the
iPod® can be controlled with the audio system
controls and display screen, use the USB con-
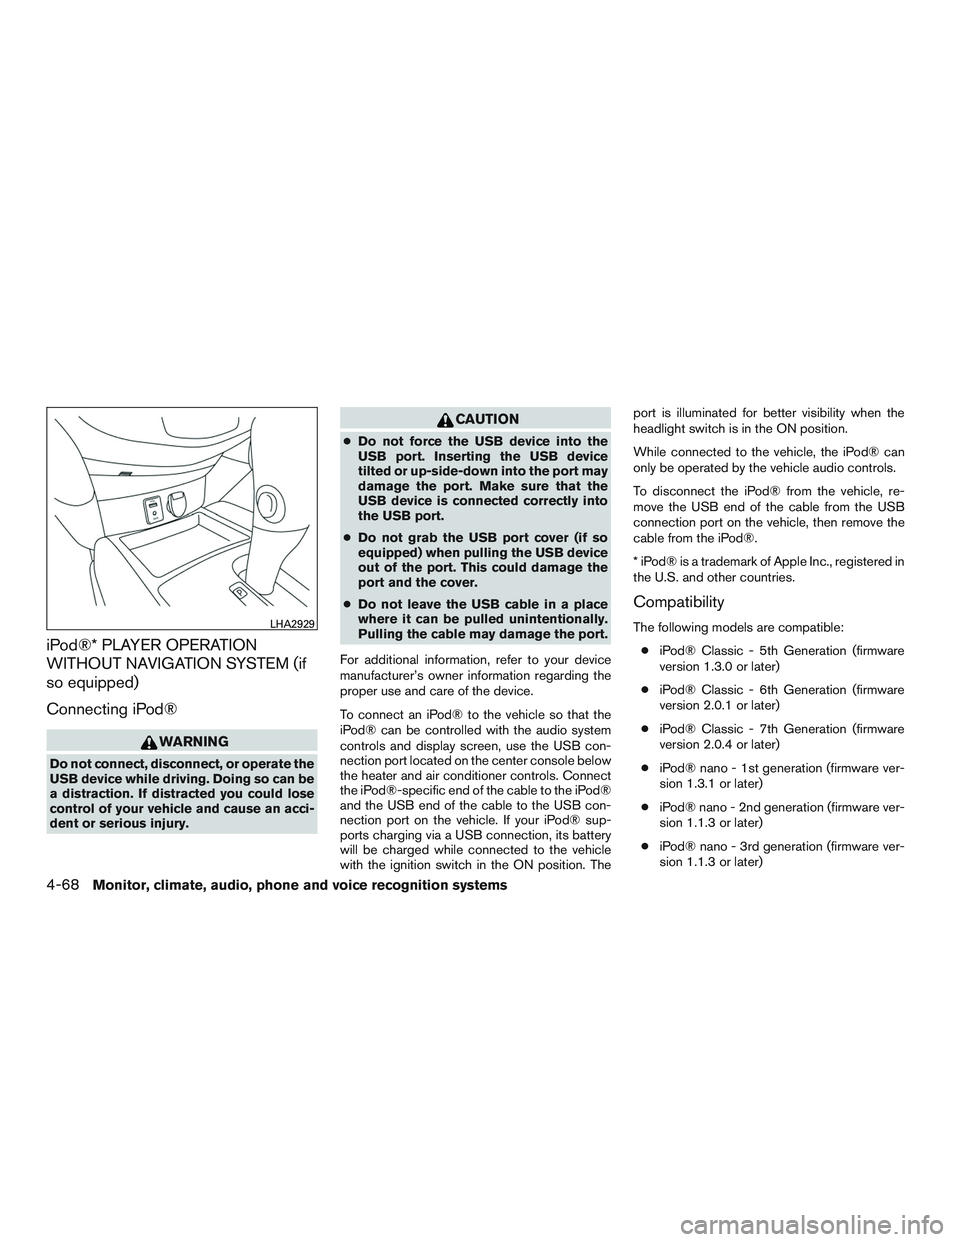
nection port located on the center console below
the heater and air conditioner controls. Connect
the iPod®-specific end of the cable to the iPod®
and the USB end of the cable to the USB con-
nection port on the vehicle. If your iPod® sup-
ports charging via a USB connection, its battery
will be charged while connected to the vehicle
with the ignition switch in the ON position. The port is illuminated for better visibility when the
headlight switch is in the ON position.
While connected to the vehicle, the iPod® can
only be operated by the vehicle audio controls.
To disconnect the iPod® from the vehicle, re-
move the USB end of the cable from the USB
connection port on the vehicle, then remove the
cable from the iPod®.
* iPod® is a trademark of Apple Inc., registered in
the U.S. and other countries.
Compatibility
The following models are compatible:
● iPod® Classic - 5th Generation (firmware
version 1.3.0 or later)
● iPod® Classic - 6th Generation (firmware
version 2.0.1 or later)
● iPod® Classic - 7th Generation (firmware
version 2.0.4 or later)
● iPod® nano - 1st generation (firmware ver-
sion 1.3.1 or later)
● iPod® nano - 2nd generation (firmware ver-
sion 1.1.3 or later)
● iPod® nano - 3rd generation (firmware ver-
sion 1.1.3 or later)LHA2929
4-68Monitor, climate, audio, phone and voice recognition systems
Page 273 of 554
iPod®* PLAYER OPERATION WITH
NAVIGATION SYSTEM (if so
equipped)
Connecting iPod®
WARNING
Do not connect, disconnect, or operate the
USB device while driving. Doing so can be
a distraction. If distracted you could lose
control of your vehicle and cause an acci-
dent or serious injury.
CAUTION
●Do not force the USB device into the
USB port. Inserting the USB device
tilted or up-side-down into the port may
damage the port. Make sure that the
USB device is connected correctly into
the USB port.
● Do not grab the USB port cover (if so
equipped) when pulling the USB device
out of the port. This could damage the
port and the cover.
● Do not leave the USB cable in a place
where it can be pulled unintentionally.
Pulling the cable may damage the port.
For additional information, refer to your device
manufacturer’s owner information regarding the
proper use and care of the device.
To connect an iPod® to the vehicle so that the
iPod® can be controlled with the audio system
controls and display screen, use the USB con-
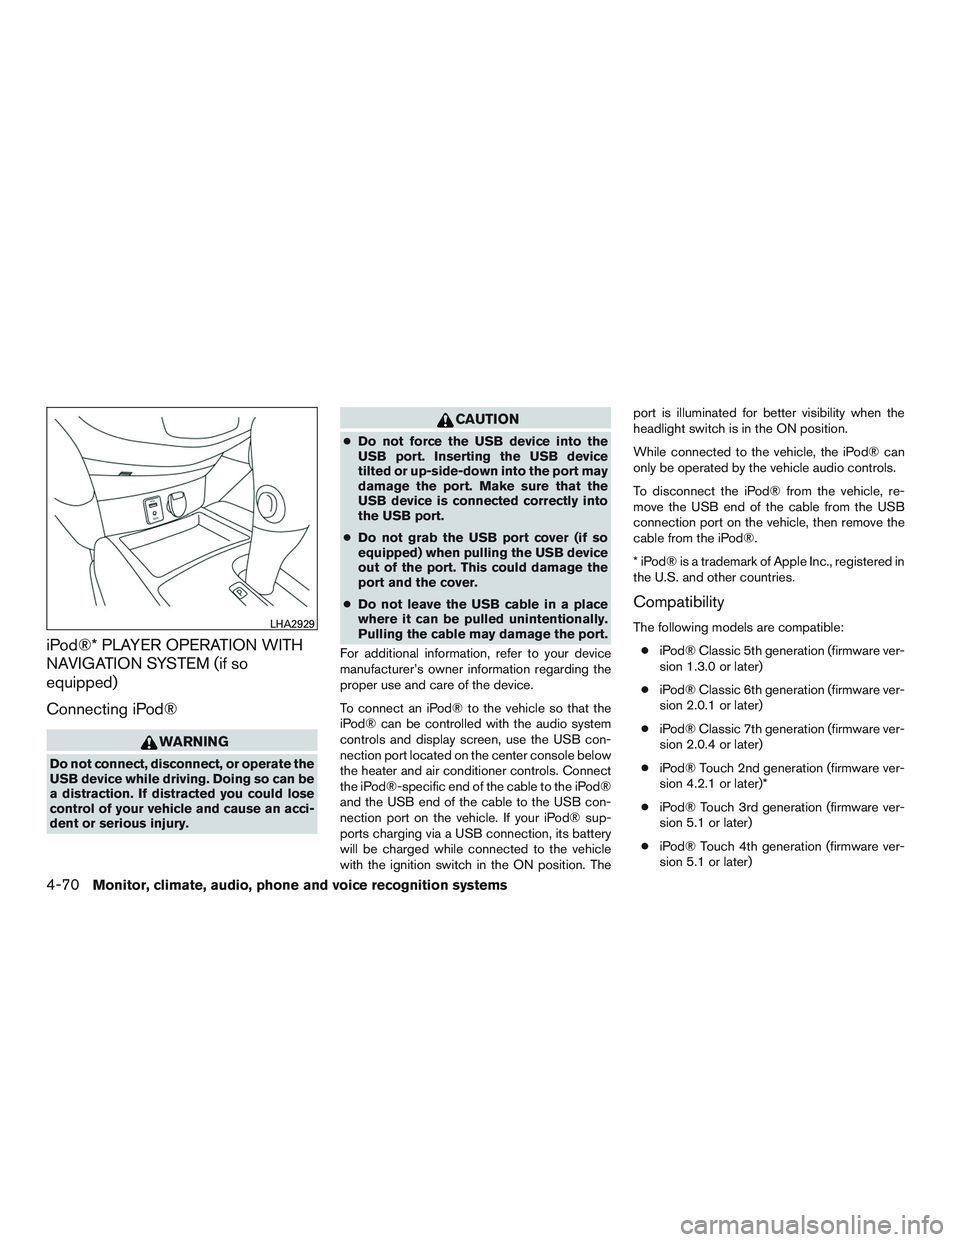
nection port located on the center console below
the heater and air conditioner controls. Connect
the iPod®-specific end of the cable to the iPod®
and the USB end of the cable to the USB con-
nection port on the vehicle. If your iPod® sup-
ports charging via a USB connection, its battery
will be charged while connected to the vehicle
with the ignition switch in the ON position. The port is illuminated for better visibility when the
headlight switch is in the ON position.
While connected to the vehicle, the iPod® can
only be operated by the vehicle audio controls.
To disconnect the iPod® from the vehicle, re-
move the USB end of the cable from the USB
connection port on the vehicle, then remove the
cable from the iPod®.
* iPod® is a trademark of Apple Inc., registered in
the U.S. and other countries.
Compatibility
The following models are compatible:
● iPod® Classic 5th generation (firmware ver-
sion 1.3.0 or later)
● iPod® Classic 6th generation (firmware ver-
sion 2.0.1 or later)
● iPod® Classic 7th generation (firmware ver-
sion 2.0.4 or later)
● iPod® Touch 2nd generation (firmware ver-
sion 4.2.1 or later)*
● iPod® Touch 3rd generation (firmware ver-
sion 5.1 or later)
● iPod® Touch 4th generation (firmware ver-
sion 5.1 or later)LHA2929
4-70Monitor, climate, audio, phone and voice recognition systems
Page 276 of 554
BLUETOOTH® STREAMING AUDIO
WITHOUT NAVIGATION SYSTEM (if
so equipped)
If you have a compatible Bluetooth® audio de-
vice that is capable of playing audio files, the
device can be connected to the vehicle’s audio
system so that the audio files on the device play
through the vehicle’s speakers.
Connecting Bluetooth® audio
To connect your Bluetooth® audio device to the
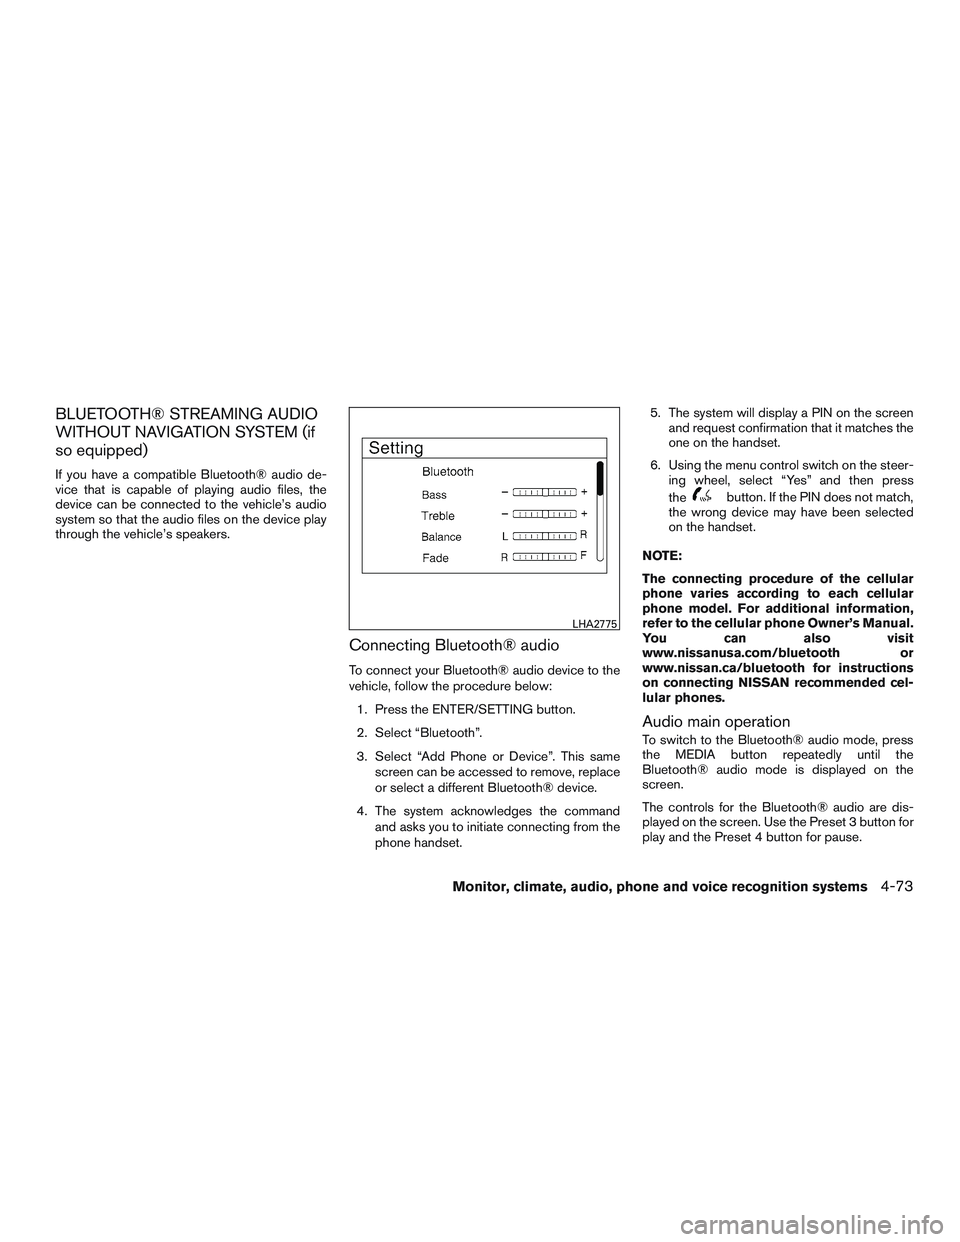
vehicle, follow the procedure below:1. Press the ENTER/SETTING button.
2. Select “Bluetooth”.
3. Select “Add Phone or Device”. This same screen can be accessed to remove, replace
or select a different Bluetooth® device.
4. The system acknowledges the command and asks you to initiate connecting from the
phone handset. 5. The system will display a PIN on the screen
and request confirmation that it matches the
one on the handset.
6. Using the menu control switch on the steer- ing wheel, select “Yes” and then press
the
button. If the PIN does not match,
the wrong device may have been selected
on the handset.
NOTE:
The connecting procedure of the cellular
phone varies according to each cellular
phone model. For additional information,
refer to the cellular phone Owner’s Manual.
You can also visit
www.nissanusa.com/bluetooth or
www.nissan.ca/bluetooth for instructions
on connecting NISSAN recommended cel-
lular phones.
Audio main operation
To switch to the Bluetooth® audio mode, press
the MEDIA button repeatedly until the
Bluetooth® audio mode is displayed on the
screen.
The controls for the Bluetooth® audio are dis-
played on the screen. Use the Preset 3 button for
play and the Preset 4 button for pause.
LHA2775
Monitor, climate, audio, phone and voice recognition systems4-73
Page 277 of 554
BLUETOOTH® STREAMING AUDIO
WITH NAVIGATION SYSTEM (if so
equipped)
If you have a compatible Bluetooth® audio de-
vice that is capable of playing audio files, the
device can be connected to the vehicle’s audio
system so that the audio files on the device play
through the vehicle’s speakers.
Connecting Bluetooth® audio
To connect your Bluetooth® audio device to the
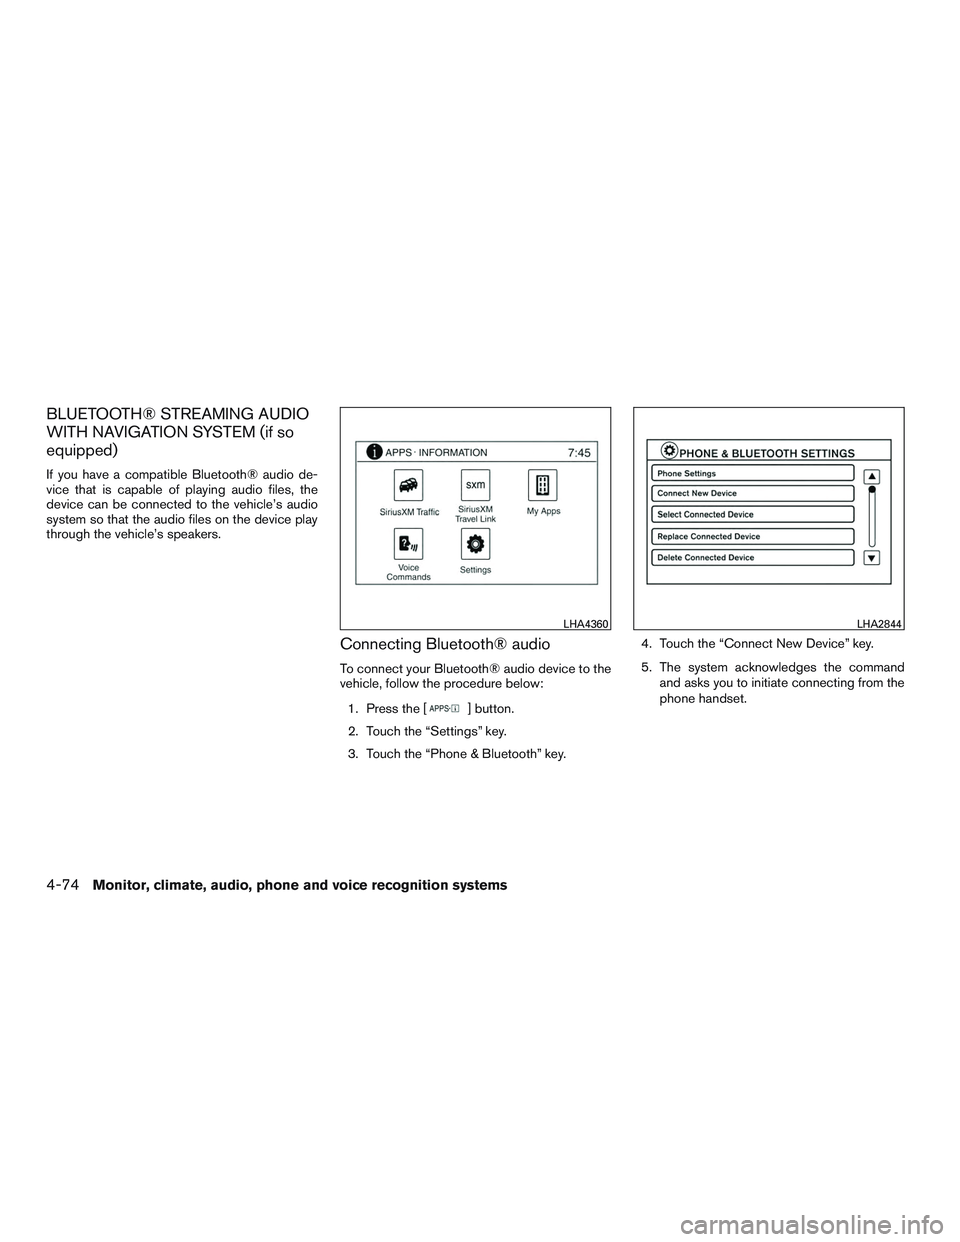
vehicle, follow the procedure below:1. Press the [
] button.
2. Touch the “Settings” key.
3. Touch the “Phone & Bluetooth” key. 4. Touch the “Connect New Device” key.
5. The system acknowledges the command
and asks you to initiate connecting from the
phone handset.
LHA4360LHA2844
4-74Monitor, climate, audio, phone and voice recognition systems
Page 280 of 554
●Press or hold for more than 1.5 seconds to
reverse or fast forward the track being
played.
(back) button
Press the(back) button to return to the
previous screen or cancel the current selection.
ANTENNA
The vehicle is equipped with a shark fin antenna
and an antenna pattern is printed inside the rear
window.
CAUTION
● Do not place metalized film near the
rear window glass or attach any metal
parts to it. This may cause poor recep-
tion or noise.
● When cleaning the inside of the rear
window, be careful not to scratch or
damage the rear window antenna.
Lightly wipe along the antenna with a
dampened soft cloth. This vehicle is equipped with Smartphone Inte-
gration technology. This allows many compatible
smartphone applications to be displayed and
easily controlled through the vehicle’s display
screen.
NOTE:
A compatible smartphone and registration
is required to use mobile applications or to
access connected features of certain ve-
hicle applications.
REGISTERING WITH
NISSANCONNECTSMMOBILE APPS
To use the Smartphone Integration feature, it is
necessary for the user to register. In order to
register, visit the NissanConnect
SMMobile Apps
website, www.nissanusa.com/connect/ or
www.nissan.ca/nissanconnect or
www.nissan.ca/nissanconnect/fr and sign up or
create an account through the prompts on the
NissanConnect Mobile Apps. Once registered,
download the NissanConnect Mobile Apps from
your compatible phone’s application download
source and then log into the application. If you
already have an account created through the
App, please log in.
CONNECT PHONE
To use this feature, a compatible smartphone
must be connected via Bluetooth® or USB to the
vehicle. For additional information, refer to
“Bluetooth® Hands-Free Phone System with
Navigation System” in this section.
NOTE:
For vehicles with navigation, Apple
iPhones® REQUIRE the phone to be
plugged in via USB for NissanConnect Mo-
bile Apps to function.
For vehicles without Navigation, Apple
iPhones® must be paired via Bluetooth®
for NissanConnect Mobile Apps to func-
tion.
NOTE:
For Android phones, NissanConnect Mo-
bile Apps REQUIRES the phone to be
paired via Bluetooth®.
NISSANCONNECTSMMOBILE APPS
(if so equipped)
Monitor, climate, audio, phone and voice recognition systems4-77
Page 281 of 554
APPLICATION DOWNLOAD
Once connected, the NissanConnect App will
search your phone to determine which compatible
applications are currently installed. The user will
then choose which apps they want to bring into
their vehicle from the list of apps within the “Man-
age My Apps” section of the NissanConnect App
on their smartphone. The vehicle will then down-
load the in-vehicle interface for each of these com-
patible applications. Once downloaded, the user
can access their selected smartphone applications
through the vehicle touch-screen. For additional
information, refer to www.nissanusa.com/connect
or www.nissan.ca/nissanconnect or
www.nissan.ca/nissanconnect/fr regarding appli-
cation availability.
NissanConnectSMServices is a suite of telemat-
ics tools that provide emergency preparedness,
remote access, customizable alerts and conve-
nience services. This feature is an option on
Navigation equipped vehicles. For additional in-
formation, refer to the separate Navigation Sys-
tem Owner’s Manual. Apple Siri® Eyes Free personal assistant can be
accessed from the vehicle. Siri Eyes Free can be
accessed in Siri Eyes Free mode to reduce user
distraction. In this mode, Siri Eyes Free is avail-
able for interaction by voice control. After con-
necting a compatible Apple device by using
Bluetooth®, Siri Eyes Free can be activated from
the
TALK switch on the steering wheel.
Siri® is a trademark of Apple Inc., registered in
the U.S. and other countries.
● Some Siri Eyes Free functions, such as dis-
playing pictures or opening apps, may not
be available while driving.
● For getting best results, always update your
device to the latest software version.
● Keep the interior of the vehicle as quiet as
possible. Close the windows to eliminate the
surrounding noises (traffic noises, vibration
sounds, etc.) , which may prevent the system
from recognizing the voice commands cor-
rectly.
● For functions that can be used in Siri Eyes
Free, please refer to the Apple website.
NISSANCONNECTSMSERVICES (if so
equipped) SIRI® EYES FREE
4-78Monitor, climate, audio, phone and voice recognition systems
Page 282 of 554
REQUIREMENTS
Siri is only available on the iPhone® 4S or later.
Devices released before iPhone® 4S are not
supported by the Siri Eyes Free system. Visit
www.apple.com/ios/siri for details about device
compatibility.
Siri must be enabled on the phone. Please check
phone settings.
If the device has a lock screen, Siri must be
accessible from the lock screen. Please check
phone settings.
For best results, always update your device to the
latest software version.
SIRI® ACTIVATION
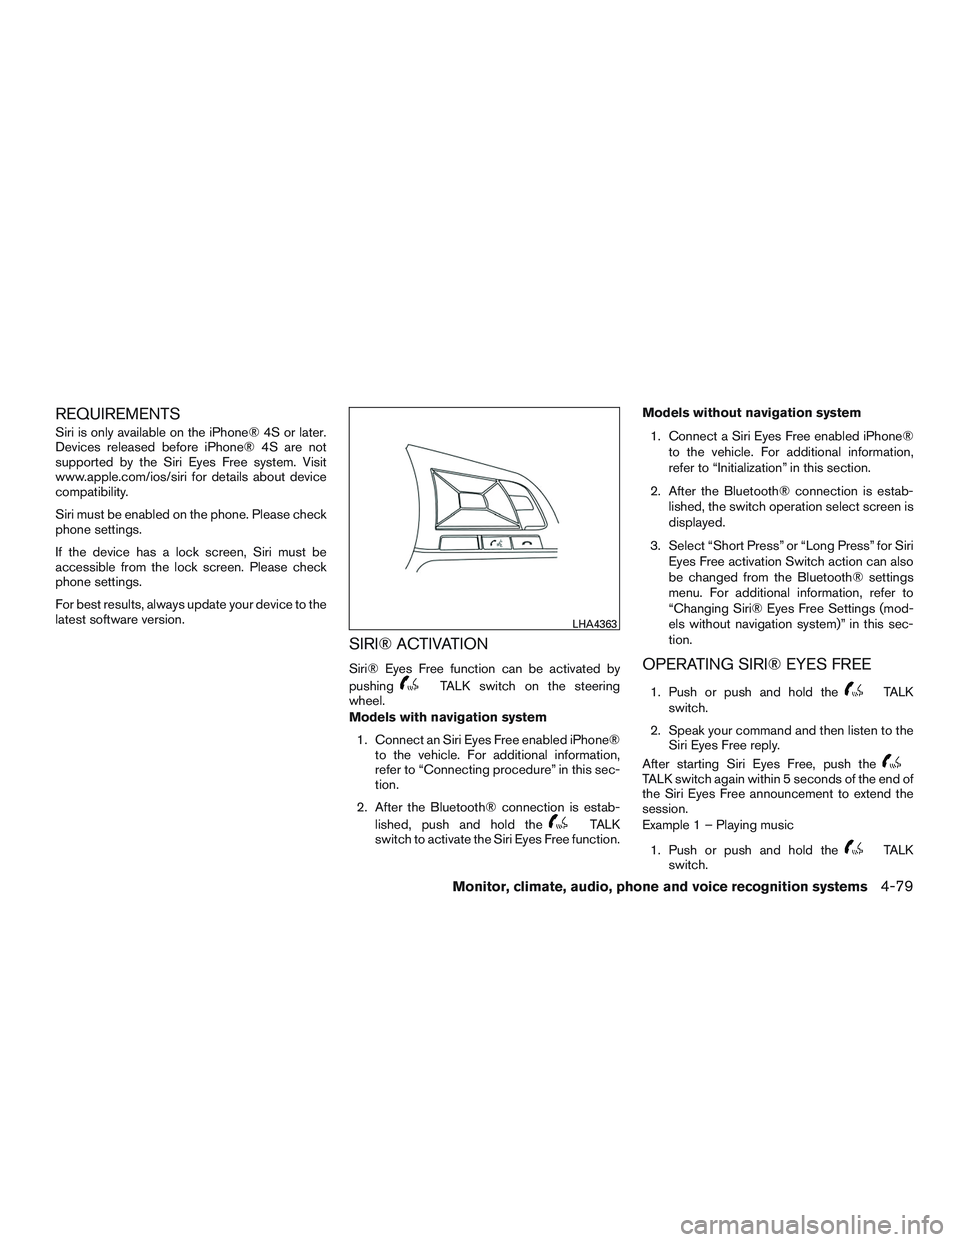
Siri® Eyes Free function can be activated by
pushing
TALK switch on the steering
wheel.
Models with navigation system
1. Connect an Siri Eyes Free enabled iPhone® to the vehicle. For additional information,
refer to “Connecting procedure” in this sec-
tion.
2. After the Bluetooth® connection is estab- lished, push and hold the
TALK
switch to activate the Siri Eyes Free function. Models without navigation system
1. Connect a Siri Eyes Free enabled iPhone® to the vehicle. For additional information,
refer to “Initialization” in this section.
2. After the Bluetooth® connection is estab- lished, the switch operation select screen is
displayed.
3. Select “Short Press” or “Long Press” for Siri Eyes Free activation Switch action can also
be changed from the Bluetooth® settings
menu. For additional information, refer to
“Changing Siri® Eyes Free Settings (mod-
els without navigation system)” in this sec-
tion.
OPERATING SIRI® EYES FREE
1. Push or push and hold theTALK
switch.
2. Speak your command and then listen to the Siri Eyes Free reply.
After starting Siri Eyes Free, push the
TALK switch again within 5 seconds of the end of
the Siri Eyes Free announcement to extend the
session.
Example 1 – Playing music
1. Push or push and hold the
TALK
switch.
LHA4363
Monitor, climate, audio, phone and voice recognition systems4-79
Page 283 of 554
2. Say “Play (artist name, song name, etc.)”.
3. Your vehicle will automatically change toBluetooth® Audio or iPod® mode* when
the music starts playing. Mode selection is
determined by the phone.
* If the iPhone® is also connected with the USB
cable.
If the audio track does not start playing automati-
cally after Siri Eyes Free ends, try changing the
track or audio source to resume playback.
NOTE:
For best results, use the native music app.
Performance of music control function
while using Podcasts, Audiobook or other
3rd party music apps may vary and is con-
trolled by the iPhone®.
Example 2 – Replying to text messages
1. If a compatible iPhone® is connected and “Show Notifications” of the iPhone® set-
tings is enabled, the vehicle will display a
notification for new incoming text messages.
2. After reading the message, push or push and hold the
TALK switch to reply
using Siri Eyes Free. 3. After a beep sounds, say “Text message” or
a similar command to reply using Siri Eyes
Free.
CHANGING SIRI® EYES FREE
SETTINGS (models without navigation
system)
Settings for Siri® Eyes Free can be found in the
Bluetooth settings menu. For additional informa-
tion, refer to “Bluetooth® settings” in this section.
1. Press the ENTER/SETTING button.
2. Use the TUNE/SCROLL knob to select “Bluetooth” and then press the
ENTER/SETTING button.
3. Use the TUNE/SCROLL knob to select “Siri” and then press the ENTER/SETTING
button.
4. Select “Short Press” or “Long Press” using the TUNE/SCROLL knob and then press
the ENTER/SETTING button.
CHANGING SIRI® EYES FREE
SETTINGS (models with navigation
system)
Settings for Siri® Eyes Free can be found in the
Bluetooth settings menu. For additional informa-
tion, refer to “Bluetooth® settings” in this section.
1. Press the [
] button.
2. Touch the “Settings” key.
3. Touch the “Phone & Bluetooth” key.
4. Touch the “Phone settings” key.
5. Select “Short Press” or “Long Press” to set the activation.
4-80Monitor, climate, audio, phone and voice recognition systems
Page 284 of 554
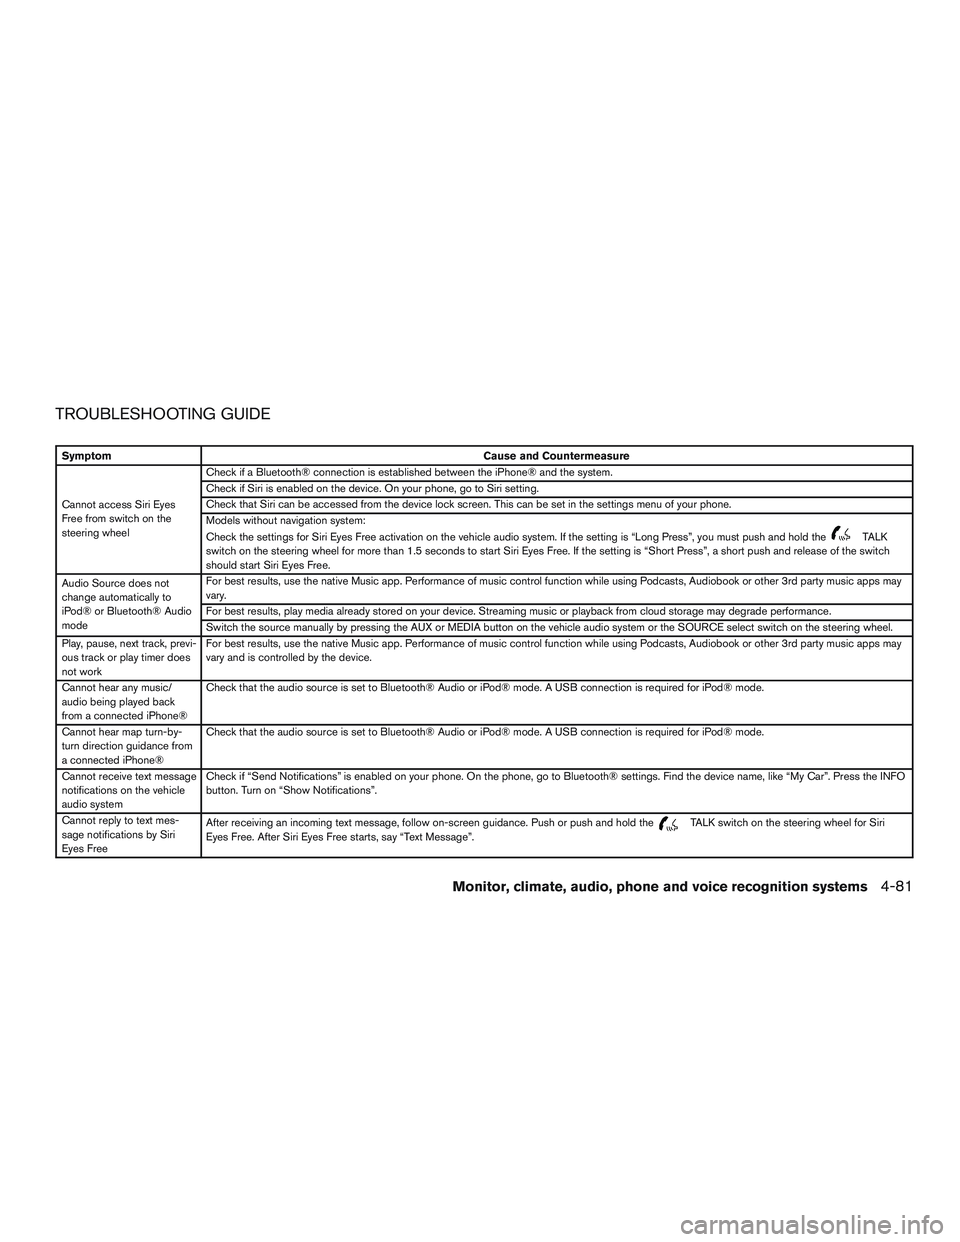
TROUBLESHOOTING GUIDE
SymptomCause and Countermeasure
Cannot access Siri Eyes
Free from switch on the
steering wheel Check if a Bluetooth® connection is established between the iPhone® and the system.
Check if Siri is enabled on the device. On your phone, go to Siri setting.
Check that Siri can be accessed from the device lock screen. This can be set in the settings menu of your phone.
Models without navigation system:
Check the settings for Siri Eyes Free activation on the vehicle audio system. If the setting is “Long Press”, you must push and hold the
TALK
switch on the steering wheel for more than 1.5 seconds to start Siri Eyes Free. If the setting is “Short Press”, a short push and release of the switch
should start Siri Eyes Free.
Audio Source does not
change automatically to
iPod® or Bluetooth® Audio
mode For best results, use the native Music app. Performance of music control function while using Podcasts, Audiobook or other 3rd party music apps may
vary.
For best results, play media already stored on your device. Streaming music or playback from cloud storage may degrade performance.
Switch the source manually by pressing the AUX or MEDIA button on the vehicle audio system or the SOURCE select switch on the steering wheel.
Play, pause, next track, previ-
ous track or play timer does
not work For best results, use the native Music app. Performance of music control function while using Podcasts, Audiobook or other 3rd party music apps may
vary and is controlled by the device.
Cannot hear any music/
audio being played back
from a connected iPhone® Check that the audio source is set to Bluetooth® Audio or iPod® mode. A USB connection is required for iPod® mode.
Cannot hear map turn-by-
turn direction guidance from
a connected iPhone® Check that the audio source is set to Bluetooth® Audio or iPod® mode. A USB connection is required for iPod® mode.
Cannot receive text message
notifications on the vehicle
audio system Check if “Send Notifications” is enabled on your phone. On the phone, go to Bluetooth® settings. Find the device name, like “My Car”. Press the INFO
button. Turn on “Show Notifications”.
Cannot reply to text mes-
sage notifications by Siri
Eyes Free After receiving an incoming text message, follow on-screen guidance. Push or push and hold the
TALK switch on the steering wheel for Siri
Eyes Free. After Siri Eyes Free starts, say “Text Message”.
Monitor, climate, audio, phone and voice recognition systems4-81