seat adjustment NISSAN ROGUE 2021 Owner´s Manual
[x] Cancel search | Manufacturer: NISSAN, Model Year: 2021, Model line: ROGUE, Model: NISSAN ROGUE 2021Pages: 556, PDF Size: 2.7 MB
Page 44 of 556

1-24Safety — Seats, seat belts and supplemental restraint system
will not be properly installed
using the damaged ancho-
rage, and a child could be
seriously injured or killed in a
collision.
— Never use the anchor points for adult seat belts or har-
nesses.
— A child restraint with a top tether strap should not be
used in the front passenger
seat.
— Keep seatbacks as upright as possible after fitting the child
restraint.
— Infants and children should always be placed in an appro-
priate child restraint while in
the vehicle.
. When the child restraint is not in
use, keep it secured with the
LATCH system or a seat belt. In a
sudden stop or collision, loose
objects can injure occupants or
damage the vehicle.CAUTION
A child restraint in a closed vehicle
can become very hot. Check the
seating surface and buckles before
placing a child in the child restraint.
This vehicle is equipped with a universal
child restraint anchor system, referred to
as the LATCH (Lower Anchors and
Tethers for CHildren) system. Some child
restraints include rigid or webbing-
mounted attachments that can be con-
nected to these anchors.
For details, see “Lower Anchors and
Tethers for CHildren (LATCH) system”
(P.1-25).
If you do not have a LATCH compatible
child restraint, the vehicle seat belts can
be used.
Several manufacturers offer child re-
straints for infants and small children of
various sizes. When selecting any child
restraint, keep the following points in
mind:
. Choose only a restraint with a label
certifying that it complies with Federal
Motor Vehicle Safety Standard 213 or
Canadian Motor Vehicle Safety Stan-
dard 213. .
Check the child restraint in your
vehicle to be sure it is compatible with
the vehicle’s seat and seat belt sys-
tem.
. If the child restraint is compatible with
your vehicle, place your child in the
child restraint and check the various
adjustments to be sure the child
restraint is compatible with your child.
Choose a child restraint that is de-
signed for your child’s height and
weight. Always follow all recom-
mended procedures.
. If the combined weight of the child
and child restraint is less than 65 lbs
(29.5 kg), you may use either the
LATCH anchors or the seat belt to
install the child restraint (not both at
the same time).
. If the combined weight of the child
and child restraint is greater than 65
lbs (29.5 kg), use the vehicle’s seat belt
(not the lower anchors) to install the
child restraint.
. Be sure to follow the child restraint
manufacturer’s instructions for instal-
lation.
All U.S. states and Canadian provinces
or territories require that infants and
small children be restrained in an ap-
proved child restraint at all times while
the vehicle is being operated. Canadian
Page 56 of 556
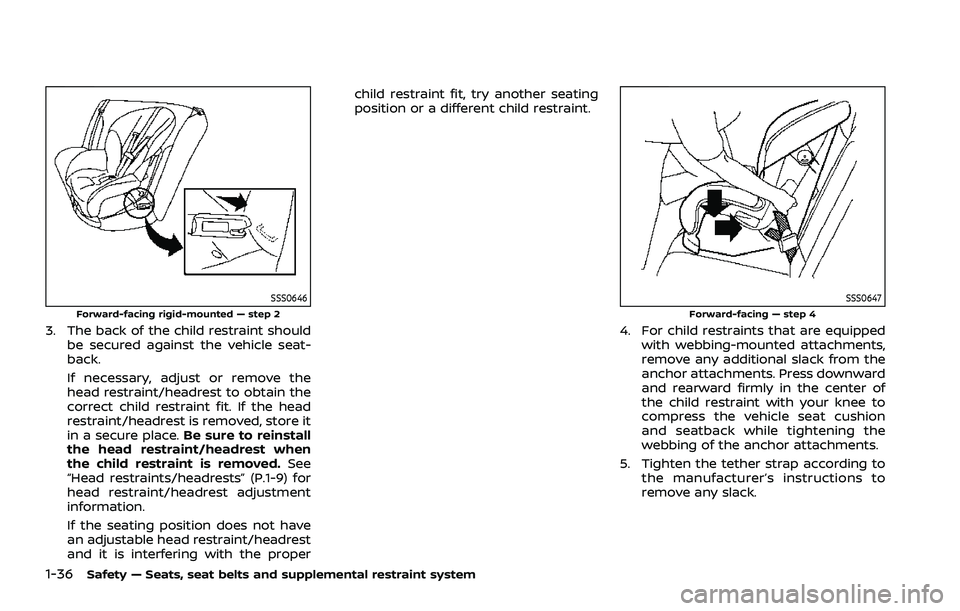
1-36Safety — Seats, seat belts and supplemental restraint system
SSS0646Forward-facing rigid-mounted — step 2
3. The back of the child restraint shouldbe secured against the vehicle seat-
back.
If necessary, adjust or remove the
head restraint/headrest to obtain the
correct child restraint fit. If the head
restraint/headrest is removed, store it
in a secure place. Be sure to reinstall
the head restraint/headrest when
the child restraint is removed. See
“Head restraints/headrests” (P.1-9) for
head restraint/headrest adjustment
information.
If the seating position does not have
an adjustable head restraint/headrest
and it is interfering with the proper child restraint fit, try another seating
position or a different child restraint.
SSS0647Forward-facing — step 4
4. For child restraints that are equipped
with webbing-mounted attachments,
remove any additional slack from the
anchor attachments. Press downward
and rearward firmly in the center of
the child restraint with your knee to
compress the vehicle seat cushion
and seatback while tightening the
webbing of the anchor attachments.
5. Tighten the tether strap according to the manufacturer’s instructions to
remove any slack.
Page 59 of 556
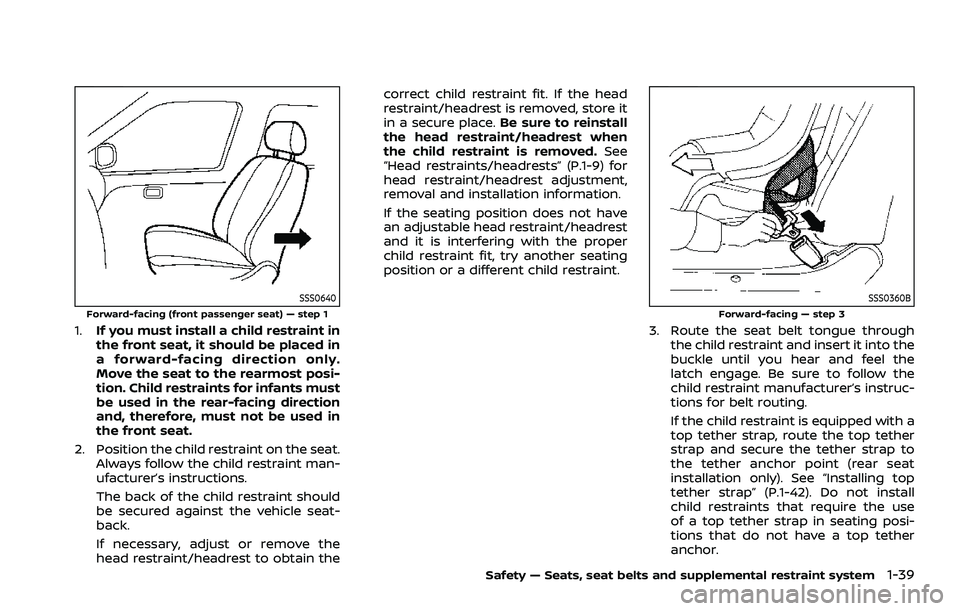
SSS0640Forward-facing (front passenger seat) — step 1
1.If you must install a child restraint in
the front seat, it should be placed in
a forward-facing direction only.
Move the seat to the rearmost posi-
tion. Child restraints for infants must
be used in the rear-facing direction
and, therefore, must not be used in
the front seat.
2. Position the child restraint on the seat. Always follow the child restraint man-
ufacturer’s instructions.
The back of the child restraint should
be secured against the vehicle seat-
back.
If necessary, adjust or remove the
head restraint/headrest to obtain the correct child restraint fit. If the head
restraint/headrest is removed, store it
in a secure place.
Be sure to reinstall
the head restraint/headrest when
the child restraint is removed. See
“Head restraints/headrests” (P.1-9) for
head restraint/headrest adjustment,
removal and installation information.
If the seating position does not have
an adjustable head restraint/headrest
and it is interfering with the proper
child restraint fit, try another seating
position or a different child restraint.
SSS0360BForward-facing — step 3
3. Route the seat belt tongue through
the child restraint and insert it into the
buckle until you hear and feel the
latch engage. Be sure to follow the
child restraint manufacturer’s instruc-
tions for belt routing.
If the child restraint is equipped with a
top tether strap, route the top tether
strap and secure the tether strap to
the tether anchor point (rear seat
installation only). See “Installing top
tether strap” (P.1-42). Do not install
child restraints that require the use
of a top tether strap in seating posi-
tions that do not have a top tether
anchor.
Safety — Seats, seat belts and supplemental restraint system1-39
Page 63 of 556
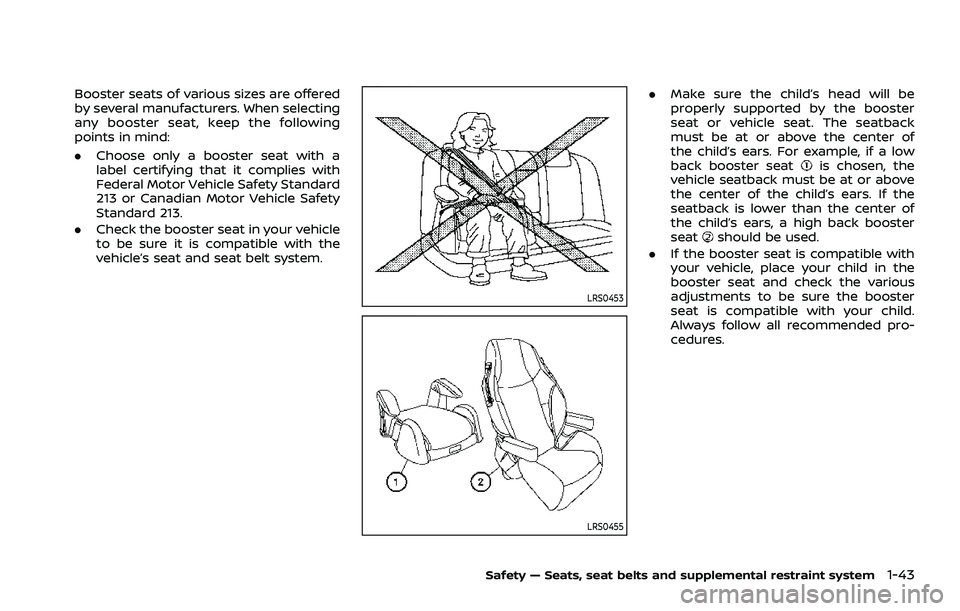
Booster seats of various sizes are offered
by several manufacturers. When selecting
any booster seat, keep the following
points in mind:
.Choose only a booster seat with a
label certifying that it complies with
Federal Motor Vehicle Safety Standard
213 or Canadian Motor Vehicle Safety
Standard 213.
. Check the booster seat in your vehicle
to be sure it is compatible with the
vehicle’s seat and seat belt system.
LRS0453
LRS0455
.Make sure the child’s head will be
properly supported by the booster
seat or vehicle seat. The seatback
must be at or above the center of
the child’s ears. For example, if a low
back booster seat
is chosen, the
vehicle seatback must be at or above
the center of the child’s ears. If the
seatback is lower than the center of
the child’s ears, a high back booster
seat
should be used.
. If the booster seat is compatible with
your vehicle, place your child in the
booster seat and check the various
adjustments to be sure the booster
seat is compatible with your child.
Always follow all recommended pro-
cedures.
Safety — Seats, seat belts and supplemental restraint system1-43
Page 65 of 556
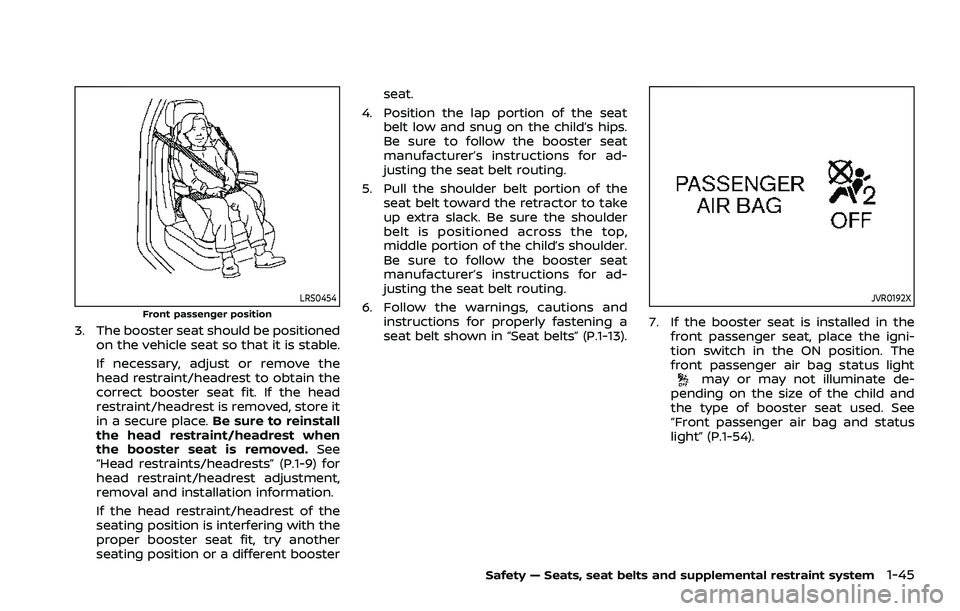
LRS0454Front passenger position
3. The booster seat should be positionedon the vehicle seat so that it is stable.
If necessary, adjust or remove the
head restraint/headrest to obtain the
correct booster seat fit. If the head
restraint/headrest is removed, store it
in a secure place. Be sure to reinstall
the head restraint/headrest when
the booster seat is removed. See
“Head restraints/headrests” (P.1-9) for
head restraint/headrest adjustment,
removal and installation information.
If the head restraint/headrest of the
seating position is interfering with the
proper booster seat fit, try another
seating position or a different booster seat.
4. Position the lap portion of the seat belt low and snug on the child’s hips.
Be sure to follow the booster seat
manufacturer’s instructions for ad-
justing the seat belt routing.
5. Pull the shoulder belt portion of the seat belt toward the retractor to take
up extra slack. Be sure the shoulder
belt is positioned across the top,
middle portion of the child’s shoulder.
Be sure to follow the booster seat
manufacturer’s instructions for ad-
justing the seat belt routing.
6. Follow the warnings, cautions and instructions for properly fastening a
seat belt shown in “Seat belts” (P.1-13).
JVR0192X
7. If the booster seat is installed in the
front passenger seat, place the igni-
tion switch in the ON position. The
front passenger air bag status light
may or may not illuminate de-
pending on the size of the child and
the type of booster seat used. See
“Front passenger air bag and status
light” (P.1-54).
Safety — Seats, seat belts and supplemental restraint system1-45
Page 177 of 556

3 Pre-driving checks and adjustments
Keys ........................................................................\
................................. 3-3Intelligent Key ........................................................................\
... 3-3
Doors ........................................................................\
.............................. 3-5
Locking with key .................................................................... 3-5
Locking with inside lock knob ..................................... 3-6
Locking with power door lock switch ................... 3-6
Automatic door locks ......................................................... 3-7
Child safety rear door lock ............................................. 3-7
Intelligent Key system .............................................................. 3-7 Intelligent Key operating range (models with
request switch) ........................................................................\
3-9
Door locks/unlocks precaution (models with
request switch) ..................................................................... 3-10
Intelligent Key operation (models with
request switch) ..................................................................... 3-11
Battery saver system ....................................................... 3-12
Warning lights and audible reminders .............. 3-12
Troubleshooting guide ................................................... 3-13
How to use remote keyless entry function ...... 3-15
Remote engine start (if so equipped) ....................... 3-19
Remote engine start operating range ............... 3-20
Remote starting the engine ....................................... 3-20
Extending engine run time ......................................... 3-20
Canceling a remote engine start ........................... 3-21
Conditions the remote engine start will
not work ........................................................................\
............. 3-21 Hood ........................................................................\
............................ 3-22
Liftgate ........................................................................\
...................... 3-23
Operating manual liftgate (if
so equipped) ........................................................................\
. 3-23
Operating power liftgate (if so equipped) ...... 3-24
Motion-activated liftgate (if
so equipped) ........................................................................\
. 3-26
Garage mode system (if so equipped) ............ 3-27
Auto closure (if so equipped) .................................. 3-28
liftgate release lever ....................................................... 3-28
Fuel-filler door ........................................................................\
..... 3-29 Opening the fuel-filler door ...................................... 3-29
How to refuel ....................................................................... 3-29
When refueling from a portable
fuel container ...................................................................... 3-30
Tilt/telescopic steering ........................................................ 3-31
Tilt and telescopic operation .................................. 3-31
Sun visors ........................................................................\
................ 3-32
Rear sunshade (if so equipped) .................................... 3-32
Mirrors ........................................................................\
...................... 3-33
Inside mirror ........................................................................\
. 3-33
Outside mirrors .................................................................. 3-34
Vanity mirror ........................................................................\
3-36
Memory seat (if so equipped) ......................................... 3-36 Memory storage function .......................................... 3-36
Page 181 of 556
CAUTION
Always carry the mechanical key
installed in the Intelligent Key.
WARNING
.Always have the doors locked
while driving. Along with the use
of seat belts, this provides great-
er safety in the event of an
accident by helping to prevent
persons from being thrown from
the vehicle. This also helps keep
children and others from unin-
tentionally opening the doors,
and will help keep out intruders.
. Before opening any door, always
look for and avoid oncoming
traffic.
. To help avoid risk of injury or
death through unintended opera-
tion of the vehicle and or its
systems, including entrapment
in windows or inadvertent door
lock activation, do not leave chil-
dren, people who require the
assistance of others or pets un-
attended in your vehicle. Addi-
tionally, the temperature inside a
closed vehicle on a warm day can
quickly become high enough to
cause a significant risk of injury
or death to people and pets.
WAD0251X
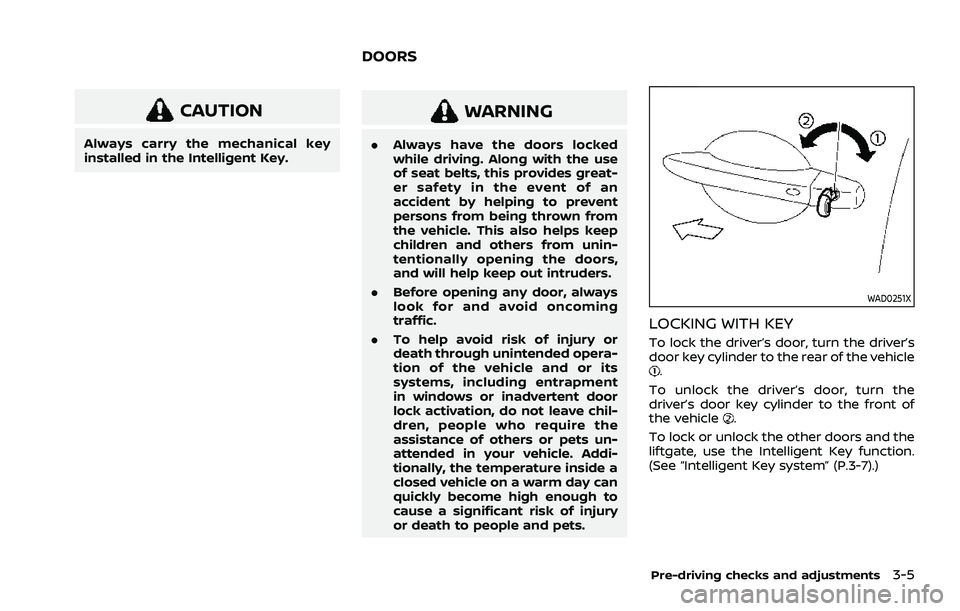
LOCKING WITH KEY
To lock the driver’s door, turn the driver’s
door key cylinder to the rear of the vehicle
.
To unlock the driver’s door, turn the
driver’s door key cylinder to the front of
the vehicle
.
To lock or unlock the other doors and the
liftgate, use the Intelligent Key function.
(See “Intelligent Key system” (P.3-7).)
Pre-driving checks and adjustments3-5
DOORS
Page 189 of 556
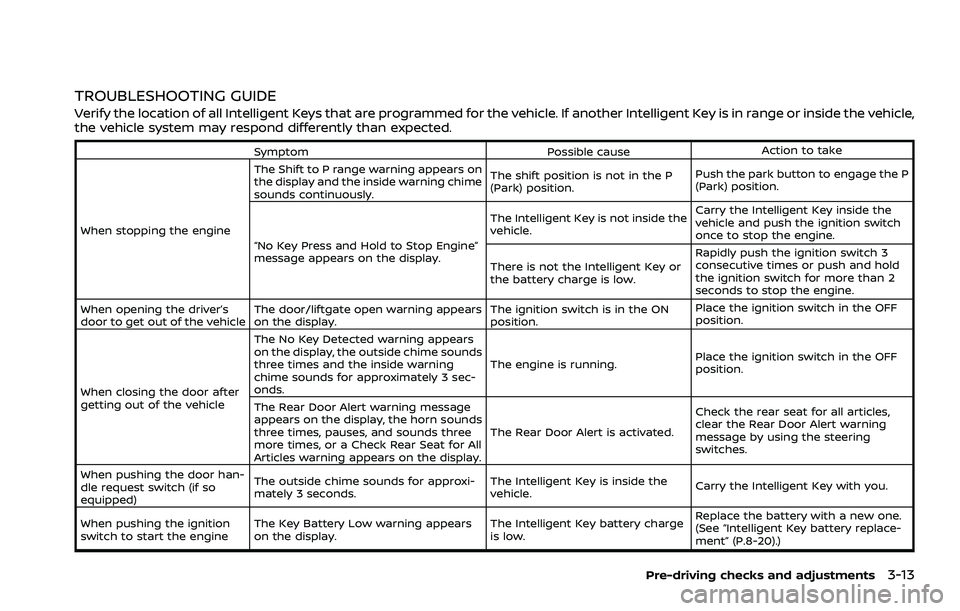
TROUBLESHOOTING GUIDE
Verify the location of all Intelligent Keys that are programmed for the vehicle. If another Intelligent Key is in range or inside the vehicle,
the vehicle system may respond differently than expected.
SymptomPossible causeAction to take
When stopping the engine The Shift to P range warning appears on
the display and the inside warning chime
sounds continuously.
The shift position is not in the P
(Park) position.
Push the park button to engage the P
(Park) position.
“No Key Press and Hold to Stop Engine”
message appears on the display. The Intelligent Key is not inside the
vehicle.
Carry the Intelligent Key inside the
vehicle and push the ignition switch
once to stop the engine.
There is not the Intelligent Key or
the battery charge is low. Rapidly push the ignition switch 3
consecutive times or push and hold
the ignition switch for more than 2
seconds to stop the engine.
When opening the driver’s
door to get out of the vehicle The door/liftgate open warning appears
on the display. The ignition switch is in the ON
position.Place the ignition switch in the OFF
position.
When closing the door after
getting out of the vehicle The No Key Detected warning appears
on the display, the outside chime sounds
three times and the inside warning
chime sounds for approximately 3 sec-
onds.
The engine is running.
Place the ignition switch in the OFF
position.
The Rear Door Alert warning message
appears on the display, the horn sounds
three times, pauses, and sounds three
more times, or a Check Rear Seat for All
Articles warning appears on the display. The Rear Door Alert is activated.
Check the rear seat for all articles,
clear the Rear Door Alert warning
message by using the steering
switches.
When pushing the door han-
dle request switch (if so
equipped) The outside chime sounds for approxi-
mately 3 seconds.
The Intelligent Key is inside the
vehicle.
Carry the Intelligent Key with you.
When pushing the ignition
switch to start the engine The Key Battery Low warning appears
on the display. The Intelligent Key battery charge
is low.Replace the battery with a new one.
(See “Intelligent Key battery replace-
ment” (P.8-20).)
Pre-driving checks and adjustments3-13
Page 204 of 556
3-28Pre-driving checks and adjustments
CAUTION
Do not set the height of the liftgate
below approximately 1/3 of the way
to the floor using garage mode. Even
if you set the height below approxi-
mately 1/3 of the way to the floor,
the height will automatically be set
to approximately 1/3 of the way to
the floor.
AUTO CLOSURE (if so equipped)
When the liftgate reaches the secondary
position, the closure motor engages and
pulls the liftgate to its primary latch
position.
Do not apply excessive force when the
auto closure is operating. Excessive
force applied may cause the mechan-
ism to malfunction.
CAUTION
.The liftgate will automatically
close from the secondary posi-
tion. To avoid pinching, keep
hands and fingers away from
liftgate opening. .
Do not let children operate the
liftgate.
WAD0155X
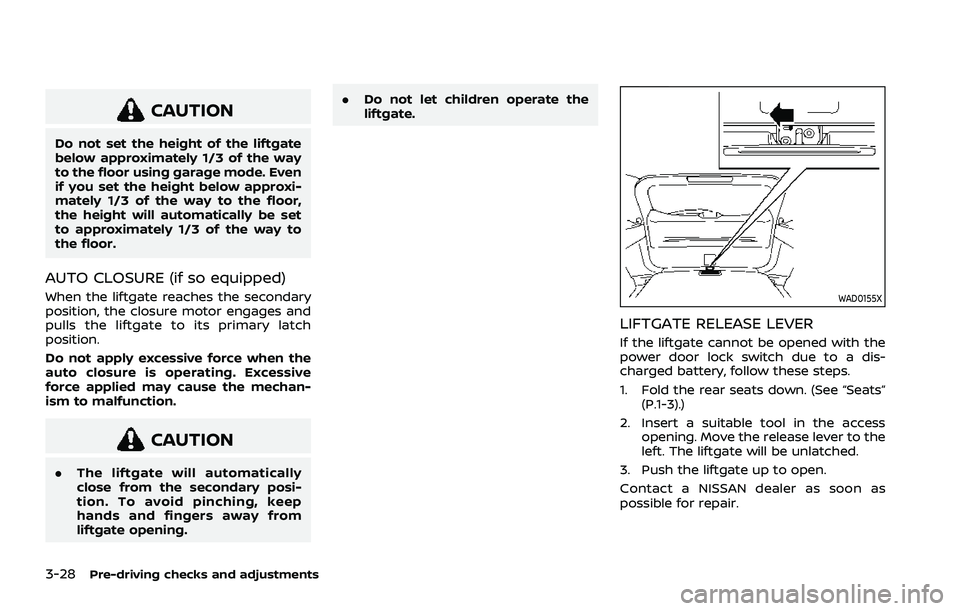
LIFTGATE RELEASE LEVER
If the liftgate cannot be opened with the
power door lock switch due to a dis-
charged battery, follow these steps.
1. Fold the rear seats down. (See “Seats”
(P.1-3).)
2. Insert a suitable tool in the access opening. Move the release lever to the
left. The liftgate will be unlatched.
3. Push the liftgate up to open.
Contact a NISSAN dealer as soon as
possible for repair.
Page 207 of 556
filler opening slowly and fully. Insert the
nozzle of the portable fuel container into
the opening along the funnel and fill the
fuel tank.
After refueling, remove the funnel from
the fuel-filler opening. Wipe the funnel
clean and return it to the tool bag.
CAUTION
.Do not insert the nozzle of the
portable fuel container directly
into the fuel-filler opening. Doing
so may damage the opening and
the fuel system.
. Use only the funnel provided with
your vehicle. Otherwise, the fuel-
filler opening and the fuel system
may be damaged.
WARNING
.Do not adjust the steering wheel
while driving. You could lose con-
trol of your vehicle and cause an
accident.
. Do not adjust the steering wheel
any closer to you than is neces-
sary for proper steering opera-
tion and comfort. The driver’s air
bag inflates with great force. If
you are unrestrained, leaning for-
ward, sitting sideways or out of
position in any way, you are at
greater risk of injury or death in a
crash. You may also receive ser-
ious or fatal injuries from the air
bag if you are up against it when
it inflates. Always sit back against
the seatback and as far away as
practical from the steering wheel.
Always use the seat belts.
WAD0127X
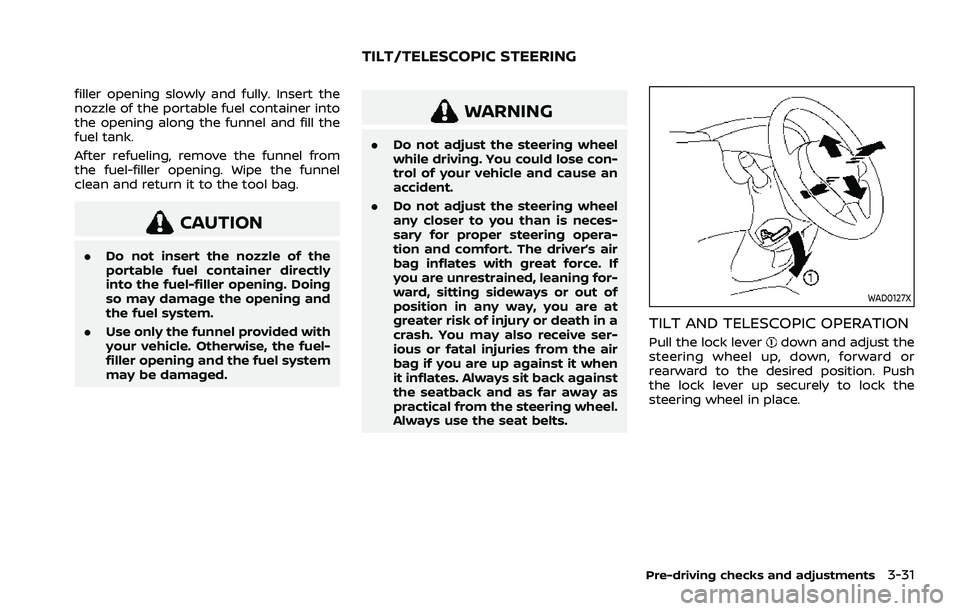
TILT AND TELESCOPIC OPERATION
Pull the lock leverdown and adjust the
steering wheel up, down, forward or
rearward to the desired position. Push
the lock lever up securely to lock the
steering wheel in place.
Pre-driving checks and adjustments3-31
TILT/TELESCOPIC STEERING