engine oil NISSAN ROGUE 2021 Owner´s Manual
[x] Cancel search | Manufacturer: NISSAN, Model Year: 2021, Model line: ROGUE, Model: NISSAN ROGUE 2021Pages: 556, PDF Size: 2.7 MB
Page 18 of 556
0-10Illustrated table of contents
WAA0174X
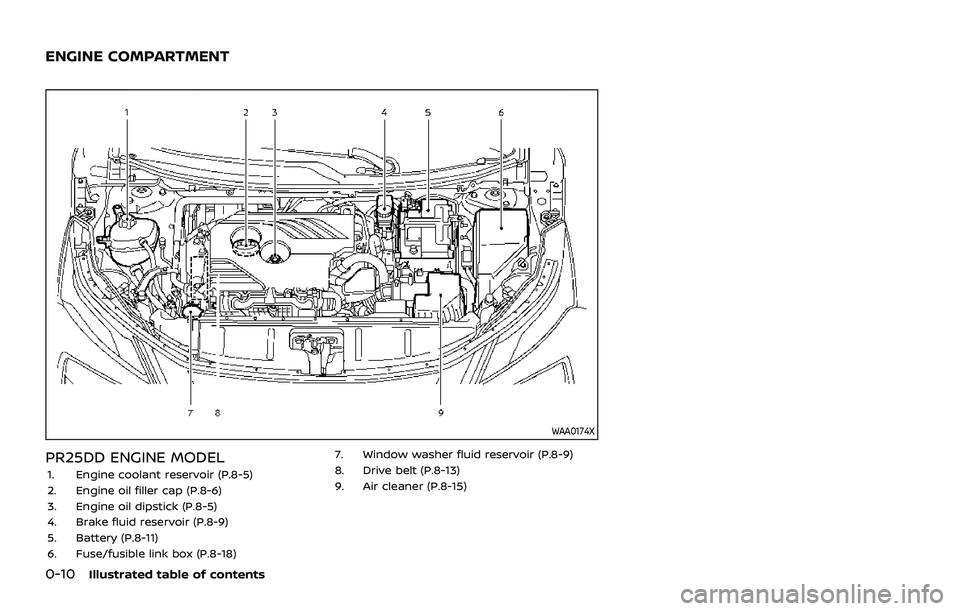
PR25DD ENGINE MODEL1. Engine coolant reservoir (P.8-5)
2. Engine oil filler cap (P.8-6)
3. Engine oil dipstick (P.8-5)
4. Brake fluid reservoir (P.8-9)
5. Battery (P.8-11)
6. Fuse/fusible link box (P.8-18)7. Window washer fluid reservoir (P.8-9)
8. Drive belt (P.8-13)
9. Air cleaner (P.8-15)
ENGINE COMPARTMENT
Page 19 of 556
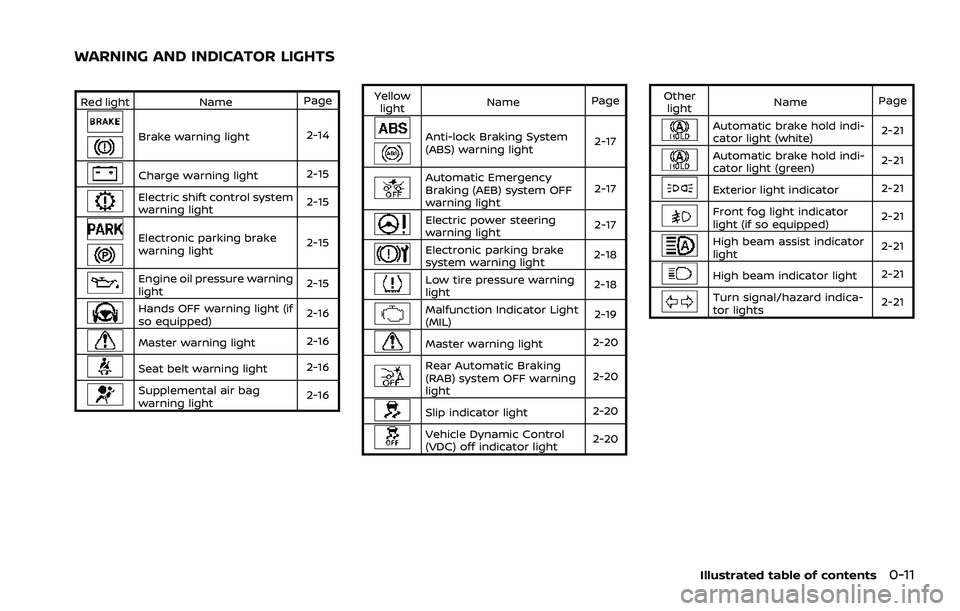
Red lightNamePage
Brake warning light 2-14
Charge warning light 2-15
Electric shift control system
warning light2-15
Electronic parking brake
warning light2-15
Engine oil pressure warning
light
2-15
Hands OFF warning light (if
so equipped)2-16
Master warning light
2-16
Seat belt warning light2-16
Supplemental air bag
warning light2-16Yellow
light Name
Page
Anti-lock Braking System
(ABS) warning light 2-17
Automatic Emergency
Braking (AEB) system OFF
warning light2-17
Electric power steering
warning light
2-17
Electronic parking brake
system warning light2-18
Low tire pressure warning
light
2-18
Malfunction Indicator Light
(MIL) 2-19
Master warning light
2-20
Rear Automatic Braking
(RAB) system OFF warning
light2-20
Slip indicator light
2-20
Vehicle Dynamic Control
(VDC) off indicator light2-20Other
light Name
Page
Automatic brake hold indi-
cator light (white) 2-21
Automatic brake hold indi-
cator light (green)
2-21
Exterior light indicator
2-21
Front fog light indicator
light (if so equipped)2-21
High beam assist indicator
light2-21
High beam indicator light
2-21
Turn signal/hazard indica-
tor lights2-21
Illustrated table of contents0-11
WARNING AND INDICATOR LIGHTS
Page 101 of 556
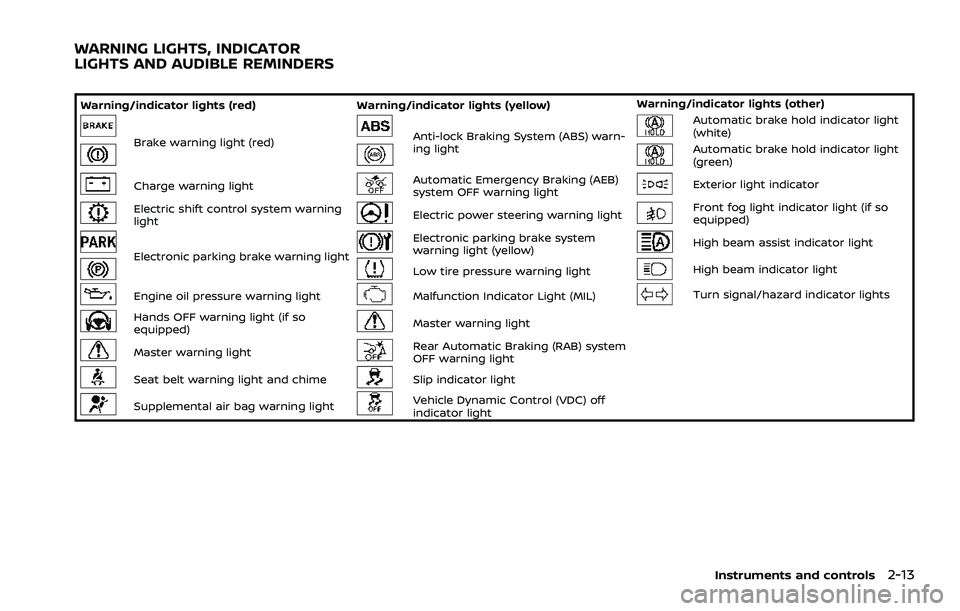
Warning/indicator lights (red)Warning/indicator lights (yellow) Warning/indicator lights (other)
Brake warning light (red)Anti-lock Braking System (ABS) warn-
ing lightAutomatic brake hold indicator light
(white)
Automatic brake hold indicator light
(green)
Charge warning lightAutomatic Emergency Braking (AEB)
system OFF warning lightExterior light indicator
Electric shift control system warning
lightElectric power steering warning lightFront fog light indicator light (if so
equipped)
Electronic parking brake warning light
Electronic parking brake system
warning light (yellow)High beam assist indicator light
Low tire pressure warning lightHigh beam indicator light
Engine oil pressure warning lightMalfunction Indicator Light (MIL)Turn signal/hazard indicator lights
Hands OFF warning light (if so
equipped)Master warning light
Master warning lightRear Automatic Braking (RAB) system
OFF warning light
Seat belt warning light and chimeSlip indicator light
Supplemental air bag warning lightVehicle Dynamic Control (VDC) off
indicator light
Instruments and controls2-13
WARNING LIGHTS, INDICATOR
LIGHTS AND AUDIBLE REMINDERS
Page 103 of 556

Charge warning light
When the ignition switch is in the ON
position, the charge warning light illumi-
nates and then turns off.
If the light illuminates while the engine is
running, it may indicate the charging
system is not functioning properly. Turn
the engine off and check the alternator
belt. If the belt is loose, broken, missing or
if the light remains on, have your vehicle
serviced immediately. It is recommended
you visit a NISSAN dealer for this service.
CAUTION
Do not continue driving if the alter-
nator belt is loose, broken or miss-
ing.
Electric shift control system
warning light
When the ignition switch is in the ON
position, the electric shift control system
warning light illuminates, and then turns
off. This indicates the electric shift control
system is operational.
The electric shift control system warning
light illuminates when a malfunction oc- curs in the electric shift control system.
When the master warning light illumi-
nates, the chime sounds and the follow-
ing message is displayed in the vehicle
information display: “When parked apply
parking brake”.
When the ignition switch is placed in the
OFF position, the chime sounds continu-
ously. Ensure the parking brake is applied.
Have the system checked by a NISSAN
dealer.
orElectronic parking
brake warning light
The electronic parking brake warning
light indicates that the electronic parking
brake system is operating.
When the ignition switch is placed in the
ON position, the electronic parking brake
warning light illuminates. When the en-
gine is started and the parking brake is
released, the warning light turns off.
If the parking brake is not released, the
electronic parking brake warning light
remains on. Be sure that the electronic
parking brake warning light has turned
off before driving. (See “Parking brake”
(P.5-25).)
If the electronic parking brake warning
light illuminates or flashes while the
electronic parking brake system warning light
(yellow) illuminates, it may
indicate that the electronic parking brake
system is not functioning properly. Have
the system checked, and if necessary
repaired. It is recommended you visit a
NISSAN dealer for this service.
Engine oil pressure warning
light
This light warns of low engine oil pres-
sure. When the ignition switch is in the ON
position, the engine oil pressure warning
light illuminates. After starting the engine,
the engine oil pressure warning light
turns off. This indicates that the oil
pressure sensors in the engine are opera-
tional.
If the engine oil pressure warning light
illuminates or blinks while the engine is
running, it may indicate that the engine
oil pressure is low.
Stop the vehicle safely as soon as possi-
ble. Stop the engine immediately and call
a NISSAN dealer.
CAUTION
. Running the engine with the en-
gine oil pressure warning light
illuminated could cause serious
damage to the engine.
Instruments and controls2-15
Page 104 of 556

2-16Instruments and controls
.The engine oil pressure warning
light is not designed to indicate a
low oil level. The oil level should
be checked using the dipstick.
(See “Engine oil” (P.8-5).)
Hands OFF warning light (if so
equipped)
When the Steering Assist is activated, it
monitors the driver’s steering wheel op-
eration. If the steering wheel is not
operated or the driver takes his/her
hands off the steering wheel for a period
of time, the warning light illuminates. If
the driver does not operate the steering
wheel after the warning light has been
illuminated, an audible alert sounds and
the warning flashes in the vehicle infor-
mation display, followed by a quick brake
application to request the driver to take
control of the vehicle again. If the driver
remains unresponsive, the vehicle will
automatically turn on the hazard lights
and slow to a complete stop. (See “Steer-
ing Assist” (P.5-113).)
Master warning light
When the ignition switch is in the ON
position, the master warning light illumi-
nates if a warning message appears in
the vehicle information display.
See “Vehicle information display” (P.2-22).
Seat belt warning light and
chime
The light and chime remind you to fasten
the seat belts.
The light illuminates whenever the igni-
tion switch is placed in the ON position,
and will remain illuminated until the seat
belts are fastened.
The seat belt warning light for the front
passenger will illuminate if the seat belt is
not fastened when the front passenger’s
seat is occupied.
When the vehicle speed exceeds 10 MPH
(15 km/h), the light will continue to blink
for about 95 seconds until the driver’s
seat belt is fastened and the light will
blink unless the front passenger’s seat
belts is securely fastened and the chime
will sound for about 95 seconds unless
the front passenger’s seat belt is securely
fastened.
When the ignition switch is placed in the
ON position, the chime will sound for about 6 seconds unless the driver’s seat
belt is securely fastened.
When the vehicle speed exceeds 10 MPH
(15 km/h), the chime will sound unless the
rear passenger’s seat belts are securely
fastened. The chime will continue to
sound for about 35 seconds until the rear
passenger’s seat belts are fastened.
For additional information, refer to “Seat
belt warning light and chime” (P.1-15).Supplemental air bag warning
light
After placing the ignition switch in the ON
position, the supplemental air bag warn-
ing light will illuminate. The supplemental
air bag warning light will turn off after
about 7 seconds if the supplemental front
air bag and supplemental side air bag,
curtain air bag systems and/or preten-
sioner seat belt are operational.
If any of the following conditions occur,
the front air bag, side air bag, curtain air
bag and pretensioner systems need ser-
vicing.
. The supplemental air bag warning
light remains on after approximately
7 seconds.
. The supplemental air bag warning
light flashes intermittently.
Page 117 of 556
.Alert Only
When selected, only the alert is dis-
played.
. OFF
When selected, no alert or horn will be
active.
(See “Rear Door Alert” (P.2-65).)
Maintenance
The maintenance mode allows user to set
alerts for the reminding of maintenance
intervals. To change an item:
Select “Maintenance” using the scroll dial
and push it.
. Oil Control System (if so equipped)
. Oil and Filter
. Tire
. Other
Oil Control System (if so equipped):
The Oil Control System can be accessed
in the Maintenance portion of the vehicle
information display settings.
Engine oil information informs the dis-
tance to oil change. Never exceed one
year or 10,000 miles (16,000 km) between
oil change intervals for the PR25DD en-
gine.
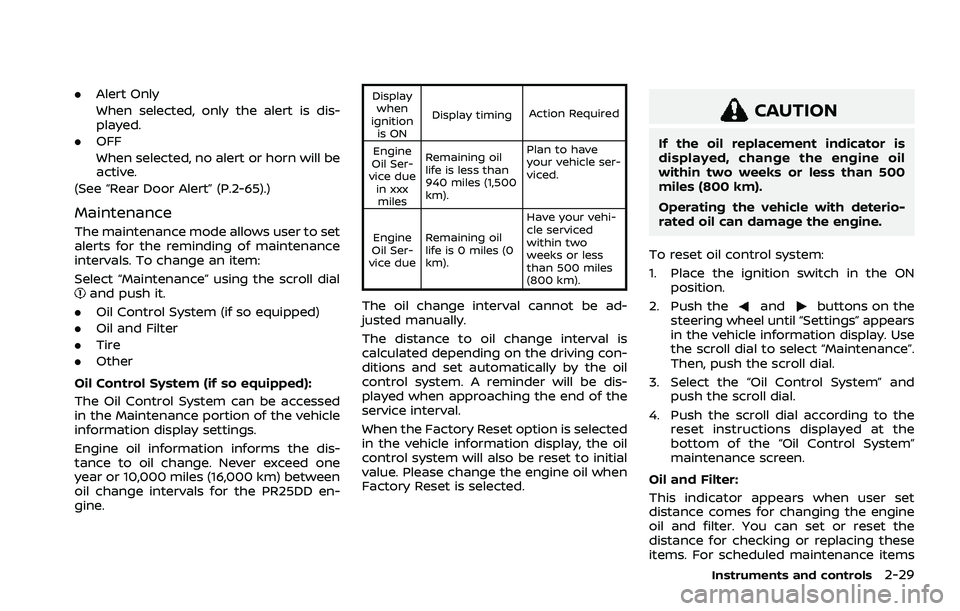
Display when
ignition is ON Display timing
Action Required
Engine
Oil Ser-
vice due in xxxmiles Remaining oil
life is less than
940 miles (1,500
km). Plan to have
your vehicle ser-
viced.
Engine
Oil Ser-
vice due Remaining oil
life is 0 miles (0
km). Have your vehi-
cle serviced
within two
weeks or less
than 500 miles
(800 km).
The oil change interval cannot be ad-
justed manually.
The distance to oil change interval is
calculated depending on the driving con-
ditions and set automatically by the oil
control system. A reminder will be dis-
played when approaching the end of the
service interval.
When the Factory Reset option is selected
in the vehicle information display, the oil
control system will also be reset to initial
value. Please change the engine oil when
Factory Reset is selected.
CAUTION
If the oil replacement indicator is
displayed, change the engine oil
within two weeks or less than 500
miles (800 km).
Operating the vehicle with deterio-
rated oil can damage the engine.
To reset oil control system:
1. Place the ignition switch in the ON position.
2. Push the
andbuttons on the
steering wheel until “Settings” appears
in the vehicle information display. Use
the scroll dial to select “Maintenance”.
Then, push the scroll dial.
3. Select the “Oil Control System” and push the scroll dial.
4. Push the scroll dial according to the reset instructions displayed at the
bottom of the “Oil Control System”
maintenance screen.
Oil and Filter:
This indicator appears when user set
distance comes for changing the engine
oil and filter. You can set or reset the
distance for checking or replacing these
items. For scheduled maintenance items
Instruments and controls2-29
Page 118 of 556
2-30Instruments and controls
and intervals, refer to the “9. Maintenance
and schedules” section.
Tire:
This indicator appears when the user set
distance comes for replacing tires. You
can set or reset the distance for replacing
tires.
WARNING
The tire replacement indicator is not
a substitute for regular tire checks,
including tire pressure checks. (See
“Changing wheels and tires” (P.8-
33).) Many factors including tire in-
flation, alignment, driving habits and
road conditions affect tire wear and
when tires should be replaced.
Setting the tire replacement indica-
tor for a certain driving distance
does not mean your tires will last
that long. Use the tire replacement
indicator as a guide only and always
perform regular tire checks. Failure
to perform regular tire checks, in-
cluding tire pressure checks could
result in tire failure. Serious vehicle
damage could occur and may lead to
a collision, which could result in
serious personal injury or death.Other:
This indicator appears when the user set
distance comes for checking or replacing
maintenance items other than the engine
oil, oil filter and tires. Other maintenance
items can include such things as air filter
or tire rotation. You can set or reset the
distance for checking or replacing the
items.
Customize Display
The display settings allows user to
choose from the various meter selections.
The display settings can be changed
using the scroll dial
.
Main Menu Selection:
Displays available screens that can be
shown in the vehicle information display.
Route Guidance (if so equipped):
To change the setting, use the scroll dial
to select and push it.
. Alerts
The “Alerts” allows user to turn the
Navigation Settings alerts on or off.
Transition (Cruise) (if so equipped):
The ”Transition (Cruise)” allows user to
turn the cruise screen transition on or off. Welcome Effect:
The “Welcome Effect” displays the avail-
able welcome effect settings.
. Gauges (if so equipped)
. Animation
Operation guidance:
The “Operation guidance” displays the
available operation guidance settings.
. Lights
. Wiper
. Seat Memory (if so equipped)
. Cruise Control (if so equipped)
Unit/Language
The units that are shown in the vehicle
information display can be changed:
.Mileage/Fuel
. Tire Pressure
. Temperature
. Language
Use the scroll dial
to select and change
the units of the vehicle information dis-
play.
Mileage/Fuel:
The unit for the mileage that is shown in
the vehicle information display can be
changed.
Page 124 of 556
2-36Instruments and controls
19. Continuously Variable Trans-
mission (CVT) position indicator
This indicator shows the CVT shift posi-
tion.
In the manual shift mode, when the
transmission does not shift to the se-
lected gear due to a transmission protec-
tion mode, the CVT position indicator will
blink and a chime will sound.
See “Continuously Variable Transmission
(CVT)” (P.5-19) for further details.
20. Drive Mode Selector indicator
When a driving mode is selected using the
Drive Mode Selector, the selected mode
indicator is displayed.
.OFF-ROAD (AWD models)
. SNOW (AWD models)
. STANDARD (2WD models)
. AUTO (AWD models)
. ECO
. SPORT
(See “Drive Mode Selector” (P.5-30).)
21. AWD Error: See Owner’s Manual
warning (if so equipped)
This warning appears when the All-Wheel
Drive (AWD) system is not functioning
properly while the engine is running.
Reduce vehicle speed and have your
vehicle checked as soon as possible. It is
recommended that you visit a NISSAN
dealer for this service. (See “Intelligent
4x4” (P.5-151).)
22. AWD High Temp. Stop vehicle
warning (if so equipped)
This warning appears when the oil tem-
perature of the powertrain parts in-
creases due to the difference in rotation
between the front and rear wheels is
large (wheel slip), such as when driving
on rough roads, driving through sand or
mud, or freeing a stuck vehicle. If this
warning is displayed, stop the vehicle with
the engine idling, as soon as it is safe to
do so. In these cases, the AWD changes to
2WD to protect the powertrain parts.
Then if the warning turns off, you can
continue AWD driving. (See “Intelligent
4x4” (P.5-151).)
23. Tire Size Incorrect: See Owner’s
Manual warning (if so equipped)
This warning may appear if there is a
large difference between the diameters of
front and rear wheels and tires. Pull off
the road in a safe area, with the engine
idling. Check that all the tire sizes, brand,
construction and tread pattern are the
same, that the tire pressures are correct
and that the tires are not excessively
worn. If you have any problems, change
tires or adjust tire pressures correctly. Do
not select the SNOW or OFF-ROAD mode
with the Drive Mode Selector and do not
drive fast. (See “Intelligent 4x4” (P.5-151).)
24. Shipping Mode On Push Storage
Fuse warning (if so equipped)
This warning may appear if the extended
storage switch is not pushed in. When this
warning appears, push in the extended
storage switch to turn off the warning.
(See “Extended storage switch” (P.8-20).)
25. Power will turn off to save the
battery warning
Under the specific conditions, this warn-
ing may appear after the ignition switch is
in the ON position for a certain period of
time.
Page 271 of 556
onds after the chime sounds. The
engine will start.
After step 3 is performed, when the
ignition switch is pushed without depres-
sing the brake pedal, the ignition switch
position will change to ON.
NOTE:
. When the ignition switch is pushed
to the ON position or the engine is
started by the above procedures, the
“Key Battery Low” warning appears
(on the vehicle information display)
even if the Intelligent Key is inside
the vehicle. This is not a malfunction.
To turn off the warning, touch the
ignition switch with the Intelligent
Key again.
. If the “Key Battery Low” warning
appears, replace the battery as soon
as possible. (See “Intelligent Key
battery replacement” (P.8-20).) .
Make sure the area around the vehicle
is clear.
. Check fluid levels such as engine oil,
coolant, brake fluid, and window
washer fluid as frequently as possible,
or at least whenever you refuel.
. Check that all windows and lights are
clean.
. Visually inspect tires for their appear-
ance and condition. Also check tires
for proper inflation.
. Lock all doors.
. Position seat and adjust head re-
straints/headrests.
. Adjust inside and outside mirrors.
. Fasten seat belts and ask all passen-
gers to do likewise.
. Check the operation of warning lights
when the ignition switch is placed in
the ON position. (See “Warning lights,
indicator lights and audible remin-
ders” (P.2-13).) 1. Apply the parking brake.
2. Confirm that the vehicle is in the P
(Park) position.
The Intelligent Key must be carried
when operating the ignition switch.
3. Push the ignition switch to the ON position. Depress the brake pedal and
push the ignition switch to start the
engine.
To start the engine immediately, push
and release the ignition switch while
depressing the brake pedal with the
ignition switch in any position.
.If the engine is very hard to start inextremely cold weather or when
restarting, depress the accelerator
pedal a little (approximately 1/3 to
the floor) and while holding, crank
the engine. Release the accelerator
pedal when the engine starts.
.If the engine is very hard to startbecause it is flooded, depress the
accelerator pedal all the way to the
floor and hold it. Push the ignition
switch to the ON position to start
cranking the engine. After 5 or 6
seconds, stop cranking by pushing
the ignition switch to OFF. After
cranking the engine, release the
accelerator pedal. Crank the engine
with your foot off the accelerator
pedal by depressing the brake
Starting and driving5-17
BEFORE STARTING THE ENGINE STARTING THE ENGINE
Page 404 of 556
5-150Starting and driving
.Recirculating the cool air in thecabin when the A/C is on reduces
cooling load.
4. Drive at economical speeds and dis- tances.
.Observing the speed limit and notexceeding 60 MPH (97 km/h)
(where legally allowed) can improve
fuel efficiency due to reduced aero-
dynamic drag.
.Maintaining a safe following dis-tance behind other vehicles re-
duces unnecessary braking.
.Safely monitoring traffic to antici- pate changes in speed permits
reduced braking and smooth accel-
eration changes.
.Select a gear range suitable to roadconditions.
5. Use cruise control.
.Using cruise control during highway driving helps maintain a steady
speed.
.Cruise control is particularly effec-tive in providing fuel savings when
driving on flat terrains.
6. Plan for the shortest route.
.Utilize a map or navigation system to determine the best route to save
time. 7. Avoid idling.
.Shutting off your engine when safe
for stops exceeding 30-60 seconds
saves fuel and reduces emissions.
8. Buy an automated pass for toll roads.
.Automated passes permit drivers to use special lanes to maintain cruis-
ing speed through the toll and
avoid stopping and starting.
9. Winter warm up.
.Limit idling time to minimize impact to fuel economy.
.Vehicles typically need no morethan 30 seconds of idling at start-
up to effectively circulate the en-
gine oil before driving.
.Your vehicle will reach its ideal
operating temperature more
quickly while driving versus idling.
10. Keeping your vehicle cool.
.Park your vehicle in a covered parking area or in the shade when-
ever possible.
.When entering a hot vehicle, open- ing the windows will help to reduce
the inside temperature faster, re-
sulting in reduced demand on your
A/C system. .
Keep your engine tuned up.
. Follow the recommended scheduled
maintenance.
. Keep the tires inflated to the correct
pressure. Low tire pressure increases
tire wear and lowers fuel economy.
. Keep the wheels in correct alignment.
Improper alignment increases tire
wear and lowers fuel economy.
. Use the recommended viscosity en-
gine oil. (See “Engine oil and oil filter
recommendation” (P.10-6).)
INCREASING FUEL ECONOMY