brake light NISSAN ROGUE 2022 Owners Manual
[x] Cancel search | Manufacturer: NISSAN, Model Year: 2022, Model line: ROGUE, Model: NISSAN ROGUE 2022Pages: 516, PDF Size: 2.13 MB
Page 93 of 516

CHECKING LIGHTS
With all doors closed, apply the parking
brake, fasten the seat belts and place the
ignition switch in the ON position without
starting the engine. The following lights (if
so equipped) will come on:
Page 140 of 516

WARNING
When the LED DRL system is active,
tail lights on your vehicle are not on.
It is necessary at dusk to turn on
your headlights. Failure to do so
could cause an accident injuring
yourself and others.
Type B:
The LED portion of the headlights auto-
matically illuminate at 100% intensity
when the engine is started and the
parking brake released. The DRL operate
with the headlight switch in the AUTO
position or
Page 273 of 516

the following conditions need to be met.
.The driver’s seat belt is fastened.
. The electronic parking brake is re-
leased.
. The shift lever is not in the P (Park)
position.
. The vehicle is not parked on a steep
hill.
NOTE:
The automatic brake hold function re-
sets to OFF every time the ignition
switch is switched from the OFF posi-
tion to the ON position.
How to deactivate the automatic
brake hold function
While the automatic brake hold function
is activated, push the automatic brake
hold switch to turn off the automatic
brake hold indicator light and deactivate
the automatic brake hold function. To
deactivate the automatic brake hold
function while the brake force has been
maintained by the automatic brake hold
function, depress the brake pedal and
push the automatic brake hold switch.
Page 364 of 516

CAUTION
During the first 1,200 miles (2,000
km), follow these recommendations
to obtain maximum engine perfor-
mance and ensure the future relia-
bility and economy of your new
vehicle. Failure to follow these re-
commendations may result in shor-
tened engine life and reduced engine
performance.
. Avoid driving for long periods at con-
stant speed, either fast or slow. Do not
run the engine over 4,000 rpm.
. Do not accelerate at full throttle in any
gear.
. Avoid quick starts.
. Avoid hard braking as much as possi-
ble. Follow these easy-to-use Fuel Efficient
Driving Tips to help you achieve the most
fuel economy from your vehicle.
1. Use smooth accelerator and brake
pedal application.
.Avoid rapid starts and stops..Use smooth, gentle accelerator andbrake application whenever possi-
ble.
.Maintain constant speed whilecommuting and coast whenever
possible.
2. Maintain constant speed.
.Look ahead to try and anticipate and minimize stops.
.Synchronizing your speed with traf-fic lights allows you to reduce your
number of stops.
.Maintaining a steady speed canminimize red light stops and im-
prove fuel efficiency.
3. Use air conditioning (A/C) at higher vehicle speeds.
.Below 40 MPH (64 km/h), it is moreefficient to open windows to cool
the vehicle due to reduced engine
load.
.Above 40 MPH (64 km/h), it is more
efficient to use A/C to cool the
vehicle due to increased aerody-
namic drag.
.Recirculating the cool air in thecabin when the A/C is on reduces
cooling load.
4. Drive at economical speeds and dis- tances.
.Observing the speed limit and notexceeding 60 MPH (97 km/h)
(where legally allowed) can improve
fuel efficiency due to reduced aero-
dynamic drag.
.Maintaining a safe following dis-tance behind other vehicles re-
duces unnecessary braking.
.Safely monitoring traffic to antici- pate changes in speed permits
reduced braking and smooth accel-
eration changes.
.Select a gear range suitable to roadconditions.
5. Use cruise control.
.Using cruise control during highway driving helps maintain a steady
speed.
.Cruise control is particularly effec-tive in providing fuel savings when
driving on flat terrains.
6. Plan for the shortest route.
.Utilize a map or navigation system to determine the best route to save
time.
BREAK-IN SCHEDULE FUEL EFFICIENT DRIVING TIPS
Page 372 of 516

BRAKE ASSIST
When the force applied to the brake pedal
exceeds a certain level, the Brake Assist is
activated generating greater braking
force than a conventional brake booster
even with light pedal force.
Page 432 of 516

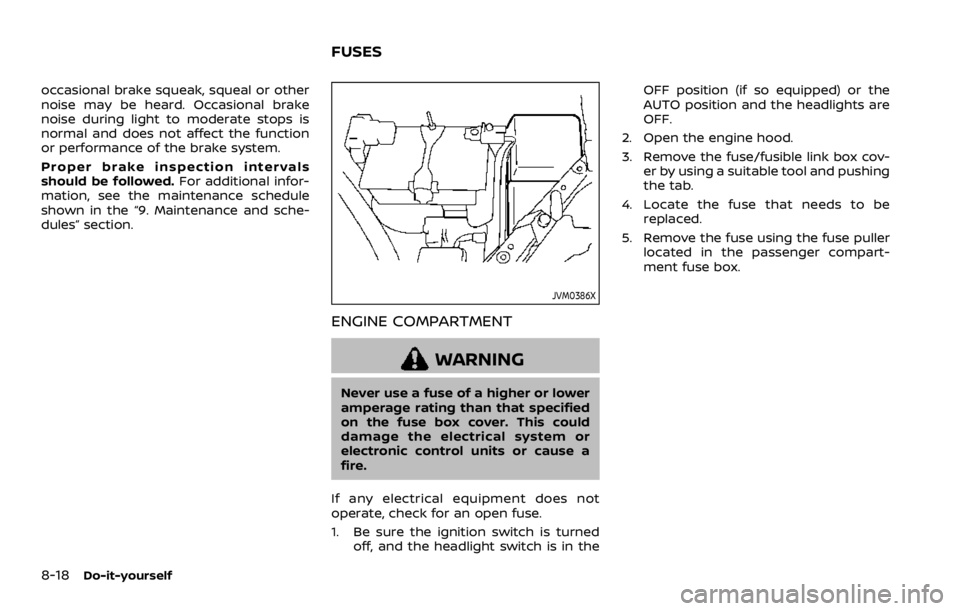
occasional brake squeak, squeal or other
noise may be heard. Occasional brake
noise during light to moderate stops is
normal and does not affect the function
or performance of the brake system.
Proper brake inspection intervals
should be followed.For additional infor-
mation, see the maintenance schedule
shown in the “9. Maintenance and sche-
dules” section.
Page 453 of 516

equipped with 4 tires that were
the same size and you are only
replacing 2 of the 4 tires, install
the new tires on the rear axle.
Placing new tires on the front
axle may cause loss of vehicle
control in some driving condi-
tions and cause an accident and
personal injury.
. If the wheels are changed for any
reason, always replace with
wheels which have the same off-
set dimension. Wheels of a differ-
ent off-set could cause prema-
ture tire wear, degrade vehicle
handling characteristics and/or
interference with the brake
discs/drums. Such interference
can lead to decreased braking
efficiency and/or early brake
pad/shoe wear. See “Wheels and
tires” (P.10-7) of this manual for
wheel off-set dimensions.
. Since the spare tire (if so
equipped) is not equipped with
the TPMS, when a spare tire is
mounted or a wheel is replaced,
the TPMS will not function and
the low tire pressure warning
light will flash for approximately
1 minute. The light will remain on
after 1 minute. Have your tires replaced and/or TPMS system
reset as soon as possible. It is
recommended you visit a NISSAN
dealer for these services.
. Replacing tires with those not
originally specified by NISSAN
could affect the proper operation
of the TPMS.
. The TPMS sensor may be da-
maged if it is not handled cor-
rectly. Be careful when handling
the TPMS sensor.
. When replacing the TPMS sensor,
the ID registration may be re-
quired. It is recommended you
visit a NISSAN dealer for ID regis-
tration.
. Do not use a valve stem cap that
is not specified by NISSAN. The
valve stem cap may become
stuck.
. Be sure that the valve stem caps
are correctly fitted. Otherwise the
valve may be clogged up with dirt
and cause a malfunction or loss
of pressure.
. Do not install a damaged or
deformed wheel or tire even if it
has been repaired. Such wheels
or tires could have structural
damage and could fail without warning.
. The use of retread tire is not
recommended.
. For additional information re-
garding tires, refer to “Important
Tire Safety Information” (US) or
“Tire Safety Information” (Cana-
da) in the Warranty Information
Booklet.
Page 507 of 516

Parking brakeElectronic parking brake
indicator light .......................................................... 2-12
Phone Bluetooth® Hands-Free Phone ..................... 4-2
Car phone or CB radio ..................................... 4-35
Power Electric power steering................................ 5-128
Power door lock ....................................................... 3-5
Power outlet............................................................. 2-65
Power windows ..................................................... 2-76
Power moonroof.......................................................... 2-78
Precautions Braking precautions....................................... 5-129
Child restraints ....................................................... 1-22
Cruise control .......................................................... 5-63
Driving safety ........................................................... 5-10
Maintenance................................................................ 8-2
On-pavement and off-road driving .......... 5-9
Seat belt usage ...................................................... 1-12
SRS ................................................................................... 1-42
When starting and driving................................ 5-4
ProPILOT assist ............................................................. 5-64
ProPILOT assist switches ...................................... 5-67
ProPILOT assist system display
and indicators ................................................................ 5-68
ProPILOT assist system operation ................ 5-66
Push starting................................................................... 6-16
Push-button ignition switch............................... 5-14