ECU NISSAN ROGUE 2023 Owner's Manual
[x] Cancel search | Manufacturer: NISSAN, Model Year: 2023, Model line: ROGUE, Model: NISSAN ROGUE 2023Pages: 508, PDF Size: 2.44 MB
Page 51 of 508
SSS0647
Forward-facing — step 4
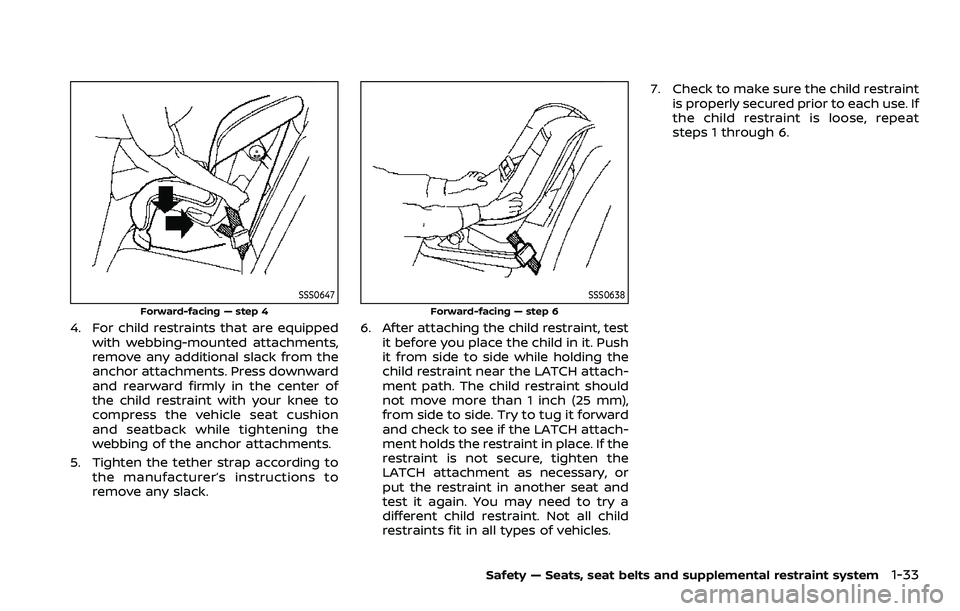
4. For child restraints that are equippedwith webbing-mounted attachments,
remove any additional slack from the
anchor attachments. Press downward
and rearward firmly in the center of
the child restraint with your knee to
compress the vehicle seat cushion
and seatback while tightening the
webbing of the anchor attachments.
5. Tighten the tether strap according to the manufacturer’s instructions to
remove any slack.
SSS0638
Forward-facing — step 6
6. After attaching the child restraint, testit before you place the child in it. Push
it from side to side while holding the
child restraint near the LATCH attach-
ment path. The child restraint should
not move more than 1 inch (25 mm),
from side to side. Try to tug it forward
and check to see if the LATCH attach-
ment holds the restraint in place. If the
restraint is not secure, tighten the
LATCH attachment as necessary, or
put the restraint in another seat and
test it again. You may need to try a
different child restraint. Not all child
restraints fit in all types of vehicles. 7. Check to make sure the child restraint
is properly secured prior to each use. If
the child restraint is loose, repeat
steps 1 through 6.
Safety — Seats, seat belts and supplemental restraint system1-33
Page 52 of 508
1-34Safety — Seats, seat belts and supplemental restraint system
WAB0058X
Installing top tether strap
WARNING
Child restraint anchorages are de-
signed to withstand only those loads
imposed by correctly fitted child
restraints. Under no circumstances
are they to be used to attach adult
seat belts, or other items or equip-
ment to the vehicle. Doing so could
damage the child restraint an-
chorages. The child restraint will not
be properly installed using the da-
maged anchorage, and a child could
be seriously injured or killed in acollision.
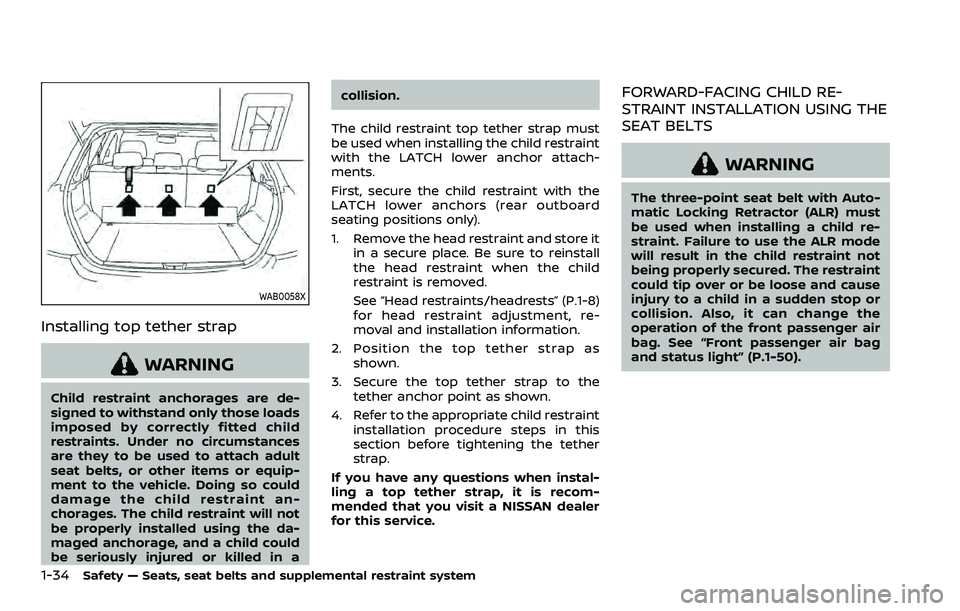
The child restraint top tether strap must
be used when installing the child restraint
with the LATCH lower anchor attach-
ments.
First, secure the child restraint with the
LATCH lower anchors (rear outboard
seating positions only).
1. Remove the head restraint and store it in a secure place. Be sure to reinstall
the head restraint when the child
restraint is removed.
See “Head restraints/headrests” (P.1-8)
for head restraint adjustment, re-
moval and installation information.
2. Position the top tether strap as shown.
3. Secure the top tether strap to the tether anchor point as shown.
4. Refer to the appropriate child restraint installation procedure steps in this
section before tightening the tether
strap.
If you have any questions when instal-
ling a top tether strap, it is recom-
mended that you visit a NISSAN dealer
for this service.
FORWARD-FACING CHILD RE-
STRAINT INSTALLATION USING THE
SEAT BELTS
WARNING
The three-point seat belt with Auto-
matic Locking Retractor (ALR) must
be used when installing a child re-
straint. Failure to use the ALR mode
will result in the child restraint not
being properly secured. The restraint
could tip over or be loose and cause
injury to a child in a sudden stop or
collision. Also, it can change the
operation of the front passenger air
bag. See “Front passenger air bag
and status light” (P.1-50).
Page 53 of 508
SSS0640
Forward-facing (front passenger seat) — step 1
Refer to all Warnings and Cautions in the
“Child safety” and “Child restraints” sec-
tions before installing a child restraint.
Do not use the lower anchors if the
combined weight of the child and the
child restraint exceeds 65 lbs (29.5 kg). If
the combined weight of the child and the
child restraint is greater than 65 lbs (29.5
kg), use the vehicle’s seat belt (not the
lower anchors) to install the child re-
straint. Be sure to follow the child re-
straint manufacturer’s instructions for
installation.
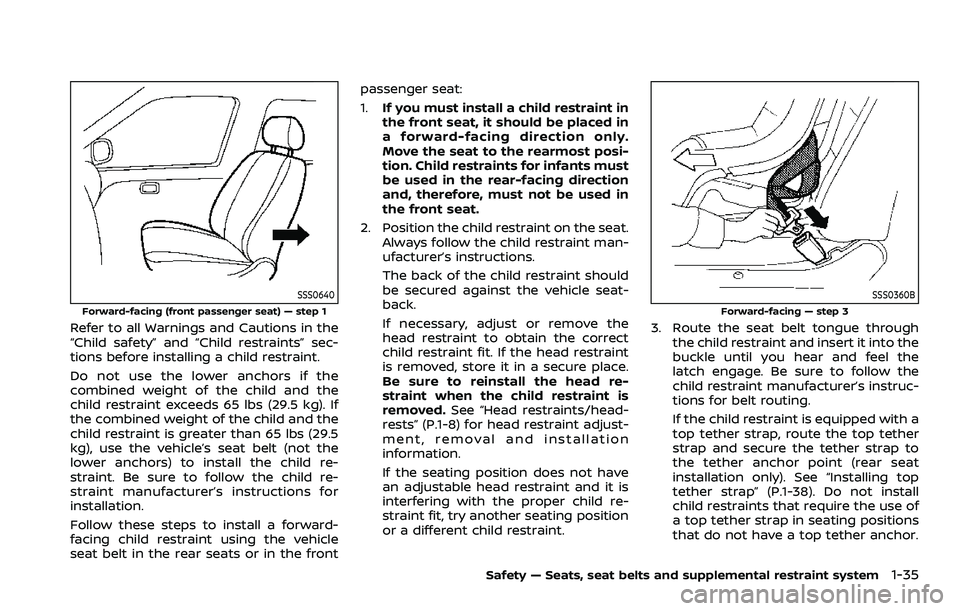
Follow these steps to install a forward-
facing child restraint using the vehicle
seat belt in the rear seats or in the frontpassenger seat:
1.
If you must install a child restraint in
the front seat, it should be placed in
a forward-facing direction only.
Move the seat to the rearmost posi-
tion. Child restraints for infants must
be used in the rear-facing direction
and, therefore, must not be used in
the front seat.
2. Position the child restraint on the seat. Always follow the child restraint man-
ufacturer’s instructions.
The back of the child restraint should
be secured against the vehicle seat-
back.
If necessary, adjust or remove the
head restraint to obtain the correct
child restraint fit. If the head restraint
is removed, store it in a secure place.
Be sure to reinstall the head re-
straint when the child restraint is
removed. See “Head restraints/head-
rests” (P.1-8) for head restraint adjust-
ment, removal and installation
information.
If the seating position does not have
an adjustable head restraint and it is
interfering with the proper child re-
straint fit, try another seating position
or a different child restraint.
SSS0360B
Forward-facing — step 3
3. Route the seat belt tongue through
the child restraint and insert it into the
buckle until you hear and feel the
latch engage. Be sure to follow the
child restraint manufacturer’s instruc-
tions for belt routing.
If the child restraint is equipped with a
top tether strap, route the top tether
strap and secure the tether strap to
the tether anchor point (rear seat
installation only). See “Installing top
tether strap” (P.1-38). Do not install
child restraints that require the use of
a top tether strap in seating positions
that do not have a top tether anchor.
Safety — Seats, seat belts and supplemental restraint system1-35
Page 55 of 508
SSS0641
Forward-facing — step 8
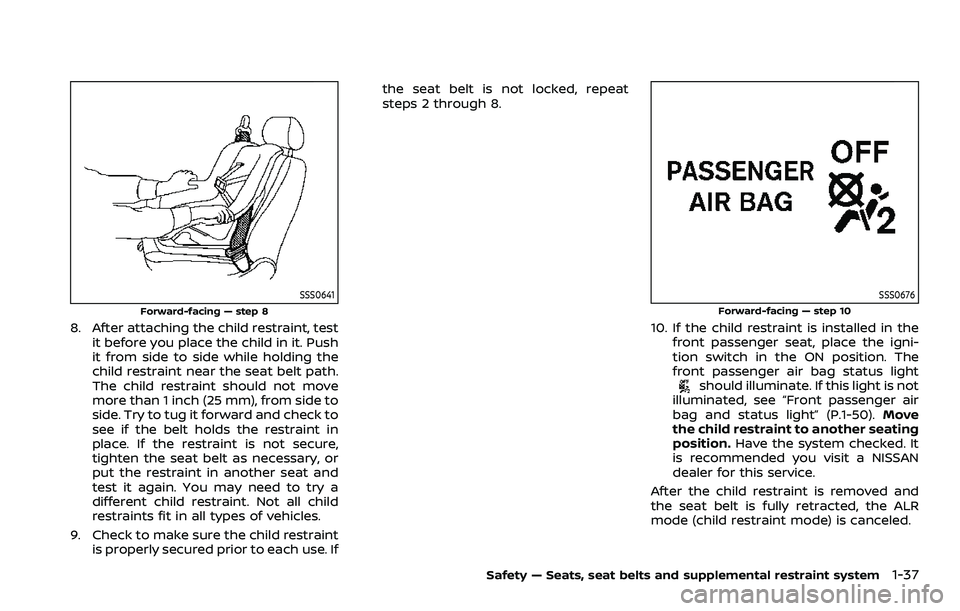
8. After attaching the child restraint, testit before you place the child in it. Push
it from side to side while holding the
child restraint near the seat belt path.
The child restraint should not move
more than 1 inch (25 mm), from side to
side. Try to tug it forward and check to
see if the belt holds the restraint in
place. If the restraint is not secure,
tighten the seat belt as necessary, or
put the restraint in another seat and
test it again. You may need to try a
different child restraint. Not all child
restraints fit in all types of vehicles.
9. Check to make sure the child restraint is properly secured prior to each use. If the seat belt is not locked, repeat
steps 2 through 8.
SSS0676
Forward-facing — step 10
10. If the child restraint is installed in the
front passenger seat, place the igni-
tion switch in the ON position. The
front passenger air bag status light
should illuminate. If this light is not
illuminated, see “Front passenger air
bag and status light” (P.1-50). Move
the child restraint to another seating
position. Have the system checked. It
is recommended you visit a NISSAN
dealer for this service.
After the child restraint is removed and
the seat belt is fully retracted, the ALR
mode (child restraint mode) is canceled.
Safety — Seats, seat belts and supplemental restraint system1-37
Page 56 of 508
1-38Safety — Seats, seat belts and supplemental restraint system
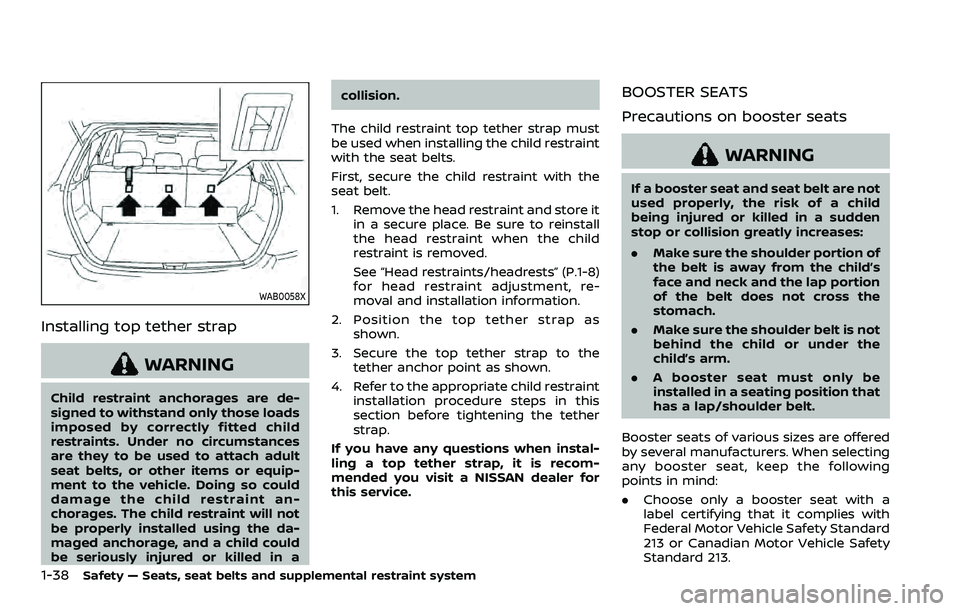
WAB0058X
Installing top tether strap
WARNING
Child restraint anchorages are de-
signed to withstand only those loads
imposed by correctly fitted child
restraints. Under no circumstances
are they to be used to attach adult
seat belts, or other items or equip-
ment to the vehicle. Doing so could
damage the child restraint an-
chorages. The child restraint will not
be properly installed using the da-
maged anchorage, and a child could
be seriously injured or killed in acollision.
The child restraint top tether strap must
be used when installing the child restraint
with the seat belts.
First, secure the child restraint with the
seat belt.
1. Remove the head restraint and store it in a secure place. Be sure to reinstall
the head restraint when the child
restraint is removed.
See “Head restraints/headrests” (P.1-8)
for head restraint adjustment, re-
moval and installation information.
2. Position the top tether strap as shown.
3. Secure the top tether strap to the tether anchor point as shown.
4. Refer to the appropriate child restraint installation procedure steps in this
section before tightening the tether
strap.
If you have any questions when instal-
ling a top tether strap, it is recom-
mended you visit a NISSAN dealer for
this service.
BOOSTER SEATS
Precautions on booster seats
WARNING
If a booster seat and seat belt are not
used properly, the risk of a child
being injured or killed in a sudden
stop or collision greatly increases:
. Make sure the shoulder portion of
the belt is away from the child’s
face and neck and the lap portion
of the belt does not cross the
stomach.
. Make sure the shoulder belt is not
behind the child or under the
child’s arm.
. A booster seat must only be
installed in a seating position that
has a lap/shoulder belt.
Booster seats of various sizes are offered
by several manufacturers. When selecting
any booster seat, keep the following
points in mind:
. Choose only a booster seat with a
label certifying that it complies with
Federal Motor Vehicle Safety Standard
213 or Canadian Motor Vehicle Safety
Standard 213.
Page 59 of 508
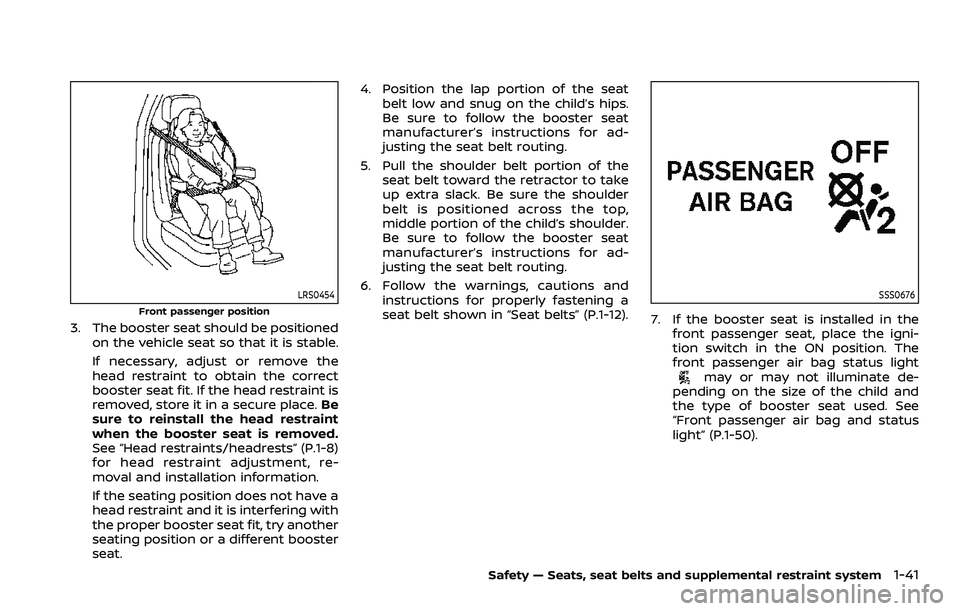
LRS0454
Front passenger position
3. The booster seat should be positionedon the vehicle seat so that it is stable.
If necessary, adjust or remove the
head restraint to obtain the correct
booster seat fit. If the head restraint is
removed, store it in a secure place. Be
sure to reinstall the head restraint
when the booster seat is removed.
See “Head restraints/headrests” (P.1-8)
for head restraint adjustment, re-
moval and installation information.
If the seating position does not have a
head restraint and it is interfering with
the proper booster seat fit, try another
seating position or a different booster
seat. 4. Position the lap portion of the seat
belt low and snug on the child’s hips.
Be sure to follow the booster seat
manufacturer’s instructions for ad-
justing the seat belt routing.
5. Pull the shoulder belt portion of the seat belt toward the retractor to take
up extra slack. Be sure the shoulder
belt is positioned across the top,
middle portion of the child’s shoulder.
Be sure to follow the booster seat
manufacturer’s instructions for ad-
justing the seat belt routing.
6. Follow the warnings, cautions and instructions for properly fastening a
seat belt shown in “Seat belts” (P.1-12).
SSS0676
7. If the booster seat is installed in thefront passenger seat, place the igni-
tion switch in the ON position. The
front passenger air bag status light
may or may not illuminate de-
pending on the size of the child and
the type of booster seat used. See
“Front passenger air bag and status
light” (P.1-50).
Safety — Seats, seat belts and supplemental restraint system1-41
Page 71 of 508
Front passenger air bag:
The front passenger air bag is designed
to automatically turn OFF when the
vehicle is operated under some condi-
tions as described below as permitted by
U.S. regulations. If the front passenger air
bag is OFF, it will not inflate in a crash. The
driver air bag and other air bags in your
vehicle are not part of this system.
The purpose of the regulation is to help
reduce the risk of injury or death from an
inflating air bag to certain front passen-
ger seat occupants, such as children, by
requiring the air bag to be automatically
turned OFF.
The occupant classification sensors
(weight sensors) are on the seat cushion
frame under the front passenger seat and
are designed to detect an occupant and
objects on the seat. For example, if a child
is in the front passenger seat, the Ad-
vanced Air Bag System is designed to turn
the passenger air bag OFF in accordance
with the regulations. Also, if a child
restraint of the type specified in the
regulations is on the seat, the occupant
classification sensors can detect it and
cause the air bag to turn OFF.
Front passenger seat adult occupants
who are properly seated and using the
seat belt as outlined in this manual
should not cause the passenger air bagand front passenger knee air bag to be
automatically turned OFF. For small
adults it may be turned OFF, however, if
the occupant does not sit in the seat
properly (for example, by not sitting up-
right, by sitting on an edge of the seat, or
by otherwise being out of position), this
could cause the sensors to turn the air
bag OFF. Always be sure to be seated and
wearing the seat belt properly for the
most effective protection by the seat belt
and supplemental air bag.
NISSAN recommends that pre-teens and
children be properly restrained in a rear
seat. NISSAN also recommends that ap-
propriate child restraints and booster
seats be properly installed in a rear seat.
If this is not possible, the occupant
classification sensors are designed to
operate as described above to turn the
front passenger air bag and front pas-
senger knee air bag OFF for specified
child restraints. Failing to properly secure
child restraints and to use the Automatic
Locking Retractor (ALR) mode (child re-
straint mode) may allow the restraint to
tip or move in an accident or sudden stop.
This can also result in the passenger air
bag and front passenger knee air bag
inflating in a crash instead of being OFF.
(See “Child restraints” (P.1-21) for proper
use and installation.)
If the front passenger seat is not occu-
pied, the passenger air bag and front
passenger knee air bag are designed not
to inflate in a crash. However, heavy
objects placed on the seat could result
in air bag inflation, because of the object
being detected by the occupant classifi-
cation sensors. Other conditions could
also result in air bag inflation, such as if a
child is standing on the seat, or if two
children are on the seat, contrary to the
instructions in this manual. Always be
sure that you and all vehicle occupants
are seated and restrained properly.
Using the front passenger air bag status
light, you can monitor when the front
passenger air bag and front passenger
knee air bag are automatically turned
OFF.
If an adult occupant is in the seat but the
front passenger air bag status light is
illuminated (indicating that the front pas-
senger air bag and front passenger knee
air bag are OFF), it could be that the
person is a small adult, or is not sitting on
the seat properly.
If a child restraint must be used in the
front seat, the front passenger air bag
status light may or may not be illumi-
nated, depending on the size of the child
and the type of child restraint being used.
If the front passenger air bag status light
Safety — Seats, seat belts and supplemental restraint system1-53
Page 83 of 508

2 Instruments and controls
Cockpit ........................................................................\
.......................... 2-3
Instrument panel ........................................................................\
.. 2-4
Meters and gauges ..................................................................... 2-5Speedometer and odometer ........................................ 2-6
Tachometer ........................................................................\
........ 2-7
Engine coolant temperature gauge ....................... 2-7
Fuel gauge ........................................................................\
........... 2-8
Instrument brightness control .................................... 2-9
Continuously Variable Transmission (CVT)
position indicator (if so equipped) ........................... 2-9
Warning lights, indicator lights and
audible reminders ..................................................................... 2-10 Checking lights ..................................................................... 2-11
Warning/indicator lights (red) ................................... 2-11
Warning/indicator lights (yellow) ........................... 2-13
Warning/indicator lights (other) ............................. 2-17
Audible reminders .............................................................. 2-18
Vehicle information display ............................................... 2-19 How to use the vehicle
information display ........................................................... 2-20
Startup display ...................................................................... 2-20
Settings ........................................................................\
............... 2-21
Vehicle information display warnings
and indicators ........................................................................\
2-31
Trip computer ........................................................................\
2-40 Clock and outside air temperature ................... 2-42
Traffic Sign Recognition (if so equipped) ...... 2-43
Security systems ....................................................................... 2-45
Vehicle Security System .............................................. 2-45
NISSAN Vehicle Immobilizer System ................. 2-47
Wiper and washer switch ................................................... 2-48
Windshield wiper and washer operation ...... 2-49
Rear window wiper and washer switch ................. 2-50
Rear window and outside mirror
defroster switch ........................................................................\
. 2-51
Headlight and turn signal switch ................................ 2-52 Headlight switch ............................................................... 2-52
Turn signal switch ........................................................... 2-58
Fog light switch (if so equipped) ......................... 2-59
Horn ........................................................................\
............................. 2-59
Heated steering wheel (if so equipped) .................. 2-59
Heated seats (if so equipped) ......................................... 2-60
Dynamic driver assistance switch
(models without ProPILOT assist) ............................... 2-61
Steering assist switch (models with
ProPILOT assist) ........................................................................\
. 2-62
Vehicle Dynamic Control (VDC) off switch ........... 2-62
Intelligent 4x4 LOCK switch (if so equipped) ...... 2-63
Rear door alert ........................................................................\
.... 2-63
ECO mode switch ..................................................................... 2-64
Page 92 of 508
2-10Instruments and controls
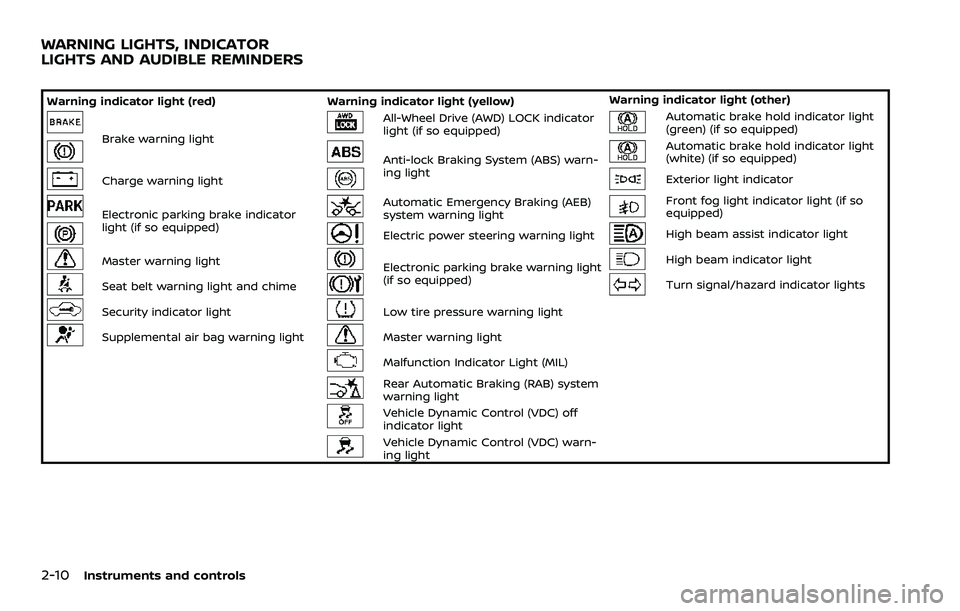
Warning indicator light (red)Warning indicator light (yellow) Warning indicator light (other)
Brake warning light
All-Wheel Drive (AWD) LOCK indicator
light (if so equipped)Automatic brake hold indicator light
(green) (if so equipped)
Anti-lock Braking System (ABS) warn-
ing lightAutomatic brake hold indicator light
(white) (if so equipped)
Charge warning lightExterior light indicator
Electronic parking brake indicator
light (if so equipped)Automatic Emergency Braking (AEB)
system warning lightFront fog light indicator light (if so
equipped)
Electric power steering warning lightHigh beam assist indicator light
Master warning lightElectronic parking brake warning light
(if so equipped)High beam indicator light
Seat belt warning light and chimeTurn signal/hazard indicator lights
Security indicator lightLow tire pressure warning light
Supplemental air bag warning lightMaster warning light
Malfunction Indicator Light (MIL)
Rear Automatic Braking (RAB) system
warning light
Vehicle Dynamic Control (VDC) off
indicator light
Vehicle Dynamic Control (VDC) warn-
ing light
WARNING LIGHTS, INDICATOR
LIGHTS AND AUDIBLE REMINDERS
Page 94 of 508
2-12Instruments and controls
.If the brake fluid level is below the
minimum or MIN mark on the
brake fluid reservoir, do not drive
until the brake system has been
checked. It is recommended you
visit a NISSAN dealer for this
service.
Charge warning light
If the light illuminates while the engine is
running, it may indicate the charging
system is not functioning properly. Turn
the engine off and check the alternator
belt. If the belt is loose, broken, missing or
if the light remains on, have your vehicle
serviced immediately. It is recommended
you visit a NISSAN dealer for this service.
CAUTION
Do not continue driving if the alter-
nator belt is loose, broken or miss-
ing.
orElectronic parking
brake indicator light (if so
equipped)
The electronic parking brake indicator
light indicates that the electronic parking
brake system is operating.
When the ignition switch is placed in the
ON position, the electronic parking brake
indicator light illuminates. When the en-
gine is started and the parking brake is
released, the warning light turns off.
If the parking brake is not fully released,
the electronic parking brake indicator
light remains on. Be sure that the electro-
nic parking brake indicator light has
turned off before driving. (See “Parking
brake” (P.5-27).)
If the electronic parking brake indicator
light illuminates or flashes while the
electronic parking brake warning light
or(yellow) illuminates, it may
indicate that the electronic parking brake
system is not functioning properly. Have
the system checked, and if necessary
repaired. It is recommended you visit a
NISSAN dealer for this service.
Master warning light
When the ignition switch is in the ON
position, the master warning light illumi-
nates if a warning message appears in
the vehicle information display.
See “Vehicle information display” (P.2-19).
Seat belt warning light and
chime
The light and chime remind you to fasten
the driver and front passenger seat belts.
The light illuminates whenever the igni-
tion switch is placed in the ON position,
and will remain illuminated until the front
seat belts are fastened.
When the vehicle speed exceeds 10 MPH
(15 km/h), the light will blink unless the
front seat belts are securely fastened.
When the ignition switch is placed in the
ON position, the chime will sound for
about 6 seconds unless the driver’s seat
belt is securely fastened.
When the vehicle speed exceeds 10 MPH
(15 km/h), the chime will sound unless the
front seat belts are securely fastened. The
chime will continue to sound for about 95
seconds until the front seat belts are
fastened.
For additional information, refer to “Seat