trip meter NISSAN ROGUE 2023 Owners Manual
[x] Cancel search | Manufacturer: NISSAN, Model Year: 2023, Model line: ROGUE, Model: NISSAN ROGUE 2023Pages: 508, PDF Size: 2.44 MB
Page 16 of 508
0-8Illustrated table of contents
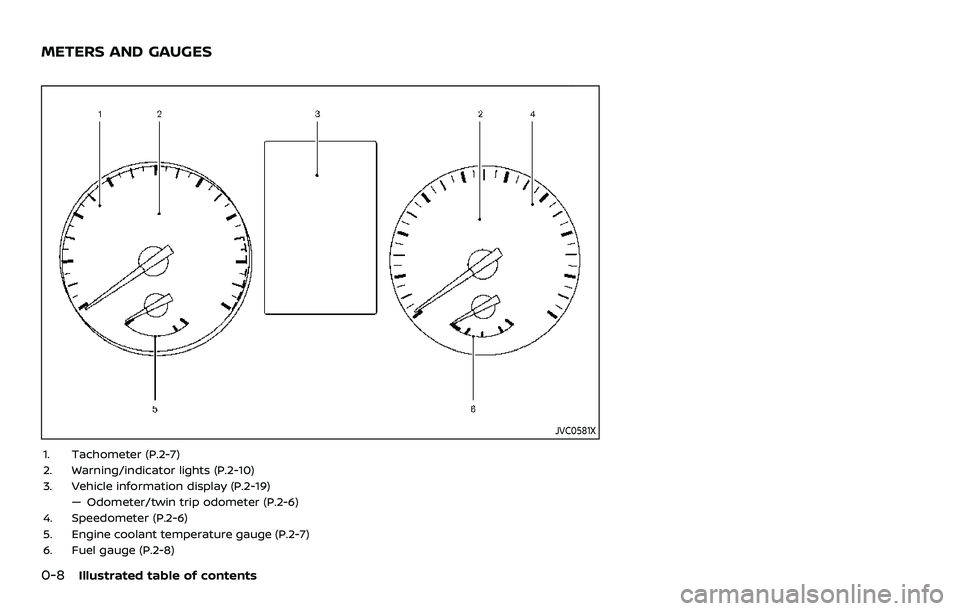
JVC0581X
1. Tachometer (P.2-7)
2. Warning/indicator lights (P.2-10)
3. Vehicle information display (P.2-19)— Odometer/twin trip odometer (P.2-6)
4. Speedometer (P.2-6)
5. Engine coolant temperature gauge (P.2-7)
6. Fuel gauge (P.2-8)
METERS AND GAUGES
Page 83 of 508
2 Instruments and controls
Cockpit ........................................................................\
.......................... 2-3
Instrument panel ........................................................................\
.. 2-4
Meters and gauges ..................................................................... 2-5Speedometer and odometer ........................................ 2-6
Tachometer ........................................................................\
........ 2-7
Engine coolant temperature gauge ....................... 2-7
Fuel gauge ........................................................................\
........... 2-8
Instrument brightness control .................................... 2-9
Continuously Variable Transmission (CVT)
position indicator (if so equipped) ........................... 2-9
Warning lights, indicator lights and
audible reminders ..................................................................... 2-10 Checking lights ..................................................................... 2-11
Warning/indicator lights (red) ................................... 2-11
Warning/indicator lights (yellow) ........................... 2-13
Warning/indicator lights (other) ............................. 2-17
Audible reminders .............................................................. 2-18
Vehicle information display ............................................... 2-19 How to use the vehicle
information display ........................................................... 2-20
Startup display ...................................................................... 2-20
Settings ........................................................................\
............... 2-21
Vehicle information display warnings
and indicators ........................................................................\
2-31
Trip computer ........................................................................\
2-40 Clock and outside air temperature ................... 2-42
Traffic Sign Recognition (if so equipped) ...... 2-43
Security systems ....................................................................... 2-45
Vehicle Security System .............................................. 2-45
NISSAN Vehicle Immobilizer System ................. 2-47
Wiper and washer switch ................................................... 2-48
Windshield wiper and washer operation ...... 2-49
Rear window wiper and washer switch ................. 2-50
Rear window and outside mirror
defroster switch ........................................................................\
. 2-51
Headlight and turn signal switch ................................ 2-52 Headlight switch ............................................................... 2-52
Turn signal switch ........................................................... 2-58
Fog light switch (if so equipped) ......................... 2-59
Horn ........................................................................\
............................. 2-59
Heated steering wheel (if so equipped) .................. 2-59
Heated seats (if so equipped) ......................................... 2-60
Dynamic driver assistance switch
(models without ProPILOT assist) ............................... 2-61
Steering assist switch (models with
ProPILOT assist) ........................................................................\
. 2-62
Vehicle Dynamic Control (VDC) off switch ........... 2-62
Intelligent 4x4 LOCK switch (if so equipped) ...... 2-63
Rear door alert ........................................................................\
.... 2-63
ECO mode switch ..................................................................... 2-64
Page 87 of 508
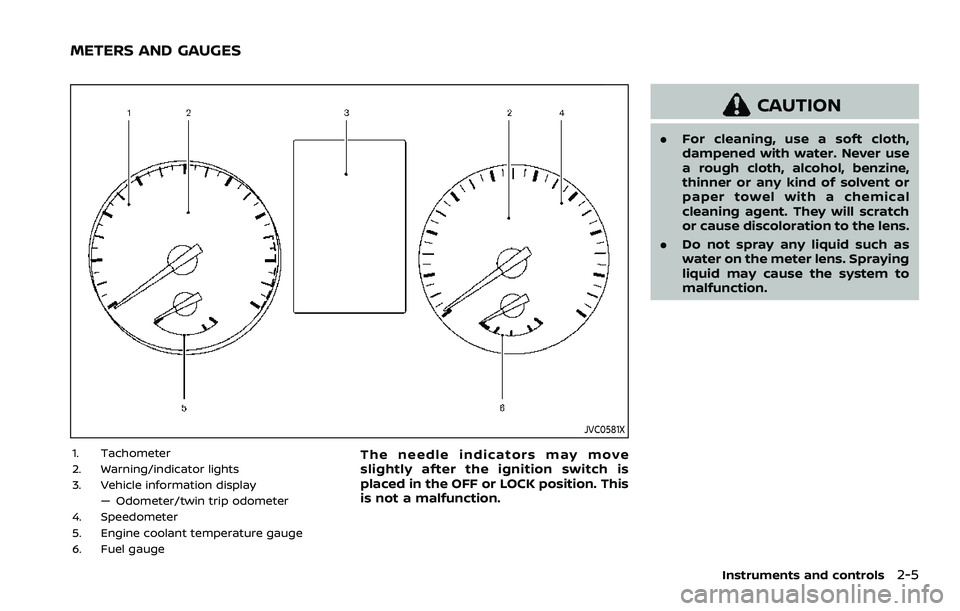
JVC0581X
1. Tachometer
2. Warning/indicator lights
3. Vehicle information display— Odometer/twin trip odometer
4. Speedometer
5. Engine coolant temperature gauge
6. Fuel gaugeThe needle indicators may move
slightly after the ignition switch is
placed in the OFF or LOCK position. This
is not a malfunction.
CAUTION
. For cleaning, use a soft cloth,
dampened with water. Never use
a rough cloth, alcohol, benzine,
thinner or any kind of solvent or
paper towel with a chemical
cleaning agent. They will scratch
or cause discoloration to the lens.
. Do not spray any liquid such as
water on the meter lens. Spraying
liquid may cause the system to
malfunction.
Instruments and controls2-5
METERS AND GAUGES
Page 88 of 508
2-6Instruments and controls
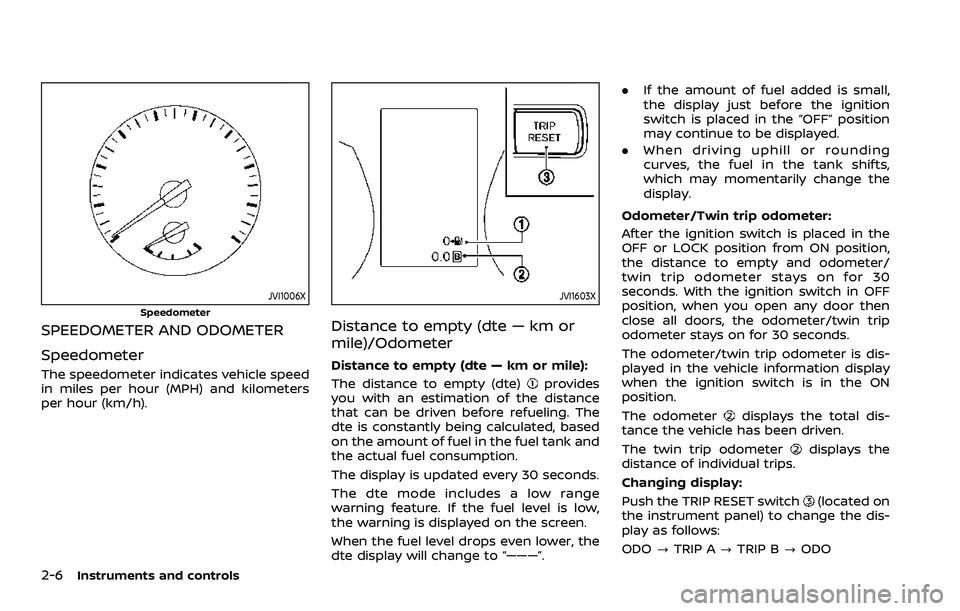
JVI1006X
Speedometer
SPEEDOMETER AND ODOMETER
Speedometer
The speedometer indicates vehicle speed
in miles per hour (MPH) and kilometers
per hour (km/h).
JVI1603X
Distance to empty (dte — km or
mile)/Odometer
Distance to empty (dte — km or mile):
The distance to empty (dte)
provides
you with an estimation of the distance
that can be driven before refueling. The
dte is constantly being calculated, based
on the amount of fuel in the fuel tank and
the actual fuel consumption.
The display is updated every 30 seconds.
The dte mode includes a low range
warning feature. If the fuel level is low,
the warning is displayed on the screen.
When the fuel level drops even lower, the
dte display will change to “———”. .
If the amount of fuel added is small,
the display just before the ignition
switch is placed in the “OFF” position
may continue to be displayed.
. When driving uphill or rounding
curves, the fuel in the tank shifts,
which may momentarily change the
display.
Odometer/Twin trip odometer:
After the ignition switch is placed in the
OFF or LOCK position from ON position,
the distance to empty and odometer/
twin trip odometer stays on for 30
seconds. With the ignition switch in OFF
position, when you open any door then
close all doors, the odometer/twin trip
odometer stays on for 30 seconds.
The odometer/twin trip odometer is dis-
played in the vehicle information display
when the ignition switch is in the ON
position.
The odometer
displays the total dis-
tance the vehicle has been driven.
The twin trip odometer
displays the
distance of individual trips.
Changing display:
Push the TRIP RESET switch
(located on
the instrument panel) to change the dis-
play as follows:
ODO ?TRIP A ?TRIP B ?ODO
Page 89 of 508
Resetting twin trip odometer:
Push the TRIP RESET switch
for more
than 1 second to reset the trip odometer
to zero.
JVI0951X
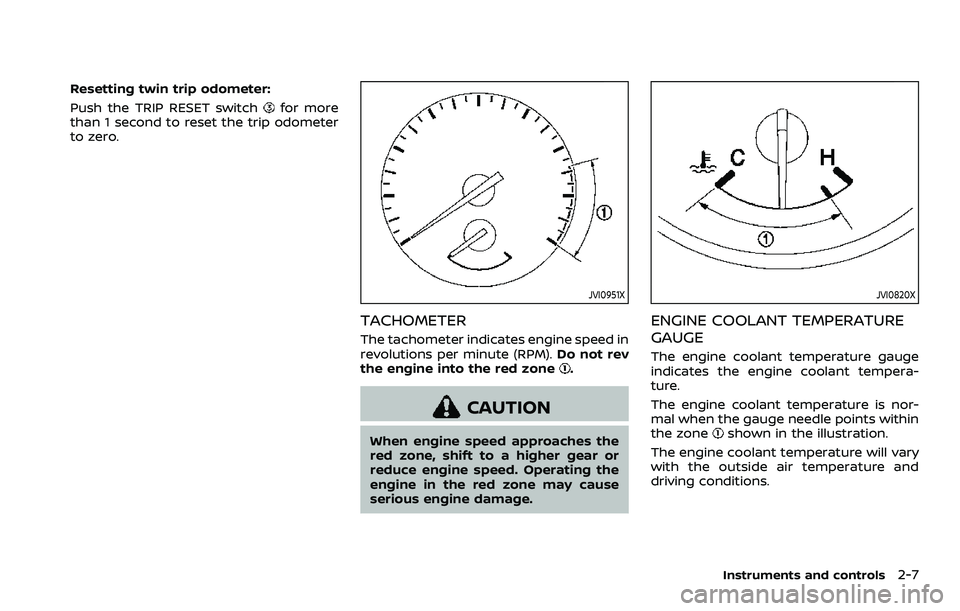
TACHOMETER
The tachometer indicates engine speed in
revolutions per minute (RPM). Do not rev
the engine into the red zone
.
CAUTION
When engine speed approaches the
red zone, shift to a higher gear or
reduce engine speed. Operating the
engine in the red zone may cause
serious engine damage.
JVI0820X
ENGINE COOLANT TEMPERATURE
GAUGE
The engine coolant temperature gauge
indicates the engine coolant tempera-
ture.
The engine coolant temperature is nor-
mal when the gauge needle points within
the zone
shown in the illustration.
The engine coolant temperature will vary
with the outside air temperature and
driving conditions.
Instruments and controls2-7
Page 101 of 508
NISSAN Intelligent Key® door buz-
zer (if so equipped)
The Intelligent Key door buzzer sounds if
any one of the following improper opera-
tions is found.
.The Intelligent Key is left inside the
vehicle when locking the doors.
. The Intelligent Key is left outside the
vehicle when operating the vehicle.
When the buzzer sounds, be sure to
check both the vehicle and the Intelligent
Key. For additional information, refer to
“Intelligent Key system” (P.3-11).
Brake pad wear warning
The disc brake pads have audible wear
warnings. When a brake pad requires
replacement, it will make a high pitched
scraping sound when the vehicle is in
motion. This scraping sound will first
occur only when the brake pedal is
depressed. After more wear of the brake
pad, the sound will always be heard even
if the brake pedal is not depressed. Have
the brakes checked as soon as possible if
the warning sound is heard.
Parking brake reminder chime
The parking brake reminder chime will
sound if the vehicle is driven at more than
4 MPH (7 km/h) (models not equipped
with electronic parking brake) or 2 MPH (4
km/h) (models equipped with electronic
parking brake) with the parking brake
applied. Stop the vehicle and release the
parking brake.
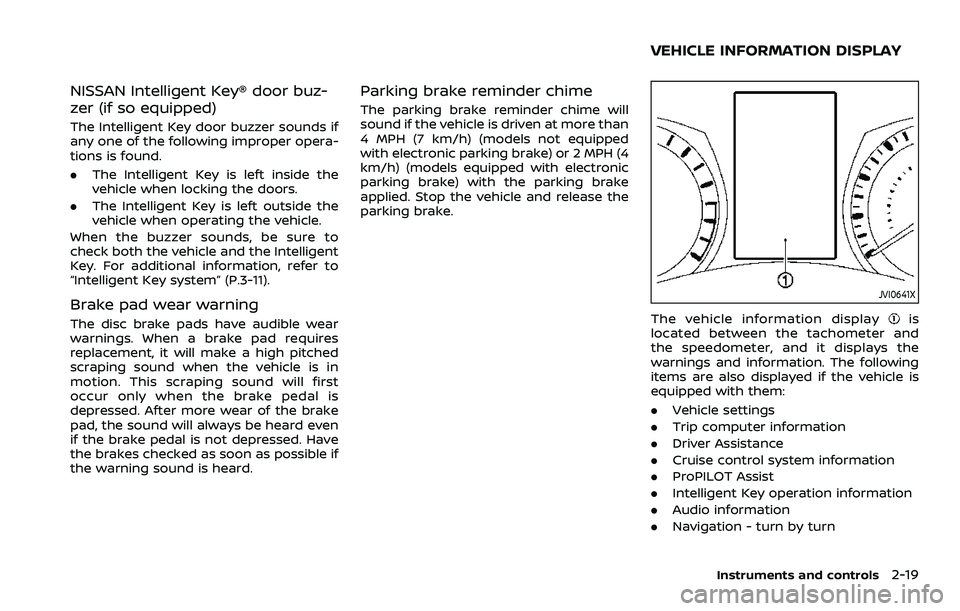
JVI0641X
The vehicle information displayis
located between the tachometer and
the speedometer, and it displays the
warnings and information. The following
items are also displayed if the vehicle is
equipped with them:
. Vehicle settings
. Trip computer information
. Driver Assistance
. Cruise control system information
. ProPILOT Assist
. Intelligent Key operation information
. Audio information
. Navigation - turn by turn
Instruments and controls2-19
VEHICLE INFORMATION DISPLAY
Page 122 of 508
2-40Instruments and controls
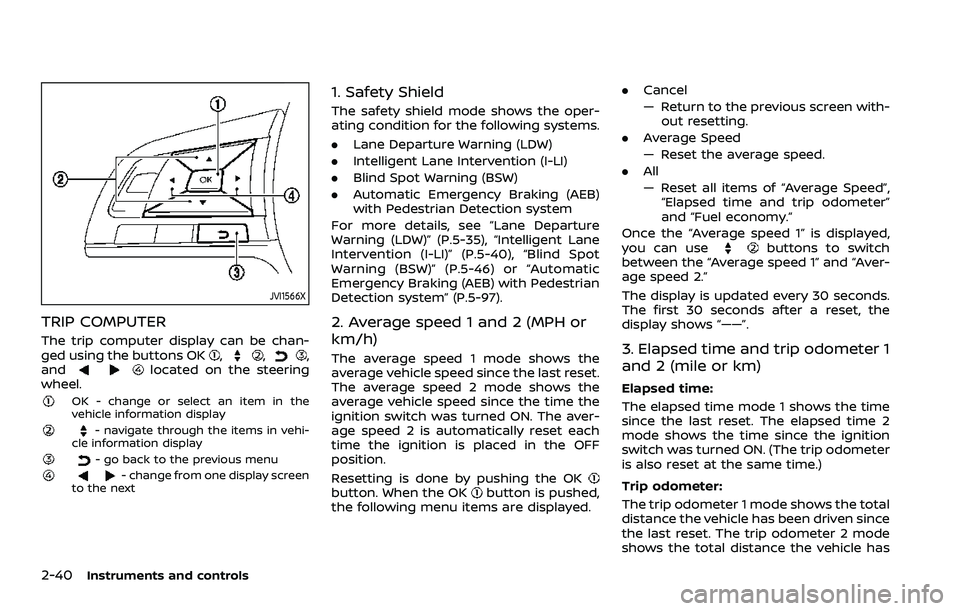
JVI1566X
TRIP COMPUTER
The trip computer display can be chan-
ged using the buttons OK,,,
andlocated on the steering
wheel.
OK - change or select an item in the
vehicle information display
- navigate through the items in vehi-
cle information display
- go back to the previous menu- change from one display screen
to the next
1. Safety Shield
The safety shield mode shows the oper-
ating condition for the following systems.
. Lane Departure Warning (LDW)
. Intelligent Lane Intervention (I-LI)
. Blind Spot Warning (BSW)
. Automatic Emergency Braking (AEB)
with Pedestrian Detection system
For more details, see “Lane Departure
Warning (LDW)” (P.5-35), “Intelligent Lane
Intervention (I-LI)” (P.5-40), “Blind Spot
Warning (BSW)” (P.5-46) or “Automatic
Emergency Braking (AEB) with Pedestrian
Detection system” (P.5-97).
2. Average speed 1 and 2 (MPH or
km/h)
The average speed 1 mode shows the
average vehicle speed since the last reset.
The average speed 2 mode shows the
average vehicle speed since the time the
ignition switch was turned ON. The aver-
age speed 2 is automatically reset each
time the ignition is placed in the OFF
position.
Resetting is done by pushing the OK
button. When the OKbutton is pushed,
the following menu items are displayed. .
Cancel
— Return to the previous screen with-
out resetting.
. Average Speed
— Reset the average speed.
. All
— Reset all items of “Average Speed”,
“Elapsed time and trip odometer”
and “Fuel economy.”
Once the “Average speed 1” is displayed,
you can use
buttons to switch
between the “Average speed 1” and “Aver-
age speed 2.”
The display is updated every 30 seconds.
The first 30 seconds after a reset, the
display shows “——”.
3. Elapsed time and trip odometer 1
and 2 (mile or km)
Elapsed time:
The elapsed time mode 1 shows the time
since the last reset. The elapsed time 2
mode shows the time since the ignition
switch was turned ON. (The trip odometer
is also reset at the same time.)
Trip odometer:
The trip odometer 1 mode shows the total
distance the vehicle has been driven since
the last reset. The trip odometer 2 mode
shows the total distance the vehicle has
Page 123 of 508
been driven since the time the ignition
switch was placed in the ON position. (The
elapsed time is also reset at the same
time.)
The elapsed time and trip odometer 2 is
automatically reset each time the ignition
is placed in the OFF position.
Resetting is done by pushing the OK
button. When the OKbutton is pushed,
the following menu items are displayed.
. Cancel
— Return to the previous screen with-
out resetting.
. Distance
— Reset the elapsed time and trip
odometer.
. All
— Reset all items of “Average Speed”,
“Elapsed time and trip odometer”
and “Fuel economy.”
Once the “Elapsed time and trip odometer
1” is displayed, you can use
buttons
to switch between the “Elapsed time and
trip odometer 1” and “Elapsed time and
trip odometer 2.”
4-5. Fuel economy/ECO pedal
guide
Current fuel consumption:
The current fuel consumption mode
shows the current fuel consumption.
Average fuel consumption:
The average fuel consumption 1 mode
shows the average fuel consumption
since the last reset. The average fuel
consumption 2 mode shows the average
fuel consumption since the time the
ignition switch was placed in the ON
position. The average fuel consumption
2 is automatically reset each time the
ignition is placed in the OFF position.
Resetting is done by pushing the OK
button. When the OKbutton is pushed,
the following menu items are displayed.
. Cancel
— Return to the previous screen with-
out resetting.
. Fuel Economy
— Reset the fuel economy.
. All
— Reset all items of “Average Speed”,
“Elapsed time and trip odometer”
and “Fuel economy”.
Once the “Fuel economy 1” is displayed,
you can use
buttons to switch
between the “Fuel economy 1” and “Fuel economy 2”.
The display is updated every 30 seconds.
For about the first 1/3 mile (500 m) after a
reset, the display shows “——”.
6. Audio
The audio mode shows the status of
audio information.
7. Navigation (if so equipped)
When the route guidance is set in the
navigation system, this item shows the
navigation route information.
8. Compass (if so equipped)
This display indicates the heading direc-
tion of the vehicle.
9. Intelligent 4x4 torque distribution
display (if so equipped)
When the Intelligent 4x4 torque distribu-
tion display is selected, you can view the
distribution ratio of the transmission
torque to the front and rear wheels
during driving.
Instruments and controls2-41
Page 146 of 508

2-64Instruments and controls
When the Rear Door Alert system is
activated and a driver exits the vehicle
after arriving at a destination:
.When the driver puts the vehicle in the
P (Park) position, a message appears
in the vehicle information display for
the driver to “Dismiss Message” or
“Disable Alert” if desired.
. With the system enabled, when the
driver exits the vehicle, an audible alert
(horn sound) will occur unless a rear
door is opened and closed within a
short time to deactivate the alert.
. If the doors are locked before the alert
is deactivated by opening a rear door,
the horn will sound.
. If the system is activated but the
liftgate is opened before opening a
rear door, the horn will be delayed
until after the liftgate is closed.
. If the audible horn alert occurs, a
message will also appear in the vehi-
cle information display that states,
“Check Back Seat for all articles”. For
additional information, see “45. Check
Back Seat For all articles” (P.2-36).
WARNING
.If the driver selects “Disable
Alert”, no audible alert will be
provided regardless of rear door
open/close status.
. There may be times when there is
an object or passenger in the rear
seat(s) but the audible alert does
not sound. For example, this may
occur if rear seat passengers
enter or exit the vehicle during a
trip.
. The system does not directly
detect objects or passengers in
the rear seat(s). Instead, it can
detect when a rear door is
opened and closed, indicating
that there may be something in
the rear seat(s).
NOTE:
There may be times when the horn
sounds but there are no objects or
passengers in the rear seat(s).
For additional information, see “44. Rear
Door Alert is activated” (P.2-36).
JVS0185X
The ECO mode system helps to enhance
the fuel economy by controlling the
engine and CVT operation (for CVT mod-
els) automatically to avoid rapid accelera-
tion.
To turn on the ECO mode system, push
the ECO switch. The ECO mode indicator
appears on the meter.
To turn off the ECO mode, push the ECO
switch again. The ECO mode indicator will
turn off.
. The ECO mode system cannot be
turned off while the accelerator pedal
is depressed even if the ECO switch is
pushed to OFF. Release the accelera-
tor pedal to turn off the ECO mode
ECO MODE SWITCH
Page 272 of 508
5-32Starting and driving
applied and the brake force of the
automatic brake hold will be re-
leased:
—The braking force is applied by
the automatic brake hold function
for 3 minutes or longer.
— The driver’s seat belt is unfas-
tened.
— The ignition switch is placed in
the OFF position.
— If a malfunction occurs in the
automatic brake hold function.
. When the vehicle stops, but the
brake force is not automatically
applied, depress the brake pedal
firmly until the automatic brake hold
indicator light (green) illuminates.
Automatic brake hold function dis-
play
The automatic brake hold function status
can be checked in the “Chassis Control”
mode in the vehicle information display.
For additional information, see “Trip com-
puter” (P.2-40).
WAF0037X
The SPORT mode switch adjusts the
engine and transmission points to en-
hance performance. Push the SPORT
mode switch on the instrument panel to
activate the SPORT mode. The SPORT
mode indicator (drive mode indicator)
appears in the vehicle information dis-
play.
NOTE:
In the SPORT mode, fuel economy may
be reduced.
JVS0185X
The ECO mode system helps to enhance
the fuel economy by controlling the
engine and CVT operation (for CVT mod-
els) automatically to avoid rapid accelera-
tion.
To turn on the ECO mode system, push
the ECO switch. The ECO mode indicator
appears on the meter.
To turn off the ECO mode, push the ECO
switch again. The ECO mode indicator will
turn off.
.The ECO mode system cannot be
turned off while the accelerator pedal
is depressed even if the ECO switch is
pushed to OFF. Release the accelera-
tor pedal to turn off the ECO mode
SPORT MODE SWITCH (if so equipped)ECO MODE SYSTEM