lock NISSAN ROGUE SELECT 2015 2.G Owners Manual
[x] Cancel search | Manufacturer: NISSAN, Model Year: 2015, Model line: ROGUE SELECT, Model: NISSAN ROGUE SELECT 2015 2.GPages: 322, PDF Size: 2.21 MB
Page 12 of 322
JVC0751X
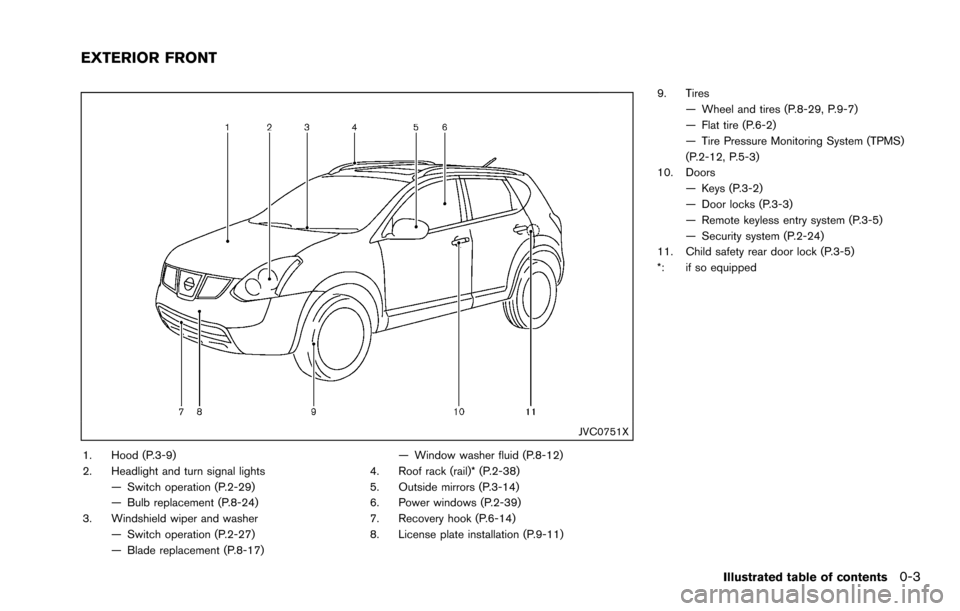
1. Hood (P.3-9)
2. Headlight and turn signal lights— Switch operation (P.2-29)
— Bulb replacement (P.8-24)
3. Windshield wiper and washer — Switch operation (P.2-27)
— Blade replacement (P.8-17) — Window washer fluid (P.8-12)
4. Roof rack (rail)* (P.2-38)
5. Outside mirrors (P.3-14)
6. Power windows (P.2-39)
7. Recovery hook (P.6-14)
8. License plate installation (P.9-11) 9. Tires
— Wheel and tires (P.8-29, P.9-7)
— Flat tire (P.6-2)
— Tire Pressure Monitoring System (TPMS)
(P.2-12, P.5-3)
10. Doors — Keys (P.3-2)
— Door locks (P.3-3)
— Remote keyless entry system (P.3-5)
— Security system (P.2-24)
11. Child safety rear door lock (P.3-5)
*: if so equipped
Illustrated table of contents0-3
EXTERIOR FRONT
Page 14 of 322
JVC0577X
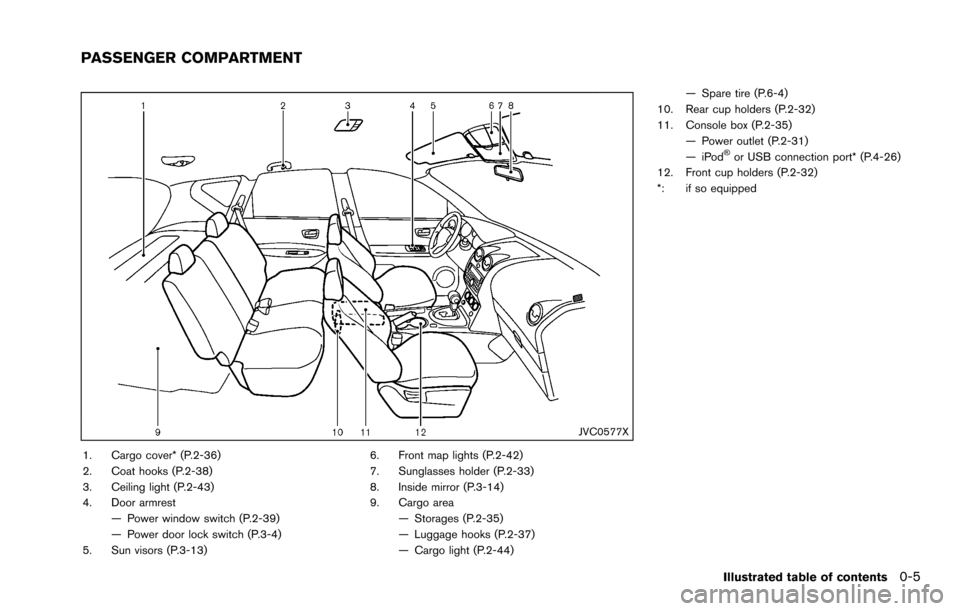
1. Cargo cover* (P.2-36)
2. Coat hooks (P.2-38)
3. Ceiling light (P.2-43)
4. Door armrest— Power window switch (P.2-39)
— Power door lock switch (P.3-4)
5. Sun visors (P.3-13) 6. Front map lights (P.2-42)
7. Sunglasses holder (P.2-33)
8. Inside mirror (P.3-14)
9. Cargo area
— Storages (P.2-35)
— Luggage hooks (P.2-37)
— Cargo light (P.2-44) — Spare tire (P.6-4)
10. Rear cup holders (P.2-32)
11. Console box (P.2-35) — Power outlet (P.2-31)
—iPod
�Šor USB connection port* (P.4-26)
12. Front cup holders (P.2-32)
*: if so equipped
Illustrated table of contents0-5
PASSENGER COMPARTMENT
Page 15 of 322
0-6Illustrated table of contents
JVC0578X
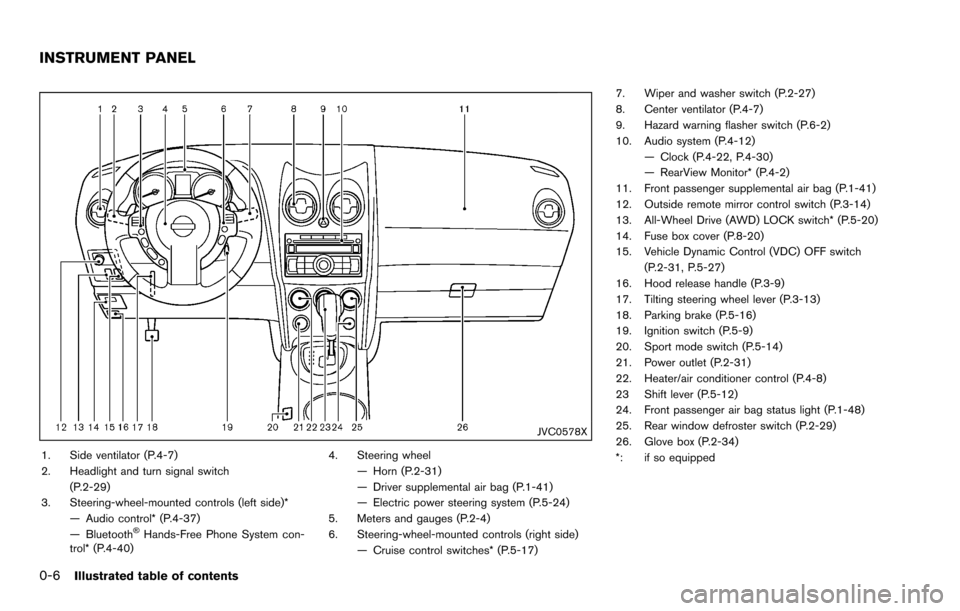
1. Side ventilator (P.4-7)
2. Headlight and turn signal switch(P.2-29)
3. Steering-wheel-mounted controls (left side)* — Audio control* (P.4-37)
— Bluetooth
�ŠHands-Free Phone System con-
trol* (P.4-40) 4. Steering wheel
— Horn (P.2-31)
— Driver supplemental air bag (P.1-41)
— Electric power steering system (P.5-24)
5. Meters and gauges (P.2-4)
6. Steering-wheel-mounted controls (right side) — Cruise control switches* (P.5-17) 7. Wiper and washer switch (P.2-27)
8. Center ventilator (P.4-7)
9. Hazard warning flasher switch (P.6-2)
10. Audio system (P.4-12)
— Clock (P.4-22, P.4-30)
— RearView Monitor* (P.4-2)
11. Front passenger supplemental air bag (P.1-41)
12. Outside remote mirror control switch (P.3-14)
13. All-Wheel Drive (AWD) LOCK switch* (P.5-20)
14. Fuse box cover (P.8-20)
15. Vehicle Dynamic Control (VDC) OFF switch (P.2-31, P.5-27)
16. Hood release handle (P.3-9)
17. Tilting steering wheel lever (P.3-13)
18. Parking brake (P.5-16)
19. Ignition switch (P.5-9)
20. Sport mode switch (P.5-14)
21. Power outlet (P.2-31)
22. Heater/air conditioner control (P.4-8)
23 Shift lever (P.5-12)
24. Front passenger air bag status light (P.1-48)
25. Rear window defroster switch (P.2-29)
26. Glove box (P.2-34)
*: if so equipped
INSTRUMENT PANEL
Page 18 of 322
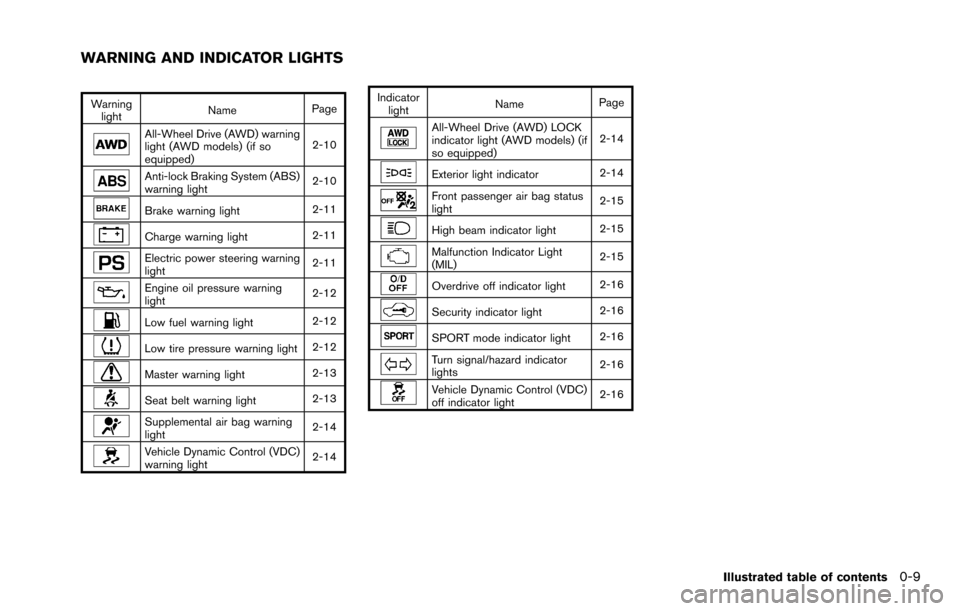
Warninglight Name
Page
All-Wheel Drive (AWD) warning
light (AWD models) (if so
equipped) 2-10
Anti-lock Braking System (ABS)
warning light
2-10
Brake warning light
2-11
Charge warning light2-11
Electric power steering warning
light2-11
Engine oil pressure warning
light2-12
Low fuel warning light
2-12
Low tire pressure warning light2-12
Master warning light2-13
Seat belt warning light2-13
Supplemental air bag warning
light2-14
Vehicle Dynamic Control (VDC)
warning light
2-14Indicator
light Name
Page
All-Wheel Drive (AWD) LOCK
indicator light (AWD models) (if
so equipped) 2-14
Exterior light indicator
2-14
Front passenger air bag status
light2-15
High beam indicator light
2-15
Malfunction Indicator Light
(MIL)2-15
Overdrive off indicator light
2-16
Security indicator light2-16
SPORT mode indicator light2-16
Turn signal/hazard indicator
lights2-16
Vehicle Dynamic Control (VDC)
off indicator light2-16
Illustrated table of contents0-9
WARNING AND INDICATOR LIGHTS
Page 21 of 322
1-2Safety — Seats, seat belts and supplemental restraint system
SSS0133
WARNING
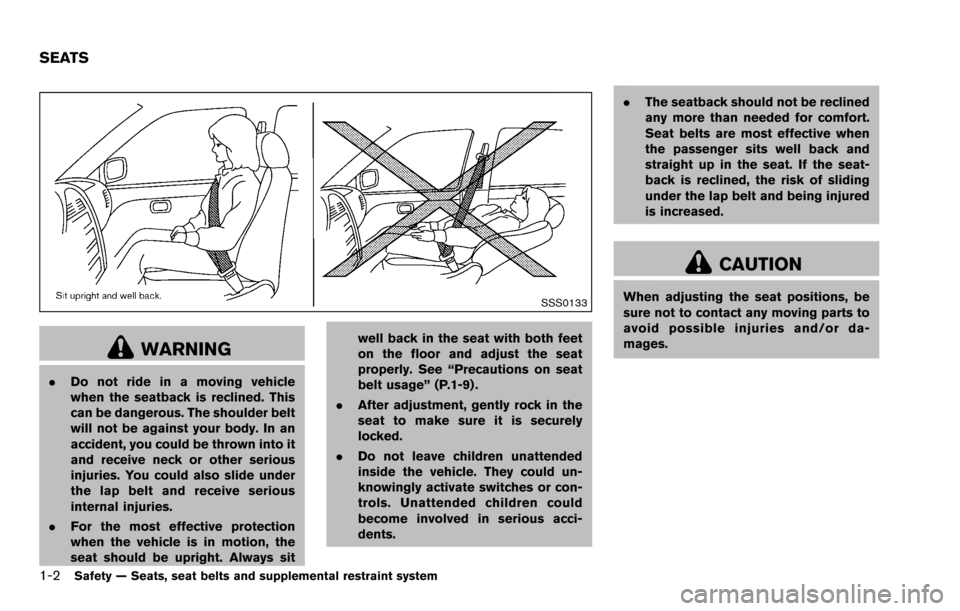
.Do not ride in a moving vehicle
when the seatback is reclined. This
can be dangerous. The shoulder belt
will not be against your body. In an
accident, you could be thrown into it
and receive neck or other serious
injuries. You could also slide under
the lap belt and receive serious
internal injuries.
. For the most effective protection
when the vehicle is in motion, the
seat should be upright. Always sit well back in the seat with both feet
on the floor and adjust the seat
properly. See “Precautions on seat
belt usage” (P.1-9) .
. After adjustment, gently rock in the
seat to make sure it is securely
locked.
. Do not leave children unattended
inside the vehicle. They could un-
knowingly activate switches or con-
trols. Unattended children could
become involved in serious acci-
dents. .
The seatback should not be reclined
any more than needed for comfort.
Seat belts are most effective when
the passenger sits well back and
straight up in the seat. If the seat-
back is reclined, the risk of sliding
under the lap belt and being injured
is increased.
CAUTION
When adjusting the seat positions, be
sure not to contact any moving parts to
avoid possible injuries and/or da-
mages.
SEATS
Page 22 of 322
SSS0792
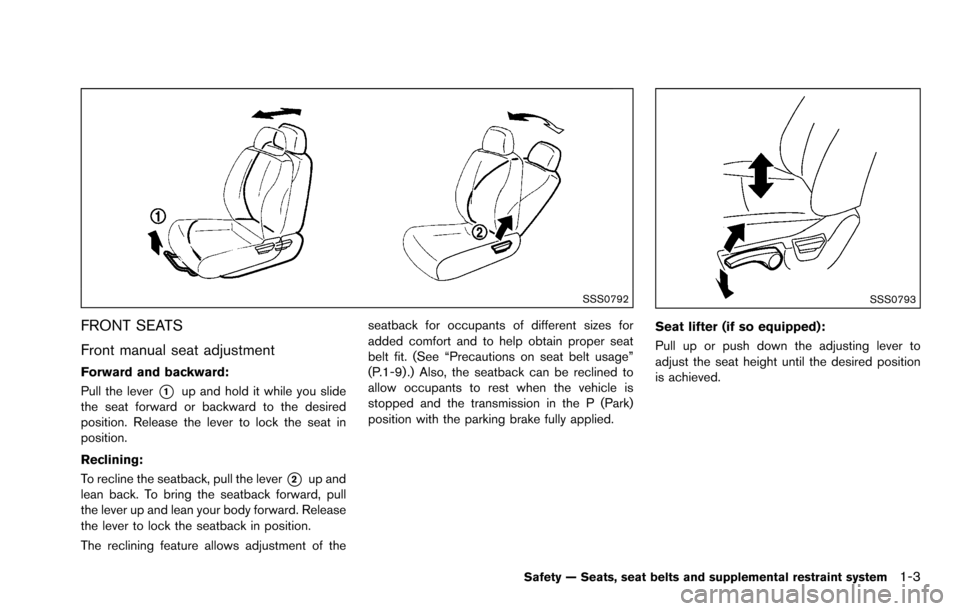
FRONT SEATS
Front manual seat adjustment
Forward and backward:
Pull the lever
*1up and hold it while you slide
the seat forward or backward to the desired
position. Release the lever to lock the seat in
position.
Reclining:
To recline the seatback, pull the lever
*2up and
lean back. To bring the seatback forward, pull
the lever up and lean your body forward. Release
the lever to lock the seatback in position.
The reclining feature allows adjustment of the seatback for occupants of different sizes for
added comfort and to help obtain proper seat
belt fit. (See “Precautions on seat belt usage”
(P.1-9) .) Also, the seatback can be reclined to
allow occupants to rest when the vehicle is
stopped and the transmission in the P (Park)
position with the parking brake fully applied.
SSS0793
Seat lifter (if so equipped):
Pull up or push down the adjusting lever to
adjust the seat height until the desired position
is achieved.
Safety — Seats, seat belts and supplemental restraint system1-3
Page 24 of 322
WARNING
Head restraint/headrest supplement
the other vehicle safety systems. They
may provide additional protection
against injury in certain rear end colli-
sions. Adjustable head restraints/head-
rests must be adjusted properly, as
specified in this section. Check the
adjustment after someone else uses
the seat. Do not attach anything to the
head restraint/headrest stalks or re-
move the head restraint/headrest. Do
not use the seat if the head restraint/
headrest has been removed. If the head
restraint/headrest was removed, rein-
stall and properly adjust the head
restraint/headrest before an occupant
uses the seating position. Failure to
follow these instructions can reduce the
effectiveness of the head restraint/
headrest. This may increase the risk of
serious injury or death in a collision.
JVR0051X
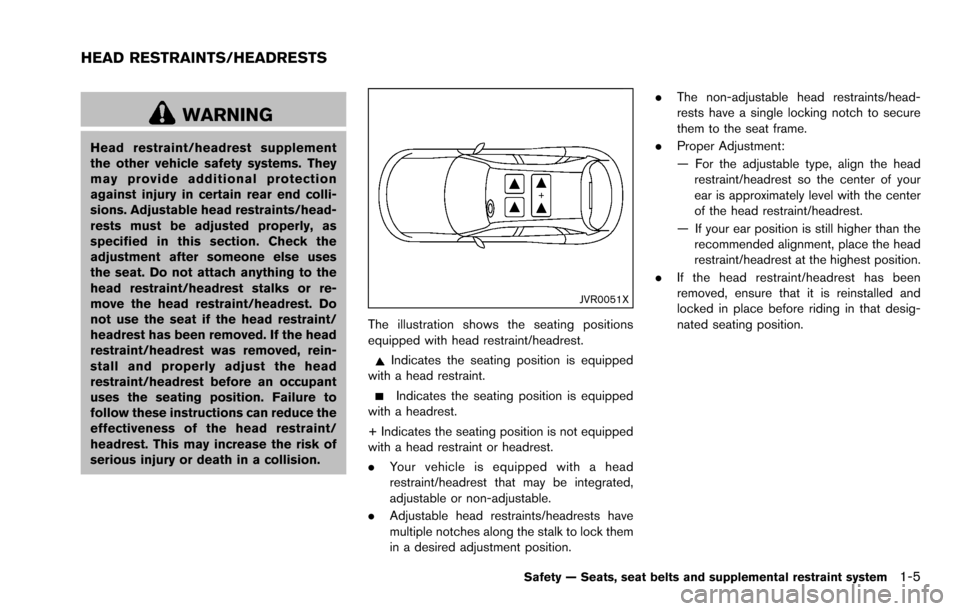
The illustration shows the seating positions
equipped with head restraint/headrest.
Indicates the seating position is equipped
with a head restraint.
Indicates the seating position is equipped
with a headrest.
+ Indicates the seating position is not equipped
with a head restraint or headrest.
. Your vehicle is equipped with a head
restraint/headrest that may be integrated,
adjustable or non-adjustable.
. Adjustable head restraints/headrests have
multiple notches along the stalk to lock them
in a desired adjustment position. .
The non-adjustable head restraints/head-
rests have a single locking notch to secure
them to the seat frame.
. Proper Adjustment:
— For the adjustable type, align the head
restraint/headrest so the center of your
ear is approximately level with the center
of the head restraint/headrest.
— If your ear position is still higher than the recommended alignment, place the head
restraint/headrest at the highest position.
. If the head restraint/headrest has been
removed, ensure that it is reinstalled and
locked in place before riding in that desig-
nated seating position.
Safety — Seats, seat belts and supplemental restraint system1-5
HEAD RESTRAINTS/HEADRESTS
Page 25 of 322
1-6Safety — Seats, seat belts and supplemental restraint system
SSS0992
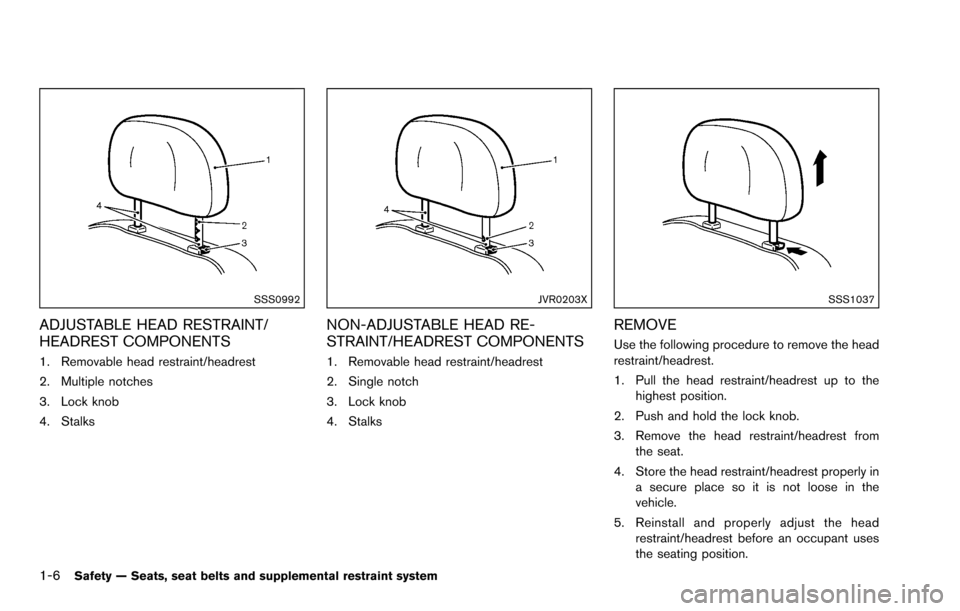
ADJUSTABLE HEAD RESTRAINT/
HEADREST COMPONENTS
1. Removable head restraint/headrest
2. Multiple notches
3. Lock knob
4. Stalks
JVR0203X
NON-ADJUSTABLE HEAD RE-
STRAINT/HEADREST COMPONENTS
1. Removable head restraint/headrest
2. Single notch
3. Lock knob
4. Stalks
SSS1037
REMOVE
Use the following procedure to remove the head
restraint/headrest.
1. Pull the head restraint/headrest up to thehighest position.
2. Push and hold the lock knob.
3. Remove the head restraint/headrest from the seat.
4. Store the head restraint/headrest properly in a secure place so it is not loose in the
vehicle.
5. Reinstall and properly adjust the head restraint/headrest before an occupant uses
the seating position.
Page 26 of 322
SSS1038
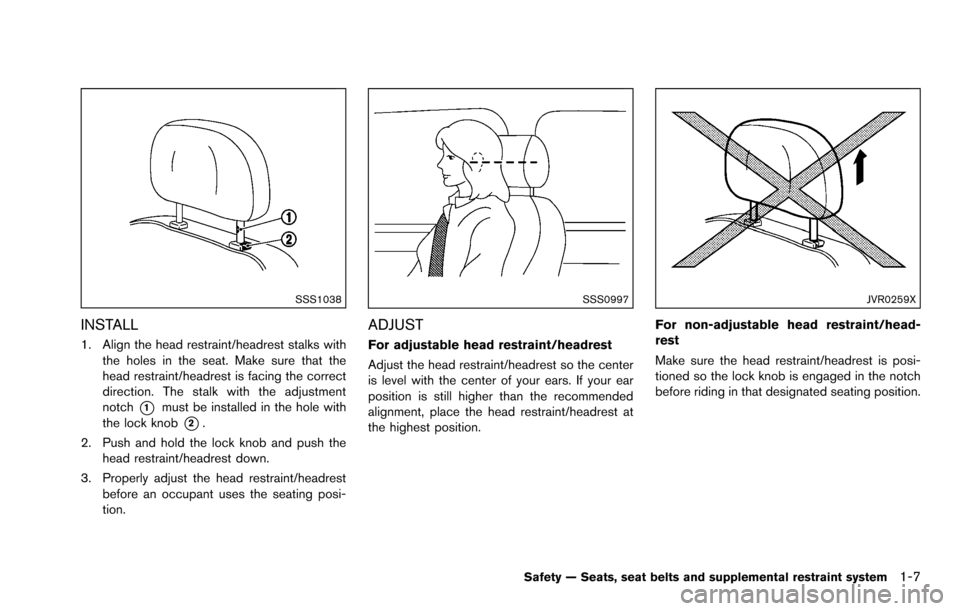
INSTALL
1. Align the head restraint/headrest stalks withthe holes in the seat. Make sure that the
head restraint/headrest is facing the correct
direction. The stalk with the adjustment
notch
*1must be installed in the hole with
the lock knob
*2.
2. Push and hold the lock knob and push the head restraint/headrest down.
3. Properly adjust the head restraint/headrest before an occupant uses the seating posi-
tion.
SSS0997
ADJUST
For adjustable head restraint/headrest
Adjust the head restraint/headrest so the center
is level with the center of your ears. If your ear
position is still higher than the recommended
alignment, place the head restraint/headrest at
the highest position.
JVR0259X
For non-adjustable head restraint/head-
rest
Make sure the head restraint/headrest is posi-
tioned so the lock knob is engaged in the notch
before riding in that designated seating position.
Safety — Seats, seat belts and supplemental restraint system1-7
Page 27 of 322
1-8Safety — Seats, seat belts and supplemental restraint system
SSS1035
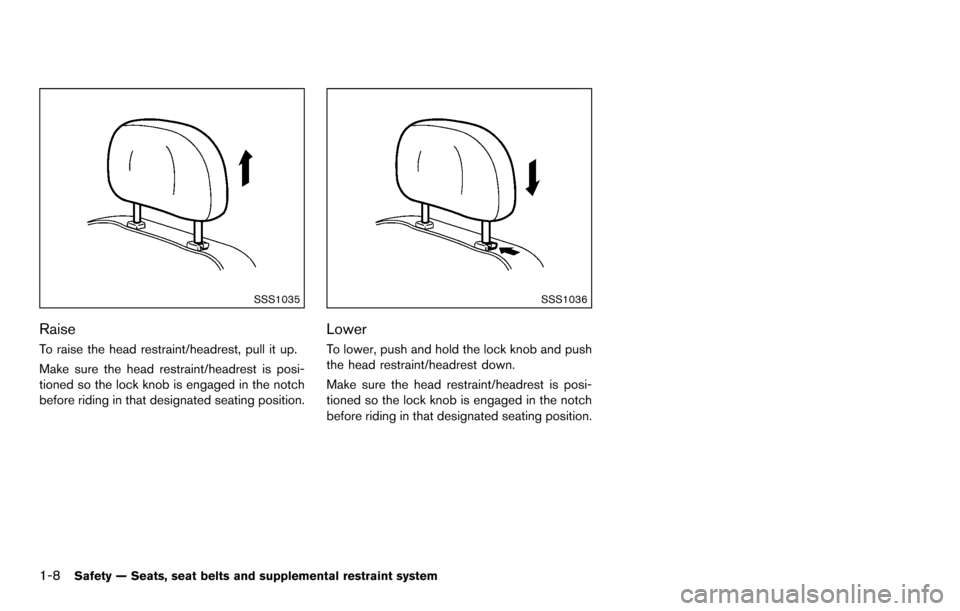
Raise
To raise the head restraint/headrest, pull it up.
Make sure the head restraint/headrest is posi-
tioned so the lock knob is engaged in the notch
before riding in that designated seating position.
SSS1036
Lower
To lower, push and hold the lock knob and push
the head restraint/headrest down.
Make sure the head restraint/headrest is posi-
tioned so the lock knob is engaged in the notch
before riding in that designated seating position.