cooling NISSAN ROGUE SPORT 2018 Owners Manual
[x] Cancel search | Manufacturer: NISSAN, Model Year: 2018, Model line: ROGUE SPORT, Model: NISSAN ROGUE SPORT 2018Pages: 512, PDF Size: 3.33 MB
Page 211 of 512

4-32Heater, air conditioner, audio and phone systems
A/C (Air Conditioner) operation:
Push the A/C button to turn on or off the
air conditioner. When the air conditioner
is on, the A/C indicator light on the button
illuminates.
MAX A/C (Quick Air Conditioning) op-
eration:
Push the MAX A/C button for maximum
cooling and dehumidifying.
When the MAX A/C mode is turned on, the
air flow mode indicator will turn off with
the air flow mode fixed at
.
At the same time, the indicator light on
the A/C button and the air recirculation
mode will turn on.
Push the MAX A/C button again to turn
off the MAX A/C mode. When the MAX A/C
mode is turned off, most of the settings
will return to the previous state, while the
indicator light on the A/C button will stay
on.
Heater operation
Heating:
This mode is used to direct heated air
from the foot outlets. Some air also flows
from the defroster outlets and the side
ventilator outlets.
1. Push the air recirculation
button
for normal heating. (The indicator light
will turn off.)
2. Push the
button. (The indicator
light will turn on.)
3. Turn the fan speed control
dial to
the desired position.
4. Turn the temperature control dial to the desired position between the
middle and the hot (right) position.
Ventilation:
This mode directs outside air from the
side and center ventilators.
1. Push the air recirculation
button.
(The indicator light will turn off.)
2. Push the
button. (The indicator
light will turn on.)
3. Turn the fan speed control
dial to
the desired position.
4. Turn the temperature control dial to the desired position. Defrosting or defogging:
This mode directs the air to the defroster
outlets to defrost/defog the windows.
1. Push the front defroster
button.
(The indicator light will turn on.)
2. Turn the fan speed control
dial to
the desired position.
3. Turn the temperature control dial to the desired position between the
middle and the hot (right) position.
To remove frost from the windshield
quickly, turn the temperature control
dial to the maximum hot (right) posi-
tion and the fan speed control
dial
to the maximum position.
When the front defroster mode is
selected, the air conditioner automa-
tically turns on if the outside tempera-
ture is more than 36°F (2°C). This
dehumidifies the air which helps defog
the windshield. The air recirculation
indicator automatically turns off, al-
lowing outside air to be drawn into
the passenger compartment to
further improve the defogging perfor-
mance. The recirculation mode can-
not be activated in the front defroster
mode.
Page 212 of 512

Bi-level heating:
The bi-level mode directs warmed air to
the side and center ventilators and to the
front and rear floor outlets.
1. Push the air recirculation
button.
(The indicator light will turn off.)
2. Push the
button. (The indicator
light will turn on.)
3. Turn the fan speed control
dial to
the desired position.
4. Turn the temperature control dial to the desired position.
Heating and defogging:
This mode heats the interior and defogs
the windows.
1. Push the
button. (The indicator
light will turn on.)
2. Turn the fan speed control
dial to
the desired position.
3. Turn the temperature control dial to the maximum hot (right) position.
When the
button is pushed, the air
conditioner automatically turns on if the
outside temperature is more than 36°F
(2°C). This dehumidifies the air which
helps defog the windshield. The air re-
circulation indicator automatically turns
off, allowing outside air to be drawn into
the passenger compartment to further improve the defogging performance.
NOTE:
Clear snow and ice from the wiper
blades and air inlet in front of the
windshield. This improves heater op-
eration.
Air conditioner operation
Start the engine, turn the fan speed
controldial to the desired position,
and push the A/C button to activate the
air conditioner. When the air conditioner
is on, cooling and dehumidifying func-
tions are added to the heater operation.
The air conditioner cooling function op-
erates only when the engine is running.
Cooling:
This mode is used to cool and dehumidify
the air.
1. Push the
button. (The indicator
light will turn on.)
2. Turn the fan speed control
dial to
the desired position.
3. Push the A/C button. (The indicator light will turn on.)
4. Turn the temperature control dial to the desired position between the
middle and the cool (left) position.
For quick cooling, push the MAX A/C
button. When the MAX A/C button is pushed, it will activate the air recirculation
mode. The amount of air coming through
the ventilators is the highest it can go
when in MAX A/C mode regardless of the
position of the fan speed control
dial.
Dehumidified heating:
This mode is used to heat and dehumidify
the air.
1. Push the air recirculation
button.
(The indicator light will turn off.)
2. Push the
button. (The indicator
light will turn on.)
3. Turn the fan speed control
dial to
the desired position.
4. Push the A/C button on. (The indicator light will turn on.)
5. Turn the temperature control dial to the desired position between the
middle and the hot (right) position.
Dehumidified defogging:
This mode is used to defog the windows
and dehumidify the air.
1. Push the front defroster
button.
(The indicator light will turn on.)
2. Turn the fan speed control
dial to
the desired position.
3. Turn the temperature control dial to the desired position.
When the front defroster or
mode is
Heater, air conditioner, audio and phone systems4-33
Page 214 of 512

JVH0665X
1. Front defrosterbutton
2. ON·OFF button/Temperature control dial (driver side)
3. MODE button
4. Display screen
5. A/C (Air Conditioner) button
6. DUAL button/Temperature control dial (passenger side)
7. Rear defroster
button (See “Rear
window and outside mirror defroster
switch” (P.2-42).)
8. Air recirculation
button
9. Fan speed controlbutton
10. AUTO button
11. Outside air circulation
button
AUTOMATIC AIR CONDITIONER AND
HEATER
Automatic operation (AUTO)
The AUTO mode may be used year-round
as the system automatically controls the
air conditioner to a constant tempera-
ture, air flow distribution and fan speed
after the desired temperature is set
manually.
Cooling and dehumidified heating:
1. Push the AUTO button (the indicator light will turn on).
2. Turn the temperature control dial to set the desired temperature.
.When the DUAL indicator light is notilluminated, pushing the DUAL but-
ton (the indicator light will turn on)
allows the user to independently
change the driver and passenger
side temperatures with the corre-
sponding temperature control dial.
.To cancel the separate tempera-ture setting, push the DUAL button
(the indicator light will turn off) and
the driver’s side temperature
setting will be applied to both the
driver and passenger sides.
The temperature of the passenger
compartment will be maintained
automatically. Air flow distribution
and fan speed are also controlled
automatically.
A visible mist may be seen coming
from the ventilators in hot and humid
conditions as the air is cooled rapidly.
This does not indicate a malfunction.
Dehumidified defrosting/defogging:
1. Push the front defroster
button
(The indicator light on the front
defroster
button will illuminate).
2. Turn the temperature control dial to set the desired temperature.
. To quickly remove frost from the out-
side surface of the windshield, set the
temperature and the fan speed to the
Heater, air conditioner, audio and phone systems4-35
Page 216 of 512
automatically switch to the outside air
circulation mode.
To turn the system off:
To turn off the heater and air conditioner,
push the ON·OFF button.
Push the ON·OFF button again, the sys-
tem will turn on in the mode which was
used immediately before the system was
turned off.
Remote engine start logic (if so
equipped)
When the remote engine start function is
activated, the vehicles equipped with the
automatic air conditioner and heater may
go into automatic heating or cooling
mode depending on the outside and
cabin temperatures. During this period,
the display and the buttons will be
inoperable until the ignition switch is
placed in the ON position. When the
temperature is low, the rear defroster
and the heated steering wheel (if so
equipped) may also be activated auto-
matically with the activation of the re-
mote engine start function. (See “Remote
engine start” (P.3-22).)
JVH0727X
JVH0728X
OPERATING TIPS (for automatic air
conditioner)
When the engine coolant temperature
and outside air temperature are low, the
air flow from the foot outlets may not
operate for a maximum of 150 seconds.
However, this is not a malfunction. After
the coolant temperature warms up, air
flow from the foot outlets will operate
normally.
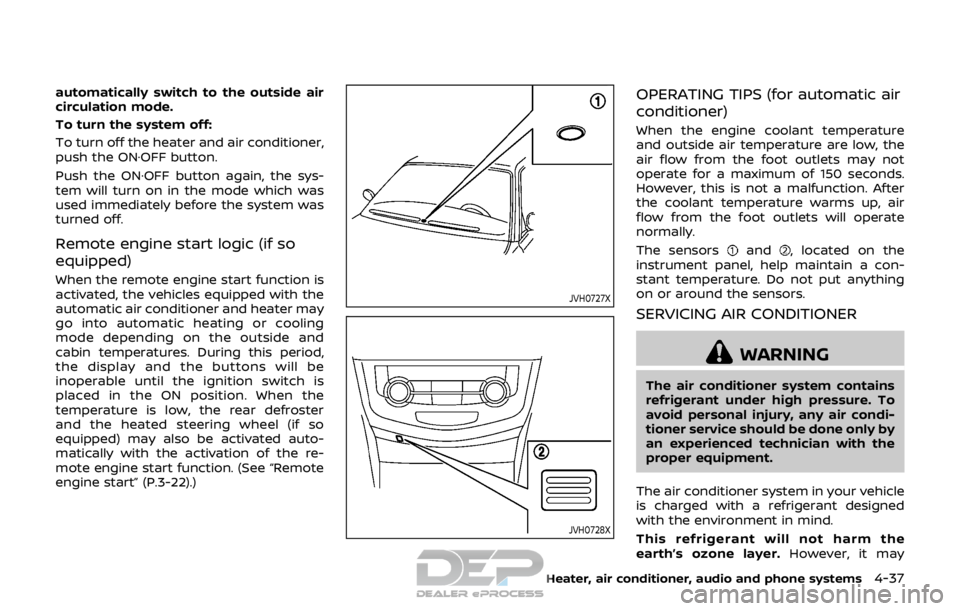
The sensors
and, located on the
instrument panel, help maintain a con-
stant temperature. Do not put anything
on or around the sensors.
SERVICING AIR CONDITIONER
WARNING
The air conditioner system contains
refrigerant under high pressure. To
avoid personal injury, any air condi-
tioner service should be done only by
an experienced technician with the
proper equipment.
The air conditioner system in your vehicle
is charged with a refrigerant designed
with the environment in mind.
This refrigerant will not harm the
earth’s ozone layer. However, it may
Heater, air conditioner, audio and phone systems4-37
Page 384 of 512
CAUTION
During the first 1,200 miles (2,000
km), follow these recommendations
to obtain maximum engine perfor-
mance and ensure the future relia-
bility and economy of your new
vehicle. Failure to follow these re-
commendations may result in shor-
tened engine life and reduced engine
performance.
. Avoid driving for long periods at con-
stant speed, either fast or slow. Do not
run the engine over 4,000 rpm.
. Do not accelerate at full throttle in any
gear.
. Avoid quick starts.
. Avoid hard braking as much as possi-
ble. Follow these easy-to-use Fuel Efficient
Driving Tips to help you achieve the most
fuel economy from your vehicle.
1. Use smooth accelerator and brake
pedal application.
.Avoid rapid starts and stops..Use smooth, gentle accelerator andbrake application whenever possi-
ble.
.Maintain constant speed whilecommuting and coast whenever
possible.
2. Maintain constant speed.
.Look ahead to try and anticipate and minimize stops.
.Synchronizing your speed with traf-fic lights allows you to reduce your
number of stops.
.Maintaining a steady speed canminimize red light stops and im-
prove fuel efficiency.
3. Use air conditioning (A/C) at higher vehicle speeds.
.Below 40 MPH (64 km/h), it is moreefficient to open windows to cool
the vehicle due to reduced engine
load.
.Above 40 MPH (64 km/h), it is more
efficient to use A/C to cool the
vehicle due to increased aerody-
namic drag.
.Recirculating the cool air in thecabin when the A/C is on reduces
cooling load.
4. Drive at economical speeds and dis- tances.
.Observing the speed limit and notexceeding 60 MPH (97 km/h)
(where legally allowed) can improve
fuel efficiency due to reduced aero-
dynamic drag.
.Maintaining a safe following dis-tance behind other vehicles re-
duces unnecessary braking.
.Safely monitoring traffic to antici- pate changes in speed permits
reduced braking and smooth accel-
eration changes.
.Select a gear range suitable to roadconditions.
5. Use cruise control.
.Using cruise control during highway driving helps maintain a steady
speed.
.Cruise control is particularly effec-tive in providing fuel savings when
driving on flat terrains.
6. Plan for the shortest route.
.Utilize a map or navigation system to determine the best route to save
time.
Starting and driving5-99
BREAK-IN SCHEDULE FUEL EFFICIENT DRIVING TIPS
Page 398 of 512
WARNING
.Never rely solely on the hill start
assist system to prevent the ve-
hicle from moving backward on a
hill. Always drive carefully and
attentively. Depress the brake
pedal when the vehicle is stopped
on a steep hill. Be especially care-
ful when stopped on a hill on
frozen or muddy roads. Failure
to prevent the vehicle from rolling
backwards may result in a loss of
control of the vehicle and possi-
ble serious injury or death.
. The hill start assist system is not
designed to hold the vehicle at a
standstill on a hill. Depress the
brake pedal when the vehicle is
stopped on a steep hill. Failure to
do so may cause the vehicle to
roll backwards and may result in
a collision or serious personal
injury.
. The hill start assist system may
not prevent the vehicle from roll-
ing backwards on a hill under all
load or road conditions. Always
be prepared to depress the brake
pedal to prevent the vehicle from
rolling backwards. Failure to do so may result in a collision or
serious personal injury.
The hill start assist system automatically
keeps the brakes applied to help prevent
the vehicle from rolling backwards in the
time it takes the driver to release the
brake pedal and apply the accelerator
when the vehicle is stopped on a hill.
The hill start assist system will operate
automatically under the following condi-
tions:
. The transmission is shifted to a for-
ward or reverse gear.
. The vehicle is stopped completely on a
hill by applying the brake.
The maximum holding time is 2 seconds.
After 2 seconds the vehicle will begin to
roll back and the hill start assist system
will stop operating completely.
The hill start assist system will not
operate when the transmission is shifted
to the N (Neutral) or P (Park) position (CVT
models) or on a flat and level road.
When the Vehicle Dynamic Control (VDC)
warning light illuminates in the meter, the
hill start assist system will not operate.
(See “Vehicle Dynamic Control (VDC)
warning light” (P.2-15).)
FREEING A FROZEN DOOR LOCK
To prevent a door lock from freezing,
apply deicer through the key hole. If the
lock becomes frozen, heat the key before
inserting it into the key hole, or use the
Intelligent Key system or the remote
keyless entry key fob.
ANTI-FREEZE
In the winter when it is anticipated that
the outside temperature will drop below
32°F (0°C), check the anti-freeze to assure
proper winter protection. For additional
information, see “Engine cooling system”
(P.8-4).
BATTERY
If the battery is not fully charged during
extremely cold weather conditions, the
battery fluid may freeze and damage the
battery. To maintain maximum efficiency,
the battery should be checked regularly.
For additional information, see “Battery”
(P.8-11).
DRAINING OF COOLANT WATER
If the vehicle is to be left outside without
anti-freeze, drain the cooling system,
including the engine block. Refill before
operating the vehicle. For details, see
“Engine cooling system” (P.8-4).
Starting and driving5-113
HILL START ASSIST SYSTEM COLD WEATHER DRIVING
Page 408 of 512
.The spare tire is designed for
emergency use. See specific in-
structions under the heading
“Wheels and tires” (P.8-29). To start your engine with a booster
battery, the instructions and precautions
below must be followed.
WARNING
.
If done incorrectly, jump starting
can lead to a battery explosion,
resulting in severe injury or
death. It could also damage your
vehicle.
. Explosive hydrogen gas is always
present in the vicinity of the
battery. Keep all sparks and
flames away from the battery.
. Do not allow battery fluid to come
into contact with eyes, skin,
clothing or painted surfaces. Bat-
tery fluid is a corrosive sulfuric
acid solution which can cause
severe burns. If the fluid should
come into contact with anything,
immediately flush the contacted
area with water.
. Keep the battery out of the reach
of children.
. The booster battery must be
rated at 12 volts. Use of an im-
properly rated battery can da-
mage your vehicle. .
Whenever working on or near a
battery, always wear suitable eye
protectors (for example, goggles
or industrial safety spectacles)
and remove rings, metal bands,
or any other jewelry. Do not lean
over the battery when jump start-
ing.
. Do not attempt to jump start a
frozen battery. It could explode
and cause serious injury.
. Your vehicle has an automatic
engine cooling fan. It could come
on at any time. Keep hands and
other objects away from it.
In case of emergency6-9
JUMP STARTING
Page 410 of 512
any other metal.
7. Start the engine of the booster vehicle
and let it run for a few minutes.
8. Keep the engine speed of the booster vehicle
at about 2,000 rpm, and
start the engine of the vehiclebeing
jump started.
CAUTION
Do not keep the starter motor en-
gaged for more than 10 seconds. If
the engine does not start right away,
place the ignition switch in the OFF
position and wait 10 seconds before
trying again.
9. After starting your engine, carefully disconnect the negative cable and
then the positive cable (
???).
10. Replace the vent caps (if so equipped). Be sure to dispose of the cloth used to
cover the vent holes as it may be
contaminated with corrosive acid. Do not attempt to start the engine by
pushing.
CAUTION
.
Continuously Variable Transmis-
sion (CVT) models cannot be
push-started or tow-started. At-
tempting to do so may cause
transmission damage.
. Three-way catalyst equipped
models should not be started by
pushing since the three way cat-
alyst may be damaged.
. Never try to start the vehicle by
towing it; when the engine starts,
the forward surge could cause
the vehicle to collide with the
tow vehicle.
WARNING
.Never continue driving if your
vehicle overheats. Doing so could
cause a vehicle fire.
. Never open the hood if steam is
coming out.
. Never remove the radiator or
coolant reservoir cap while the
engine is hot. If the radiator or
coolant reservoir cap is removed
when the engine is hot, pressur-
ized hot water will spurt out and
possibly cause burning, scalding
or serious injury.
. If steam or coolant is coming
from the engine, stand clear of
the vehicle to prevent getting
burned.
. The engine cooling fan will start
at anytime when the coolant
temperature exceeds preset de-
grees.
. Be careful not to allow your
hands, hair, jewelry or clothing
to come into contact with, or to
get caught in the cooling fan or
drive belts.
If your vehicle is overheating (indicated by
In case of emergency6-11
PUSH STARTING IF YOUR VEHICLE OVERHEATS
Page 411 of 512
6-12In case of emergency
an extremely high temperature gauge
reading), or if you feel a lack of engine
power, detect abnormal noise, etc., take
the following steps:
1. Move the vehicle safely off the roadand apply the parking brake.
2. Continuously Variable Transmission
(CVT) models:
Move the shift lever to the P (Park)
position.
Manual Transmission (MT) models:
Move the shift lever to the N (Neutral)
position.
Do not stop the engine.
3. Turn off the air conditioner (if so equipped). Open all the windows,
move the heater or air conditioner
temperature control to maximum hot
and fan control to high speed.
4. Get out of the vehicle. Look and listen for steam or coolant escaping from
the radiator before opening the hood.
(If steam or coolant is escaping, turn
off the engine.) Do not open the hood
further until no steam or coolant can
be seen.
5. Open the engine hood.
WARNING
If steam or water is coming from the
engine, stand clear to prevent get-
ting burned.
6. Visually check the drive belt for da- mage or looseness. Also check if the
cooling fan is running. The radiator
hoses and radiator should not leak
water. If coolant is leaking or the
cooling fan does not run, stop the
engine.
WARNING
Be careful not to allow your hands,
hair, jewelry or clothing to come into
contact with, or get caught in, engine
belts or the engine cooling fan. The
engine cooling fan can start at any
time. 7. After the engine cools down, check
the coolant level in the reservoir with
the engine running. Add coolant to
the reservoir if necessary. Have your
vehicle repaired. It is recommended
you visit a NISSAN dealer for this
service.
Page 426 of 512

8 Do-it-yourself
Maintenance precautions ...................................................... 8-2
Engine compartment check locations ........................ 8-3MR20DD engine model ..................................................... 8-4
Engine cooling system ............................................................. 8-4 Checking engine coolant level .................................... 8-5
Changing engine coolant ................................................ 8-6
Engine oil ........................................................................\
..................... 8-6 Checking engine oil level ................................................. 8-6
Changing engine oil and filter ..................................... 8-6
Continuously Variable Transmission
(CVT) fluid ........................................................................\
.................... 8-9
Brake and clutch (if so equipped) fluid ....................... 8-9
Window washer fluid .............................................................. 8-10
Battery ........................................................................\
........................ 8-11 Jump starting ........................................................................\
. 8-12
Variable voltage control system ................................... 8-13
Drive belt ........................................................................\
.................. 8-13
Spark plugs ........................................................................\
............. 8-14 Replacing spark plugs ..................................................... 8-14
Air cleaner ........................................................................\
............... 8-15 Windshield wiper blades ..................................................... 8-16
Cleaning ........................................................................\
........... 8-16
Replacing ........................................................................\
........ 8-16
Rear window wiper blade .................................................. 8-17
Brakes ........................................................................\
........................ 8-17 Self-adjusting brakes ..................................................... 8-17
Brake pad wear warning ............................................ 8-17
Fuses ........................................................................\
........................... 8-18 Engine compartment .................................................... 8-18
Passenger compartment ........................................... 8-20
Key fob battery replacement .......................................... 8-21
Intelligent Key battery replacement .......................... 8-23
Lights ........................................................................\
.......................... 8-25 Headlights ........................................................................\
...... 8-25
Exterior and interior lights ........................................ 8-27
Wheels and tires ........................................................................\
8-29
Tire pressure ........................................................................\
8-29
Tire labeling ........................................................................\
.. 8-33
Types of tires ....................................................................... 8-35
Tire chains ........................................................................\
...... 8-36
Changing wheels and tires ...................................... 8-37