headlight aiming NISSAN ROGUE SPORT 2018 Owners Manual
[x] Cancel search | Manufacturer: NISSAN, Model Year: 2018, Model line: ROGUE SPORT, Model: NISSAN ROGUE SPORT 2018Pages: 512, PDF Size: 3.33 MB
Page 320 of 512

LDW SYSTEM LIMITATIONS
WARNING
Listed below are the system limita-
tions for the LDW system. Failure to
follow the warnings and instructions
for proper use of the LDW system
could result in serious injury or
death.
.The system will not operate at
speeds below approximately 37
MPH (60 km/h) or if it cannot
detect lane markers.
. Excessive noise will interfere with
the warning chime sound, and
the chime may not be heard.
. Do not use the LDW system under
the following conditions as it may
not function properly:
— During bad weather (rain, fog,
snow, etc.).
— When driving on slippery roads, such as on ice or snow.
— When driving on winding or uneven roads.
— When there is a lane closure due to road repairs. — When driving in a makeshift or
temporary lane.
— When driving on roads where the lane width is too narrow.
— When driving without normal tire conditions (for example,
tire wear, low tire pressure,
installation of spare tire, tire
chains, non-standard wheels).
— When the vehicle is equipped with non-original brake parts
or suspension parts.
. The system may not function
properly under the following con-
ditions:
— On roads where there are
multiple parallel lane markers;
lane markers that are faded or
not painted clearly; yellow
painted lane markers; non-
standard lane markers; or
lane markers covered with
water, dirt, snow, etc.
— On roads where discontinued lane markers are still detect-
able.
— On roads where there are sharp curves. — On roads where there are
sharply contrasting objects,
such as shadows, snow,
water, wheel ruts, seams or
lines remaining after road re-
pairs. (The LDW system could
detect these items as lane
markers.)
— On roads where the traveling lane merges or separates.
— When the vehicle’s traveling direction does not align with
the lane marker.
— When traveling close to the vehicle in front of you, which
obstructs the lane camera
unit detection range.
— When rain, snow, dirt or object adheres to the windshield in
front of the lane camera unit.
— When the headlights are not bright due to dirt on the lens
or if the aiming is not adjusted
properly.
— When strong light enters the lane camera unit. (For exam-
ple, the light directly shines on
the front of the vehicle at
sunrise or sunset.)
Starting and driving5-35
Page 325 of 512

5-40Starting and driving
.Because the I-LI may not activate
under the road, weather, and lane
marker conditions described in
this section, it may not activate
every time your vehicle begins to
leave its lane and you will need to
apply corrective steering.
. The I-LI system will not operate at
speeds below approximately 37
MPH (60 km/h) or if it cannot
detect lane markers.
. Do not use the I-LI system under
the following conditions as it may
not function properly:
— During bad weather (rain, fog,
snow, etc.).
— When driving on slippery roads, such as on ice or snow.
— When driving on winding or uneven roads.
— When there is a lane closure due to road repairs.
— When driving in a makeshift or temporary lane.
— When driving on roads where the lane width is too narrow.
— When driving without normal tire conditions (for example,
tire wear, low tire pressure, installation of spare tire, tire
chains, non-standard wheels).
— When the vehicle is equipped with non-original brake parts
or suspension parts.
. The system may not function
properly under the following con-
ditions:
— On roads where there are
multiple parallel lane markers;
lane markers that are faded or
not painted clearly; yellow
painted lane markers; non-
standard lane markers; or
lane markers covered with
water, dirt, snow, etc.
— On roads where discontinued lane markers are still detect-
able.
— On roads where there are sharp curves.
— On roads where there are sharply contrasting objects,
such as shadows, snow,
water, wheel ruts, seams or
lines remaining after road re-
pairs. (The I-LI system could
detect these items as lane
markers.) — On roads where the traveling
lane merges or separates.
— When the vehicle’s traveling direction does not align with
the lane marker.
— When traveling close to the vehicle in front of you, which
obstructs the lane camera
unit detection range.
— When rain, snow or dirt ad- heres to the windshield in
front of the lane camera unit.
— When the headlights are not bright due to dirt on the lens
or if the aiming is not adjusted
properly.
— When strong light enters the lane camera unit. (For exam-
ple, the light directly shines on
the front of the vehicle at
sunrise or sunset.)
— When a sudden change in brightness occurs. (For exam-
ple, when the vehicle enters or
exits a tunnel or under a
bridge.)
. Excessive noise will interfere with
the warning chime sound, and
the chime may not be heard.
Page 451 of 512

8-26Do-it-yourself
Replacing
LED headlight model:
If LED headlight replacement is required,
it is recommended that you visit a NISSAN
dealer for this service.
Halogen headlight model:
The headlight is a semi-sealed beam type
which uses a replaceable headlight (halo-
gen) bulb.
CAUTION
.Do not leave the bulb out of the
headlight reflector for a long
period of time. Dust, moisture,
smoke, etc. entering the head-
light body may affect bulb per-
formance.
. High pressure halogen gas is
sealed inside the halogen bulb.
The bulb may break if the glass
envelope is scratched or the bulb
is dropped.
. Only touch the base when hand-
ling the bulb. Never touch the
glass envelope. Touching the
glass envelope could significantly
affect bulb life and/or headlight
performance. .
Aiming is not necessary after
replacing the bulb. When aiming
adjustment is necessary, it is
recommended you visit a NISSAN
dealer for this service.
Use the same number and wattage as
originally installed as shown in the chart.
JVM0395X
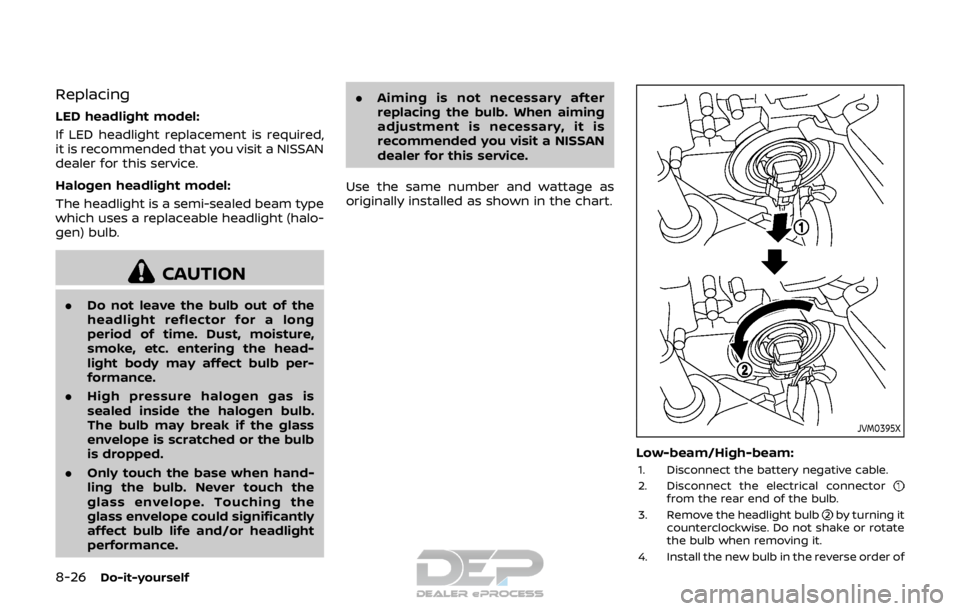
Low-beam/High-beam:
1. Disconnect the battery negative cable.
2. Disconnect the electrical connector
from the rear end of the bulb.
3. Remove the headlight bulb
by turning it
counterclockwise. Do not shake or rotate
the bulb when removing it.
4. Install the new bulb in the reverse order of