brake NISSAN ROGUE SPORT 2019 User Guide
[x] Cancel search | Manufacturer: NISSAN, Model Year: 2019, Model line: ROGUE SPORT, Model: NISSAN ROGUE SPORT 2019Pages: 500, PDF Size: 2.37 MB
Page 99 of 500
.Rear Automatic Braking (RAB)
. Rear Sonar System (RSS)
For additional information, refer to the
“Starting and driving” section of this
manual.
NISSAN Intelligent Key® door buz-
zer (if so equipped)
The Intelligent Key door buzzer sounds if
any one of the following improper opera-
tions is found.
. The Intelligent Key is left inside the
vehicle when locking the doors.
. The Intelligent Key is left outside the
vehicle when operating the vehicle.
When the buzzer sounds, be sure to
check both the vehicle and the Intelligent
Key. For additional information, refer to
“Intelligent Key system” (P.3-11).
Brake pad wear warning
The disc brake pads have audible wear
warnings. When a brake pad requires
replacement, it will make a high pitched
scraping sound when the vehicle is in
motion. This scraping sound will first
occur only when the brake pedal is
depressed. After more wear of the brake
pad, the sound will always be heard even
if the brake pedal is not depressed. Have
the brakes checked as soon as possible if
the warning sound is heard.
Parking brake reminder chime
The parking brake reminder chime will
sound if the vehicle is driven at more than
4 MPH (7 km/h) (models not equipped
with electronic parking brake) or 2 MPH (4
km/h) (models equipped with electronic
parking brake) with the parking brake
applied. Stop the vehicle and release the
parking brake.
Seat belt warning chime
The seat belt warning chime will sound
for about 6 seconds unless the driver’s
seat belt is securely fastened.
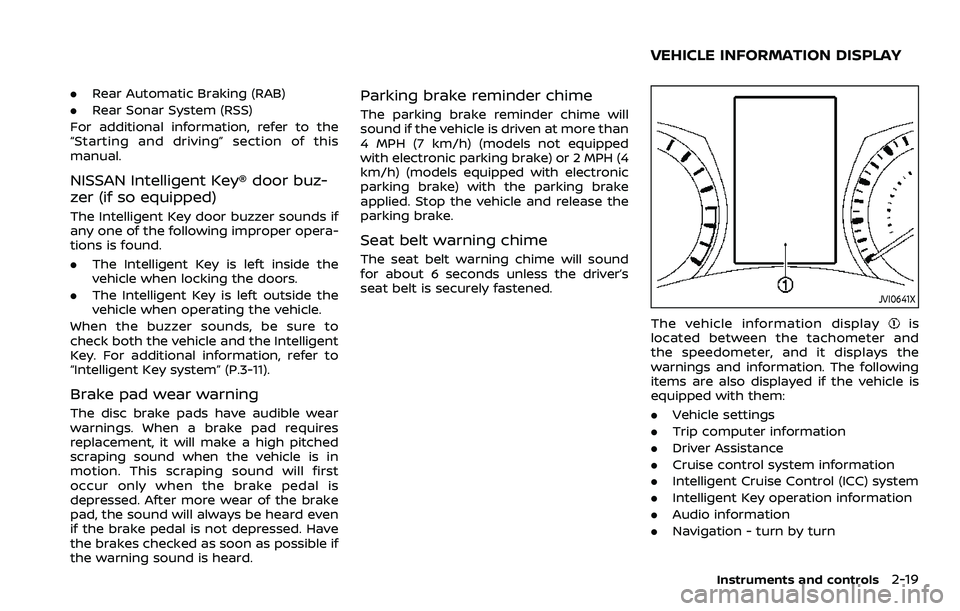
JVI0641X
The vehicle information displayis
located between the tachometer and
the speedometer, and it displays the
warnings and information. The following
items are also displayed if the vehicle is
equipped with them:
. Vehicle settings
. Trip computer information
. Driver Assistance
. Cruise control system information
. Intelligent Cruise Control (ICC) system
. Intelligent Key operation information
. Audio information
. Navigation - turn by turn
Instruments and controls2-19
VEHICLE INFORMATION DISPLAY
Page 101 of 500
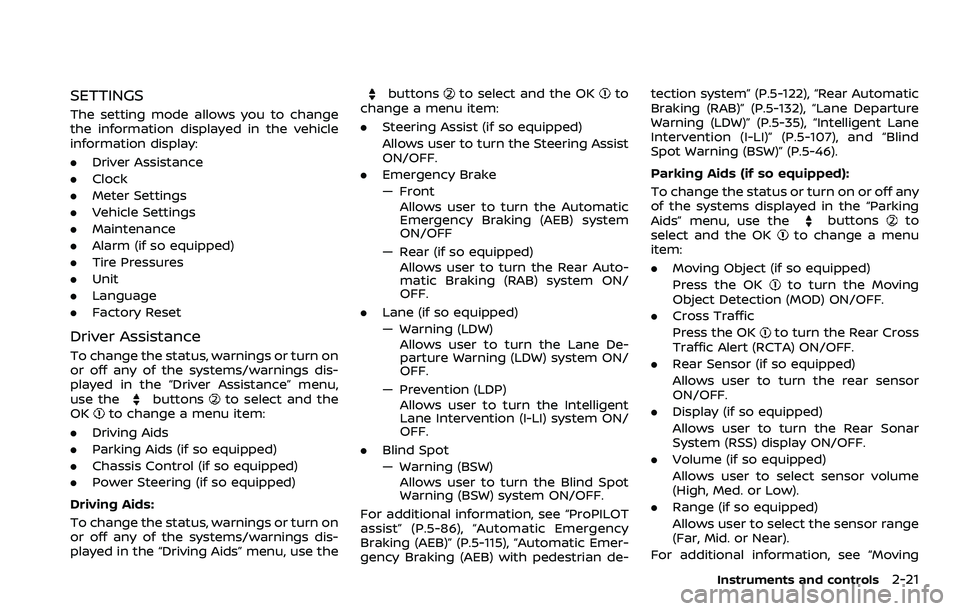
SETTINGS
The setting mode allows you to change
the information displayed in the vehicle
information display:
.Driver Assistance
. Clock
. Meter Settings
. Vehicle Settings
. Maintenance
. Alarm (if so equipped)
. Tire Pressures
. Unit
. Language
. Factory Reset
Driver Assistance
To change the status, warnings or turn on
or off any of the systems/warnings dis-
played in the “Driver Assistance” menu,
use the
buttonsto select and the
OKto change a menu item:
. Driving Aids
. Parking Aids (if so equipped)
. Chassis Control (if so equipped)
. Power Steering (if so equipped)
Driving Aids:
To change the status, warnings or turn on
or off any of the systems/warnings dis-
played in the “Driving Aids” menu, use the
buttonsto select and the OKto
change a menu item:
. Steering Assist (if so equipped)
Allows user to turn the Steering Assist
ON/OFF.
. Emergency Brake
— Front
Allows user to turn the Automatic
Emergency Braking (AEB) system
ON/OFF
— Rear (if so equipped) Allows user to turn the Rear Auto-
matic Braking (RAB) system ON/
OFF.
. Lane (if so equipped)
— Warning (LDW)
Allows user to turn the Lane De-
parture Warning (LDW) system ON/
OFF.
— Prevention (LDP) Allows user to turn the Intelligent
Lane Intervention (I-LI) system ON/
OFF.
. Blind Spot
— Warning (BSW)
Allows user to turn the Blind Spot
Warning (BSW) system ON/OFF.
For additional information, see “ProPILOT
assist” (P.5-86), “Automatic Emergency
Braking (AEB)” (P.5-115), “Automatic Emer-
gency Braking (AEB) with pedestrian de- tection system” (P.5-122), “Rear Automatic
Braking (RAB)” (P.5-132), “Lane Departure
Warning (LDW)” (P.5-35), “Intelligent Lane
Intervention (I-LI)” (P.5-107), and “Blind
Spot Warning (BSW)” (P.5-46).
Parking Aids (if so equipped):
To change the status or turn on or off any
of the systems displayed in the “Parking
Aids” menu, use the
buttonsto
select and the OKto change a menu
item:
. Moving Object (if so equipped)
Press the OK
to turn the Moving
Object Detection (MOD) ON/OFF.
. Cross Traffic
Press the OK
to turn the Rear Cross
Traffic Alert (RCTA) ON/OFF.
. Rear Sensor (if so equipped)
Allows user to turn the rear sensor
ON/OFF.
. Display (if so equipped)
Allows user to turn the Rear Sonar
System (RSS) display ON/OFF.
. Volume (if so equipped)
Allows user to select sensor volume
(High, Med. or Low).
. Range (if so equipped)
Allows user to select the sensor range
(Far, Mid. or Near).
For additional information, see “Moving
Instruments and controls2-21
Page 102 of 500
2-22Instruments and controls
Object Detection (MOD)” (P.4-21), “Rear
Cross Traffic Alert (RCTA)” (P.5-56) and
“Rear sonar system (RSS)” (P.5-152).
Chassis Control:
To change the status, warnings or turn on
or off any of the systems/warnings dis-
played in the “Chassis Control” menu.
Use the
buttonsto select and the
OKto change a menu item:
. Trace Control
— See “Intelligent Trace Control” (P.5-
149) for more information.
. Engine Brake (if so equipped)
— See “Intelligent Engine Brake (Con-
tinuously Variable Transmission
(CVT) models)” (P.5-150) for more
information.
Press the OK
to turn ON/OFF.
Power Steering:
Use the
buttonsto select and the
OKto change a menu item:
. NORMAL
The NORMAL mode is recommended
for normal driving.
. SPORT
The SPORT mode adjusts the steering
to enhance performance.
Clock
Allows user to adjust the clock settings
and time within the vehicle information
display. Adjustments that can be made
include automatically setting the time,
12H/24H format, Daylight Savings Time,
time zone, and manually setting the time
(depending on the vehicle’s equipment).
The clock may also be set within the
center display. For additional information,
refer to the separate NissanConnect
Owner’s Manual.
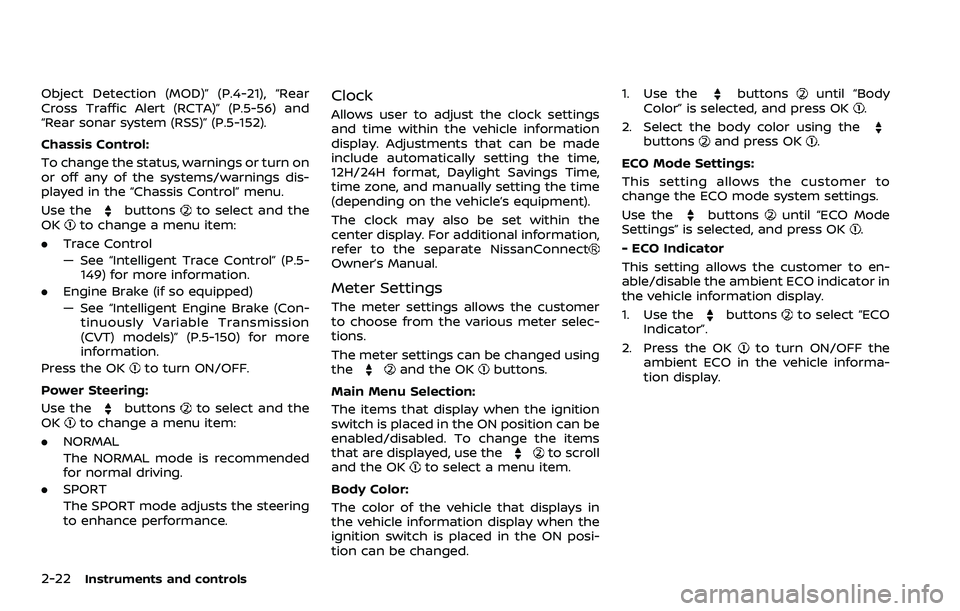
Meter Settings
The meter settings allows the customer
to choose from the various meter selec-
tions.
The meter settings can be changed using
the
and the OKbuttons.
Main Menu Selection:
The items that display when the ignition
switch is placed in the ON position can be
enabled/disabled. To change the items
that are displayed, use the
to scroll
and the OKto select a menu item.
Body Color:
The color of the vehicle that displays in
the vehicle information display when the
ignition switch is placed in the ON posi-
tion can be changed. 1. Use the
buttonsuntil “Body
Color” is selected, and press OK.
2. Select the body color using the
buttonsand press OK.
ECO Mode Settings:
This setting allows the customer to
change the ECO mode system settings.
Use the
buttonsuntil “ECO Mode
Settings” is selected, and press OK.
- ECO Indicator
This setting allows the customer to en-
able/disable the ambient ECO indicator in
the vehicle information display.
1. Use the
buttonsto select “ECO
Indicator”.
2. Press the OK
to turn ON/OFF the
ambient ECO in the vehicle informa-
tion display.
Page 111 of 500
VEHICLE INFORMATION DISPLAY
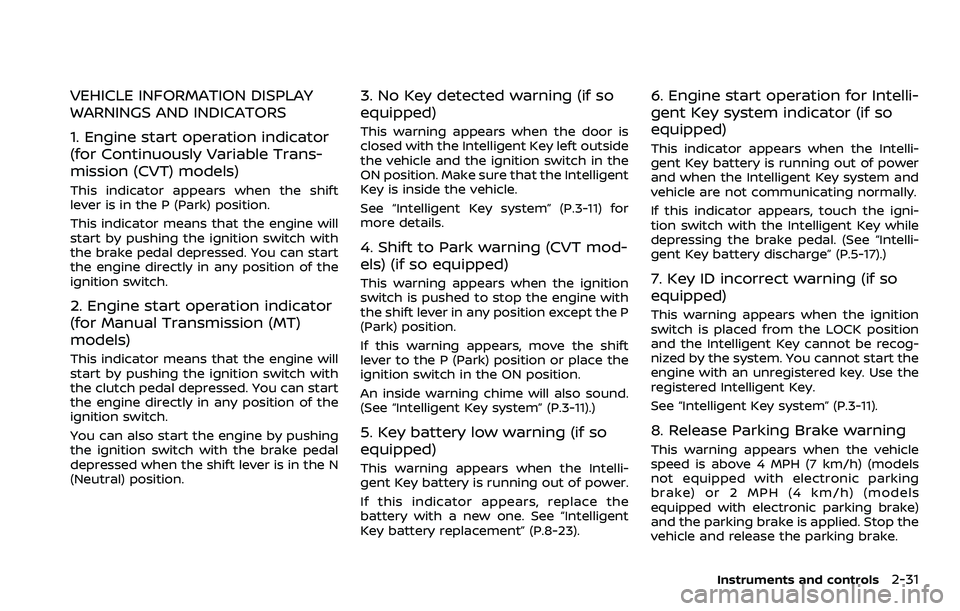
WARNINGS AND INDICATORS
1. Engine start operation indicator
(for Continuously Variable Trans-
mission (CVT) models)
This indicator appears when the shift
lever is in the P (Park) position.
This indicator means that the engine will
start by pushing the ignition switch with
the brake pedal depressed. You can start
the engine directly in any position of the
ignition switch.
2. Engine start operation indicator
(for Manual Transmission (MT)
models)
This indicator means that the engine will
start by pushing the ignition switch with
the clutch pedal depressed. You can start
the engine directly in any position of the
ignition switch.
You can also start the engine by pushing
the ignition switch with the brake pedal
depressed when the shift lever is in the N
(Neutral) position.
3. No Key detected warning (if so
equipped)
This warning appears when the door is
closed with the Intelligent Key left outside
the vehicle and the ignition switch in the
ON position. Make sure that the Intelligent
Key is inside the vehicle.
See “Intelligent Key system” (P.3-11) for
more details.
4. Shift to Park warning (CVT mod-
els) (if so equipped)
This warning appears when the ignition
switch is pushed to stop the engine with
the shift lever in any position except the P
(Park) position.
If this warning appears, move the shift
lever to the P (Park) position or place the
ignition switch in the ON position.
An inside warning chime will also sound.
(See “Intelligent Key system” (P.3-11).)
5. Key battery low warning (if so
equipped)
This warning appears when the Intelli-
gent Key battery is running out of power.
If this indicator appears, replace the
battery with a new one. See “Intelligent
Key battery replacement” (P.8-23).
6. Engine start operation for Intelli-
gent Key system indicator (if so
equipped)
This indicator appears when the Intelli-
gent Key battery is running out of power
and when the Intelligent Key system and
vehicle are not communicating normally.
If this indicator appears, touch the igni-
tion switch with the Intelligent Key while
depressing the brake pedal. (See “Intelli-
gent Key battery discharge” (P.5-17).)
7. Key ID incorrect warning (if so
equipped)
This warning appears when the ignition
switch is placed from the LOCK position
and the Intelligent Key cannot be recog-
nized by the system. You cannot start the
engine with an unregistered key. Use the
registered Intelligent Key.
See “Intelligent Key system” (P.3-11).
8. Release Parking Brake warning
This warning appears when the vehicle
speed is above 4 MPH (7 km/h) (models
not equipped with electronic parking
brake) or 2 MPH (4 km/h) (models
equipped with electronic parking brake)
and the parking brake is applied. Stop the
vehicle and release the parking brake.
Instruments and controls2-31
Page 115 of 500
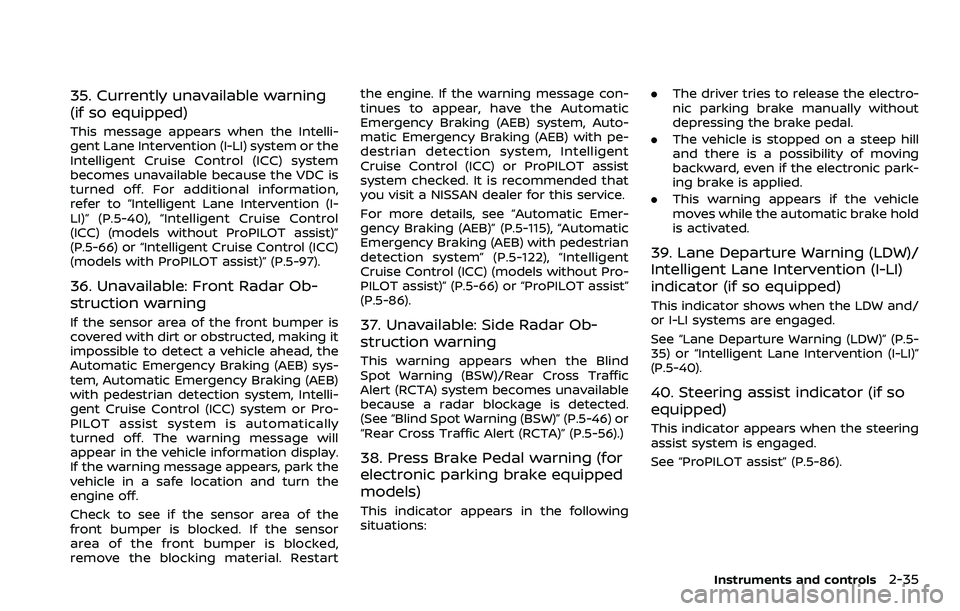
35. Currently unavailable warning
(if so equipped)
This message appears when the Intelli-
gent Lane Intervention (I-LI) system or the
Intelligent Cruise Control (ICC) system
becomes unavailable because the VDC is
turned off. For additional information,
refer to “Intelligent Lane Intervention (I-
LI)” (P.5-40), “Intelligent Cruise Control
(ICC) (models without ProPILOT assist)”
(P.5-66) or “Intelligent Cruise Control (ICC)
(models with ProPILOT assist)” (P.5-97).
36. Unavailable: Front Radar Ob-
struction warning
If the sensor area of the front bumper is
covered with dirt or obstructed, making it
impossible to detect a vehicle ahead, the
Automatic Emergency Braking (AEB) sys-
tem, Automatic Emergency Braking (AEB)
with pedestrian detection system, Intelli-
gent Cruise Control (ICC) system or Pro-
PILOT assist system is automatically
turned off. The warning message will
appear in the vehicle information display.
If the warning message appears, park the
vehicle in a safe location and turn the
engine off.
Check to see if the sensor area of the
front bumper is blocked. If the sensor
area of the front bumper is blocked,
remove the blocking material. Restartthe engine. If the warning message con-
tinues to appear, have the Automatic
Emergency Braking (AEB) system, Auto-
matic Emergency Braking (AEB) with pe-
destrian detection system, Intelligent
Cruise Control (ICC) or ProPILOT assist
system checked. It is recommended that
you visit a NISSAN dealer for this service.
For more details, see “Automatic Emer-
gency Braking (AEB)” (P.5-115), “Automatic
Emergency Braking (AEB) with pedestrian
detection system” (P.5-122), “Intelligent
Cruise Control (ICC) (models without Pro-
PILOT assist)” (P.5-66) or “ProPILOT assist”
(P.5-86).37. Unavailable: Side Radar Ob-
struction warning
This warning appears when the Blind
Spot Warning (BSW)/Rear Cross Traffic
Alert (RCTA) system becomes unavailable
because a radar blockage is detected.
(See “Blind Spot Warning (BSW)” (P.5-46) or
“Rear Cross Traffic Alert (RCTA)” (P.5-56).)
38. Press Brake Pedal warning (for
electronic parking brake equipped
models)
This indicator appears in the following
situations:
.
The driver tries to release the electro-
nic parking brake manually without
depressing the brake pedal.
. The vehicle is stopped on a steep hill
and there is a possibility of moving
backward, even if the electronic park-
ing brake is applied.
. This warning appears if the vehicle
moves while the automatic brake hold
is activated.
39. Lane Departure Warning (LDW)/
Intelligent Lane Intervention (I-LI)
indicator (if so equipped)
This indicator shows when the LDW and/
or I-LI systems are engaged.
See “Lane Departure Warning (LDW)” (P.5-
35) or “Intelligent Lane Intervention (I-LI)”
(P.5-40).
40. Steering assist indicator (if so
equipped)
This indicator appears when the steering
assist system is engaged.
See “ProPILOT assist” (P.5-86).
Instruments and controls2-35
Page 117 of 500
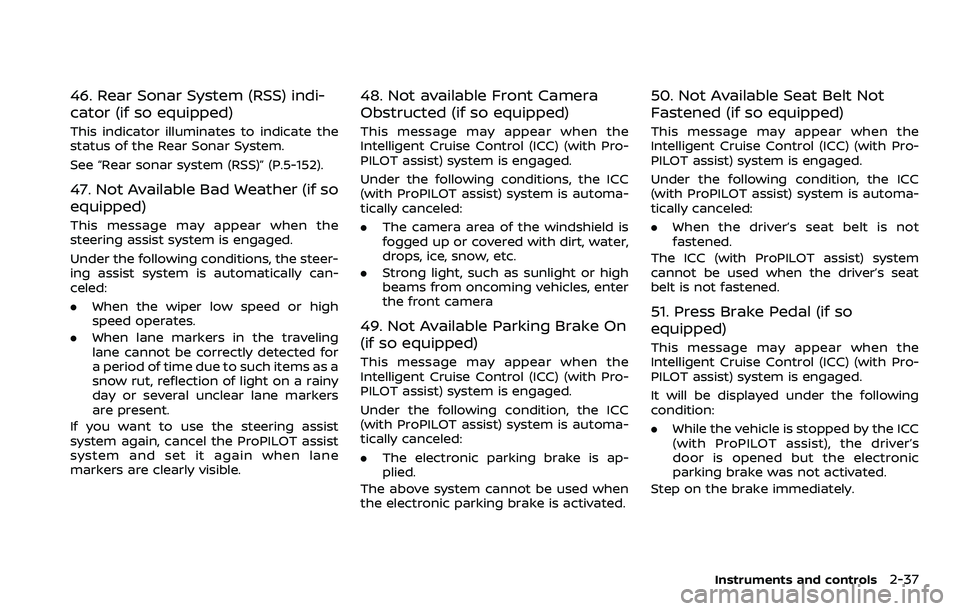
46. Rear Sonar System (RSS) indi-
cator (if so equipped)
This indicator illuminates to indicate the
status of the Rear Sonar System.
See “Rear sonar system (RSS)” (P.5-152).
47. Not Available Bad Weather (if so
equipped)
This message may appear when the
steering assist system is engaged.
Under the following conditions, the steer-
ing assist system is automatically can-
celed:
.When the wiper low speed or high
speed operates.
. When lane markers in the traveling
lane cannot be correctly detected for
a period of time due to such items as a
snow rut, reflection of light on a rainy
day or several unclear lane markers
are present.
If you want to use the steering assist
system again, cancel the ProPILOT assist
system and set it again when lane
markers are clearly visible.
48. Not available Front Camera
Obstructed (if so equipped)
This message may appear when the
Intelligent Cruise Control (ICC) (with Pro-
PILOT assist) system is engaged.
Under the following conditions, the ICC
(with ProPILOT assist) system is automa-
tically canceled:
. The camera area of the windshield is
fogged up or covered with dirt, water,
drops, ice, snow, etc.
. Strong light, such as sunlight or high
beams from oncoming vehicles, enter
the front camera
49. Not Available Parking Brake On
(if so equipped)
This message may appear when the
Intelligent Cruise Control (ICC) (with Pro-
PILOT assist) system is engaged.
Under the following condition, the ICC
(with ProPILOT assist) system is automa-
tically canceled:
.The electronic parking brake is ap-
plied.
The above system cannot be used when
the electronic parking brake is activated.
50. Not Available Seat Belt Not
Fastened (if so equipped)
This message may appear when the
Intelligent Cruise Control (ICC) (with Pro-
PILOT assist) system is engaged.
Under the following condition, the ICC
(with ProPILOT assist) system is automa-
tically canceled:
. When the driver’s seat belt is not
fastened.
The ICC (with ProPILOT assist) system
cannot be used when the driver’s seat
belt is not fastened.
51. Press Brake Pedal (if so
equipped)
This message may appear when the
Intelligent Cruise Control (ICC) (with Pro-
PILOT assist) system is engaged.
It will be displayed under the following
condition:
. While the vehicle is stopped by the ICC
(with ProPILOT assist), the driver’s
door is opened but the electronic
parking brake was not activated.
Step on the brake immediately.
Instruments and controls2-37
Page 120 of 500

2-40Instruments and controls
.All
— Reset all items of “Average Speed”,
“Elapsed time and trip odometer”
and “Fuel economy.”
Once the “Elapsed time and trip odometer
1” is displayed, you can use
buttons
to switch between the “Elapsed time and
trip odometer 1” and “Elapsed time and
trip odometer 2.”
4-5. Fuel economy/ECO pedal
guide
Current fuel consumption:
The current fuel consumption mode
shows the current fuel consumption.
Average fuel consumption:
The average fuel consumption 1 mode
shows the average fuel consumption
since the last reset. The average fuel
consumption 2 mode shows the average
fuel consumption since the time the
ignition switch was placed in the ON
position. The average fuel consumption
2 is automatically reset each time the
ignition is placed in the OFF position.
Resetting is done by pushing the OK
button. When the OKbutton is pushed,
the following menu items are displayed.
. Cancel — Return to the previous screen with-
out resetting.
. Fuel Economy
— Reset the fuel economy.
. All
— Reset all items of “Average Speed”,
“Elapsed time and trip odometer”
and “Fuel economy”.
Once the “Fuel economy 1” is displayed,
you can use
buttons to switch
between the “Fuel economy 1” and “Fuel
economy 2”.
The display is updated every 30 seconds.
For about the first 1/3 mile (500 m) after a
reset, the display shows “——”.
6. Audio
The audio mode shows the status of
audio information.
7. Navigation (if so equipped)
When the route guidance is set in the
navigation system, this item shows the
navigation route information.
8. Compass (if so equipped)
This display indicates the heading direc-
tion of the vehicle.
9. Intelligent 4x4 torque distribution
display (if so equipped)
When the Intelligent 4x4 torque distribu-
tion display is selected, you can view the
distribution ratio of the transmission
torque to the front and rear wheels
during driving.
10. Chassis control
When Intelligent Trace Control, Intelligent
Engine Brake (Continuously Variable
Transmission (CVT) models) or Active Ride
Control system is operated, it shows the
operating condition. It also shows oper-
ating condition of Hill Start Assist. The
operating condition of the automatic
brake hold system (if so equipped) is also
shown. See “Intelligent Trace Control”
(P.5-149), “Intelligent Engine Brake (Con-
tinuously Variable Transmission (CVT)
models)” (P.5-150), “Active Ride Control”
(P.5-151), “Hill Start Assist system” (P.5-152)
or “Automatic brake hold” (P.5-29) for
more details.
11. Tire Pressures
The tire pressure mode shows the pres-
sure of all four tires while the vehicle is
driven.
When the Tire Pressure Low — Add Air
warning appears, the display can be
switched to the tire pressure mode by
Page 132 of 500
2-52Instruments and controls
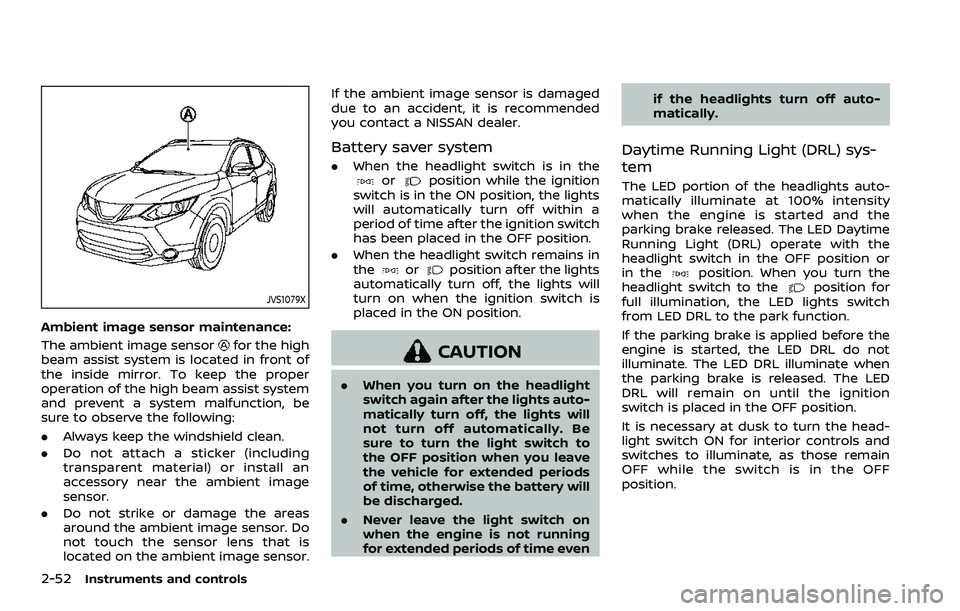
JVS1079X
Ambient image sensor maintenance:
The ambient image sensor
for the high
beam assist system is located in front of
the inside mirror. To keep the proper
operation of the high beam assist system
and prevent a system malfunction, be
sure to observe the following:
. Always keep the windshield clean.
. Do not attach a sticker (including
transparent material) or install an
accessory near the ambient image
sensor.
. Do not strike or damage the areas
around the ambient image sensor. Do
not touch the sensor lens that is
located on the ambient image sensor. If the ambient image sensor is damaged
due to an accident, it is recommended
you contact a NISSAN dealer.
Battery saver system
.
When the headlight switch is in theorposition while the ignition
switch is in the ON position, the lights
will automatically turn off within a
period of time after the ignition switch
has been placed in the OFF position.
. When the headlight switch remains in
the
orposition after the lights
automatically turn off, the lights will
turn on when the ignition switch is
placed in the ON position.
CAUTION
. When you turn on the headlight
switch again after the lights auto-
matically turn off, the lights will
not turn off automatically. Be
sure to turn the light switch to
the OFF position when you leave
the vehicle for extended periods
of time, otherwise the battery will
be discharged.
. Never leave the light switch on
when the engine is not running
for extended periods of time even if the headlights turn off auto-
matically.
Daytime Running Light (DRL) sys-
tem
The LED portion of the headlights auto-
matically illuminate at 100% intensity
when the engine is started and the
parking brake released. The LED Daytime
Running Light (DRL) operate with the
headlight switch in the OFF position or
in the
position. When you turn the
headlight switch to theposition for
full illumination, the LED lights switch
from LED DRL to the park function.
If the parking brake is applied before the
engine is started, the LED DRL do not
illuminate. The LED DRL illuminate when
the parking brake is released. The LED
DRL will remain on until the ignition
switch is placed in the OFF position.
It is necessary at dusk to turn the head-
light switch ON for interior controls and
switches to illuminate, as those remain
OFF while the switch is in the OFF
position.
Page 137 of 500
the brakes to the left or right wheels
individually (for a short period of time). For
additional information, see “Intelligent
Lane Intervention (I-LI)” (P.5-40).
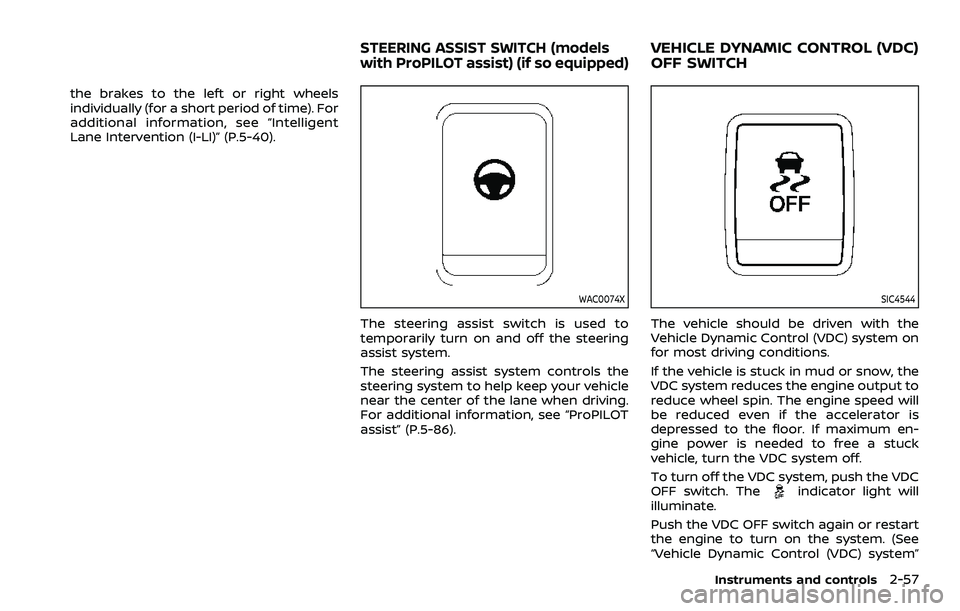
WAC0074X
The steering assist switch is used to
temporarily turn on and off the steering
assist system.
The steering assist system controls the
steering system to help keep your vehicle
near the center of the lane when driving.
For additional information, see “ProPILOT
assist” (P.5-86).
SIC4544
The vehicle should be driven with the
Vehicle Dynamic Control (VDC) system on
for most driving conditions.
If the vehicle is stuck in mud or snow, the
VDC system reduces the engine output to
reduce wheel spin. The engine speed will
be reduced even if the accelerator is
depressed to the floor. If maximum en-
gine power is needed to free a stuck
vehicle, turn the VDC system off.
To turn off the VDC system, push the VDC
OFF switch. The
indicator light will
illuminate.
Push the VDC OFF switch again or restart
the engine to turn on the system. (See
“Vehicle Dynamic Control (VDC) system”
Instruments and controls2-57
STEERING ASSIST SWITCH (models
with ProPILOT assist) (if so equipped)VEHICLE DYNAMIC CONTROL (VDC)
OFF SWITCH
Page 146 of 500
2-66Instruments and controls
JVI1336X
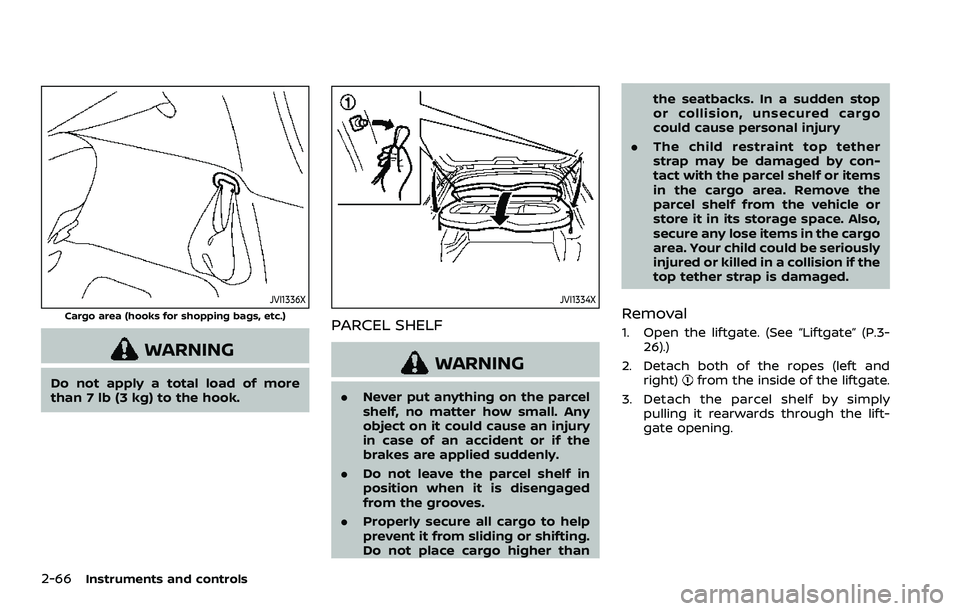
Cargo area (hooks for shopping bags, etc.)
WARNING
Do not apply a total load of more
than 7 lb (3 kg) to the hook.
JVI1334X
PARCEL SHELF
WARNING
.Never put anything on the parcel
shelf, no matter how small. Any
object on it could cause an injury
in case of an accident or if the
brakes are applied suddenly.
. Do not leave the parcel shelf in
position when it is disengaged
from the grooves.
. Properly secure all cargo to help
prevent it from sliding or shifting.
Do not place cargo higher than the seatbacks. In a sudden stop
or collision, unsecured cargo
could cause personal injury
. The child restraint top tether
strap may be damaged by con-
tact with the parcel shelf or items
in the cargo area. Remove the
parcel shelf from the vehicle or
store it in its storage space. Also,
secure any lose items in the cargo
area. Your child could be seriously
injured or killed in a collision if the
top tether strap is damaged.
Removal
1. Open the liftgate. (See “Liftgate” (P.3-
26).)
2. Detach both of the ropes (left and right)
from the inside of the liftgate.
3. Detach the parcel shelf by simply pulling it rearwards through the lift-
gate opening.