check oil NISSAN ROGUE SPORT 2019 User Guide
[x] Cancel search | Manufacturer: NISSAN, Model Year: 2019, Model line: ROGUE SPORT, Model: NISSAN ROGUE SPORT 2019Pages: 500, PDF Size: 2.37 MB
Page 413 of 500
8 Do-it-yourself
Maintenance precautions ...................................................... 8-2
Engine compartment check locations ........................ 8-3MR20DD engine model ..................................................... 8-4
Engine cooling system ............................................................. 8-4 Checking engine coolant level .................................... 8-5
Changing engine coolant ................................................ 8-6
Engine oil ........................................................................\
..................... 8-6 Checking engine oil level ................................................. 8-6
Changing engine oil and filter ..................................... 8-6
Continuously Variable Transmission
(CVT) fluid ........................................................................\
.................... 8-9
Brake and clutch (if so equipped) fluid ....................... 8-9
Window washer fluid .............................................................. 8-10
Battery ........................................................................\
........................ 8-11 Jump starting ........................................................................\
. 8-12
Variable voltage control system ................................... 8-13
Drive belt ........................................................................\
.................. 8-13
Spark plugs ........................................................................\
............. 8-14 Replacing spark plugs ..................................................... 8-14
Air cleaner ........................................................................\
............... 8-15 Windshield wiper blades ..................................................... 8-16
Cleaning ........................................................................\
........... 8-16
Replacing ........................................................................\
........ 8-16
Rear window wiper blade .................................................. 8-17
Brakes ........................................................................\
........................ 8-17 Self-adjusting brakes ..................................................... 8-17
Brake pad wear warning ............................................ 8-17
Fuses ........................................................................\
........................... 8-18 Engine compartment .................................................... 8-18
Passenger compartment ........................................... 8-20
Key fob battery replacement .......................................... 8-21
Intelligent Key battery replacement .......................... 8-23
Lights ........................................................................\
.......................... 8-25 Headlights ........................................................................\
...... 8-25
Exterior and interior lights ........................................ 8-27
Wheels and tires ........................................................................\
8-29
Tire pressure ........................................................................\
8-29
Tire labeling ........................................................................\
.. 8-33
Types of tires ....................................................................... 8-35
Tire chains ........................................................................\
...... 8-36
Changing wheels and tires ...................................... 8-37
Page 415 of 500
off and wait until it cools down.
. Avoid direct contact with used
engine oil and coolant. Impro-
perly disposed engine oil, and
engine coolant and/or other ve-
hicle fluids can damage the en-
vironment. Always conform to
local regulations for disposal of
vehicle fluid.
. Never leave the engine or the CVT
related component harnesses
disconnected while the ignition
switch is in the ON position.
. Never connect or disconnect the
battery or any transistorized
component while the ignition
switch is in the ON position.
. Your vehicle is equipped with an
automatic engine cooling fan. It
may come on at any time without
warning, even if the ignition key is
in the OFF position and the en-
gine is not running. To avoid
injury, always disconnect the ne-
gative battery cable before work-
ing near the fan.
This “8. Do-it-yourself” section gives in-
structions regarding only those items
which are relatively easy for an owner to
perform. A genuine NISSAN Service Manual is also
available. (See “Owner’s manual/service
manual order information” (P.10-20).)
You should be aware that incomplete or
improper servicing may result in operat-
ing difficulties or excessive emissions, and
could affect your warranty coverage.
If in
doubt about any servicing, it is recom-
mended you have it done by a NISSAN
dealer.
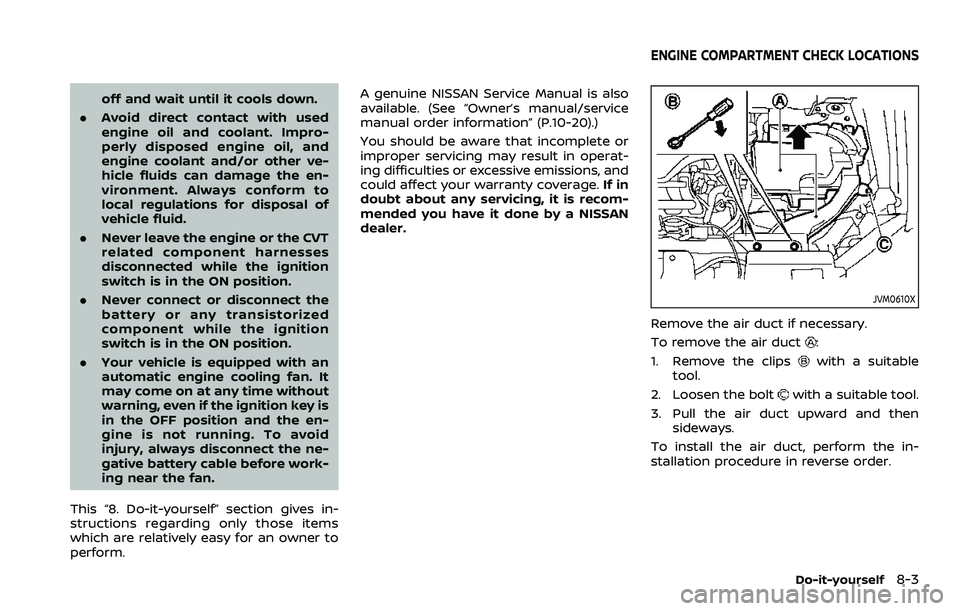
JVM0610X
Remove the air duct if necessary.
To remove the air duct
:
1. Remove the clips
with a suitable
tool.
2. Loosen the bolt
with a suitable tool.
3. Pull the air duct upward and then sideways.
To install the air duct, perform the in-
stallation procedure in reverse order.
Do-it-yourself8-3
ENGINE COMPARTMENT CHECK LOCATIONS
Page 418 of 500
8-6Do-it-yourself
recommended you visit a NISSAN dealer
for this service.
CHANGING ENGINE COOLANT
A NISSAN dealer can change the engine
coolant. The service procedure can be
found in the NISSAN Service Manual.
Improper servicing can result in re-
duced heater performance and engine
overheating.
WARNING
.To avoid being scalded, never
change the coolant when the
engine is hot.
. Never remove the radiator or
coolant reservoir cap when the
engine is hot. Serious burns could
be caused by high pressure fluid
escaping from the radiator.
. Avoid direct skin contact with
used coolant. If skin contact is
made, wash thoroughly with soap
or hand cleaner as soon as pos-
sible.
. Keep coolant out of the reach of
children and pets.
Engine coolant must be disposed of
properly. Check your local regulations.SDI1993
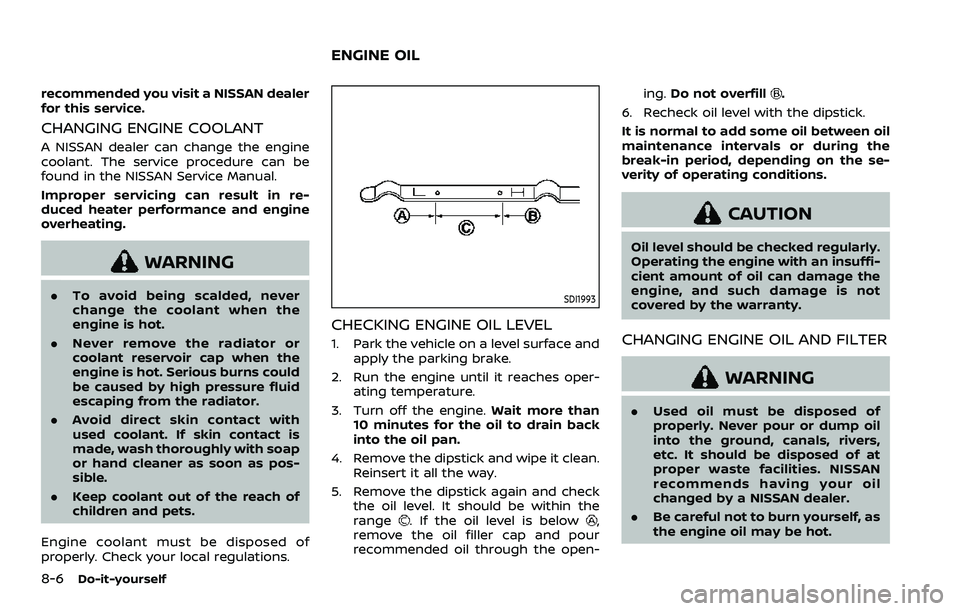
CHECKING ENGINE OIL LEVEL
1. Park the vehicle on a level surface and apply the parking brake.
2. Run the engine until it reaches oper- ating temperature.
3. Turn off the engine. Wait more than
10 minutes for the oil to drain back
into the oil pan.
4. Remove the dipstick and wipe it clean. Reinsert it all the way.
5. Remove the dipstick again and check the oil level. It should be within the
range
. If the oil level is below,
remove the oil filler cap and pour
recommended oil through the open- ing.
Do not overfill
.
6. Recheck oil level with the dipstick.
It is normal to add some oil between oil
maintenance intervals or during the
break-in period, depending on the se-
verity of operating conditions.
CAUTION
Oil level should be checked regularly.
Operating the engine with an insuffi-
cient amount of oil can damage the
engine, and such damage is not
covered by the warranty.
CHANGING ENGINE OIL AND FILTER
WARNING
. Used oil must be disposed of
properly. Never pour or dump oil
into the ground, canals, rivers,
etc. It should be disposed of at
proper waste facilities. NISSAN
recommends having your oil
changed by a NISSAN dealer.
. Be careful not to burn yourself, as
the engine oil may be hot.
ENGINE OIL
Page 420 of 500
8-8Do-it-yourself
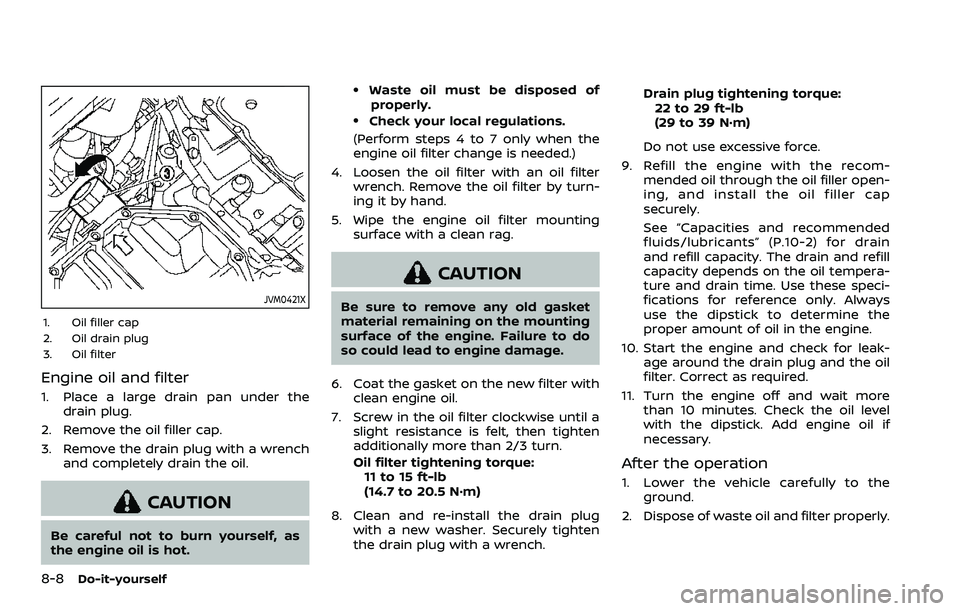
JVM0421X
1. Oil filler cap
2. Oil drain plug
3. Oil filter
Engine oil and filter
1. Place a large drain pan under thedrain plug.
2. Remove the oil filler cap.
3. Remove the drain plug with a wrench and completely drain the oil.
CAUTION
Be careful not to burn yourself, as
the engine oil is hot.
.Waste oil must be disposed ofproperly.
.Check your local regulations.
(Perform steps 4 to 7 only when the
engine oil filter change is needed.)
4. Loosen the oil filter with an oil filter wrench. Remove the oil filter by turn-
ing it by hand.
5. Wipe the engine oil filter mounting surface with a clean rag.
CAUTION
Be sure to remove any old gasket
material remaining on the mounting
surface of the engine. Failure to do
so could lead to engine damage.
6. Coat the gasket on the new filter with clean engine oil.
7. Screw in the oil filter clockwise until a slight resistance is felt, then tighten
additionally more than 2/3 turn.
Oil filter tightening torque:11 to 15 ft-lb
(14.7 to 20.5 N·m)
8. Clean and re-install the drain plug with a new washer. Securely tighten
the drain plug with a wrench. Drain plug tightening torque:
22 to 29 ft-lb
(29 to 39 N·m)
Do not use excessive force.
9. Refill the engine with the recom- mended oil through the oil filler open-
ing, and install the oil filler cap
securely.
See “Capacities and recommended
fluids/lubricants” (P.10-2) for drain
and refill capacity. The drain and refill
capacity depends on the oil tempera-
ture and drain time. Use these speci-
fications for reference only. Always
use the dipstick to determine the
proper amount of oil in the engine.
10. Start the engine and check for leak- age around the drain plug and the oil
filter. Correct as required.
11. Turn the engine off and wait more than 10 minutes. Check the oil level
with the dipstick. Add engine oil if
necessary.
After the operation
1. Lower the vehicle carefully to the
ground.
2. Dispose of waste oil and filter properly.
Page 421 of 500
WARNING
.Prolonged and repeated contact
with used engine oil may cause
skin cancer.
. Try to avoid direct skin contact
with used oil. If skin contact is
made, wash thoroughly with soap
or hand cleaner as soon as pos-
sible.
. Keep used engine oil out of reach
of children. When checking or replacement is re-
quired, we recommend a NISSAN dealer
for servicing.
CAUTION
.
NISSAN recommends using Gen-
uine NISSAN CVT Fluid NS-3 (or
equivalent) ONLY in NISSAN CVTs.
Do not mix with other fluids.
. Do not use Automatic transmis-
sion fluid (ATF) or Manual Trans-
mission fluid in a NISSAN CVT, as
it may damage the CVT. Damage
caused by the use of fluids other
than as recommended is not
covered by the NISSAN’s New
Vehicle Limited Warranty.
. Using fluids that are not equiva-
lent to Genuine NISSAN CVT Fluid
NS-3 may also damage the CVT.
Damage caused by the use of
fluids other than as recom-
mended is not covered by the
NISSAN’s New Vehicle Limited
Warranty. For additional brake and clutch fluid
information, see “Capacities and recom-
mended fluids/lubricants” (P.10-2) of this
manual.
WARNING
.
Use only new fluid from a sealed
container. Old, inferior or con-
taminated fluid may damage the
brake and clutch systems. The
use of improper fluids can da-
mage the brake and clutch sys-
tems, and affect the vehicle’s
stopping ability.
. Clean the filler cap before remov-
ing.
. Brake and clutch fluid is poiso-
nous and should be stored care-
fully in marked containers out of
the reach of children.
CAUTION
Do not spill the fluid on any painted
surfaces. This will damage the paint.
If fluid is spilled, immediately wash
the surface with water.
Do-it-yourself8-9
CONTINUOUSLY VARIABLE
TRANSMISSION (CVT) FLUIDBRAKE AND CLUTCH (if so equipped) FLUID
Page 433 of 500
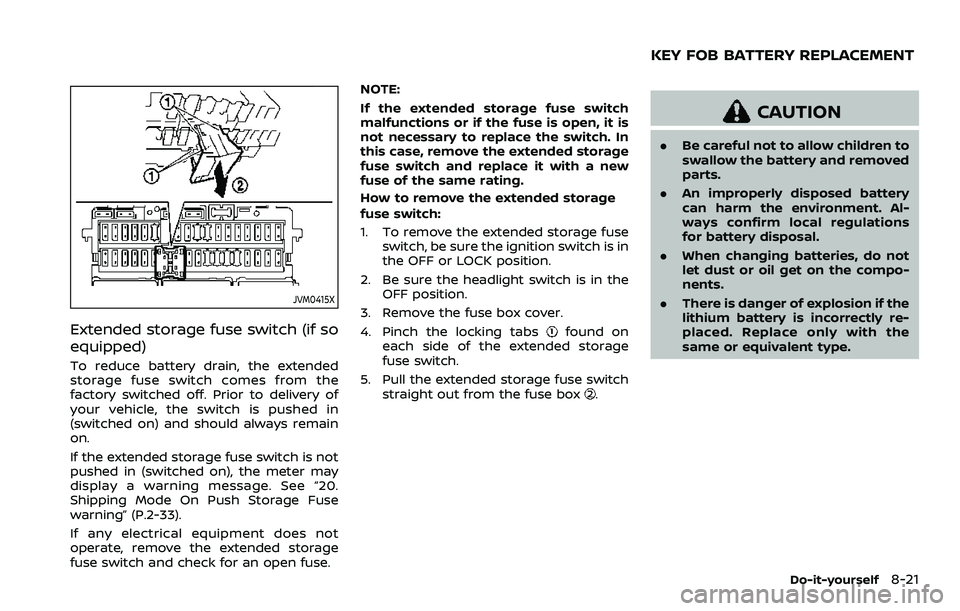
JVM0415X
Extended storage fuse switch (if so
equipped)
To reduce battery drain, the extended
storage fuse switch comes from the
factory switched off. Prior to delivery of
your vehicle, the switch is pushed in
(switched on) and should always remain
on.
If the extended storage fuse switch is not
pushed in (switched on), the meter may
display a warning message. See “20.
Shipping Mode On Push Storage Fuse
warning” (P.2-33).
If any electrical equipment does not
operate, remove the extended storage
fuse switch and check for an open fuse.NOTE:
If the extended storage fuse switch
malfunctions or if the fuse is open, it is
not necessary to replace the switch. In
this case, remove the extended storage
fuse switch and replace it with a new
fuse of the same rating.
How to remove the extended storage
fuse switch:
1. To remove the extended storage fuse
switch, be sure the ignition switch is in
the OFF or LOCK position.
2. Be sure the headlight switch is in the OFF position.
3. Remove the fuse box cover.
4. Pinch the locking tabs
found on
each side of the extended storage
fuse switch.
5. Pull the extended storage fuse switch straight out from the fuse box
.
CAUTION
.Be careful not to allow children to
swallow the battery and removed
parts.
. An improperly disposed battery
can harm the environment. Al-
ways confirm local regulations
for battery disposal.
. When changing batteries, do not
let dust or oil get on the compo-
nents.
. There is danger of explosion if the
lithium battery is incorrectly re-
placed. Replace only with the
same or equivalent type.
Do-it-yourself8-21
KEY FOB BATTERY REPLACEMENT
Page 458 of 500
9-4Maintenance and schedules
Steering wheel:Check for changes in the
steering conditions, such as excessive
free play, hard steering or strange noises.
Warning lights and chimes: Make sure
that all warning lights and chimes are
operating properly.
Windshield defroster: Check that the air
comes out of the defroster outlets prop-
erly and in sufficient quantity when oper-
ating the heater or air conditioner.
Windshield wiper and washer*: Check
that the wipers and washers operate
properly and that the wipers do not
streak.
Under the hood and vehicle
The maintenance items listed here should
be checked periodically (for example,
each time you check the engine oil or
refuel).
Battery*: Check the fluid level in each cell.
It should be between the MAX and MIN
lines. Vehicles operated in high tempera-
tures or under severe condition require
frequent checks of the battery fluid level.
NOTE:
Care should be taken to avoid situations
that can lead to potential battery dis-
charge and potential no-start condi-
tions such as: 1.
Installation or extended use of elec-
tronic accessories that consume
battery power when the engine is
not running (Phone chargers, GPS,
DVD players, etc.)
2. Vehicle is not driven regularly and/
or only driven short distances.
In these cases, the battery may need to
be charged to maintain battery health.
Brake and clutch fluid level*: Make sure
that the brake and clutch fluid level is
between the MAX and MIN lines on the
reservoir.
Engine coolant level*: Check the coolant
level when the engine is cold.
Engine drive belt*: Make sure that the
drive belt is not frayed, worn, cracked or
oily.
Engine oil level*: Check the level after
parking the vehicle on a level surface and
turning off the engine. Wait more than 10
minutes for the oil to drain back into the
oil pan.
Exhaust system: Make sure there are no
loose supports, cracks or holes. If the
sound of the exhaust seems unusual or
there is a smell of exhaust fumes, im-
mediately have the exhaust system in-
spected. It is recommended you visit a
NISSAN dealer for this service. (See “Pre-
cautions when starting and driving” (P.5- 4) for exhaust gas (carbon monoxide).)
Fluid leaks:
Check under the vehicle for
fuel, oil, water or other fluid leaks after the
vehicle has been parked for a while. Water
dripping from the air conditioner after use
is normal. If you should notice any leaks
or if gasoline fumes are evident, check for
the cause and have it corrected immedi-
ately.
Radiator and hoses: Check the front of
the radiator and clean off any dirt, insects,
leaves, etc., that may have accumulated.
Make sure the hoses have no cracks,
deformation, rot or loose connections.
Underbody: The underbody is frequently
exposed to corrosive substances such as
those used on icy roads or to control
dust. It is very important to remove these
substances, otherwise rust will form on
the floor pan, frame, fuel lines and around
the exhaust system. At the end of winter,
the underbody should be thoroughly
flushed with plain water, being careful to
clean those areas where mud and dirt
may accumulate. For additional informa-
tion, see “Cleaning exterior” (P.7-2).
Windshield washer fluid*: Check that
there is adequate fluid in the reservoir.
Page 459 of 500
The following descriptions are provided
to give you a better understanding of the
scheduled maintenance items that
should be regularly checked or replaced.
The maintenance schedule indicates at
which mileage/time intervals each item
requires service.
In addition to scheduled maintenance,
your vehicle requires that some items be
checked during normal day-to-day op-
eration. Refer to “General maintenance”
(P.9-2).
Items marked with “*” are recommended
by NISSAN for reliable vehicle operation.
You are not required to perform main-
tenance on these items in order to
maintain the warranties which come with
your vehicle. Other maintenance items
and intervals are required.
When applicable, additional information
can be found in the “8. Do-it-yourself”
section of this manual.
NOTE:
NISSAN does not advocate the use of
non-OEM approved aftermarket flush-
ing systems and strongly advises
against performing these services on a
NISSAN product. Many of the aftermar-
ket flushing systems use non-OEM ap-
proved chemicals or solvents, the use of
which has not been validated by
NISSAN.For recommended fuel, lubricants,
fluids, grease, and refrigerant, refer to
“Capacities and recommended fluids/
lubricants” (P.10-2) of this manual.
EMISSION CONTROL SYSTEM MAIN-
TENANCE
Drive belt*:
Check engine drive belt for wear, fraying
or cracking and for proper tension. Re-
place any damaged drive belt.
Engine air filter:
Replace at specified intervals. When driv-
ing for prolonged periods in dusty condi-
tions, check/replace the filter more
frequently.
Engine coolant*:
Replace coolant at the specified interval.
When adding or replacing coolant, be
sure to use only Genuine NISSAN Long
Life Antifreeze/Coolant (blue) or equiva-
lent with the proper mixture. (Refer to
“Engine cooling system” (P.8-4) to deter-
mine the proper mixture for your area.)
NOTE:
Mixing any other type of coolant or the
use of non-distilled water may reduce
the recommended service interval of
the coolant.
Engine oil and oil filter:
Replace engine oil and oil filter at the
specified intervals. For recommended oil
grade and viscosity refer to “Capacities
and recommended fluids/lubricants”
(P.10-2).
Engine valve clearance*:
Inspect only if valve noise increases.
Adjust valve clearance if necessary.
Evaporative emissions control vapor
lines*:
Check vapor lines for leaks or looseness.
Tighten connections or replace parts as
necessary.
Fuel filter
Periodic maintenance is not required (in-
tank type filter).
Fuel lines*:
Check the fuel hoses, piping and connec-
tions for leaks, looseness, or deterioration.
Tighten connections or replace parts as
necessary.
Spark plugs:
Replace at specified intervals. Install new
plugs of the type as originally equipped.
Maintenance and schedules9-5
EXPLANATION OF SCHEDULED
MAINTENANCE ITEMS
Page 460 of 500
9-6Maintenance and schedules
CHASSIS AND BODY MAINTENANCE
Brake lines and cables:
Visually inspect for proper installation.
Check for chafing, cracks, deterioration,
and signs of leaking. Replace any deterio-
rated or damaged parts immediately.
Brake pads and rotors:
Check for wear, deterioration and fluid
leaks. Replace any deteriorated or da-
maged parts immediately.
Exhaust system:
Visually inspect the exhaust pipes, muffler
and hangers for leaks, cracks, deteriora-
tion, and damage. Tighten connections or
replace parts as necessary.
In-cabin microfilter:
Replace at specified intervals. When driv-
ing for prolonged periods in dusty condi-
tions, replace the filter more frequently.
Propeller shaft(s):
Check for damage, looseness, and grease
leakage. (AWD)
Steering gear and linkage, axle and
suspension parts, drive shaft boots:
Check for damage, looseness, and leak-
age of oil or grease. Under severe driving
conditions, inspect more frequently.Tire rotation:
Tires should be rotated every 5,000 miles
(8,000 km) according to the instructions
under “Explanation of general mainte-
nance items” (P.9-2). When rotating tires,
check for damage and uneven wear.
Replace if necessary.
Transmission fluid/oil, differential oil
and transfer case oil:
Visually inspect for signs of leakage at
specified intervals.
If using a car-top carrier, or driving on
rough or muddy roads:
.
Replace the Manual Transmission
gear oil every 20,000 miles (32,000
km) or 24 months.
. Replace the CVT fluid every 60,000
miles (96,000 km) or request the deal-
er to inspect the fluid deterioration
data using a CONSULT. If the dete-
rioration data is more than 210,000,
replace the CVT fluid.
To help ensure smooth, safe and eco-
nomical driving, NISSAN provides two
maintenance schedules that may be
used, depending upon the conditions in
which you usually drive. These schedules
contain both distance and time intervals,
up to 120,000 miles (192,000 km)/144
months. For most people, the odometer
reading will indicate when service is
needed. However, if you drive very little,
your vehicle should be serviced at the
regular time intervals shown in the sche-
dule.
After 120,000 miles (192,000 km)/144
months, continue maintenance at the
same mileage/time intervals.
ADDITIONAL MAINTENANCE ITEMS
FOR SEVERE OPERATING CONDI-
TIONS
Additional maintenance items for se-
vere operating conditions; should be
performed on vehicles that are driven
under especially demanding conditions.
Additional maintenance items should be
performed if you primarily operate your
vehicle under the following conditions:
. Repeated short trips of less than 5
miles (8 km).
. Repeated short trips of less than 10
miles (16 km) with outside tempera-
tures remaining below freezing.
MAINTENANCE SCHEDULES
Page 475 of 500
ing, which may cause excessive fuel
consumption or engine damage. If any
of the above symptoms are encountered,
have your vehicle checked. It is recom-
mended you visit a NISSAN dealer for
servicing.
However, now and then you may notice
light spark knock for a short time while
accelerating or driving up hills. This is
not a cause for concern, because you
get the greatest fuel benefit when there
is light spark knock for a short time
under heavy engine load.
JVT0351X
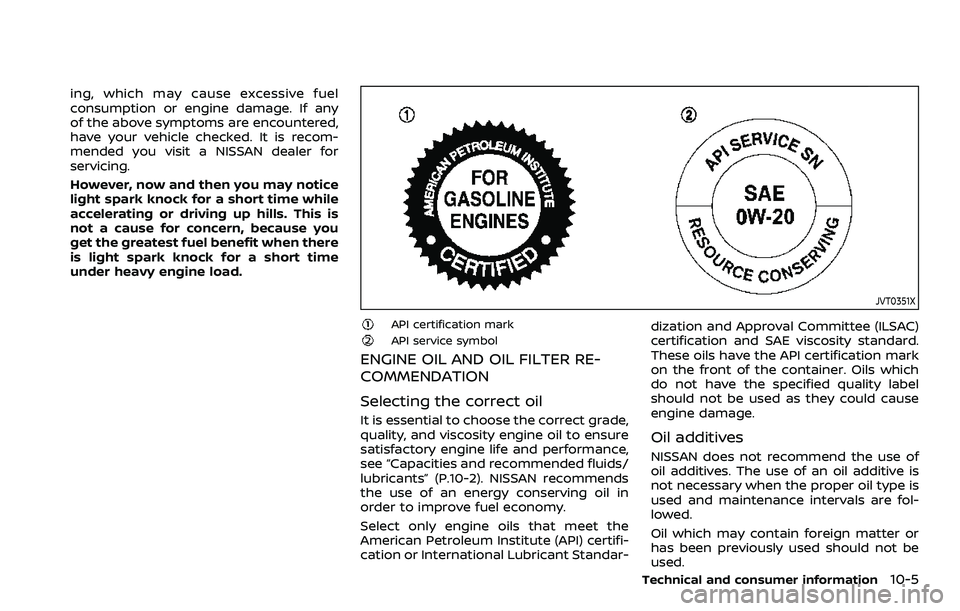
API certification markAPI service symbol
ENGINE OIL AND OIL FILTER RE-
COMMENDATION
Selecting the correct oil
It is essential to choose the correct grade,
quality, and viscosity engine oil to ensure
satisfactory engine life and performance,
see “Capacities and recommended fluids/
lubricants” (P.10-2). NISSAN recommends
the use of an energy conserving oil in
order to improve fuel economy.
Select only engine oils that meet the
American Petroleum Institute (API) certifi-
cation or International Lubricant Standar-dization and Approval Committee (ILSAC)
certification and SAE viscosity standard.
These oils have the API certification mark
on the front of the container. Oils which
do not have the specified quality label
should not be used as they could cause
engine damage.
Oil additives
NISSAN does not recommend the use of
oil additives. The use of an oil additive is
not necessary when the proper oil type is
used and maintenance intervals are fol-
lowed.
Oil which may contain foreign matter or
has been previously used should not be
used.
Technical and consumer information10-5