fuel cap NISSAN ROGUE SPORT 2020 Owners Manual
[x] Cancel search | Manufacturer: NISSAN, Model Year: 2020, Model line: ROGUE SPORT, Model: NISSAN ROGUE SPORT 2020Pages: 492, PDF Size: 2.02 MB
Page 99 of 492
High beam assist indicator
light
The indicator light illuminates when the
headlights come on while the headlight
switch is in the AUTO position with the
high beam selected. This indicates that
the high beam assist system is opera-
tional. (See “High beam assist” (P.2-55).)
High beam indicator light
This light illuminates when the headlight
high beam is on and goes out when the
low beam is selected.
Malfunction Indicator Light
(MIL)
If the malfunction indicator light comes
on steady or blinks while the engine is
running, it may indicate a potential emis-
sion control and/or Continuously Variable
Transmission (CVT) malfunction.
The malfunction indicator light may also
illuminate steady if the fuel-filler cap is
loose or missing, or if the vehicle runs out
of fuel. Check to make sure the fuel-filler
cap is installed and closed tightly, and
that the vehicle has at least 3 US gallons
(11.4 liters) of fuel in the fuel tank.
After a few driving trips, the
light
should turn off if no other potential emission control system malfunction ex-
ists.
If this indicator light remains on for 20
seconds and then blinks for 10 seconds
when the engine is not running, it indi-
cates that the vehicle is not ready for an
emission control system inspection/
maintenance test. (See “Readiness for
Inspection/Maintenance (I/M) test” (P.10-
18).)
Operation:
The malfunction indicator light will come
on in one of two ways:
.
Malfunction indicator light on steady
— An emission control system and/or
CVT malfunction has been detected.
Check the fuel-filler cap if the LOOSE
FUEL CAP warning appears in the
vehicle information display. If the
fuel-filler cap is loose or missing, tight-
en or install the cap and continue to
drive the vehicle. The
light should
turn off after a few driving trips. If the
light does not turn off after a few
driving trips, have the vehicle in-
spected. It is recommended you visit
a NISSAN dealer for this service. You
do not need to have your vehicle
towed to the dealer.
. Malfunction indicator light blinking —
An engine misfire has been detected which may damage the emission
control system.
To reduce or avoid emission control
system damage:
1) Do not drive at speeds above 45
MPH (72 km/h).
2) Avoid hard acceleration or decel- eration.
3) Avoid steep uphill grades.
4) If possible, reduce the amount of cargo being hauled or towed.
The malfunction indicator light may
stop blinking and remain on.
Have the vehicle inspected. It is re-
commended you visit a NISSAN dealer
for this service. You do not need to
have your vehicle towed to the dealer.
CAUTION
Continued vehicle operation without
having the emission control system
and/or CVT system checked and
repaired as necessary could lead to
poor driveability, reduced fuel econ-
omy, and possible damage to the
emission control system.
Instruments and controls2-17
Page 114 of 492

2-32Instruments and controls
9. Low fuel level warning
This warning appears when the fuel level
in the fuel tank is getting low. Refuel as
soon as it is convenient, preferably before
the fuel gauge reaches 0 (Empty). There
will be a small reserve of fuel in the tank
when the fuel gauge needle reaches 0
(Empty).
10. Low Washer Fluid warning (if so
equipped)
This warning appears when the window
washer fluid is at a low level. Add window
washer fluid as necessary. For additional
information, refer to “Window washer
fluid” (P.8-10).
11. Door/liftgate open warning
This warning appears if any of the doors
and/or the liftgate are open or not closed
securely. The vehicle icon indicates which
door or the liftgate is open on the display.
12. Rear seat belt warning
This rear seat belt warning appears after
the ignition switch is placed in the ON
position. If any of the rear passenger’s
seat belts is not fastened, the seat icon
illuminates in red to show which seat belt
is not fastened. The seat icon illuminates
in red until the corresponding rear pas-
senger’s seat belt is fastened. The warn-ing will automatically turn off after
approximately 35 seconds. When the
vehicle speed exceeds 10 MPH (15 km/h),
if a rear passenger’s seat belt is unfas-
tened, a buzzer will sound and the seat
icon illuminates in red. The seat icon
illuminates in red until the corresponding
rear passenger’s seat belt is fastened. The
warning will automatically turn off after
approximately 35 seconds. For precau-
tions on seat belt usage, see “Seat belts”
(P.1-12).
13. Key System Error: See Owner’s
Manual warning (if so equipped)
This warning appears if there is a mal-
function in the Intelligent Key system.
If this warning appears while the engine is
stopped, the engine cannot be started. If
this warning appears while the engine is
running, the vehicle can be driven. How-
ever, it is recommended that you visit a
NISSAN dealer for repair as soon as
possible.
14. Loose Fuel Cap warning
This warning appears when the fuel-filler
cap is not tightened correctly after the
vehicle has been refueled. For additional
information, refer to “Fuel-filler cap” (P.3-
28).
15. Tire Pressure Low — Add Air
warning
This warning appears when the low tire
pressure warning light in the meter
illuminates and low tire pressure is de-
tected. The warning appears each time
the ignition switch is placed in the ON
position as long as the low tire pressure
warning light remains illuminated. If this
warning appears, stop the vehicle and
adjust the pressure to the recommended
COLD tire pressure shown on the Tire and
Loading Information label. (See “Low tire
pressure warning light” (P.2-13) and “Tire
Pressure Monitoring System (TPMS)” (P.5-
5).)
16. Low Oil Pressure Stop Vehicle
warning
This warning appears if low engine oil
pressure is detected. If the warning ap-
pears during normal driving, pull off the
road in a safe area and stop the engine
immediately. It is recommended that you
call a NISSAN dealer.
The low oil pressure warning is not
designed to indicate a low oil level. Use
the dipstick to check the oil level. (See
“Engine oil” (P.8-6).)
Page 167 of 492

3 Pre-driving checks and adjustments
Keys ........................................................................\
................................. 3-2NISSAN Vehicle Immobilizer System key (if
so equipped) ........................................................................\
...... 3-2
Intelligent Key (if so equipped) ................................... 3-3
Doors ........................................................................\
.............................. 3-5 Locking with key .................................................................... 3-5
Locking with inside lock knob ..................................... 3-6
Locking with power door lock switch ................... 3-7
Automatic door locks ......................................................... 3-7
Child safety rear door lock ............................................. 3-7
Remote keyless entry system (if so equipped) ...... 3-8 How to use remote keyless entry system ......... 3-9
Intelligent Key system (if so equipped) .................... 3-11
Intelligent Key operating range .............................. 3-13
Door locks/unlocks precaution ............................... 3-13
Intelligent Key operation .............................................. 3-14
Battery saver system ....................................................... 3-16
Warning lights and audible reminders .............. 3-16
Troubleshooting guide ................................................... 3-17
How to use remote keyless entry function ...... 3-19
Remote engine start (if so equipped) ....................... 3-23 Remote engine start operating range ............... 3-23 Remote starting the engine .................................... 3-23
Extending engine run time ....................................... 3-24
Canceling a remote engine start ........................ 3-24
Conditions the remote engine start will
not work ........................................................................\
.......... 3-24
Hood ........................................................................\
............................ 3-25
Liftgate ........................................................................\
...................... 3-26 Liftgate release lever ..................................................... 3-27
Fuel-filler door ........................................................................\
..... 3-28 Opening the fuel-filler door ...................................... 3-28
Fuel-filler cap ....................................................................... 3-28
Tilt/telescopic steering ........................................................ 3-30 Tilt or telescopic operation ...................................... 3-31
Sun visors ........................................................................\
................ 3-31
Mirrors ........................................................................\
...................... 3-32 Inside mirror ........................................................................\
. 3-32
Outside mirrors .................................................................. 3-33
Vanity mirror ........................................................................\
3-34
Automatic Drive Positioner (if so equipped) ....... 3-34 Memory storage function .......................................... 3-35
Entry/Exit function .......................................................... 3-35
System operation ............................................................. 3-36
Page 194 of 492
3-28Pre-driving checks and adjustments
WARNING
.Fuel is extremely flammable and
highly explosive under certain
conditions. You could be burned
or seriously injured if it is misused
or mishandled. Always stop the
engine and do not smoke or allow
open flames or sparks near the
vehicle when refueling.
. Fuel may be under pressure. Turn
the cap a half of a turn, and wait
for any “hissing” sound to stop to
prevent fuel from spraying out
and possibly causing personal
injury. Then remove the cap.
. Use only an original equipment
type fuel-filler cap as a replace-
ment. It has a built-in safety valve
needed for proper operation of
the fuel system and emission
control system. An incorrect cap
can result in a serious malfunc-
tion and possible injury.
JVP0540X
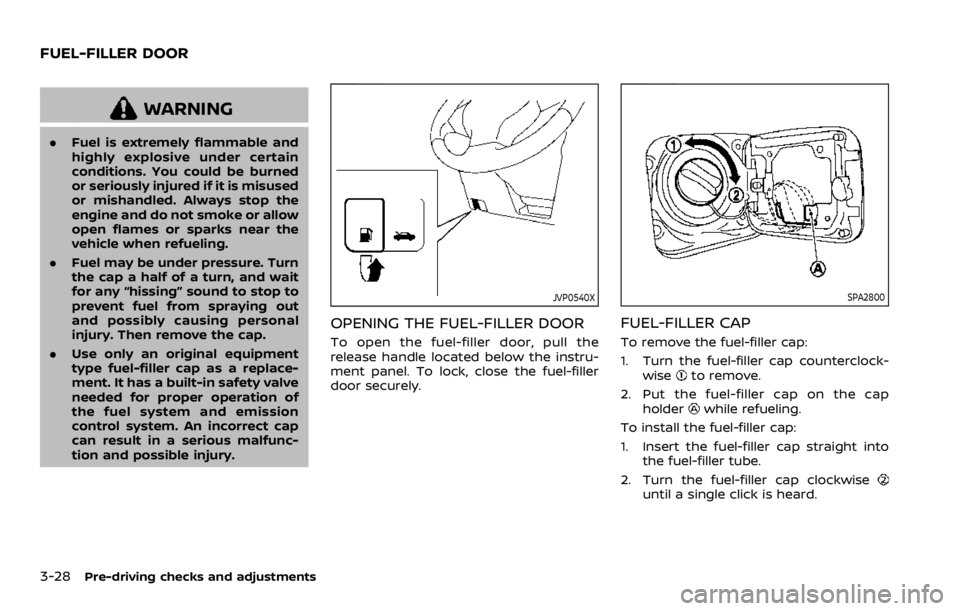
OPENING THE FUEL-FILLER DOOR
To open the fuel-filler door, pull the
release handle located below the instru-
ment panel. To lock, close the fuel-filler
door securely.
SPA2800
FUEL-FILLER CAP
To remove the fuel-filler cap:
1. Turn the fuel-filler cap counterclock-
wise
to remove.
2. Put the fuel-filler cap on the cap holder
while refueling.
To install the fuel-filler cap:
1. Insert the fuel-filler cap straight into the fuel-filler tube.
2. Turn the fuel-filler cap clockwise
until a single click is heard.
FUEL-FILLER DOOR
Page 195 of 492
WARNING
.Gasoline is extremely flammable
and highly explosive under cer-
tain conditions. You could be
burned or seriously injured if it is
misused or mishandled. Always
stop engine and do not smoke or
allow open flames or sparks near
the vehicle when refueling.
. Do not attempt to top off the fuel
tank after the fuel pump nozzle
shuts off automatically. Contin-
ued refueling may cause fuel
overflow, resulting in fuel spray
and possibly a fire.
. Use only an original equipment
type fuel-filler cap as a replace-
ment. It has a built-in safety valve
needed for proper operation of
the fuel system and emission
control system. An incorrect cap
can result in a serious malfunc-
tion and possible injury. It could
also cause the malfunction indi-
cator light to come on.
. Never pour fuel into the throttle
body to attempt to start your
vehicle. .
Do not fill a portable fuel contain-
er in the vehicle or trailer. Static
electricity can cause an explosion
of flammable liquid, vapor or gas
in any vehicle or trailer. To reduce
the risk of serious injury or death
when filling portable fuel contain-
ers:
— Always place the container on
the ground when filling.
— Do not use electronic devices when filling.
— Keep the pump nozzle in con- tact with the container while
you are filling it.
— Use only approved portable fuel containers for flammable
liquid.
CAUTION
. If fuel is spilled on the vehicle
body, flush it away with water to
avoid paint damage.
. Insert the cap straight into the
fuel-filler tube, then tighten until
the fuel-filler cap clicks. Failure to
tighten the fuel-filler cap properly
may cause the
malfunction indicator light (MIL) to illuminate.
If the
light illuminates be-
cause the fuel-filler cap is loose
or missing, tighten or install the
cap and continue to drive the
vehicle. The
light should turn
off after a few driving trips. If the
light does not turn off after a
few driving trips, have the vehicle
inspected. It is recommended you
visit a NISSAN dealer for this
service.
For additional information, see
“Malfunction Indicator Light
(MIL)” (P.2-17).
. The LOOSE FUEL CAP warning
message will be displayed if the
fuel-filler cap is not properly tigh-
tened. It may take a few driving
trips for the message to be dis-
played. Failure to tighten the fuel-
filler cap properly after the LOOSE
FUEL CAP warning message is
displayed may cause the
Malfunction Indicator Light (MIL)
to illuminate.
Pre-driving checks and adjustments3-29
Page 196 of 492
3-30Pre-driving checks and adjustments
JVP0503X
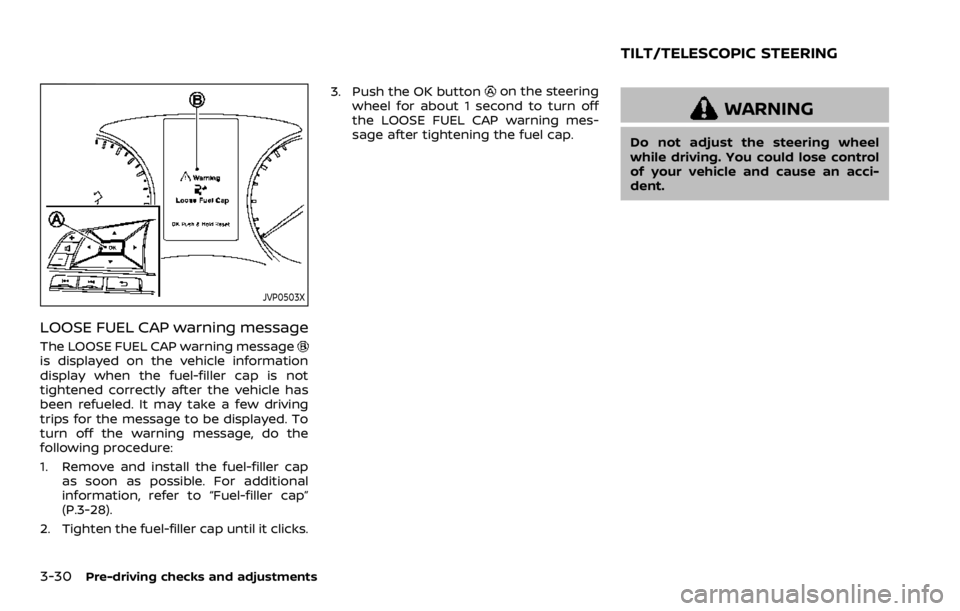
LOOSE FUEL CAP warning message
The LOOSE FUEL CAP warning messageis displayed on the vehicle information
display when the fuel-filler cap is not
tightened correctly after the vehicle has
been refueled. It may take a few driving
trips for the message to be displayed. To
turn off the warning message, do the
following procedure:
1. Remove and install the fuel-filler capas soon as possible. For additional
information, refer to “Fuel-filler cap”
(P.3-28).
2. Tighten the fuel-filler cap until it clicks. 3. Push the OK button
on the steering
wheel for about 1 second to turn off
the LOOSE FUEL CAP warning mes-
sage after tightening the fuel cap.
WARNING
Do not adjust the steering wheel
while driving. You could lose control
of your vehicle and cause an acci-
dent.
TILT/TELESCOPIC STEERING
Page 408 of 492
8-2Do-it-yourself
When performing any inspection or main-
tenance work on your vehicle, always
take care to prevent serious accidental
injury to yourself or damage to the
vehicle. The following are general precau-
tions which should be closely observed.
WARNING
.Park the vehicle on a level sur-
face, apply the parking brake
securely and block the wheels to
prevent the vehicle from moving.
Move the shift lever to the P
(Park) position (CVT model) or
the shift lever to the N (Neutral)
position (MT model).
. Be sure the ignition switch is in
the OFF or LOCK position when
performing any parts replace-
ment or repairs.
. If you must work with the engine
running, keep your hands, cloth-
ing, hair and tools away from
moving fans, belts and any other
moving parts.
. It is advisable to secure or re-
move any loose clothing and
remove any jewelry, such as
rings, watches, etc. before work-
ing on your vehicle. .
Always wear eye protection
whenever you work on your ve-
hicle.
. If you must run the engine in an
enclosed space such as a garage,
be sure there is proper ventilation
for exhaust gases to escape.
. Never get under the vehicle while
it is supported only by a jack. If it
is necessary to work under the
vehicle, support it with safety
stands.
. Because the fuel lines are under
high pressure even when the
engine is off, it is recommended
you visit a NISSAN dealer for
service of the fuel filter or fuel
lines.
. Do not work under the hood while
the engine is hot. Always turn off
the engine and wait until it cools
down.
. If you must work with the engine
running, keep your hands, cloth-
ing, hair and tools away from
moving fans, belts and any other
moving parts.
. Keep smoking materials, flame
and sparks away from fuel and
the battery. .
On gasoline engine models with
the Multiport Fuel Injection (MFI)
system, the fuel filter and fuel
lines should be serviced because
the fuel lines are under high
pressure even when the engine
is turned off. It is recommended
that you visit a NISSAN dealer for
this service.
. Your vehicle is equipped with an
automatic engine cooling fan. It
may come on at any time without
warning, even if the ignition
switch is in the OFF position and
the engine is not running. To
avoid injury, always disconnect
the negative battery cable before
working near the fan.
. Avoid direct contact with used
engine oil and coolant. Impro-
perly disposed engine oil, engine
coolant, and/or other vehicle
fluids can hurt the environment.
Always conform to local regula-
tions for disposal of vehicle fluids.
CAUTION
.Do not work under the hood while
the engine is hot. Turn the engine
MAINTENANCE PRECAUTIONS
Page 453 of 492

tion, see “Cleaning exterior” (P.7-2).
Windshield washer fluid*:Check that
there is adequate fluid in the reservoir.The following descriptions are provided
to give you a better understanding of the
scheduled maintenance items that
should be regularly checked or replaced.
The maintenance schedule indicates at
which mileage/time intervals each item
requires service.
In addition to scheduled maintenance,
your vehicle requires that some items be
checked during normal day-to-day op-
eration. Refer to “General maintenance”
(P.9-2).
Items marked with “*” are recommended
by NISSAN for reliable vehicle operation.
You are not required to perform main-
tenance on these items in order to
maintain the warranties which come with
your vehicle. Other maintenance items
and intervals are required.
When applicable, additional information
can be found in the “8. Do-it-yourself”
section of this manual.
NOTE:
NISSAN does not advocate the use of
non-OEM approved aftermarket flush-
ing systems and strongly advises
against performing these services on a
NISSAN product. Many of the aftermar-
ket flushing systems use non-OEM ap-
proved chemicals or solvents, the use of
which has not been validated by
NISSAN. For recommended fuel, lubricants,
fluids, grease, and refrigerant, refer to
“Capacities and recommended fluids/
lubricants” (P.10-2) of this manual.
EMISSION CONTROL SYSTEM MAIN-
TENANCE
Drive belt*:
Check engine drive belt for wear, fraying
or cracking and for proper tension. Re-
place any damaged drive belt.
Engine air filter:
Replace at specified intervals. When driv-
ing for prolonged periods in dusty condi-
tions, check/replace the filter more
frequently.
Engine coolant*:
Replace coolant at the specified interval.
When adding or replacing coolant, be
sure to use only Genuine NISSAN Long
Life Antifreeze/Coolant (blue) or equiva-
lent with the proper mixture. (Refer to
“Engine cooling system” (P.8-4) to deter-
mine the proper mixture for your area.)
NOTE:
Mixing any other type of coolant or the
use of non-distilled water may reduce
the recommended service interval of
the coolant.
Maintenance and schedules9-5
EXPLANATION OF SCHEDULED
MAINTENANCE ITEMS
Page 454 of 492

9-6Maintenance and schedules
Engine oil and oil filter:
Replace engine oil and oil filter at the
specified intervals. For recommended oil
grade and viscosity refer to “Capacities
and recommended fluids/lubricants”
(P.10-2).
Engine valve clearance*:
Inspect only if valve noise increases.
Adjust valve clearance if necessary.
Evaporative emissions control vapor
lines*:
Check vapor lines for leaks or looseness.
Tighten connections or replace parts as
necessary.
Fuel filter
Periodic maintenance is not required (in-
tank type filter).
Fuel lines*:
Check the fuel hoses, piping and connec-
tions for leaks, looseness, or deterioration.
Tighten connections or replace parts as
necessary.
Spark plugs:
Replace at specified intervals. Install new
plugs of the type as originally equipped.CHASSIS AND BODY MAINTENANCE
Brake lines and cables:
Visually inspect for proper installation.
Check for chafing, cracks, deterioration,
and signs of leaking. Replace any deterio-
rated or damaged parts immediately.
Brake pads and rotors:
Check for wear, deterioration and fluid
leaks. Replace any deteriorated or da-
maged parts immediately.
Exhaust system:
Visually inspect the exhaust pipes, muffler
and hangers for leaks, cracks, deteriora-
tion, and damage. Tighten connections or
replace parts as necessary.
In-cabin microfilter:
Replace at specified intervals. When driv-
ing for prolonged periods in dusty condi-
tions, replace the filter more frequently.
Propeller shaft(s):
Check for damage, looseness, and grease
leakage. (AWD)
Steering gear and linkage, axle and
suspension parts, drive shaft boots:
Check for damage, looseness, and leak-
age of oil or grease. Under severe driving
conditions, inspect more frequently.
Tire rotation:
Tires should be rotated every 7,500 miles(12,000 km) according to the instructions
under “Explanation of general mainte-
nance items” (P.9-2). When rotating tires,
check for damage and uneven wear.
Replace if necessary.
Transmission fluid/oil, differential oil
and transfer case oil:
Visually inspect for signs of leakage at
specified intervals.
If using a car-top carrier, or driving on
rough or muddy roads:
.
Replace the Manual Transmission
gear oil every 20,000 miles (32,000
km) or 24 months.
. Replace the CVT fluid every 60,000
miles (96,000 km) or request the deal-
er to inspect the fluid deterioration
data using a CONSULT. If the dete-
rioration data is more than 210,000,
replace the CVT fluid.
Page 463 of 492

10 Technical and consumer information
Capacities and
recommended fluids/lubricants .................................... 10-2Fuel information .................................................................. 10-3
Engine oil and oil filter recommendation ........ 10-5
Air conditioning system refrigerant and
lubricant recommendations ...................................... 10-6
Specifications ........................................................................\
........ 10-7 Engine ........................................................................\
.................. 10-7
Wheels and tires .................................................................. 10-7
Dimensions and weights .............................................. 10-8
When traveling or registering in
another country ........................................................................\
. 10-8
Vehicle identification .............................................................. 10-8 Vehicle Identification Number (VIN) plate ....... 10-8
Vehicle identification number
(chassis number) ................................................................. 10-9
Engine serial number ....................................................... 10-9
F.M.V.S.S./C.M.V.S.S. certification label ................. 10-9
Emission control information label .................. 10-10
Tire and Loading Information label ................. 10-10
Air conditioner specification label ..................... 10-10
Installing front license plate ......................................... 10-11
Vehicle loading information .......................................... 10-11
Terms ........................................................................\
................ 10-11 Vehicle load capacity ................................................ 10-12
Securing the load ......................................................... 10-13
Loading tips ...................................................................... 10-13
Measurement of weights ....................................... 10-14
Towing a trailer ...................................................................... 10-14
Flat towing ........................................................................\
......... 10-15
Flat towing for All–Wheel Drive vehicle
(if so equipped) ............................................................... 10-15
Flat towing for Front-Wheel Drive vehicle
(if so equipped) ............................................................... 10-15
Uniform tire quality grading ........................................ 10-16 Treadwear ........................................................................\
.. 10-16
Traction AA, A, B and C ........................................... 10-16
Temperature A, B and C ......................................... 10-16
Emission control system warranty ......................... 10-17
Reporting safety defects ................................................ 10-17
Readiness for Inspection/Maintenance
(I/M) test ........................................................................\
............... 10-18
Event Data Recorders (EDR) ......................................... 10-19 Additional data recording (on vehicles
equipped with optional ProPILOT
assist) ........................................................................\
............. 10-19
Owner’s manual/service manual
order information ................................................................. 10-20