navigation system NISSAN ROGUE SPORT 2020 Owners Manual
[x] Cancel search | Manufacturer: NISSAN, Model Year: 2020, Model line: ROGUE SPORT, Model: NISSAN ROGUE SPORT 2020Pages: 492, PDF Size: 2.02 MB
Page 3 of 492
safety features to all occupants
of the vehicle.
. ALWAYS review this Owner’s Man-
ual for important safety informa-
tion.
On-pavement and off-road
driving
This vehicle will handle and maneuver
differently from an ordinary passenger
car because it has a higher center of
gravity. As with other vehicles with
features of this type, failure to operate
this vehicle correctly may result in loss
of control or an accident. Be sure to
read “Avoiding collision and rollover”
and “Driving safety precautions” in the
“5. Starting and driving” section of this
manual.
MODIFICATION OF YOUR VEHI-
CLE
This vehicle should not be modified.
Modification could affect its perfor-
mance, safety or durability, and may
even violate governmental regula-
tions. In addition, damage or perfor-
mance problems resulting from
modification may not be covered un-
der NISSAN warranties.
WARNING
Installing an aftermarket On-Board
Diagnostic (OBD) plug-in device that
uses the port during normal driving,
for example remote insurance com-
pany monitoring, remote vehicle di-
agnostics, telematics or engine
reprogramming, may cause interfer-
ence or damage to vehicle systems.
We do not recommend or endorse
the use of any aftermarket OBD
plug-in devices, unless specifically
approved by NISSAN. The vehicle
warranty may not cover damage
caused by any aftermarket plug-in
device.
WHEN READING THE MANUAL
This manual includes information for all
features and equipment available on
this model. Features and equipment in
your vehicle may vary depending on
model, trim level, options selected, or-
der, date of production, region or avail-
ability. Therefore, you may find
information about features or equip-
ment that are not included or installed
on your vehicle.
All information, specifications and illustra-
tions in this manual are those in effect at
the time of printing. NISSAN reserves the
right to change specifications, perfor-
mance, design or component suppliers
without notice and without obligation.
From time to time, NISSAN may update
or revise this manual to provide Owners
with the most accurate information cur-
rently available. Please carefully read and
retain with this manual all revision up-
dates sent to you by NISSAN to ensure
you have access to accurate and up-to-
date information regarding your vehicle.
Current versions of vehicle Owner’s Man-
uals and any updates can also be found in
the Owner section of the NISSAN website
at https://owners.nissanusa.com/now-
ners/navigation/manualsGuide. If you
have questions concerning any informa-
tion in your Owner’s Manual, contact
Page 15 of 492

WAA0119X
1. Side ventilator (P.4-25)
2. Meters and gauges (P.2-5)/Clock (P.2-42)
3. Center ventilator (P.4-25)
4. Audio system** or navigation system**— RearView Monitor* (P.4-2)
— Intelligent Around View® Monitor*
(P.4-10) — Bluetooth® Hands-Free Phone Sys-
tem**
5. Front passenger supplemental air bag (P.1-42)
6. Fuse box cover (P.8-20)
7. Fuel-filler door release handle (P.3-28)
8. Hood release handle (P.3-25) 9. Steering wheel lock lever (P.3-30)
10. Driver’s front-impact air bag (P.1-42)/Horn
(P.2-59)
11. Driver supplemental knee air bag (P.1-42)
12. Heater/air conditioner control (P.4-26)
13. Auxiliary input jack** and USB connection port**
14. Power outlet (P.2-65)
15. Defroster switch (P.2-52)
16. Passenger supplemental knee air bag (P.1-42)
17. Glove box (P.2-68)
*: if so equipped
**: See the separate NissanConnect® Own- er’s Manual (if so equipped).
Illustrated table of contents0-7
INSTRUMENT PANEL
Page 86 of 492

2-4Instruments and controls
WAA0119X
1. Side ventilator
2. Meters and gauges/Clock
3. Center ventilator
4. Audio system** or navigation system**— RearView Monitor*
— Intelligent Around View® Monitor*
— Bluetooth® Hands-Free Phone Sys- tem**
5. Front passenger supplemental air bag
6. Fuse box cover
7. Fuel-filler door release handle
8. Hood release handle
9. Steering wheel lock lever
10. Driver’s front-impact air bag /Horn 11. Driver supplemental knee air bag
12. Heater/air conditioner control
13. Auxiliary input jack** and USB connection
port**
14. Power outlet
15. Defroster switch
16. Passenger supplemental knee air bag
17. Glove box
*: if so equipped
**: See the separate NissanConnect® Own- er’s Manual (if so equipped).
INSTRUMENT PANEL
Page 101 of 492

“Intelligent Key system” (P.3-11).
Brake pad wear warning
The disc brake pads have audible wear
warnings. When a brake pad requires
replacement, it will make a high pitched
scraping sound when the vehicle is in
motion. This scraping sound will first
occur only when the brake pedal is
depressed. After more wear of the brake
pad, the sound will always be heard even
if the brake pedal is not depressed. Have
the brakes checked as soon as possible if
the warning sound is heard.
Parking brake reminder chime
The parking brake reminder chime will
sound if the vehicle is driven at more than
4 MPH (7 km/h) (models not equipped
with electronic parking brake) or 2 MPH (4
km/h) (models equipped with electronic
parking brake) with the parking brake
applied. Stop the vehicle and release the
parking brake.
JVI0641X
The vehicle information displayis
located between the tachometer and
the speedometer, and it displays the
warnings and information. The following
items are also displayed if the vehicle is
equipped with them:
. Vehicle settings
. Trip computer information
. Driver Assistance
. Cruise control system information
. ProPILOT Assist
. Intelligent Key operation information
. Audio information
. Navigation - turn by turn .
Indicators and warnings
. Tire pressure information
. Chassis Control
. Other information
Instruments and controls2-19
VEHICLE INFORMATION DISPLAY
Page 102 of 492

2-20Instruments and controls
JVI1566X
HOW TO USE THE VEHICLE INFOR-
MATION DISPLAY
The vehicle information display can be
changed using the buttons OK,,, andlocated on the
steering wheel.
OK - change or select an item in the
vehicle information display
- navigate through the items in vehi-
cle information display
- go back to the previous menu- change from one display screen
to the next (i.e. trip, Fuel economy)
STARTUP DISPLAY
When the ignition switch is placed in the
ON position, the vehicle information dis-
play may display the following screens if
the vehicle is equipped with them:
. Home
. Drive Computer — Average Speed-Trip
(Distance & Time)-Fuel Economy
. Compass or Navigation
. Audio
. ProPILOT Assist
. Driving Aids
. Tire Pressures
. 4x4–i
. Chassis Control
. Warnings
. Settings
Warnings will only display if there are any
present. For more information on warn-
ings and indicators, see “Vehicle informa-
tion display warnings and indicators” (P.2-
31).
To control what items display in the
vehicle information display, see “Settings”
(P.2-20).
SETTINGS
The setting mode allows you to change
the information displayed in the vehicle
information display:
. Driver Assistance
. Clock
. Meter Settings
. Vehicle Settings
. Maintenance
. Alarm (if so equipped)
. Tire Pressures
. Unit
. Language
. Factory Reset
Driver Assistance
To change the status, warnings or turn on
or off any of the systems/warnings dis-
played in the “Driver Assistance” menu,
use the
buttonsto select and the
OKto change a menu item:
. Driving Aids
. Parking Aids (if so equipped)
. Chassis Control (if so equipped)
. Driver Attention (if so equipped)
. Speed Limit Sign (if so equipped)
Driving Aids:
To change the status, warnings or turn on
or off any of the systems/warnings dis-
Page 123 of 492

4-5. Fuel economy/ECO pedal
guide
Current fuel consumption:
The current fuel consumption mode
shows the current fuel consumption.
Average fuel consumption:
The average fuel consumption 1 mode
shows the average fuel consumption
since the last reset. The average fuel
consumption 2 mode shows the average
fuel consumption since the time the
ignition switch was placed in the ON
position. The average fuel consumption
2 is automatically reset each time the
ignition is placed in the OFF position.
Resetting is done by pushing the OK
button. When the OKbutton is pushed,
the following menu items are displayed.
. Cancel
— Return to the previous screen with-
out resetting.
. Fuel Economy
— Reset the fuel economy.
. All
— Reset all items of “Average Speed”,
“Elapsed time and trip odometer”
and “Fuel economy”.
Once the “Fuel economy 1” is displayed,
you can use
buttons to switch
between the “Fuel economy 1” and “Fuel economy 2”.
The display is updated every 30 seconds.
For about the first 1/3 mile (500 m) after a
reset, the display shows “——”.
6. Audio
The audio mode shows the status of
audio information.
7. Navigation (if so equipped)
When the route guidance is set in the
navigation system, this item shows the
navigation route information.
8. Compass (if so equipped)
This display indicates the heading direc-
tion of the vehicle.
9. Intelligent 4x4 torque distribution
display (if so equipped)
When the Intelligent 4x4 torque distribu-
tion display is selected, you can view the
distribution ratio of the transmission
torque to the front and rear wheels
during driving.
10. Chassis control
When Intelligent Trace Control, Intelligent
Engine Brake (Continuously Variable
Transmission (CVT) models) or Active Ride
Control system is operated, it shows the
operating condition. It also shows oper-
ating condition of Hill Start Assist. The
operating condition of the automatic
brake hold function (if so equipped) is
also shown. See “Intelligent Trace Control”
(P.5-131), “Intelligent Engine Brake (Con-
tinuously Variable Transmission (CVT)
models)” (P.5-132), “Active Ride Control”
(P.5-133), “Hill Start Assist system” (P.5-
134) or “Automatic brake hold” (P.5-29) for
more details.
11. Tire Pressures
The tire pressure mode shows the pres-
sure of all four tires while the vehicle is
driven.
When the Tire Pressure Low — Add Air
warning appears, the display can be
switched to the tire pressure mode by
pushing the OK
button to reveal addi-
tional details on the displayed warning.
Instruments and controls2-41
Page 126 of 492
2-44Instruments and controls
Turning the Intelligent Driver Alert-
ness system on and off
To activate or deactivate this function,
see “Settings” (P.2-20).
NOTE:
The setting will be retained even if the
engine is restarted.
System Malfunction
If the Intelligent Driver Alertness system
malfunctions, the system warning mes-
sage will appear in the vehicle informa-
tion display and the function will be
stopped automatically.
Action to take:
Stop the vehicle in a safe location, and
then turn off and restart the engine. If the
system warning message continues to
appear, have the system checked by a
NISSAN dealer.
WAC0198X
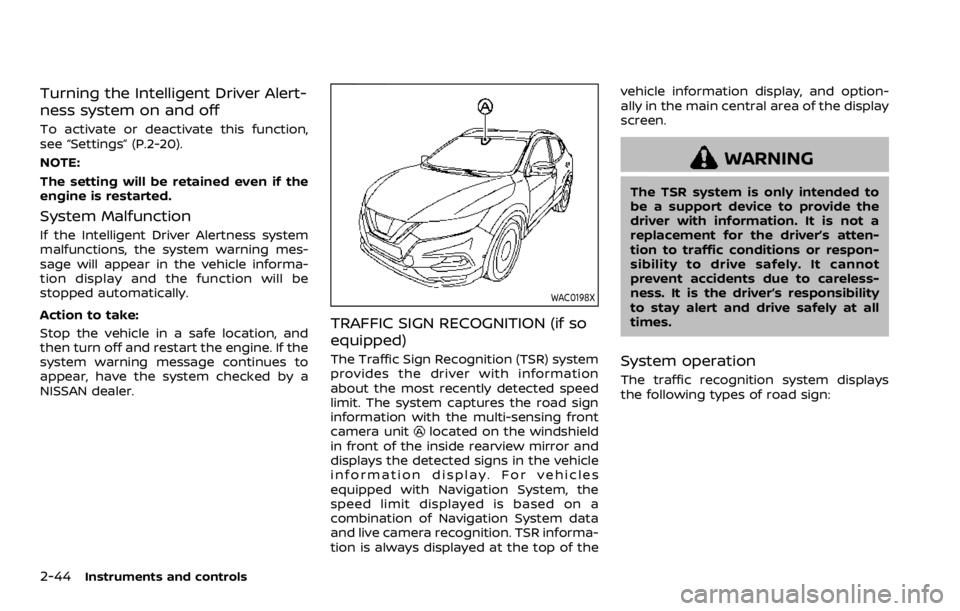
TRAFFIC SIGN RECOGNITION (if so
equipped)
The Traffic Sign Recognition (TSR) system
provides the driver with information
about the most recently detected speed
limit. The system captures the road sign
information with the multi-sensing front
camera unit
located on the windshield
in front of the inside rearview mirror and
displays the detected signs in the vehicle
information display. For vehicles
equipped with Navigation System, the
speed limit displayed is based on a
combination of Navigation System data
and live camera recognition. TSR informa-
tion is always displayed at the top of the vehicle information display, and option-
ally in the main central area of the display
screen.
WARNING
The TSR system is only intended to
be a support device to provide the
driver with information. It is not a
replacement for the driver’s atten-
tion to traffic conditions or respon-
sibility to drive safely. It cannot
prevent accidents due to careless-
ness. It is the driver’s responsibility
to stay alert and drive safely at all
times.
System operation
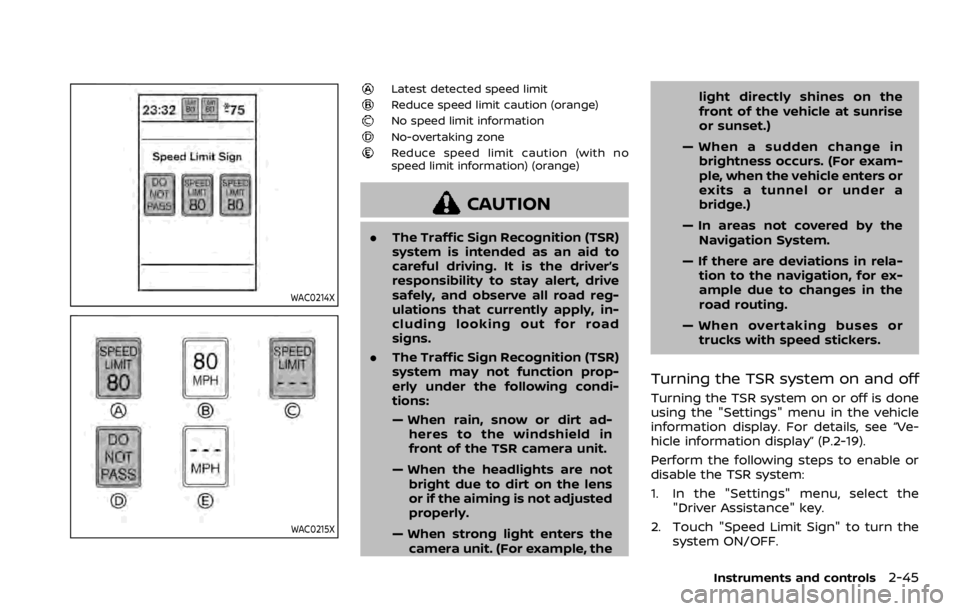
The traffic recognition system displays
the following types of road sign:
Page 127 of 492
WAC0214X
WAC0215X
Latest detected speed limitReduce speed limit caution (orange)No speed limit informationNo-overtaking zoneReduce speed limit caution (with no
speed limit information) (orange)
CAUTION
.The Traffic Sign Recognition (TSR)
system is intended as an aid to
careful driving. It is the driver’s
responsibility to stay alert, drive
safely, and observe all road reg-
ulations that currently apply, in-
cluding looking out for road
signs.
. The Traffic Sign Recognition (TSR)
system may not function prop-
erly under the following condi-
tions:
— When rain, snow or dirt ad-
heres to the windshield in
front of the TSR camera unit.
— When the headlights are not bright due to dirt on the lens
or if the aiming is not adjusted
properly.
— When strong light enters the camera unit. (For example, the light directly shines on the
front of the vehicle at sunrise
or sunset.)
— When a sudden change in brightness occurs. (For exam-
ple, when the vehicle enters or
exits a tunnel or under a
bridge.)
— In areas not covered by the Navigation System.
— If there are deviations in rela- tion to the navigation, for ex-
ample due to changes in the
road routing.
— When overtaking buses or trucks with speed stickers.
Turning the TSR system on and off
Turning the TSR system on or off is done
using the "Settings" menu in the vehicle
information display. For details, see “Ve-
hicle information display” (P.2-19).
Perform the following steps to enable or
disable the TSR system:
1. In the "Settings" menu, select the "Driver Assistance" key.
2. Touch "Speed Limit Sign" to turn the system ON/OFF.
Instruments and controls2-45
Page 174 of 492
3-8Pre-driving checks and adjustments
It is possible to lock/unlock all doors
(including the liftgate), and activate the
panic alarm by using the key fob from
outside the vehicle.
Before locking the doors, make sure the
key is not left in the vehicle.
The key fob can operate at a distance of
approximately 33 ft (10 m) from the
vehicle. (The effective distance depends
upon the conditions around the vehicle.)
As many as 4 key fobs can be used with
one vehicle. For information concerning
the purchase and use of additional key
fobs, contact a NISSAN dealer.
The key fob will not function:
.When the key fob is not within the
operational range.
. When the doors are open or not
closed securely.
. When the key is in the ignition switch.
. When the battery is discharged.
WARNING
The remote keyless entry key fob
transmits radio waves when the
buttons are pushed. The FAA advises
that the radio waves may affect
aircraft navigation and communica-
tion systems. Do not operate the key fob while on an airplane. Make sure
the buttons are not operated unin-
tentionally when the unit is stored
during a flight.
CAUTION
The following conditions or occur-
rences will damage the key fob.
.
Do not allow the key fob to
become wet.
. Do not drop the key fob.
. Do not strike the key fob sharply
against another object.
. If the outside temperature is be-
low 14°F (-10°C) degrees, the bat-
tery of key fob may not function
properly.
. Do not place the key fob for an
extended period in an area where
temperatures exceed 140°F
(60°C).
If a key fob is lost or stolen, NISSAN
recommends erasing the ID code of
that key fob. This will prevent the key
fob from unauthorized use to unlock
the vehicle. For information regard-
ing the erasing procedure, it is re-
commended that you visit a NISSAN dealer.
For information regarding the replace-
ment of a battery, see “Key fob battery
replacement” (P.8-21).
REMOTE KEYLESS ENTRY SYSTEM
(if so equipped)
Page 177 of 492
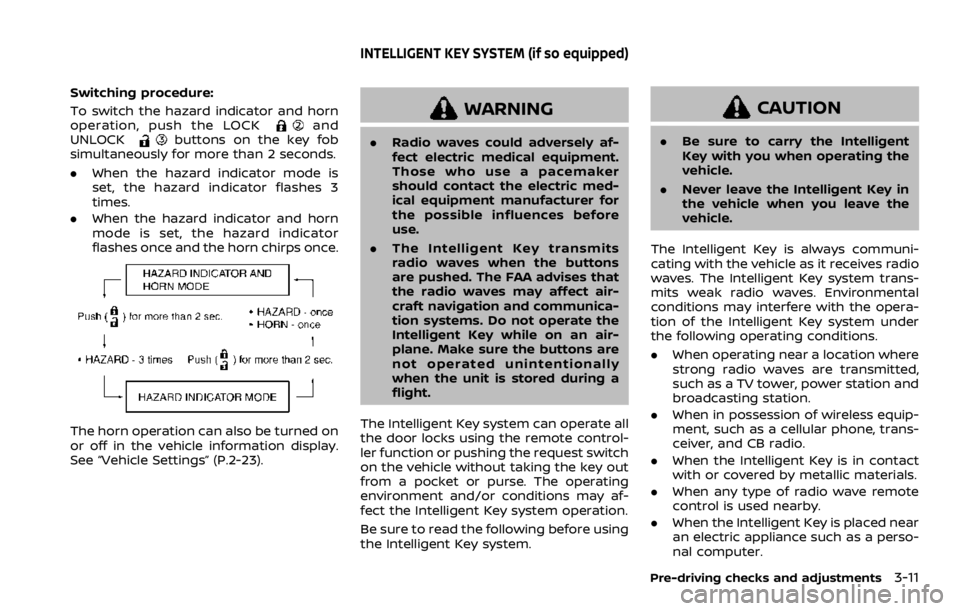
Switching procedure:
To switch the hazard indicator and horn
operation, push the LOCK
and
UNLOCKbuttons on the key fob
simultaneously for more than 2 seconds.
. When the hazard indicator mode is
set, the hazard indicator flashes 3
times.
. When the hazard indicator and horn
mode is set, the hazard indicator
flashes once and the horn chirps once.
The horn operation can also be turned on
or off in the vehicle information display.
See “Vehicle Settings” (P.2-23).
WARNING
.Radio waves could adversely af-
fect electric medical equipment.
Those who use a pacemaker
should contact the electric med-
ical equipment manufacturer for
the possible influences before
use.
. The Intelligent Key transmits
radio waves when the buttons
are pushed. The FAA advises that
the radio waves may affect air-
craft navigation and communica-
tion systems. Do not operate the
Intelligent Key while on an air-
plane. Make sure the buttons are
not operated unintentionally
when the unit is stored during a
flight.
The Intelligent Key system can operate all
the door locks using the remote control-
ler function or pushing the request switch
on the vehicle without taking the key out
from a pocket or purse. The operating
environment and/or conditions may af-
fect the Intelligent Key system operation.
Be sure to read the following before using
the Intelligent Key system.
CAUTION
. Be sure to carry the Intelligent
Key with you when operating the
vehicle.
. Never leave the Intelligent Key in
the vehicle when you leave the
vehicle.
The Intelligent Key is always communi-
cating with the vehicle as it receives radio
waves. The Intelligent Key system trans-
mits weak radio waves. Environmental
conditions may interfere with the opera-
tion of the Intelligent Key system under
the following operating conditions.
. When operating near a location where
strong radio waves are transmitted,
such as a TV tower, power station and
broadcasting station.
. When in possession of wireless equip-
ment, such as a cellular phone, trans-
ceiver, and CB radio.
. When the Intelligent Key is in contact
with or covered by metallic materials.
. When any type of radio wave remote
control is used nearby.
. When the Intelligent Key is placed near
an electric appliance such as a perso-
nal computer.
Pre-driving checks and adjustments3-11
INTELLIGENT KEY SYSTEM (if so equipped)