NISSAN ROGUE SPORT 2021 Owners Manual
Manufacturer: NISSAN, Model Year: 2021, Model line: ROGUE SPORT, Model: NISSAN ROGUE SPORT 2021Pages: 516, PDF Size: 2.43 MB
Page 421 of 516
.Prolonged and repeated contact
with used engine oil may cause
skin cancer.
. Avoid direct skin contact with
used oil. If contacted, wash thor-
oughly with soap or hand cleaner
and plenty of water as soon as
possible.
. Store used engine oil in marked
containers out of the reach of
children.
Vehicle set-up
1. Park the vehicle on a level surface and
apply the parking brake.
2. Run the engine until it reaches the operating temperature.
3. Turn the engine off and wait more than 10 minutes.
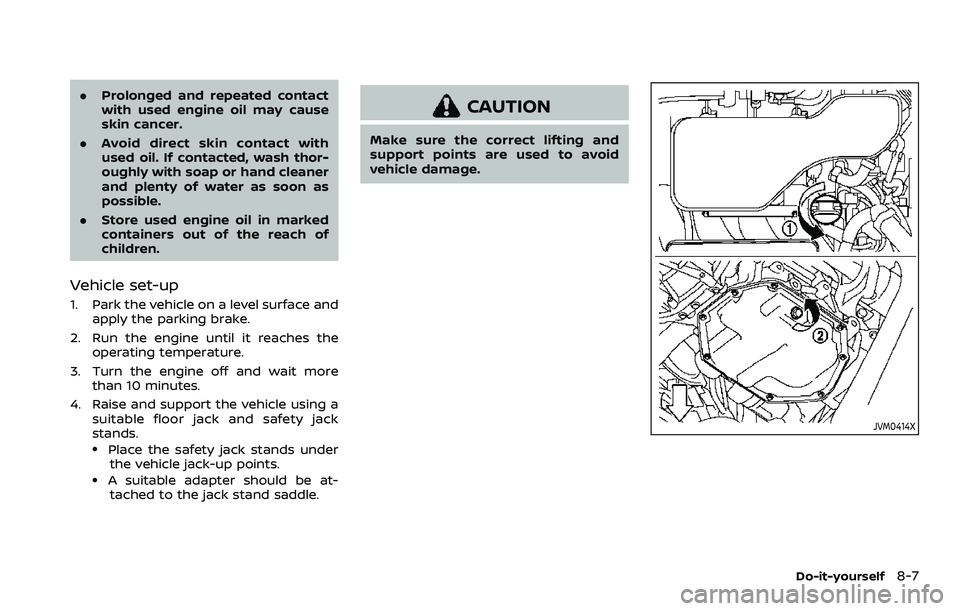
4. Raise and support the vehicle using a suitable floor jack and safety jack
stands.
.Place the safety jack stands underthe vehicle jack-up points.
.A suitable adapter should be at-tached to the jack stand saddle.
CAUTION
Make sure the correct lifting and
support points are used to avoid
vehicle damage.
JVM0414X
Do-it-yourself8-7
Page 422 of 516

8-8Do-it-yourself
JVM0421X
1. Oil filler cap
2. Oil drain plug
3. Oil filter
Engine oil and filter
1. Place a large drain pan under thedrain plug.
2. Remove the oil filler cap.
3. Remove the drain plug with a wrench and completely drain the oil.
CAUTION
Be careful not to burn yourself, as
the engine oil is hot.
.Waste oil must be disposed ofproperly.
.Check your local regulations.
(Perform steps 4 to 7 only when the
engine oil filter change is needed.)
4. Loosen the oil filter with an oil filter wrench. Remove the oil filter by turn-
ing it by hand.
5. Wipe the engine oil filter mounting surface with a clean rag.
CAUTION
Be sure to remove any old gasket
material remaining on the mounting
surface of the engine. Failure to do
so could lead to engine damage.
6. Coat the gasket on the new filter with clean engine oil.
7. Screw in the oil filter clockwise until a slight resistance is felt, then tighten
additionally more than 2/3 turn.
Oil filter tightening torque:11 to 15 ft-lb
(14.7 to 20.5 N·m)
8. Clean and re-install the drain plug with a new washer. Securely tighten
the drain plug with a wrench. Drain plug tightening torque:
22 to 29 ft-lb
(29 to 39 N·m)
Do not use excessive force.
9. Refill the engine with the recom- mended oil through the oil filler open-
ing, and install the oil filler cap
securely.
See “Capacities and recommended
fluids/lubricants” (P.10-2) for drain
and refill capacity. The drain and refill
capacity depends on the oil tempera-
ture and drain time. Use these speci-
fications for reference only. Always
use the dipstick to determine the
proper amount of oil in the engine.
10. Start the engine and check for leak- age around the drain plug and the oil
filter. Correct as required.
11. Turn the engine off and wait more than 10 minutes. Check the oil level
with the dipstick. Add engine oil if
necessary.
After the operation
1. Lower the vehicle carefully to the
ground.
2. Dispose of waste oil and filter properly.
Page 423 of 516
WARNING
.Prolonged and repeated contact
with used engine oil may cause
skin cancer.
. Try to avoid direct skin contact
with used oil. If skin contact is
made, wash thoroughly with soap
or hand cleaner as soon as pos-
sible.
. Keep used engine oil out of reach
of children. When checking or replacement is re-
quired, we recommend a NISSAN dealer
for servicing.
CAUTION
.
NISSAN recommends using Gen-
uine NISSAN CVT Fluid NS-3 (or
equivalent) ONLY in NISSAN CVTs.
Do not mix with other fluids.
. Do not use Automatic transmis-
sion fluid (ATF) or Manual Trans-
mission fluid in a NISSAN CVT, as
it may damage the CVT. Damage
caused by the use of fluids other
than as recommended is not
covered by the NISSAN’s New
Vehicle Limited Warranty.
. Using fluids that are not equiva-
lent to Genuine NISSAN CVT Fluid
NS-3 may also damage the CVT.
Damage caused by the use of
fluids other than as recom-
mended is not covered by the
NISSAN’s New Vehicle Limited
Warranty. For additional brake and clutch fluid
information, see “Capacities and recom-
mended fluids/lubricants” (P.10-2) of this
manual.
WARNING
.
Use only new fluid from a sealed
container. Old, inferior or con-
taminated fluid may damage the
brake and clutch systems. The
use of improper fluids can da-
mage the brake and clutch sys-
tems, and affect the vehicle’s
stopping ability.
. Clean the filler cap before remov-
ing.
. Brake and clutch fluid is poiso-
nous and should be stored care-
fully in marked containers out of
the reach of children.
CAUTION
Do not spill the fluid on any painted
surfaces. This will damage the paint.
If fluid is spilled, immediately wash
the surface with water.
Do-it-yourself8-9
CONTINUOUSLY VARIABLE
TRANSMISSION (CVT) FLUIDBRAKE AND CLUTCH (if so equipped) FLUID
Page 424 of 516
8-10Do-it-yourself
JVM0789X
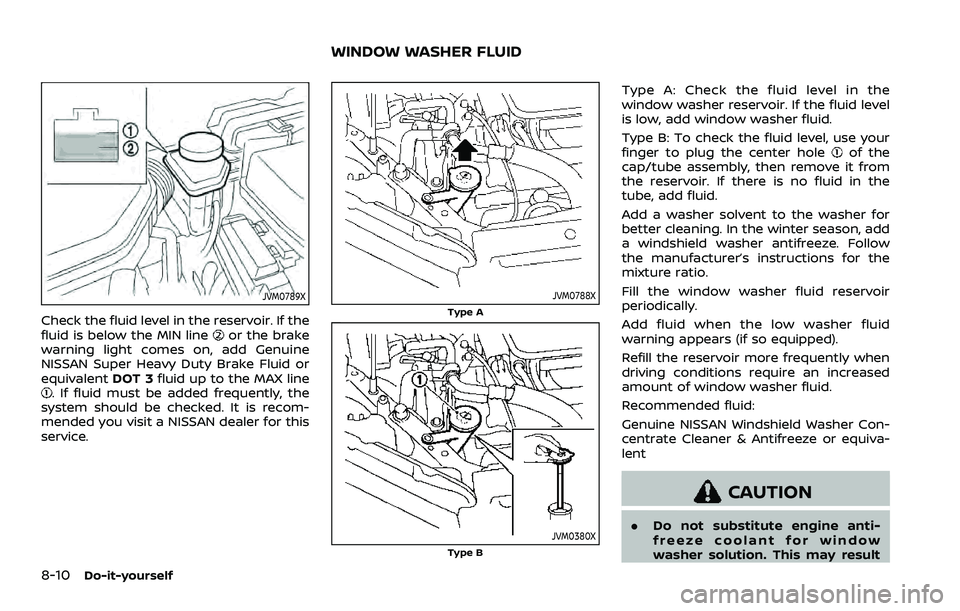
Check the fluid level in the reservoir. If the
fluid is below the MIN lineor the brake
warning light comes on, add Genuine
NISSAN Super Heavy Duty Brake Fluid or
equivalent DOT 3fluid up to the MAX line
. If fluid must be added frequently, the
system should be checked. It is recom-
mended you visit a NISSAN dealer for this
service.
JVM0788X
Type A
JVM0380XType B
Type A: Check the fluid level in the
window washer reservoir. If the fluid level
is low, add window washer fluid.
Type B: To check the fluid level, use your
finger to plug the center hole
of the
cap/tube assembly, then remove it from
the reservoir. If there is no fluid in the
tube, add fluid.
Add a washer solvent to the washer for
better cleaning. In the winter season, add
a windshield washer antifreeze. Follow
the manufacturer’s instructions for the
mixture ratio.
Fill the window washer fluid reservoir
periodically.
Add fluid when the low washer fluid
warning appears (if so equipped).
Refill the reservoir more frequently when
driving conditions require an increased
amount of window washer fluid.
Recommended fluid:
Genuine NISSAN Windshield Washer Con-
centrate Cleaner & Antifreeze or equiva-
lent
CAUTION
. Do not substitute engine anti-
freeze coolant for window
washer solution. This may result
WINDOW WASHER FLUID
Page 425 of 516
in damage to the paint.
. Do not fill the window washer
reservoir tank with washer fluid
concentrates at full strength.
Some methyl alcohol based
washer fluid concentrates may
permanently stain the grille if
spilled while filling the window
washer reservoir tank.
. Pre-mix washer fluid concen-
trates with water to the manu-
facturer’s recommended levels
before pouring the fluid into the
window washer reservoir tank. Do
not use the window washer re-
servoir tank to mix the washer
fluid concentrate and water..Keep the battery surface clean and
dry. Clean the battery with a solution
of baking soda and water.
. Make certain the terminal connec-
tions are clean and securely tightened.
. If the vehicle is not to be used for 30
days or longer, disconnect the nega-
tive 7battery terminal cable to pre-
vent discharging it.
NOTE:
Care should be taken to avoid situations
that can lead to potential battery dis-
charge and potential no-start condi-
tions such as:
1. Installation or extended use of elec-
tronic accessories that consume
battery power when the engine is
not running (Phone chargers, GPS,
DVD players, etc.)
2. Vehicle is not driven regularly and/
or only driven short distances.
In these cases, the battery may need to
be charged to maintain battery health.
WARNING
. Do not expose the battery to
flames or electrical sparks. Hy-
drogen gas generated by the
battery is explosive. Do not allow
battery fluid to contact your skin, eyes, fabrics or painted surfaces.
After touching a battery or bat-
tery cap, do not touch or rub your
eyes. Thoroughly wash your
hands. If the acid contacts your
eyes, skin or clothing, immedi-
ately flush with water for at least
15 minutes and seek medical
attention.
. Do not operate the vehicle if the
fluid in the battery is low. Low
battery fluid can cause a higher
load on the battery which can
generate heat, reduce battery life,
and in some cases lead to an
explosion.
. When working on or near a bat-
tery, always wear suitable eye
protection and remove all jew-
elry.
. Battery posts, terminals and re-
lated accessories contain lead
and lead compounds. Wash
hands after handling.
. Keep the battery out of the reach
of children.
Do-it-yourself8-11
BATTERY
Page 426 of 516
8-12Do-it-yourself
DI0137MA
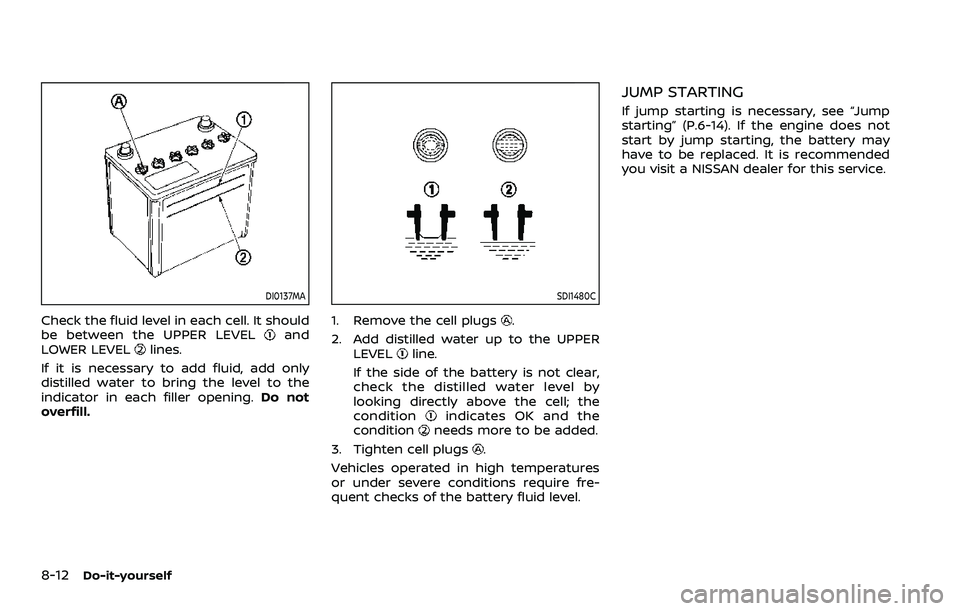
Check the fluid level in each cell. It should
be between the UPPER LEVELand
LOWER LEVELlines.
If it is necessary to add fluid, add only
distilled water to bring the level to the
indicator in each filler opening. Do not
overfill.
SDI1480C
1. Remove the cell plugs.
2. Add distilled water up to the UPPER LEVEL
line.
If the side of the battery is not clear,
check the distilled water level by
looking directly above the cell; the
condition
indicates OK and the
conditionneeds more to be added.
3. Tighten cell plugs
.
Vehicles operated in high temperatures
or under severe conditions require fre-
quent checks of the battery fluid level.
JUMP STARTING
If jump starting is necessary, see “Jump
starting” (P.6-14). If the engine does not
start by jump starting, the battery may
have to be replaced. It is recommended
you visit a NISSAN dealer for this service.
Page 427 of 516

CAUTION
.Do not ground accessories di-
rectly to the battery terminal.
Doing so will bypass the variable
voltage control system and the
vehicle battery may not charge
completely.
. Use electrical accessories with
the engine running to avoid dis-
charging the vehicle battery.
The variable voltage control system mea-
sures the amount of electrical discharge
from the battery and controls voltage
generated by the generator.
SDI1881
1. Alternator
2. Drive belt auto-tensioner
3. Crankshaft pulley
4. Air conditioner compressor
5. Water pump
WARNING
Be sure the ignition switch is in the
OFF or LOCK position before servi-
cing drive belts. The engine could
rotate unexpectedly.
1. Visually inspect the belt for signs of unusual wear, cuts, fraying or loosen-
ess. If the belt is in poor condition or loose, have it replaced or adjusted. It is
recommended you visit a NISSAN
dealer for this service.
2. Have the belt condition checked reg- ularly.
Do-it-yourself8-13
VARIABLE VOLTAGE CONTROL SYSTEMDRIVE BELT
Page 428 of 516
8-14Do-it-yourself
WARNING
Be sure the engine and ignition
switch are off and that the parking
brake is applied.
CAUTION
Be sure to use the correct socket to
remove the spark plugs. An incorrect
socket can damage the spark plugs.
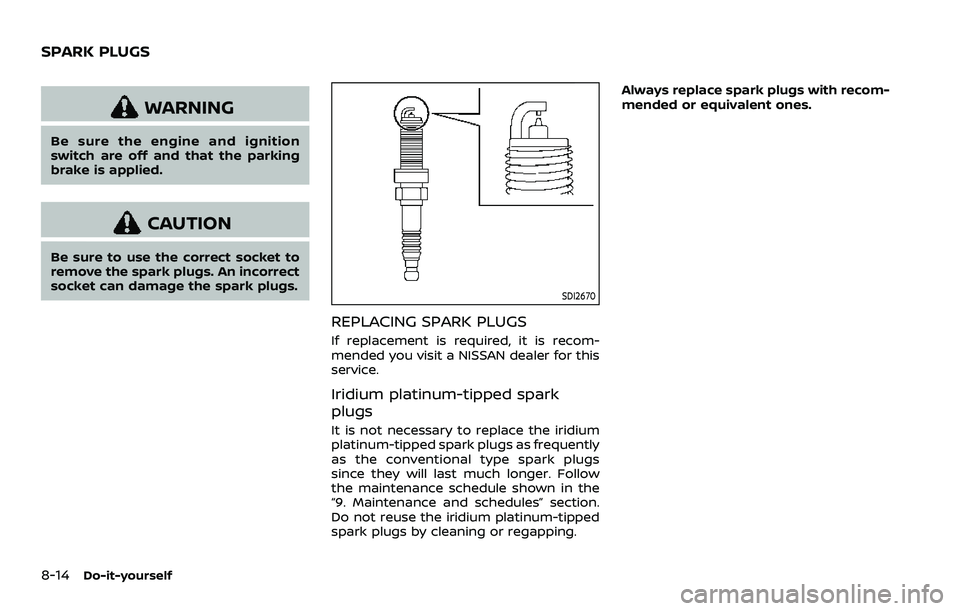
SDI2670
REPLACING SPARK PLUGS
If replacement is required, it is recom-
mended you visit a NISSAN dealer for this
service.
Iridium platinum-tipped spark
plugs
It is not necessary to replace the iridium
platinum-tipped spark plugs as frequently
as the conventional type spark plugs
since they will last much longer. Follow
the maintenance schedule shown in the
“9. Maintenance and schedules” section.
Do not reuse the iridium platinum-tipped
spark plugs by cleaning or regapping.Always replace spark plugs with recom-
mended or equivalent ones.
SPARK PLUGS
Page 429 of 516
WAI0158X
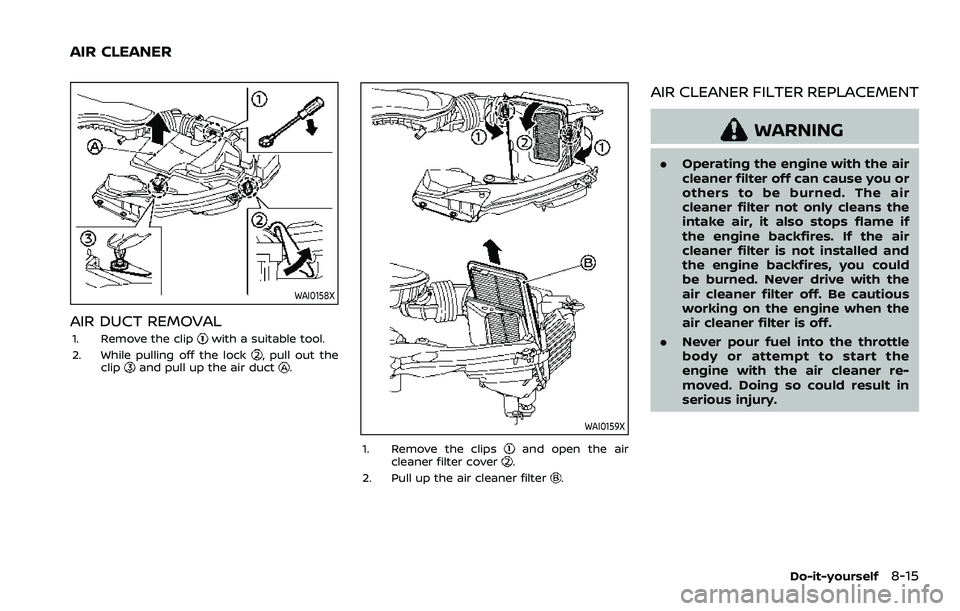
AIR DUCT REMOVAL
1. Remove the clipwith a suitable tool.
2. While pulling off the lock, pull out the
clipand pull up the air duct.
WAI0159X
1. Remove the clipsand open the air
cleaner filter cover.
2. Pull up the air cleaner filter
.
AIR CLEANER FILTER REPLACEMENT
WARNING
. Operating the engine with the air
cleaner filter off can cause you or
others to be burned. The air
cleaner filter not only cleans the
intake air, it also stops flame if
the engine backfires. If the air
cleaner filter is not installed and
the engine backfires, you could
be burned. Never drive with the
air cleaner filter off. Be cautious
working on the engine when the
air cleaner filter is off.
. Never pour fuel into the throttle
body or attempt to start the
engine with the air cleaner re-
moved. Doing so could result in
serious injury.
Do-it-yourself8-15
AIR CLEANER
Page 430 of 516
8-16Do-it-yourself
CLEANING
If your windshield is not clear after using
the windshield washer or if a wiper blade
chatters when running, wax or other
material may be on the blade or wind-
shield.
Clean the outside of the windshield with a
washer solution or a mild detergent. Your
windshield is clean if beads do not form
when rinsing with clear water.
Clean each blade by wiping it with a cloth
soaked in a washer solution or a mild
detergent. Then rinse the blade with clear
water. If your windshield is still not clear
after cleaning the blades and using the
wiper, replace the blades.
CAUTION
Worn windshield wiper blades can
damage the windshield and impair
driver vision.
SDI2359
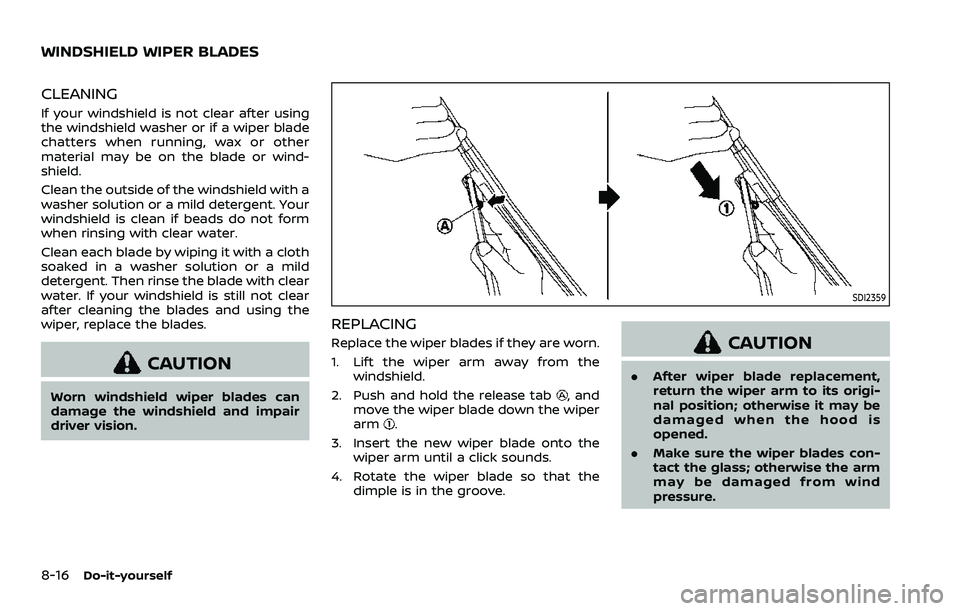
REPLACING
Replace the wiper blades if they are worn.
1. Lift the wiper arm away from thewindshield.
2. Push and hold the release tab
, and
move the wiper blade down the wiper
arm
.
3. Insert the new wiper blade onto the wiper arm until a click sounds.
4. Rotate the wiper blade so that the dimple is in the groove.
CAUTION
.After wiper blade replacement,
return the wiper arm to its origi-
nal position; otherwise it may be
damaged when the hood is
opened.
. Make sure the wiper blades con-
tact the glass; otherwise the arm
may be damaged from wind
pressure.
WINDSHIELD WIPER BLADES