change wheel NISSAN ROGUE SPORT 2022 Owners Manual
[x] Cancel search | Manufacturer: NISSAN, Model Year: 2022, Model line: ROGUE SPORT, Model: NISSAN ROGUE SPORT 2022Pages: 508, PDF Size: 2.43 MB
Page 74 of 508
1-56Safety — Seats, seat belts and supplemental restraint system
repositioned in the rear seat and it is
recommended that the vehicle should be
checked by a NISSAN dealer as soon as
possible.
3. If the light is OFF with no front passengerand no objects on the front passenger
seat, the vehicle should be checked as
soon as possible. It is recommended you
visit a NISSAN dealer for this service.
Other supplemental front-impact
air bag precautions
WARNING
.Do not place any objects on the
steering wheel pad or on the
instrument panel. Also, do not
place any objects between any
occupant and the steering wheel
or instrument panel. Such objects
may become dangerous projec-
tiles and cause injury if the front
air bags inflate.
. Do not place objects with sharp
edges on the seat. Also, do not
place heavy objects on the seat
that will leave permanent impres-
sions in the seat. Such objects
can damage the seat or occupant
classification sensors (weight
sensors). This can affect the op- eration of the air bag system and
result in serious personal injury.
. Do not use water or acidic clea-
ners (hot steam cleaners) on the
seat. This can damage the seat or
occupant classification sensors.
This can also affect the operation
of the air bag system and result in
serious personal injury.
. Immediately after inflation, sev-
eral front air bag system compo-
nents will be hot. Do not touch
them; you may severely burn
yourself.
. No unauthorized changes should
be made to any components or
wiring of the supplemental air
bag system. This is to prevent
accidental inflation of the supple-
mental air bag or damage to the
supplemental air bag system.
. Do not make unauthorized
changes to your vehicle’s electri-
cal system, suspension system or
front end structure. This could
affect proper operation of the
front air bag system.
. Tampering with the front air bag
system may result in serious per-
sonal injury. Tampering includes
changes to the steering wheel and the instrument panel assem-
bly by placing material over the
steering wheel pad and above the
instrument panel or by installing
additional trim material around
the air bag system.
. Removing or modifying the front
passenger seat may affect the
function of the air bag system
and result in serious personal
injury.
. Modifying or tampering with the
front passenger seat may result
in serious personal injury. For
example, do not change the front
seats by placing material on the
seat cushion or by installing ad-
ditional trim material, such as
seat covers, on the seat that is
not specifically designed to as-
sure proper air bag operation.
Additionally, do not stow any
objects under the front passen-
ger seat or the seat cushion and
seatback. Such objects may inter-
fere with the proper operation of
the occupant classification sen-
sors.
. No unauthorized changes should
be made to any components or
wiring of the seat belt system.
This may affect the front air bag
Page 102 of 508
2-20Instruments and controls
.Indicators and warnings
. Tire pressure information
. Chassis Control
. Other information
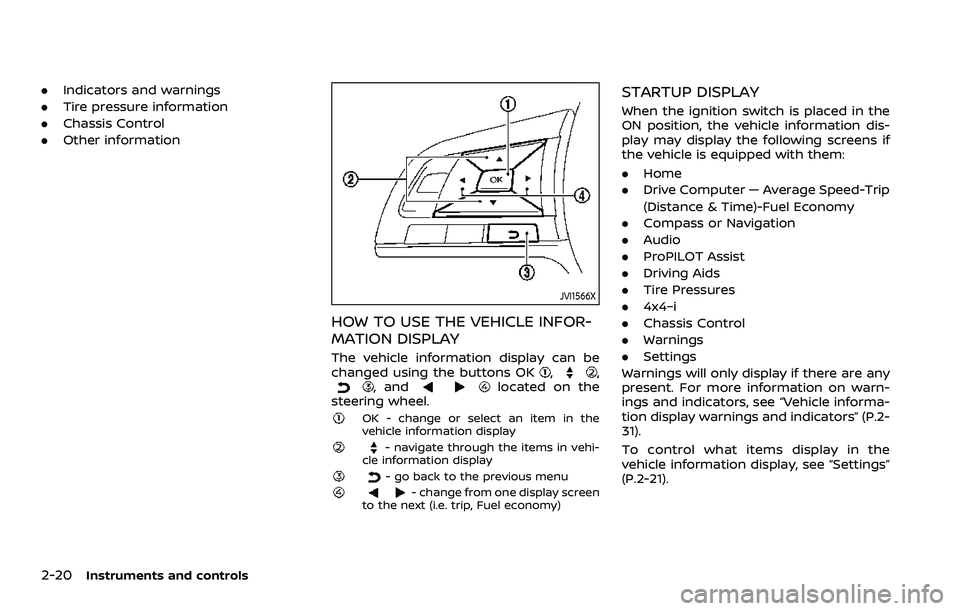
JVI1566X
HOW TO USE THE VEHICLE INFOR-
MATION DISPLAY
The vehicle information display can be
changed using the buttons OK,,, andlocated on the
steering wheel.
OK - change or select an item in the
vehicle information display
- navigate through the items in vehi-
cle information display
- go back to the previous menu- change from one display screen
to the next (i.e. trip, Fuel economy)
STARTUP DISPLAY
When the ignition switch is placed in the
ON position, the vehicle information dis-
play may display the following screens if
the vehicle is equipped with them:
. Home
. Drive Computer — Average Speed-Trip
(Distance & Time)-Fuel Economy
. Compass or Navigation
. Audio
. ProPILOT Assist
. Driving Aids
. Tire Pressures
. 4x4–i
. Chassis Control
. Warnings
. Settings
Warnings will only display if there are any
present. For more information on warn-
ings and indicators, see “Vehicle informa-
tion display warnings and indicators” (P.2-
31).
To control what items display in the
vehicle information display, see “Settings”
(P.2-21).
Page 107 of 508
Rear Door Alert:
.Horn & Alert
When selected, the alert is displayed
and the horn sounds.
. Alert Only
When selected, only the alert is dis-
played.
. OFF
When selected, no alert or horn will be
active.
For additional information, refer to “Rear
door alert” (P.2-63).
Remote start (if so equipped):
The “Remote start” feature allows user to
turn the remote engine start on or off.
When turned on, the engine can be
restarted remotely. For additional infor-
mation, refer to “Remote engine start”
(P.3-23).Maintenance
The maintenance mode allows you to set
alerts for the reminding of maintenance
intervals. To change an item:
Select “Maintenance” using the
switchand press OK.
Oil and Filter:
This indicator appears when the custo-
mer set distance comes for changing the
engine oil and filter. You can set or reset
the distance for checking or replacing
these items. For scheduled maintenance
items and intervals, refer to the “9. Main-
tenance and schedules” section.
Tire:
This indicator appears when the custo-
mer set distance comes for replacing
tires. You can set or reset the distance
for replacing tires.
WARNING
The tire replacement indicator is not
a substitute for regular tire checks,
including tire pressure checks. See
“Changing wheels and tires” (P.8-37).
Many factors including tire inflation,
alignment, driving habits and road
conditions affect tire wear and when
tires should be replaced. Setting the tire replacement indicator for a cer-
tain driving distance does not mean
your tires will last that long. Use the
tire replacement indicator as a guide
only and always perform regular tire
checks. Failure to perform regular
tire checks, including tire pressure
checks could result in tire failure.
Serious vehicle damage could occur
and may lead to a collision, which
could result in serious personal in-
jury or death.
Other:
This indicator appears when the custo-
mer set distance comes for checking or
replacing maintenance items other than
the engine oil, oil filter and tires. Other
maintenance items can include such
things as air filter or tire rotation. You
can set or reset the distance for checking
or replacing the items.
Instruments and controls2-25
Page 115 of 508
CAUTION
Running the engine with the engine
oil pressure warning displayed could
cause serious damage to the engine.
17. AWD Error: See Owner’s Manual
warning (if so equipped)
This warning appears when the All-Wheel
Drive (AWD) system is not functioning
properly while the engine is running.
Reduce vehicle speed and have the sys-
tem checked. It is recommended that you
visit a NISSAN dealer for this service. See
“Intelligent 4x4” (P.5-123).
18. AWD High Temp. Stop vehicle
warning (if so equipped)
This warning may appear while trying to
free a stuck vehicle due to increased oil
temperature. The driving mode may
change to Two-Wheel Drive (2WD). If this
warning is displayed, stop the vehicle with
the engine idling, as soon as it is safe to
do so. Then if the warning turns off, you
can continue driving. See “Intelligent 4x4”
(P.5-123).
19. Tire Size Incorrect: See Owner’s
Manual warning (if so equipped)
This warning may appear if there is a
large difference between the diameters of
the front and rear wheels and tires. Pull
off the road in a safe area, with the engine
idling. Check that all the tire sizes are the
same, that the tire pressure is correct and
that the tires are not excessively worn.
See “Intelligent 4x4” (P.5-123).
20. Battery Voltage Low Charge
Battery warning
This warning appears when the battery
voltage is low and the battery needs to be
charged.
21. Shipping Mode On Push Storage
Fuse warning (if so equipped)
This warning may appear if the extended
storage fuse switch is not pushed in
(switched on). When this warning ap-
pears, push in (switch on) the extended
storage fuse switch to turn off the warn-
ing. For more information, see “Extended
storage fuse switch” (P.8-21).
22. Power will turn off to save the
battery warning
This warning appears after the ignition
switch is in the ON position for a certain
period of time.
23. Power turned off to save the
battery warning
This warning appears after the ignition
switch is automatically turned OFF to
save the battery.
24. Reminder: Turn OFF Headlights
warning
This warning appears when the driver
side door is opened with the headlight
switch is left ON and the ignition switch is
placed in the OFF or LOCK position. Place
the headlight switch in OFF (if so
equipped) or AUTO position. For addi-
tional information, see “Headlight and
turn signal switch” (P.2-52).
25. Headlight System Error: See
Owner’s Manual warning (if so
equipped)
This warning appears if the LED head-
lights are malfunctioning. Have the sys-
tem checked. It is recommended that you
visit a NISSAN dealer for this service.
Instruments and controls2-33
Page 122 of 508
2-40Instruments and controls
JVI1566X
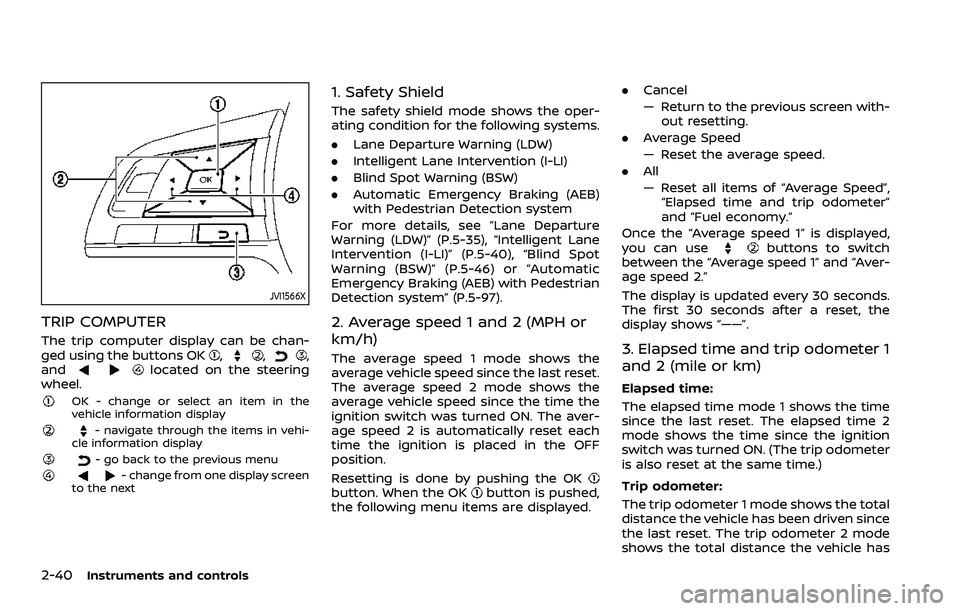
TRIP COMPUTER
The trip computer display can be chan-
ged using the buttons OK,,,
andlocated on the steering
wheel.
OK - change or select an item in the
vehicle information display
- navigate through the items in vehi-
cle information display
- go back to the previous menu- change from one display screen
to the next
1. Safety Shield
The safety shield mode shows the oper-
ating condition for the following systems.
. Lane Departure Warning (LDW)
. Intelligent Lane Intervention (I-LI)
. Blind Spot Warning (BSW)
. Automatic Emergency Braking (AEB)
with Pedestrian Detection system
For more details, see “Lane Departure
Warning (LDW)” (P.5-35), “Intelligent Lane
Intervention (I-LI)” (P.5-40), “Blind Spot
Warning (BSW)” (P.5-46) or “Automatic
Emergency Braking (AEB) with Pedestrian
Detection system” (P.5-97).
2. Average speed 1 and 2 (MPH or
km/h)
The average speed 1 mode shows the
average vehicle speed since the last reset.
The average speed 2 mode shows the
average vehicle speed since the time the
ignition switch was turned ON. The aver-
age speed 2 is automatically reset each
time the ignition is placed in the OFF
position.
Resetting is done by pushing the OK
button. When the OKbutton is pushed,
the following menu items are displayed. .
Cancel
— Return to the previous screen with-
out resetting.
. Average Speed
— Reset the average speed.
. All
— Reset all items of “Average Speed”,
“Elapsed time and trip odometer”
and “Fuel economy.”
Once the “Average speed 1” is displayed,
you can use
buttons to switch
between the “Average speed 1” and “Aver-
age speed 2.”
The display is updated every 30 seconds.
The first 30 seconds after a reset, the
display shows “——”.
3. Elapsed time and trip odometer 1
and 2 (mile or km)
Elapsed time:
The elapsed time mode 1 shows the time
since the last reset. The elapsed time 2
mode shows the time since the ignition
switch was turned ON. (The trip odometer
is also reset at the same time.)
Trip odometer:
The trip odometer 1 mode shows the total
distance the vehicle has been driven since
the last reset. The trip odometer 2 mode
shows the total distance the vehicle has
Page 138 of 508
2-56Instruments and controls
.The timing of switching the low
beam and high beam may
change under the following situa-
tions.
— The brightness of the head-
lights of the oncoming vehicle
or leading vehicle.
— The movement and direction of the oncoming vehicle and
the leading vehicle.
— When only one light on the oncoming vehicle or the lead-
ing vehicle is illuminated.
— When the oncoming vehicle or the leading vehicle is a two-
wheeled vehicle.
— Road conditions (incline, curve, the road surface, etc.).
— The number of passengers and the amount of cargo.
JVI1621X
Type A
WAC0414XType B
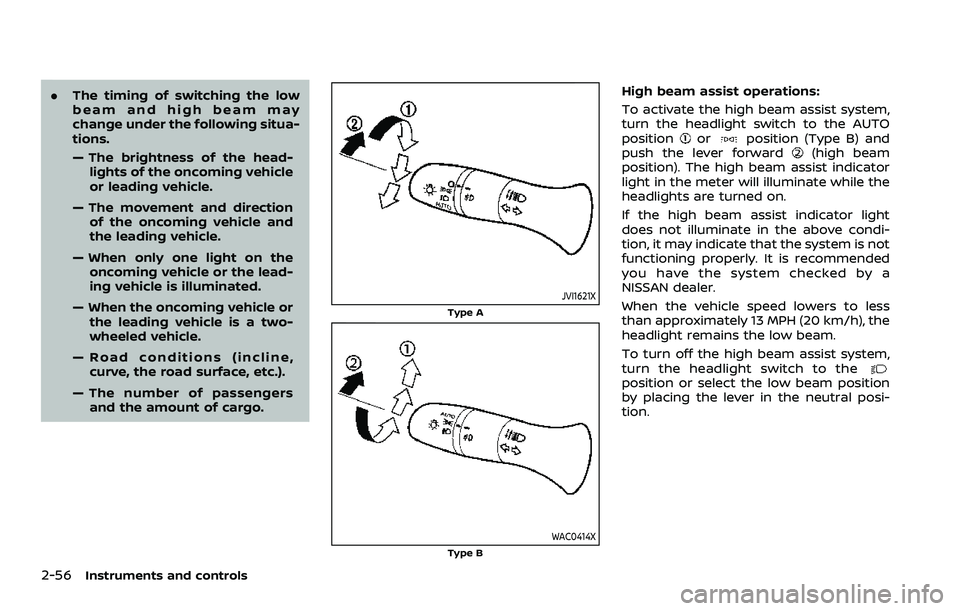
High beam assist operations:
To activate the high beam assist system,
turn the headlight switch to the AUTO
position
orposition (Type B) and
push the lever forward(high beam
position). The high beam assist indicator
light in the meter will illuminate while the
headlights are turned on.
If the high beam assist indicator light
does not illuminate in the above condi-
tion, it may indicate that the system is not
functioning properly. It is recommended
you have the system checked by a
NISSAN dealer.
When the vehicle speed lowers to less
than approximately 13 MPH (20 km/h), the
headlight remains the low beam.
To turn off the high beam assist system,
turn the headlight switch to the
position or select the low beam position
by placing the lever in the neutral posi-
tion.
Page 247 of 508
recommended you visit a NISSAN
dealer for these services.
. Replacing tires with those not
originally specified by NISSAN
could affect the proper operation
of the TPMS.
. Do not inject any tire liquid or
aerosol tire sealant into the tires,
as this may cause a malfunction
of the tire pressure sensors
(models without emergency tire
puncture repair kit).
. NISSAN recommends using only
Genuine NISSAN Emergency Tire
Sealant provided with your vehi-
cle. Other tire sealants may da-
mage the valve stem seal which
can cause the tire to lose air
pressure. Visit a NISSAN dealer
as soon as possible after using
tire repair sealant (models with
emergency tire puncture repair
kit).
CAUTION
.The TPMS may not function prop-
erly when the wheels are
equipped with tire chains or the
wheels are buried in snow. .
Do not place metalized film or
any metal parts (antenna, etc.) on
the windows. This may cause
poor reception of the signals
from the tire pressure sensors,
and the TPMS will not function
properly.
Some devices and transmitters may tem-
porarily interfere with the operation of
the TPMS and cause the low tire pressure
warning light to illuminate. Some exam-
ples are:
. Facilities or electric devices using
similar radio frequencies are near the
vehicle.
. If a transmitter set to similar frequen-
cies is being used in or near the
vehicle.
. If a computer (or similar equipment) or
a DC/AC converter is being used in or
near the vehicle.
Low tire pressure warning light may
illuminate in the following cases.
. If the vehicle is equipped with a wheel
and tire without TPMS.
. If the TPMS has been replaced and the
ID has not been registered.
. If the wheel is not originally specified
by NISSAN. FCC Notice:
For USA:
This device complies with Part 15 of the
FCC Rules. Operation is subject to the
following two conditions: (1) This device
may not cause harmful interference,
and (2) this device must accept any
interference received, including inter-
ference that may cause undesired op-
eration.
Note: Changes or modifications not
expressly approved by the party re-
sponsible for compliance could void
the user’s authority to operate the
equipment.
For Canada:
This device complies with Industry Ca-
nada licence-exempt RSS standard(s).
Operation is subject to the following
two conditions: (1) this device may not
cause interference, and (2) this device
must accept any interference, including
interference that may cause undesired
operation of the device.
Starting and driving5-7
Page 250 of 508
5-10Starting and driving
WARNING
The following actions can increase
the chance of losing control of the
vehicle if there is a sudden loss of tire
air pressure. Losing control of the
vehicle may cause a collision and
result in personal injury.
.The vehicle generally moves or
pulls in the direction of the flat
tire.
. Do not rapidly apply the brakes.
. Do not rapidly release the accel-
erator pedal.
. Do not rapidly turn the steering
wheel.
1. Remain calm and do not overreact.
2. Maintain a firm grip on the steering wheel with both hands and try to hold
a straight course.
3. When appropriate, slowly release the accelerator pedal to gradually slow
the vehicle.
4. Gradually steer the vehicle to a safe location off the road and away from
traffic if possible. 5. Lightly apply the brake pedal to gra-
dually stop the vehicle.
6. Turn on the hazard warning flashers and either contact a roadside emer-
gency service to change the tire or see
“Changing a flat tire (models with
spare tire)” (P.6-4) of this Owner’s
Manual.
DRINKING ALCOHOL/DRUGS AND
DRIVING
WARNING
Never drive under the influence of
alcohol or drugs. Alcohol in the
bloodstream reduces coordination,
delays reaction time and impairs
judgement. Driving after drinking
alcohol increases the likelihood of
being involved in an accident injuring
yourself and others. Additionally, if
you are injured in an accident, alco-
hol can increase the severity of the
injury.
NISSAN is committed to safe driving.
However, you must choose not to drive
under the influence of alcohol. Every year
thousands of people are injured or killed
in alcohol-related accidents. Although the
local laws vary on what is considered to be legally intoxicated, the fact is that
alcohol affects all people differently and
most people underestimate the effects of
alcohol.
Remember, drinking and driving don’t
mix! And that is true for drugs, too (over-
the-counter, prescription, and illegal
drugs). Don’t drive if your ability to oper-
ate your vehicle is impaired by alcohol,
drugs, or some other physical condition.
DRIVING SAFETY PRECAUTIONS
Your vehicle is designed for both normal
and off-road use. However, avoid driving
in deep water or mud as your vehicle is
mainly designed for leisure use, unlike a
conventional off-road vehicle.
Remember that Two-Wheel Drive (2WD)
models are less capable than All-Wheel
Drive (AWD) models for rough road driving
and extrication when stuck in deep snow,
mud, or the like.
Please observe the following precautions:
WARNING
.
Drive carefully when off the road
and avoid dangerous areas. Every
person who drives or rides in this
vehicle should be seated with
their seat belt fastened. This will
Page 277 of 508
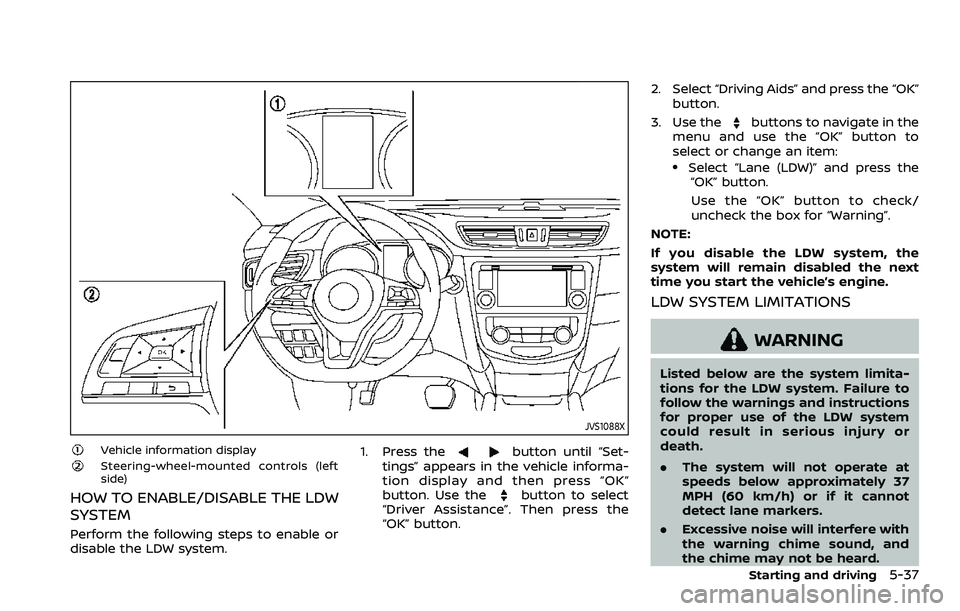
JVS1088X
Vehicle information displaySteering-wheel-mounted controls (left
side)
HOW TO ENABLE/DISABLE THE LDW
SYSTEM
Perform the following steps to enable or
disable the LDW system.1. Press the
button until “Set-
tings” appears in the vehicle informa-
tion display and then press “OK”
button. Use the
button to select
“Driver Assistance”. Then press the
“OK” button. 2. Select “Driving Aids” and press the “OK”
button.
3. Use the
buttons to navigate in the
menu and use the “OK” button to
select or change an item:
.Select “Lane (LDW)” and press the “OK” button.
Use the “OK” button to check/
uncheck the box for “Warning”.
NOTE:
If you disable the LDW system, the
system will remain disabled the next
time you start the vehicle’s engine.
LDW SYSTEM LIMITATIONS
WARNING
Listed below are the system limita-
tions for the LDW system. Failure to
follow the warnings and instructions
for proper use of the LDW system
could result in serious injury or
death.
. The system will not operate at
speeds below approximately 37
MPH (60 km/h) or if it cannot
detect lane markers.
. Excessive noise will interfere with
the warning chime sound, and
the chime may not be heard.
Starting and driving5-37
Page 278 of 508
5-38Starting and driving
.Do not use the LDW system under
the following conditions as it may
not function properly:
— During bad weather (rain, fog,
snow, etc.).
— When driving on slippery roads, such as on ice or snow.
— When driving on winding or uneven roads.
— When there is a lane closure due to road repairs.
— When driving in a makeshift or temporary lane.
— When driving on roads where the lane width is too narrow.
— When driving without normal tire conditions (for example,
tire wear, low tire pressure,
installation of spare tire (if so
equipped), tire chains, non-
standard wheels).
— When the vehicle is equipped with non-original brake parts
or suspension parts.
. The system may not function
properly under the following con-
ditions: — On roads where there are
multiple parallel lane markers;
lane markers that are faded or
not painted clearly; yellow
painted lane markers; non-
standard lane markers; or
lane markers covered with
water, dirt, snow, etc.
— On roads where discontinued lane markers are still detect-
able.
— On roads where there are sharp curves.
— On roads where there are sharply contrasting objects,
such as shadows, snow,
water, wheel ruts, seams or
lines remaining after road re-
pairs. (The LDW system could
detect these items as lane
markers.)
— On roads where the traveling lane merges or separates.
— When the vehicle’s traveling direction does not align with
the lane marker.
— When traveling close to the vehicle in front of you, which
obstructs the lane camera
unit detection range. — When rain, snow, dirt or object
adheres to the windshield in
front of the lane camera unit.
— When the headlights are not bright due to dirt on the lens
or if the aiming is not adjusted
properly.
— When strong light enters the lane camera unit. (For exam-
ple, the light directly shines on
the front of the vehicle at
sunrise or sunset.)
— When a sudden change in brightness occurs. (For exam-
ple, when the vehicle enters or
exits a tunnel or under a
bridge.)
SYSTEM TEMPORARILY UNAVAIL-
ABLE
Condition A:
If the vehicle is parked in direct sunlight
under high temperature conditions (over
approximately 104°F (40°C)) and then
started, the LDW system may be deacti-
vated automatically, the LDW indicator
will flash and the following message will
appear in the vehicle information display.
- “Unavailable: High Cabin Temperature”
When the interior temperature is reduced,