horn NISSAN ROGUE SPORT 2022 Owners Manual
[x] Cancel search | Manufacturer: NISSAN, Model Year: 2022, Model line: ROGUE SPORT, Model: NISSAN ROGUE SPORT 2022Pages: 508, PDF Size: 2.43 MB
Page 14 of 508
0-6Illustrated table of contents
WAA0118X
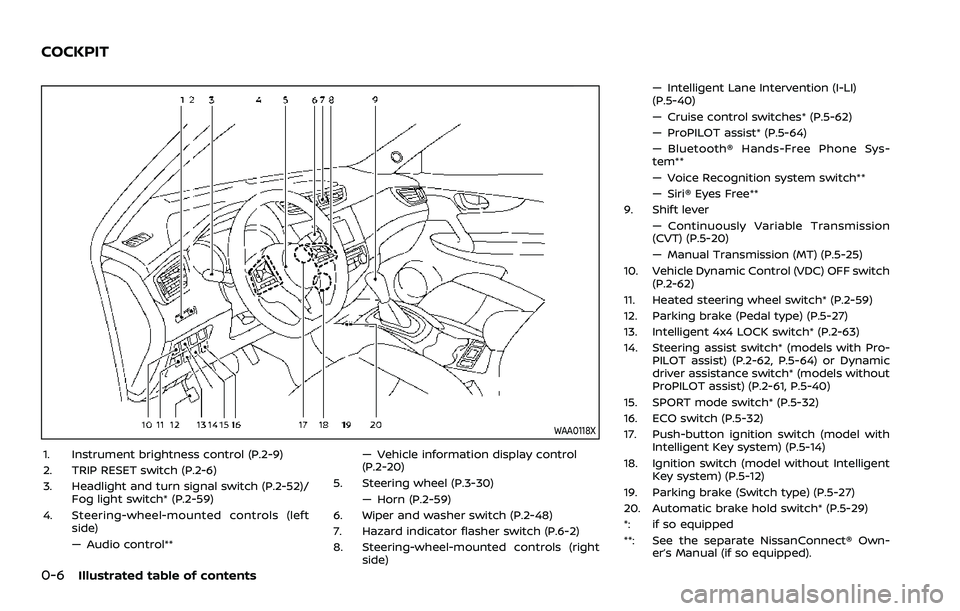
1. Instrument brightness control (P.2-9)
2. TRIP RESET switch (P.2-6)
3. Headlight and turn signal switch (P.2-52)/Fog light switch* (P.2-59)
4. Steering-wheel-mounted controls (left side)
— Audio control** — Vehicle information display control
(P.2-20)
5. Steering wheel (P.3-30) — Horn (P.2-59)
6. Wiper and washer switch (P.2-48)
7. Hazard indicator flasher switch (P.6-2)
8. Steering-wheel-mounted controls (right side) — Intelligent Lane Intervention (I-LI)
(P.5-40)
— Cruise control switches* (P.5-62)
— ProPILOT assist* (P.5-64)
— Bluetooth® Hands-Free Phone Sys-
tem**
— Voice Recognition system switch**
— Siri® Eyes Free**
9. Shift lever — Continuously Variable Transmission
(CVT) (P.5-20)
— Manual Transmission (MT) (P.5-25)
10. Vehicle Dynamic Control (VDC) OFF switch (P.2-62)
11. Heated steering wheel switch* (P.2-59)
12. Parking brake (Pedal type) (P.5-27)
13. Intelligent 4x4 LOCK switch* (P.2-63)
14. Steering assist switch* (models with Pro- PILOT assist) (P.2-62, P.5-64) or Dynamic
driver assistance switch* (models without
ProPILOT assist) (P.2-61, P.5-40)
15. SPORT mode switch* (P.5-32)
16. ECO switch (P.5-32)
17. Push-button ignition switch (model with Intelligent Key system) (P.5-14)
18. Ignition switch (model without Intelligent Key system) (P.5-12)
19. Parking brake (Switch type) (P.5-27)
20. Automatic brake hold switch* (P.5-29)
*: if so equipped
**: See the separate NissanConnect® Own- er’s Manual (if so equipped).
COCKPIT
Page 15 of 508
WAA0119X
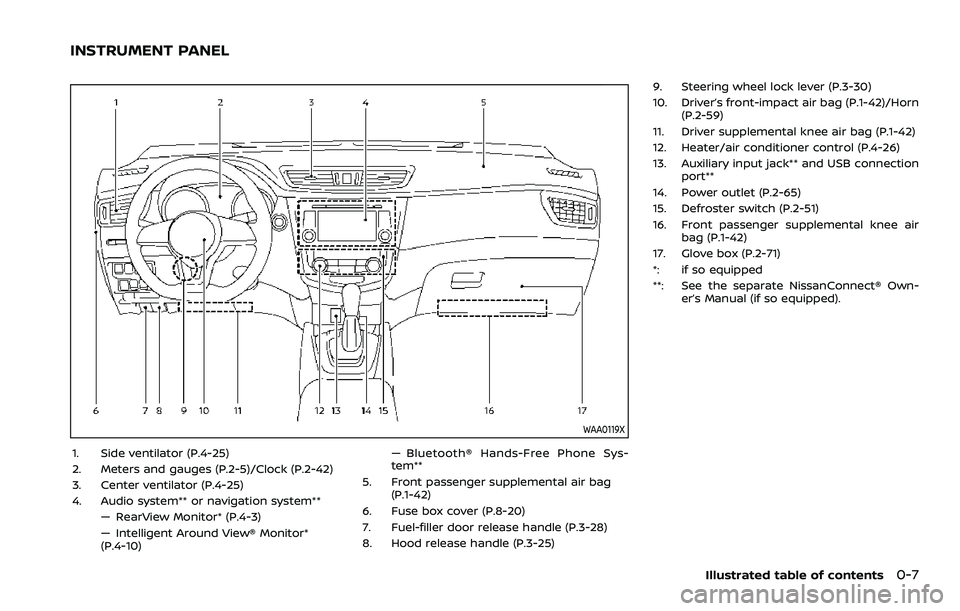
1. Side ventilator (P.4-25)
2. Meters and gauges (P.2-5)/Clock (P.2-42)
3. Center ventilator (P.4-25)
4. Audio system** or navigation system**— RearView Monitor* (P.4-3)
— Intelligent Around View® Monitor*
(P.4-10) — Bluetooth® Hands-Free Phone Sys-
tem**
5. Front passenger supplemental air bag (P.1-42)
6. Fuse box cover (P.8-20)
7. Fuel-filler door release handle (P.3-28)
8. Hood release handle (P.3-25) 9. Steering wheel lock lever (P.3-30)
10. Driver’s front-impact air bag (P.1-42)/Horn
(P.2-59)
11. Driver supplemental knee air bag (P.1-42)
12. Heater/air conditioner control (P.4-26)
13. Auxiliary input jack** and USB connection port**
14. Power outlet (P.2-65)
15. Defroster switch (P.2-51)
16. Front passenger supplemental knee air bag (P.1-42)
17. Glove box (P.2-71)
*: if so equipped
**: See the separate NissanConnect® Own- er’s Manual (if so equipped).
Illustrated table of contents0-7
INSTRUMENT PANEL
Page 83 of 508
2 Instruments and controls
Cockpit ........................................................................\
.......................... 2-3
Instrument panel ........................................................................\
.. 2-4
Meters and gauges ..................................................................... 2-5Speedometer and odometer ........................................ 2-6
Tachometer ........................................................................\
........ 2-7
Engine coolant temperature gauge ....................... 2-7
Fuel gauge ........................................................................\
........... 2-8
Instrument brightness control .................................... 2-9
Continuously Variable Transmission (CVT)
position indicator (if so equipped) ........................... 2-9
Warning lights, indicator lights and
audible reminders ..................................................................... 2-10 Checking lights ..................................................................... 2-11
Warning/indicator lights (red) ................................... 2-11
Warning/indicator lights (yellow) ........................... 2-13
Warning/indicator lights (other) ............................. 2-17
Audible reminders .............................................................. 2-18
Vehicle information display ............................................... 2-19 How to use the vehicle
information display ........................................................... 2-20
Startup display ...................................................................... 2-20
Settings ........................................................................\
............... 2-21
Vehicle information display warnings
and indicators ........................................................................\
2-31
Trip computer ........................................................................\
2-40 Clock and outside air temperature ................... 2-42
Traffic Sign Recognition (if so equipped) ...... 2-43
Security systems ....................................................................... 2-45
Vehicle Security System .............................................. 2-45
NISSAN Vehicle Immobilizer System ................. 2-47
Wiper and washer switch ................................................... 2-48
Windshield wiper and washer operation ...... 2-49
Rear window wiper and washer switch ................. 2-50
Rear window and outside mirror
defroster switch ........................................................................\
. 2-51
Headlight and turn signal switch ................................ 2-52 Headlight switch ............................................................... 2-52
Turn signal switch ........................................................... 2-58
Fog light switch (if so equipped) ......................... 2-59
Horn ........................................................................\
............................. 2-59
Heated steering wheel (if so equipped) .................. 2-59
Heated seats (if so equipped) ......................................... 2-60
Dynamic driver assistance switch
(models without ProPILOT assist) ............................... 2-61
Steering assist switch (models with
ProPILOT assist) ........................................................................\
. 2-62
Vehicle Dynamic Control (VDC) off switch ........... 2-62
Intelligent 4x4 LOCK switch (if so equipped) ...... 2-63
Rear door alert ........................................................................\
.... 2-63
ECO mode switch ..................................................................... 2-64
Page 85 of 508
WAA0118X
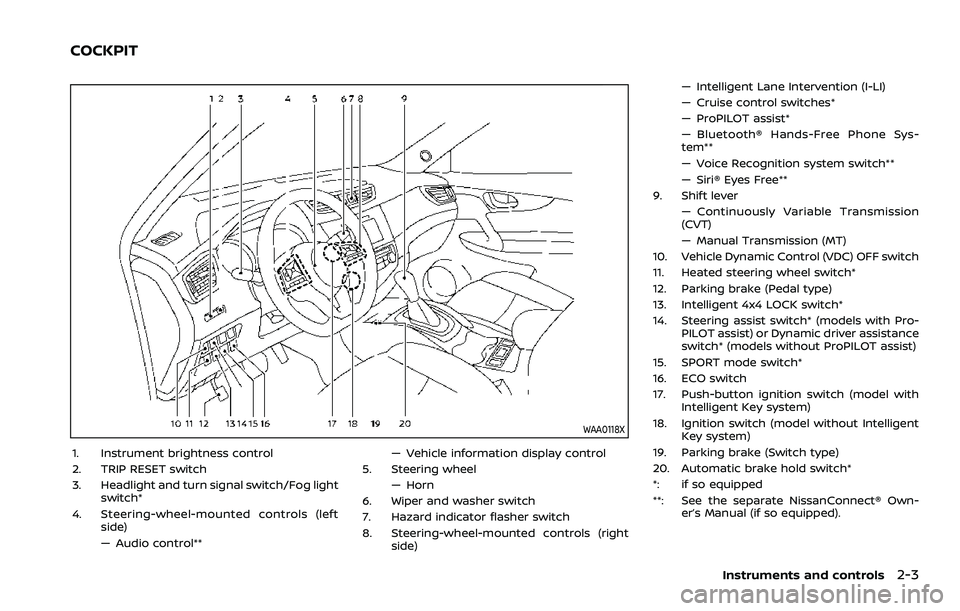
1. Instrument brightness control
2. TRIP RESET switch
3. Headlight and turn signal switch/Fog lightswitch*
4. Steering-wheel-mounted controls (left side)
— Audio control** — Vehicle information display control
5. Steering wheel — Horn
6. Wiper and washer switch
7. Hazard indicator flasher switch
8. Steering-wheel-mounted controls (right side) — Intelligent Lane Intervention (I-LI)
— Cruise control switches*
— ProPILOT assist*
— Bluetooth® Hands-Free Phone Sys-
tem**
— Voice Recognition system switch**
— Siri® Eyes Free**
9. Shift lever — Continuously Variable Transmission
(CVT)
— Manual Transmission (MT)
10. Vehicle Dynamic Control (VDC) OFF switch
11. Heated steering wheel switch*
12. Parking brake (Pedal type)
13. Intelligent 4x4 LOCK switch*
14. Steering assist switch* (models with Pro- PILOT assist) or Dynamic driver assistance
switch* (models without ProPILOT assist)
15. SPORT mode switch*
16. ECO switch
17. Push-button ignition switch (model with Intelligent Key system)
18. Ignition switch (model without Intelligent Key system)
19. Parking brake (Switch type)
20. Automatic brake hold switch*
*: if so equipped
**: See the separate NissanConnect® Own- er’s Manual (if so equipped).
Instruments and controls2-3
COCKPIT
Page 86 of 508
2-4Instruments and controls
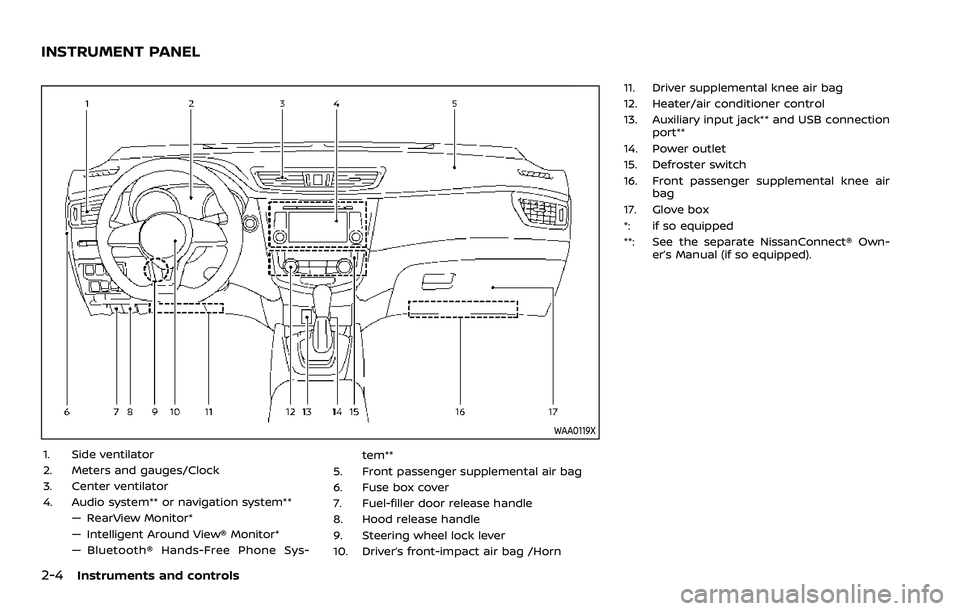
WAA0119X
1. Side ventilator
2. Meters and gauges/Clock
3. Center ventilator
4. Audio system** or navigation system**— RearView Monitor*
— Intelligent Around View® Monitor*
— Bluetooth® Hands-Free Phone Sys- tem**
5. Front passenger supplemental air bag
6. Fuse box cover
7. Fuel-filler door release handle
8. Hood release handle
9. Steering wheel lock lever
10. Driver’s front-impact air bag /Horn 11. Driver supplemental knee air bag
12. Heater/air conditioner control
13. Auxiliary input jack** and USB connection
port**
14. Power outlet
15. Defroster switch
16. Front passenger supplemental knee air bag
17. Glove box
*: if so equipped
**: See the separate NissanConnect® Own- er’s Manual (if so equipped).
INSTRUMENT PANEL
Page 106 of 508
2-24Instruments and controls
Headlight can be adjusted. From the
“Lighting” menu, select “Light Sensitiv-
ity”. Use the
buttonsand the OKto select the required sensitivity.
The following options are available:
— Turn on earliest
— Turn on earlier
— Turn on standard
— Turn on later
. Light Off Delay
The duration of the automatic head-
lights can be changed from 0 to 180
seconds. From the “Lighting” menu,
select “Light Off Delay”. Use the OK
to change the duration.
Turn indicator:
The “3 Flash Pass” overtaking feature can
be set to be ON or OFF. From the “Turn
indicator” menu, select “3 Flash Pass”. Use
the OK
to turn this feature ON or OFF.
Locking:
There are the following options in the
“Locking” menu:
. I–Key Door Lock (if so equipped)
When this item is turned on, the
request switch on the door is acti-
vated. From the “Locking” menu, select
“I-Key Door Lock”. Use the OK
to
activate or deactivate this function. .
Selective Unlock
When this item is turned on, and the
door handle request switch on the
driver’s or front passenger’s side door
is pushed, only the corresponding
door is unlocked. All the doors can
be unlocked if the door handle re-
quest switch is pushed again within 1
minute. When this item is turned to off,
all the doors will be unlocked when
the door handle request switch is
pushed once. From the “Locking”
menu, select “Selective Unlock”. Use
the OK
to activate or deactivate this
function.
. Auto Door Unlock
The “Auto Door Unlock” feature allows
the customer to customize the auto
door unlock options.
— Ignition OFF
— Shift to Park (for Continuously Vari-
able Transmission (CVT) models)
— Off
. Answer Bk. Horn (if so equipped)
When the answer back horn is on, the
horn will chirp and the hazard indica-
tors will flash twice when locking the
vehicle with the Intelligent Key or
remote keyless entry function. Wipers:
.
Speed Dependent
The “Speed Dependent” feature can be
activated or deactivated. From the
“Wipers” menu, select “Speed Depen-
dent”. Use the OK
to turn this
feature ON or OFF.
. Reverse Link
The “Reverse Link” wiper feature can
be set to be ON or OFF. From the
“Wipers” menu, select “Reverse Link”.
Use the OK
to turn this feature ON
or OFF.
. Drip wipe
The “Drip wipe” feature can be set to
be ON or OFF. From the “Wipers” menu,
select “Drip wipe”. Use the OK
to turn
this feature ON or OFF.
Driving Position (if so equipped):
. Exit Seat Slide
When this item is turned on, this
feature will move the driver’s seat
backward for an easy exit when the
ignition switch is turned off and the
driver’s door is opened. After getting
into the vehicle and placing the igni-
tion switch in the ON position, the
driver’s seat will move to the previous
set position. See “Memory Seat” (P.3-
34).
Page 107 of 508
Rear Door Alert:
.Horn & Alert
When selected, the alert is displayed
and the horn sounds.
. Alert Only
When selected, only the alert is dis-
played.
. OFF
When selected, no alert or horn will be
active.
For additional information, refer to “Rear
door alert” (P.2-63).
Remote start (if so equipped):
The “Remote start” feature allows user to
turn the remote engine start on or off.
When turned on, the engine can be
restarted remotely. For additional infor-
mation, refer to “Remote engine start”
(P.3-23).Maintenance
The maintenance mode allows you to set
alerts for the reminding of maintenance
intervals. To change an item:
Select “Maintenance” using the
switchand press OK.
Oil and Filter:
This indicator appears when the custo-
mer set distance comes for changing the
engine oil and filter. You can set or reset
the distance for checking or replacing
these items. For scheduled maintenance
items and intervals, refer to the “9. Main-
tenance and schedules” section.
Tire:
This indicator appears when the custo-
mer set distance comes for replacing
tires. You can set or reset the distance
for replacing tires.
WARNING
The tire replacement indicator is not
a substitute for regular tire checks,
including tire pressure checks. See
“Changing wheels and tires” (P.8-37).
Many factors including tire inflation,
alignment, driving habits and road
conditions affect tire wear and when
tires should be replaced. Setting the tire replacement indicator for a cer-
tain driving distance does not mean
your tires will last that long. Use the
tire replacement indicator as a guide
only and always perform regular tire
checks. Failure to perform regular
tire checks, including tire pressure
checks could result in tire failure.
Serious vehicle damage could occur
and may lead to a collision, which
could result in serious personal in-
jury or death.
Other:
This indicator appears when the custo-
mer set distance comes for checking or
replacing maintenance items other than
the engine oil, oil filter and tires. Other
maintenance items can include such
things as air filter or tire rotation. You
can set or reset the distance for checking
or replacing the items.
Instruments and controls2-25
Page 118 of 508
2-36Instruments and controls
41. Steering assist indicator (if so
equipped)
This indicator appears when the steering
assist system is engaged.
See “ProPILOT assist” (P.5-64).
42. Steering assist alert (if so
equipped)
This message may appear when the
steering assist system is engaged.
It will be displayed under the following
condition:
.When not holding the steering wheel
or when there is no steering wheel
operation.
Hold on the steering wheel immediately.
When the steering operation is detected,
the warning turns off and the steering
assist function is automatically restored.
For additional information, refer to “Pro-
PILOT assist” (P.5-64).
43. Automatic Emergency Braking
(AEB) emergency warning indicator
This indicator illuminates along, with an
audible warning, when the system de-
tects the possibility of a forward collision.
See “Automatic Emergency Braking (AEB)
with Pedestrian Detection system” (P.5-
97).
44. Rear Door Alert is activated
When the system is enabled, this message
appears when the Rear Door Alert system
is active and can remind the driver to
check the back seat.
. Using the steering switch, a driver can
select “Dismiss Message” to clear the
display for a period of time. If no
selection is made, this message auto-
matically turns off after a period of
time.
. Using the steering switch, a driver can
select “Disable Alert” to disable the
horn alert for the remainder of the
current trip.
For additional information, see “Rear door
alert” (P.2-63).
WARNING
Selecting “Dismiss Message” during a
stop within a trip temporarily dis-
misses the message for that stop
without turning the system off.
Alerts can be provided for other
stops during the trip. Selecting “Dis-
able Alert” turns off the Rear Door
Alert system for the remainder of a
trip and no audible alert will be
provided. NOTE:
This system is disabled until a driver
enables it using the vehicle information
display. See “Vehicle Settings” (P.2-23).
45. Check Back Seat For all articles
When the system is enabled, this message
appears when the vehicle comes to a
complete stop, the shift lever is moved
from the D (Drive) position to P (Park)
position, and the driver exits the vehicle.
This message alerts the driver, after a
period of time, to check for items in the
rear seat after the audible alert has been
provided.
NOTE:
This system is disabled until a driver
enables it using the vehicle information
display. For additional information, see
“Vehicle Settings” (P.2-23).
46. Rear Automatic Braking (RAB)
indicator
This indicator illuminates to indicate the
status of the Rear Automatic Braking
(RAB) system.
See “Rear Automatic Braking (RAB)” (P.5-
116).
Page 128 of 508
2-46Instruments and controls
cannot prevent it, nor can it prevent the
theft of interior or exterior vehicle com-
ponents in all situations. Always secure
your vehicle even if parking for a brief
period. Never leave your keys in the
vehicle, and always lock it when unat-
tended. Be aware of your surroundings,
and park in secure, well-lit areas when-
ever possible.
Many devices offering additional protec-
tion, such as component locks, identifica-
tion markers, and tracking systems, are
available at auto supply stores and speci-
alty shops. Your NISSAN dealer may also
offer such equipment. Check with your
insurance company to see if you may be
eligible for discounts for various theft
protection features.
SIC2045
How to arm the vehicle security
system
1. Close all windows.The system can be
armed even if the windows are open.
2. Remove the keys from the vehicle.
3. Close all doors, hood (if so equipped) and liftgate. Lock all doors. The doors
can be locked with the key fob (if so
equipped), Intelligent Key (if so
equipped), the request switch (if so
equipped), or power door lock switch.
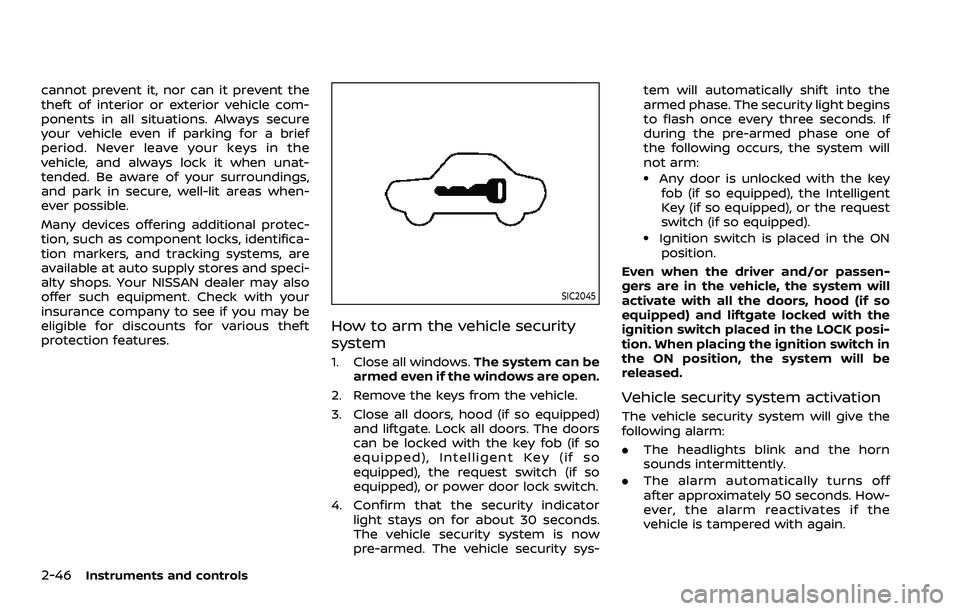
4. Confirm that the security indicator light stays on for about 30 seconds.
The vehicle security system is now
pre-armed. The vehicle security sys- tem will automatically shift into the
armed phase. The security light begins
to flash once every three seconds. If
during the pre-armed phase one of
the following occurs, the system will
not arm:
.Any door is unlocked with the key
fob (if so equipped), the Intelligent
Key (if so equipped), or the request
switch (if so equipped).
.Ignition switch is placed in the ON
position.
Even when the driver and/or passen-
gers are in the vehicle, the system will
activate with all the doors, hood (if so
equipped) and liftgate locked with the
ignition switch placed in the LOCK posi-
tion. When placing the ignition switch in
the ON position, the system will be
released.
Vehicle security system activation
The vehicle security system will give the
following alarm:
. The headlights blink and the horn
sounds intermittently.
. The alarm automatically turns off
after approximately 50 seconds. How-
ever, the alarm reactivates if the
vehicle is tampered with again.
Page 141 of 508
JVI0980X
Example
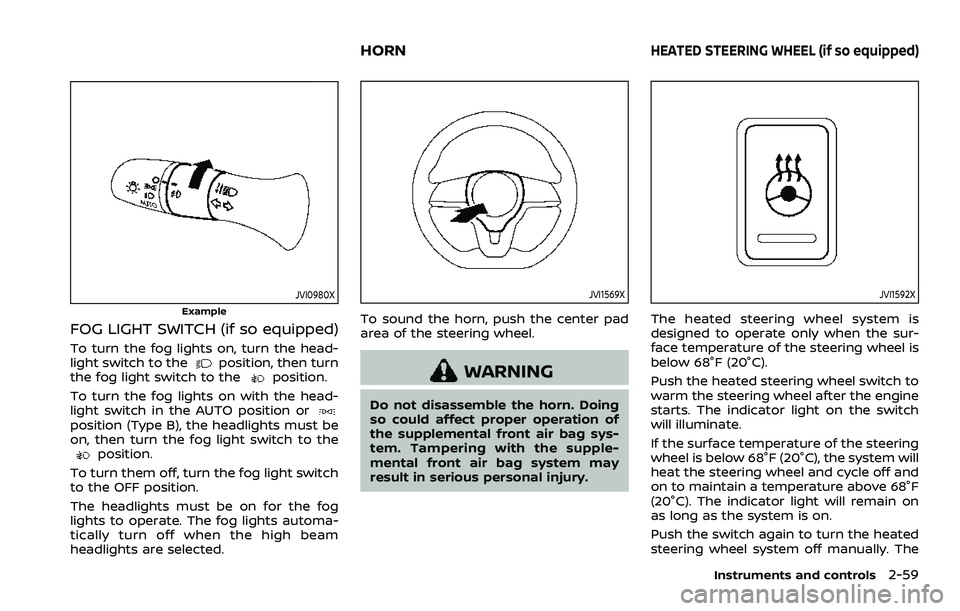
FOG LIGHT SWITCH (if so equipped)
To turn the fog lights on, turn the head-
light switch to theposition, then turn
the fog light switch to theposition.
To turn the fog lights on with the head-
light switch in the AUTO position or
position (Type B), the headlights must be
on, then turn the fog light switch to the
position.
To turn them off, turn the fog light switch
to the OFF position.
The headlights must be on for the fog
lights to operate. The fog lights automa-
tically turn off when the high beam
headlights are selected.
JVI1569X
To sound the horn, push the center pad
area of the steering wheel.
WARNING
Do not disassemble the horn. Doing
so could affect proper operation of
the supplemental front air bag sys-
tem. Tampering with the supple-
mental front air bag system may
result in serious personal injury.
JVI1592X
The heated steering wheel system is
designed to operate only when the sur-
face temperature of the steering wheel is
below 68°F (20°C).
Push the heated steering wheel switch to
warm the steering wheel after the engine
starts. The indicator light on the switch
will illuminate.
If the surface temperature of the steering
wheel is below 68°F (20°C), the system will
heat the steering wheel and cycle off and
on to maintain a temperature above 68°F
(20°C). The indicator light will remain on
as long as the system is on.
Push the switch again to turn the heated
steering wheel system off manually. The
Instruments and controls2-59
HORNHEATED STEERING WHEEL (if so equipped)