REAR NISSAN SENTRA 1997 B14 / 4.G Owners Manual
[x] Cancel search | Manufacturer: NISSAN, Model Year: 1997, Model line: SENTRA, Model: NISSAN SENTRA 1997 B14 / 4.GPages: 194, PDF Size: 1.62 MB
Page 8 of 194

1Instruments and controls
Meters and gauges ................................................1-2
Speedometer and odometer ..................................1-3
Tachometer (if so equipped) ..................................1-3
Engine coolant temperature gauge........................1-3
Fuel gauge .............................................................1-4
Warning/indicator lights and chimes ......................1-5
Theft warning (if so equipped) ...............................1-9
Windshield wiper and washer switch ...................1-10
Rear window defogger switch ..............................1-11
Headlight and turn signal switch ..........................1-12
Daytime running light system (for Canada) .........1-12Instrument brightness control ...............................1-13
Front fog light switch (if so equipped)..................1-13
Hazard warning flasher switch .............................1-14
Cigarette lighter (accessory) and ashtray ............1-14
Cup holder ............................................................1-15
Manual windows ...................................................1-16
Power windows (if so equipped) ..........................1-16
Sunroof (if so equipped).......................................1-18
Interior light...........................................................1-18
Trunk light (if so equipped) ..................................1-19
ZX
Page 19 of 194
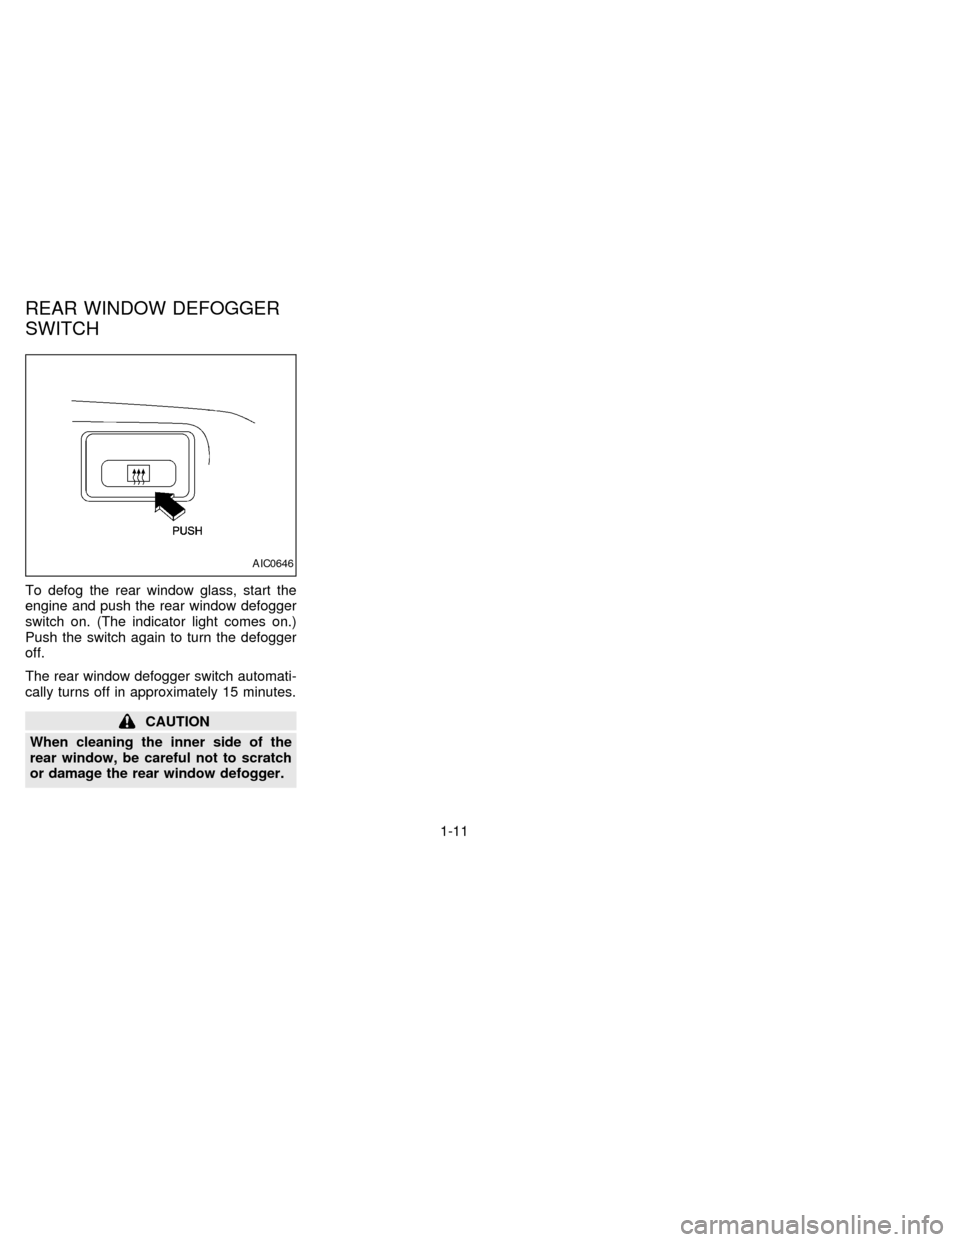
To defog the rear window glass, start the
engine and push the rear window defogger
switch on. (The indicator light comes on.)
Push the switch again to turn the defogger
off.
The rear window defogger switch automati-
cally turns off in approximately 15 minutes.
CAUTION
When cleaning the inner side of the
rear window, be careful not to scratch
or damage the rear window defogger.
AIC0646
REAR WINDOW DEFOGGER
SWITCH
1-11
ZX
Page 25 of 194

The passenger side switch opens or closes
only the corresponding window. To open
the window, push the switch downward. To
close the window, lift the switch upward.Rear power windows
The rear power window switches open or
close only the corresponding window. To
open the window, push the switch down-
ward. To close the window, lift the switch
upward.
Automatic power window switch
To fully open the driver side window, de-
press the automatic power window switch
and release it; it need not be held. The
window automatically opens all the way.
AIC0613AIC0614AIC0615
1-17
ZX
Page 29 of 194

2Pre-driving checks and adjustments
Key .........................................................................2-2
Door locks ..............................................................2-2
Power door lock (if so equipped) ...........................2-3
Multi-remote control system (if so equipped).........2-3
Battery replacement ...............................................2-5
Child safety rear door lock (4-door only) ...............2-6
Hood release ..........................................................2-7................2-7
Glove box ...............................................................2-8
Trunk lid lock operation ..........................................2-8
Opener cancel lever for trunk lid (if so
equipped) ...............................................................2-9
Fuel filler lid lock operation ..................................2-10
Fuel filler cap ........................................................2-10
Front seats ...........................................................2-12
Seat adjustment ...................................................2-12
Tilting front seat (2-door model)...........................2-14
Head restraints .....................................................2-14
Rear seat ..............................................................2-15
Supplemental restraint system (supplemental
air bag system) (if so equipped) ..........................2-16Supplemental air bag system
(if so equipped) ....................................................2-20
Warning labels (if so equipped) ...........................2-22
Supplemental air bag warning light (if so
equipped) .............................................................2-22
Seat belts .............................................................2-24
Precautions on seat belt usage ...........................2-24
Child safety...........................................................2-26
3-point type with retractor ....................................2-27
2-point type without retractor (rear center lap
belt).......................................................................2-29
Seat belt extenders ..............................................2-30
Seat belt maintenance .........................................2-30
Child restraints for infants and small children......2-31
Top strap child restraint .......................................2-34
Tilting steering wheel ...........................................2-37
Outside mirror control...........................................2-38
Inside mirror .........................................................2-39
Vanity mirror (if so equipped)...............................2-39
ZX
Page 30 of 194

A key number plate is supplied with your
key. Record the key number that is on the
key number plate and keep it in a safe place
(such as your wallet), NOT IN THE CAR. If
you lose your keys, see your NISSAN
dealer for duplicates by using the key num-
ber. NISSAN does not record key numbers
so it is very important to keep track of your
key number plate.
A key number is only necessary when you
have lost all keys and do not have one to
duplicate from. If you still have a key, this
key can be duplicated by your NISSAN
dealer or a locksmith shop.
Locking front door with key
To lock the door, turn the key towards the
front of the vehicle.
To unlock, turn it towards the rear.
Locking the door without key
To lock the door from the outside without a
key, move the inside lock knob to the lock
position, then close the door.
When locking the door this way, be certain
not to leave the key inside the vehicle.
APD0619
APD0622
PD1160M
KEY DOOR LOCKS
2-2
ZX
Page 31 of 194
POWER DOOR LOCK
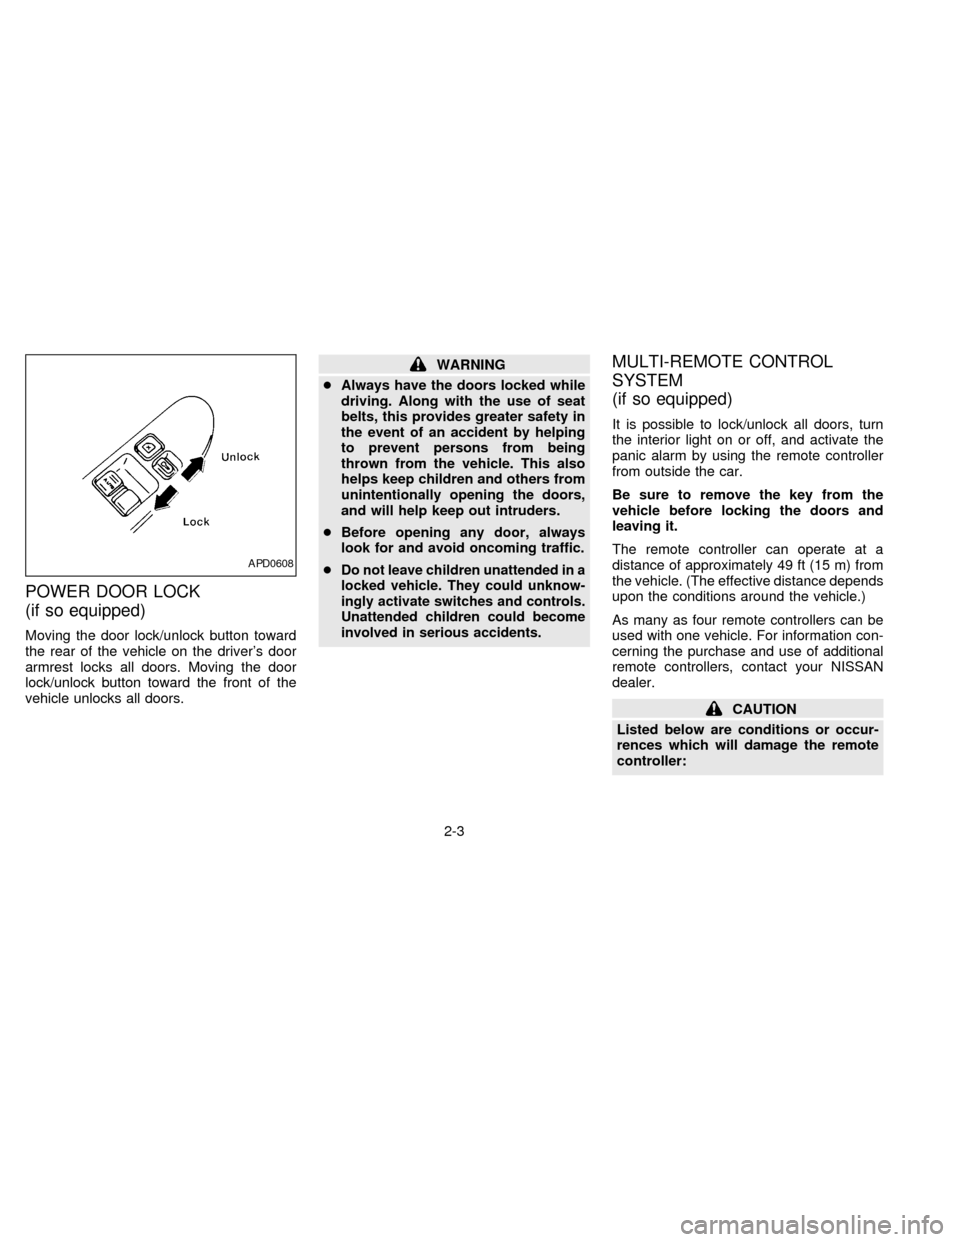
(if so equipped)
Moving the door lock/unlock button toward
the rear of the vehicle on the driver's door
armrest locks all doors. Moving the door
lock/unlock button toward the front of the
vehicle unlocks all doors.
WARNING
cAlways have the doors locked while
driving. Along with the use of seat
belts, this provides greater safety in
the event of an accident by helping
to prevent persons from being
thrown from the vehicle. This also
helps keep children and others from
unintentionally opening the doors,
and will help keep out intruders.
cBefore opening any door, always
look for and avoid oncoming traffic.
c
Do not leave children unattended in a
locked vehicle. They could unknow-
ingly activate switches and controls.
Unattended children could become
involved in serious accidents.
MULTI-REMOTE CONTROL
SYSTEM
(if so equipped)
It is possible to lock/unlock all doors, turn
the interior light on or off, and activate the
panic alarm by using the remote controller
from outside the car.
Be sure to remove the key from the
vehicle before locking the doors and
leaving it.
The remote controller can operate at a
distance of approximately 49 ft (15 m) from
the vehicle. (The effective distance depends
upon the conditions around the vehicle.)
As many as four remote controllers can be
used with one vehicle. For information con-
cerning the purchase and use of additional
remote controllers, contact your NISSAN
dealer.
CAUTION
Listed below are conditions or occur-
rences which will damage the remote
controller:
APD0608
2-3
ZX
Page 34 of 194

If the battery is removed for any reason
other than replacement, perform step 4
above.
cAn improperly disposed battery can
hurt the environment. Always confirm
local regulations for battery disposal.
cThe multi-remote controller is water-
resistant; however, if it does get wet,
immediately wipe completely dry.
cThe operational range of the multi-
remote controller extends to approxi-
mately 49 ft (15 m) from the vehicle.
This range may vary with conditions.
FCC Notice:
Changes or modifications not expressly
approved by the manufacturer for com-
pliance could void the user's authority to
operate the equipment. This device com-
plies with Part 15 of the FCC Rules and
RSS-210 of Industry Canada. Operation
is subject to the following two condi-
tions: (1) This device may not cause
harmful interference, and (2) this device
must accept any interference received,
including interference that may cause
undesired operation of the device.
CHILD SAFETY REAR DOOR
LOCK (4-door only)
Child safety locks help prevent doors from
being opened accidentally, especially when
small children are in the vehicle.
The child safety lock levers are located on
the edge of the rear doors.
When the lever is in the lock position, the
rear door can be opened only from the
outside.
PD1161M
2-6
ZX
Page 42 of 194
TILTING FRONT SEAT (2-door
model)
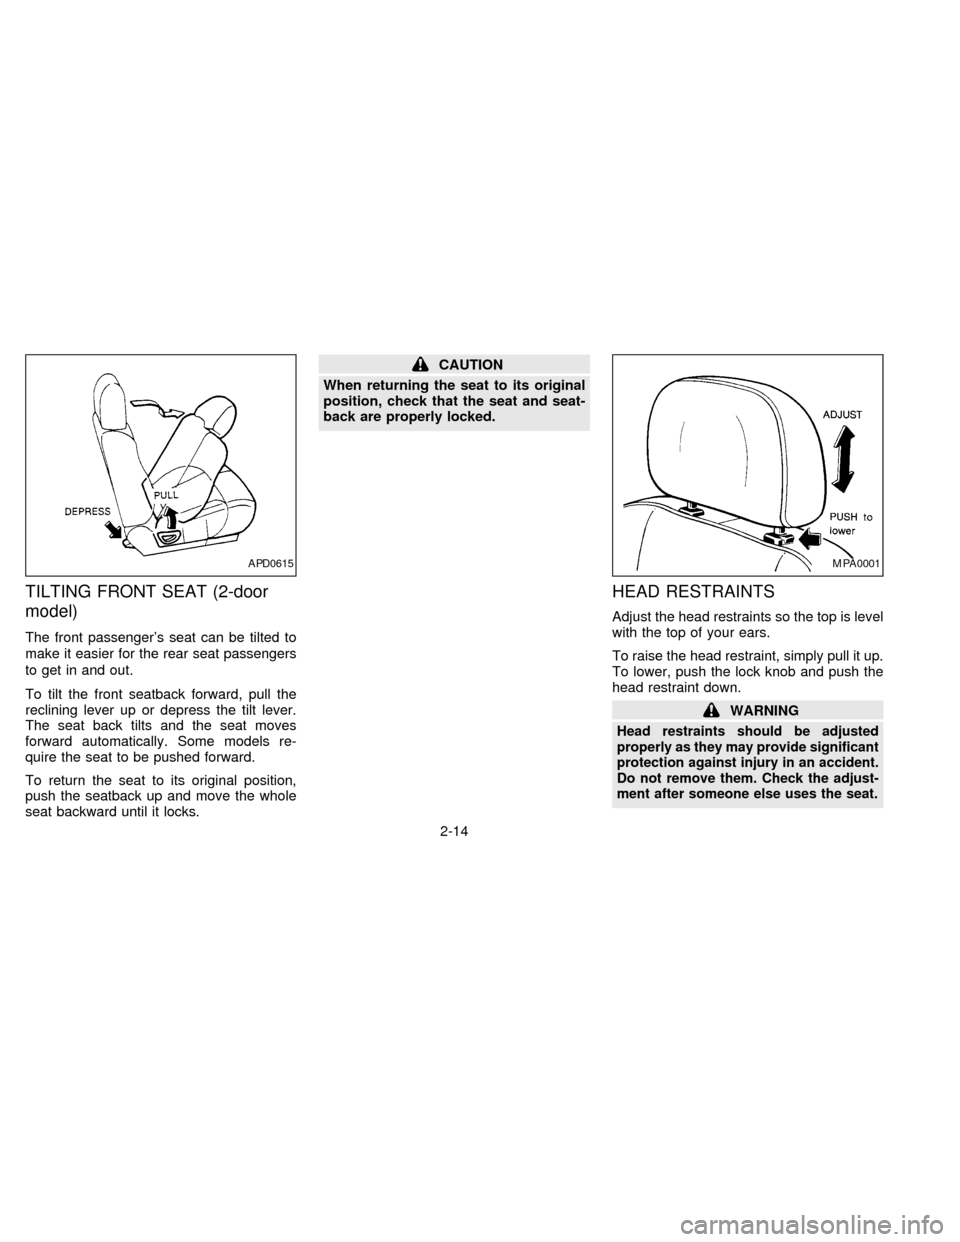
The front passenger's seat can be tilted to
make it easier for the rear seat passengers
to get in and out.
To tilt the front seatback forward, pull the
reclining lever up or depress the tilt lever.
The seat back tilts and the seat moves
forward automatically. Some models re-
quire the seat to be pushed forward.
To return the seat to its original position,
push the seatback up and move the whole
seat backward until it locks.
CAUTION
When returning the seat to its original
position, check that the seat and seat-
back are properly locked.
HEAD RESTRAINTS
Adjust the head restraints so the top is level
with the top of your ears.
To raise the head restraint, simply pull it up.
To lower, push the lock knob and push the
head restraint down.
WARNING
Head restraints should be adjusted
properly as they may provide significant
protection against injury in an accident.
Do not remove them. Check the adjust-
ment after someone else uses the seat.
APD0615MPA0001
2-14
ZX
Page 43 of 194
REAR SEAT
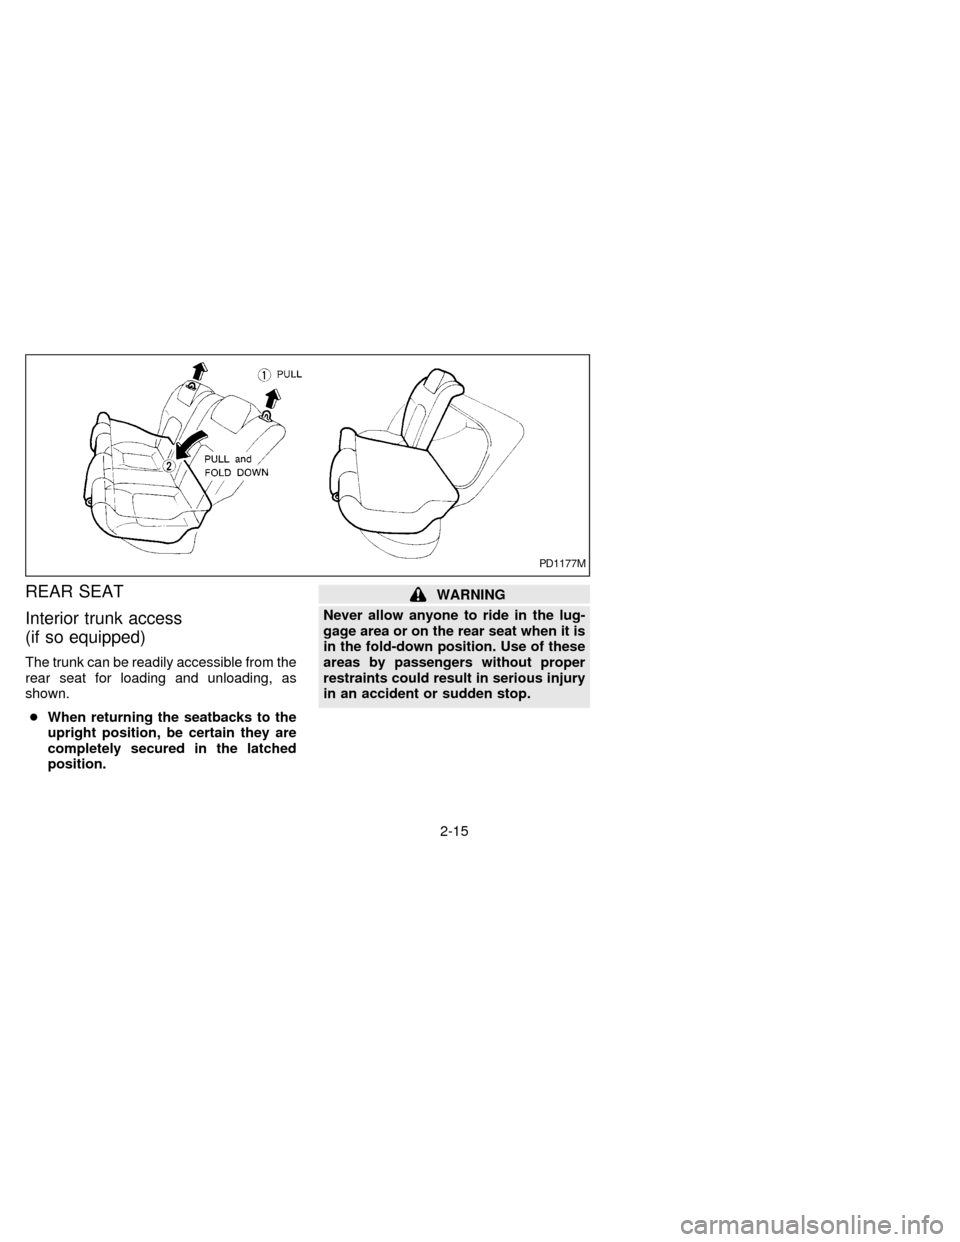
Interior trunk access
(if so equipped)
The trunk can be readily accessible from the
rear seat for loading and unloading, as
shown.
cWhen returning the seatbacks to the
upright position, be certain they are
completely secured in the latched
position.
WARNING
Never allow anyone to ride in the lug-
gage area or on the rear seat when it is
in the fold-down position. Use of these
areas by passengers without proper
restraints could result in serious injury
in an accident or sudden stop.
PD1177M
2-15
ZX
Page 45 of 194
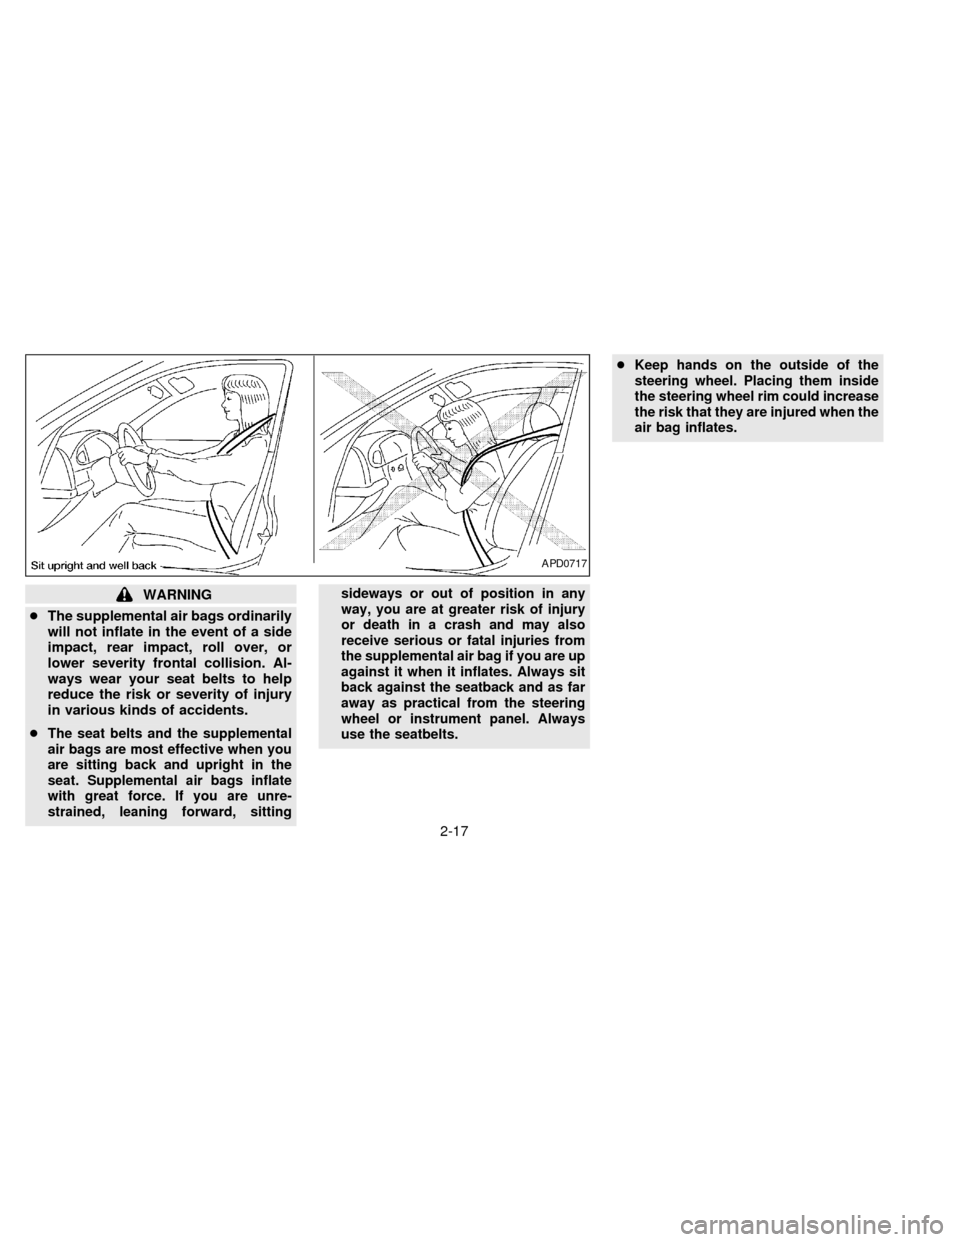
WARNING
cThe supplemental air bags ordinarily
will not inflate in the event of a side
impact, rear impact, roll over, or
lower severity frontal collision. Al-
ways wear your seat belts to help
reduce the risk or severity of injury
in various kinds of accidents.
c
The seat belts and the supplemental
air bags are most effective when you
are sitting back and upright in the
seat. Supplemental air bags inflate
with great force. If you are unre-
strained, leaning forward, sittingsideways or out of position in any
way, you are at greater risk of injury
or death in a crash and may also
receive serious or fatal injuries from
the supplemental air bag if you are up
against it when it inflates. Always sit
back against the seatback and as far
away as practical from the steering
wheel or instrument panel. Always
use the seatbelts.cKeep hands on the outside of the
steering wheel. Placing them inside
the steering wheel rim could increase
the risk that they are injured when the
air bag inflates.
APD0717
2-17
ZX