change wheel NISSAN SENTRA 1997 B14 / 4.G Owners Manual
[x] Cancel search | Manufacturer: NISSAN, Model Year: 1997, Model line: SENTRA, Model: NISSAN SENTRA 1997 B14 / 4.GPages: 194, PDF Size: 1.62 MB
Page 49 of 194
cNo unauthorized changes should be
made to any components or wiring of
the supplemental air bag system. This
is to prevent accidental inflation of
the supplemental air bag or damage
to the supplemental air bag system.
cDo not make unauthorized changes
to your vehicle's electrical system,
suspension system or front end
structure. This could affect proper
operation of the supplemental air
bag system.
cTampering with the supplemental air
bag system may result in serious
personal injury. Tampering includes
changes to the steering wheel and
the instrument panel assembly by
placing material over the steering
wheel pad and above the instrument
panel, or by installing additional trim
material around the supplemental air
bag system.cWork around and on the supplemen-
tal air bag system should be done by
an authorized NISSAN dealer. Instal-
lation of electrical equipment should
also be done by an authorized NIS-
SAN dealer. The yellow SRS wiring
should not be modified or discon-
nected. Unauthorized electrical test
equipment and probing devices
should not be used on the supple-
mental air bag system.
cThe SRS wiring harnesses are cov-
ered with yellow insulation either
just before the harness connectors
or over the complete harness for
easy identification.When selling your vehicle, we request that
you inform the buyer about the supplemen-
tal air bag system and guide the buyer to the
appropriate sections in this Owner's
Manual.
2-21
ZX
Page 109 of 194
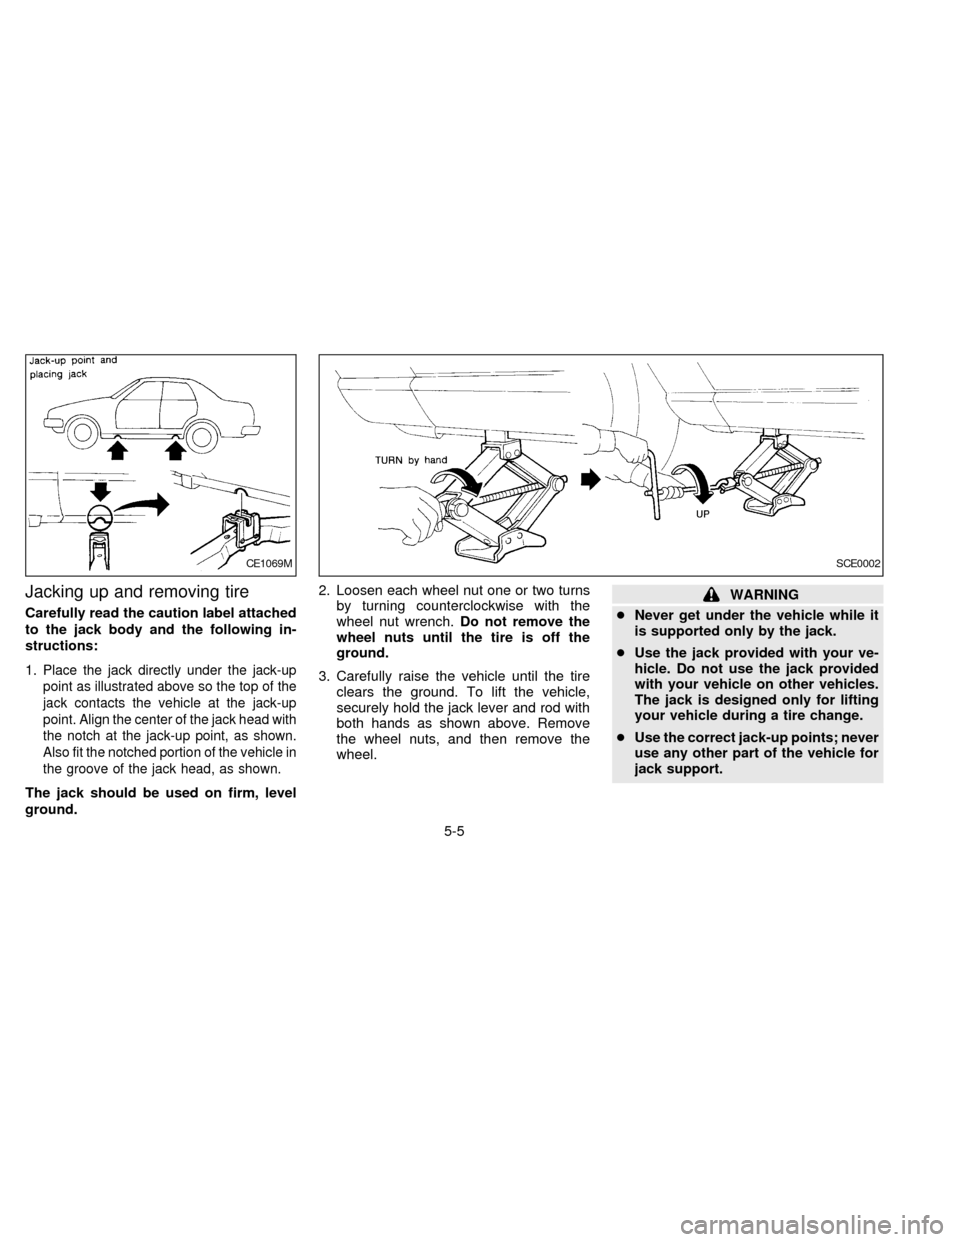
Jacking up and removing tire
Carefully read the caution label attached
to the jack body and the following in-
structions:
1.
Place the jack directly under the jack-up
point as illustrated above so the top of the
jack contacts the vehicle at the jack-up
point. Align the center of the jack head with
the notch at the jack-up point, as shown.
Also fit the notched portion of the vehicle in
the groove of the jack head, as shown.
The jack should be used on firm, level
ground.2. Loosen each wheel nut one or two turns
by turning counterclockwise with the
wheel nut wrench.Do not remove the
wheel nuts until the tire is off the
ground.
3. Carefully raise the vehicle until the tire
clears the ground. To lift the vehicle,
securely hold the jack lever and rod with
both hands as shown above. Remove
the wheel nuts, and then remove the
wheel.
WARNING
cNever get under the vehicle while it
is supported only by the jack.
cUse the jack provided with your ve-
hicle. Do not use the jack provided
with your vehicle on other vehicles.
The jack is designed only for lifting
your vehicle during a tire change.
cUse the correct jack-up points; never
use any other part of the vehicle for
jack support.
CE1069MSCE0002
5-5
ZX
Page 157 of 194
cIf the wheels are changed for any
reason, always replace with
wheelswhich have the same offset
dimension. Wheels of a different off-
set could cause early tire wear, poor
vehicle handling characteristics
and/or interference with the brake
discs/drums. Such interference can
lead to decreased braking efficiency
and/or early brake pad/shoe wear.
cDo not install a deformed wheel or
tire even if it has been repaired. Such
wheels or tires could have structural
damage and could fail without warn-
ing.
Wheel balance
Unbalanced wheels may affect vehicle han-
dling and tire life. Even with regular use,
wheels can get out of balance. Therefore,
they should be balanced as required.
Wheel balance service should be per-
formed with the wheels off the vehicle. Spin
balancing the front wheels on the vehicle
could lead to transmission damage.
Care of wheels
cWash the wheels when washing the
vehicle to maintain their appearance.
cClean the inner side of the wheels when
the wheel is changed or the underside of
the vehicle is washed.
cDo not use abrasive cleaners when
washing the wheels.
cInspect wheel rims regularly for dents or
corrosion. Such damage may cause
loss of pressure or poor seal at the tire
bead.
cNISSAN recommends waxing the road
wheels to protect against road salt in
areas where it is used during winter.
Spare tire (T-type spare tire)
Observe the following precautions if the T-type
spare tire must be used, otherwise your vehicle
could be damaged or involved in an accident:
CAUTION
cThe T-type spare tire should be used
only for emergency. It should be re-
placed by the standard tire at the
first opportunity.cDrive carefully while the T-type
spare tire is installed. Avoid sharp
turns and abrupt braking while
driving.
cPeriodically check tire inflation pres-
sure, and always keep it at 60 psi
(420 kPa, 4.2 bar).
cDo not drive your vehicle at speeds
faster than 50 MPH (80 km/h).
cDo not use tire chains on a T-type
spare tire. Tire chains will not fit
properly on the T-type spare tire and
may cause damage to the vehicle.
cWhen driving on roads covered with
snow or ice, the T-type spare tire
should be used on the rear wheel
and the original tire used on the front
wheels (drive wheels). Use tire
chains only on the front two original
tires.
cTire tread of the T-type spare tire will
wear at a faster rate than the original
tire. Replace the T-type spare tire as
soon as the tread wear indicators
appear.
7-35
ZX
Page 161 of 194

Tire rotation* ÐTires should be rotated
every 7,500 miles (12,000 km).
Wheel alignment and balance ÐIf the
vehicle should pull to either side while driv-
ing on a straight and level road, or if you
detect uneven or abnormal tire wear, there
may be a need for wheel alignment.
If the steering wheel or seat vibrates at
normal highway speeds, wheel balancing
may be needed.
Windshield wiper blades* ÐCheck for
cracks or wear if they do not wipe properly.
Doors and engine hood ÐCheck that all
doors and the engine hood operate prop-
erly. Also ensure that all latches lock se-
curely. Lubricate hinges, latches, rollers and
links if necessary. Make sure the secondary
latch keeps the hood from opening when
the primary latch is released.
When driving in areas using road salt or
other corrosive materials, check lubrication
frequently.
Lights* ÐMake sure the headlights, stop
lights, tail lights, turn signal lights, and other
lights are all operating properly and installed
securely. Also check headlight aim.INSIDE THE VEHICLE
The maintenance items listed here should
be checked on a regular basis, such as
when performing periodic maintenance,
cleaning the vehicle, etc.
Additional information on the following
items with ``*'' is found in the ``Do-it-
yourself operations'' section.
Warning lights and chimes ÐMake sure
all warning lights and chimes are operating
properly.
Windshield wiper and washer* ÐCheck
that the wipers and washer operate properly
and that the wipers do not streak.
Windshield defroster ÐCheck that the air
comes out of the defroster outlets properly
and in sufficient quantity when operating the
heater or air conditioner.
Steering wheel ÐCheck for changes in
the steering conditions, such as excessive
freeplay, hard steering or strange noises.
Seats ÐCheck seat position controls such
as seat adjusters, seatback recliner, etc. to
ensure they operate smoothly and all
latches lock securely in every position.
Check that the head restraints move up anddown smoothly and the locks hold securely
in all latched positions.
Seat belts ÐCheck that all parts of the seat
belt system (e.g., buckles, anchors, adjust-
ers and retractors) operate properly and
smoothly, and are installed securely. Check
the belt webbing for cuts, fraying, wear or
damage.
Accelerator pedal ÐCheck the pedal for
smooth operation and make sure the pedal
does not catch or require uneven effort.
Keep the floor mats away from the pedal.
Clutch pedal* ÐMake sure the pedal
operates smoothly and check that it has the
proper free travel.
Brakes ÐCheck that the brakes do not pull
the vehicle to one side when applied.
Brake pedal* ÐCheck the pedal for
smooth operation and make sure it has the
proper distance under it when depressed
fully. Check the brake booster function. Be
certain to keep floor mats away from the
pedal.
Parking brake* ÐCheck that the lever has
the proper travel and confirm that your
vehicle is held securely on a fairly steep hill
8-3
ZX
Page 184 of 194
struck from the rear, where practical
remove the hitch when not in use.
Remove receiver when not in use.
cAfter the hitch is removed, seal the
bolt holes to prevent exhaust fumes,
water or dust from entering the pas-
senger compartment.
cRegularly check that all hitch mount-
ing bolts are securely mounted.
Tire pressures
cWhen towing a trailer, inflate the vehicle
tires to the recommended cold tire pres-
sure indicated on the tire placard (lo-
cated on the driver side center pillar).
cTrailer tire condition, size, load rating
and proper inflation pressure should be
in accordance with the trailer and tire
manufacturers' specifications.
Safety chain
Always use a suitable chain between your
vehicle and the trailer. The chain should be
crossed and should be attached to the hitch,
not to the vehicle bumper or axle. Be sure to
leave enough slack in the chain to permit
turning corners.
Trailer lights
Trailer lights should comply with federal
and/ or local regulations. When wiring the
vehicle for towing, connect the stop and tail
light pickup into the vehicle electrical circuit.
Trailer brakes
If your trailer is equipped with a braking
system, make sure it conforms to federal
and/or local regulations and that it is prop-
erly installed.
WARNING
Never connect a trailer brake system
directly to the vehicle brake system.
Pre-towing tips
cBe certain your vehicle maintains a level
position when a loaded and/or unloaded
trailer is hitched. Do not drive the vehicle if
it has an abnormal nose-up or nose- down
condition; check for improper tongue load,
overload, worn suspension or other pos-
sible causes of either condition.
cAlways secure items in the trailer to
prevent load shifts while driving.cBe certain your rear view mirrors con-
form to all federal, state or local regula-
tions. If not, install any mirrors required
for towing before driving the vehicle.
Trailer towing tips
In order to gain skill and an understanding
of the vehicle's behavior, you should prac-
tice turning, stopping and backing up in an
area which is free from traffic. Steering,
stability, and braking performance are
somewhat different than under normal driv-
ing conditions.
cAlways secure items in the trailer to
prevent load shift while driving.
c
Avoid abrupt starts, acceleration or stops.
cAvoid sharp turns or lane changes.
cAlways drive your vehicle at a moderate
speed.
c
Always block the wheels on both vehicle
and trailer when parking. Parking on a
slope is not recommended; however, if
you must do so, and if your vehicle is
equipped with automatic transmission,
first block the wheels and apply the park-
ing brake, and then move the transmis-
sion shift lever into the P position. If you
move the shift lever to the P position
before blocking the wheels and applying
9-16
ZX
Page 185 of 194
the parking brake, transmission damage
could occur.
cWhen going down a hill, shift into a lower
gear and use the engine braking effect.
When ascending a long grade, down-
shift the transmission to a lower gear
and reduce speed to reduce chances of
engine overloading and/or overheating.
cIf the engine temperature coolant rises
to an extremely high temperature when
the air conditioning system is on, turn off
the air conditioner. Coolant heat can be
additionally vented by opening the win-
dows, switching the fan control to high
and setting the temperature control to
the HOT position.
cTrailer towing requires more fuel than
normal circumstances.
cAvoid towing a trailer for your vehicle's
first 500 miles (800 km).
cHave your vehicle serviced more often
than at intervals specified in the recom-
mended Maintenance Schedule.
cWhen making a turn, your trailer wheels
will be closer to the inside of the turn
than your vehicle wheels. To compen-
sate for this, make a larger than normal
turning radius during the turn.cCrosswinds and rough roads adversely
affect vehicle/trailer handling, possibly
causing vehicle sway. When being
passed by larger vehicles, be prepared
for possible changes in crosswinds that
could affect vehicle handling. If swaying
does occur, firmly grip the steering
wheel, steer straight ahead, and imme-
diately (but gradually) reduce vehicle
speed. This combination helps to stabi-
lize the vehicle. Never increase speed.
cBe careful when passing other vehicles.
Passing while towing a trailer requires
considerably more distance than normal
passing. Remember the length of the
trailer must also pass the other vehicle
before you can safely change lanes.
cTo maintain engine braking efficiency
and electrical charging performance, do
not use fifth gear (manual transmission)
or overdrive (automatic transmission).
cAvoid holding the brake pedal down too
long or too frequently. This could cause
the brakes to overheat, resulting in re-
duced braking efficiency.
When towing a trailer, change the oil in
the transmission more frequently.
See the Maintenance Schedule.DOT Quality Grades: All passenger car tires
must conform to Federal Safety Require-
ments in addition to these grades.
Treadwear
Treadwear grade is a comparative rating
based on tire wear rate when tested under
controlled conditions on specified govern-
ment test courses. For example, a tire
graded 150 would wear one and a half
(1-1/2) times as well on the government
course as a tire graded 100. However,
relative tire performance depends on actual
driving conditions, and may vary signifi-
cantly from the norm due to variations in
driving habits, service practices and differ-
ences in road characteristics and climate.
Traction A, B and C
Traction grades are A (the highest), B and C.
They represent a tire's ability to stop on wet
pavement as measured under controlled con-
ditions, on specified government test sur-
faces of asphalt and concrete. A tire marked
with a C may have poor traction performance.
WARNING
The traction grade assigned to your
vehicle tires is based on straight line
UNIFORM TIRE QUALITY
GRADING
9-17
ZX