low beam NISSAN SENTRA 1997 B14 / 4.G Owners Manual
[x] Cancel search | Manufacturer: NISSAN, Model Year: 1997, Model line: SENTRA, Model: NISSAN SENTRA 1997 B14 / 4.GPages: 194, PDF Size: 1.62 MB
Page 13 of 194

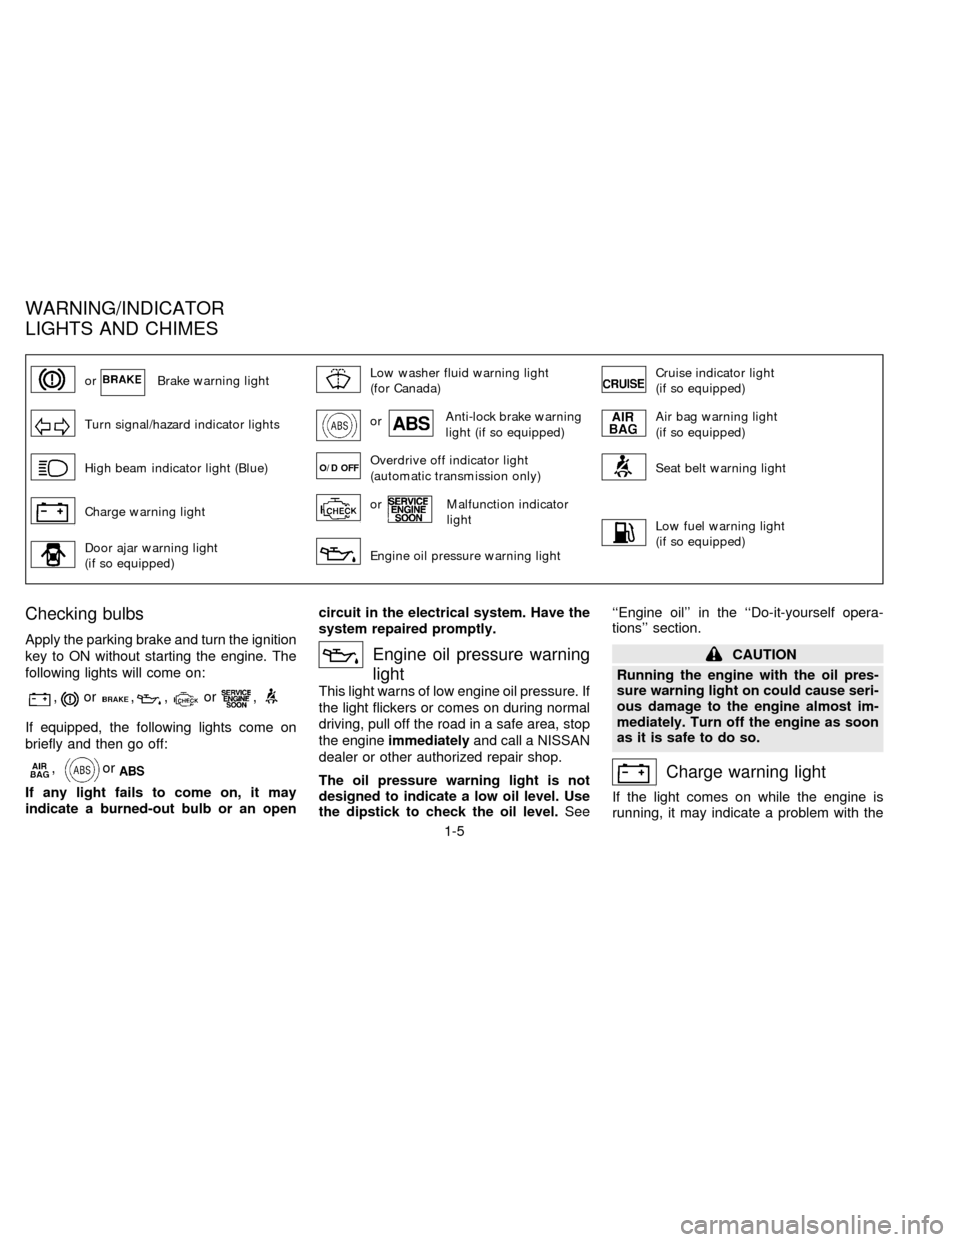
orBrake warning lightLow washer fluid warning light
(for Canada)Cruise indicator light
(if so equipped)
Turn signal/hazard indicator lightsorAnti-lock brake warning
light (if so equipped)Air bag warning light
(if so equipped)
High beam indicator light (Blue)O/D OFFOverdrive off indicator light
(automatic transmission only)Seat belt warning light
Charge warning lightorMalfunction indicator
light
Low fuel warning light
(if so equipped)
Door ajar warning light
(if so equipped)Engine oil pressure warning light
Checking bulbs
Apply the parking brake and turn the ignition
key to ON without starting the engine. The
following lights will come on:
,or,,or,
If equipped, the following lights come on
briefly and then go off:
,or
If any light fails to come on, it may
indicate a burned-out bulb or an opencircuit in the electrical system. Have the
system repaired promptly.
Engine oil pressure warning
light
This light warns of low engine oil pressure. If
the light flickers or comes on during normal
driving, pull off the road in a safe area, stop
the engineimmediatelyand call a NISSAN
dealer or other authorized repair shop.
The oil pressure warning light is not
designed to indicate a low oil level. Use
the dipstick to check the oil level.See``Engine oil'' in the ``Do-it-yourself opera-
tions'' section.
CAUTION
Running the engine with the oil pres-
sure warning light on could cause seri-
ous damage to the engine almost im-
mediately. Turn off the engine as soon
as it is safe to do so.
Charge warning light
If the light comes on while the engine is
running, it may indicate a problem with the
WARNING/INDICATOR
LIGHTS AND CHIMES
1-5
ZX
Page 15 of 194

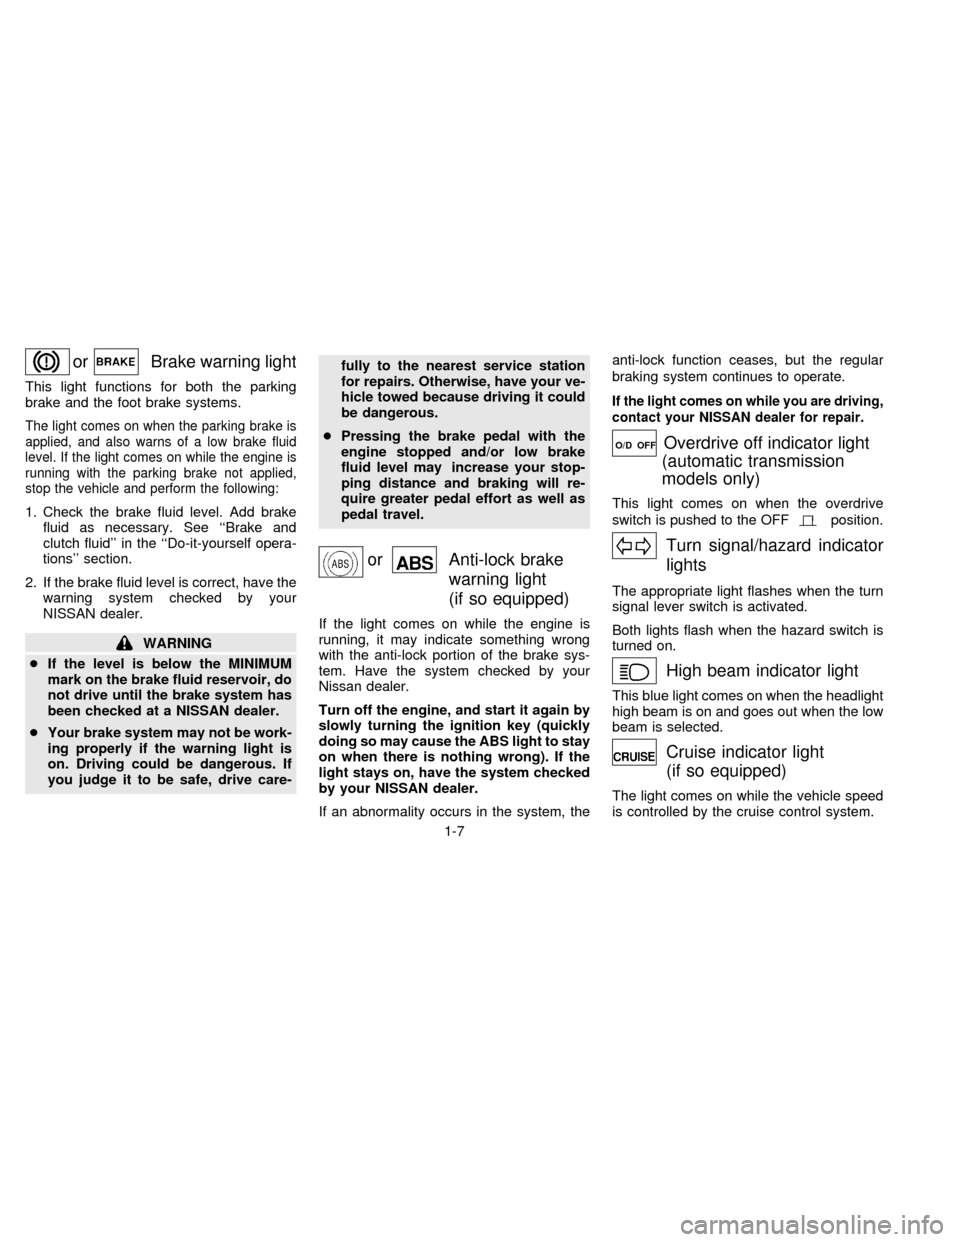
orBrake warning light
This light functions for both the parking
brake and the foot brake systems.
The light comes on when the parking brake is
applied, and also warns of a low brake fluid
level. If the light comes on while the engine is
running with the parking brake not applied,
stop the vehicle and perform the following:
1. Check the brake fluid level. Add brake
fluid as necessary. See ``Brake and
clutch fluid'' in the ``Do-it-yourself opera-
tions'' section.
2. If the brake fluid level is correct, have the
warning system checked by your
NISSAN dealer.
WARNING
cIf the level is below the MINIMUM
mark on the brake fluid reservoir, do
not drive until the brake system has
been checked at a NISSAN dealer.
cYour brake system may not be work-
ing properly if the warning light is
on. Driving could be dangerous. If
you judge it to be safe, drive care-fully to the nearest service station
for repairs. Otherwise, have your ve-
hicle towed because driving it could
be dangerous.
cPressing the brake pedal with the
engine stopped and/or low brake
fluid level may increase your stop-
ping distance and braking will re-
quire greater pedal effort as well as
pedal travel.
orAnti-lock brake
warning light
(if so equipped)
If the light comes on while the engine is
running, it may indicate something wrong
with the anti-lock portion of the brake sys-
tem. Have the system checked by your
Nissan dealer.
Turn off the engine, and start it again by
slowly turning the ignition key (quickly
doing so may cause the ABS light to stay
on when there is nothing wrong). If the
light stays on, have the system checked
by your NISSAN dealer.
If an abnormality occurs in the system, theanti-lock function ceases, but the regular
braking system continues to operate.
If the light comes on while you are driving,
contact your NISSAN dealer for repair.
O/D OFFOverdrive off indicator light
(automatic transmission
models only)
This light comes on when the overdrive
switch is pushed to the OFF
position.
Turn signal/hazard indicator
lights
The appropriate light flashes when the turn
signal lever switch is activated.
Both lights flash when the hazard switch is
turned on.
High beam indicator light
This blue light comes on when the headlight
high beam is on and goes out when the low
beam is selected.
Cruise indicator light
(if so equipped)
The light comes on while the vehicle speed
is controlled by the cruise control system.
1-7
ZX
Page 20 of 194

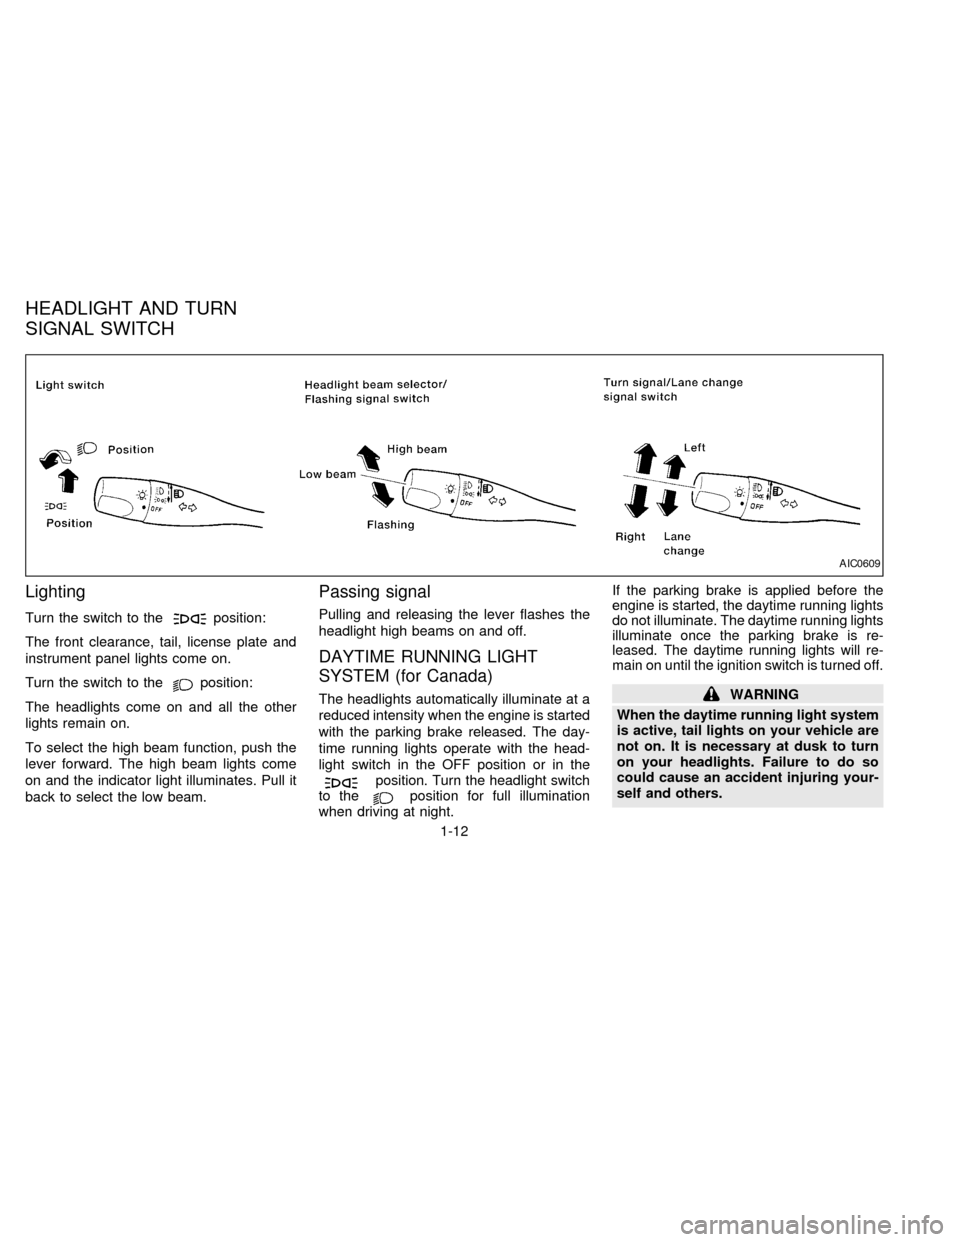
Lighting
Turn the switch to theposition:
The front clearance, tail, license plate and
instrument panel lights come on.
Turn the switch to the
position:
The headlights come on and all the other
lights remain on.
To select the high beam function, push the
lever forward. The high beam lights come
on and the indicator light illuminates. Pull it
back to select the low beam.
Passing signal
Pulling and releasing the lever flashes the
headlight high beams on and off.
DAYTIME RUNNING LIGHT
SYSTEM (for Canada)
The headlights automatically illuminate at a
reduced intensity when the engine is started
with the parking brake released. The day-
time running lights operate with the head-
light switch in the OFF position or in the
position. Turn the headlight switch
to theposition for full illumination
when driving at night.If the parking brake is applied before the
engine is started, the daytime running lights
do not illuminate. The daytime running lights
illuminate once the parking brake is re-
leased. The daytime running lights will re-
main on until the ignition switch is turned off.
WARNING
When the daytime running light system
is active, tail lights on your vehicle are
not on. It is necessary at dusk to turn
on your headlights. Failure to do so
could cause an accident injuring your-
self and others.
AIC0609
HEADLIGHT AND TURN
SIGNAL SWITCH
1-12
ZX
Page 21 of 194

Turn signal
Move the lever up or down to signal the
turning direction. When the turn is com-
pleted, the turn signals cancel automati-
cally.
Lane change signal
To signal a lane change, move the lever up
or down to the point where the indicator light
begins to flash, but the lever does not latch.
The instrument brightness control operates
when the headlight switch is in the
orposition.
Turn the control to adjust the brightness of
instrument panel lights.To turn the front fog lights on, rotate the
switch to theposition.
To turn them off, turn the switch toward the
back of the vehicle to the OFF position.
The low-beam headlight function must be
on for the fog lights to operate. The fog
lights automatically turn off whenever the
high-beam headlight function is selected.
AIC0608AIC0618
INSTRUMENT BRIGHTNESS
CONTROLFRONT FOG LIGHT SWITCH
(if so equipped)
1-13
ZX
Page 148 of 194

cAiming is not necessary after replac-
ing the bulb.
cDo not leave the bulb out of the
headlight reflector for a long period
of time as dust, moisture, and smoke
may enter the headlight body and
affect the performance of the head-
light.
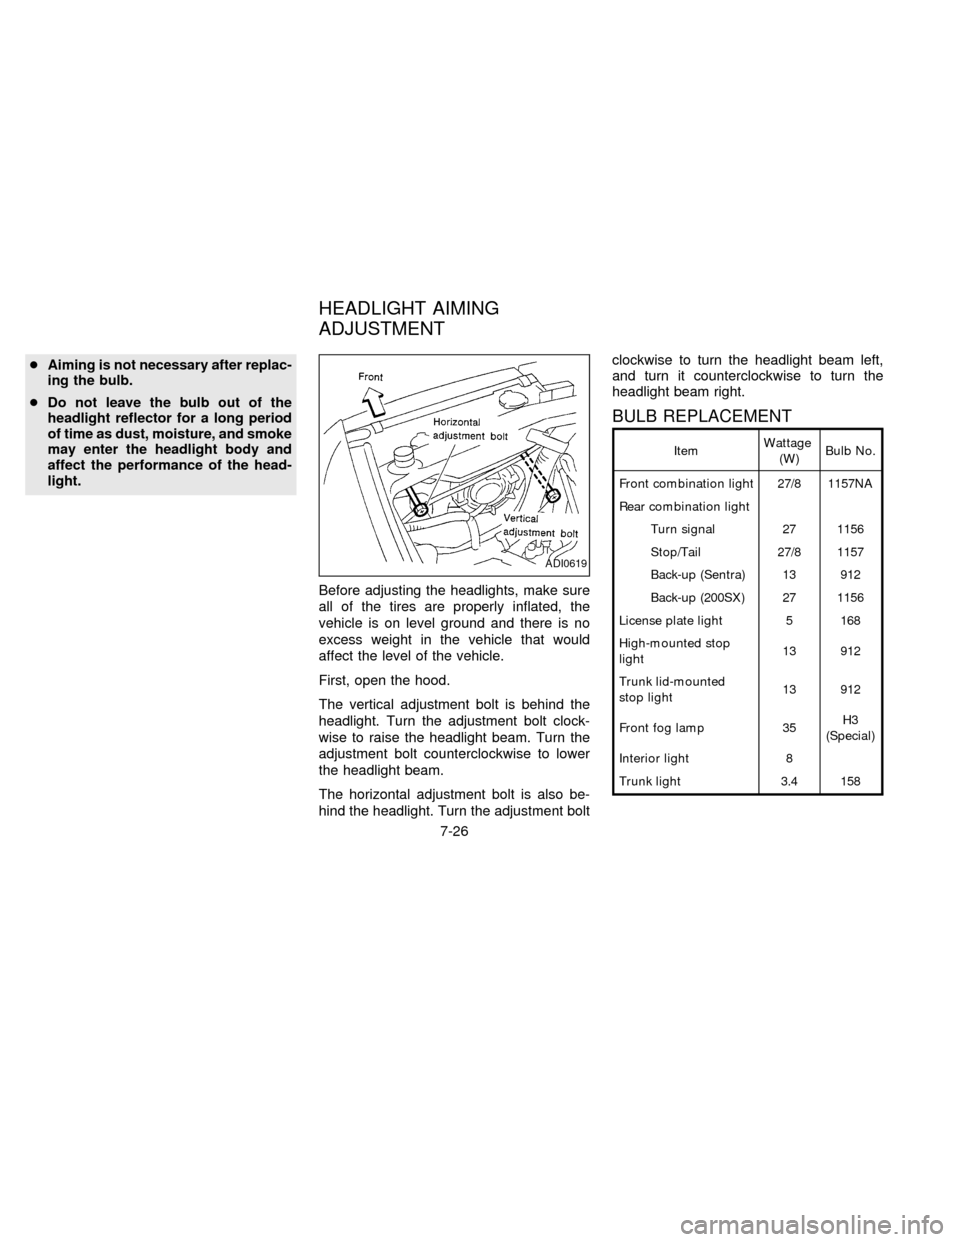
Before adjusting the headlights, make sure
all of the tires are properly inflated, the
vehicle is on level ground and there is no
excess weight in the vehicle that would
affect the level of the vehicle.
First, open the hood.
The vertical adjustment bolt is behind the
headlight. Turn the adjustment bolt clock-
wise to raise the headlight beam. Turn the
adjustment bolt counterclockwise to lower
the headlight beam.
The horizontal adjustment bolt is also be-
hind the headlight. Turn the adjustment boltclockwise to turn the headlight beam left,
and turn it counterclockwise to turn the
headlight beam right.
BULB REPLACEMENT
ItemWattage
(W)Bulb No.
Front combination light 27/8 1157NA
Rear combination light
Turn signal 27 1156
Stop/Tail 27/8 1157
Back-up (Sentra) 13 912
Back-up (200SX) 27 1156
License plate light 5 168
High-mounted stop
light13 912
Trunk lid-mounted
stop light13 912
Front fog lamp 35H3
(Special)
Interior light 8
Trunk light 3.4 158
ADI0619
HEADLIGHT AIMING
ADJUSTMENT
7-26
ZX