Transmission NISSAN SENTRA 1998 B14 / 4.G Owners Manual
[x] Cancel search | Manufacturer: NISSAN, Model Year: 1998, Model line: SENTRA, Model: NISSAN SENTRA 1998 B14 / 4.GPages: 216, PDF Size: 1.82 MB
Page 46 of 216
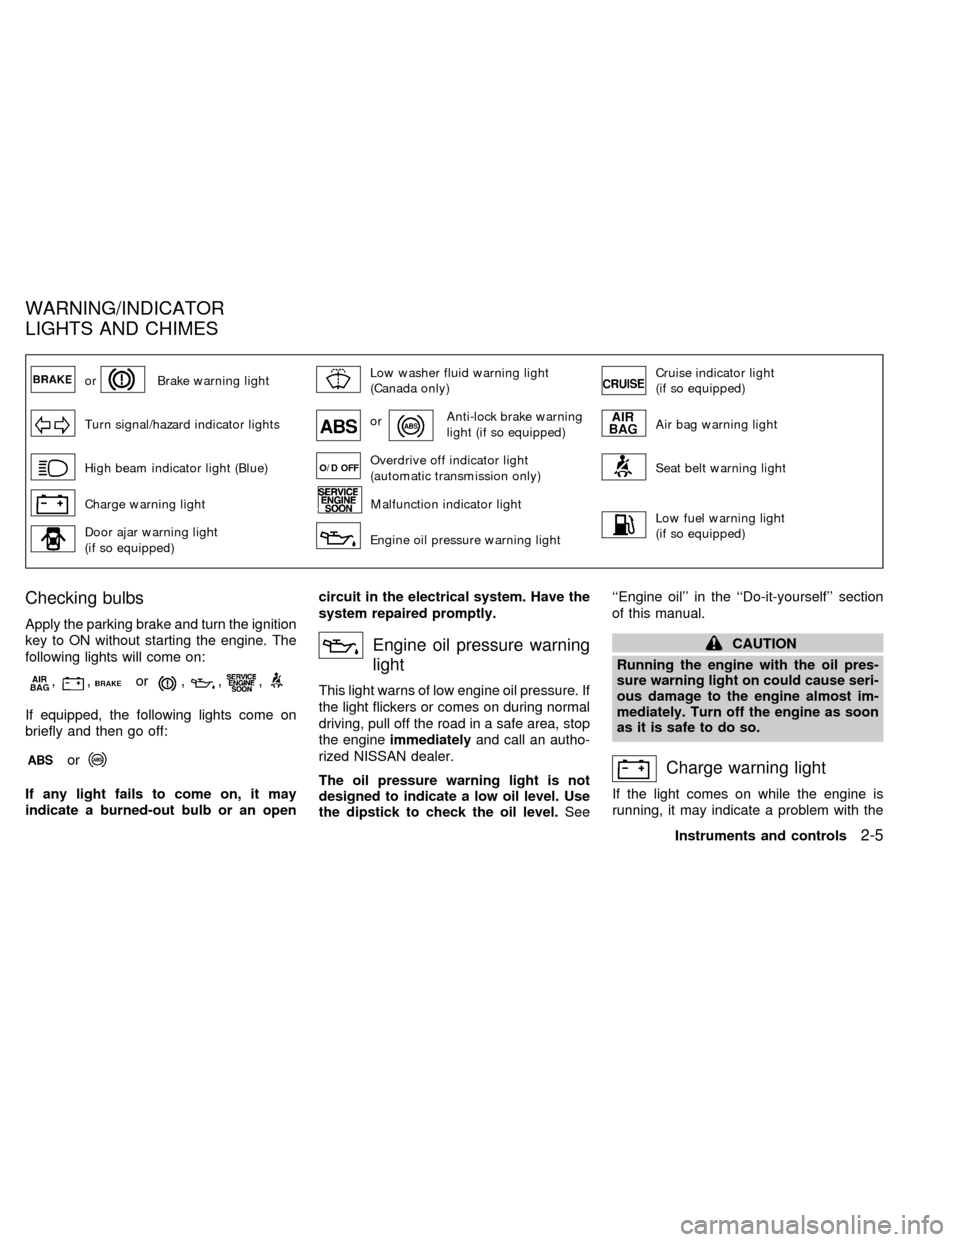
orBrake warning lightLow washer fluid warning light
(Canada only)Cruise indicator light
(if so equipped)
Turn signal/hazard indicator lightsorAnti-lock brake warning
light (if so equipped)Air bag warning light
High beam indicator light (Blue)O/D OFFOverdrive off indicator light
(automatic transmission only)Seat belt warning light
Charge warning lightMalfunction indicator lightLow fuel warning light
(if so equipped)Door ajar warning light
(if so equipped)Engine oil pressure warning light
Checking bulbs
Apply the parking brake and turn the ignition
key to ON without starting the engine. The
following lights will come on:
,,or,,,
If equipped, the following lights come on
briefly and then go off:
or
If any light fails to come on, it may
indicate a burned-out bulb or an opencircuit in the electrical system. Have the
system repaired promptly.
Engine oil pressure warning
light
This light warns of low engine oil pressure. If
the light flickers or comes on during normal
driving, pull off the road in a safe area, stop
the engineimmediatelyand call an autho-
rized NISSAN dealer.
The oil pressure warning light is not
designed to indicate a low oil level. Use
the dipstick to check the oil level.See``Engine oil'' in the ``Do-it-yourself'' section
of this manual.
CAUTION
Running the engine with the oil pres-
sure warning light on could cause seri-
ous damage to the engine almost im-
mediately. Turn off the engine as soon
as it is safe to do so.
Charge warning light
If the light comes on while the engine is
running, it may indicate a problem with the
WARNING/INDICATOR
LIGHTS AND CHIMES
Instruments and controls2-5
ZX
Page 48 of 216
orBrake warning light
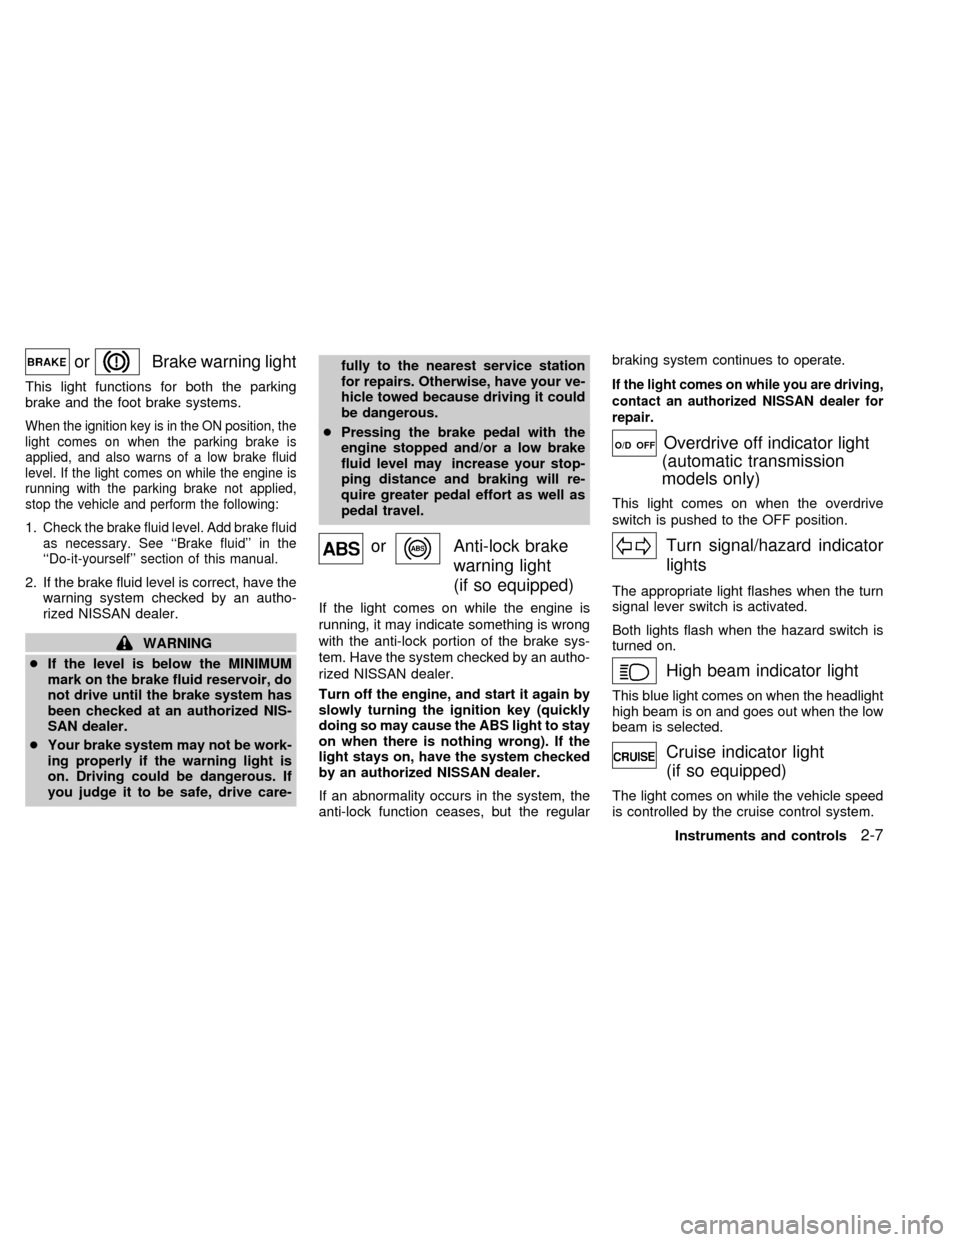
This light functions for both the parking
brake and the foot brake systems.
When the ignition key is in the ON position, the
light comes on when the parking brake is
applied, and also warns of a low brake fluid
level. If the light comes on while the engine is
running with the parking brake not applied,
stop the vehicle and perform the following:
1.Check the brake fluid level. Add brake fluid
as necessary. See ``Brake fluid'' in the
``Do-it-yourself'' section of this manual.
2. If the brake fluid level is correct, have the
warning system checked by an autho-
rized NISSAN dealer.
WARNING
cIf the level is below the MINIMUM
mark on the brake fluid reservoir, do
not drive until the brake system has
been checked at an authorized NIS-
SAN dealer.
cYour brake system may not be work-
ing properly if the warning light is
on. Driving could be dangerous. If
you judge it to be safe, drive care-fully to the nearest service station
for repairs. Otherwise, have your ve-
hicle towed because driving it could
be dangerous.
cPressing the brake pedal with the
engine stopped and/or a low brake
fluid level may increase your stop-
ping distance and braking will re-
quire greater pedal effort as well as
pedal travel.
orAnti-lock brake
warning light
(if so equipped)
If the light comes on while the engine is
running, it may indicate something is wrong
with the anti-lock portion of the brake sys-
tem. Have the system checked by an autho-
rized NISSAN dealer.
Turn off the engine, and start it again by
slowly turning the ignition key (quickly
doing so may cause the ABS light to stay
on when there is nothing wrong). If the
light stays on, have the system checked
by an authorized NISSAN dealer.
If an abnormality occurs in the system, the
anti-lock function ceases, but the regularbraking system continues to operate.
If the light comes on while you are driving,
contact an authorized NISSAN dealer for
repair.
O/D OFFOverdrive off indicator light
(automatic transmission
models only)
This light comes on when the overdrive
switch is pushed to the OFF position.
Turn signal/hazard indicator
lights
The appropriate light flashes when the turn
signal lever switch is activated.
Both lights flash when the hazard switch is
turned on.
High beam indicator light
This blue light comes on when the headlight
high beam is on and goes out when the low
beam is selected.
Cruise indicator light
(if so equipped)
The light comes on while the vehicle speed
is controlled by the cruise control system.
Instruments and controls
2-7
ZX
Page 106 of 216

5 Starting and driving
Precautions when starting and driving ...................5-2
Exhaust gas (carbon monoxide) ............................5-2
Three way catalyst .................................................5-2
Avoiding collision and rollover................................5-3
Drinking alcohol/drugs and driving .........................5-3
Ignition switch .........................................................5-4
Manual transmission ..............................................5-4
Automatic transmission ..........................................5-4
Before starting the engine ......................................5-5
Driving with automatic transmission
(if so equipped) ......................................................5-6
Overdrive switch .....................................................5-8Driving with manual transmission ..........................5-9
Starting the engine ...............................................5-11
Parking brake operation .......................................5-11
Cruise control (if so equipped) .............................5-12
Break-in schedule ................................................5-14
Increasing fuel economy ......................................5-14
Parking/parking on hills ........................................5-15
Power steering system .........................................5-16
Brake system........................................................5-17
Anti-lock brake system (ABS) (if so equipped) ....5-17
Cold weather driving ............................................5-19
ZX
Page 109 of 216
MANUAL TRANSMISSION
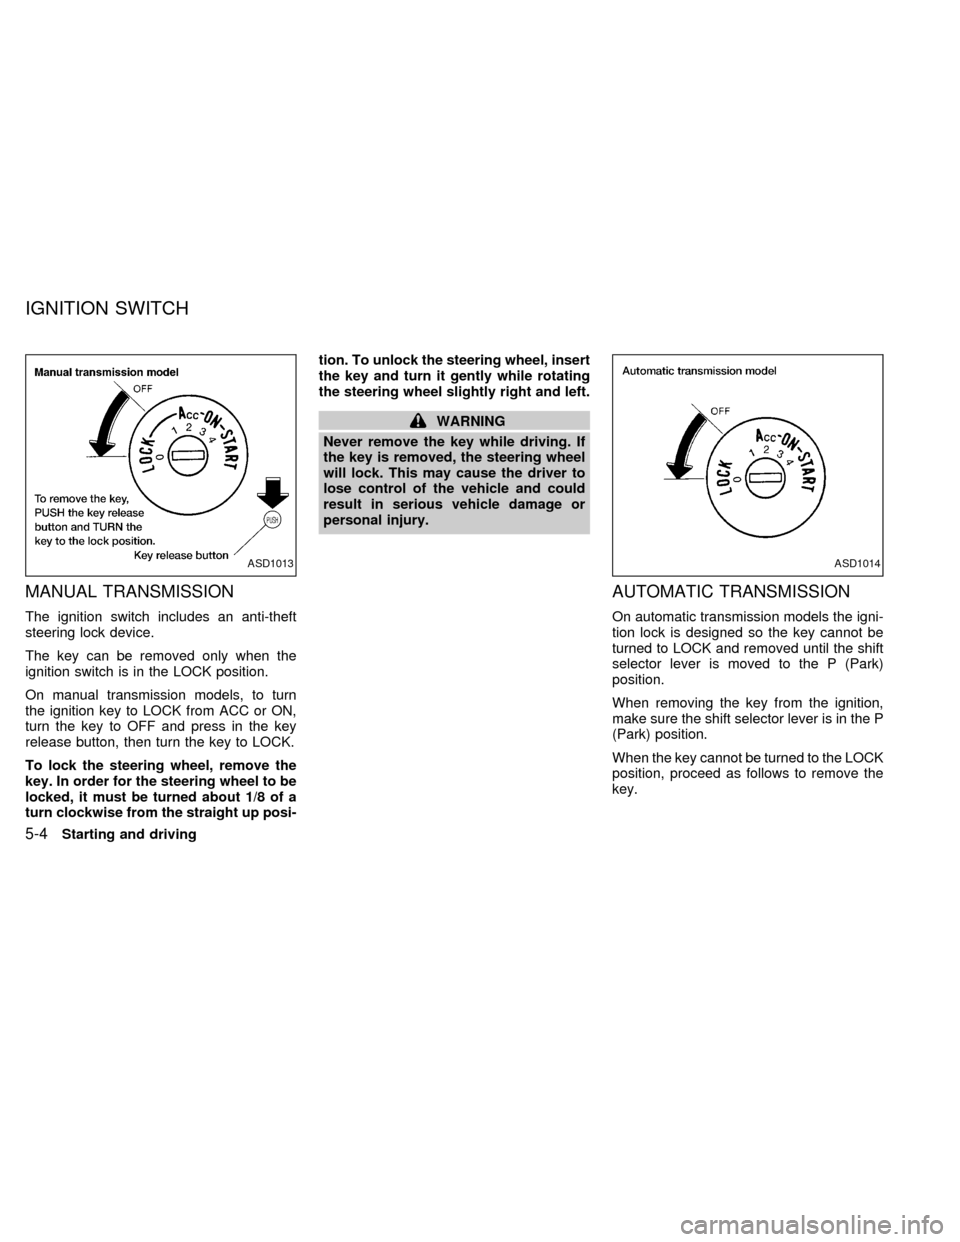
The ignition switch includes an anti-theft
steering lock device.
The key can be removed only when the
ignition switch is in the LOCK position.
On manual transmission models, to turn
the ignition key to LOCK from ACC or ON,
turn the key to OFF and press in the key
release button, then turn the key to LOCK.
To lock the steering wheel, remove the
key. In order for the steering wheel to be
locked, it must be turned about 1/8 of a
turn clockwise from the straight up posi-tion. To unlock the steering wheel, insert
the key and turn it gently while rotating
the steering wheel slightly right and left.
WARNING
Never remove the key while driving. If
the key is removed, the steering wheel
will lock. This may cause the driver to
lose control of the vehicle and could
result in serious vehicle damage or
personal injury.
AUTOMATIC TRANSMISSION
On automatic transmission models the igni-
tion lock is designed so the key cannot be
turned to LOCK and removed until the shift
selector lever is moved to the P (Park)
position.
When removing the key from the ignition,
make sure the shift selector lever is in the P
(Park) position.
When the key cannot be turned to the LOCK
position, proceed as follows to remove the
key.
ASD1013ASD1014
IGNITION SWITCH
5-4Starting and driving
ZX
Page 110 of 216
1) Move the shift selector lever into the P
(Park) position.
2) Turn the ignition key slightly toward the
ON position.
3) Turn the key to the LOCK position.
4) Remove the key.
If the key is removed from the ignition
switch, the shift selector lever cannot be
moved from P (Park).The shift selector
lever can be moved if the ignition switch
is in the ACC position. The shift selector
lever can also be moved if the ignition
switch is in the ON position and the foot
brake pedal is depressed.
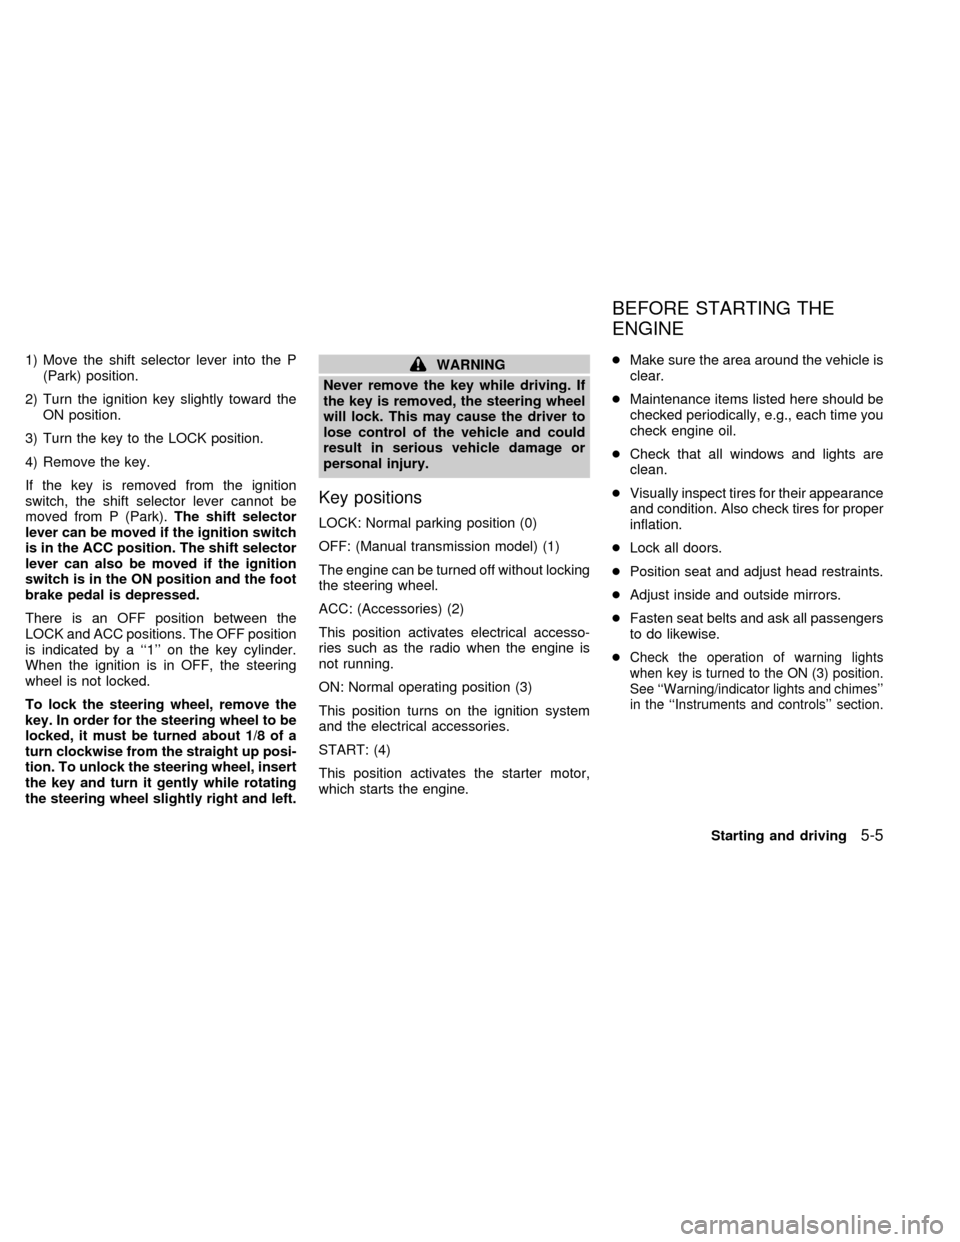
There is an OFF position between the
LOCK and ACC positions. The OFF position
is indicated by a ``1'' on the key cylinder.
When the ignition is in OFF, the steering
wheel is not locked.
To lock the steering wheel, remove the
key. In order for the steering wheel to be
locked, it must be turned about 1/8 of a
turn clockwise from the straight up posi-
tion. To unlock the steering wheel, insert
the key and turn it gently while rotating
the steering wheel slightly right and left.WARNING
Never remove the key while driving. If
the key is removed, the steering wheel
will lock. This may cause the driver to
lose control of the vehicle and could
result in serious vehicle damage or
personal injury.
Key positions
LOCK: Normal parking position (0)
OFF: (Manual transmission model) (1)
The engine can be turned off without locking
the steering wheel.
ACC: (Accessories) (2)
This position activates electrical accesso-
ries such as the radio when the engine is
not running.
ON: Normal operating position (3)
This position turns on the ignition system
and the electrical accessories.
START: (4)
This position activates the starter motor,
which starts the engine.cMake sure the area around the vehicle is
clear.
cMaintenance items listed here should be
checked periodically, e.g., each time you
check engine oil.
cCheck that all windows and lights are
clean.
cVisually inspect tires for their appearance
and condition. Also check tires for proper
inflation.
cLock all doors.
cPosition seat and adjust head restraints.
cAdjust inside and outside mirrors.
cFasten seat belts and ask all passengers
to do likewise.
c
Check the operation of warning lights
when key is turned to the ON (3) position.
See ``Warning/indicator lights and chimes''
in the ``Instruments and controls'' section.
BEFORE STARTING THE
ENGINE
Starting and driving5-5
ZX
Page 111 of 216
WARNING
cDo not depress the accelerator pedal
while shifting from P (Park) or N
(Neutral) to R (Reverse), D (Drive), 2
or 1. Always depress the brake pedal
until shifting is completed. Failure to
do so could cause you to lose con-
trol and have an accident.
cCold engine idle speed is high, so
use caution when shifting into a for-
ward or reverse gear before the en-
gine has warmed up.
cNever shift to P (Park) or R (Reverse)
while the vehicle is moving. This
could cause an accident.
CAUTION
cWhen stopping the vehicle on an
uphill grade, do not hold the vehicle
by depressing the accelerator pedal.
The foot brake should be used for
this purpose.
cOn slippery roads, do not downshift.
This may cause a loss of control.The automatic transmission in you vehicle is
electronically controlled by a transmission
control module to produce maximum power
and smooth operation.
The recommended operating procedures
for this transmission are shown on the fol-
lowing pages. Follow these procedures for
maximum vehicle performance and driving
enjoyment.
Starting the vehicle
cAfter starting the engine, fully depress
the foot brake pedal before shifting the
shift selector lever to the D (Drive), R
(Reverse), 2 or 1 position. Be sure the
vehicle is at a complete stop before
attempting to shift the shift selector lever.
cKeep the foot brake pedal depressed
and shift into a driving gear.
cRelease the foot brake, then gradually
start the vehicle in motion.
The automatic transmission is designed so
the foot brake pedal MUST be depressed
before shifting from P (Park) to any drive
position while the ignition switch is ON.
The shift lever cannot be moved out of P
(Park) and into any of the other gear
positions if the ignition key is turned to
LOCK or if the key is removed.
If the battery charge is low, the shift
selector lever can be moved if the igni-
tion switch is in the ACC position.
DRIVING WITH AUTOMATIC
TRANSMISSION
(if so equipped)
5-6Starting and driving
ZX
Page 112 of 216

Shifting with automatic transmission
Push the button to shift into P (Park), R (Re-
verse) or from D (Drive) to 2. All other positions
can be selected without pushing the button.
P (Park):
Use this selector position when the vehicle is
parked or when starting the engine. Always
be sure the vehicle is at a complete stop. For
maximum safety, depress the brake pedal,
then push in the shift lever button and move
the lever to the P (Park) position. Apply the
parking brake. When parking on a hill, apply
the parking brake first, then shift the lever
into the P (Park) position.
Shifting from P (Park)
If the ignition switch is in the ON position
and the foot brake pedal is depressed, but
the shift selector lever still cannot be moved
out of P (Park), follow these instructions.
1. Turn the ignition key to the LOCK posi-
tion.
2. Apply the parking brake.
3. Reinsert the key and turn it to the ACC
position.
4.
Depress the foot brake pedal and move
the shift selector lever to N (Neutral).
5. Start the engine.These instructions for starting the vehicle in
N (Neutral) should only be used until service
can be obtained at an authorized NISSAN
dealership. Never drive the vehicle if the
stop lights are not operating properly.
R (Reverse):
Use this position to back up. Always be sure
the vehicle is at a complete stop before
shifting into the R (Reverse) position. For
maximum safety, check to ensure the area
behind the vehicle is clear. With the brake
pedal depressed, push in the shift selector
lever button and move the shift selector
lever to the R (Reverse) position.
N (Neutral):
Neither forward nor reverse gear is engaged.
The engine can be started in this position.
You may shift to N (Neutral) and restart a
stalled engine while the vehicle is moving.
D (Drive):
Use this position for all normal forward
driving.
2 (Second gear):
Use this position for hill climbing or engine
braking on downhill grades.
ASD0612
Starting and driving5-7
ZX
Page 113 of 216

Do not shift into the 2 position at speeds
above 68 MPH (110 km/h). Do not exceed
68 MPH (110 km/h) in the 2 position.
1 (Low gear):
Use this position when climbing steep hills
slowly or slow driving through deep snow,
sand or mud, or for maximum engine brak-
ing on steep downhill grades.
Do not shift into the 1 position at speeds
above 34 MPH (55 km/h). Do not exceed 34
MPH (55 km/h) in the 1 position.
Accelerator downshift
in D position
For rapid passing or hill climbing while driv-
ing, fully depress the accelerator pedal to
the floor. This shifts the transmission down
into third gear, second gear or first gear,
depending on vehicle speed.OVERDRIVE SWITCH
ON: With the engine running and the
selector lever in the D (Drive) posi-
tion, the transmission upshifts into
OVERDRIVE as vehicle speed in-
creases.
OVERDRIVE does not engage until the
engine has reached operating tempera-
ture.
OFF: For driving up and down long slopes
where engine braking is necessary
push the OVERDRIVE switch once.
The O/D OFF indicator light in theinstrument panel comes on at this
time.
When cruising at a low speed or
climbing a gentle slope, you may feel
uncomfortable shift shocks as the
transmission shifts between third gear
and overdrive repeatedly. In this case,
depress the OVERDRIVE switch to
turn the OVERDRIVE off. The O/D
OFF indicator light in the instrument
panel comes on at this time.
When driving conditions change, depress
the overdrive switch to turn the OVER-
DRIVE on.
Remember not to drive at high speeds for
extended periods of time with the OVER-
DRIVE off. This reduces fuel economy.ASD1007
5-8Starting and driving
ZX
Page 114 of 216
WARNING
cDo not downshift abruptly on slip-
pery roads. This may cause a loss of
control.
cDo not over-rev the engine when
shifting to a lower gear. This may
cause a loss of control or engine
damage.
CAUTION
cDo not rest your foot on the clutch
pedal while driving. This may cause
clutch damage.
cStop your vehicle completely before
shifting into R (Reverse).
cWhen the vehicle is stopped for a
duration, for example at a stop light,
shift to N (Neutral) and release the
clutch pedal with the foot brake ap-
plied.
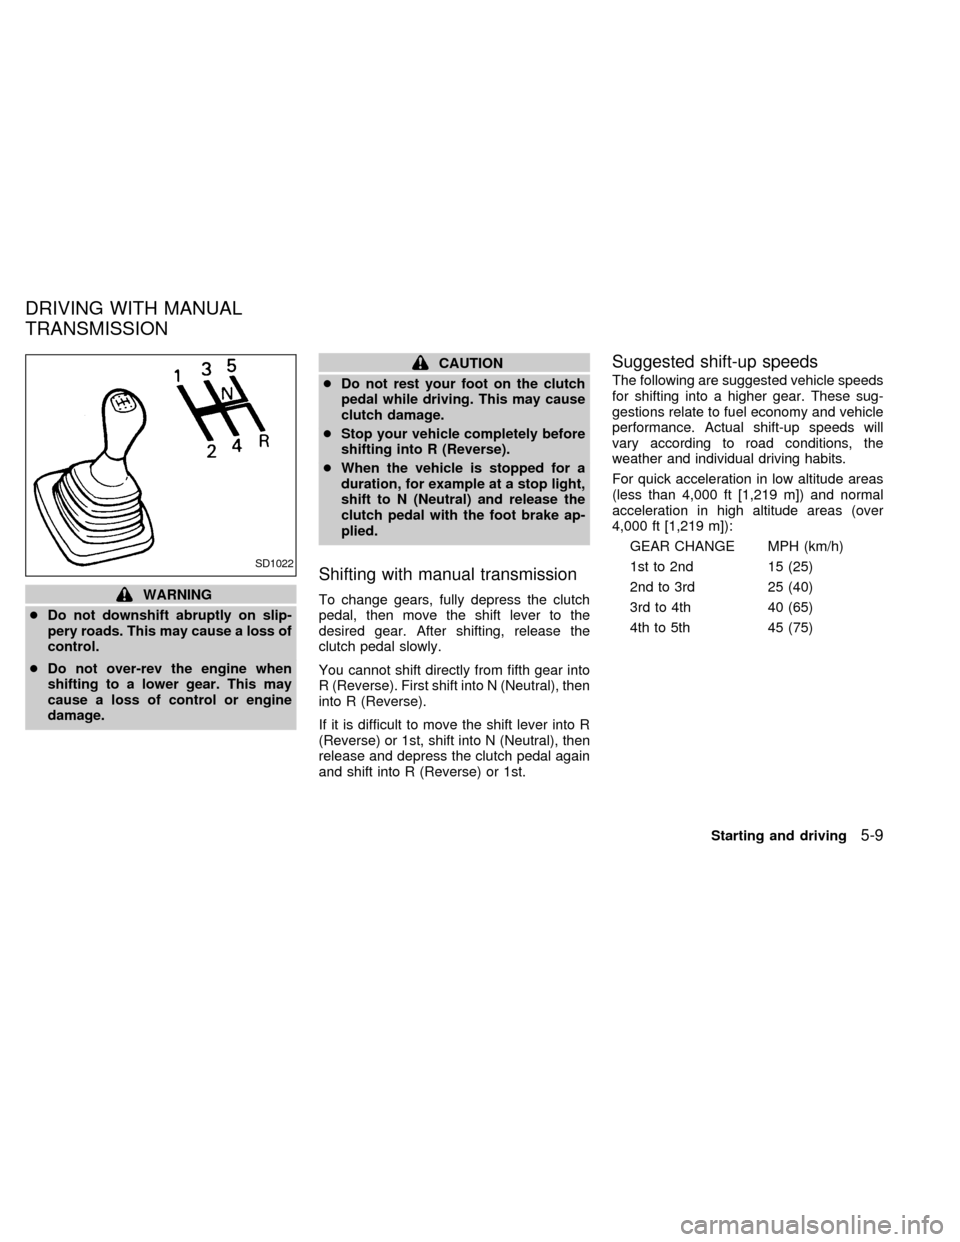
Shifting with manual transmission
To change gears, fully depress the clutch
pedal, then move the shift lever to the
desired gear. After shifting, release the
clutch pedal slowly.
You cannot shift directly from fifth gear into
R (Reverse). First shift into N (Neutral), then
into R (Reverse).
If it is difficult to move the shift lever into R
(Reverse) or 1st, shift into N (Neutral), then
release and depress the clutch pedal again
and shift into R (Reverse) or 1st.
Suggested shift-up speeds
The following are suggested vehicle speeds
for shifting into a higher gear. These sug-
gestions relate to fuel economy and vehicle
performance. Actual shift-up speeds will
vary according to road conditions, the
weather and individual driving habits.
For quick acceleration in low altitude areas
(less than 4,000 ft [1,219 m]) and normal
acceleration in high altitude areas (over
4,000 ft [1,219 m]):
GEAR CHANGE MPH (km/h)
1st to 2nd 15 (25)
2nd to 3rd 25 (40)
3rd to 4th 40 (65)
4th to 5th 45 (75)
SD1022
DRIVING WITH MANUAL
TRANSMISSION
Starting and driving5-9
ZX
Page 116 of 216
1. Apply the parking brake.
2.Automatic transmission:
Move the shift selector lever to P (Park)
or N (Neutral). (P is recommended.)
The shift selector lever cannot be
moved out of P (Park) and into any of
the other gear positions if the ignition
key is turned to OFF or if the key is
removed.
The starter is designed not to operate
if the shift selector lever is in one of
the driving positions.
Manual transmission:
Move the shift lever to N (Neutral), and
depress the clutch pedal to the floor.
The starter is designed to operate
only when the clutch pedal is fully
depressed.
3. Crank the enginewith your foot off the
accelerator pedalby turning the ignition
key to START. Release the key when the
engine starts. If the engine starts, but
fails to run, repeat the above procedure.
Ð If the engine is very hard to start in
extremely cold or hot weather, de-press and hold the accelerator pedal
to help start the engine.
Ð In the summer, when restarting the
engine within 30 minutes after it has
been stopped, keep the accelerator
pedal fully depressed while starting.
CAUTION
Do not operate the starter for more than
15 seconds at a time. If the engine does
not start, turn the key off and wait 10
seconds before cranking again, other-
wise the starter could be damaged.
4.Warm-up
Allow the engine to idle for at least 30
seconds after starting. Drive at moderate
speed for a short distance first, especially
in cold weather.
WARNING
cBe sure the parking brake is fully
released before driving. Failure to do
so can cause brake failure and lead
to an accident.
cDo not release the parking brake
from outside the vehicle.
cDo not use the gearshift in place of
the parking brake. When parking, be
sure the parking brake is fully en-
gaged.
c
Do not leave children unattended in a
vehicle. They could release the park-
ing brake and cause an accident.
STARTING THE ENGINE PARKING BRAKE
OPERATION
Starting and driving5-11
ZX