ECO mode NISSAN SENTRA 1999 B14 / 4.G User Guide
[x] Cancel search | Manufacturer: NISSAN, Model Year: 1999, Model line: SENTRA, Model: NISSAN SENTRA 1999 B14 / 4.GPages: 223, PDF Size: 1.86 MB
Page 104 of 223
CAUTION
Always properly tighten the antenna
rod during installation or the antenna
rod may break during vehicle opera-
tion.Microphone installed model
If equipped with a genuine NISSAN cellular
phone, your NISSAN features a non-
directional microphone in the steering col-
umn cover, so it is not necessary to look at
or speak directly into the microphone when
calling.
To do so could detract from the driving
operation and cause an accident.
See the manual for car phone operation.
Pre-wired and antenna for phone
installed model
Some models are pre-wired to accept the
genuine NISSAN cellular phone.
In addition, the same model has the phone
antenna built into the rear glass window.
When installing a CB ham radio or a car
phone in your NISSAN, be sure to observe
the following cautions, otherwise the new
equipment may adversely affect the Multi-
port Fuel Injection (MFI) system and other
electronic parts.CAUTION
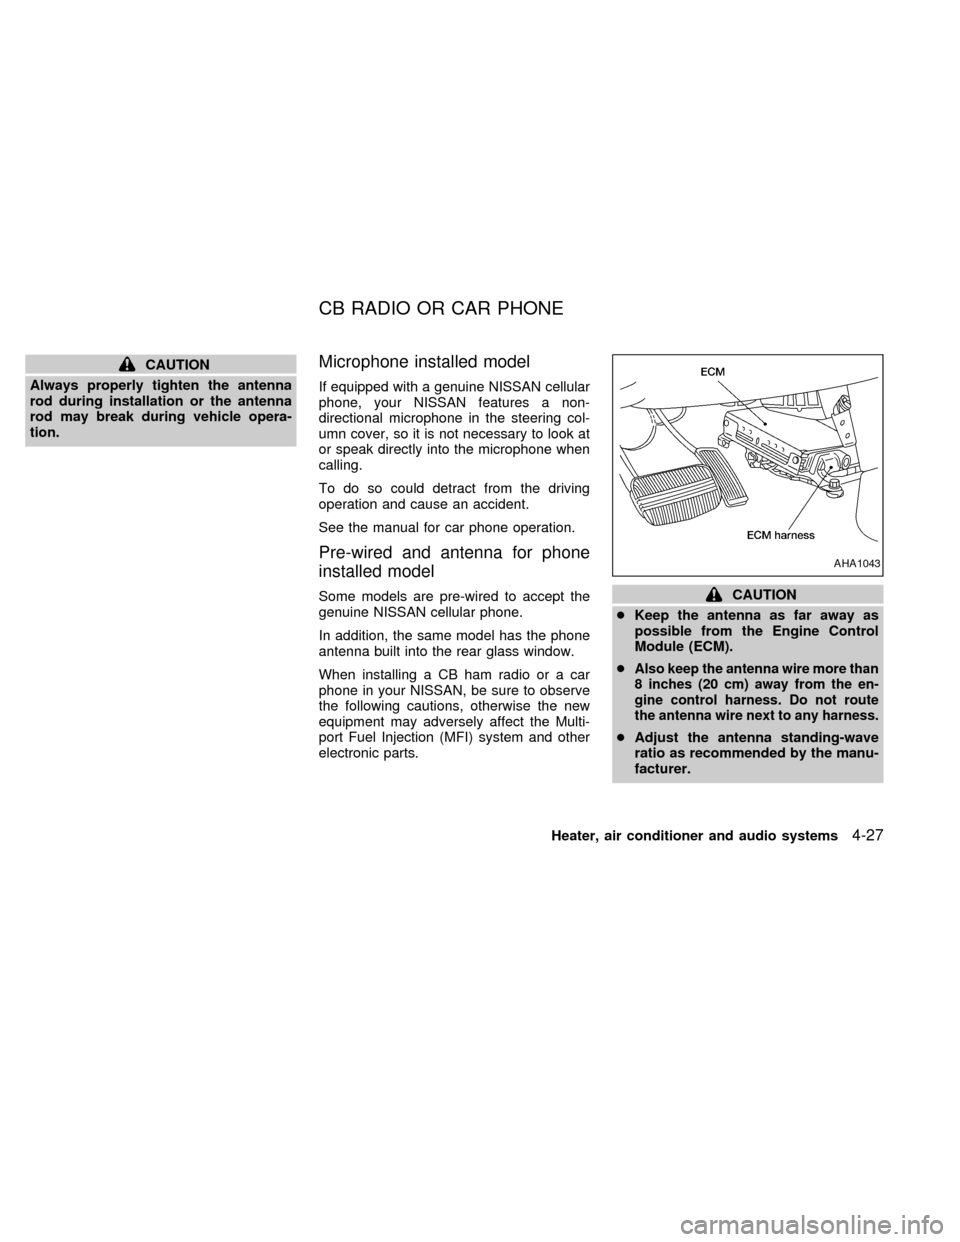
cKeep the antenna as far away as
possible from the Engine Control
Module (ECM).
c
Also keep the antenna wire more than
8 inches (20 cm) away from the en-
gine control harness. Do not route
the antenna wire next to any harness.
cAdjust the antenna standing-wave
ratio as recommended by the manu-
facturer.
AHA1043
CB RADIO OR CAR PHONE
Heater, air conditioner and audio systems4-27
ZX
Page 115 of 223
CAUTION
cDo not rest your foot on the clutch
pedal while driving. This may cause
clutch damage.
cStop your vehicle completely before
shifting into R (Reverse).
cWhen the vehicle is stopped for a
duration, for example at a stop light,
shift to N (Neutral) and release the
clutch pedal with the foot brake ap-
plied.
Shifting with manual transmission
To change gears, or when upshifting or
downshifting, depress the clutch pedal fully,
shift into the appropriate gear, then release
the clutch slowly and smoothly.
You cannot shift directly from fifth gear into
R (Reverse). First shift into N (Neutral), then
into R (Reverse).
If it is difficult to move the shift lever into R
(Reverse) or 1st, shift into N (Neutral), then
release and depress the clutch pedal again
and shift into R (Reverse) or 1st.
Suggested shift-up speeds
The following are suggested vehicle speeds
for shifting into a higher gear. These sug-
gestions relate to fuel economy and vehicle
performance. Actual shift-up speeds will
vary according to road conditions, the
weather and individual driving habits.
For quick acceleration in low altitude areas
(less than 4,000 ft [1,219 m]) and normal
acceleration in high altitude areas (over
4,000 ft [1,219 m]):
GEAR CHANGE MPH (km/h)
1st to 2nd 15 (24)
2nd to 3rd 25 (40)
3rd to 4th 40 (64)
4th to 5th 45 (72)For quick acceleration in high altitude areas
(over 4,000 ft [1,219 m]):
For GA16DE engine models:
Gear change MPH (km/h)
1st to 2nd 15 (25)
2nd to 3rd 35 (55)
3rd to 4th 45 (75)
4th to 5th 50 (80)
For SR20DE engine models:
1st to 2nd 15 (25)
2nd to 3rd 25 (40)
3rd to 4th 40 (65)
4th to 5th 45 (75)
5-10Starting and driving
ZX
Page 116 of 223

Suggested maximum speed in each
gear
Downshift to a lower gear if the engine is not
running smoothly, or if you need to acceler-
ate.
Do not exceed the maximum suggested
speed (shown below) in any gear. For level
road driving, use the highest gear sug-
gested for that speed. Always observe
posted speed limits, and drive according to
the road conditions, which will ensure safe
operation. Do not over-rev the engine when
shifting to a lower gear as it may cause
engine damage or loss of vehicle control.
GA16DE engine models:
GEAR MPH (km/h)
1st 30 (50)
2nd 55 (90)
3rd 85 (135)
4th & 5th ÐSR20DE engine models:
GEAR MPH (km/h)
1st 35 (55)
2nd 60 (95)
3rd 85 (135)
4th & 5th Ð1. Apply the parking brake.
2.Automatic transmission:
Move the shift selector lever to P (Park)
or N (Neutral). (P is recommended.)
The shift selector lever cannot be
moved out of P (Park) and into any of
the other gear positions if the ignition
key is turned to OFF or if the key is
removed.
The starter is designed not to operate
if the shift selector lever is in one of
the driving positions.
Manual transmission:
Move the selector lever to N (Neutral),
and depress the clutch pedal to the floor.
The starter is designed to operate
only when the clutch pedal is fully
depressed.
3. Crank the enginewith your foot off the
accelerator pedalby turning the ignition
key to START. Release the key when the
engine starts. If the engine starts, but
fails to run, repeat the above procedure.
Ð If the engine is very hard to start in
extremely cold or hot weather, de-
STARTING THE ENGINE
Starting and driving5-11
ZX
Page 117 of 223
press and hold the accelerator pedal
to help start the engine.
Ð In the summer, when restarting the
engine within 30 minutes after it has
been stopped, keep the accelerator
pedal fully depressed while starting.
CAUTION
Do not operate the starter for more than
15 seconds at a time. If the engine does
not start, turn the key off and wait 10
seconds before cranking again, other-
wise the starter could be damaged.
4.Warm-up
Allow the engine to idle for at least 30
seconds after starting. Drive at moderate
speed for a short distance first, especially
in cold weather.
WARNING
cBe sure the parking brake is fully
released before driving. Failure to do
so can cause brake failure and lead
to an accident.
cDo not release the parking brake
from outside the vehicle.
cDo not use the gearshift in place of
the parking brake. When parking, be
sure the parking brake is fully en-
gaged.
c
Do not leave children unattended in a
vehicle. They could release the park-
ing brake and cause an accident.
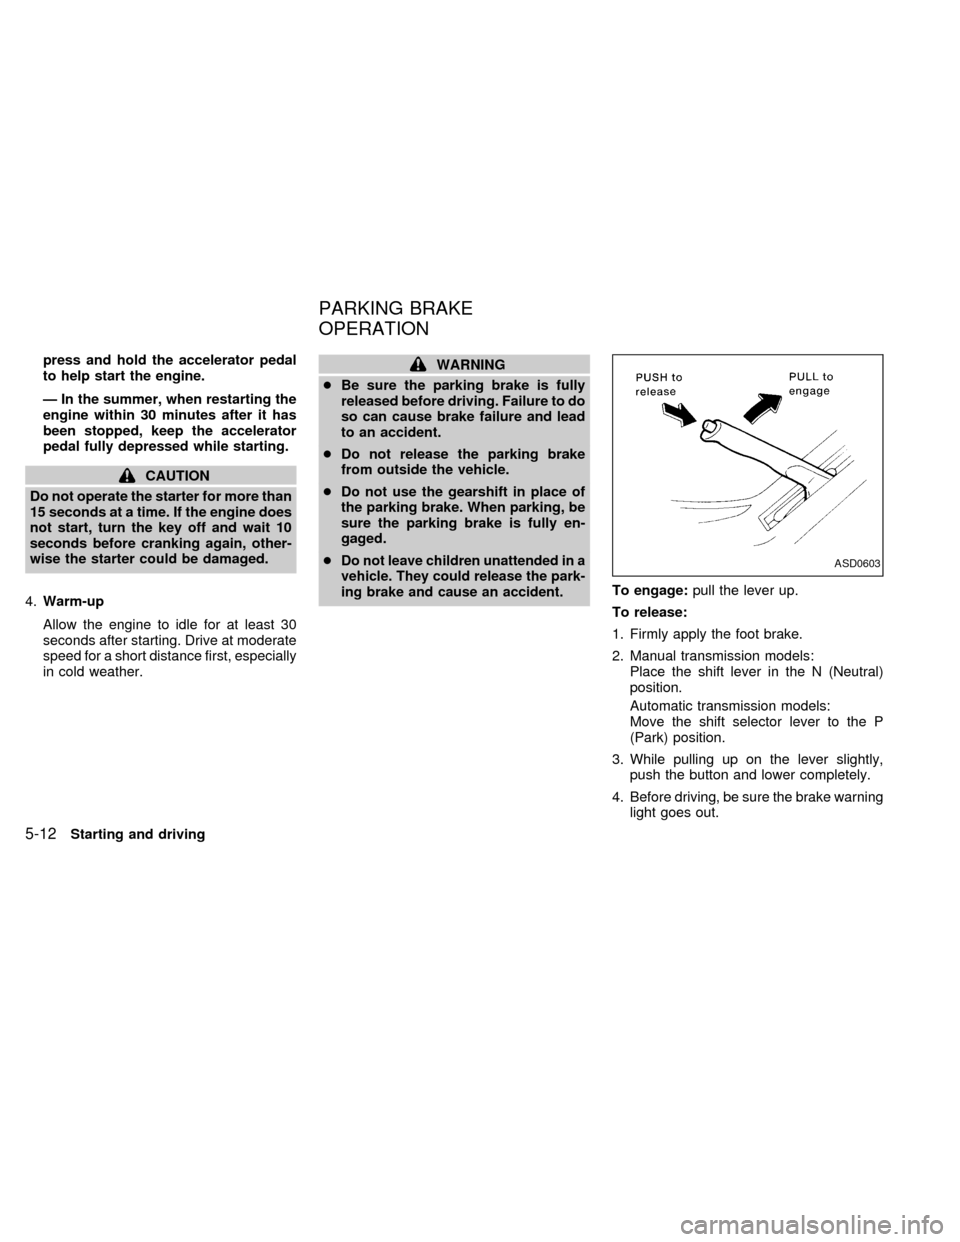
To engage:pull the lever up.
To release:
1. Firmly apply the foot brake.
2. Manual transmission models:
Place the shift lever in the N (Neutral)
position.
Automatic transmission models:
Move the shift selector lever to the P
(Park) position.
3. While pulling up on the lever slightly,
push the button and lower completely.
4. Before driving, be sure the brake warning
light goes out.
ASD0603
PARKING BRAKE
OPERATION
5-12Starting and driving
ZX
Page 120 of 223

During the first 1,000 miles (1,600 km),
follow these recommendations for the future
reliability and economy of your new vehicle.
Failure to follow these recommendations
may result in vehicle damage or shortened
engine life.
cDo not drive over 55 MPH (90 km/h) and
do not run the engine over 4,000 rpm.
Avoid driving for long periods at constant
speed, either fast or slow.
cDo not accelerate at full throttle in any
gear.
cAvoid quick starts.
cAvoid hard braking as much as possible.
cDo not tow a trailer for the first 500 miles
(800 km).cAccelerate slowly and smoothly. Main-
tain cruising speeds with a constant ac-
celerator position.
cDrive at moderate speeds on the high-
way. Driving at high speed lowers fuel
economy.
cAvoid unnecessary stopping and brak-
ing. Maintain a safe distance behind
other vehicles.
cUse a proper gear range which suits road
conditions. On level roads, shift into high
gear as soon as possible.
cAvoid unnecessary engine idling.cKeep your engine tuned up.
cFollow the recommended periodic main-
tenance schedule.
cKeep the tires inflated to the correct
pressure. Low tire pressure increases
tire wear and wastes fuel.
cKeep the front wheels in correct align-
ment. Improper alignment increases tire
wear and lowers fuel economy.
cAir conditioner operation lowers fuel
economy. Use the air conditioner only
when necessary.
cWhen cruising at highway speeds, it is
more economical to use the air condi-
tioner and leave the windows closed to
reduce drag.
SD1001M
BREAK-IN SCHEDULE INCREASING FUEL
ECONOMY
Starting and driving5-15
ZX
Page 121 of 223
WARNING
Do not park the vehicle over flammable
materials such as dry grass, waste pa-
per or rags. They may ignite and cause
a fire.
1. Firmly apply the parking brake.
2.Manual transmission models:
Place the shift lever in the R (Reverse)
position. When parking on an uphill
grade, place the shift lever in 1 (First)
gear.Automatic transmission models:
Move the selector lever to the P (Park)
position.
WARNING
cSafe parking procedures require that
both the parking brake be set and
the transmission placed into the P
(Park) position (automatic transmis-
sion) or in the appropriate gear
(manual transmission). Failure to do
so could cause the vehicle to move
unexpectedly or roll away and resultin an accident. Make sure the shift
lever has been pushed as far forward
as it can go and cannot be moved
without depressing the button at the
end of the lever.
cNever leave the engine running while
the vehicle is unattended.
c
Do not leave children unattended in-
side the vehicle. They could unknow-
inly activate switches or controls.
Unattended children could become
involved in serious accidents.
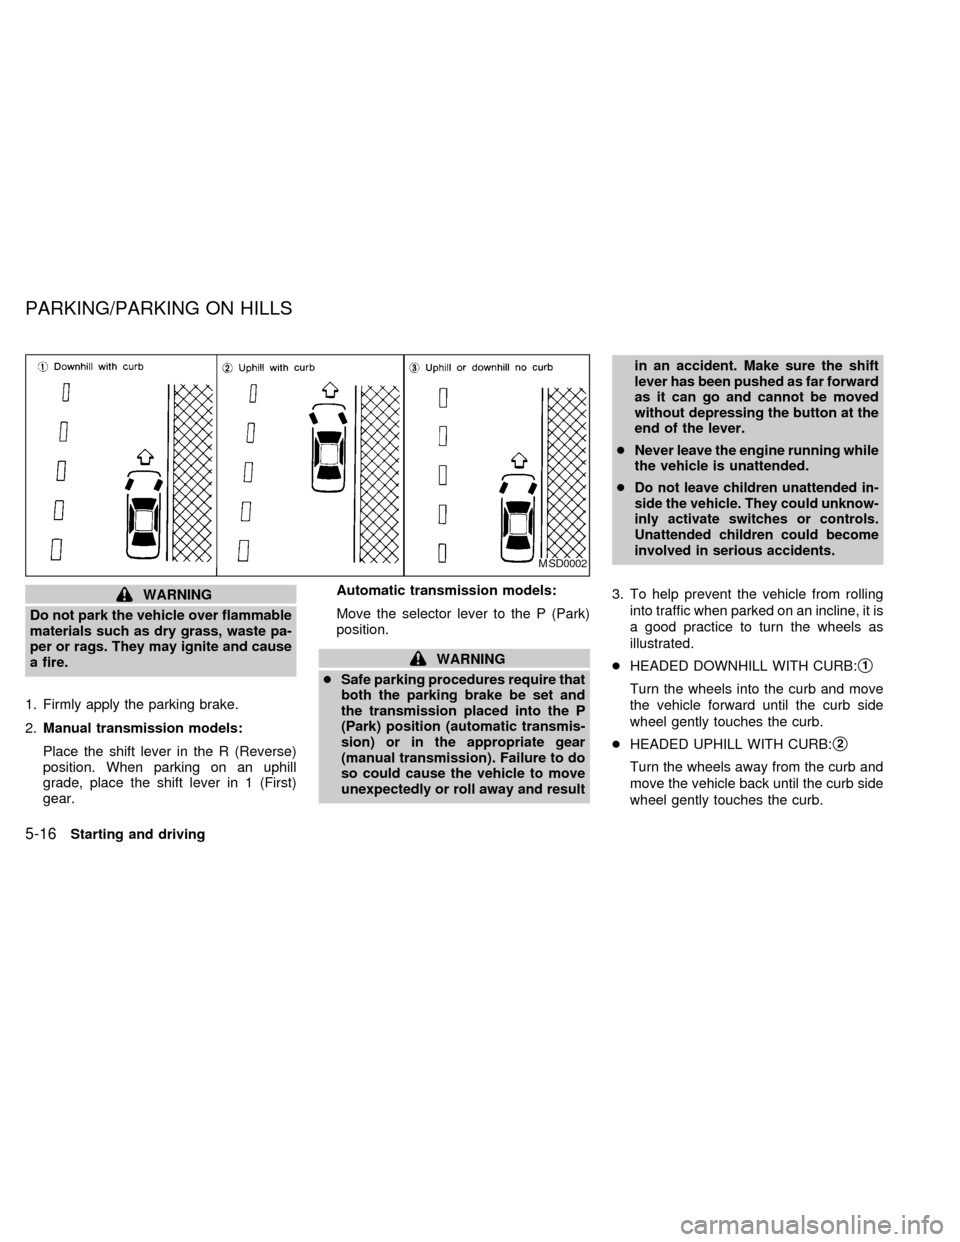
3. To help prevent the vehicle from rolling
into traffic when parked on an incline, it is
a good practice to turn the wheels as
illustrated.
cHEADED DOWNHILL WITH CURB:
s1
Turn the wheels into the curb and move
the vehicle forward until the curb side
wheel gently touches the curb.
cHEADED UPHILL WITH CURB:
s2
Turn the wheels away from the curb and
move the vehicle back until the curb side
wheel gently touches the curb.
MSD0002
PARKING/PARKING ON HILLS
5-16Starting and driving
ZX
Page 133 of 223
cNever jack up the vehicle more than
necessary.
cNever use blocks on or under the
jack.
cDo not start or run engine while
vehicle is on the jack as it may cause
the vehicle to move.
cDo not allow passengers to stay in
the vehicle while it is on the jack.
cNever run the engine with a wheel off
the ground. It may cause the vehicle
to move. This is especially true for
models equipped with a limited slip
differential carrier.
Installing the spare tire
The T-type spare tire is designed for
emergency use. See specific instruc-
tions under the heading ``Wheels and
tires'' in the ``Do-it- yourself'' section of
this owner's manual.
1. Clean any mud or dirt from the surface
between the wheel and hub.
2. Carefully put the spare tire on and tighten
the wheel nuts finger tight.
3. With the wheel nut wrench, tighten wheel
nuts alternately and evenly until they are
tight.4. Lower the vehicle slowly until the tire
touches the ground. Then, with the wheel
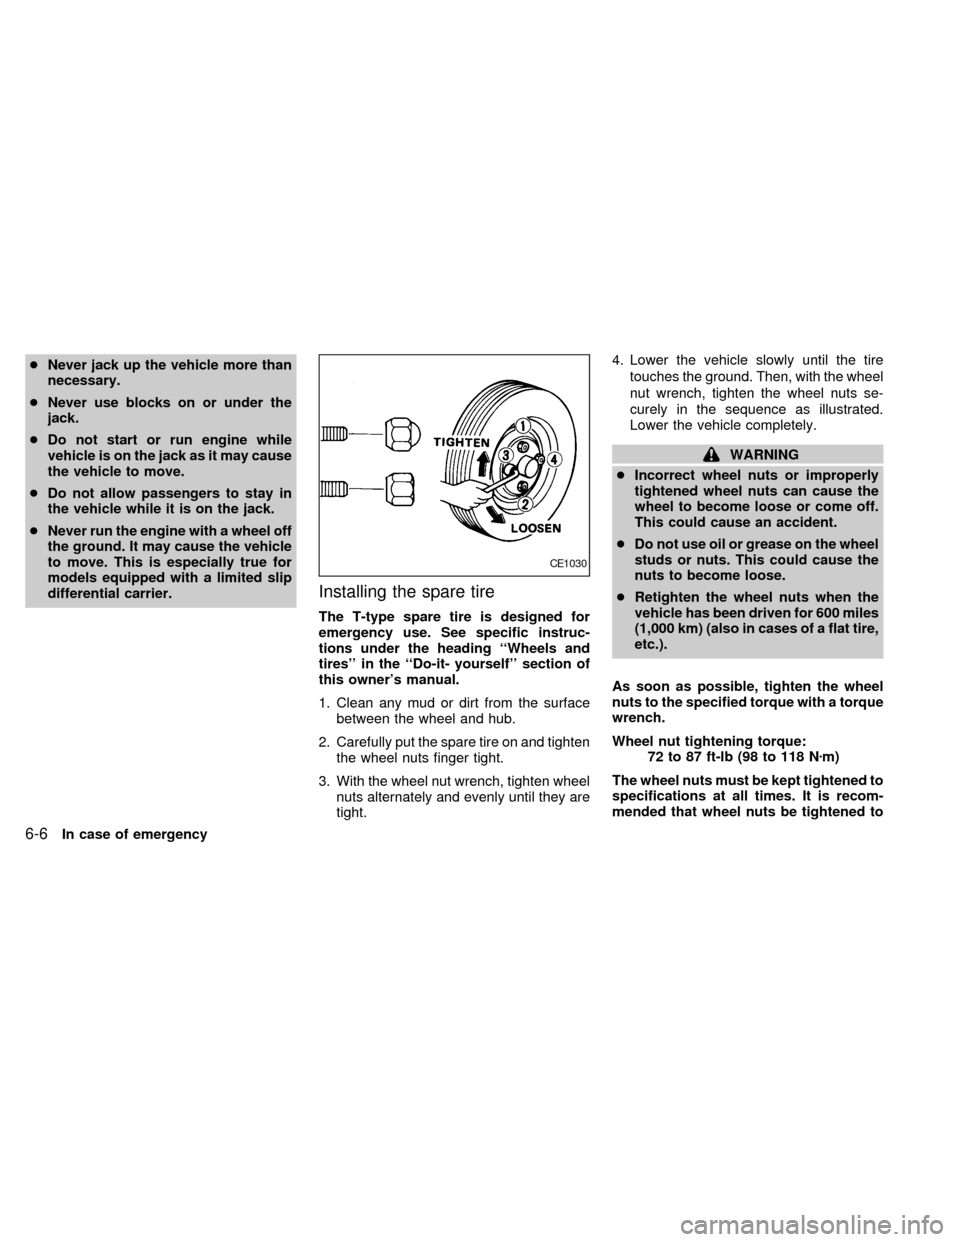
nut wrench, tighten the wheel nuts se-
curely in the sequence as illustrated.
Lower the vehicle completely.
WARNING
cIncorrect wheel nuts or improperly
tightened wheel nuts can cause the
wheel to become loose or come off.
This could cause an accident.
cDo not use oil or grease on the wheel
studs or nuts. This could cause the
nuts to become loose.
cRetighten the wheel nuts when the
vehicle has been driven for 600 miles
(1,000 km) (also in cases of a flat tire,
etc.).
As soon as possible, tighten the wheel
nuts to the specified torque with a torque
wrench.
Wheel nut tightening torque:
72 to 87 ft-lb (98 to 118 Nzm)
The wheel nuts must be kept tightened to
specifications at all times. It is recom-
mended that wheel nuts be tightened to
CE1030
6-6In case of emergency
ZX
Page 136 of 223
Always follow the instructions below.
Failure to do so could result in damage
to the charging system and cause per-
sonal injury.
1.
If the booster battery is in another vehicle,
position the two vehicles to bring their
batteries into close proximity to each other.
Do not allow the two vehicles to touch.
2. Apply the parking brake. Move the shift
lever to N (Neutral) (on automatic trans-
mission models, move the lever to P
(Park)). Switch off all unnecessary elec-trical systems (lights, heater, air condi-
tioner, etc.).
3. Remove vent caps on the battery (if so
equipped). Cover the battery with an old
cloth to reduce explosion hazard.
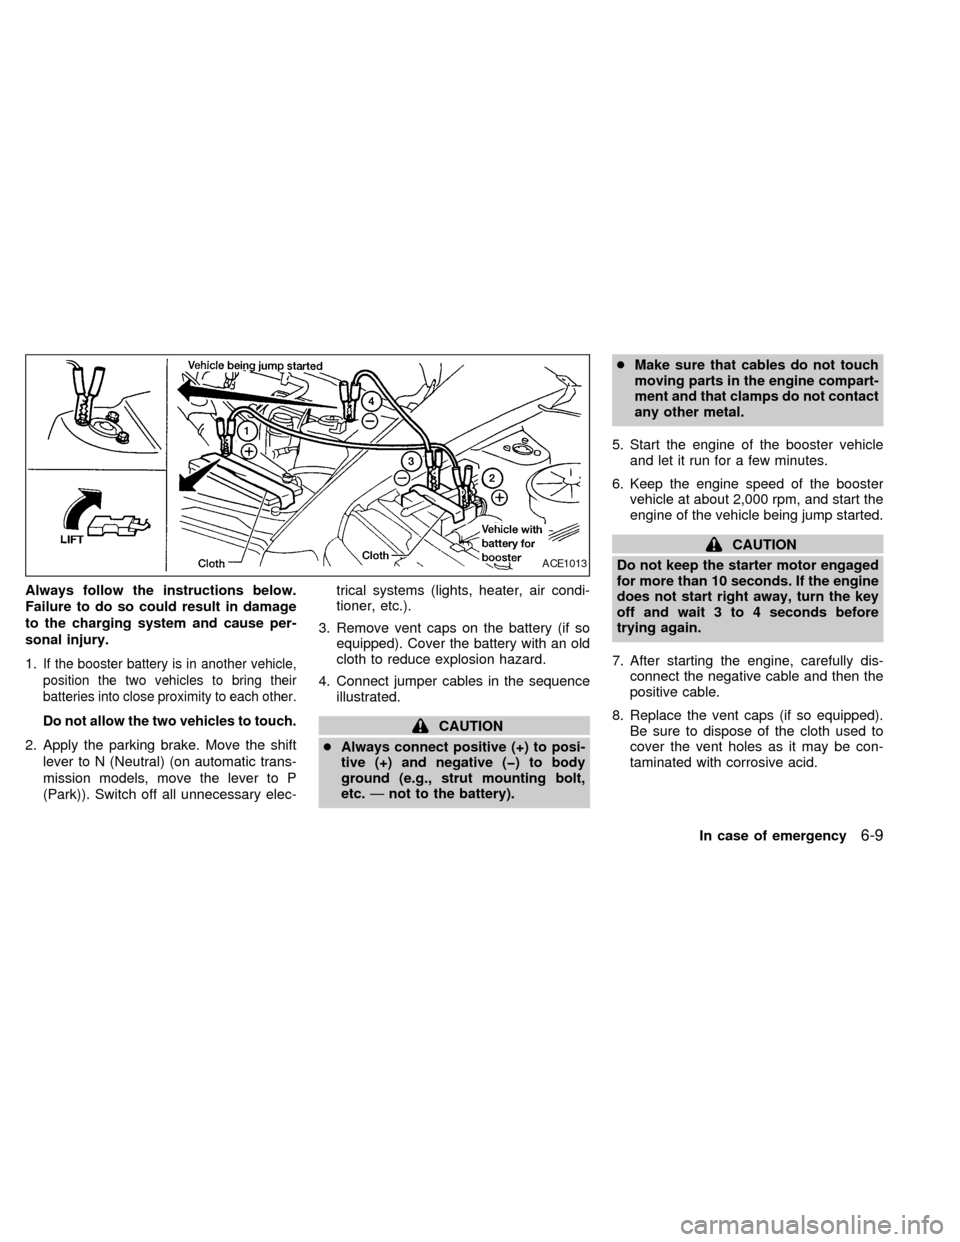
4. Connect jumper cables in the sequence
illustrated.
CAUTION
cAlways connect positive (+) to posi-
tive (+) and negative (þ) to body
ground (e.g., strut mounting bolt,
etc.Ðnot to the battery).cMake sure that cables do not touch
moving parts in the engine compart-
ment and that clamps do not contact
any other metal.
5. Start the engine of the booster vehicle
and let it run for a few minutes.
6. Keep the engine speed of the booster
vehicle at about 2,000 rpm, and start the
engine of the vehicle being jump started.
CAUTION
Do not keep the starter motor engaged
for more than 10 seconds. If the engine
does not start right away, turn the key
off and wait 3 to 4 seconds before
trying again.
7. After starting the engine, carefully dis-
connect the negative cable and then the
positive cable.
8. Replace the vent caps (if so equipped).
Be sure to dispose of the cloth used to
cover the vent holes as it may be con-
taminated with corrosive acid.
ACE1013
In case of emergency6-9
ZX
Page 138 of 223
WARNING
Be careful not to allow your hands, hair,
jewelry or clothing to come into contact
with, or to get caught in, the running
fan, belts, or fan motor. The fan motor
can start at any time when the coolant
temperature is high.
7. After the engine cools down, check the
coolant level in the reservoir tank with the
engine running. Add coolant to the res-
ervoir tank if necessary. Have your ve-
hicle repaired at an authorized NISSAN
dealer.When towing your vehicle, U.S States, Cana-
dian Provinces and local regulations for tow-
ing must be followed. Incorrect towing equip-
ment could damage your vehicle. Towing
instructions are available from an authorized
NISSAN dealer. Local service operators are
generally familiar with the applicable laws
and procedures for towing. To assure proper
towing and to prevent accidental damage to
your vehicle, NISSAN recommends having a
service operator tow your vehicle. It is advis-
able to have the service operator carefully
read the following precautions.
WARNING
cNever ride in a vehicle that is being
towed.
cNever get under your vehicle after it
has been lifted by a tow truck.
CAUTION
cWhen towing, make sure that the
transmission, axles, steering system
and powertrain are in working con-
dition. If any unit is damaged, dollies
must be used.cWhen towing manual transmission
models with the front wheels on the
ground (if you do not use towing
dollies):
Turn the ignition key to the OFF
position and secure the steering
wheel in a straight ahead position
with a rope or similar device. Never
place the ignition key in the LOCK
position. This will result in damage
to the steering lock mechanism.
Move the gearshift lever to the N
(Neutral) position.
cWhen towing with the rear wheels on
the ground, release the parking
brake.
cAttach safety chains for all towing.
TOW TRUCK TOWING
In case of emergency6-11
ZX
Page 139 of 223
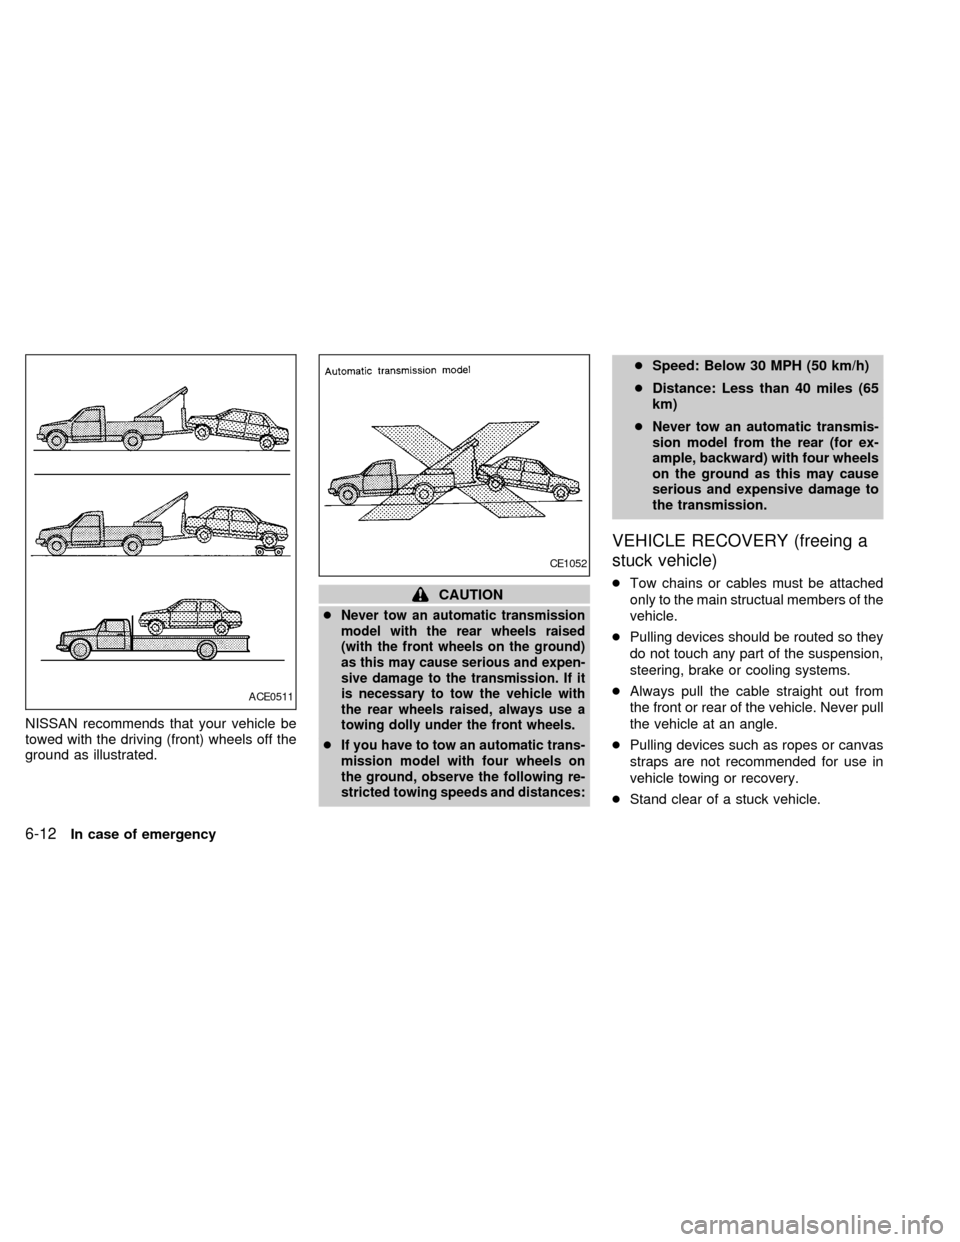
NISSAN recommends that your vehicle be
towed with the driving (front) wheels off the
ground as illustrated.
CAUTION
c
Never tow an automatic transmission
model with the rear wheels raised
(with the front wheels on the ground)
as this may cause serious and expen-
sive damage to the transmission. If it
is necessary to tow the vehicle with
the rear wheels raised, always use a
towing dolly under the front wheels.
cIf you have to tow an automatic trans-
mission model with four wheels on
the ground, observe the following re-
stricted towing speeds and distances:
cSpeed: Below 30 MPH (50 km/h)
cDistance: Less than 40 miles (65
km)
c
Never tow an automatic transmis-
sion model from the rear (for ex-
ample, backward) with four wheels
on the ground as this may cause
serious and expensive damage to
the transmission.
VEHICLE RECOVERY (freeing a
stuck vehicle)
cTow chains or cables must be attached
only to the main structual members of the
vehicle.
cPulling devices should be routed so they
do not touch any part of the suspension,
steering, brake or cooling systems.
cAlways pull the cable straight out from
the front or rear of the vehicle. Never pull
the vehicle at an angle.
cPulling devices such as ropes or canvas
straps are not recommended for use in
vehicle towing or recovery.
cStand clear of a stuck vehicle.
ACE0511
CE1052
6-12In case of emergency
ZX