manual transmission NISSAN SENTRA 1999 B14 / 4.G User Guide
[x] Cancel search | Manufacturer: NISSAN, Model Year: 1999, Model line: SENTRA, Model: NISSAN SENTRA 1999 B14 / 4.GPages: 223, PDF Size: 1.86 MB
Page 119 of 223

COAST/SET switch and release it. The
CRUISE light in the instrument panel comes
on. Take your foot off the accelerator pedal.
Your vehicle maintains the set speed.
cTo pass another vehicle,depress the
accelerator pedal. When you release the
pedal, the vehicle returns to the previ-
ously set speed.
cThe vehicle may not maintain the set
speed when going up or down steep
hills. If this happens, drive without the
cruise control.
To cancel the preset speed,use one of
the following three methods.
a) Push the CANCEL button; the CRUISE
light in the instrument panel goes out.
b) Tap the brake pedal; the CRUISE light in
the instrument panel goes out.
c) Turn the main switch off. Both the ON
indicator on the main switch and CRUISE
light in the instrument panel go out.
The cruise control is automatically can-
celled and the CRUISE light in the instru-
ment panel goes out if:
cyou depress the brake pedal while push-ing the RES/ACCEL set switch.
cthe vehicle slows down more than 8 MPH
(13 km/h) below the set speed.
cyou depress the clutch pedal (manual
transmission), or move the shift selector
lever to N (Neutral) (automatic transmis-
sion).
To reset at a faster cruising speed,use
one of the following three methods.
a) Depress the accelerator pedal. When the
vehicle attains the desired speed, push
and release the COAST/SET switch.
b) Push and hold the RES/ACCEL set
switch. When the vehicle attains the
speed you desire, release the switch.
c) Push and release the RES/ACCEL set
switch. Each time you do this, the set
speed increases by about 1 MPH (1.6
km/h).
To reset at a slower cruising speed,use
one of the following three methods.
a) Lightly tap the brake pedal. When the
vehicle attains the desired speed, push
the COAST/SET switch and release it.
b) Push and hold the COAST/SET switch.Release the switch when the vehicle
slows down to the desired speed.
c) Push and release the COAST/SET
switch. Each time you do this, the set
speed decreases by about 1 MPH (1.6
km/h).
To resume the preset speed,push and
release the RES/ACCEL switch. The ve-
hicle returns to the last set cruising speed
when the vehicle speed is over 30 MPH (48
km/h).
5-14Starting and driving
ZX
Page 121 of 223
WARNING
Do not park the vehicle over flammable
materials such as dry grass, waste pa-
per or rags. They may ignite and cause
a fire.
1. Firmly apply the parking brake.
2.Manual transmission models:
Place the shift lever in the R (Reverse)
position. When parking on an uphill
grade, place the shift lever in 1 (First)
gear.Automatic transmission models:
Move the selector lever to the P (Park)
position.
WARNING
cSafe parking procedures require that
both the parking brake be set and
the transmission placed into the P
(Park) position (automatic transmis-
sion) or in the appropriate gear
(manual transmission). Failure to do
so could cause the vehicle to move
unexpectedly or roll away and resultin an accident. Make sure the shift
lever has been pushed as far forward
as it can go and cannot be moved
without depressing the button at the
end of the lever.
cNever leave the engine running while
the vehicle is unattended.
c
Do not leave children unattended in-
side the vehicle. They could unknow-
inly activate switches or controls.
Unattended children could become
involved in serious accidents.
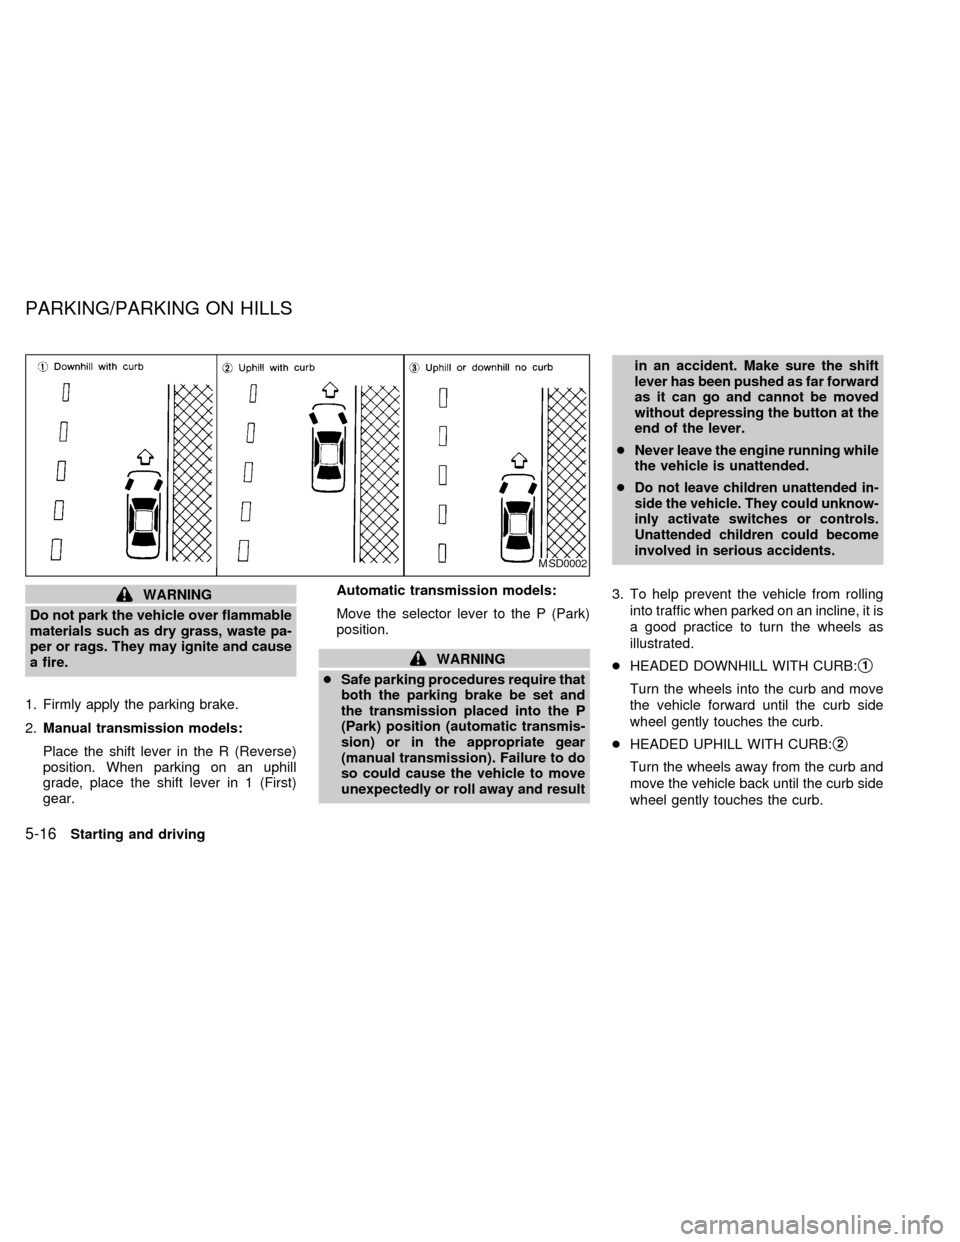
3. To help prevent the vehicle from rolling
into traffic when parked on an incline, it is
a good practice to turn the wheels as
illustrated.
cHEADED DOWNHILL WITH CURB:
s1
Turn the wheels into the curb and move
the vehicle forward until the curb side
wheel gently touches the curb.
cHEADED UPHILL WITH CURB:
s2
Turn the wheels away from the curb and
move the vehicle back until the curb side
wheel gently touches the curb.
MSD0002
PARKING/PARKING ON HILLS
5-16Starting and driving
ZX
Page 129 of 223
If you have a flat tire, follow the instructions
below.
Stopping the vehicle
1. Safely move the vehicle off the road and
away from traffic.
2. Turn on the hazard warning flashers.
3. Park on a level surface and apply the
parking brake. Shift the manual transmis-
sion into R (Reverse), or the automatic
transmission into P (Park).
4. Turn off the engine.
5. Raise the hood to warn other traffic, and
to signal professional road assistance
personnel that you need assistance.
6. Have all passengers get out of the ve-
hicle and stand in a safe place, away
from traffic and clear of the vehicle.
WARNING
cMake sure that the parking brake is
securely applied and the manual
transmission is shifted into R (Re-
verse), or the automatic transmis-
sion into P (Park).cNever change tires when the vehicle
is on a slope, ice or slippery areas.
This is hazardous.
cNever change tires if oncoming traf-
fic is close to your vehicle. Wait for
professional road assistance.
Getting the spare tire and tools
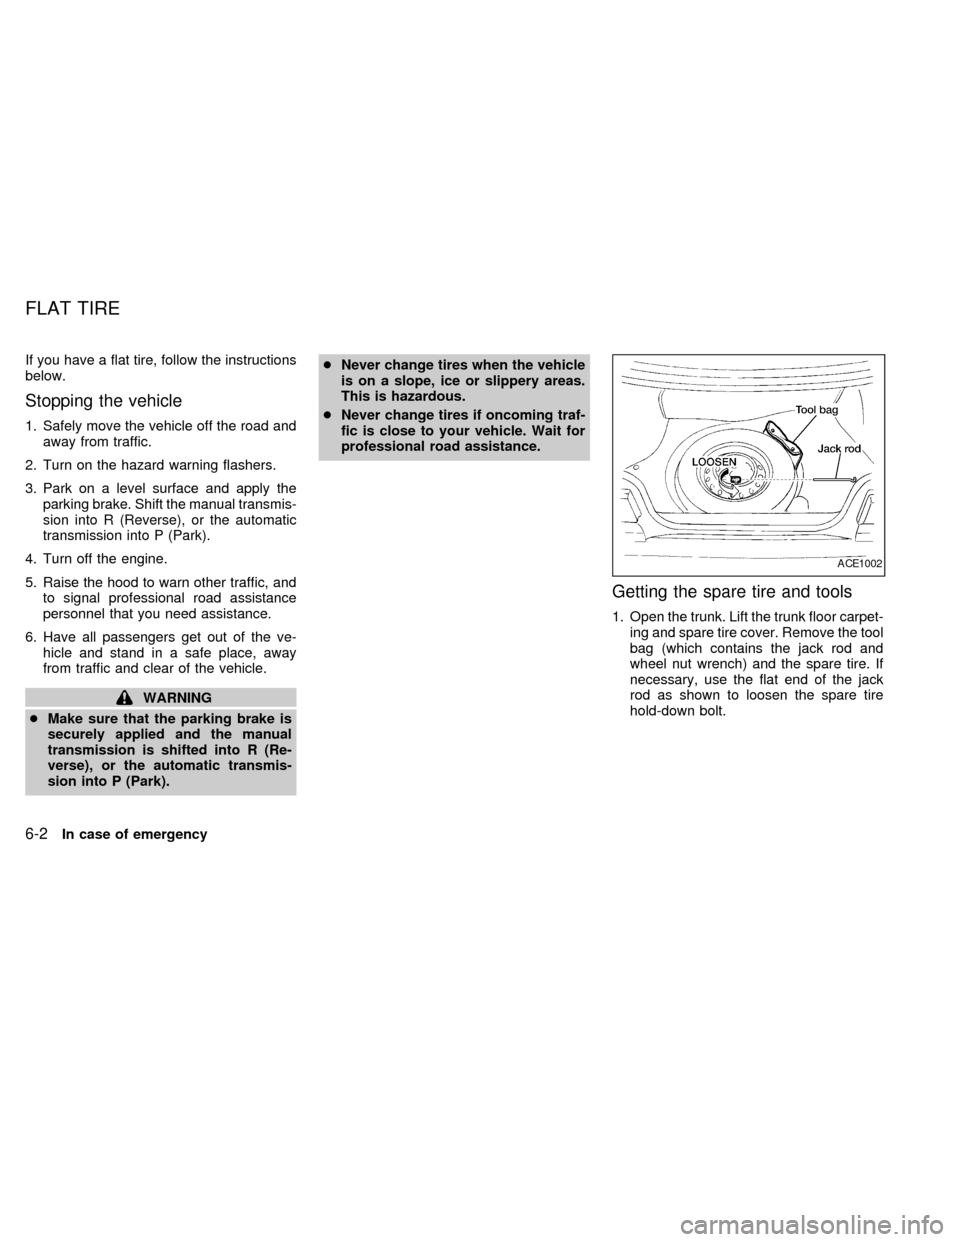
1. Open the trunk. Lift the trunk floor carpet-
ing and spare tire cover. Remove the tool
bag (which contains the jack rod and
wheel nut wrench) and the spare tire. If
necessary, use the flat end of the jack
rod as shown to loosen the spare tire
hold-down bolt.
ACE1002
FLAT TIRE
6-2In case of emergency
ZX
Page 137 of 223
CAUTION
cAutomatic transmission models can-
not be push started. This may cause
transmission damage.
cThree-way catalytic converter
equipped models should not be
started by pushing since the three
way catalyst may be damaged.
cNever try to start the vehicle by tow-
ing it; when the engine starts, the
forward surge could cause the ve-
hicle to collide with the tow vehicle.If your vehicle is overheating (indicated by
an extremely high temperature gauge read-
ing), or if you feel a lack of engine power,
detect abnormal noise, etc., take the follow-
ing steps.
WARNING
cDo not continue to drive if your ve-
hicle overheats. Doing so could
cause a vehicle fire.
cTo avoid the danger of being
scalded, never remove the radiator
cap while the engine is still hot.
When the radiator cap is removed,
pressurized hot water will spurt out,
possibly causing serious injury.
cDo not open the hood if steam is
coming out.
1. Move the vehicle safely off the road,
apply the parking brake and move the
shift lever to N (Neutral) (manual trans-
mission) or the shift selector lever to P
(Park) (automatic transmission).
Do not stop the engine.
2. Turn off the air conditioner. Open all the
windows, move the heater or air condi-
tioner temperature control to maximumhot and fan control to high speed.
3. If engine overheating is caused by climb-
ing a long hill on a hot day, run the engine
at a fast idle (approximately 1,500 rpm)
until the temperature gauge indication
returns to normal.
4. Get out of the vehicle. Look and listen for
steam or coolant escaping from the ra-
diator before opening the hood. Wait until
no steam or coolant can be seen before
proceeding.
5. Open the hood.
WARNING
If steam or water is coming from the
engine, stand clear to prevent getting
burned.
6. Visually check drive belts for damage or
looseness. Also check if the cooling fan
is running. The radiator hoses and radia-
tor should not leak water. If coolant is
leaking, the water pump belt is missing or
loose, or the cooling fan does not run,
stop the engine.
PUSH STARTING IF YOUR VEHICLE
OVERHEATS
6-10In case of emergency
ZX
Page 138 of 223
WARNING
Be careful not to allow your hands, hair,
jewelry or clothing to come into contact
with, or to get caught in, the running
fan, belts, or fan motor. The fan motor
can start at any time when the coolant
temperature is high.
7. After the engine cools down, check the
coolant level in the reservoir tank with the
engine running. Add coolant to the res-
ervoir tank if necessary. Have your ve-
hicle repaired at an authorized NISSAN
dealer.When towing your vehicle, U.S States, Cana-
dian Provinces and local regulations for tow-
ing must be followed. Incorrect towing equip-
ment could damage your vehicle. Towing
instructions are available from an authorized
NISSAN dealer. Local service operators are
generally familiar with the applicable laws
and procedures for towing. To assure proper
towing and to prevent accidental damage to
your vehicle, NISSAN recommends having a
service operator tow your vehicle. It is advis-
able to have the service operator carefully
read the following precautions.
WARNING
cNever ride in a vehicle that is being
towed.
cNever get under your vehicle after it
has been lifted by a tow truck.
CAUTION
cWhen towing, make sure that the
transmission, axles, steering system
and powertrain are in working con-
dition. If any unit is damaged, dollies
must be used.cWhen towing manual transmission
models with the front wheels on the
ground (if you do not use towing
dollies):
Turn the ignition key to the OFF
position and secure the steering
wheel in a straight ahead position
with a rope or similar device. Never
place the ignition key in the LOCK
position. This will result in damage
to the steering lock mechanism.
Move the gearshift lever to the N
(Neutral) position.
cWhen towing with the rear wheels on
the ground, release the parking
brake.
cAttach safety chains for all towing.
TOW TRUCK TOWING
In case of emergency6-11
ZX
Page 149 of 223
When performing any inspection or mainte-
nance work on your vehicle, always take
care to prevent serious accidental injury to
yourself or damage to the vehicle. The
following are general precautions which
should be closely observed.
WARNING
cPark the vehicle on a level surface,
apply the parking brake securely and
block the wheels to prevent the ve-
hicle from moving. For a manual
transmission, move the gearshift
control lever to N (Neutral). For an
automatic transmission, move the
shift lever to P (Park).
cBe sure the ignition key is OFF when
performing any parts replacement or
repairs.
cBe sure to turn the ignition key to the
OFF or LOCK position. When the
ignition key is in the ON or ACC
position, the cooling fan may start to
operate suddenly even when the en-
gine is not running.cIf you must work with the engine
running, keep your hands, clothing,
hair and tools away from moving
fans, belts and any other moving
parts.
cIt is advisable to remove ties and any
jewelry, such as rings, watches, etc.,
before working on your vehicle.
cIf you must run the engine in an
enclosed space such as a garage, be
sure there is proper ventilation for
exhaust gases.
cNever get under the vehicle while it
is supported by only a jack. If it is
necessary to work under the vehicle,
support it with safety stands.
cKeep smoking materials, flame and
sparks away from fuel and battery.
cOn gasoline engine models with the
Multiport Fuel Injection (MFI) sys-
tem, the fuel filter or fuel lines
should be serviced by an authorized
NISSAN dealer because the fuel
lines are under high pressure even
when the engine is off.
CAUTION
cDo not work under the hood while
the engine is hot. Turn the engine off
and wait until it cools down.
cNever connect or disconnect either
the battery or any transistorized
component connector while the igni-
tion is ON.
c
Avoid contact with used motor oil.
Improperly disposed motor oil and/or
other vehicle fluids can hurt the en-
vironment. Always conform to local
regulations for disposal of vehicle
fluid.
This ``Do-it-yourself'' section gives instruc-
tions regarding only those items which are
relatively easy for an owner to perform.
You should be aware that incomplete or
improper servicing may result in operating
difficulties or excessive emissions, and
could affect your warranty coverage.If in
doubt about any servicing, have it done
by an authorized NISSAN dealer.
MAINTENANCE
PRECAUTIONS
8-2Do-it-yourself
ZX
Page 189 of 223

Parking brake* ÐCheck that the lever has
the proper travel and confirm that your
vehicle is held securely on a fairly steep hill
with only the parking brake applied.
Automatic transmission ``Park'' mecha-
nism ÐOn a fairly steep hill check that your
vehicle is held securely with the selector
lever in the P (Park) position without apply-
ing any brakes.
UNDER THE HOOD AND VEHICLE
The maintenance items listed here should
be checked periodically, such as each time
you check the engine oil or refuel.
Additional information on the following
items with an ``*'' is found in the ``Do-it-
yourself'' section of this manual.
Windshield washer fluid* ÐCheck for
adequate fluid in the tank.
Engine coolant level* ÐCheck the cool-
ant level when the engine is cold.
Radiator and hoses ÐCheck the front of
the radiator and clean off any dirt, insects,
leaves, etc., that may have accumulated.
Make sure the hoses have no cracks, de-
formation, rot or loose connections.Brake fluid level* ÐMake sure the brake
fluid level is between the MIN and MAX
lines on the reservoir.
Battery* ÐCheck the fluid level in each
cell.
Engine drive belts* ÐMake sure the drive
belts are not frayed, worn, cracked or oily.
Engine oil level* ÐCheck the level after
parking the vehicle on a level surface, with
the engine off. Wait a few minutes for the oil
to drain back into the oil pan.
Power steering fluid level* and lines Ð
Check the level when the fluid is cold, with
the engine off. Check the lines for proper
attachment, leaks, cracks, etc.
Automatic transmission fluid level* Ð
Check the level after putting the selector
lever in P (Park) with the engine idling at
operating temperature.Exhaust system ÐMake sure there are no
cracks, holes, loose joints or supports. If the
sound of the exhaust seems unusual or
there is a smell of exhaust fumes, immedi-
ately have the exhaust system inspected by
an authorized NISSAN dealer. (See the
carbon monoxide warning in the ``Starting
and driving'' section of this manual.)
Underbody ÐThe underbody is frequently
exposed to corrosive substances such as
those used on icy roads or to control dust. It
is very important to remove these sub-
stances, from the underbody, otherwise rust
may form on the floor pan, frame, fuel lines
and exhaust system. At the end of winter,
the underbody should be thoroughly flushed
with plain water, especially those areas
where mud and dirt may have accumulate.
See the ``Appearance and care'' section of
this manual.
Fluid leaks ÐCheck under the vehicle for
fuel, oil, water or other fluid leaks after the
vehicle has been parked for awhile. Water
dripping from the air conditioner after use is
normal. If you should notice any leaks or if
gasoline fumes are evident, check for the
cause and have it corrected immediately by
an authorized NISSAN dealer.
9-4Maintenance
ZX
Page 192 of 223
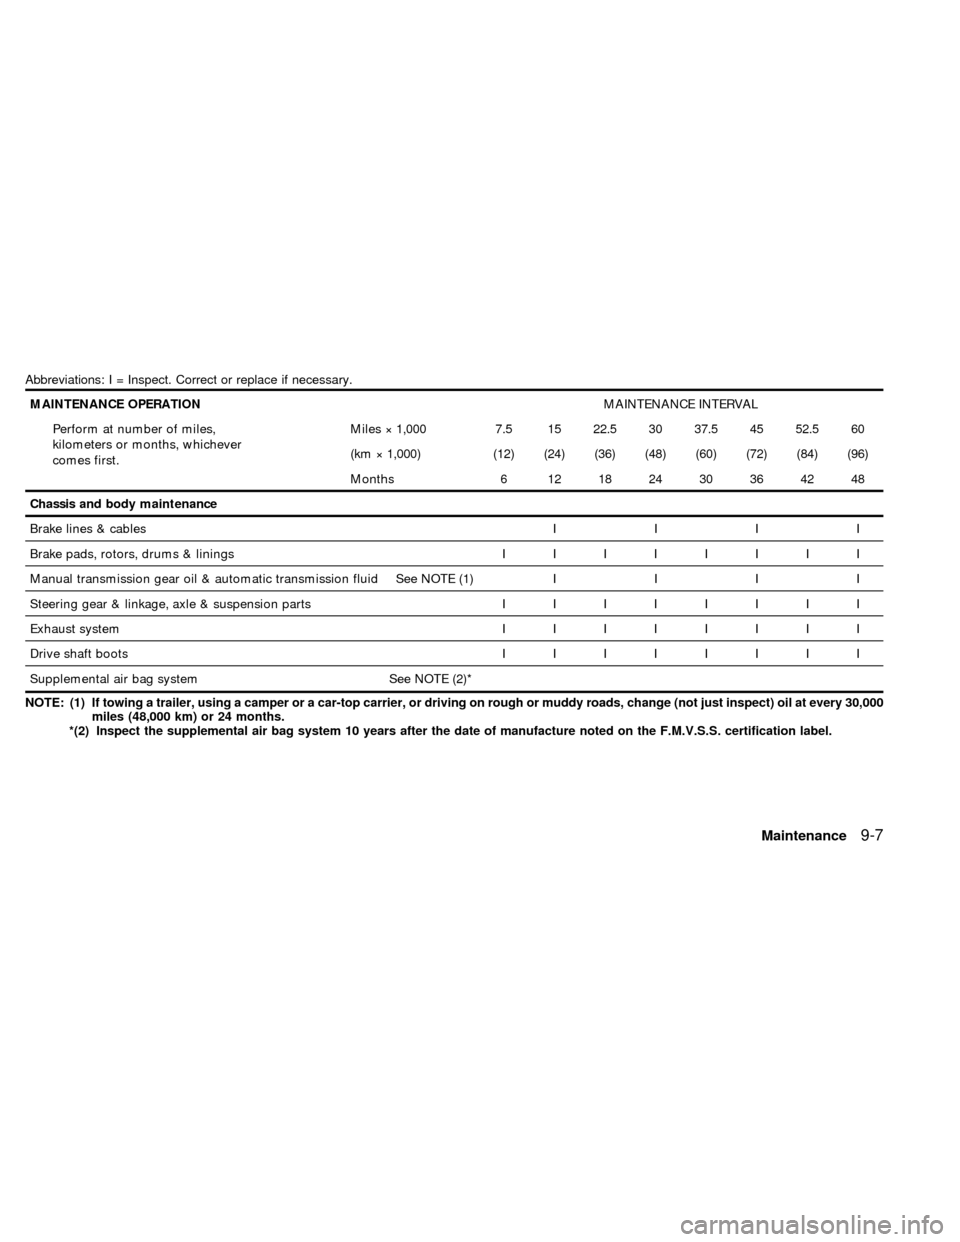
Abbreviations: I = Inspect. Correct or replace if necessary.
MAINTENANCE OPERATIONMAINTENANCE INTERVAL
Perform at number of miles,
kilometers or months, whichever
comes first.Miles ý 1,000 7.5 15 22.5 30 37.5 45 52.5 60
(km ý 1,000) (12) (24) (36) (48) (60) (72) (84) (96)
Months 6 12 18 24 30 36 42 48
Chassis and body maintenance
Brake lines & cablesIIII
Brake pads, rotors, drums & liningsIIIIIIII
Manual transmission gear oil & automatic transmission fluid See NOTE (1)IIII
Steering gear & linkage, axle & suspension partsIIIIIIII
Exhaust systemIIIIIIII
Drive shaft bootsIIIIIIII
Supplemental air bag system See NOTE (2)*
NOTE: (1) If towing a trailer, using a camper or a car-top carrier, or driving on rough or muddy roads, change (not just inspect) oil at every 30,000
miles (48,000 km) or 24 months.
*(2) Inspect the supplemental air bag system 10 years after the date of manufacture noted on the F.M.V.S.S. certification label.
Maintenance9-7
ZX
Page 194 of 223
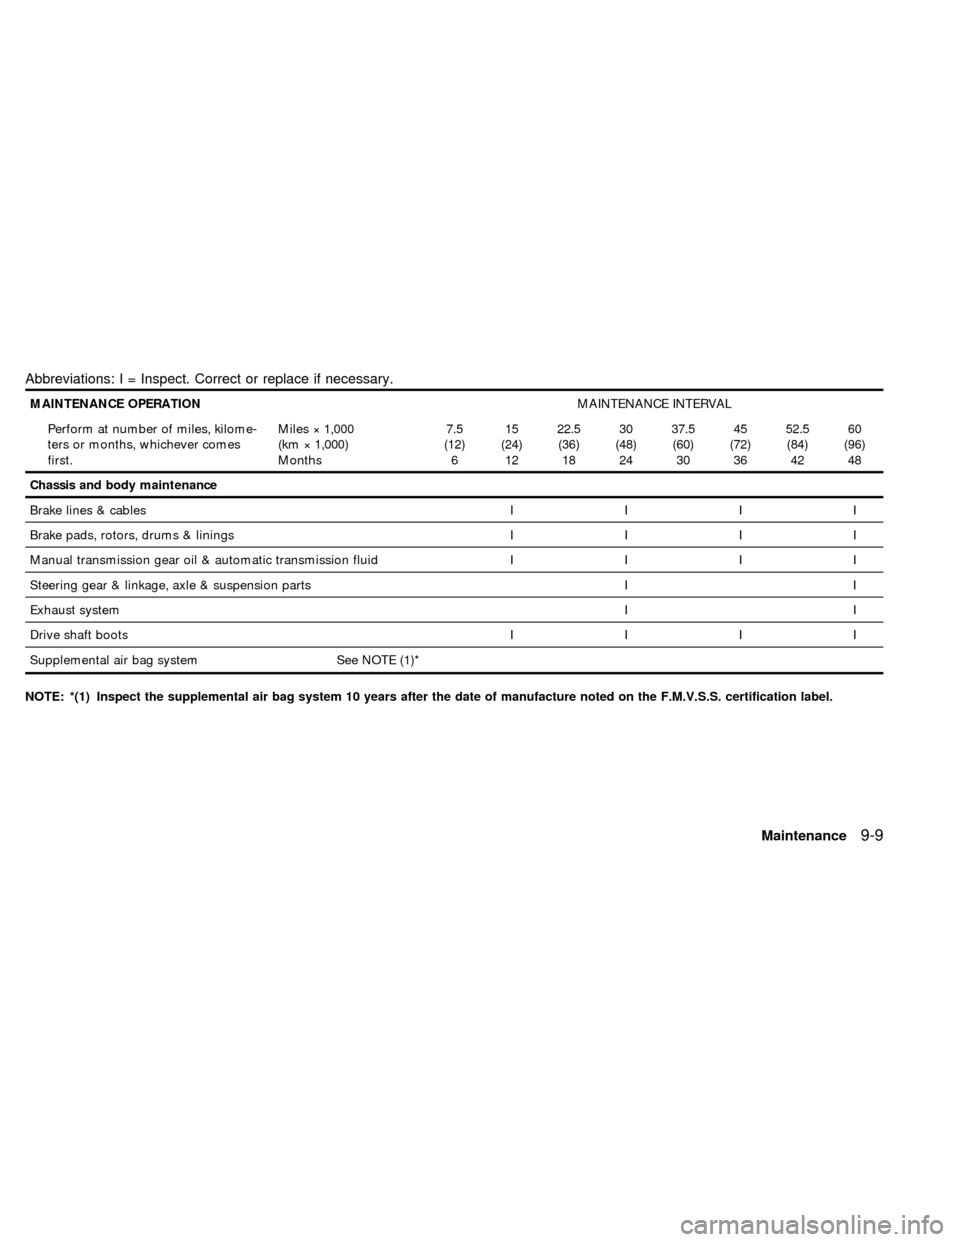
Abbreviations: I = Inspect. Correct or replace if necessary.
MAINTENANCE OPERATIONMAINTENANCE INTERVAL
Perform at number of miles, kilome-
ters or months, whichever comes
first.Miles ý 1,000
(km ý 1,000)
Months7.5
(12)
615
(24)
1222.5
(36)
1830
(48)
2437.5
(60)
3045
(72)
3652.5
(84)
4260
(96)
48
Chassis and body maintenance
Brake lines & cablesIIII
Brake pads, rotors, drums & liningsIIII
Manual transmission gear oil & automatic transmission fluidIIII
Steering gear & linkage, axle & suspension parts I I
Exhaust systemII
Drive shaft bootsIIII
Supplemental air bag system See NOTE (1)*
NOTE: *(1) Inspect the supplemental air bag system 10 years after the date of manufacture noted on the F.M.V.S.S. certification label.
Maintenance9-9
ZX
Page 195 of 223

Additional information on the following
items with an ``*'' is found in the ``Do-it-
yourself'' section of this manual.
Emission control system
maintenance
Drive belts* ÐCheck drive belts for wear,
fraying or cracking and also for proper tension.
Replace any damaged drive belts.
Air cleaner filter ÐUnder normal driving
conditions, the air cleaner filter should be
replaced in accordance with the maintenance
schedule. However, driving the vehicle in
dusty areas may cause rapid clogging of the
element. Consequently, the element may
have to be replaced more frequently.
EVAP vapor lines ÐCheck vapor lines
and connections for leaks, looseness or
deterioration. If leaks are found, replace
them.
Fuel lines ÐCheck the fuel hoses, piping
and connections for leaks, looseness or
deterioration. Replace any damaged parts.
Fuel filter ÐIf the vehicle is operated under
extremely adverse weather conditions or in
areas where ambient temperatures are ei-
ther extremely low or extremely high, thefilter might become clogged. In such an
event, replace the filter immediately.
Engine coolant* ÐDrain and flush the
cooling system.
Engine oil & oil filter* ÐUnder normal
driving conditions, the engine oil and oil filter
should be replaced in accordance with the
maintenance schedule. However, under se-
vere driving conditions, they may have to be
replaced more frequently.
Spark plugs* ÐReplace with new plugs
having the correct heat range.
Intake & exhaust valve clearance Ð
Check and adjust the valve clearance.
Chassis and body maintenance
Brake lines & cables ÐCheck the brake
lines and hoses (including brake booster
vacuum hoses, connections & check valve)
and parking brake cables for proper attach-
ment, leaks, cracks, chafing, abrasion, de-
terioration, etc.
Brake pads, rotors, drums & linings Ð
Check these and the other brake compo-
nents for wear, deterioration and leaks. Un-
der severe driving conditions, they may have
to be inspected more frequently.
Manual & automatic transmission fluid*
ÐCheck the fluid level and visually inspect
for signs of leakage. Under severe driving
conditions, the fluid should be replaced at
the specified interval.
Steering gear & linkage, axle & suspen-
sion parts, and drive shaft boots Ð
Check for damage, looseness and leakage
of oil or grease. Under severe driving con-
ditions, inspection should be performed
more frequently.
Exhaust system ÐVisually check the ex-
haust pipes, muffler, and hangers for proper
attachment, leaks, cracks, chafing, abra-
sion, deterioration, etc. Under severe
driving conditions, inspection should be per-
formed more frequently.
Supplemental air bag system ÐCheck
the supplemental air bag system compo-
nents for proper attachment, damage, de-
formities, cracks, rust, etc. Work around and
on the supplemental air bag system should
be done by an authorized NISSAN dealer.
EXPLANATION OF
MAINTENANCE ITEMS
9-10Maintenance
ZX