lock NISSAN SENTRA 2000 B15 / 5.G Owners Manual
[x] Cancel search | Manufacturer: NISSAN, Model Year: 2000, Model line: SENTRA, Model: NISSAN SENTRA 2000 B15 / 5.GPages: 240, PDF Size: 1.94 MB
Page 9 of 240
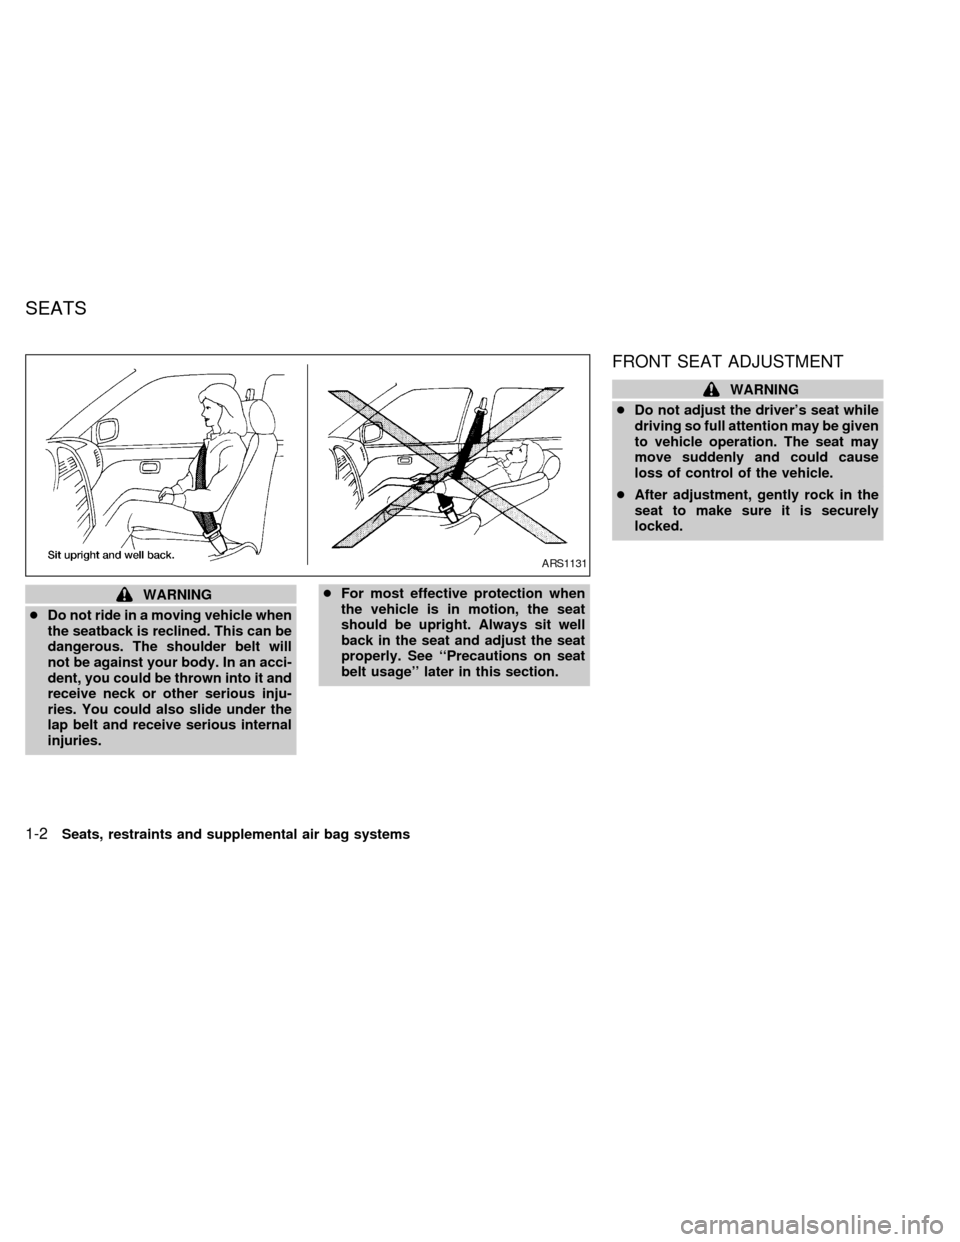
WARNING
cDo not ride in a moving vehicle when
the seatback is reclined. This can be
dangerous. The shoulder belt will
not be against your body. In an acci-
dent, you could be thrown into it and
receive neck or other serious inju-
ries. You could also slide under the
lap belt and receive serious internal
injuries.cFor most effective protection when
the vehicle is in motion, the seat
should be upright. Always sit well
back in the seat and adjust the seat
properly. See ``Precautions on seat
belt usage'' later in this section.
FRONT SEAT ADJUSTMENT
WARNING
cDo not adjust the driver's seat while
driving so full attention may be given
to vehicle operation. The seat may
move suddenly and could cause
loss of control of the vehicle.
cAfter adjustment, gently rock in the
seat to make sure it is securely
locked.
ARS1131
SEATS
1-2Seats, restraints and supplemental air bag systems
ZX
Page 10 of 240

Forward and backward
Pull the lever up while you slide the seat
forward or backward to the desired position.
Release the lever to lock the seat in position.
Reclining
To recline the seatback, pull the lever up
and lean back. To bring the back of the seat
forward again, pull the lever and move your
body forward.Seat lifter
Turn either dial to adjust the angle and
height of the seat cushion to the desired
position.
WRS0001SPA0099A
Seats, restraints and supplemental air bag systems1-3
ZX
Page 11 of 240
REAR SEAT ADJUSTMENT
Interior trunk access
(if so equipped)
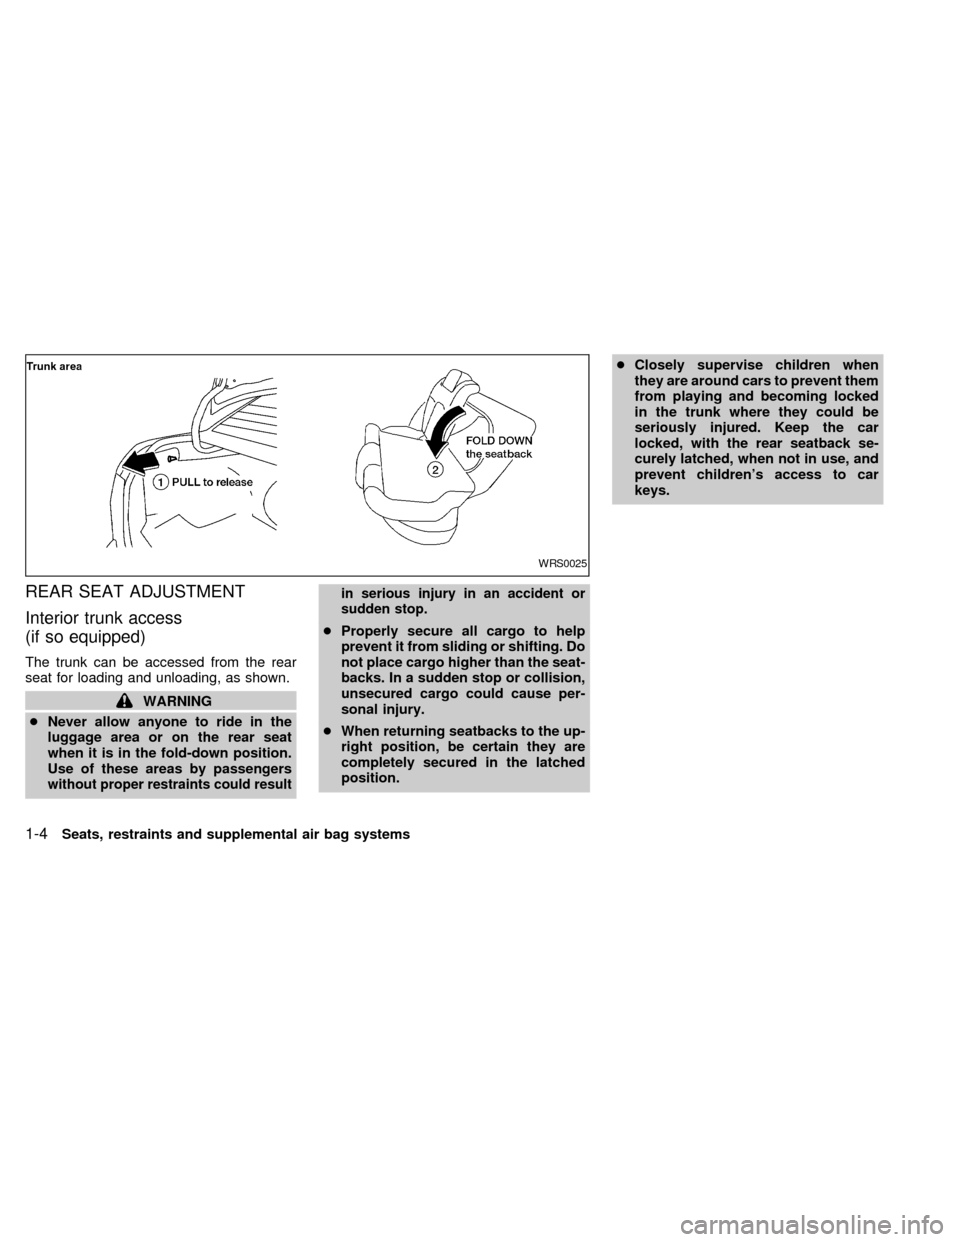
The trunk can be accessed from the rear
seat for loading and unloading, as shown.
WARNING
cNever allow anyone to ride in the
luggage area or on the rear seat
when it is in the fold-down position.
Use of these areas by passengers
without proper restraints could resultin serious injury in an accident or
sudden stop.
cProperly secure all cargo to help
prevent it from sliding or shifting. Do
not place cargo higher than the seat-
backs. In a sudden stop or collision,
unsecured cargo could cause per-
sonal injury.
cWhen returning seatbacks to the up-
right position, be certain they are
completely secured in the latched
position.cClosely supervise children when
they are around cars to prevent them
from playing and becoming locked
in the trunk where they could be
seriously injured. Keep the car
locked, with the rear seatback se-
curely latched, when not in use, and
prevent children's access to car
keys.
WRS0025
1-4Seats, restraints and supplemental air bag systems
ZX
Page 12 of 240
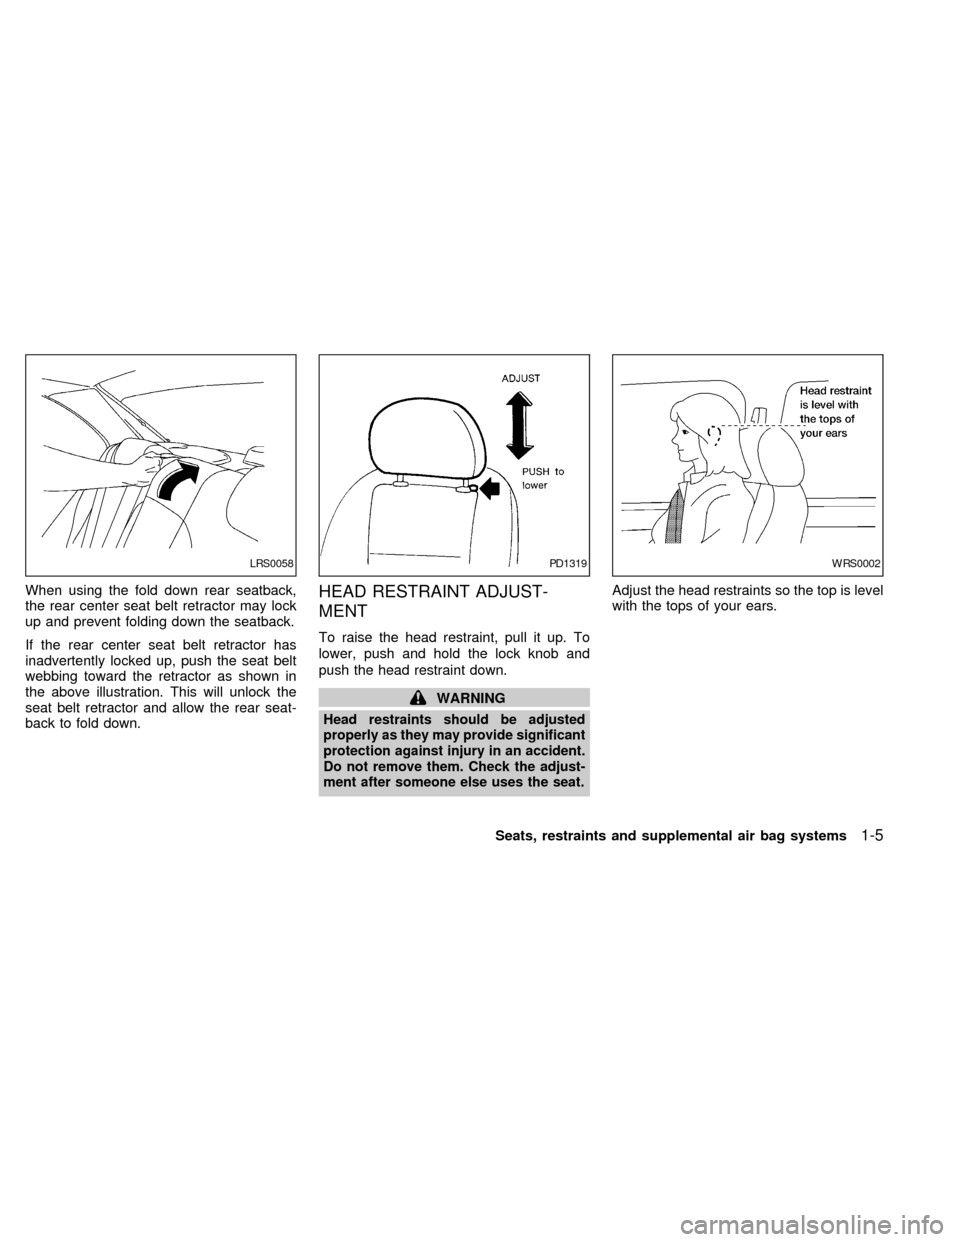
When using the fold down rear seatback,
the rear center seat belt retractor may lock
up and prevent folding down the seatback.
If the rear center seat belt retractor has
inadvertently locked up, push the seat belt
webbing toward the retractor as shown in
the above illustration. This will unlock the
seat belt retractor and allow the rear seat-
back to fold down.HEAD RESTRAINT ADJUST-
MENT
To raise the head restraint, pull it up. To
lower, push and hold the lock knob and
push the head restraint down.
WARNING
Head restraints should be adjusted
properly as they may provide significant
protection against injury in an accident.
Do not remove them. Check the adjust-
ment after someone else uses the seat.
Adjust the head restraints so the top is level
with the tops of your ears.
LRS0058PD1319WRS0002
Seats, restraints and supplemental air bag systems1-5
ZX
Page 24 of 240
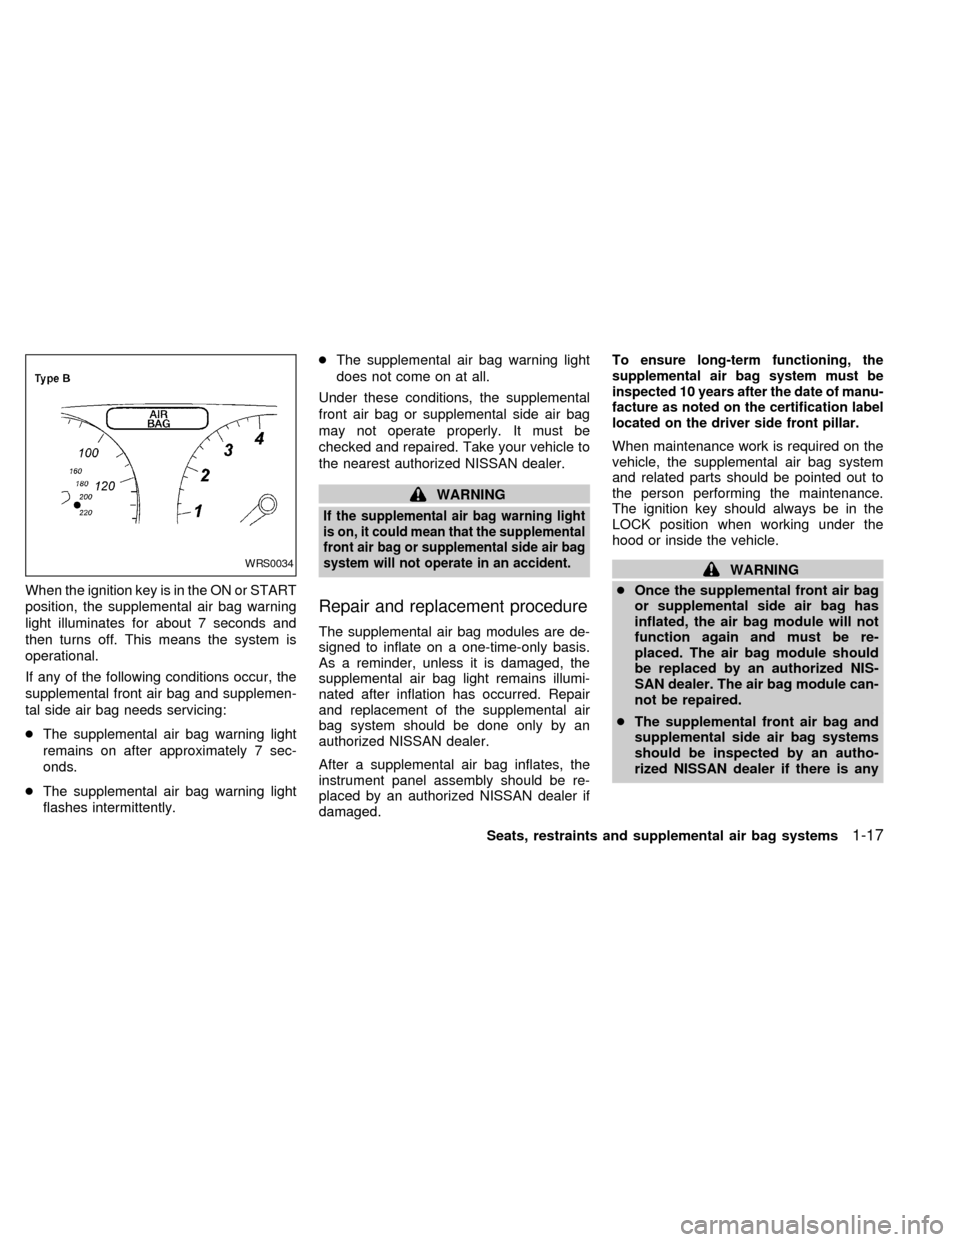
When the ignition key is in the ON or START
position, the supplemental air bag warning
light illuminates for about 7 seconds and
then turns off. This means the system is
operational.
If any of the following conditions occur, the
supplemental front air bag and supplemen-
tal side air bag needs servicing:
cThe supplemental air bag warning light
remains on after approximately 7 sec-
onds.
cThe supplemental air bag warning light
flashes intermittently.cThe supplemental air bag warning light
does not come on at all.
Under these conditions, the supplemental
front air bag or supplemental side air bag
may not operate properly. It must be
checked and repaired. Take your vehicle to
the nearest authorized NISSAN dealer.
WARNING
If the supplemental air bag warning light
is on, it could mean that the supplemental
front air bag or supplemental side air bag
system will not operate in an accident.
Repair and replacement procedure
The supplemental air bag modules are de-
signed to inflate on a one-time-only basis.
As a reminder, unless it is damaged, the
supplemental air bag light remains illumi-
nated after inflation has occurred. Repair
and replacement of the supplemental air
bag system should be done only by an
authorized NISSAN dealer.
After a supplemental air bag inflates, the
instrument panel assembly should be re-
placed by an authorized NISSAN dealer if
damaged.
To ensure long-term functioning, the
supplemental air bag system must be
inspected 10 years after the date of manu-
facture as noted on the certification label
located on the driver side front pillar.
When maintenance work is required on the
vehicle, the supplemental air bag system
and related parts should be pointed out to
the person performing the maintenance.
The ignition key should always be in the
LOCK position when working under the
hood or inside the vehicle.
WARNING
cOnce the supplemental front air bag
or supplemental side air bag has
inflated, the air bag module will not
function again and must be re-
placed. The air bag module should
be replaced by an authorized NIS-
SAN dealer. The air bag module can-
not be repaired.
cThe supplemental front air bag and
supplemental side air bag systems
should be inspected by an autho-
rized NISSAN dealer if there is anyWRS0034
Seats, restraints and supplemental air bag systems1-17
ZX
Page 29 of 240
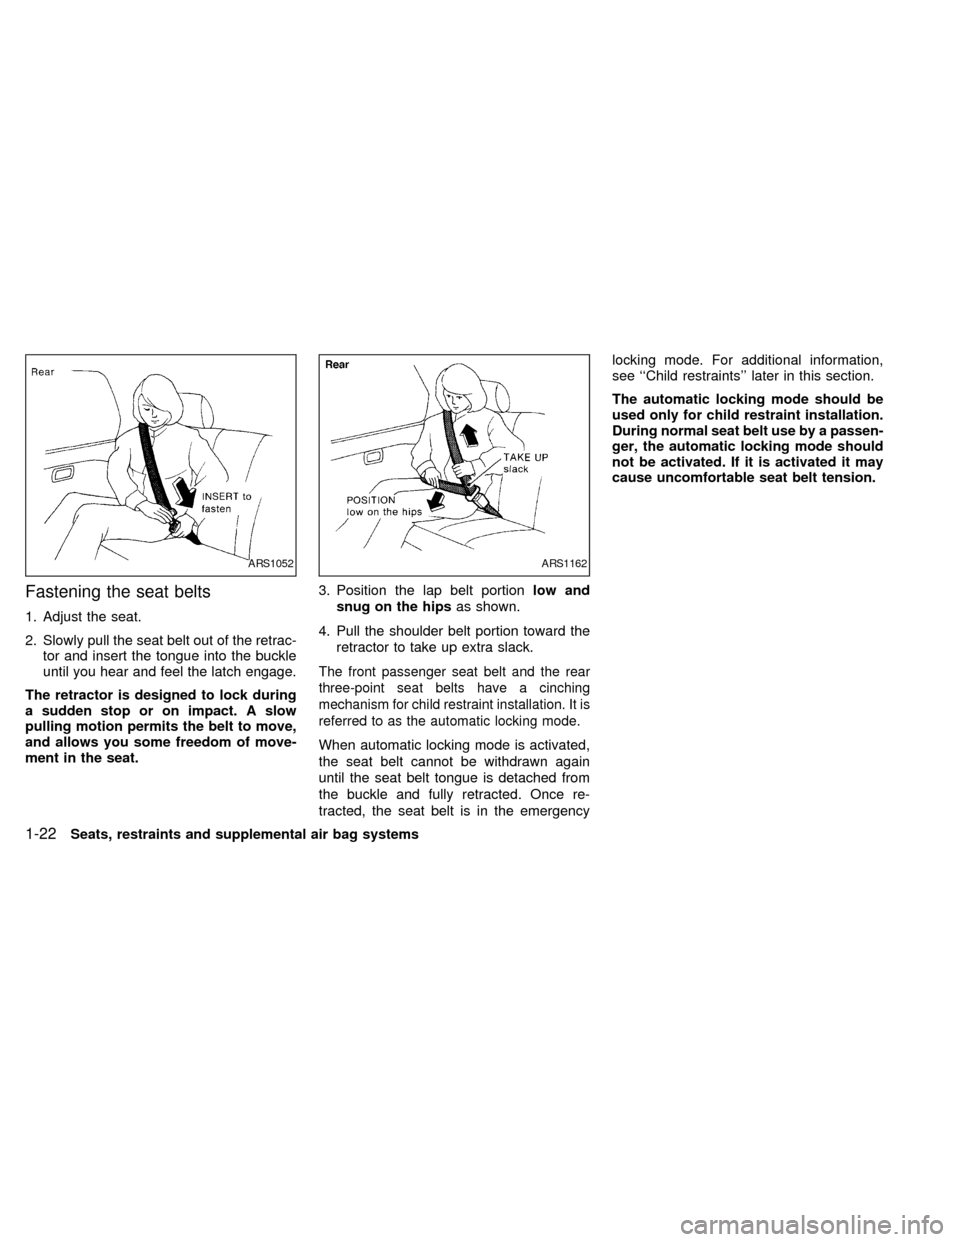
Fastening the seat belts
1. Adjust the seat.
2. Slowly pull the seat belt out of the retrac-
tor and insert the tongue into the buckle
until you hear and feel the latch engage.
The retractor is designed to lock during
a sudden stop or on impact. A slow
pulling motion permits the belt to move,
and allows you some freedom of move-
ment in the seat.3. Position the lap belt portionlow and
snug on the hipsas shown.
4. Pull the shoulder belt portion toward the
retractor to take up extra slack.
The front passenger seat belt and the rear
three-point seat belts have a cinching
mechanism for child restraint installation. It is
referred to as the automatic locking mode.
When automatic locking mode is activated,
the seat belt cannot be withdrawn again
until the seat belt tongue is detached from
the buckle and fully retracted. Once re-
tracted, the seat belt is in the emergencylocking mode. For additional information,
see ``Child restraints'' later in this section.
The automatic locking mode should be
used only for child restraint installation.
During normal seat belt use by a passen-
ger, the automatic locking mode should
not be activated. If it is activated it may
cause uncomfortable seat belt tension.
ARS1052ARS1162
1-22Seats, restraints and supplemental air bag systems
ZX
Page 30 of 240

Unfastening the seat belts
To unfasten the seat belt, press the button
on the buckle. The seat belt automatically
retracts.
Checking seat belt operation
Your seat belt retractors are designed to lock
seat belt movement by two separate meth-
ods:
1) When the seat belt is pulled quickly from
the retractor.
2) When the vehicle slows down rapidly.
To increase your confidence in the seat
belts, check the operation as follows.
cGrasp the shoulder belt and pull forward
quickly. The retractor should lock and
restrict further belt movement.
If the retractor does not lock during this check
or if you have any question about belt opera-
tion, see an authorized NISSAN dealer.Center of rear seat
Selecting correct set of seat belts:
The center seat belt buckle is identified by
the word ``CENTER.'' The center seat belt
tongue can be fastenedonlyinto the center
seat belt buckle.
ARS1054WRS0005
Seats, restraints and supplemental air bag systems1-23
ZX
Page 31 of 240
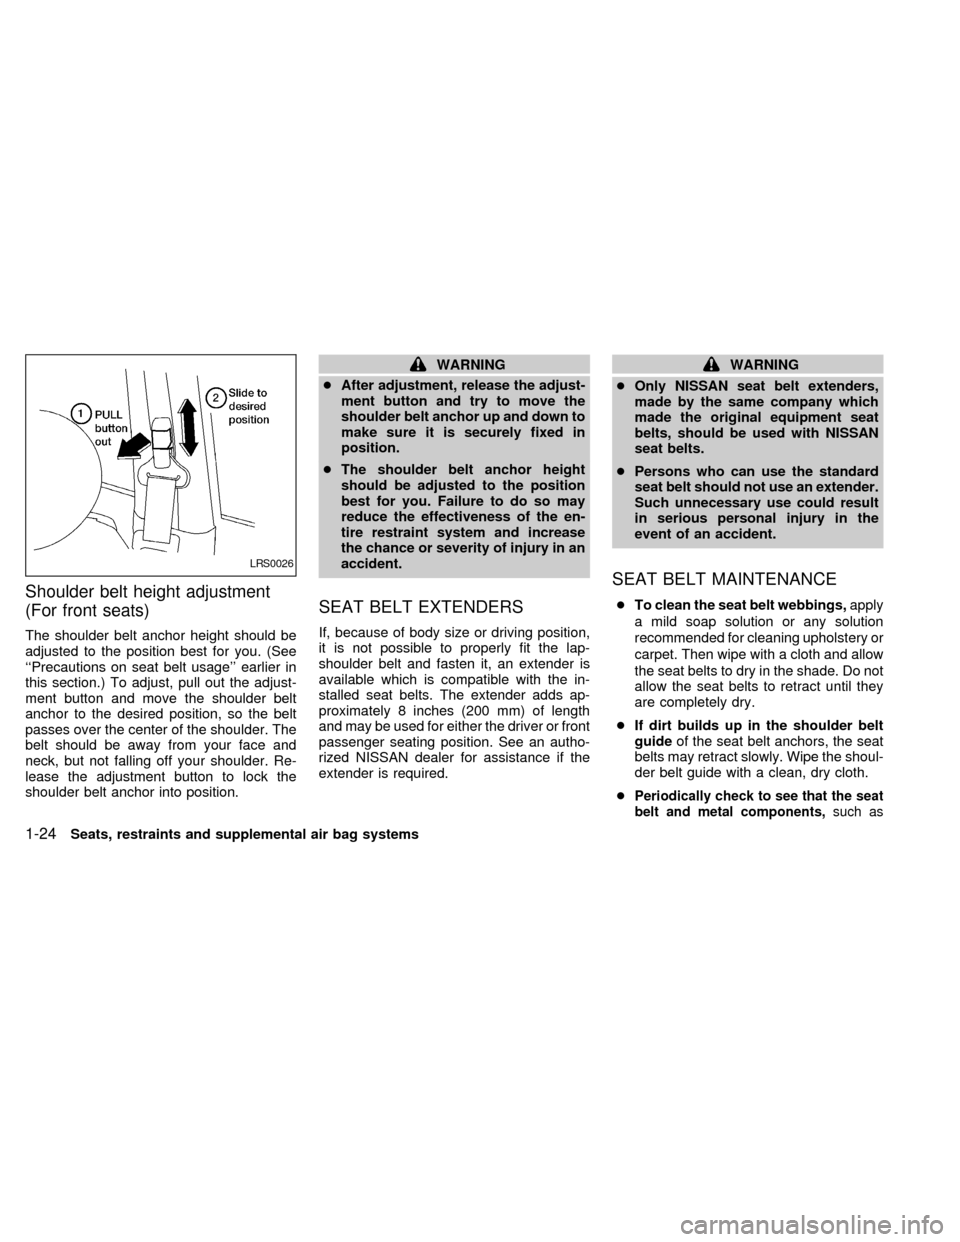
Shoulder belt height adjustment
(For front seats)
The shoulder belt anchor height should be
adjusted to the position best for you. (See
``Precautions on seat belt usage'' earlier in
this section.) To adjust, pull out the adjust-
ment button and move the shoulder belt
anchor to the desired position, so the belt
passes over the center of the shoulder. The
belt should be away from your face and
neck, but not falling off your shoulder. Re-
lease the adjustment button to lock the
shoulder belt anchor into position.
WARNING
cAfter adjustment, release the adjust-
ment button and try to move the
shoulder belt anchor up and down to
make sure it is securely fixed in
position.
cThe shoulder belt anchor height
should be adjusted to the position
best for you. Failure to do so may
reduce the effectiveness of the en-
tire restraint system and increase
the chance or severity of injury in an
accident.
SEAT BELT EXTENDERS
If, because of body size or driving position,
it is not possible to properly fit the lap-
shoulder belt and fasten it, an extender is
available which is compatible with the in-
stalled seat belts. The extender adds ap-
proximately 8 inches (200 mm) of length
and may be used for either the driver or front
passenger seating position. See an autho-
rized NISSAN dealer for assistance if the
extender is required.
WARNING
cOnly NISSAN seat belt extenders,
made by the same company which
made the original equipment seat
belts, should be used with NISSAN
seat belts.
cPersons who can use the standard
seat belt should not use an extender.
Such unnecessary use could result
in serious personal injury in the
event of an accident.
SEAT BELT MAINTENANCE
cTo clean the seat belt webbings,apply
a mild soap solution or any solution
recommended for cleaning upholstery or
carpet. Then wipe with a cloth and allow
the seat belts to dry in the shade. Do not
allow the seat belts to retract until they
are completely dry.
cIf dirt builds up in the shoulder belt
guideof the seat belt anchors, the seat
belts may retract slowly. Wipe the shoul-
der belt guide with a clean, dry cloth.
c
Periodically check to see that the seat
belt and metal components,such as
LRS0026
1-24Seats, restraints and supplemental air bag systems
ZX
Page 33 of 240
restraint and check the various adjust-
ments to be sure the child restraint is
compatible with your child. Always follow
all recommended procedures.
All U.S. states and Canadian provinces
or territories require that infants and
small children be restrained in approved
child restraints at all times while the
vehicle is being operated.
WARNING
cImproper use of a child restraint can
result in increased injuries for both
the infant or child and other occu-
pants in the vehicle.
cFollow all of the child restraint manu-
facturer's instructions for installa-
tion and use. When purchasing a
child restraint, be sure to select one
which will fit your child and vehicle.
It may not be possible to properly
install some types of child restraints
in your vehicle.
cIf the child restraint is not anchored
properly, the risk of a child being
injured in a collision or a sudden
stop greatly increases.cAdjustable seatbacks should be po-
sitioned to fit the child restraint, but
as upright as possible.
c
After attaching the child restraint,
test it before you place the child in it.
Tilt it from side to side. Try to tug it
forward and check to see if the belt
holds the restraint in place. If the
restraint is not secure, tighten the
belt as necessary, or put the restraint
in another seat and test it again.
cFor a front-facing child restraint, if
the seat position where it is installed
has a three-point type lap/shoulder
belt, check to make sure the shoulder
belt does not go in front of the child's
face or neck. If it does, put the shoul-
der belt behind the child restraint. If
you must install a front-facing child
restraint in the front seat, see ``Instal-
lation on front passenger seat'' later
in this section for details.
cWhen your child restraint is not in
use, keep it secured with a seat belt
to prevent it from being thrown
around in case of a sudden stop or
accident.
CAUTION
Remember that a child restraint left in a
closed vehicle can become very hot.
Check the seating surface and buckles
before placing your child in the child
restraint.
INSTALLATION ON REAR SEAT
CENTER OR OUTBOARD POSI-
TIONS
WARNING
cThe three-point belt in your vehicle
is equipped with a locking mode re-
tractor which must be used when
installing a child restraint.
cFailure to use the retractor's locking
mode will result in the child restraint
not being properly secured. The re-
straint could tip over or otherwise be
unsecured and cause injury to the
child in a sudden stop or collision.
1-26Seats, restraints and supplemental air bag systems
ZX
Page 35 of 240

3. Pull on the shoulder belt until all of the
belt is fully extended. At this time, the
seat belt retractor is in the automatic
locking mode (child restraint mode). It
reverts back to emergency locking mode
when the seat belt is fully retracted.4. Allow the seat belt to retract. Pull up on
the seat belt to remove any slack in the
belt.5. Before placing the child in the child re-
straint, use force to tilt the child restraint
from side to side, and tug it forward to
make sure that it is securely held in
place.
6. Check that the retractor is in the auto-
matic locking mode by trying to pull more
seat belt out of the retractor. If you can-
not pull any more belt webbing out of the
retractor, the seat belt is in the automatic
locking mode.
7. Check to make sure that the child re-
straint is properly secured prior to each
WRS0037WRS0038WRS0039
1-28Seats, restraints and supplemental air bag systems
ZX