clock NISSAN SENTRA 2002 B15 / 5.G Owners Manual
[x] Cancel search | Manufacturer: NISSAN, Model Year: 2002, Model line: SENTRA, Model: NISSAN SENTRA 2002 B15 / 5.GPages: 235, PDF Size: 1.97 MB
Page 70 of 235

Rear power windows
The rear power window switches open or
close only the corresponding window. To
open the window, push the switch down. To
close the window, lift the switch up.
Automatic operation
To fully open the driver's side window, press
the driver's side window switch down to the
second detent and release it. The window
automatically opens all the way. To stop the
window, lift the switch up while the window
is opening.
MANUAL WINDOWS
The side windows can be opened or closed
by turning the hand crank on each door.
To open a window on the driver side, turn
the crank clockwise. To close a window,
turn the crank counterclockwise.
To open a window on the passenger side,
turn the crank counterclockwise. To close a
window, turn the crank clockwise.
LIC0044AIC1144AIC0648
Instruments and controls2-25
ZX
Page 84 of 235

Cancel lever
When the lever is in the cancel position, the
trunk lid cannot be opened with the trunk lid
opener lever. It can be opened only with the
key.
KEY OPERATION
To open the trunk lid from outside the
vehicle, turn the key clockwise. To close the
trunk lid, push the trunk lid down securely.
WPD0021APD1110
Pre-driving checks and adjustments3-11
ZX
Page 86 of 235

OPENER OPERATION
To open the fuel filler lid, pull up the opener
lever. To lock, close the fuel filler lid se-
curely.
FUEL FILLER CAP
The fuel filler cap is a ratcheting type.
Tighten the cap clockwise until ratcheting
clicks are heard.
WPD0027WPD0035
FUEL FILLER LID
Pre-driving checks and adjustments3-13
ZX
Page 101 of 235

RADIO
Turn the ignition key to ACC or ON and
press the power on switch to turn on the
radio. If you listen to the radio with the
engine not running, the key should be
turned to the ACC position.
Radio reception is affected by station signal
strength, distance from radio transmitter,
buildings, bridges, mountains and other ex-
ternal influences. Intermittent changes in
reception quality normally are caused by
these external influences.
Using a cellular phone in or near the
vehicle may influence radio reception
quality.
Radio reception
Your NISSAN radio system is equipped with
state-of-the-art electronic circuits to en-
hance radio reception. These circuits are
designed to extend reception range, and to
enhance the quality of that reception.
However there are some general character-
istics of both FM and AM radio signals that
can affect radio reception quality in a mov-
ing vehicle, even when the finest equipment
is used. These characteristics are com-pletely normal in a given reception area,
and do not indicate any malfunction in your
NISSAN radio system.
Reception conditions will constantly change
because of vehicle movement. Buildings,
terrain, signal distance and interference
from other vehicles can work against ideal
reception. Described below are some of the
factors that can affect your radio reception.
FM RADIO RECEPTION
Range: FM range is normally limited to 25 to
30 miles (40 to 48 km), with monaural
(single channel) FM having slightly more
range than stereo FM. External influences
may sometimes interfere with FM station
reception even if the FM station is within 25
miles (40 km). The strength of the FM signal
is directly related to the distance between
the transmitter and receiver. FM signals
follow a line-of-sight path, exhibiting many
of the same characteristics as light. For
example they will reflect off objects.
Fade and drift: As your vehicle moves away
from a station transmitter, the signals will
tend to fade and/or drift.
Static and flutter: During signal interference
from buildings, large hills or due to antennaposition, usually in conjunction with in-
creased distance from the station transmit-
ter, static or flutter can be heard. This can
be reduced by adjusting the treble control
counterclockwise to reduce treble re-
sponse.
Multipath reception: Because of the reflec-
tive characteristics of FM signals, direct and
reflected signals reach the receiver at the
same time. The signals may cancel each
other, resulting in momentary flutter or loss
of sound.
AM RADIO RECEPTION
AM signals, because of their low frequency,
can bend around objects and skip along the
ground. In addition, the signals can be
bounced off the ionosphere and bent back
to earth. Because of these characteristics.
AM signals are also subject to interference
as they travel from transmitter to receiver.
Fading: Occurs while the vehicle is passing
through freeway underpasses or in areas
with many tall buildings. It can also occur for
several seconds during ionospheric turbu-
AUDIO SYSTEM
4-10Heater, air conditioner and audio systems
ZX
Page 104 of 235

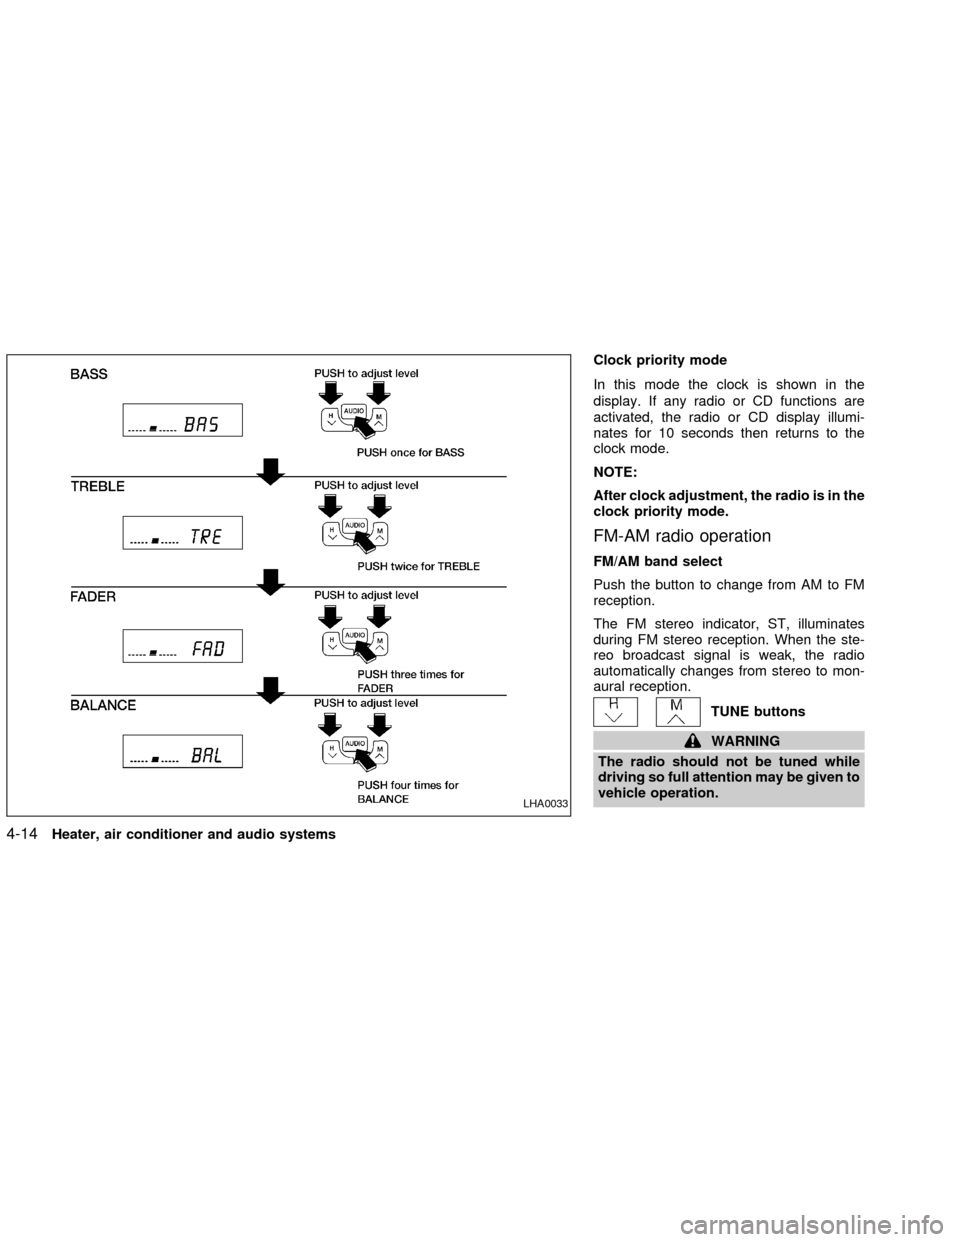
Fader (FAD) adjusts the sound level be-
tween the front and rear speakers and Bal-
ance (BAL) adjusts the sound between the
right and left speakers.
Clock operation
Pressing the clock button alternates the
clock and the radio/CD player options in the
display.
Clock set
Depressing the clock and
buttons to-
gether sets hours. Depressing the clock and
buttons together sets minutes.
Heater, air conditioner and audio systems
4-13
ZX
Page 105 of 235

Clock priority mode
In this mode the clock is shown in the
display. If any radio or CD functions are
activated, the radio or CD display illumi-
nates for 10 seconds then returns to the
clock mode.
NOTE:
After clock adjustment, the radio is in the
clock priority mode.
FM-AM radio operation
FM/AM band select
Push the button to change from AM to FM
reception.
The FM stereo indicator, ST, illuminates
during FM stereo reception. When the ste-
reo broadcast signal is weak, the radio
automatically changes from stereo to mon-
aural reception.
TUNE buttons
WARNING
The radio should not be tuned while
driving so full attention may be given to
vehicle operation.
LHA0033
4-14Heater, air conditioner and audio systems
ZX
Page 110 of 235

Mode cancels if another disc selection but-
ton is pushed or by waiting longer than 15
seconds to load a CD.
CD Eject - ALL
When the
button is pressed for longer
than 1.5 seconds, the CD changer auto-
matically changes to All Disc Eject Mode.
The disc indicator light for the current CD (or
the last CD that was played) starts flashing
orange and both WAIT and the disc selec-
tion button number flash in the display until
the CD ejects. When the CD ejects, the disc
indicator light turns off and the display turns
from WAIT to EJECT. When the CD is
removed from the unit, the next CD starts to
eject. After all the CDs are ejected, the CD
changer turns off.
If a CD is ejected and is not removed
within 10 seconds, it will be pulled back
into the slot.
CD CARE AND CLEANING
cHandle a CD by its edges. Never touch
the surface of the disc. Do not bend the
disc.
cAlways place the discs in the storage
case when they are not being used.
cTo clean a disc, wipe the surface from
the center to the outer edge using a
clean, soft cloth. Do not wipe the disc
using a circular motion.
Do not use a conventional record cleaner
or alcohol intended for industrial use.
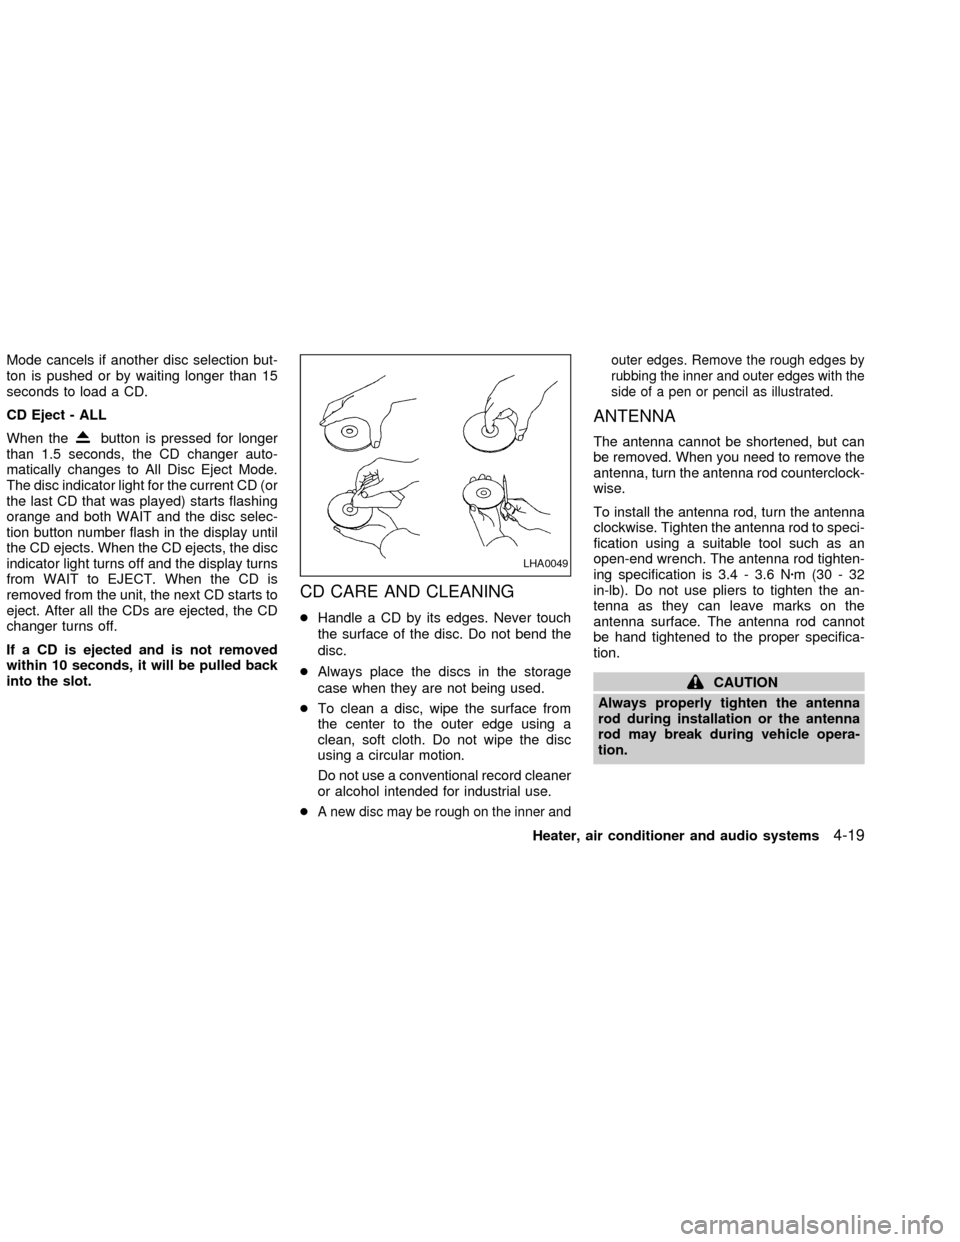
c
A new disc may be rough on the inner andouter edges. Remove the rough edges by
rubbing the inner and outer edges with the
side of a pen or pencil as illustrated.
ANTENNA
The antenna cannot be shortened, but can
be removed. When you need to remove the
antenna, turn the antenna rod counterclock-
wise.
To install the antenna rod, turn the antenna
clockwise. Tighten the antenna rod to speci-
fication using a suitable tool such as an
open-end wrench. The antenna rod tighten-
ing specification is 3.4 - 3.6 Nzm(30-32
in-lb). Do not use pliers to tighten the an-
tenna as they can leave marks on the
antenna surface. The antenna rod cannot
be hand tightened to the proper specifica-
tion.
CAUTION
Always properly tighten the antenna
rod during installation or the antenna
rod may break during vehicle opera-
tion.
LHA0049
Heater, air conditioner and audio systems4-19
ZX
Page 115 of 235

the influence of alcohol. Every year thou-
sands of people are injured or killed in
alcohol-related accidents. Although the lo-
cal laws vary on what is considered to be
legally intoxicated, the fact is that alcohol
affects all people differently and most
people underestimate the effects of alcohol.
Remember, drinking and driving don't mix!
And that is true for drugs, too (over-the-
counter, prescription, and illegal drugs). Do
not drive if your ability to operate your
vehicle is impaired by alcohol, drugs, or
some other physical condition.
AUTOMATIC TRANSMISSION
On automatic transmission models the igni-
tion lock is designed so the key cannot be
turned to LOCK and removed until the shift
selector lever is moved to the P (Park)
position.
When removing the key from the ignition,
make sure the shift selector lever is in the P
(Park) position.
When the key cannot be turned to the LOCK
position, proceed as follows to remove the
key.1) Move the shift selector lever into the P
(Park) position.
2) Turn the ignition key slightly toward the
ON position.
3) Turn the key to the LOCK position.
4) Remove the key.
The shift lever is designed so it cannot be
moved out of P(Park) and into any of the
other gear positions if the ignition key is
turned to OFF or if the key is removed from
the switch.
The shift selector lever can be moved if
the ignition switch is in the ON position
and the foot brake pedal is depressed.
There is an OFF position between the
LOCK and ACC positions. The OFF posi-
tion is indicated by a ``1'' on the key
cylinder. When the ignition is in OFF, the
steering wheel is not locked.
In order for the steering wheel to be
locked, it must be turned about 1/8 of a
turn clockwise from the straight up posi-
tion.
To lock the steering wheel, turn the key
to the LOCK position. To unlock the
steering wheel, insert the key and turn it
WSD0004
IGNITION SWITCH
5-4Starting and driving
ZX
Page 116 of 235

gently while rotating the steering wheel
slightly right and left.
WARNING
Never remove or turn the key to the
LOCK position while driving. The steer-
ing wheel will lock. This may cause the
driver to lose control of the vehicle and
could result in serious vehicle damage
or personal injury.
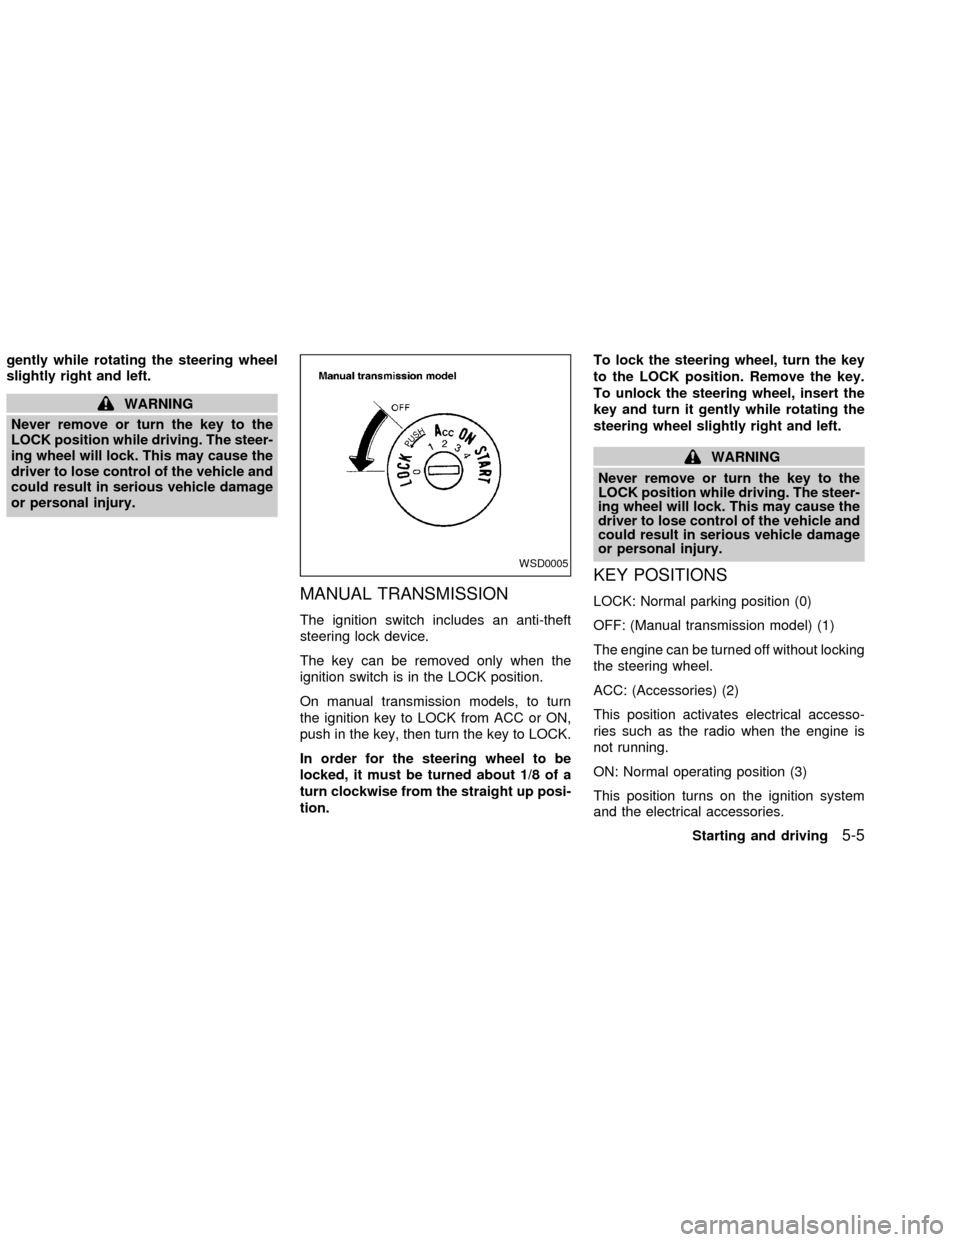
MANUAL TRANSMISSION
The ignition switch includes an anti-theft
steering lock device.
The key can be removed only when the
ignition switch is in the LOCK position.
On manual transmission models, to turn
the ignition key to LOCK from ACC or ON,
push in the key, then turn the key to LOCK.
In order for the steering wheel to be
locked, it must be turned about 1/8 of a
turn clockwise from the straight up posi-
tion.To lock the steering wheel, turn the key
to the LOCK position. Remove the key.
To unlock the steering wheel, insert the
key and turn it gently while rotating the
steering wheel slightly right and left.
WARNING
Never remove or turn the key to the
LOCK position while driving. The steer-
ing wheel will lock. This may cause the
driver to lose control of the vehicle and
could result in serious vehicle damage
or personal injury.
KEY POSITIONS
LOCK: Normal parking position (0)
OFF: (Manual transmission model) (1)
The engine can be turned off without locking
the steering wheel.
ACC: (Accessories) (2)
This position activates electrical accesso-
ries such as the radio when the engine is
not running.
ON: Normal operating position (3)
This position turns on the ignition system
and the electrical accessories.
WSD0005
Starting and driving5-5
ZX
Page 117 of 235

START: (4)
This position activates the starter motor,
which starts the engine.
NISSAN VEHICLE IMMOBILIZER
SYSTEM (NVIS) (if so equipped)
The Nissan Vehicle Immobilizer System
(NVIS) will not allow the engine to start
without the use of a registered NVIS key.
If the engine fails to start using a registered
NVIS key, it may be due to interference
caused by another NVIS key, an automated
toll road device or automated payment de-
vice on the key ring. Restart the engine
using the following procedures:
1. Leave the ignition switch in the ON posi-
tion for approximately 5 seconds.
2. Turn the ignition switch to the OFF or
LOCK position and wait approximately 5
seconds.
3. Repeat step 1 and 2 again.
4. Restart the engine while holding the de-
vice (which may have caused the inter-
ference) separate from the registered
NVIS key.
If this procedure allows the engine to start,NISSAN recommends placing the regis-
tered NVIS key on a separate key ring to
avoid interference from other devices.cMake sure the area around the vehicle is
clear.
cMaintenance items listed here should be
checked periodically, for example, each
time you check engine oil.
cCheck that all windows and lights are
clean.
cVisually inspect tires for their appearance
and condition. Also check tires for proper
inflation.
cLock all doors.
cPosition seat and adjust head restraints.
cAdjust inside and outside mirrors.
cFasten seat belts and ask all passengers
to do likewise.
c
Check the operation of warning lights
when key is turned to the ON (3) position.
See ``Warning/indicator lights and audible
reminders'' in the ``Instrument and con-
trols'' section.
BEFORE STARTING THE
ENGINE
5-6Starting and driving
ZX