flat tire NISSAN SENTRA 2002 B15 / 5.G Owners Manual
[x] Cancel search | Manufacturer: NISSAN, Model Year: 2002, Model line: SENTRA, Model: NISSAN SENTRA 2002 B15 / 5.GPages: 235, PDF Size: 1.97 MB
Page 117 of 235

START: (4)
This position activates the starter motor,
which starts the engine.
NISSAN VEHICLE IMMOBILIZER
SYSTEM (NVIS) (if so equipped)
The Nissan Vehicle Immobilizer System
(NVIS) will not allow the engine to start
without the use of a registered NVIS key.
If the engine fails to start using a registered
NVIS key, it may be due to interference
caused by another NVIS key, an automated
toll road device or automated payment de-
vice on the key ring. Restart the engine
using the following procedures:
1. Leave the ignition switch in the ON posi-
tion for approximately 5 seconds.
2. Turn the ignition switch to the OFF or
LOCK position and wait approximately 5
seconds.
3. Repeat step 1 and 2 again.
4. Restart the engine while holding the de-
vice (which may have caused the inter-
ference) separate from the registered
NVIS key.
If this procedure allows the engine to start,NISSAN recommends placing the regis-
tered NVIS key on a separate key ring to
avoid interference from other devices.cMake sure the area around the vehicle is
clear.
cMaintenance items listed here should be
checked periodically, for example, each
time you check engine oil.
cCheck that all windows and lights are
clean.
cVisually inspect tires for their appearance
and condition. Also check tires for proper
inflation.
cLock all doors.
cPosition seat and adjust head restraints.
cAdjust inside and outside mirrors.
cFasten seat belts and ask all passengers
to do likewise.
c
Check the operation of warning lights
when key is turned to the ON (3) position.
See ``Warning/indicator lights and audible
reminders'' in the ``Instrument and con-
trols'' section.
BEFORE STARTING THE
ENGINE
5-6Starting and driving
ZX
Page 128 of 235
cKeep your engine tuned up.
cFollow the recommended periodic main-
tenance schedule.
cKeep the tires inflated to the correct
pressure. Low tire pressure increases
tire wear and wastes fuel.
cKeep the front wheels in correct align-
ment. Improper alignment increases tire
wear and lowers fuel economy.
cAir conditioner operation lowers fuel
economy. Use the air conditioner only
when necessary.
cWhen cruising at highway speeds, it is
more economical to use the air condi-
tioner and leave the windows closed to
reduce drag.
WARNING
Do not park the vehicle over flammable
materials such as dry grass, waste pa-
per or rags. They may ignite and cause
a fire.
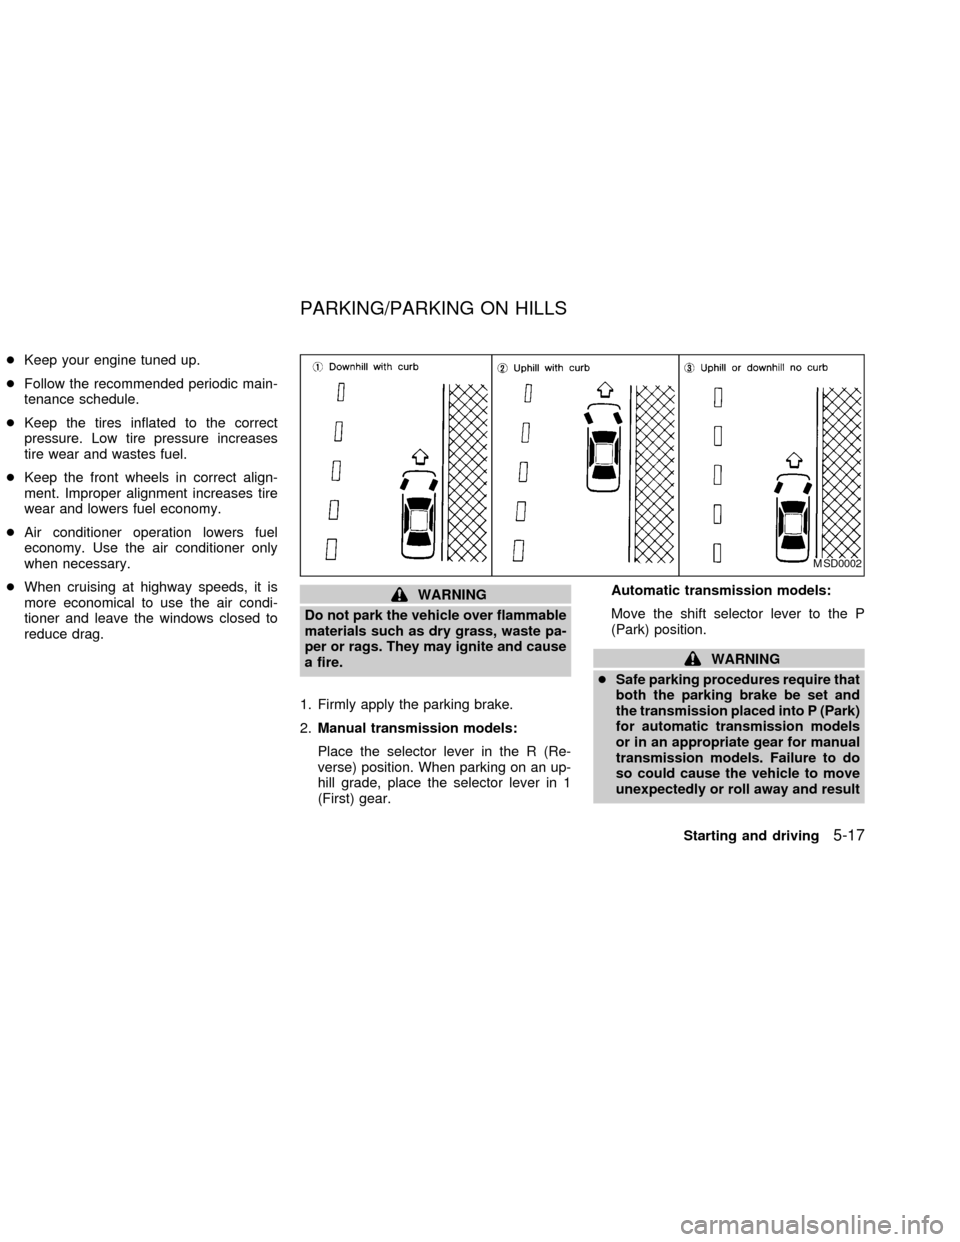
1. Firmly apply the parking brake.
2.Manual transmission models:
Place the selector lever in the R (Re-
verse) position. When parking on an up-
hill grade, place the selector lever in 1
(First) gear.Automatic transmission models:
Move the shift selector lever to the P
(Park) position.
WARNING
cSafe parking procedures require that
both the parking brake be set and
the transmission placed into P (Park)
for automatic transmission models
or in an appropriate gear for manual
transmission models. Failure to do
so could cause the vehicle to move
unexpectedly or roll away and result
MSD0002
PARKING/PARKING ON HILLS
Starting and driving5-17
ZX
Page 134 of 235

6 In case of emergency
Flat tire ...................................................................6-2
Changing a flat tire ............................................6-2
Jump starting ..........................................................6-8
Push starting ........................................................6-10
If your vehicle overheats ......................................6-10Towing your vehicle .............................................6-11
Towing recommended by Nissan ....................6-12
Vehicle recovery (freeing a stuck
vehicle) ............................................................6-13
ZX
Page 135 of 235
CHANGING A FLAT TIRE
If you have a flat tire, follow the instructions
below.
Stopping the vehicle
1. Safely move the vehicle off the road and
away from traffic.
2. Turn on the hazard warning flashers.
3. Park on a level surface and apply the
parking brake. Shift the manual transmis-
sion into R (Reverse), or the automatic
transmission into P (Park).
4. Turn off the engine.
5. Raise the hood to warn other traffic, and
to signal professional road assistance
personnel that you need assistance.
6. Have all passengers get out of the ve-
hicle and stand in a safe place, away
from traffic and clear of the vehicle.
WARNING
cMake sure the parking brake is se-
curely applied and the manual trans-
mission is shifted into R (Re-verse), or the automatic transmis-
sion into P (Park).
cNever change tires when the vehicle
is on a slope, ice or slippery areas.
This is hazardous.
cNever change tires if oncoming traf-
fic is close to your vehicle. Wait for
professional road assistance.
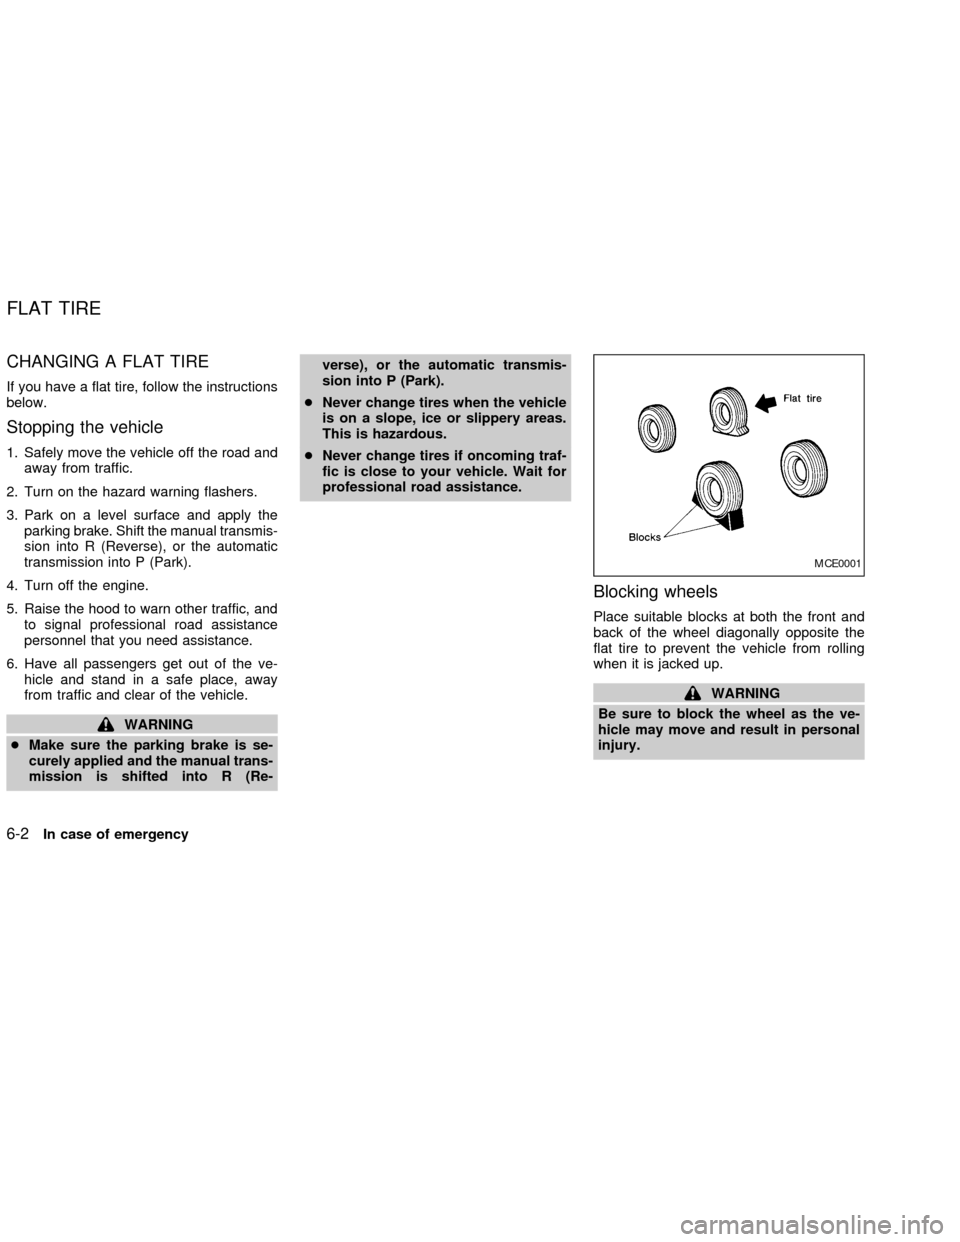
Blocking wheels
Place suitable blocks at both the front and
back of the wheel diagonally opposite the
flat tire to prevent the vehicle from rolling
when it is jacked up.
WARNING
Be sure to block the wheel as the ve-
hicle may move and result in personal
injury.
MCE0001
FLAT TIRE
6-2In case of emergency
ZX
Page 136 of 235

Getting the spare tire and tools
1. Open the trunk. Lift the trunk floor carpet-
ing and spare tire cover. Remove the tool
bag (which contains the jack rod and
wheel nut wrench) and the spare tire. If
necessary, use the flat end of the jack
rod as shown to loosen the spare tire
hold-down bolt.2. To remove the jack, turn the jack screw
counterclockwise. Use the tapered end
of the jack rod to loosen the jack from its
storage position.
WCE0012WCE0009
In case of emergency6-3
ZX
Page 140 of 235
Installing the spare tire
The TEMPORARY USE ONLY spare tire
is designed for emergency use. See spe-
cific instructions under the heading
``Wheels and tires'' in the ``Maintenance
and do-it- yourself'' section of this own-
er's manual.
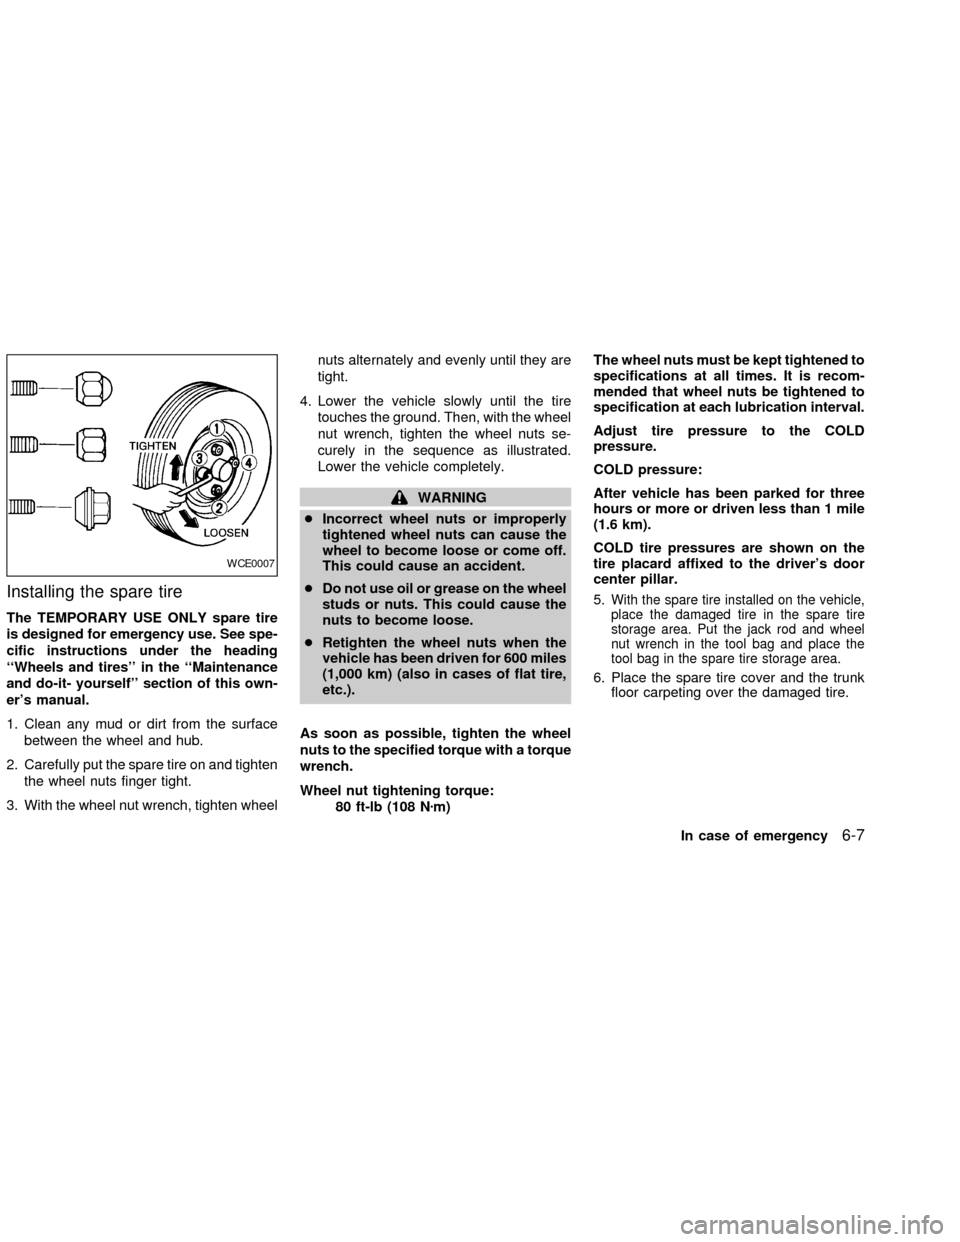
1. Clean any mud or dirt from the surface
between the wheel and hub.
2. Carefully put the spare tire on and tighten
the wheel nuts finger tight.
3. With the wheel nut wrench, tighten wheelnuts alternately and evenly until they are
tight.
4. Lower the vehicle slowly until the tire
touches the ground. Then, with the wheel
nut wrench, tighten the wheel nuts se-
curely in the sequence as illustrated.
Lower the vehicle completely.
WARNING
cIncorrect wheel nuts or improperly
tightened wheel nuts can cause the
wheel to become loose or come off.
This could cause an accident.
cDo not use oil or grease on the wheel
studs or nuts. This could cause the
nuts to become loose.
cRetighten the wheel nuts when the
vehicle has been driven for 600 miles
(1,000 km) (also in cases of flat tire,
etc.).
As soon as possible, tighten the wheel
nuts to the specified torque with a torque
wrench.
Wheel nut tightening torque:
80 ft-lb (108 Nzm)The wheel nuts must be kept tightened to
specifications at all times. It is recom-
mended that wheel nuts be tightened to
specification at each lubrication interval.
Adjust tire pressure to the COLD
pressure.
COLD pressure:
After vehicle has been parked for three
hours or more or driven less than 1 mile
(1.6 km).
COLD tire pressures are shown on the
tire placard affixed to the driver's door
center pillar.
5.
With the spare tire installed on the vehicle,
place the damaged tire in the spare tire
storage area. Put the jack rod and wheel
nut wrench in the tool bag and place the
tool bag in the spare tire storage area.
6. Place the spare tire cover and the trunk
floor carpeting over the damaged tire.
WCE0007
In case of emergency6-7
ZX
Page 192 of 235

Adjusting the headlight aim
Before performing aiming adjustment, make
sure of the following:
a. Use an aiming wall screen.
b. Keep all of the tires inflated to the correct
pressure.
c. Place the vehicle and screen on level
ground.
d. See that the vehicle is unloaded (except
for full levels of coolant, engine oil and
fuel, and that the spare tire, jack, and
tools are stored). Have the driver or anequivalent weight placed in the driver's
seat.
1. Open the hood. Turn headlight low beam
on.
2. Adjust the vertical aim by turning the
adjustment screw.
cCover the opposite light and ensure the
fog lights (if so equipped) are turned off.
cAdjust beam pattern until cutoff line is
positioned at the same height off ground
as bulb center (on H-line).
LDI0027
Maintenance and do-it-yourself8-37
ZX
Page 198 of 235

If you have a flat tire, see the ``In case of
emergency'' section of this manual.
TIRE PRESSURE
Maximum inflation pressure
Do not exceed the maximum inflation pres-
sures shown on the side wall of the tire.
Tire inflation pressure
Check the tire pressure (including the
spare) at least once a month and always
prior to long distance trips. Incorrect tire
pressure may adversely affect tire life and
vehicle handling. Tire pressure should be
WDI0030DI1033M
WHEELS AND TIRES
Maintenance and do-it-yourself8-43
ZX
Page 199 of 235
checked when tires are COLD. Tires are
considered COLD after the vehicle has
been parked for three or more hours, or
driven less than 1 mile (1.6 km) at moderate
speeds. COLD tire pressures are shown on
the tire placard affixed to the driver's side
rear door pillar.
WARNING
cImproperly inflated tires can fail sud-
denly and cause an accident.
c
The vehicle weight capacity is indi-
cated on the tire placard. Do not load
your vehicle beyond this capacity.
Overloading your vehicle may result
in reduced tire life, unsafe operating
conditions due to premature tire fail-
ure, or unfavorable handling charac-
teristics and could also lead to a
serious accident. Loading beyond the
specified capacity may also result in
failure of other vehicle components.
cBefore taking a long trip, or when-
ever you heavily load your vehicle,
use a tire pressure gauge to ensure
that the tire pressures are at the
specified level.cDo not drive your vehicle over 85
MPH (140 km/h) unless it is equipped
with high speed rated tires. Driving
faster than 85 MPH (140 km/h) may
result in tire failure, loss of control
and possible injury.
cFor additional information regarding
tires, refer to ``Important Tire Safety
Information'' in the Warranty Infor-
mation Booklet (US) or ``Tire Safety
Information'' in the Warranty and
Roadside Assistance Information
booklet (Canada).
TYPES OF TIRES
WARNING
cWhen changing or replacing tires, be
sure all four tires are of the same
type (i.e., summer, all season or
snow) and construction. An autho-
rized NISSAN dealer may be able to
help you with information about tire
type, size, speed rating and availabil-
ity. Replacement tires may have a
lower speed rating than the factory
equipped tires, and may not matchthe potential maximum vehicle speed.
Never exceed the maximum speed rat-
ing of the tire.
cFor additional information regarding
tires, refer to ``Important Tire Safety
Information'' in the Warranty Informa-
tion Booklet (US) or ``Tire Safety In-
formation'' in the Warranty and Road-
side Assistance Information booklet
(Canada).
All Season tires
NISSAN specifies All Season tires on some
models to provide good performance all
year round, including snowy and icy road
conditions. All Season tires are identified by
``ALL SEASON'' and/or ``M&S'' on the tire
sidewall. Snow tires have better snow trac-
tion than All Season tires and may be more
appropriate in some areas.
Summer tires
NISSAN specifies summer tires on some
models to provide superior performance on
dry roads. Summer tire performance is sub-
stantially reduced in snow and ice. Summer
tires do not have the tire traction rating
``M&S'' on the tire sidewall.
8-44Maintenance and do-it-yourself
ZX
Page 200 of 235

If you plan to operate your vehicle in snowy
or icy conditions, NISSAN recommends the
use of ``SNOW'' tires or ``ALL SEASON''
tires on all four wheels.
Snow tires
If snow tires are needed, it is necessary to
select tires equivalent in size and load rating
to the original equipment tires. If you do not,
it can adversely affect the safety and han-
dling of your vehicle.
Generally, snow tires have lower speed
ratings than factory equipped tires and may
not match the potential maximum vehicle
speed. Never exceed the maximum speed
rating of the tire.
If you plan to operate your vehicle in snowy
or icy conditions, NISSAN recommends the
use of ``SNOW'' tires or ``ALL SEASON''
tires on all four wheels.
For additional traction on icy roads, studded
tires may be used. However, some U.S.
states and Canadian provinces prohibit their
use. Check local, state and provincial laws
before installing studded tires. Skid and
traction capabilities of studded snow tires
on wet or dry surfaces may be poorer than
that of non-studded snow tires.
TIRE CHAINS
Use of tire chains may be prohibited accord-
ing to location. Check the local laws before
installing tire chains. When installing tire
chains, make sure they are of proper size
for the tires on your vehicle and are installed
according to the chain manufacturer's sug-
gestions.Use only SAE class ªSº chains.
Other types may damage your vehicle. Use
chain tensioners when recommended by
the tire chain manufacturer to ensure a tight
fit. Loose end links of the tire chain must be
secured or removed to prevent the possibil-
ity of whipping action damage to the fenders
or underbody. If possible, avoid fully loading
your vehicle when using tire chains. In ad-
dition, drive at a reduced speed. Otherwise,
your vehicle may be damaged and/or ve-
hicle handling and performance may be
adversely affected.
Never install tire chains on a TEMPORARY
USE ONLY spare tire. Do not use tire
chains on dry roads.
Tire chains must be installed only on the
front wheels and not on the rear wheels.
CHANGING WHEELS AND TIRES
Tire rotation
Tire should be rotated every 7,500 miles
(12,000 km).
See ``Flat tire'' in the ``In case of emergency''
section for tire replacing procedures.
As soon as possible, tighten the wheel
nuts to the specified torque with a torque
wrench.
Wheel nut tightening torque:
80 ft-lb (108 Nzm)
ADI1115
Maintenance and do-it-yourself8-45
ZX