remove seats NISSAN SENTRA 2002 B15 / 5.G Owners Manual
[x] Cancel search | Manufacturer: NISSAN, Model Year: 2002, Model line: SENTRA, Model: NISSAN SENTRA 2002 B15 / 5.GPages: 235, PDF Size: 1.97 MB
Page 12 of 235
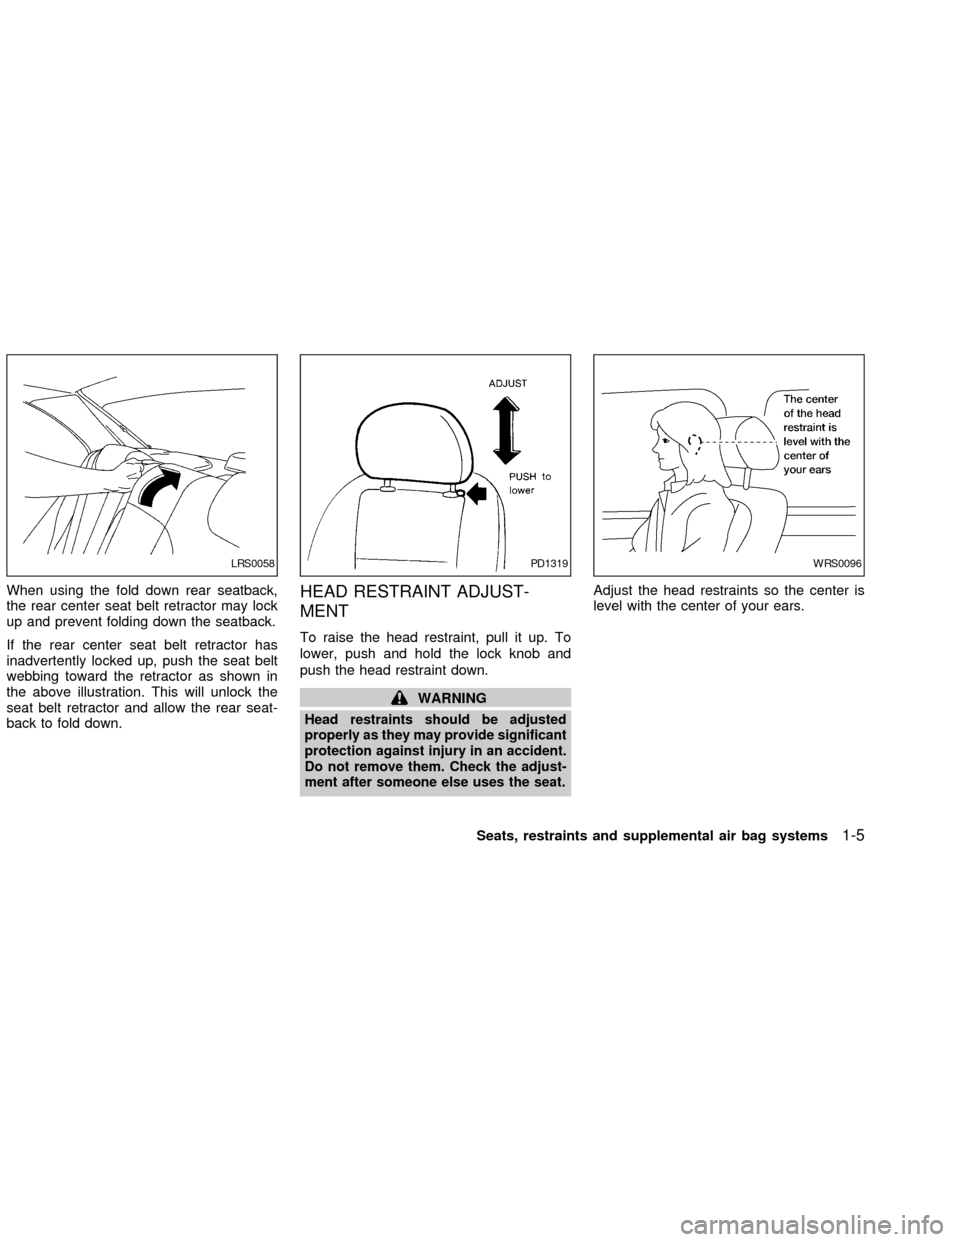
When using the fold down rear seatback,
the rear center seat belt retractor may lock
up and prevent folding down the seatback.
If the rear center seat belt retractor has
inadvertently locked up, push the seat belt
webbing toward the retractor as shown in
the above illustration. This will unlock the
seat belt retractor and allow the rear seat-
back to fold down.HEAD RESTRAINT ADJUST-
MENT
To raise the head restraint, pull it up. To
lower, push and hold the lock knob and
push the head restraint down.
WARNING
Head restraints should be adjusted
properly as they may provide significant
protection against injury in an accident.
Do not remove them. Check the adjust-
ment after someone else uses the seat.
Adjust the head restraints so the center is
level with the center of your ears.
LRS0058PD1319WRS0096
Seats, restraints and supplemental air bag systems1-5
ZX
Page 35 of 235

3. Pull on the shoulder belt until all of the
belt is fully extended. At this time, the
seat belt retractor is in the automatic
locking mode (child restraint mode). It
reverts back to emergency locking mode
when the seat belt is fully retracted.4. Allow the seat belt to retract. Pull up on
the seat belt to remove any slack in the
belt.5. Before placing the child in the child re-
straint, use force to tilt the child restraint
from side to side, and tug it forward to
make sure that it is securely held in
place.
6. Check that the retractor is in the auto-
matic locking mode by trying to pull more
seat belt out of the retractor. If you can-
not pull any more belt webbing out of the
retractor, the seat belt is in the automatic
locking mode.
7. Check to make sure that the child re-
straint is properly secured prior to each
WRS0037WRS0038WRS0039
1-28Seats, restraints and supplemental air bag systems
ZX
Page 36 of 235

use. If the belt is not locked, repeat steps
three through six.
After the child restraint is removed and the
seat belt is allowed to wind back into the
retractor, the automatic locking mode (child
restraint mode) is canceled.
Rear facing
When you install a child restraint in the rear
seat, follow these steps:
1. Position the child restraint on the seat.
The direction of the child restraint de-
pends on the type of the child restraint
and the size of the child. Always follow
the restraint manufacturer's instructions.
WRS0040WRS0009
Seats, restraints and supplemental air bag systems1-29
ZX
Page 37 of 235

2. Route the seat belt tongue through the
child restraint and insert it into the buckle
until you hear and feel the latch engage.
Be sure to follow the child restraint manu-
facturer's instructions for belt routing.3. Pull on the shoulder belt until all of the
belt is fully extended. At this time, the
seat belt retractor is in the automatic
locking mode (child restraint mode). It
reverts back to emergency locking mode
when the seat belt is fully retracted.4. Allow the seat belt to retract. Pull up on
the seat belt to remove any slack in the
belt.
WRS0041WRS0010WRS0042
1-30Seats, restraints and supplemental air bag systems
ZX
Page 38 of 235

5. Before placing the child in the child re-
straint, use force to tilt the child restraint
from side to side, and tug it forward to
make sure that it is securely held in
place.
6. Check that the retractor is in the auto-
matic locking mode by trying to pull more
seat belt out of the retractor. If you can-
not pull any more belt webbing out of the
retractor, the seat belt is in the automatic
locking mode.
7. Check to make sure that the child re-
straint is properly secured prior to eachuse. If the belt is not locked, repeat steps
three through six.
After the child restraint is removed and the
seat belt is allowed to wind back into the
retractor, the automatic locking mode (child
restraint mode) is canceled.
WRS0043
Seats, restraints and supplemental air bag systems1-31
ZX
Page 41 of 235
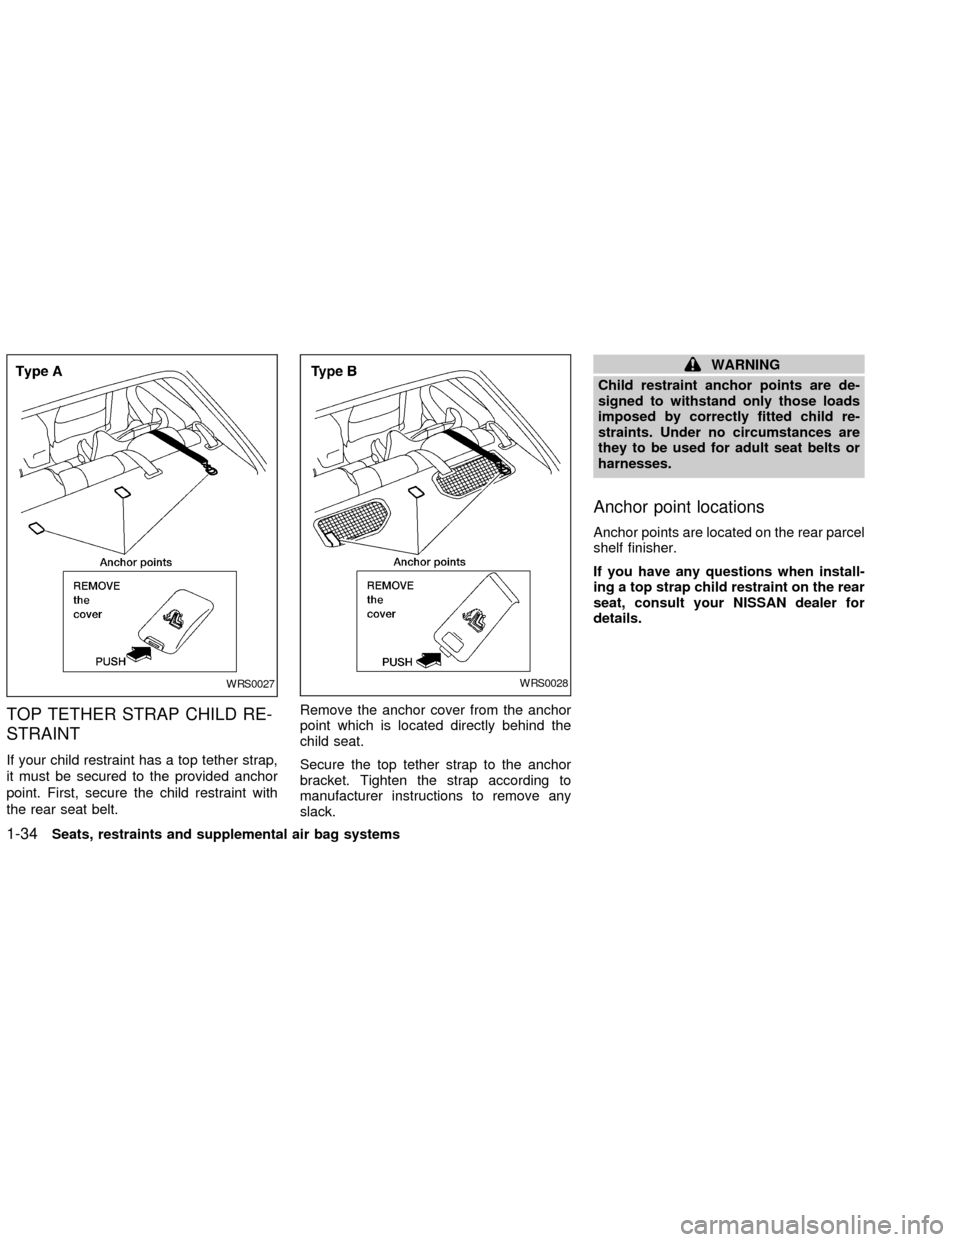
TOP TETHER STRAP CHILD RE-
STRAINT
If your child restraint has a top tether strap,
it must be secured to the provided anchor
point. First, secure the child restraint with
the rear seat belt.Remove the anchor cover from the anchor
point which is located directly behind the
child seat.
Secure the top tether strap to the anchor
bracket. Tighten the strap according to
manufacturer instructions to remove any
slack.
WARNING
Child restraint anchor points are de-
signed to withstand only those loads
imposed by correctly fitted child re-
straints. Under no circumstances are
they to be used for adult seat belts or
harnesses.
Anchor point locations
Anchor points are located on the rear parcel
shelf finisher.
If you have any questions when install-
ing a top strap child restraint on the rear
seat, consult your NISSAN dealer for
details.
WRS0027WRS0028
1-34Seats, restraints and supplemental air bag systems
ZX
Page 44 of 235

4.Allow the seat belt to retract slightly. Pull
up on the seat belt to remove any slack in
the belt.5. Before placing the child in the child re-
straint, use force to tilt the child restraint
from side to side, and tug it forward to
make sure it is securely held in place.
6.
Check that the retractor is in the automatic
locking mode by trying to pull more seat
belt out of the retractor. If you cannot pull
any more belt webbing out of the retractor,
the seat belt is in the automatic locking
mode.
7. Check to make sure the child restraint is
properly secured prior to each use. If the
lap belt is not locked, repeat steps three
through six.After the child restraint is removed and the
seat belt is fully retracted, the automatic
locking mode (child restraint mode) is can-
celed.
WRS0046WRS0047
Seats, restraints and supplemental air bag systems1-37
ZX
Page 151 of 235
Occasionally remove loose dust from the
interior trim, plastic parts and seats using a
vacuum cleaner or soft brush. Wipe the
vinyl and leather surfaces with a clean, soft
cloth dampened in mild soap solution, then
wipe clean with a dry soft cloth. Before
using any fabric protector, read the manu-
facturer's recommendations. Some fabric
protectors contain chemicals that may stain
or bleach the seat material.
Use a cloth dampened only with water, to
clean the meter and gauge lens.
CAUTION
cNever use benzine, thinner, or any
similar material.
cNever use fabric protectors unless
recommended by the manufacturer.
cDo not use glass or plastic cleaner
on meter or gauge lens covers. It
may damage the lens cover.
Floor mats
The use of genuine NISSAN floor mats can
extend the life of your vehicle carpet and
make it easier to clean the interior.No
matter what mats are used, be sure theyare fitted for your vehicle and are prop-
erly positioned in the footwell to prevent
interference with pedal operation.Mats
should be maintained with regular cleaning
and replaced if they become excessively
worn.
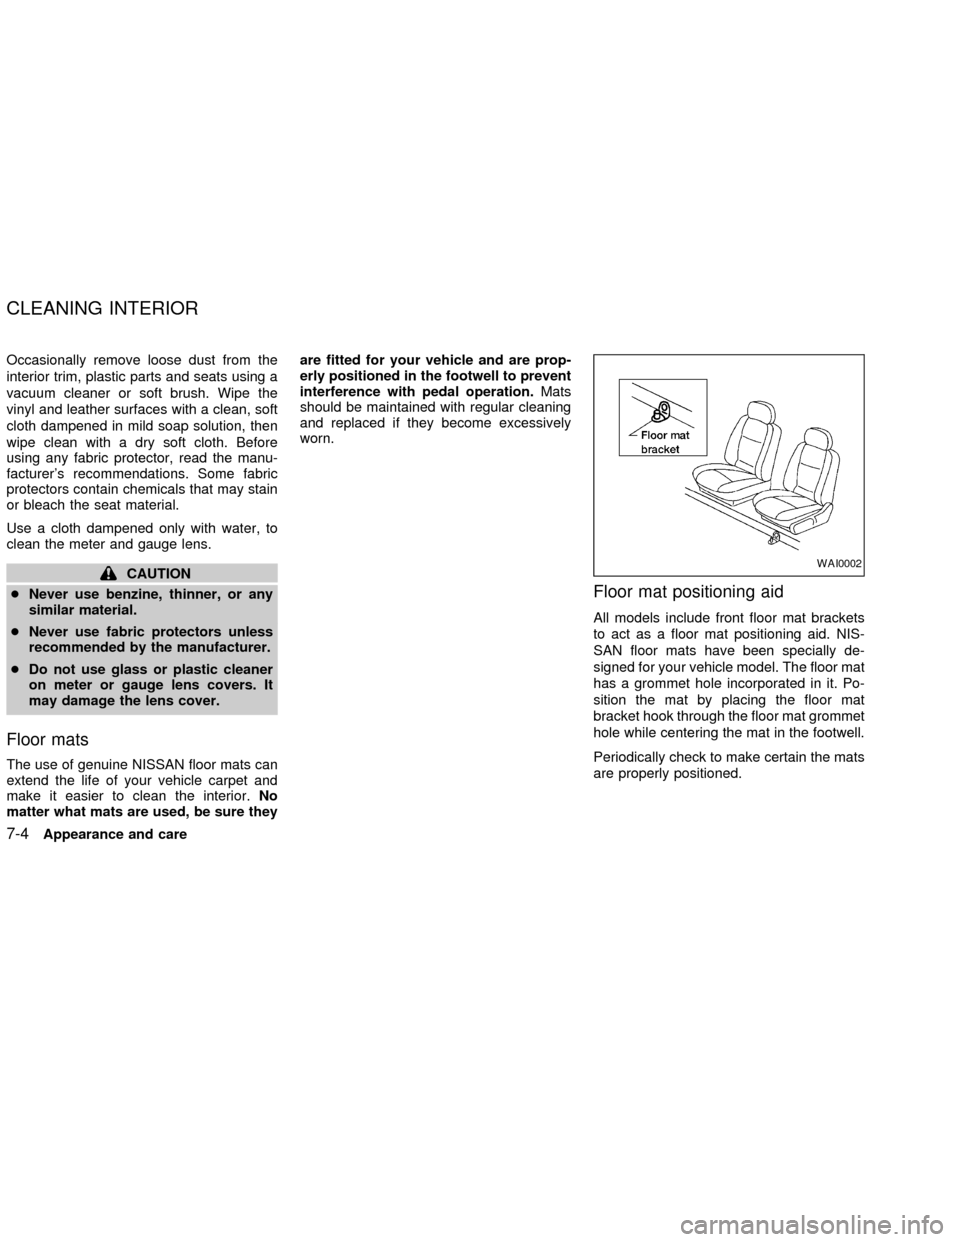
Floor mat positioning aid
All models include front floor mat brackets
to act as a floor mat positioning aid. NIS-
SAN floor mats have been specially de-
signed for your vehicle model. The floor mat
has a grommet hole incorporated in it. Po-
sition the mat by placing the floor mat
bracket hook through the floor mat grommet
hole while centering the mat in the footwell.
Periodically check to make certain the mats
are properly positioned.
WAI0002
CLEANING INTERIOR
7-4Appearance and care
ZX
Page 152 of 235
SEAT BELTS
The seat belts can be cleaned by wiping
them with a sponge dampened in a mild
soap solution. Allow the belts to dry com-
pletely in the shade before using them. See
``Seat belt maintenance'' in the ``Seats, re-
straints and supplemental air bag systems''
section of this owner's manual.
WARNING
Do not allow wet seat belts to roll up in
the retractor. NEVER use bleach, dye,
or chemical solvents to clean the seat
belts, since these materials may se-
verely weaken the seat belt webbing.
MOST COMMON FACTORS
CONTRIBUTING TO VEHICLE
CORROSION
1. The accumulation of moisture-retaining
dirt and debris in body panel sections,
cavities, and other areas.
2. Damage to paint and other protective
coatings caused by gravel and stone
chips or minor traffic accidents.
ENVIRONMENTAL FACTORS IN-
FLUENCE THE RATE OF COR-
ROSION
Moisture
Accumulation of sand, dirt and water on the
vehicle body underside can accelerate cor-
rosion. Wet floor coverings will not dry com-
pletely inside the vehicle, and should be
removed for drying to avoid floor panel
corrosion.
Relative humidity
Corrosion will be accelerated:
cin areas of high relative humidity.cin areas where the temperatures stay
above freezing.
cwhere atmospheric pollution exists.
cwhere road salt is used.
Temperature
High temperatures accelerate the rate of
corrosion to those parts which are not well
ventilated.
Air pollution
Industrial pollution, the presence of salt in
the air in coastal areas, or heavy road salt
use accelerates the corrosion process.
Road salt also accelerates the disintegra-
tion of paint surfaces.
TO PROTECT YOUR VEHICLE
FROM CORROSION
cwash and wax your vehicle often to keep
the vehicle clean.
calways check for minor damage to the
paint and repair it as soon as possible.
ckeep drain holes at the bottom of the
doors open to avoid water accumulation.
ccheck the underbody for accumulation of
CORROSION PROTECTION
Appearance and care7-5
ZX
Page 217 of 235
WARNING
cIt is extremely dangerous to ride in a
cargo area inside the vehicle. In a
collision, people riding in these ar-
eas are more likely to be seriously
injured or killed.
cDo not allow people to ride in any
area of the vehicle that is not
equipped with seats and seat belts.
c
Be sure everyone in the vehicle is in a
seat with their seat belt properly fas-
tened.
TERMS
It is important to familiarize yourself with the
following terms before loading your vehicle:
cCurb Weight (actual weight of your ve-
hicle) - vehicle weight including: standard
and optional equipment, fluids, emer-
gency tools, and spare tire assembly.
This weightdoes notinclude passen-
gers and cargo.
cGVW (Gross Vehicle Weight) - curb
weight plus the combined weight of pas-
sengers and cargo.
cGVWR (Gross Vehicle Weight Rating) -maximum total weight (load) limit speci-
fied for the vehicle.
cGAWR (Gross Axle Weight Rating) -
maximum weight (load) limit specified for
the front or rear axle.
DETERMINING VEHICLE LOAD
CAPACITY
The load capacity of this vehicle is deter-
mined by weight, not by available cargo
space. For example, a luggage rack, bike
carrier, cartop carrier or similar equipment
does not increase the load carrying capacity
of your vehicle.
To determine vehicle load capacity:
Vehicle weight can be determined by using
a commercial-grade scale, found at places
such as a truck stop, gravel quarry, grain
elevator, or a scrap metal recycling facility.
1) Determine the curb weight of your ve-
hicle.
2) Compare the curb weight amount to the
GVWR specified for your vehicle to de-
termine how much more weight your
vehicle can carry.
3) After loading (cargo and passengers),re-weigh your vehicle to determine if
either GVWR or GAWR for your vehicle
is exceeded. If GVWR is exceeded, re-
move cargo as necessary. If either the
front or rear GAWR is exceeded, shift the
load or remove cargo as necessary.
LOADING TIPS
cThe GVW must not exceed GVWR or
GAWR as specified on the F.M.V.S.S.
Certification Label.
cDo not load the front and rear axle to the
GAWR. Doing so will exceed the GVWR.
WARNING
cProperly secure all cargo to help
prevent it from sliding or shifting. Do
not place cargo higher than the seat-
backs. In a sudden stop or collision,
unsecured cargo could cause per-
sonal injury.
cDo not load your vehicle any heavier
than the GVWR or the maximum
front and rear GAWRs. If you do,
parts of your vehicle can break, tire
damage could occur, or it can
change the way your vehicle
handles. This could result in loss of
control and cause personal injury.
VEHICLE LOADING
INFORMATION
9-14Technical and consumer information
ZX