change time NISSAN SENTRA 2014 B17 / 7.G Quick Reference Guide
[x] Cancel search | Manufacturer: NISSAN, Model Year: 2014, Model line: SENTRA, Model: NISSAN SENTRA 2014 B17 / 7.GPages: 24, PDF Size: 3.14 MB
Page 7 of 24

5
CLOCK SET/ADJUSTMENT
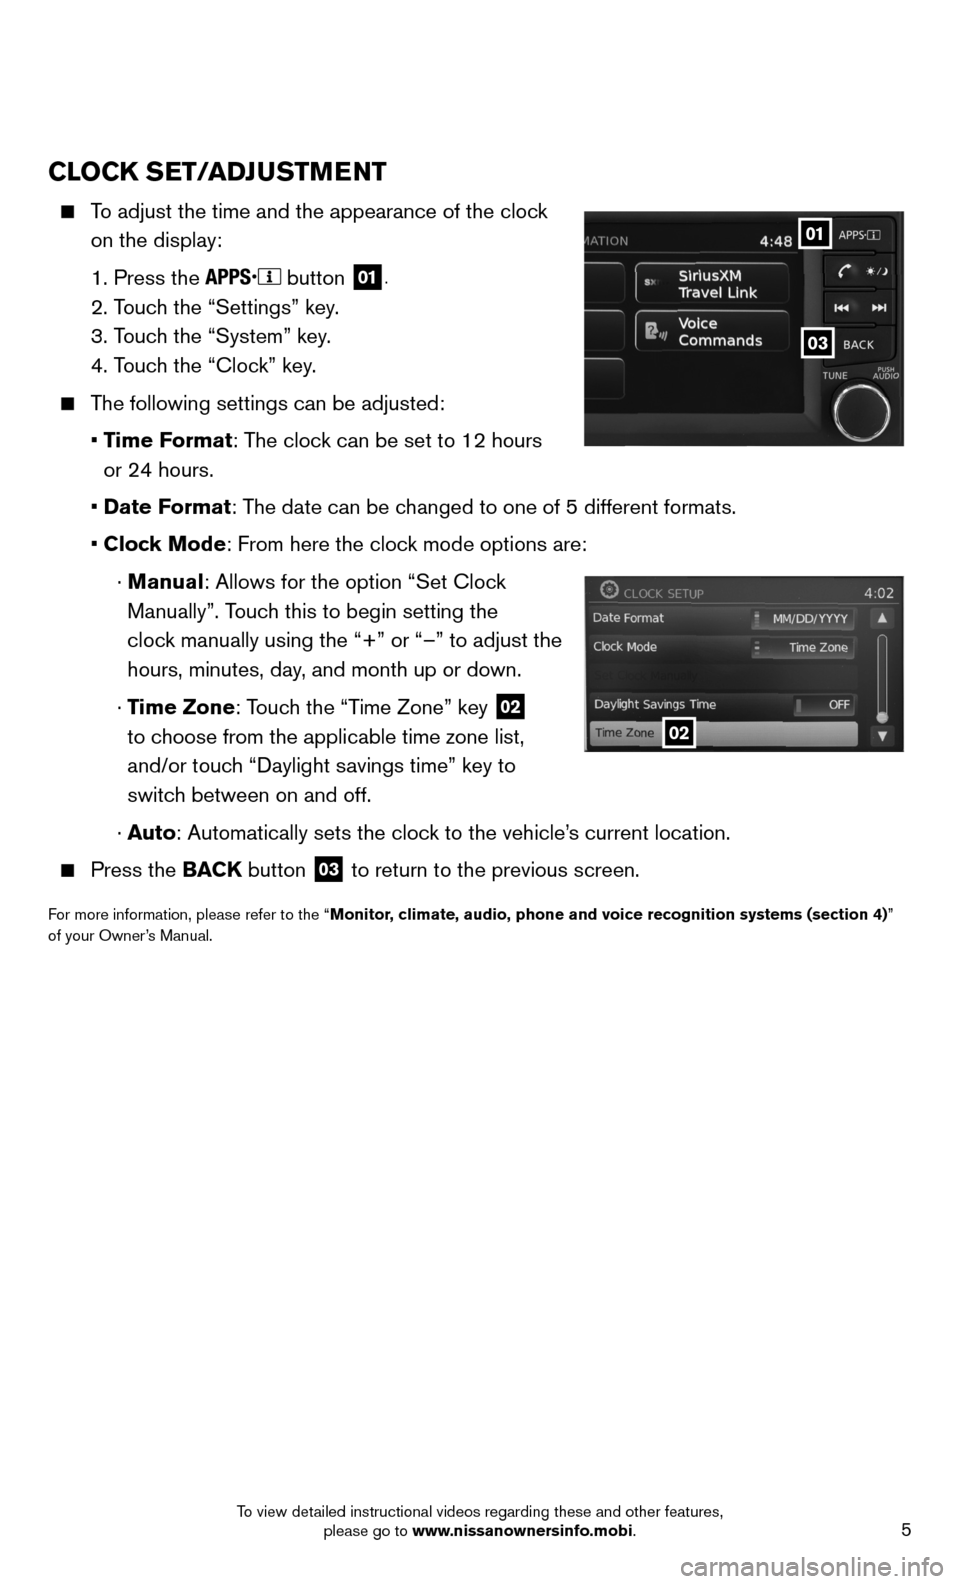
To adjust the time and the appearance of the clock
on the display:
1. Press the
button 01.
2. Touch the “Settings” key.
3. Touch the “System” key.
4. Touch the “Clock” key.
The following settings can be adjusted:
• Time Format: The clock can be set to 12 hours
or 24 hours.
• Date Format: The date can be changed to one of 5 different formats.
• Clock Mode: From here the clock mode options are:
· Manual: Allows for the option “Set Clock
Manually”. Touch this to begin setting the
clock manually using the “+” or “–” to adjust the
hours, minutes, day, and month up or down.
· Time Zone: Touch the “Time Zone” key
02
to choose from the applicable time zone list,
and/or touch “Daylight savings time” key to
switch between on and off.
· Auto: Automatically sets the clock to the vehicle’s current location.
Press the BACK button 03 to return to the previous screen.
For more information, please refer to the “Monitor, climate, audio, phone and voice recognition systems (section 4)”
of your Owner’s Manual.
03
01
02
To view detailed instructional videos regarding these and other features, please go to www.nissanownersinfo.mobi.
Page 10 of 24

8
FIRST DRIVE FEATURES
TURNING THE ENGINE OFF
For a Continuously Variable Transmission, apply the brake pedal, move the shift lever to the
P (PARK) position, apply the parking brake and press the ignition switch.
For a manual transmission, apply the brake pedal, place the vehicle in 1s\
t gear, apply the
parking brake and push the ignition switch.
For more information, refer to the “Starting and driving (section 5)” of your Owner’s Manual.
HEADLIGHT CONTROL SWITCH
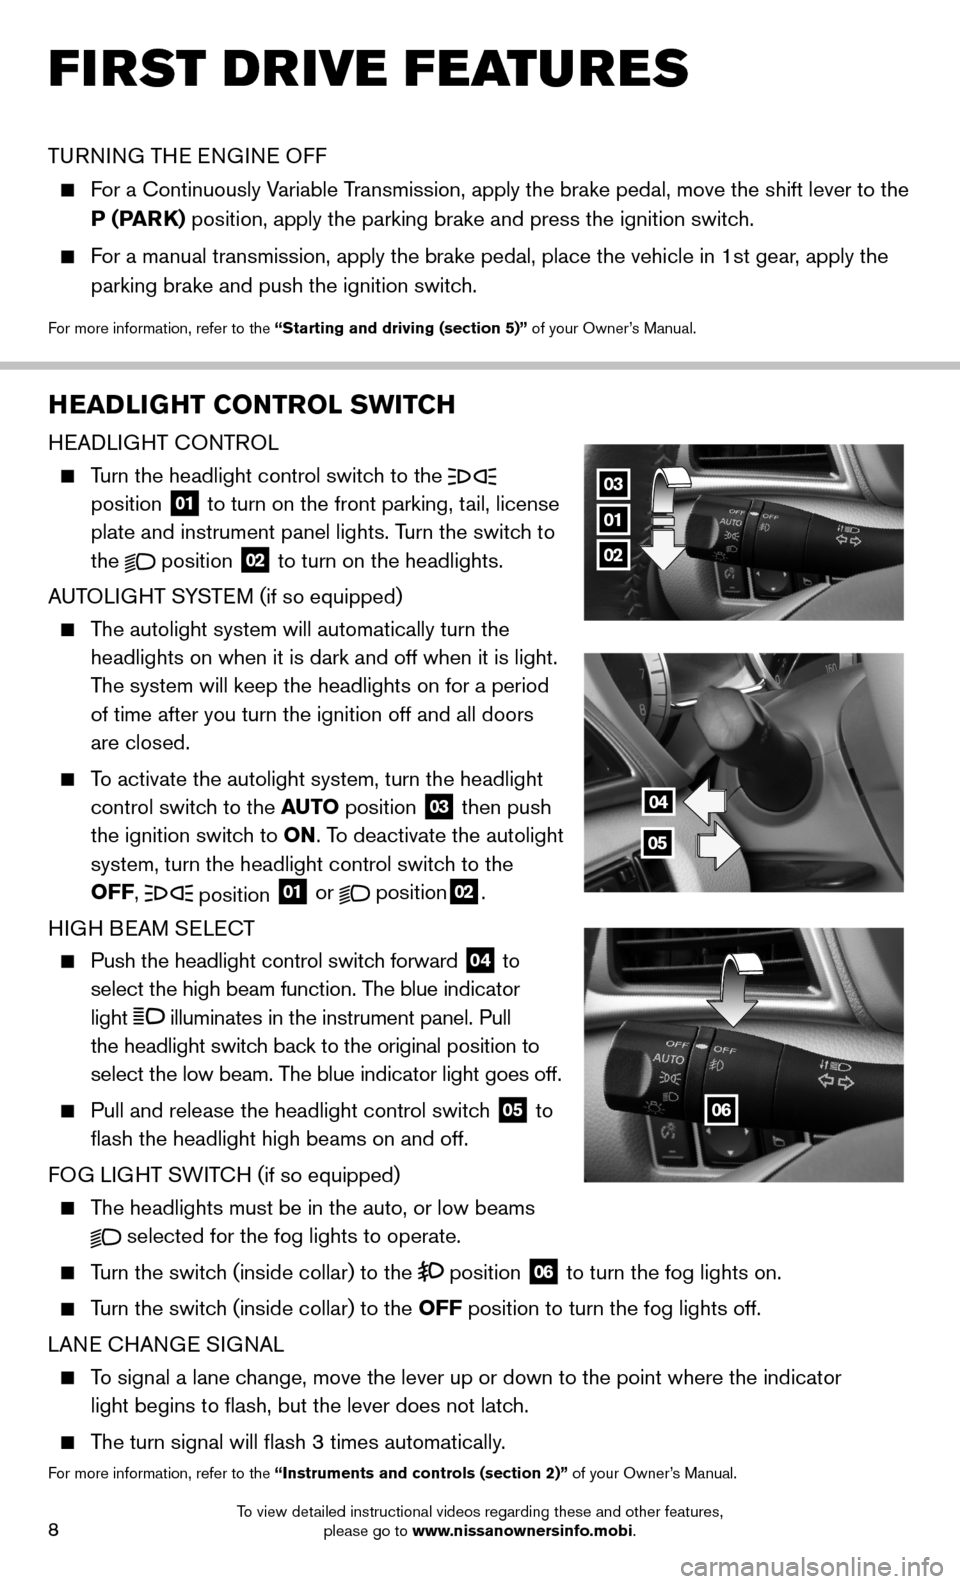
HEADLIGHT CONTROL
Turn the headlight control switch to the
position 01 to turn on the front parking, tail, license
plate and instrument panel lights. Turn the switch to
the
position
02 to turn on the headlights.
AUTOLIGHT SYSTEM (if so equipped)
The autolight system will automatically turn the
headlights on when it is dark and off when it is light.
The system will keep the headlights on for a period
of time after you turn the ignition off and all doors
are closed.
To activate the autolight system, turn the headlight
control switch to the AUTO position
03 then push
the ignition switch to ON. To deactivate the autolight
system, turn the headlight control switch to the
OFF,
position 01 or position02.
HIGH BEAM SELECT
Push the headlight control switch forward
04 to
select the high beam function. The blue indicator
light
illuminates in the instrument panel. Pull
the headlight switch back to the original position to
select the low beam. The blue indicator light goes off.
Pull and release the headlight control switch
05 to
flash the headlight high beams on and off.
FOG LIGHT SWITCH (if so equipped)
The headlights must be in the auto, or low beams
selected for the fog lights to operate.
Turn the switch (inside collar) to the position
06 to turn the fog lights on.
Turn the switch (inside collar)
to the OFF position to turn the fog lights off.
LANE CHANGE SIGNAL
To signal a lane change, move the lever up or down to the point where the indicator
light begins to flash, but the lever does not latch.
The turn signal will flash 3 times automatically.
For more information, refer to the “Instruments and controls (section 2)” of your Owner’s Manual.
01
02
03
06
04
05
To view detailed instructional videos regarding these and other features, please go to www.nissanownersinfo.mobi.
Page 21 of 24

19
04
03
06
07
05
0102
NAVIGATION SYSTEM (if so equipped)
Your Navigation System can calculate a route from the current location to\
a preferred
destination. The real-time map display and turn-by-turn voice guidance will lead you a\
long
the route.
The Navigation System will continually update your vehicle’s position. If you have deviated
from the original route, it will recalculate the route from your current\
location.
NissanConnect™ Apps integrates popular smartphone apps and services into your vehicle.\
NissanConnect ™ Apps requires a subscription. Please visit www.nissanconnect.com
for more information.
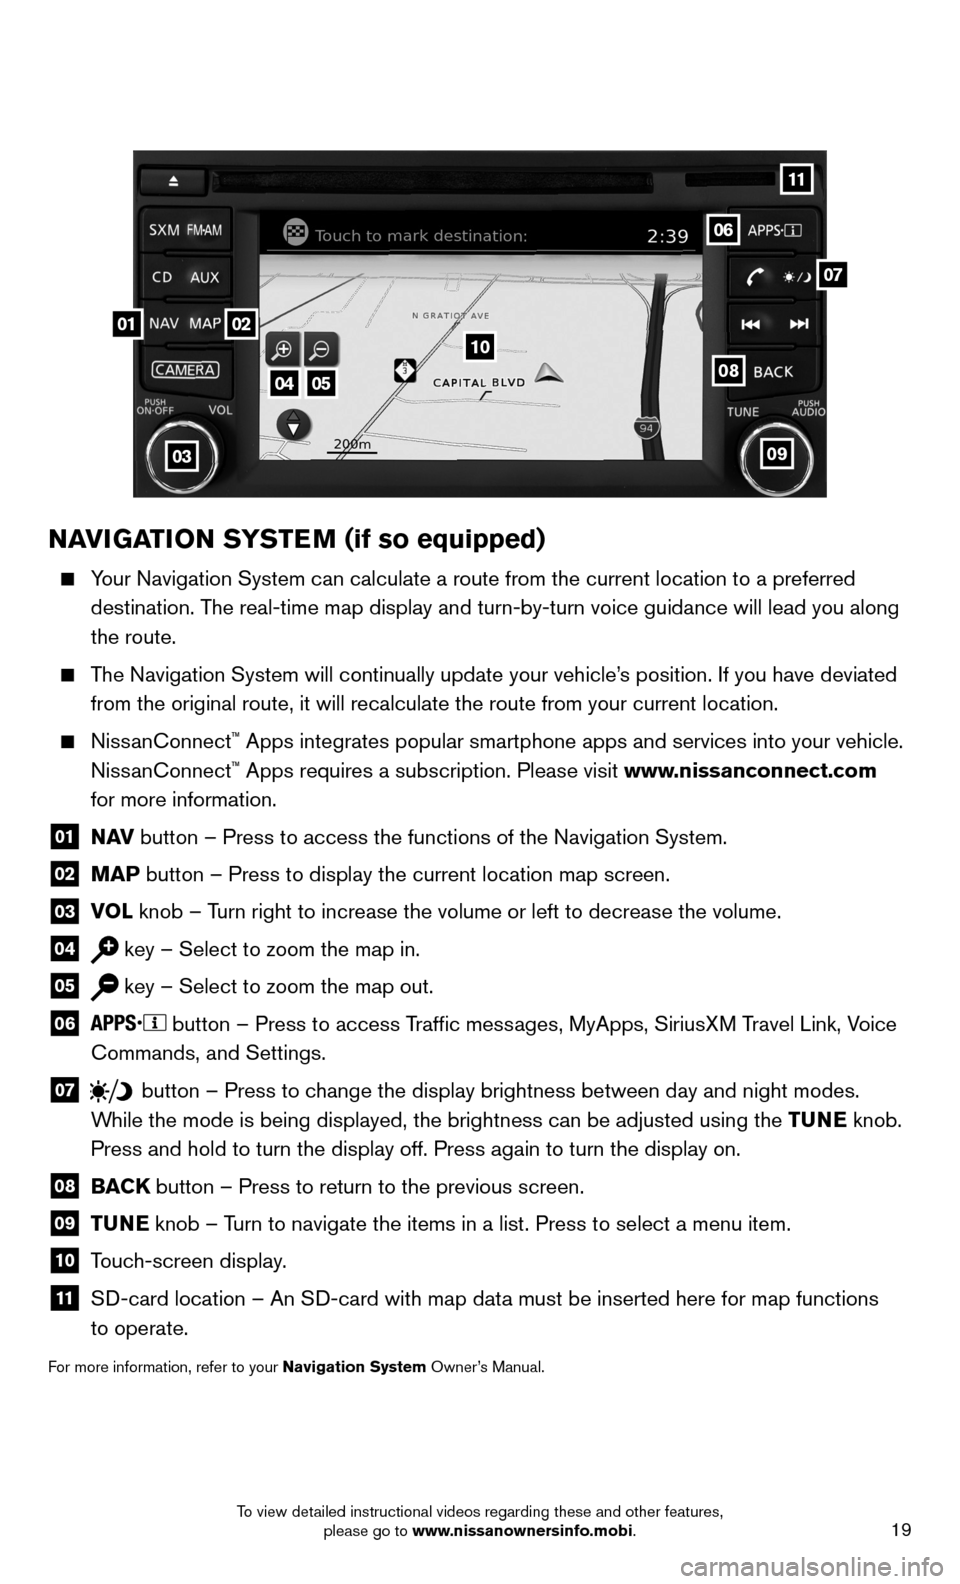
01 N AV
button – Press to access the functions of the Navigation System.
02 MAP button – Press to display the current location map screen.
03 VOL
knob – Turn right to increase the volume or left to decrease the volume.
04 key – Select to zoom the map in.
05 key – Select to zoom the map out.
06 button – Press to access Traffic messages, MyApps, SiriusXM Travel Link, Voice
Commands, and Settings.
07 button
– Press to change the display brightness between day and night modes.
While the mode is being displayed, the brightness can be adjusted using t\
he TUNE knob.
Press and hold to turn the display off. Press again to turn the display \
on.
08
BACK button – Press to return to the previous screen.
09 TUNE
knob – Turn to navigate the items in a list. Press to select a menu item.
10 Touch-screen display.
11 SD-card location – An SD-card with map data must be inserted here for map functions
to operate.
For more information, refer to your Navigation System Owner’s Manual.
08
09
10
11
To view detailed instructional videos regarding these and other features, please go to www.nissanownersinfo.mobi.
Page 24 of 24

Nissan, the Nissan Brand Symbol, Z and
Nissan model names are Nissan trademarks.
©
2014 Nissan North America, Inc.
QR14E 0B17U2
Printing: March 2014 (06)
To view detailed instructional videos,
go to www.nissanownersinfo.mobi/2014/sentra
or snap this barcode with an appropriate barcode reader.
This Quick Reference Guide is intended to provide an overview of some of the uniq\
ue features of your new vehicle. See your
Owner’s Manual, which contains important safety warnings and information about the operation and maintenance of yo\
ur vehicle,
for complete details. NISSAN North America, Inc. reserves the right to make changes, at any time, without prior notice, in prices,
colors, materials, equipment, specifications, and models and to discon\
tinue models or equipment. Due to continuous product
development and other pre- and post-production factors, actual vehicle, \
materials and specifications may vary. Some vehicles are
shown with optional equipment. See the actual vehicle for complete accur\
acy. Specifications, options and accessories may differ
in Hawaii, U.S. territories and other countries. For additional information on availability, options or accessories, see your NISSAN
dealer or contact NISSAN North America, Inc.