audio NISSAN SENTRA 2015 B17 / 7.G Quick Reference Guide
[x] Cancel search | Manufacturer: NISSAN, Model Year: 2015, Model line: SENTRA, Model: NISSAN SENTRA 2015 B17 / 7.GPages: 24, PDF Size: 1.85 MB
Page 2 of 24
*See your Owner’s Manual for information.
2
1
3
10
15
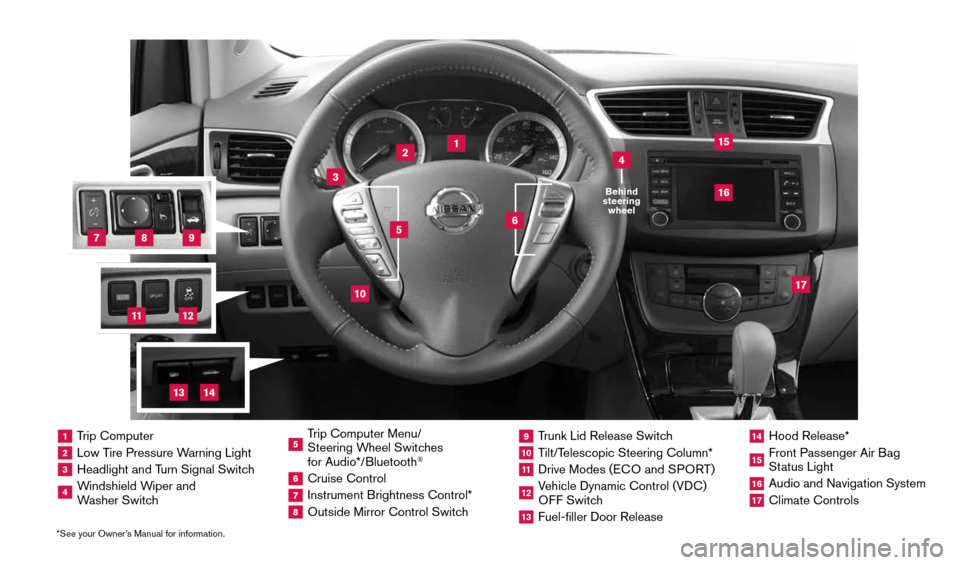
1 Trip Computer2 Low Tire Pressure Warning Light3 Headlight and Turn Signal Switch4 Windshield Wiper and
Washer Switch
5 Trip Computer Menu/
Steering Wheel Switches
for Audio*/Bluetooth
®
6 Cruise Control7 Instrument Brightness Control*8 Outside Mirror Control Switch
9 Trunk Lid Release Switch10 Tilt/Telescopic Steering Column*11 Drive Modes ( ECO and SPORT )12 Vehicle Dynamic Control (VDC)
OFF Switch13 Fuel-filler Door Release
14 Hood Release*15 Front Passenger Air Bag
Status Light16 Audio and Navigation System17 Climate Controls
6
5
16
17
4Behind
steering wheel
8
7
9
11
12
14
13
1911994_15c_Sentra_QRG_060815.indd 36/8/15 2:39 PM
Page 4 of 24
2
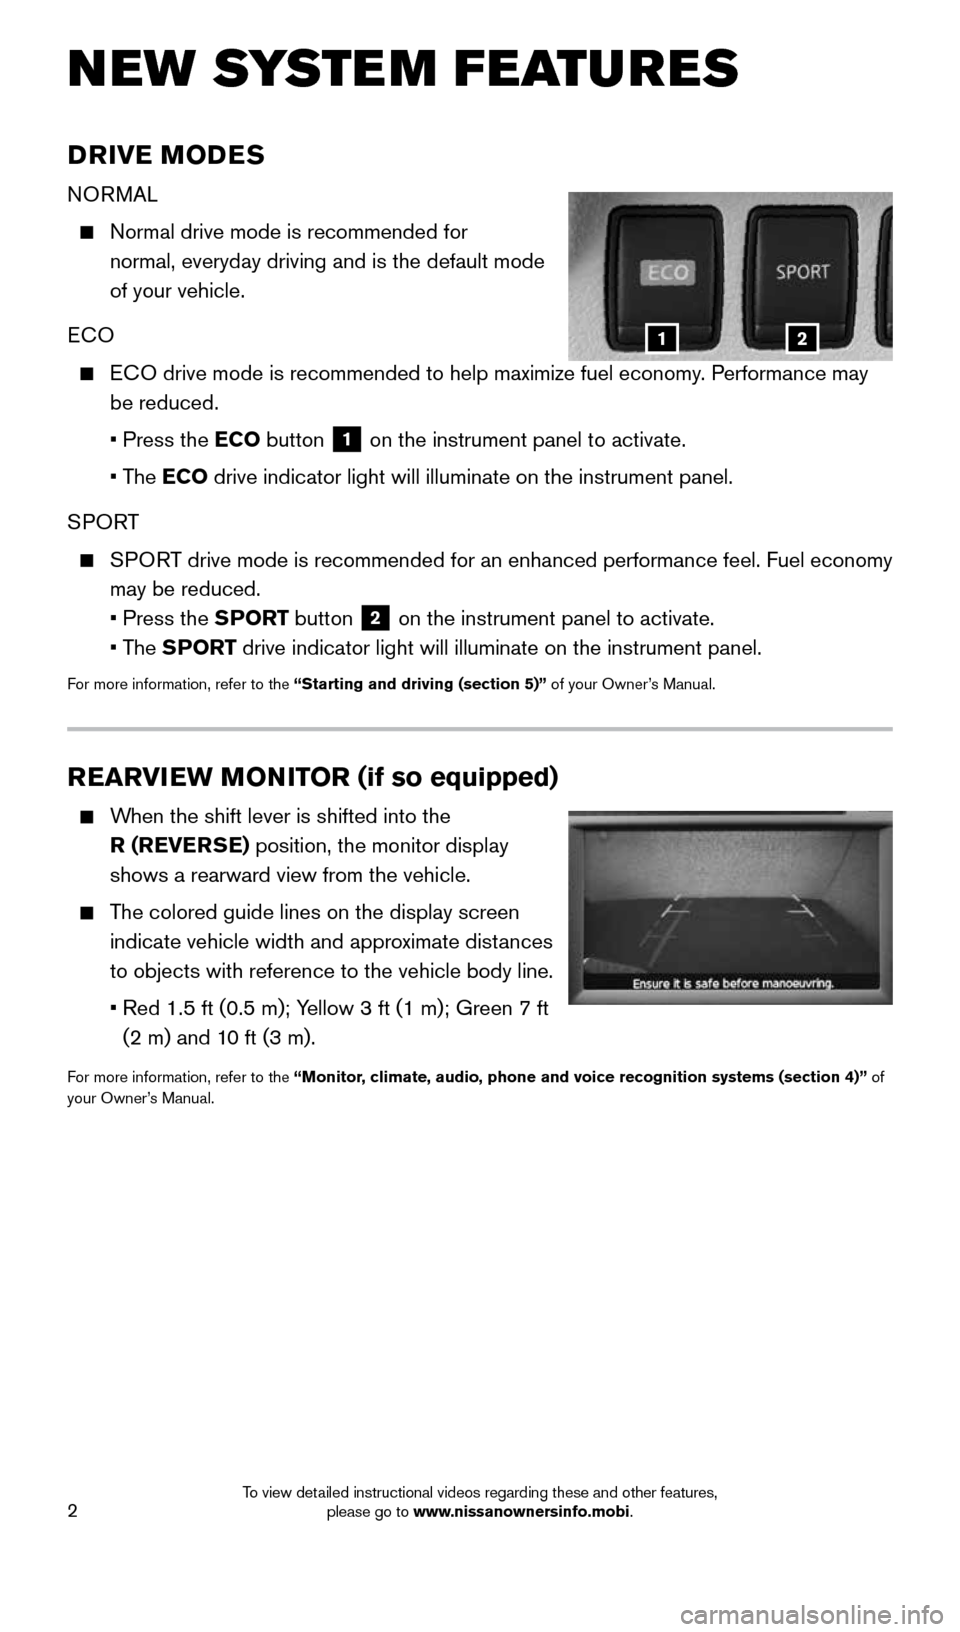
DRIVE MODES
NORMAL
Normal drive mode is recommended for
normal, everyday driving and is the default mode
of your vehicle.
ECO
ECO drive mode is recommended to help maximize fuel economy. Performance may
be reduced.
• Press the ECO button
1 on the instrument panel to activate.
• The ECO drive indicator light will illuminate on the instrument panel.
SPORT
SPORT drive mode is recommended for an enhanced performance feel. Fuel econ\
omy
may be reduced.
• Press the SPORT button
2 on the instrument panel to activate.
• The SPORT drive indicator light will illuminate on the instrument panel.
For more information, refer to the “Starting and driving (section 5)” of your Owner’s Manual.
NEW SYSTEM FEATURES
REARVIEW MONITOR (if so equipped)
When the shift lever is shifted into the
R (REVERSE) position, the monitor display
shows a rearward view from the vehicle.
The colored guide lines on the display screen
indicate vehicle width and approximate distances
to objects with reference to the vehicle body line.
• Red 1.5 ft (0.5 m); Yellow 3 ft (1 m); Green 7 ft
(2 m) and 10 ft (3 m).
For more information, refer to the “Monitor, climate, audio, phone and voice recognition systems (section 4)” of
your Owner’s Manual.
12
1911994_15c_Sentra_QRG_060815.indd 26/8/15 2:39 PM
To view detailed instructional videos regarding these and other features, please go to www.nissanownersinfo.mobi.
Page 8 of 24
6
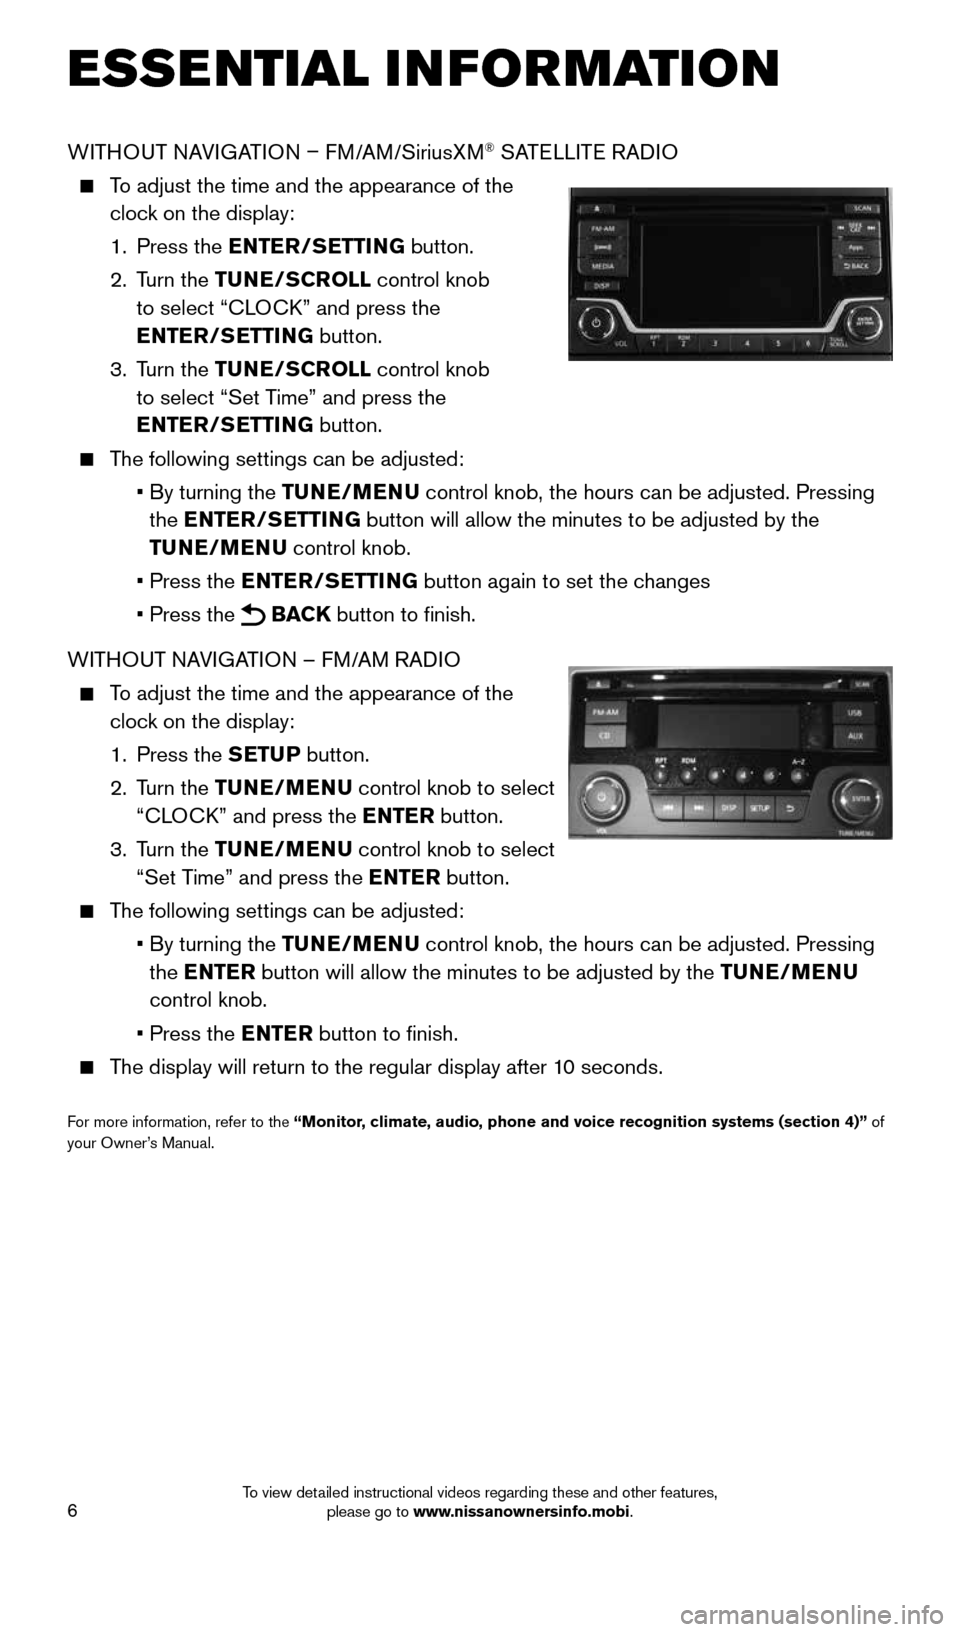
WITHOUT NAVIGATION – FM/AM/SiriusXM® SATELLITE RADIO
To adjust the time and the appearance of the
clock on the display:
1. Press the ENTER/SETTING button.
2. Turn the TUNE/SCROLL control knob
to select “CLOCK” and press the
ENTER/SETTING button.
3. Turn the TUNE/SCROLL control knob
to select “Set Time” and press the
ENTER/SETTING button.
The following settings can be adjusted:
• By turning the TUNE/MENU control knob, the hours can be adjusted. Pressing
the ENTER/SETTING button will allow the minutes to be adjusted by the
TUNE/MENU control knob.
• Press the ENTER/SETTING button again to set the changes
• Press the
BACK button to finish.
WITHOUT NAVIGATION – FM/AM RADIO
To adjust the time and the appearance of the
clock on the display:
1. Press the SETUP button.
2. Turn the TUNE/MENU control knob to select
“CLOCK” and press the ENTER button.
3. Turn the TUNE/MENU control knob to select
“Set Time” and press the ENTER button.
The following settings can be adjusted:
• By turning the TUNE/MENU control knob, the hours can be adjusted. Pressing
the ENTER button will allow the minutes to be adjusted by the TUNE/MENU
control knob.
• Press the ENTER button to finish.
The display will return to the regular display after 10 seconds.
For more information, refer to the “Monitor, climate, audio, phone and voice recognition systems (section 4)” of
your Owner’s Manual.
ESSE NTIAL I N FOR MATION
1911994_15c_Sentra_QRG_060815.indd 66/8/15 2:39 PM
To view detailed instructional videos regarding these and other features, please go to www.nissanownersinfo.mobi.
Page 14 of 24
12
FIRST DRIVE FEATURES
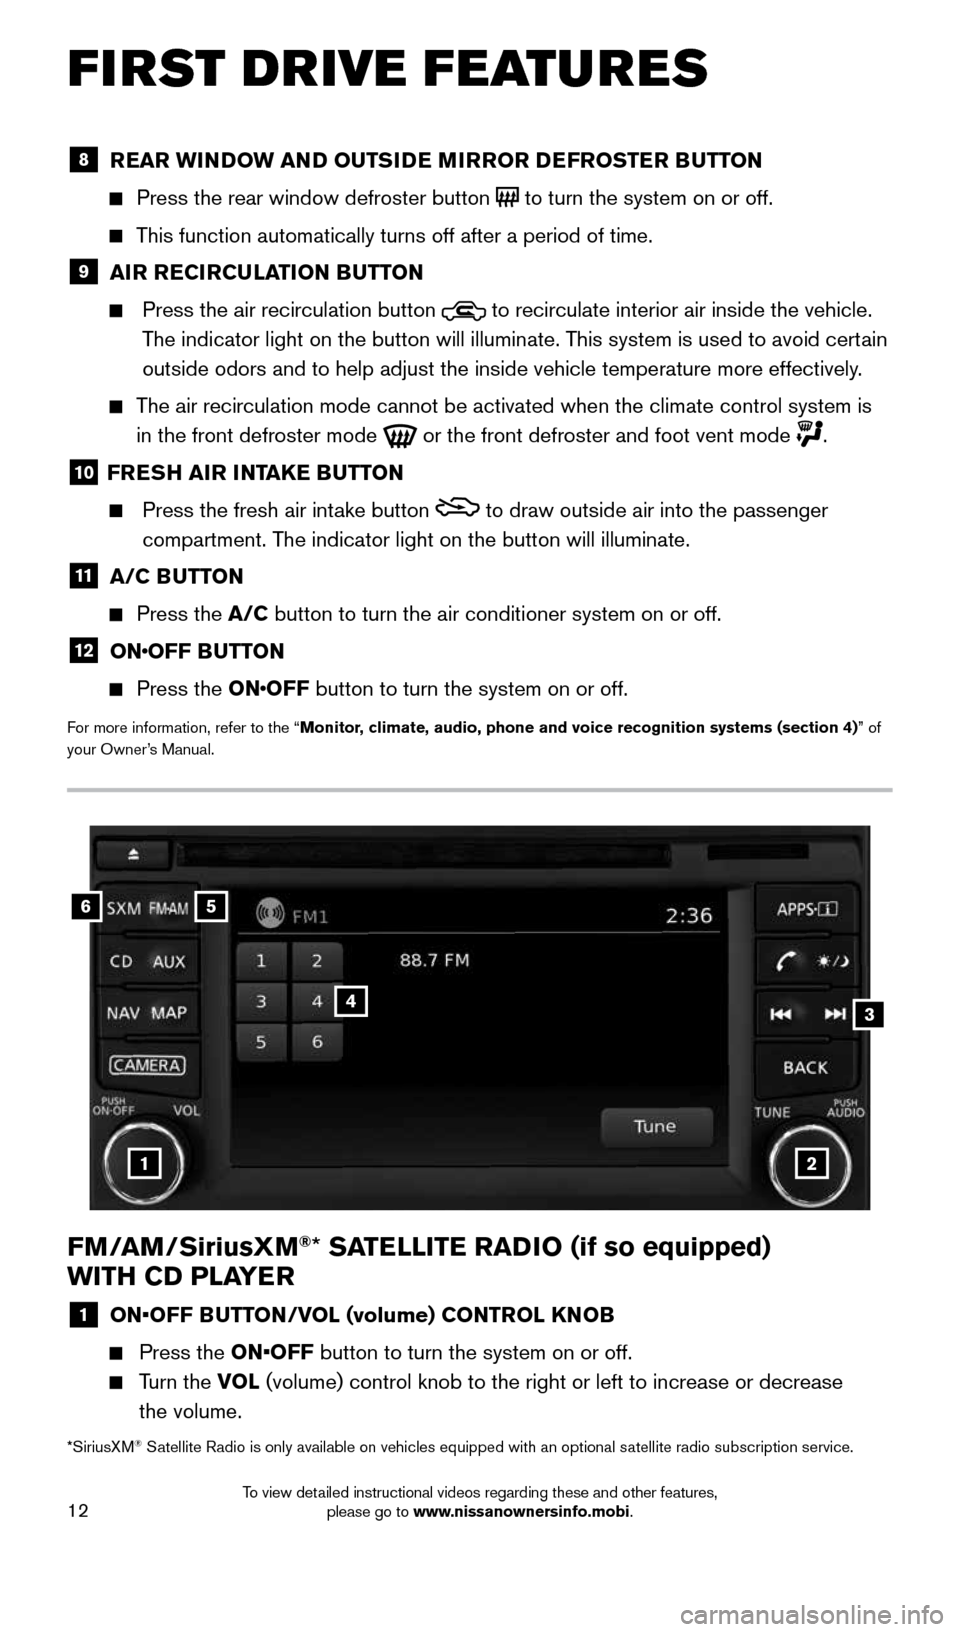
FM/AM/SiriusXM®* SATELLITE RADIO (if so equipped)
WITH CD PLAYER
1 ON•OFF BUTTON/VOL (volume) CONTROL KNOB
Press the ON•OFF button to turn the system on or off.
Turn the VOL (volume) control knob to the right or left to increase or decrease
the volume.
56
3
1
4
2
8 REAR WINDOW AND OUTSIDE MIRROR DEFROSTER BUTTON
Press the rear window defroster button to turn the system on or off.
This function automatically turns off after a period of time.
9 AIR RECIRCULATION BUTTON
Press the air recirculation button to recirculate interior air inside the vehicle.
The indicator light on the button will illuminate. This system is used to avoid certain
outside odors and to help adjust the inside vehicle temperature more eff\
ectively.
The air recirculation mode cannot be activated when the climate control s\
ystem is
in the front defroster mode
or the front defroster and foot vent mode .
10 FRESH AIR INTAKE BUTTON
Press the fresh air intake button to draw outside air into the passenger
compartment. The indicator light on the button will illuminate.
11 A/C BUTTON
Press the A/C button to turn the air conditioner system on or off.
12 ONOFF BUTTON
Press the ONOFF button to turn the system on or off.
For more information, refer to the “Monitor, climate, audio, phone and voice recognition systems (section 4) ” of
your Owner’s Manual.
*SiriusXM
® Satellite Radio is only available on vehicles equipped with an optional s\
atellite radio subscription service.
1911994_15c_Sentra_QRG_060815.indd 126/8/15 2:40 PM
To view detailed instructional videos regarding these and other features, please go to www.nissanownersinfo.mobi.
Page 15 of 24
13
2 AUDIO BUTTON/TUNE CONTROL KNOB
To manually tune the radio, turn the TUNE control knob left or right.
Press the AUDIO button to go to the audio settings screen.
3
SEEK/CATEGORY BUTTONS
To tune and stop at the previous or next broadcasting station, press the seek
buttons
or .
For satellite radio to switch to the first channel of the previous or next category,
press the seek buttons
or .
To change tracks on a CD, press the seek buttons or .
When the seek buttons or are pressed and held while a CD is playing, the
CD will rewind or fast forward. When the button is released, the CD will play at
normal speed.
4 STATION SELECT KEYS
Twelve stations can be set for the FM band, 6 for the AM band and 18 for
satellite radio.
To store a station in a preset, first select a radio band by pressing the
FM•AM
button
5 or SXM button
6 then tune to the desired FM, AM or
satellite radio station.
Now select and hold the desired station memory key (1-6) until the preset number
is updated on the display and a beep is heard. Programing is now complet\
e.
To retrieve a previously set station, select the radio band where the preset was
stored then press the corresponding station memory key (1-6).
For more information, refer to the “Monitor, climate, audio, phone and voice recognition systems (section 4)” of
your Owner’s Manual.
USB (Universal Serial Bus) CONNECTION PORT/AUX JACK
AND iPOD® INTERFACE
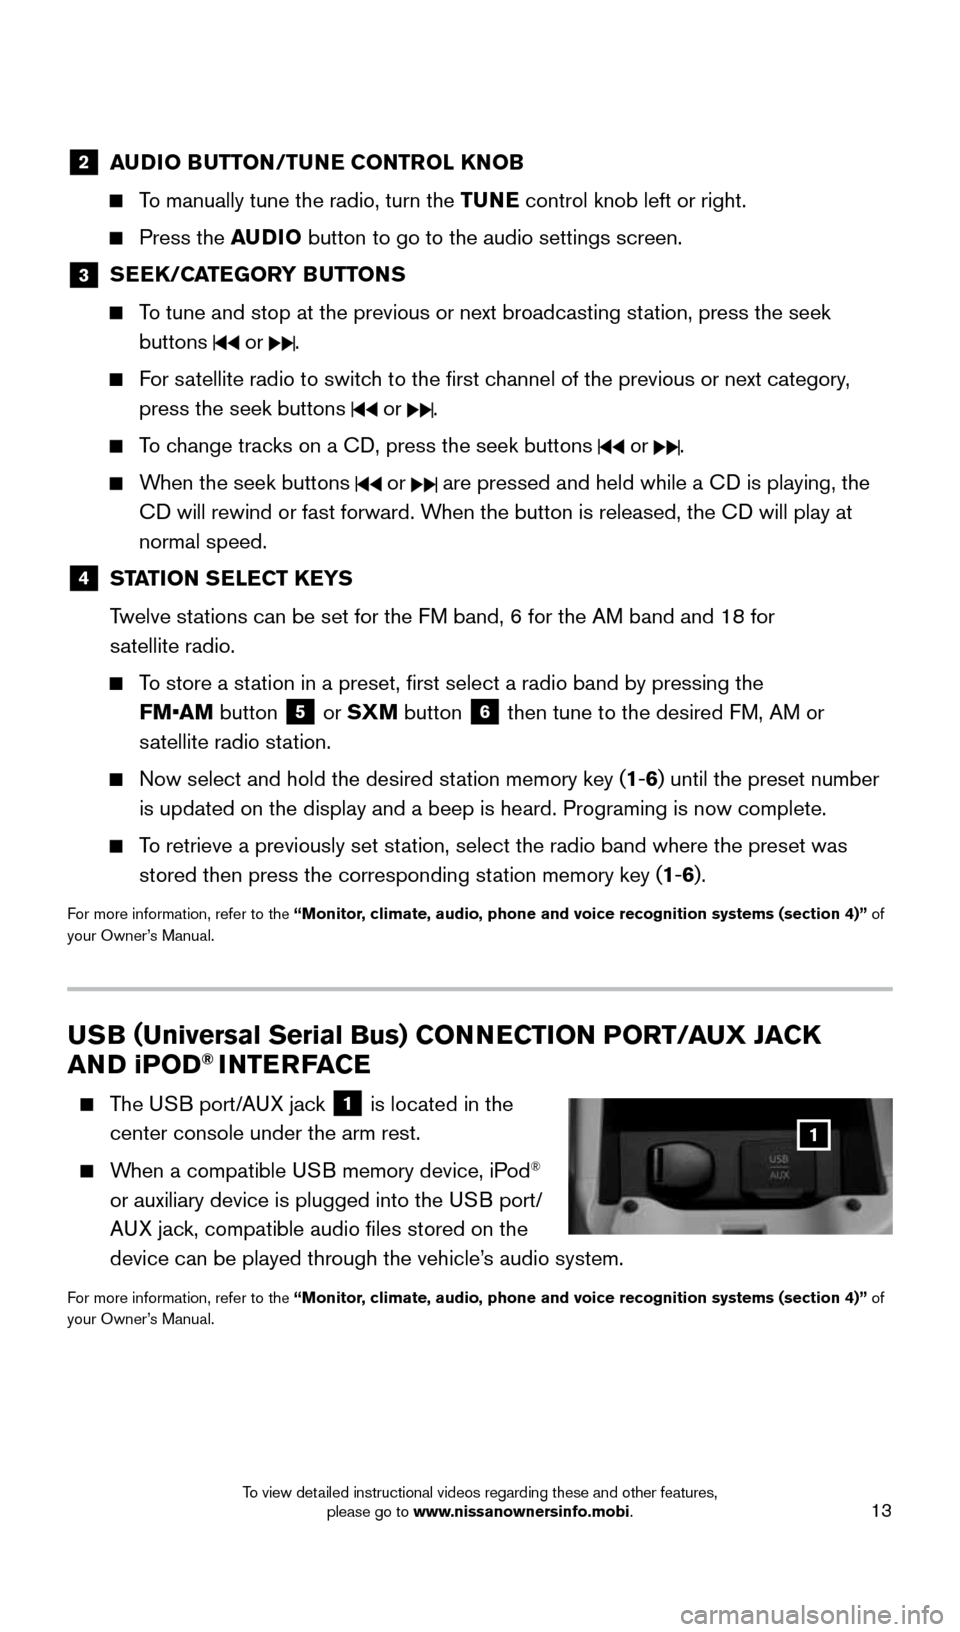
The USB port/AUX jack
1 is located in the
center console under the arm rest.
When a compatible USB memory device, iPod®
or auxiliary device is plugged into the USB port/
AUX jack, compatible audio files stored on the
device can be played through the vehicle’s audio system.
For more information, refer to the “Monitor, climate, audio, phone and voice recognition systems (section 4)” of
your Owner’s Manual.
1
1911994_15c_Sentra_QRG_060815.indd 136/8/15 2:40 PM
To view detailed instructional videos regarding these and other features, please go to www.nissanownersinfo.mobi.
Page 18 of 24

16
SYSTEM GUIDE
BLUETOOTH® HANDS-FREE PHONE SYSTEM
A cellular telephone should not be used while driving so full attention may be given to
vehicle operation.*
SYSTEM OPERATING TIPS
Press the button to interrupt the voice
prompts at any time and speak a command after
the tone.
To use the system faster, you may speak the
second level commands with the main menu
command on the main menu. For example,
press the
button and after the tone say
“Call Redial”.
*Some jurisdictions prohibit the use of cellular telephones while drivin\
g.
NISSANCONNECTSM MOBILE APPS (if so equipped)
Integrates popular smartphone apps and services into your vehicle.
The NissanConnect Mobile Apps companion app must be downloaded to your
smartphone, and you must be enrolled.
FOR SYSTEM WITH NAVIGATION
• iPhone
®: Please connect over USB when using an iPhone® with
NissanConnect Mobile Apps.
• Android: Please connect over Bluetooth
® when using an Android device with
NissanConnect Mobile Apps.
FOR SYSTEM WITHOUT NAVIGATION
• iPhone
®: Please connect over Bluetooth® when using an iPhone® with
NissanConnect Mobile Apps.
• Android: Please connect over Bluetooth
® when using an Android device with
NissanConnect Mobile Apps.
For more information on how to pair your phone and set up NissanConnect Mobile
Apps, visit: www.nissanusa.com/connect/support.
For more information, refer to the “Monitor, climate, audio, phone and voice recognition systems (section 4) ” of
your Owner’s Manual.
Text message integration requires that the cellular phone support Message Access
Profile (MAP) for both receiving and sending text messages. Some cellular phones
may not support all text messaging features. Please visit www.nissanusa.com/
bluetooth for compatibility information as well as your device’s Owner’s Manual.
For more information, refer to the “Monitor, climate, audio, phone and voice recognition systems (section 4) ” of
your Owner’s Manual.
1911994_15c_Sentra_QRG_060815.indd 166/8/15 2:40 PM
To view detailed instructional videos regarding these and other features, please go to www.nissanownersinfo.mobi.
Page 19 of 24
17
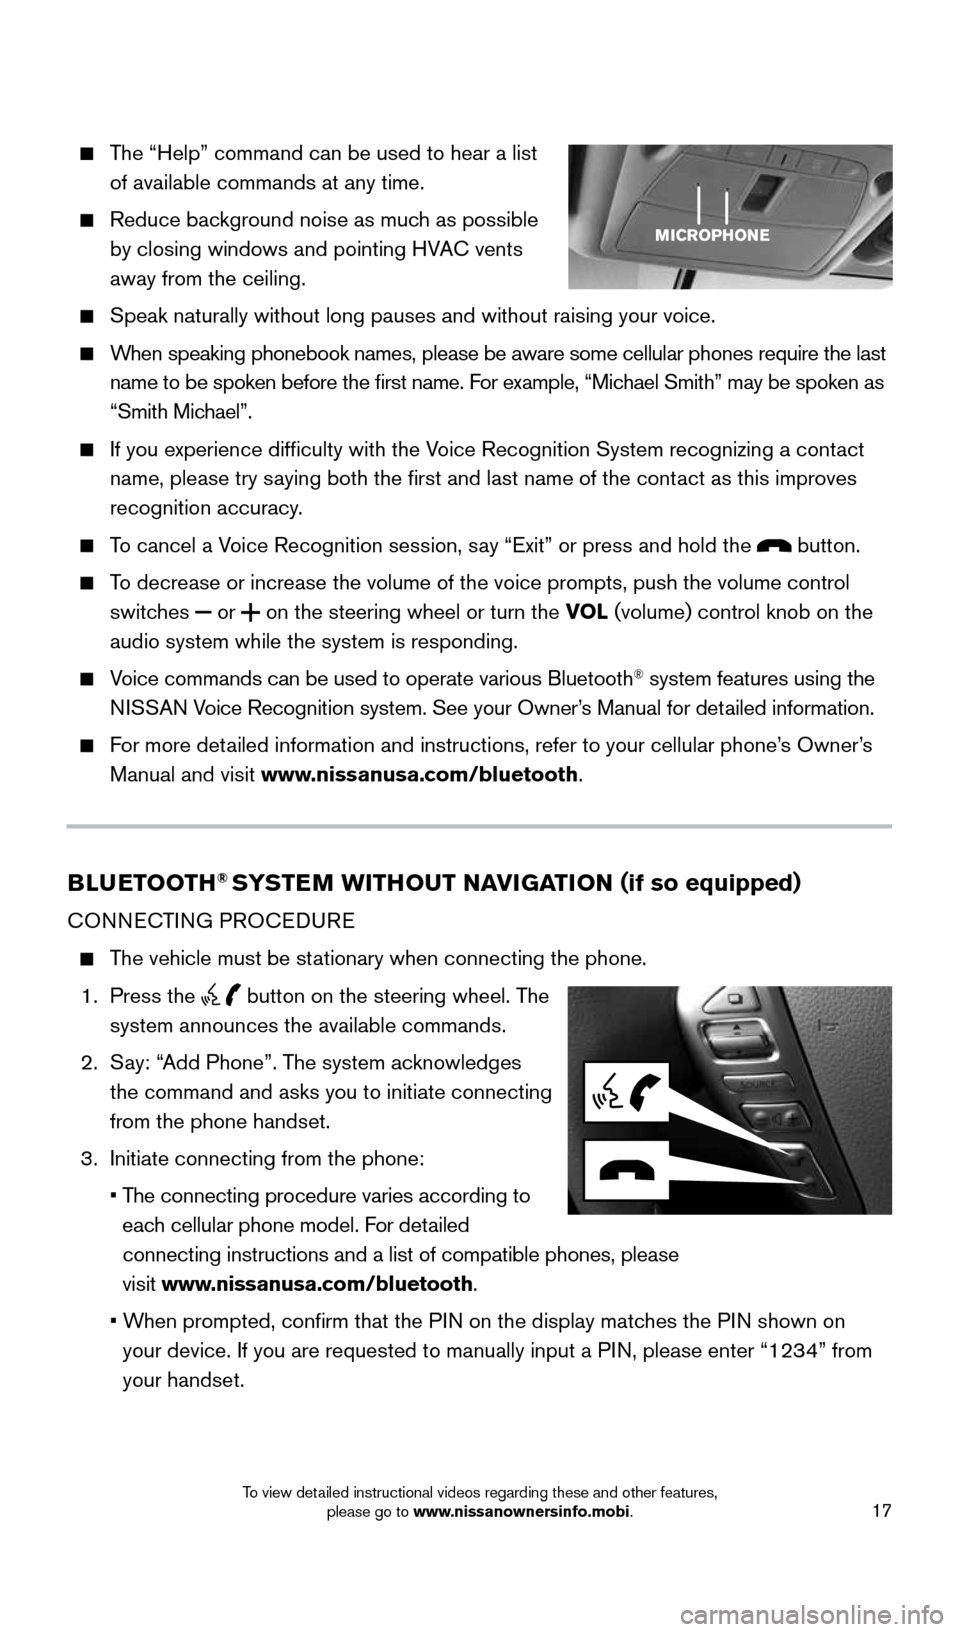
The “Help” command can be used to hear a list
of available commands at any time.
Reduce background noise as much as possible
by closing windows and pointing HVAC vents
away from the ceiling.
Speak naturally without long pauses and without raising your voice.
When speaking phonebook names, please be aware some cellular phones requi\
re the last
name to be spoken before the first name. For example, “Michael Smith” may be spoken as
“Smith Michael”.
If you experience difficulty with the Voice Recognition System recognizing a contact
name, please try saying both the first and last name of the contact as this improves
recognition accuracy.
To cancel a Voice Recognition session, say “Exit” or press and hold the button.
To decrease or increase the volume of the voice prompts, push the volume \
control
switches
or
on the steering wheel or turn the VOL (volume) control knob on the
audio system while the system is responding.
Voice commands can be used to operate various Bluetooth® system features using the
NISSAN Voice Recognition system. See your Owner’s Manual for detailed information.
For more detailed information and instructions, refer to your cellular phone’s Owner’s
Manual and visit www.nissanusa.com/bluetooth.
BLUETOOTH® SYSTEM WITHOUT NAVIGATION ( if so equipped)
CONNECTING PROCEDURE
The vehicle must be stationary when connecting the phone.
1. Press the
button on the steering wheel. The
system announces the available commands.
2. Say: “Add Phone”. The system acknowledges
the command and asks you to initiate connecting
from the phone handset.
3. Initiate connecting from the phone:
• The connecting procedure varies according to
each cellular phone model. For detailed
connecting instructions and a list of compatible phones, please
visit www.nissanusa.com/bluetooth.
• When prompted, confirm that the PIN on the display matches the PIN shown on
your device. If you are requested to manually input a PIN, please enter “1234” from
your handset.
1911994_15c_Sentra_QRG_060815.indd 176/8/15 2:40 PM
To view detailed instructional videos regarding these and other features, please go to www.nissanownersinfo.mobi.
Page 20 of 24

18
SYSTEM GUIDE
PHONEBOOK SETUP
The phonebook stores up to 1,000 entries for each cellular phone paired with the system.
Depending on your cellular phone, the system may automatically download \
your cellular
phone’s entire phonebook to the vehicle’s Bluetooth® system.
MAKING A CALL FROM THE PHONEBOOK
1. Press the
button.
2. After waiting for the tone, say “Call”.
3. After the next tone, speak a name of a phonebook entry. For example, “Michael Smith”.
4. Confirm that the correct name is recognized by saying “Dial” after the tone.
MAKING A CALL BY PHONE NUMBER
1. Press the
button. A tone will sound.
2. Say: “Call”. The system acknowledges the command and announces the next set of
available commands.
3. Say: “Phone Number”. The system acknowledges the command and announces the
next set of available commands.
4. Say the number you wish to call starting with the area code in single digit format.
5. When you have finished speaking the phone number, the system repeats it back and
announces the available commands.
6. Say: “Dial”. The system acknowledges the command and makes the call.
RECEIVING/ENDING A CALL
When you receive a phone call, a ring tone sounds through the audio syste\
m.
To accept the call, press the
button.
To reject the call, press the button.
To hang-up the phone at the end of a call or to disconnect while making a\
call,
press the
button.
For more information, refer to the “Monitor, climate, audio, phone and voice recognition systems (section 4)” of
your Owner’s Manual or please visit www.nissanusa.com/bluetooth.
1911994_15c_Sentra_QRG_060815.indd 186/8/15 2:40 PM
To view detailed instructional videos regarding these and other features, please go to www.nissanownersinfo.mobi.
Page 21 of 24
19
BLUETOOTH® SYSTEM WITH NAVIGATION (if so equipped)
Send predefined or custom text messages* through your vehicle’s Bluetooth® system.
Receive texts through your vehicle’s Bluetooth® system that can be read to you.
Bluetooth® Streaming Audio allows you to use a compatible Bluetooth® device to play
audio files. Your compatible Bluetooth® device can be connected to the vehicle’s audio
system, allowing audio files to play through the vehicle’s speakers.
CONNECTING PROCEDURE
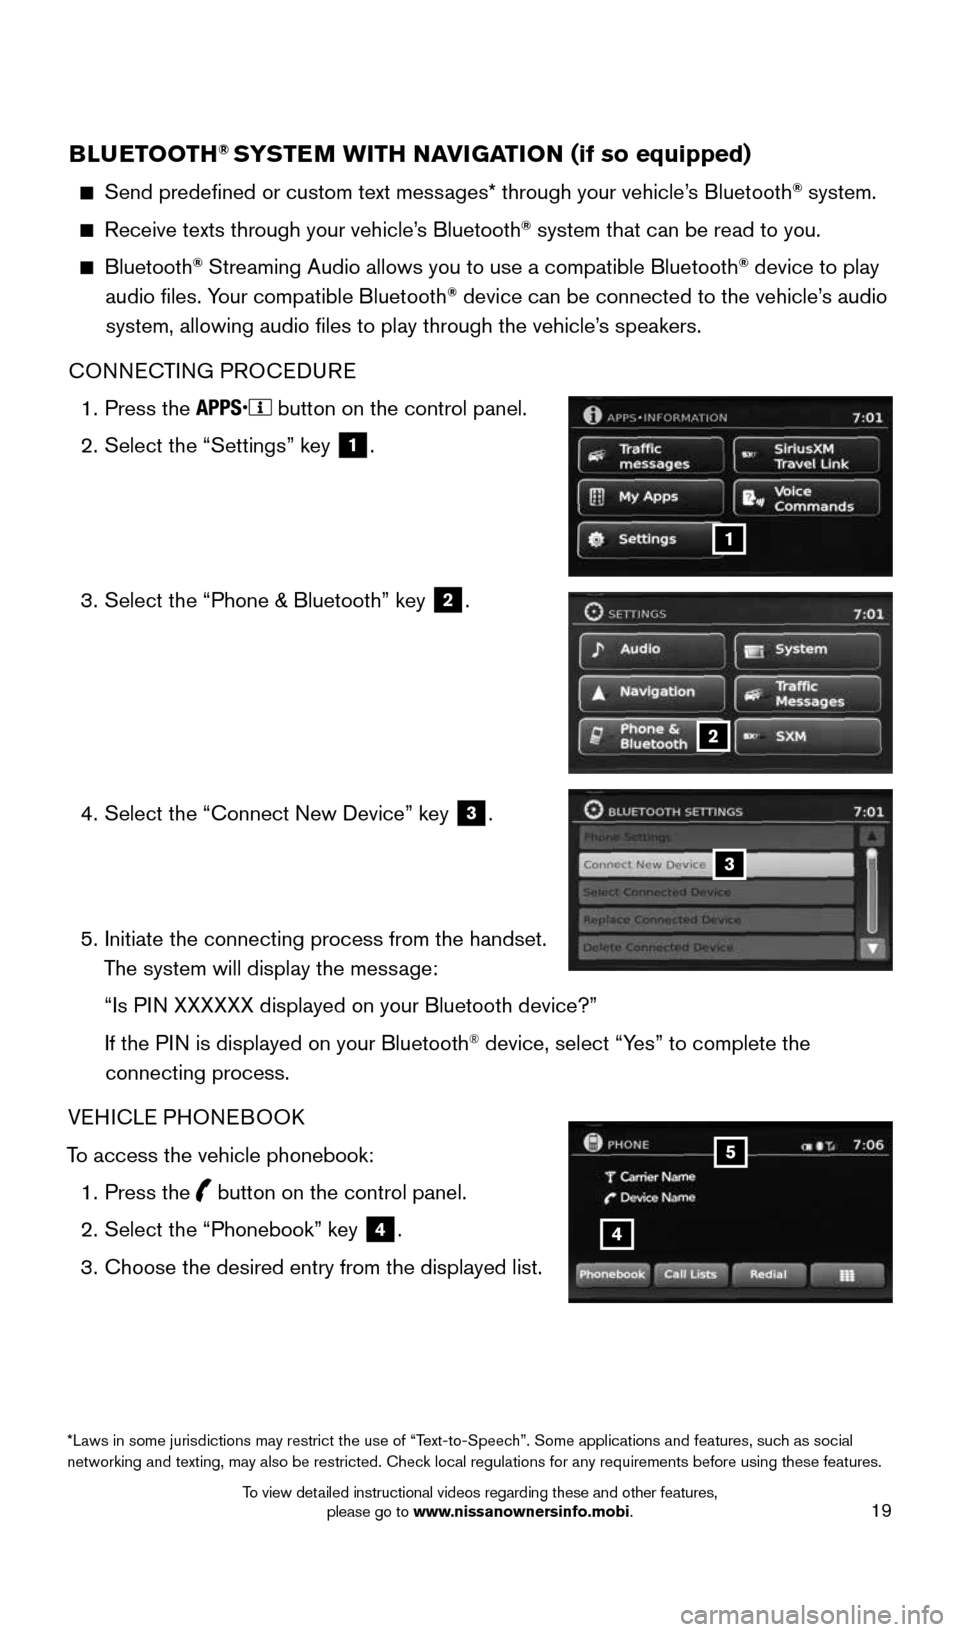
1. Press the
button on the control panel.
2. Select the “Settings” key
1.
3. Select the “Phone & Bluetooth” key
2.
4. Select the “Connect New Device” key
3.
5. Initiate the connecting process from the handset.
The system will display the message:
“Is PIN XXXXXX displayed on your Bluetooth device?”
If the PIN is displayed on your Bluetooth
® device, select “Yes” to complete the
connecting process.
VEHICLE PHONEBOOK
To access the vehicle phonebook: 1. Press the
button on the control panel.
2. Select the “Phonebook” key
4.
3. Choose the desired entry from the displayed list.
1
2
3
*Laws in some jurisdictions may restrict the use of “Text-to-Speech”. Some applications and features, such as social
networking and texting, may also be restricted. Check local regulations for any requirements before using these features.
4
5
1911994_15c_Sentra_QRG_060815.indd 196/8/15 2:40 PM
To view detailed instructional videos regarding these and other features, please go to www.nissanownersinfo.mobi.
Page 22 of 24
20
SYSTEM GUIDE
MAKING A CALL
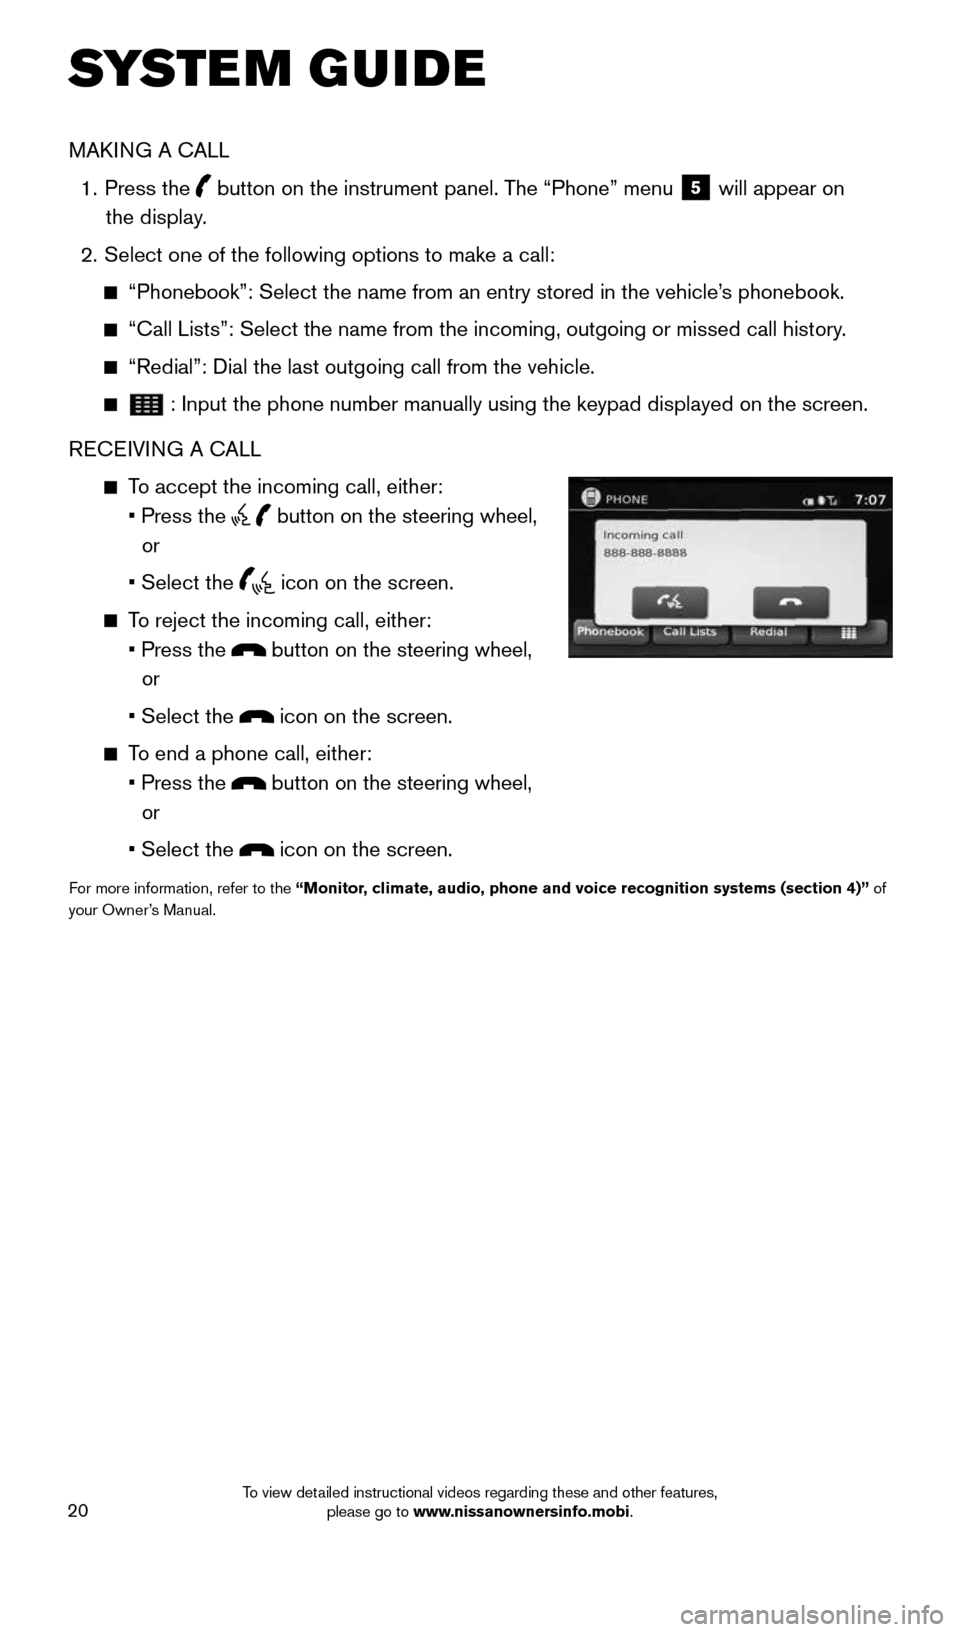
1. Press the
button on the instrument panel. The “Phone” menu
5 will appear on
the display.
2. Select one of the following options to make a call:
“Phonebook”: Select the name from an entry stored in the vehicle’\
s phonebook.
“Call Lists”: Select the name from the incoming, outgoing or misse\
d call history.
“Redial”: Dial the last outgoing call from the vehicle.
: Input the phone number manually using the keypad displayed on the scree\
n.
RECEIVING A CALL
To accept the incoming call, either:
• Press the
button on the steering wheel,
or
• Select the
icon on the screen.
To reject the incoming call, either:
• Press the
button on the steering wheel,
or
• Select the
icon on the screen.
To end a phone call, either:
• Press the
button on the steering wheel,
or
• Select the
icon on the screen.
For more information, refer to the “Monitor, climate, audio, phone and voice recognition systems (section 4)” of
your Owner’s Manual.
1911994_15c_Sentra_QRG_060815.indd 206/8/15 2:40 PM
To view detailed instructional videos regarding these and other features, please go to www.nissanownersinfo.mobi.