lights NISSAN SENTRA 2016 B17 / 7.G Quick Reference Guide
[x] Cancel search | Manufacturer: NISSAN, Model Year: 2016, Model line: SENTRA, Model: NISSAN SENTRA 2016 B17 / 7.GPages: 32, PDF Size: 2.35 MB
Page 5 of 32
3
Roadside Assistance – Roadside Assistance can
be accessed by:
1.
In-vehicle menu (headset button on the
map screen)
2. Niss
anConnect Services companion app
3.
Calling the Roadside Assist
ance
Provider directly
•
T
his service allows subscribers to receive
assistance for a non-emergency incident, such as towing, or a third party response.
In-vehicle Mess aging – Enables NISSAN to send service reminders, marketing,
renewal and other messages to subscribers directly into the vehicle.
Vehicle Health Report – Get a monthly overview on your vehicle’s overall health delivered to your email.
Dealer Service Sc heduling – Provides the subscriber with information and a
mechanism to allow him or her to contact a dealer to schedule service for the vehicle.
Stolen Vehicle Locator – A Response Specialist will attempt to obtain location information from a reported stolen vehicle and provide that information \
to local law
enforcement agencies to assist in the recovery of your stolen vehicle.
Remote Door Loc k/Unlock – Remotely access your vehicle via a NissanConnect
Services Response Specialist, the NissanConnect Services companion app or
website to remotely lock or unlock your vehicle.
Remote Sound Horn and Flash Lights – Sound the horn and flash the l\
ights remotely
using the Niss anConnect Services companion app or website.
Alarm Notification – T his system will notify you when the factory-installed vehicle alarm
system has been activated.
Maintenance Alert – Receive notifications via a selected method of \
a vehicle system
malfunction that triggers instrument panel warning lights.
Connected Searc h – Select “Connected Search” from the Destination menu on the
vehicle’s Navigation System to conduct a Point Of Interest (POI) search within a
certain distance of the vehicle’s location.
Assisted Searc h – Allows the subscriber to verbally request POI destination data from
a live operator.
Destination Download – Use the Niss anConnect Services companion app or website
to search for and send destinations directly to the vehicle.
Journey Planner – Send a route with up to five waypoints and a dest\
ination directly to
the vehicle.
Boundary Alert – Monitor the movement of your vehicle within a specifi\
ed region. Set up boundaries in the Monitoring section of the NissanConnect Services web portal.
Speed Alert – Set up a maximum speed on the Niss anConnect Services web portal.
You will receive notifications if your vehicle exceeds the maximum spee\
d setting.
1938277_16c_Sentra_US_pQRG_050516.indd 35/6/16 10:27 AM
To view detailed instructional videos regarding these and other features, please go to www.nissanownersinfo.mobi.
Page 9 of 32
7
ESSE NTIAL I N FOR MATION
TIRE PRESSURE MONITORING SYSTEM (TPMS) WITH
EASY FILL TIRE ALERT (if so equipped)
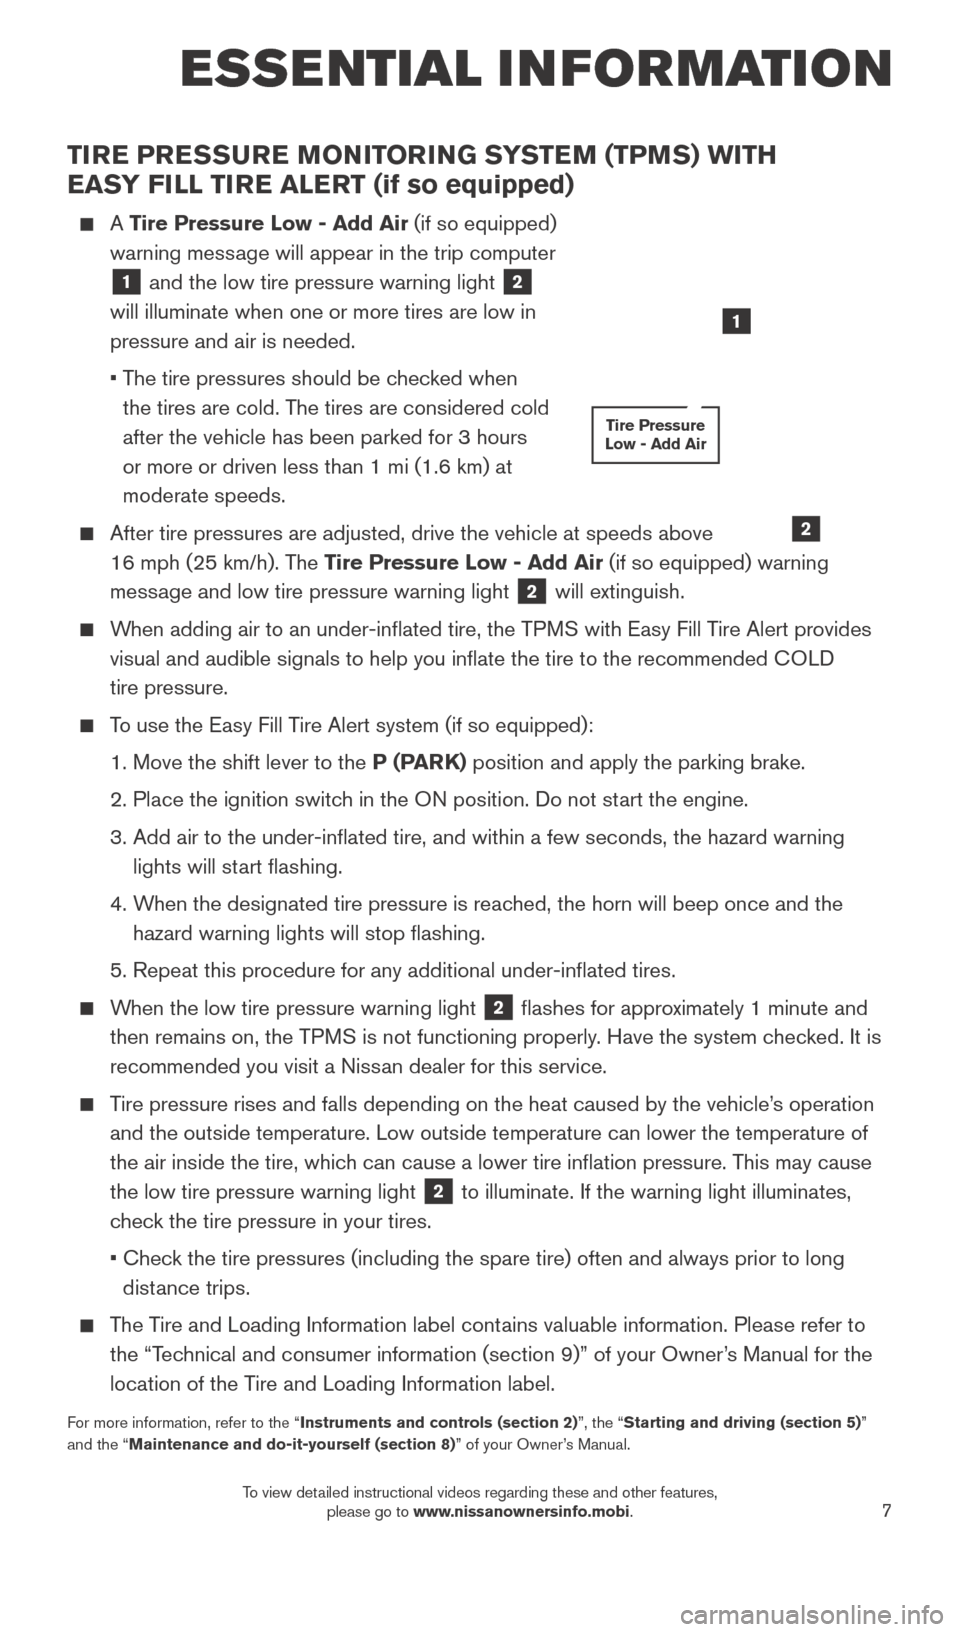
A Tire Pressure Low - Add Air (if so equipped)
warning message will appear in the trip computer
1 and the low tire pressure warning light 2
will illuminate when one or more tires are low in
pressure and air is needed.
•
T
he tire pressures should be checked when
the tires are cold. The tires are considered cold
after the vehicle has been parked for 3 hours
or more or driven less than 1 mi (1.6 km) at
moderate speeds.
After tire pressures are adjusted, drive the vehicle at speeds above
16 mph (25 km/h). T he Tire Pressure Low - Add Air (if so equipped) warning
message and low tire pressure warning light
2 will extinguish.
When adding air to an under-inflated tire, the TPMS with Easy Fill Tire Alert provides
visual and audible signals to help you inflate the tire to the recomme\
nded COLD
tire pressure.
To use the Easy Fill Tire Alert system (if so equipped):
1. Move the shift lever to the
P (PARK) position and apply the parking brake.
2. Place the ignition switc
h in the ON position. Do not start the engine.
3.
Add air to the under-inflated tire, and within a few seconds, the haza\
rd warning
lights will st
art flashing.
4.
W
hen the designated tire pressure is reached, the horn will beep once and the
hazard warning lights will stop flashing.
5. Repeat this procedure for any additional under-inflated tires.
When the low tire pressure warning light 2 flashes for approximately 1 minute and
then remains on, the TPMS is not functioning properly. Have the system checked. It is
recommended you visit a Nissan dealer for this service.
Tire pressure rises and falls depending on the heat caused by the vehicle\
’s operation and the outside temperature. Low outside temperature can lower the tempe\
rature of
the air inside the tire, which can cause a lower tire inflation pressure. This may cause
the low tire pressure warning light
2 to illuminate. If the warning light illuminates,
check the tire pressure in your tires.
•
Chec
k the tire pressures (including the spare tire) often and always prior\
to long
distance trips.
The Tire and Loading Information label contains valuable information. Please refer to the “Technical and consumer information (section 9)” of your Owner’s Manual for the
location of the Tire and Loading Information label.
For more information, refer to the “Instruments and controls (section 2)”, the “Starting and driving (section 5)”
and the “Maintenance and do-it-yourself (section 8)” of your Owner’s Manual.
1
Tire Pressure
Low - Add Air
2
1938277_16c_Sentra_US_pQRG_050516.indd 75/6/16 10:27 AM
To view detailed instructional videos regarding these and other features, please go to www.nissanownersinfo.mobi.
Page 12 of 32
10
TRUNK LID RELEASE SWITCH
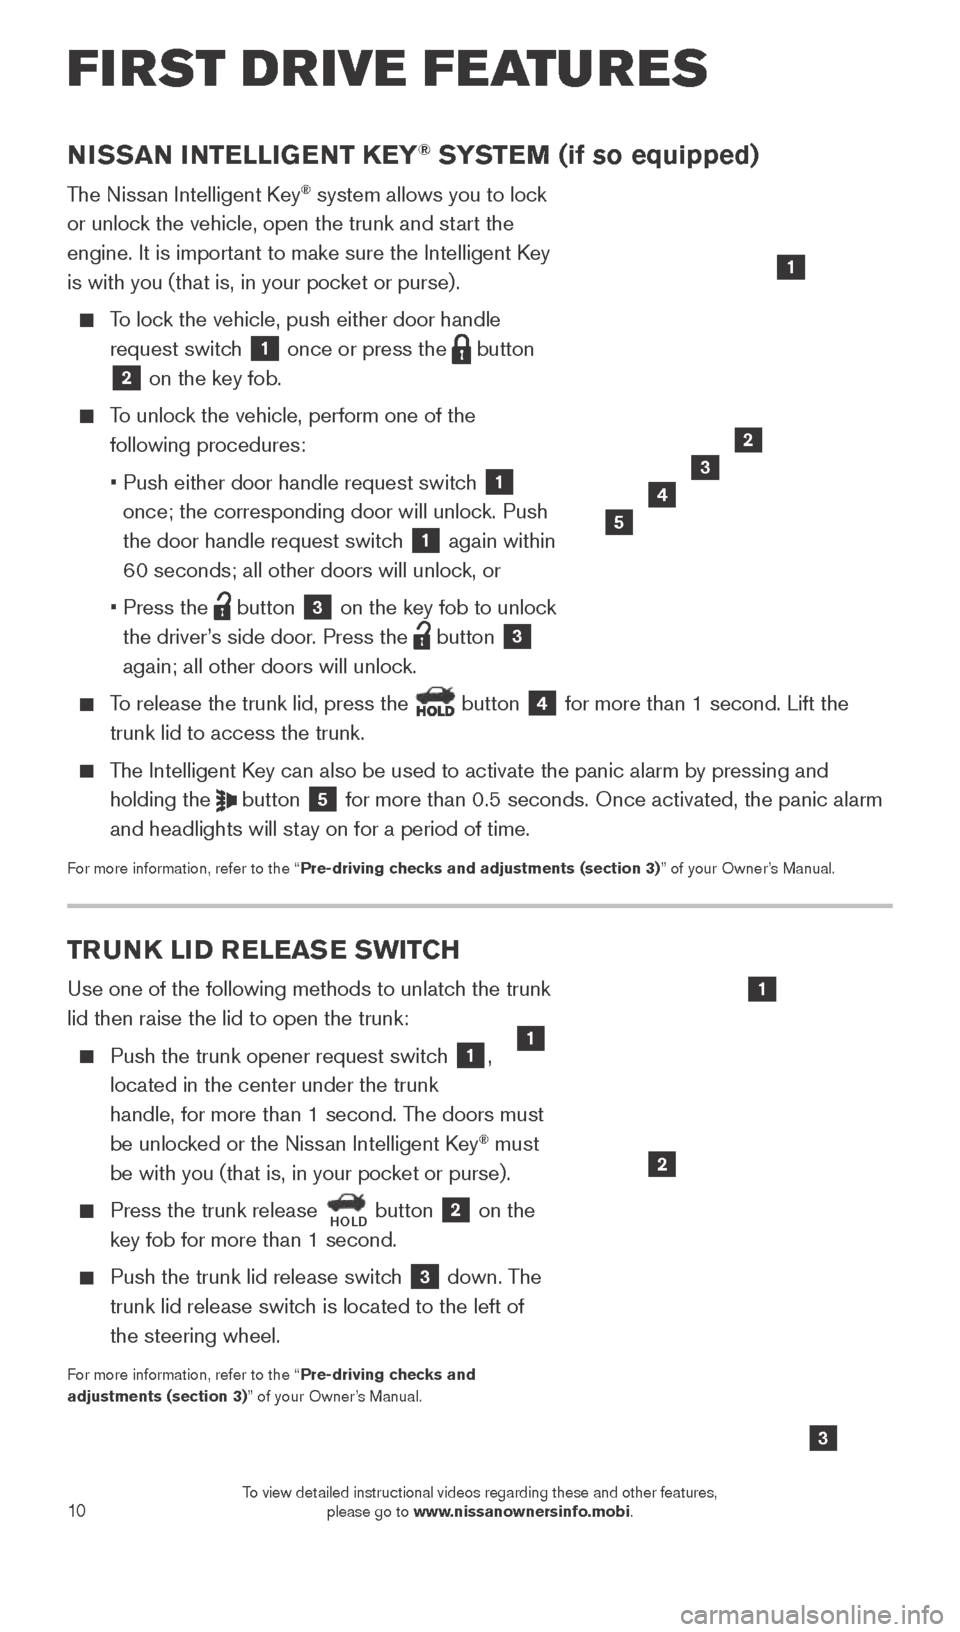
Use one of the following methods to unlatch the trunk
lid then raise the lid to open the trunk:
Push the trunk opener request switch 1,
located in the center under the trunk
handle, for more than 1 second. The doors must
be unlocked or the Nissan Intelligent Key
® must
be with you (that is, in your pocket or purse).
Press the trunk release HOLD button 2 on the
key fob for more than 1 second.
Push the trunk lid release switc h 3 down. The
trunk lid release switch is located to the left of
the steering wheel.
For more information, refer to the “Pre-driving checks and
adjustments (section 3)” of your Owner’s Manual.
3
NISSAN INTELLIGENT KEY® SYSTEM (if so equipped)
The Nissan Intelligent Key® system allows you to lock
or unlock the vehicle, open the trunk and start the
engine. It is important to make sure the Intelligent Key
is with you (that is, in your pocket or purse).
To lock the vehicle, push either door handle request switch
1 once or press the button
2 on the key fob.
To unlock the vehicle, perform one of the following procedures:
•
Push either door handle request switc
h
1
once; the corresponding door will unlock. Push
the door handle request switch
1 again within
60 seconds; all other doors will unlock, or
•
Press the button 3 on the key fob to unlock
the driver’s side door. Press the
button 3
again; all other doors will unlock.
To release the trunk lid, press the button 4 for more than 1 second. Lift the
trunk lid to access the trunk.
The Intelligent Key can also be used to activate the panic alarm by pressing and holding the
button 5 for more than 0.5 seconds. Once activated, the panic alarm
and headlights will stay on for a period of time.
For more information, refer to the “Pre-driving checks and adjustments (section 3)” of your Owner’s Manual.
1
2
3
4
2
5
1
FIRST DRIVE FEATURES
1
1938277_16c_Sentra_US_pQRG_050516.indd 105/6/16 10:28 AM
To view detailed instructional videos regarding these and other features, please go to www.nissanownersinfo.mobi.
Page 14 of 32
12
TURNING THE ENGINE OFF
For a Continuously Variable Transmission, apply the brake pedal, move the shift lever to the P (PARK) position, apply the parking brake and push the ignition switch.
For a manual transmission, apply the brake pedal, depress the clutch pedal, place the vehicle in 1 (FIRST) gear, apply the parking brake and turn the ignition off.
For more information, refer to the “Starting and driving (section 5)” of your Owner’s Manual.
HEADLIGHT CONTROL SWITCH
HEADLIGHT CONTROL
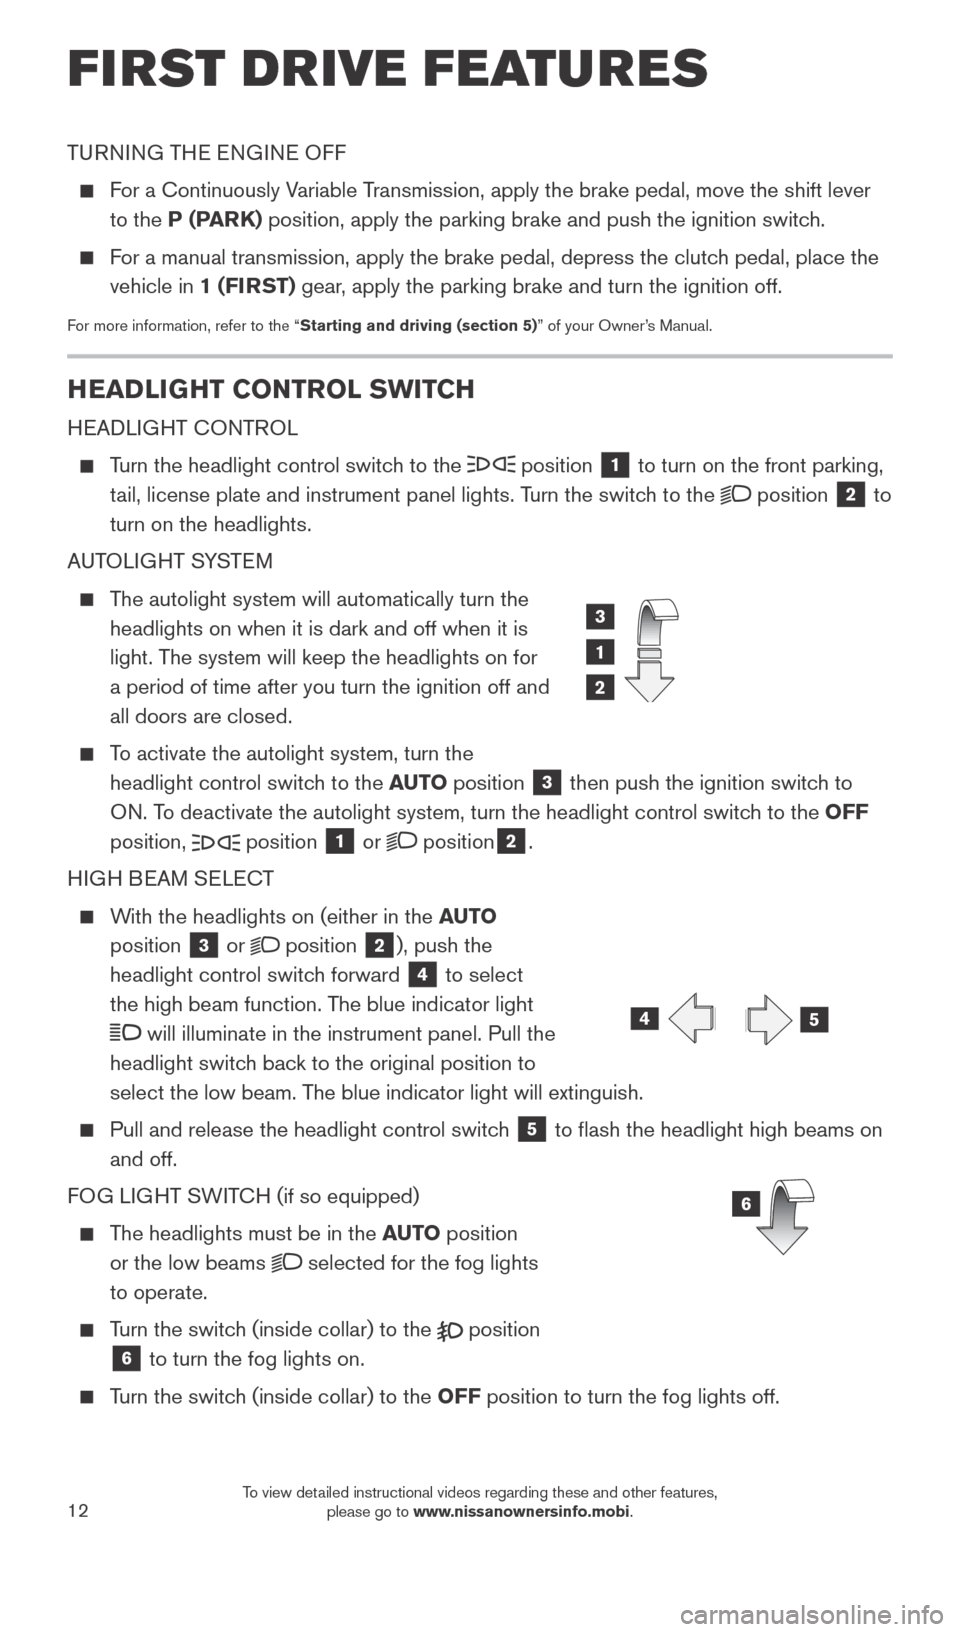
Turn the headlight control switch to the position 1 to turn on the front parking,
tail, license plate and instrument panel lights. Turn the switch to the
position 2 to
turn on the headlights.
AUTOLIGHT SYSTEM
The autolight system will automatically turn the headlights on when it is dark and off when it is
light. The system will keep the headlights on for
a period of time after you turn the ignition off and
all doors are closed.
To activate the autolight system, turn the headlight control switch to the AUTO position
3 then push the ignition switch to
ON. To deactivate the autolight system, turn the headlight control switch to the OFF
position,
position 1 or position2.
HIGH BEAM SELECT
With the headlights on (either in the AUTO
position
3 or position 2), push the
headlight control switch forward
4 to select
the high beam function. The blue indicator light
will illuminate in the instrument panel. Pull the
headlight switch back to the original position to
select the low beam. The blue indicator light will extinguish.
Pull and release the headlight control switc h 5 to flash the headlight high beams on
and off.
FOG LIGHT SWITCH (if so equipped)
The headlights must be in the AUTO position
or the low beams
selected for the fog lights
to operate.
Turn the switch (inside collar) to the position
6 to turn the fog lights on.
Turn the switch (inside collar) to the OFF position to turn the fog lights off.
1
2
3
6
45
FIRST DRIVE FEATURES
1938277_16c_Sentra_US_pQRG_050516.indd 125/6/16 10:28 AM
To view detailed instructional videos regarding these and other features, please go to www.nissanownersinfo.mobi.
Page 20 of 32
18
FIRST DRIVE FEATURES
INTELLIGENT CRUISE CONTROL (ICC) (if so equipped)
VEHICLE-TO-VEHICLE DISTANCE CONTROL MODE
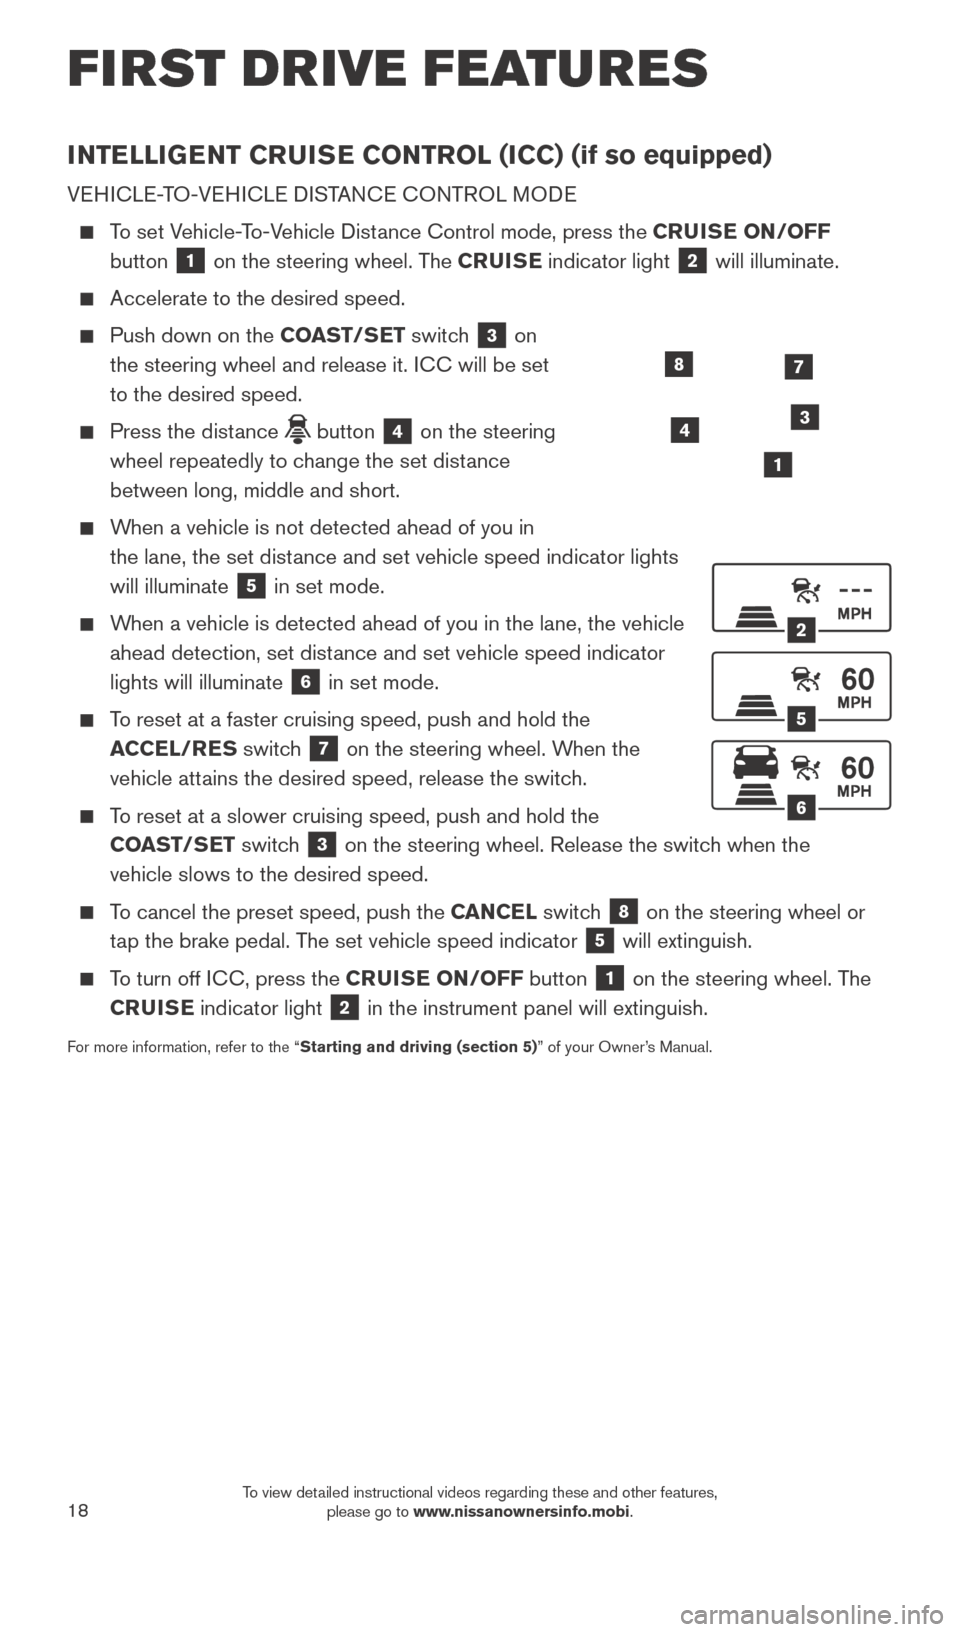
To set Vehicle-To-Vehicle Distance Control mode, press the CRUISE ON/OFF button
1 on the steering wheel. The CRUISE indicator light 2 will illuminate.
Accelerate to the desired speed.
Push down on the COAST/SET switch 3 on
the steering wheel and release it. ICC will be set
to the desired speed.
Press the dist ance button 4 on the steering
wheel repeatedly to change the set distance
between long, middle and short.
When a vehicle is not detected ahead of you in the lane, the set distance and set vehicle speed indicator lights
will illuminate
5 in set mode.
When a vehicle is detected ahead of you in the lane, the vehicle ahead detection, set distance and set vehicle speed indicator
lights will illuminate
6 in set mode.
To reset at a faster cruising speed, push and hold the ACCEL/RES switch
7 on the steering wheel. When the
vehicle attains the desired speed, release the switch.
To reset at a slower cruising speed, push and hold the COAST/SET switch
3 on the steering wheel. Release the switch when the
vehicle slows to the desired speed.
To cancel the preset speed, push the CANCEL switch 8 on the steering wheel or
tap the brake pedal. The set vehicle speed indicator
5 will extinguish.
To turn off ICC, press the CRUISE ON/OFF button 1 on the steering wheel. The
CRUISE indicator light
2 in the instrument panel will extinguish.
For more information, refer to the “Starting and driving (section 5)” of your Owner’s Manual.
2
5
6
1
4
87
3
1938277_16c_Sentra_US_pQRG_050516.indd 185/6/16 10:29 AM
To view detailed instructional videos regarding these and other features, please go to www.nissanownersinfo.mobi.
Page 29 of 32
27
HOMELINK® UNIVERSAL TRANSCEIVER (if so equipped)
The HomeLink® Universal Transceiver can learn and consolidate the functions of up to
three different hand-held transmitters, operating items such as garage doors, property
gates, outdoor and indoor lights or alarm systems.
To program the HomeLink® Universal Transceiver:
•
P
osition the handheld transceiver 1-3 in (26-76 mm) away from the HomeLink
surface, keeping the HomeLink indicator light in view.
•
Press and hold the desired HomeLink button and the handheld transmitter \
button
simultaneously until the HomeLink indicator light flashes slowly and then ra\
pidly.
•
B
oth buttons may be released when the indicator light flashes rapidly.
To verify the programing is complete, press and hold the HomeLink button \
and observe the indicator light:
•
A solid, continuous light indicates the programing is complete and the H\
omeLink
button will activate your device.
•
A blinking light that turns to a solid, continuous light after 2 seconds\
indicates
additional steps are required to complete the programing.
An additional person may make the remaining steps easier . To complete the
programing process:
•
At the receiver of the device that you are programing to the HomeLink sy\
stem, press
and release the “learn” or “smart” button (the name may var\
y by manufacturer
, but it
is usually located near where the hanging antenna wire is attached to the unit). You
have approximately 30 seconds to initiate the following step.
•
Press and hold the programed HomeLink button for 2 seconds and release.
You may have to repeat the previous two steps up to three times to comple\
te the programing process. HomeLink should now activate your device.
For more information, refer to the “Instruments and controls (section 2)” of your Owner’s Manual, the HomeLink
website at www.homelink.com or call 1-800-355-3515.
HOMELINK
1938277_16c_Sentra_US_pQRG_050516.indd 275/6/16 10:30 AM
To view detailed instructional videos regarding these and other features, please go to www.nissanownersinfo.mobi.