length NISSAN SENTRA 2020 Owner´s Manual
[x] Cancel search | Manufacturer: NISSAN, Model Year: 2020, Model line: SENTRA, Model: NISSAN SENTRA 2020Pages: 528, PDF Size: 3.56 MB
Page 42 of 528
WARNING
• Af ter adjustment, release the adjust-
ment button and try to move the
shoulder belt anchor up and down to
make sure it is securely fixed in
position.
• The shoulder belt anchor height
should be adjusted to the position
best for you. Failure to do so may re-
duce the effectiveness of the entire
restraint system and increase the
chance or severity of injury in an
accident.
SEAT BELT EXTENDERS
If, because of body size or driving position, it
is not possible to properly fit the lap/
shoulder belt and fasten it, an extender
that is compatible with the installed seat
belts is available for purchase. The ex-
tender adds approximately 8 in (200 mm)
of length and may be used for either the
driver or front passenger seating position.
It is recommended that you visit a NISSAN
dealer for assistance with purchasing an
extender if an extender is required.
WARNING
• Only NISSAN seat belt extenders,
made by the same company which
made the original equipment seat
belts, should be used with NISSAN
seat belts.
• Adults and children who can use the
standard seat belt should not use an
extender. Such unnecessary use
could result in serious personal injury
in the event of an accident.
• Never use seat belt extenders to in-
stall child restraints. If the child re-
straint is not secured properly, the
child could be seriously injured or
killed in a collision or a sudden stop.
SEAT BELT MAINTENANCE
• To clean the seat belt webbing, apply a
mild soap solution or any solution rec-
ommended for cleaning upholstery or
carpet. Then wipe with a cloth and allow
the seat belts to dry in the shade. Do not
allow the seat belts to retract until they
are completely dry.
• If dirt builds up in the shoulder belt
guide of the seat belt anchors, the seat
belts may retract slowly. Wipe the shoul-
der belt guide with a clean, dry cloth. •
Periodically check to see that the seat
belt and the metal components, such
as buckles, tongues, retractors, flexible
wires and anchors, work properly. If loose
parts, deterioration, cuts or other dam-
age on the webbing is found, the entire
seat belt assembly should be replaced.
1-20Safety-Seats, seat belts and supplemental restraint system
Page 111 of 528
Vehicle Settings
The vehicle settings allow the user to change the lighting and locking settings.
Menu itemResult
Lighting Displays the available option for lighting.
Light Off Delay (if so equipped) Allows user to change the length of time the exterior lights remain on.
Locking Displays the available locking options.
Selective Unlock Allows user to turn selective unlock on or off. When turned on, only the driver’s door is unlocked af ter the door un-
lock operation. When the door handle request switch on the driver’s or front passenger’s side door is pushed to be
unlocked, only the corresponding door is unlocked first. All the doors can be unlocked if the door unlock operation
is performed again within 5 seconds. When this item is turned off, all the doors will be unlocked af ter the door un-
lock operation is performed once.
Auto Door Unlock Displays the auto door unlock options.
Shif t to Park Doors will unlock when the vehicle is shif ted into P (Park).
IGN OFF Doors will unlock when the ignition is turned off.
OFF Doors will have to be manually unlocked.
Horn beeps on lock Allows user to turn answer back horn on or off. When turned on, the horn will chirp and the hazard indicators will
flash once when locking the vehicle with the Intelligent Key.
Wipers Displays the various wipers settings. For additional information, refer to “Wiper and washer switch” in this section.
Speed Dependent Allows the user to turn the speed dependent feature on or off.
Rear Door Alert Displays the available Rear Door Alert options. For additional information, refer to “Rear Door Alert” in this section.
Horn & Alert When selected, the alert is displayed and horn sounds.
Alert Only When selected, only the alert is displayed.
OFF When selected, no alert or horn will be active.
Instruments and controls2-21
Page 128 of 528
TPMS Setting
The TPMS settings menu allows the user to view or change the tire pressure units displayed in the vehicle information display.
Menu itemResult
TPMS Setting Displays available tire pressure settings.
Tire Pressure Unit Allows user to select the tire pressure units that will display in the vehicle information display.
Clock
Menu item Result
Clock Allows user to adjust the clock settings and time within the vehicle information display. Adjustments that can
be made include manually setting the time, 12H/24H format, and time zone (if so equipped).
The clock can also be set within the center display. For additional information, refer to the separate
NissanConnect® Owner’s Manual.
Vehicle Settings
The vehicle settings allow the user to change the settings for lights, wipers, locking, keys, and other vehicle settings.
Menu item Result
Lighting Displays the available lighting options.
Welcome Headlight (if so equipped) Allows user to turn the welcome light on or off.
Auto Room Lamp Allows user to turn the auto room lamp on or off.
Light Off Delay (if so equipped) Allows user to change the length of time the exterior lights remain on.
Turn indicator (if so equipped) Displays the available turn indicator options.
3 Flashes Allows user to turn 3 flash pass feature on or off.
Continuous Allows user to adjust the continuous feature.
Locking Displays the available locking options.
Ext. Door Switch Allows user to turn the exterior door switch on or off. When turned on, the request switch on the door is acti-
vated.
2-38Instruments and controls
Page 290 of 528
WARNING
• Do not leave children or adults who
would normally require the assis-
tance of others alone in your vehicle.
Pets should also not be lef t alone.
They could accidentally injure them-
selves or others through inadvertent
operation of the vehicle. Also, on hot,
sunny days, temperatures in a closed
vehicle could quickly become high
enough to cause severe or possibly
fatal injuries to people or animals.
• Closely supervise children when they
are around cars to prevent them
from playing and becoming locked in
the trunk where they could be seri-
ously injured. Keep the car locked,
with the rear seatback and trunk lid
securely latched when not in use, and
prevent children's access to car keys.
EXHAUST GAS (carbon monoxide)
WARNING
• Do not breathe exhaust gases; they
contain colorless and odorless car-
bon monoxide. Carbon monoxide is
dangerous. It can cause uncon-
sciousness or death. •
If you suspect that exhaust fumes
are entering the vehicle, drive with all
windows fully open, and have the ve-
hicle inspected immediately.
• Do not run the engine in closed
spaces such as a garage.
• Do not park the vehicle with the en-
gine running for any extended length
of time.
• Keep the rear vent windows, lif t-
gates, doors and trunk lids (if so
equipped) closed while driving, oth-
erwise exhaust gases could be
drawn into the passenger compart-
ment. If you must drive with one of
these open, follow these precau-
tions:
1. Open all the windows.
2. Set the
air recirculation but-
ton to off and the fan control dial
to high to circulate the air.
• If electrical wiring or other cable con-
nections must pass to a trailer
through the seal on the trunk lid or
the body, follow the manufacturer's
recommendation to prevent carbon
monoxide entry into the vehicle. •
The exhaust system and body should
be inspected by a qualified mechanic
whenever:
a. The vehicle is raised for service.
b. You suspect that exhaust fumes are entering into the passenger
compartment.
c. You notice a change in the sound of the exhaust system.
d. You have had an accident involv- ing damage to the exhaust sys-
tem, underbody, or rear of the
vehicle.
THREE-WAY CATALYST
The three-way catalyst is an emission con-
trol device installed in the exhaust system.
Exhaust gases in the three-way catalyst
are burned at high temperatures to help
reduce pollutants.
WARNING
• The exhaust gas and the exhaust
system are very hot. Keep people,
animals or flammable materials
away from the exhaust system
components.
PRECAUTIONS WHEN STARTING AND
DRIVING
5-4Starting and driving
Page 505 of 528
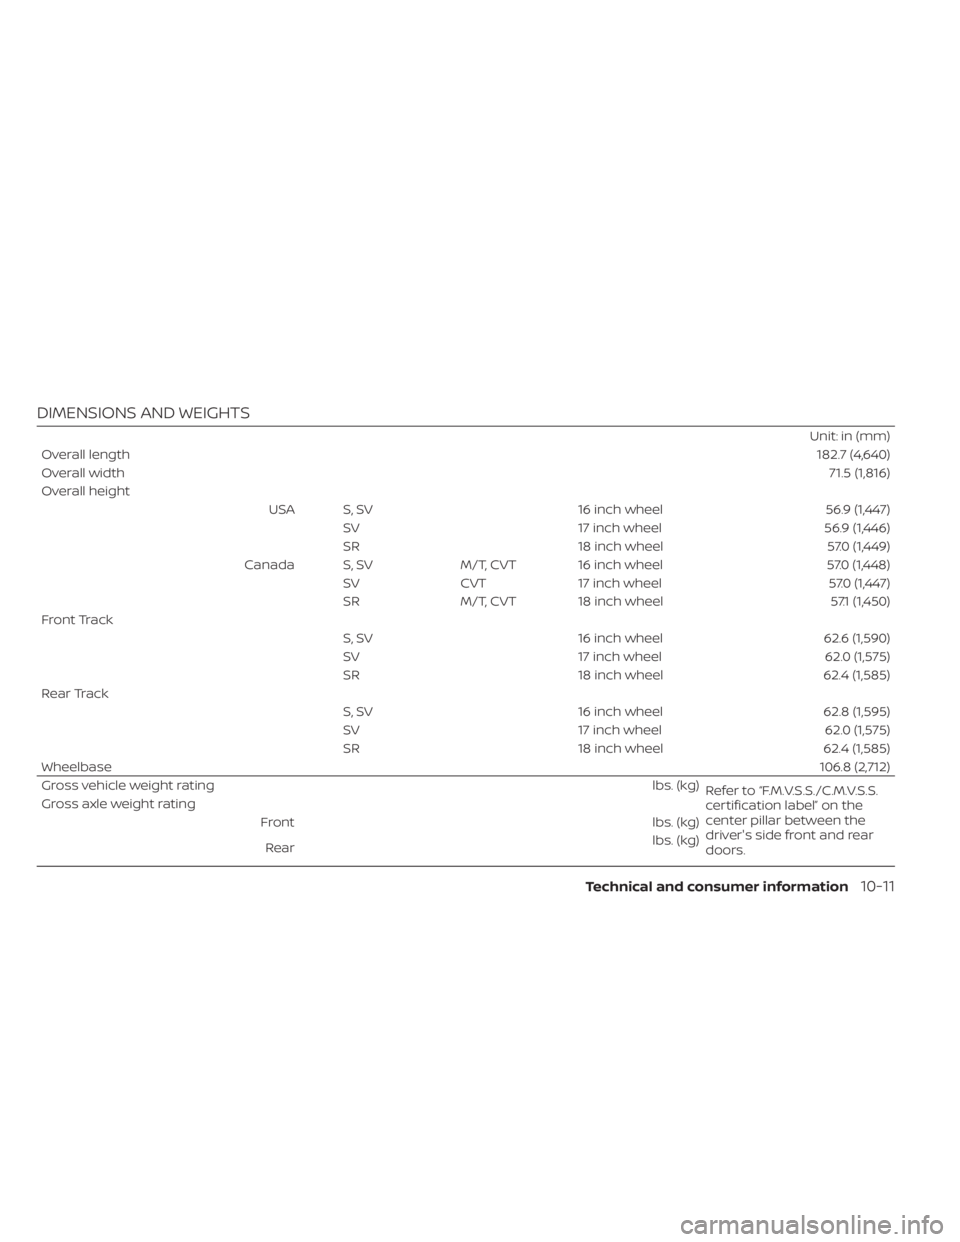
DIMENSIONS AND WEIGHTS
Unit: in (mm)
Overall length 182.7 (4,640)
Overall width 71.5 (1,816)
Overall height USA S, SV 16 inch wheel 56.9 (1,447)SV 17 inch wheel 56.9 (1,446)
SR 18 inch wheel 57.0 (1,449)
Canada S, SV M/T, CVT 16 inch wheel 57.0 (1,448) SV CVT 17 inch wheel 57.0 (1,447)
SR M/T, CVT 18 inch wheel 57.1 (1,450)
Front Track S, SV 16 inch wheel 62.6 (1,590)
SV 17 inch wheel 62.0 (1,575)
SR 18 inch wheel 62.4 (1,585)
Rear Track S, SV 16 inch wheel 62.8 (1,595)
SV 17 inch wheel 62.0 (1,575)
SR 18 inch wheel 62.4 (1,585)
Wheelbase 106.8 (2,712)
Gross vehicle weight rating lbs. (kg)
Refer to “F.M.V.S.S./C.M.V.S.S.
certification label” on the
center pillar between the
driver's side front and rear
doors.
Gross axle weight rating
Front lbs. (kg)
Rear lbs. (kg)
Technical and consumer information10-11
Page 508 of 528
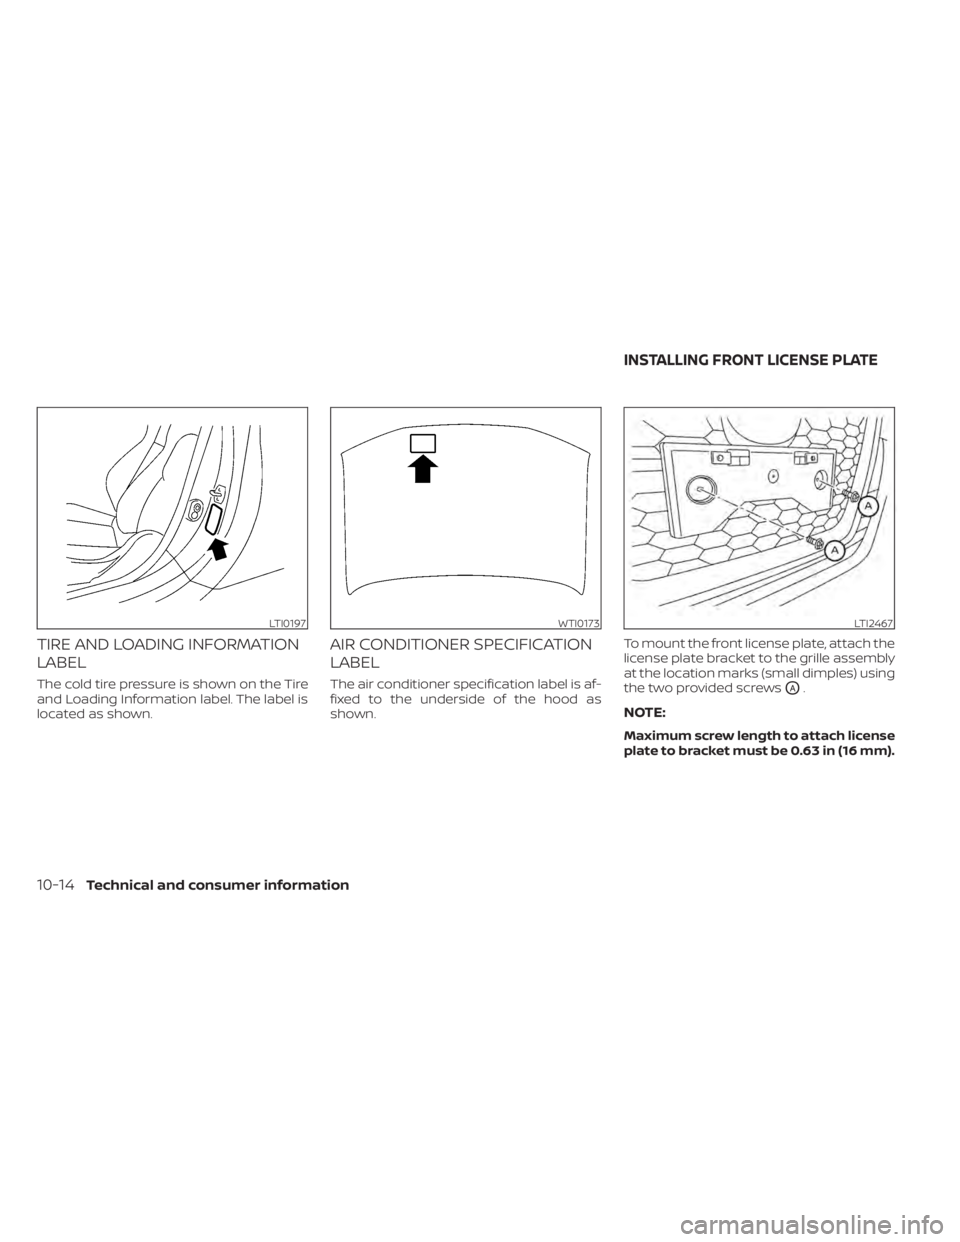
TIRE AND LOADING INFORMATION
LABEL
The cold tire pressure is shown on the Tire
and Loading Information label. The label is
located as shown.
AIR CONDITIONER SPECIFICATION
LABEL
The air conditioner specification label is af-
fixed to the underside of the hood as
shown.To mount the front license plate, attach the
license plate bracket to the grille assembly
at the location marks (small dimples) using
the two provided screwsOA.
NOTE:
Maximum screw length to attach license
plate to bracket must be 0.63 in (16 mm).
LTI0197WTI0173LTI2467
INSTALLING FRONT LICENSE PLATE
10-14Technical and consumer information