battery NISSAN SENTRA 2021 User Guide
[x] Cancel search | Manufacturer: NISSAN, Model Year: 2021, Model line: SENTRA, Model: NISSAN SENTRA 2021Pages: 528, PDF Size: 3.51 MB
Page 146 of 528
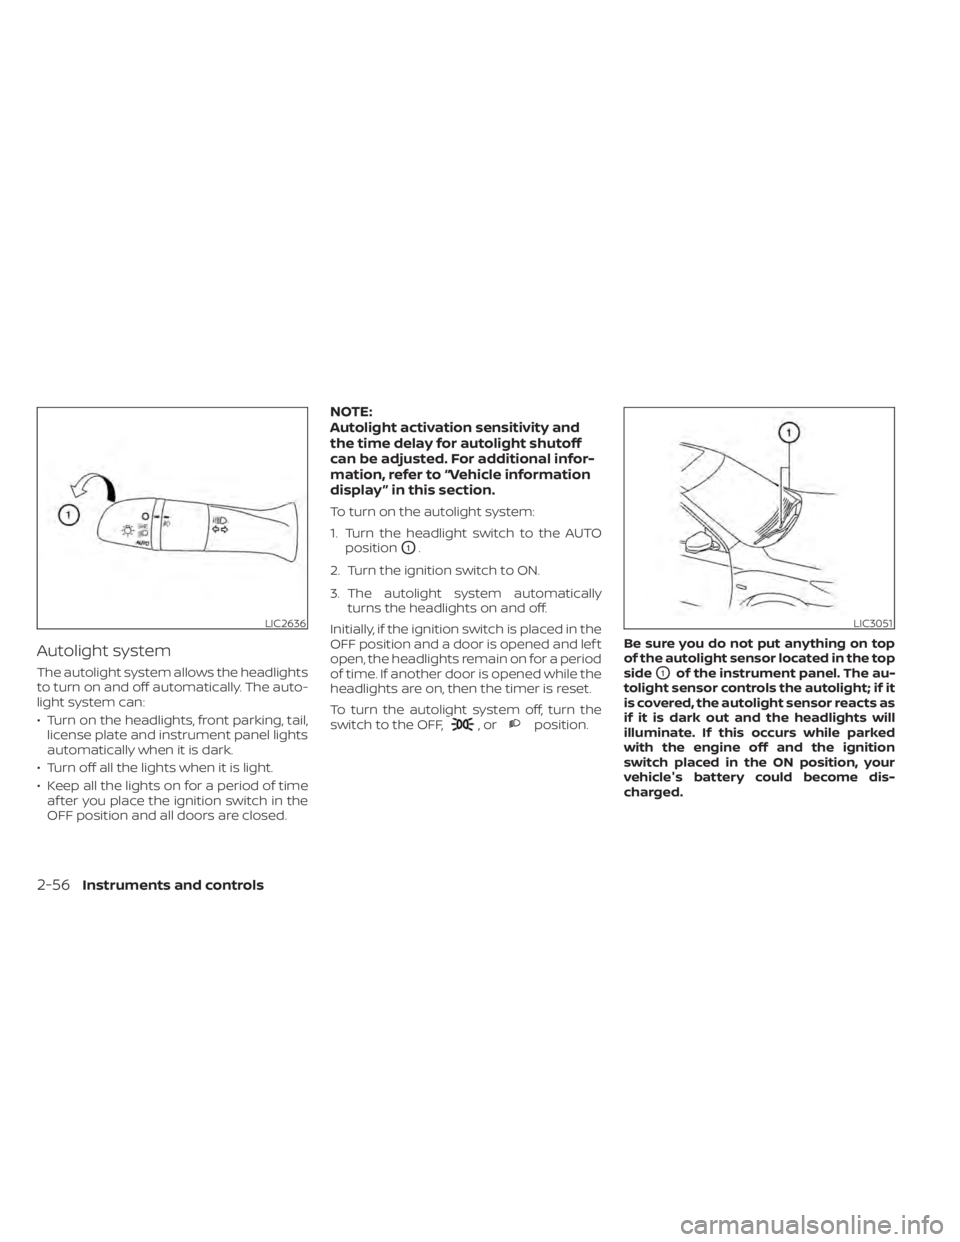
Autolight system
The autolight system allows the headlights
to turn on and off automatically. The auto-
light system can:
• Turn on the headlights, front parking, tail,license plate and instrument panel lights
automatically when it is dark.
• Turn off all the lights when it is light.
• Keep all the lights on for a period of time af ter you place the ignition switch in the
OFF position and all doors are closed.
NOTE:
Autolight activation sensitivity and
the time delay for autolight shutoff
can be adjusted. For additional infor-
mation, refer to “Vehicle information
display ” in this section.
To turn on the autolight system:
1. Turn the headlight switch to the AUTO position
O1.
2. Turn the ignition switch to ON.
3. The autolight system automatically turns the headlights on and off.
Initially, if the ignition switch is placed in the
OFF position and a door is opened and lef t
open, the headlights remain on for a period
of time. If another door is opened while the
headlights are on, then the timer is reset.
To turn the autolight system off, turn the
switch to the OFF,
,orposition. Be sure you do not put anything on top
of the autolight sensor located in the top
side
O1of the instrument panel. The au-
tolight sensor controls the autolight; if it
is covered, the autolight sensor reacts as
if it is dark out and the headlights will
illuminate. If this occurs while parked
with the engine off and the ignition
switch placed in the ON position, your
vehicle's battery could become dis-
charged.
LIC3051
2-56Instruments and controls
Page 149 of 528
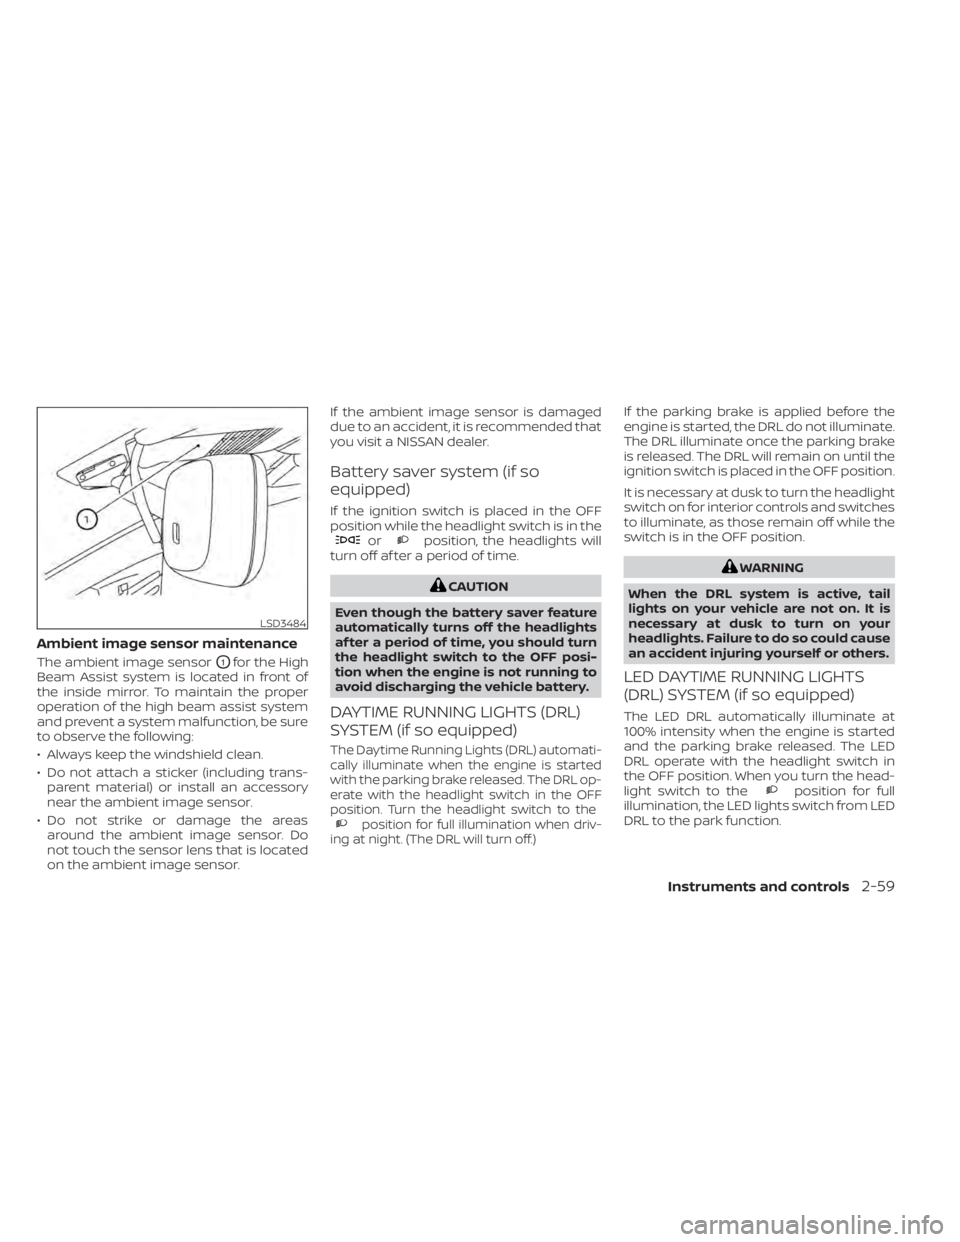
Ambient image sensor maintenance
The ambient image sensorO1for the High
Beam Assist system is located in front of
the inside mirror. To maintain the proper
operation of the high beam assist system
and prevent a system malfunction, be sure
to observe the following:
• Always keep the windshield clean.
• Do not attach a sticker (including trans- parent material) or install an accessory
near the ambient image sensor.
• Do not strike or damage the areas around the ambient image sensor. Do
not touch the sensor lens that is located
on the ambient image sensor. If the ambient image sensor is damaged
due to an accident, it is recommended that
you visit a NISSAN dealer.
Battery saver system (if so
equipped)
If the ignition switch is placed in the OFF
position while the headlight switch is in the
orposition, the headlights will
turn off af ter a period of time.
position for full illumination when driv-
ing at night. (The DRL will turn off.)
If the parking brake is applied before the
engine is started, the DRL do not illuminate.
The DRL illuminate once the parking brake
is released. The DRL will remain on until the
ignition switch is placed in the OFF position.
It is necessary at dusk to turn the headlight
switch on for interior controls and switches
to illuminate, as those remain off while the
switch is in the OFF position.
position for full
illumination, the LED lights switch from LED
DRL to the park function.
LSD3484
Page 152 of 528
WARNING
Do not disassemble the horn. Doing so
could affect proper operation of the
supplemental front air bag system.
Tampering with the supplemental
front air bag system may result in seri-
ous personal injury.
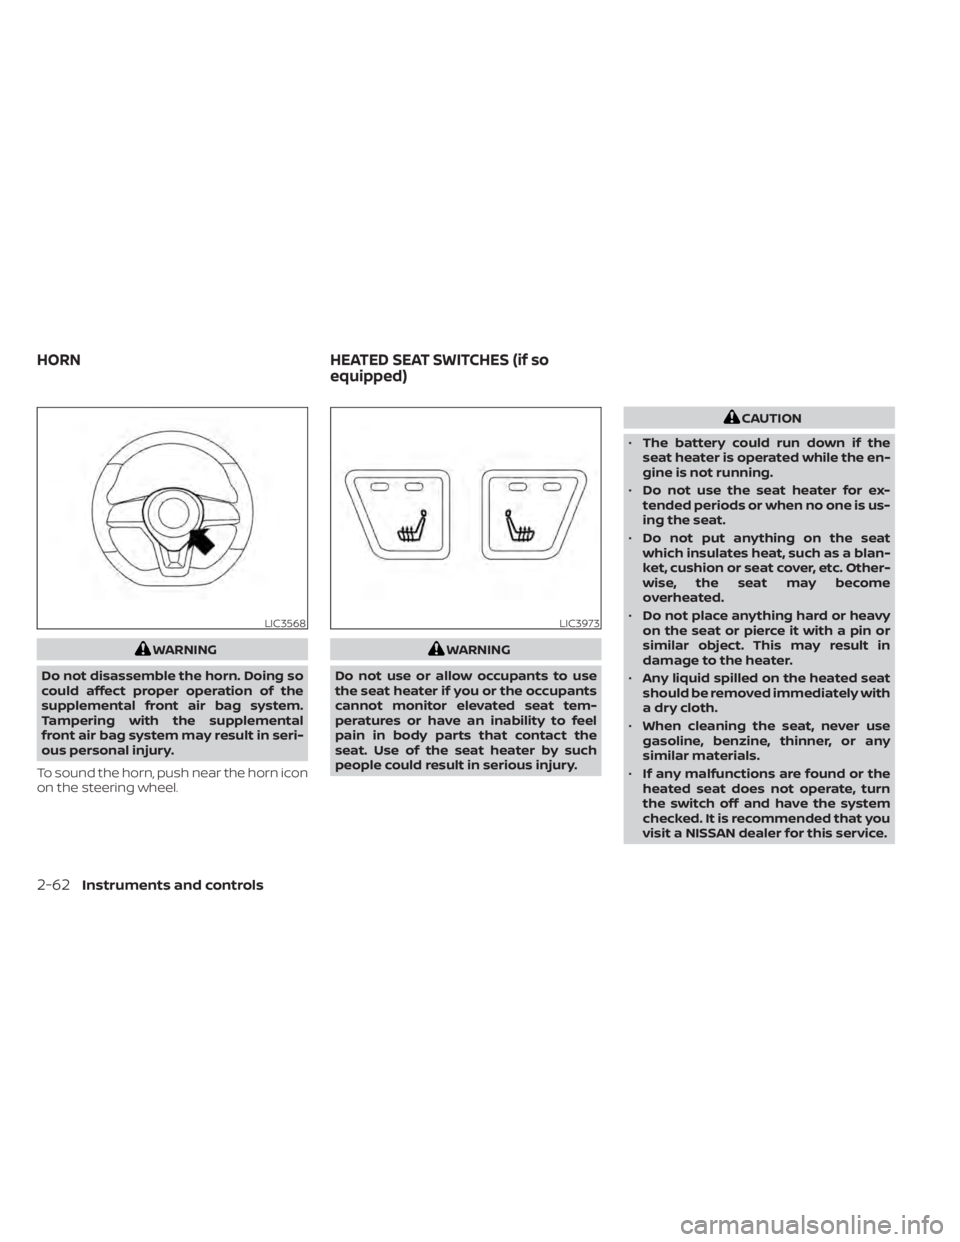
To sound the horn, push near the horn icon
on the steering wheel.
CAUTION
• The battery could run down if the
seat heater is operated while the en-
gine is not running.
• Do not use the seat heater for ex-
tended periods or when no one is us-
ing the seat.
• Do not put anything on the seat
which insulates heat, such as a blan-
ket, cushion or seat cover, etc. Other-
wise, the seat may become
overheated.
• Do not place anything hard or heavy
on the seat or pierce it with a pin or
similar object. This may result in
damage to the heater.
• Any liquid spilled on the heated seat
should be removed immediately with
a dry cloth.
• When cleaning the seat, never use
gasoline, benzine, thinner, or any
similar materials.
• If any malfunctions are found or the
heated seat does not operate, turn
the switch off and have the system
checked. It is recommended that you
visit a NISSAN dealer for this service.
LIC3973
HORN HEATED SEAT SWITCHES (if so
equipped)
Page 162 of 528
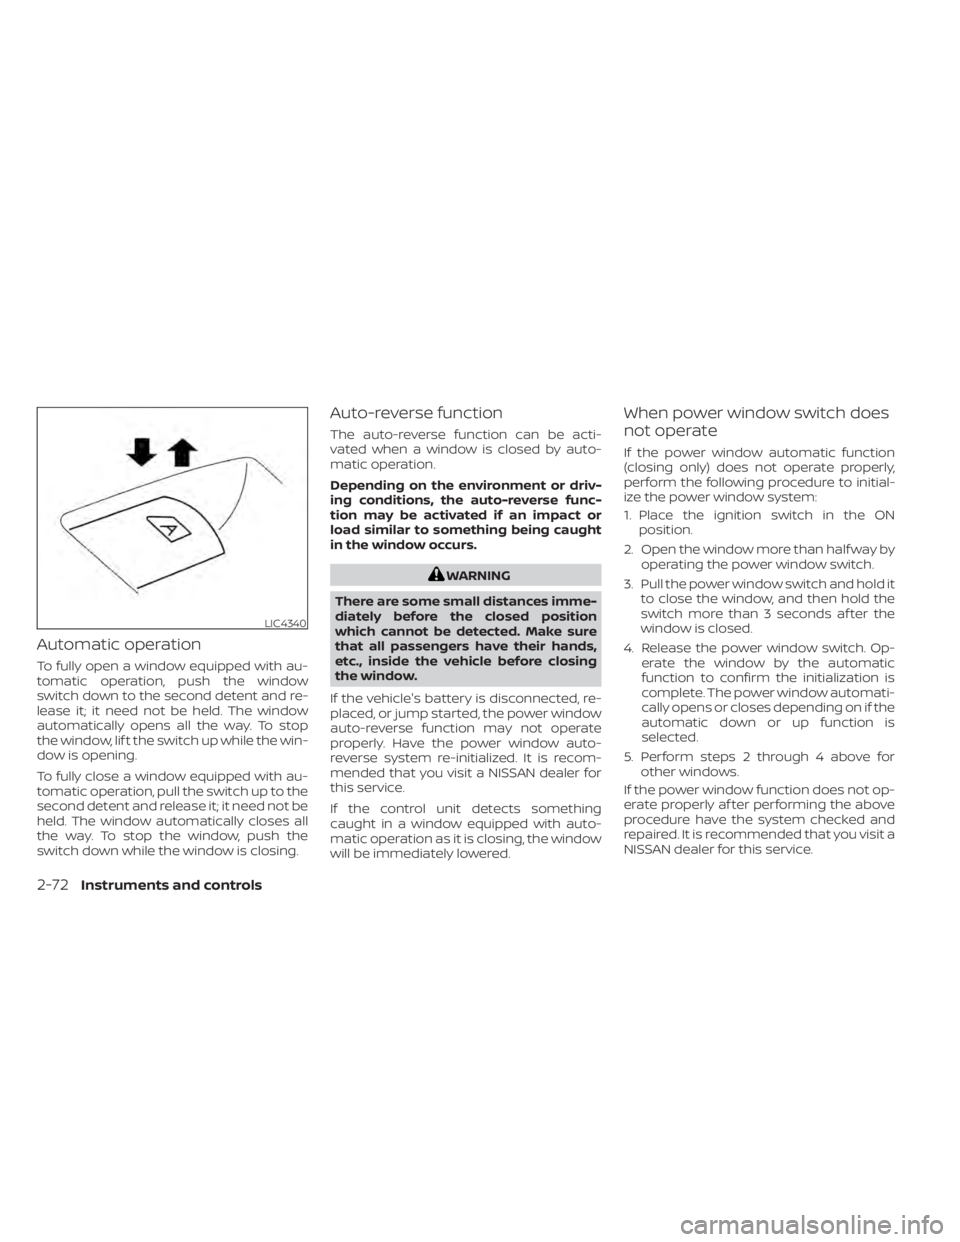
Automatic operation
To fully open a window equipped with au-
tomatic operation, push the window
switch down to the second detent and re-
lease it; it need not be held. The window
automatically opens all the way. To stop
the window, lif t the switch up while the win-
dow is opening.
To fully close a window equipped with au-
tomatic operation, pull the switch up to the
second detent and release it; it need not be
held. The window automatically closes all
the way. To stop the window, push the
switch down while the window is closing.
Auto-reverse function
The auto-reverse function can be acti-
vated when a window is closed by auto-
matic operation.
Depending on the environment or driv-
ing conditions, the auto-reverse func-
tion may be activated if an impact or
load similar to something being caught
in the window occurs.
WARNING
There are some small distances imme-
diately before the closed position
which cannot be detected. Make sure
that all passengers have their hands,
etc., inside the vehicle before closing
the window.
If the vehicle's battery is disconnected, re-
placed, or jump started, the power window
auto-reverse function may not operate
properly. Have the power window auto-
reverse system re-initialized. It is recom-
mended that you visit a NISSAN dealer for
this service.
If the control unit detects something
caught in a window equipped with auto-
matic operation as it is closing, the window
will be immediately lowered.
When power window switch does
not operate
If the power window automatic function
(closing only) does not operate properly,
perform the following procedure to initial-
ize the power window system:
1. Place the ignition switch in the ON position.
2. Open the window more than half way by operating the power window switch.
3. Pull the power window switch and hold it to close the window, and then hold the
switch more than 3 seconds af ter the
window is closed.
4. Release the power window switch. Op- erate the window by the automatic
function to confirm the initialization is
complete. The power window automati-
cally opens or closes depending on if the
automatic down or up function is
selected.
5. Perform steps 2 through 4 above for other windows.
If the power window function does not op-
erate properly af ter performing the above
procedure have the system checked and
repaired. It is recommended that you visit a
NISSAN dealer for this service.
LIC4340
2-72Instruments and controls
Page 165 of 528
NOTE:
The step lights (if so equipped) illumi-
nate when the driver and passenger
doors are opened regardless of the inte-
rior light switch position. These lights
will turn off automatically af ter a period
of time while doors are open to prevent
the battery from becoming discharged.
CAUTION
Do not use for extended periods of time
with the engine stopped. This could re-
sult in a discharged battery.
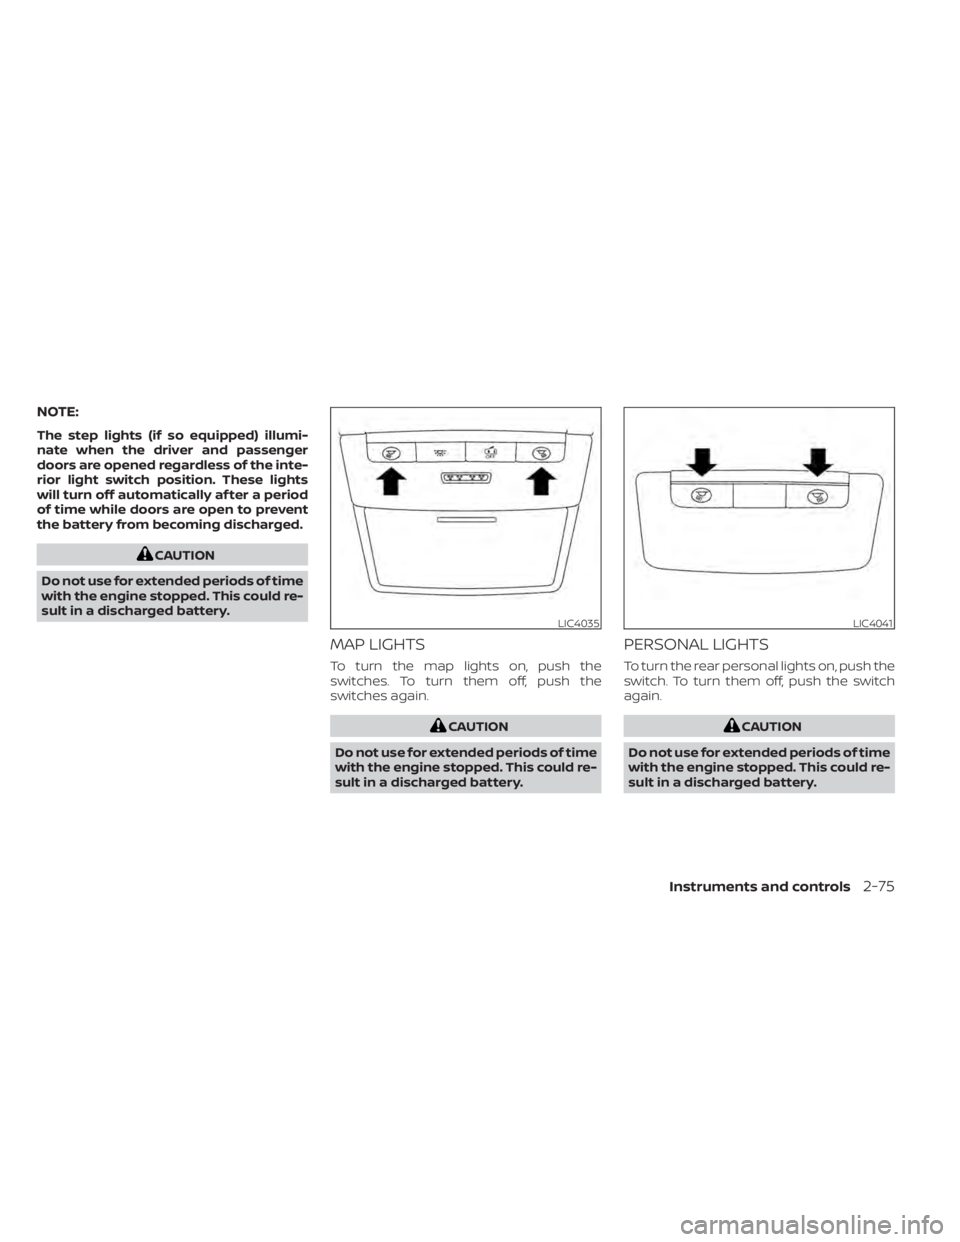
MAP LIGHTS
To turn the map lights on, push the
switches. To turn them off, push the
switches again.
LIC4041
Page 166 of 528
The light illuminates when the trunk lid is
opened. When the trunk lid is closed, the
light goes off.
The light will go off af ter a period of time if
the trunk lid is lef t open, unless the ignition
switch is placed in the ON position.
For additional information, refer to “Exterior
and interior lights” in the “Do-it-yourself ”
section of this manual.The HomeLink® Universal Transceiver pro-
vides a convenient way to consolidate the
functions of up to three individual hand-
held transmitters into one built-in device.
HomeLink® Universal Transceiver:
• Will operate most radio frequency de-
vices such as garage doors, gates, home
and office lighting, entry door locks and
security systems.
• Is powered by your vehicle's battery. No separate batteries are required. If the ve-
hicle's battery is discharged or is discon-
nected, HomeLink® will retain all pro-
gramming.
When the HomeLink® Universal Trans-
ceiver is programmed, retain the original
transmitter for future programming pro-
cedures (Example: new vehicle pur-
chases). Upon sale of the vehicle, the
programmed HomeLink® Universal
Transceiver buttons should be erased for
security purposes. For additional infor-
mation, refer to “Programming
HomeLink®” in this section.WARNING
• Your vehicle's engine should be
turned off while programming the
HomeLink® Universal Transceiver. Do
not breathe exhaust gases; they con-
tain colorless and odorless carbon
monoxide. Carbon monoxide is dan-
gerous. It can cause unconscious-
ness or death.
• Do not use the HomeLink® Universal
Transceiver with any garage door
opener that lacks safety stop and re-
verse features as required by federal
safety standards. (These standards
became effective for opener models
manufactured af ter April 1, 1982). A
garage door opener which cannot
detect an object in the path of a clos-
ing garage door and then automati-
cally stop and reverse, does not meet
current federal safety standards. Us-
ing a garage door opener without
these features increases the risk of
serious injury or death.
TRUNK LIGHT HOMELINK® UNIVERSAL
TRANSCEIVER (if so equipped)
2-76Instruments and controls
Page 167 of 528
•During the programming procedure
your garage door or security gate will
open and close (if the transmitter is
within range). Make sure that people
or objects are clear of the garage
door, gate, etc. that you are
programming.
PROGRAMMING HOMELINK®
If you have any questions or are having
difficulty programming your HomeLink®
buttons, refer to the HomeLink® web site at:
www.homelink.com or call 1-800-355-3515.
NOTE:
Place the ignition switch in the ON posi-
tion (without starting the engine) when
programming HomeLink®. It is also rec-
ommended that a new battery be placed
in the hand-held transmitter of the de-
vice being programmed to HomeLink®
for quicker programming and accurate
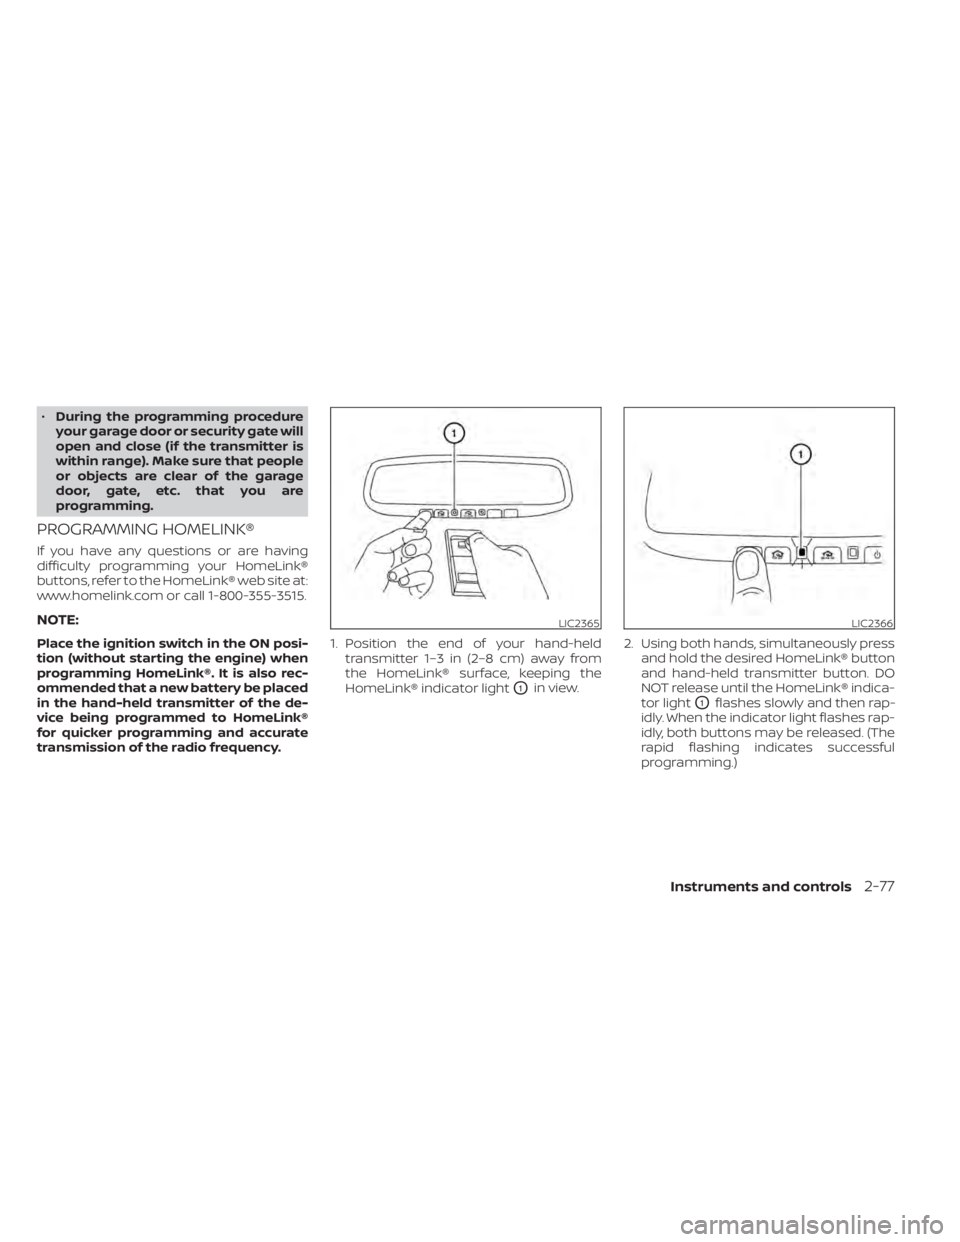
transmission of the radio frequency. 1. Position the end of your hand-held
transmitter 1–3 in (2–8 cm) away from
the HomeLink® surface, keeping the
HomeLink® indicator light
O1in view. 2. Using both hands, simultaneously press
and hold the desired HomeLink® button
and hand-held transmitter button. DO
NOT release until the HomeLink® indica-
tor light
O1flashes slowly and then rap-
idly. When the indicator light flashes rap-
idly, both buttons may be released. (The
rapid flashing indicates successful
programming.)
LIC2365LIC2366
Page 169 of 528
2. Using both hands, simultaneously pressand hold the desired HomeLink® button
and the hand-held transmitter button.
During training, your hand-held trans-
mitter may automatically stop transmit-
ting. Continue to press and hold the de-
sired HomeLink® button while you press
and re-press (“cycle”) your hand-held
transmitter every 2 seconds until the
frequency signal has been learned. The
HomeLink® indicator light will flash
slowly and then rapidly af ter several
seconds upon successful training. DO
NOT release until the HomeLink® indica-
tor light flashes slowly and then rapidly.
When the indicator light flashes rapidly,
both buttons may be released. The rapid
flashing indicates successful training.
Proceed with “Programming
HomeLink®” step 3 to complete.
If the device was unplugged during the
programming procedure, remember to
plug it back in when programming is
completed.
OPERATING THE HOMELINK®
UNIVERSAL TRANSCEIVER
The HomeLink® Universal Transceiver, af ter
it is programmed, can be used to activate
the programmed device. To operate, sim-
ply press and release the appropriate pro- grammed HomeLink® Universal Trans-
ceiver button. The amber indicator light will
illuminate while the signal is being trans-
mitted.
For convenience, the hand-held transmit-
ter of the device may also be used at any
time.
PROGRAMMING TROUBLE-
DIAGNOSIS
If the HomeLink® does not quickly learn the
hand-held transmitter information:
• Replace the hand-held transmitter bat-
teries with new batteries.
• Position the hand-held transmitter with its battery area facing away from the
HomeLink® surface.
• Press and hold both the HomeLink® and hand-held transmitter buttons without
interruption.
• Position the hand-held transmitter1-3 inches (26 - 76 mm) away from the
HomeLink® surface. Hold the transmitter
in that position for up to 15 seconds. If
HomeLink® is not programmed within
that time, try holding the transmitter in
another position – keeping the indicator
light in view at all times. If you have any questions or are having
difficulty programming your HomeLink®
buttons, refer to the HomeLink® web site at:
www.homelink.com or call 1-800-355-3515.
CLEARING THE PROGRAMMED
INFORMATION
The following procedure clears the pro-
grammed information from both buttons.
Individual buttons cannot be cleared. How-
ever, individual buttons can be repro-
grammed. For additional information, refer
to “Reprogramming a single HomeLink®
button” in this section.
To clear all programming:
1. Press and hold the two outer HomeLink®
buttons until the indicator light begins to
flash in approximately 10 seconds. Do
not hold for longer than 20 seconds.
2. Release both buttons.
HomeLink® is now in the programming
mode and can be programmed at any
time beginning with “Programming
HomeLink®” - Step 1.
Instruments and controls2-79
Page 178 of 528
CAUTION
• Be sure to carry the Intelligent Key
with you when operating the vehicle.
• Never leave the Intelligent Key in the
vehicle when you leave the vehicle.
The Intelligent Key is always communicat-
ing with the vehicle as it receives radio
waves. The Intelligent Key system trans-
mits weak radio waves. Environmental
conditions may interfere with the opera-
tion of the Intelligent Key system under the
following operating conditions:
• When operating near a location where strong radio waves are transmitted, such
as a TV tower, power station and broad-
casting station.
• When in possession of wireless equip- ment, such as a cellular telephone, trans-
ceiver or a CB radio.
• When the Intelligent Key is in contact with or covered by metallic materials.
• When any type of radio wave remote con- trol is used nearby.
• When the Intelligent Key is placed near an electric appliance such as a personal
computer.
• When the vehicle is parked near a parking meter. In such cases, correct the operating condi-
tions before using the Intelligent Key func-
tion or use the mechanical key.
Although the life of the battery varies de-
pending on the operating conditions, the
battery’s life is approximately two years. If
the battery is discharged, replace it with a
new one.
When the Intelligent Key battery is low, the
Intelligent Key system warning (
) will
show on the vehicle information display af-
ter the ignition switch is placed in the ON
position.
Since the Intelligent Key is continuously re-
ceiving radio waves, if the key is lef t near
equipment which transmits strong radio
waves, such as signals from a TV and per-
sonal computer, the battery life may be-
come shorter.
For information regarding replacement of
a battery, refer to “Battery replacement” in
the “Do-it-yourself ” section of this manual.
As many as four Intelligent Keys can be
registered and used with one vehicle. For
information about the purchase and use of
additional Intelligent Keys, it is recom-
mended that you visit a NISSAN dealer.
Page 179 of 528
If an Intelligent Key is lost or stolen, NISSAN
recommends erasing the ID code of that
Intelligent Key from the vehicle. This may
prevent the unauthorized use of the Intelli-
gent Key to operate the vehicle. For infor-
mation regarding the erasing procedure, it
is recommended that you visit a NISSAN
dealer.
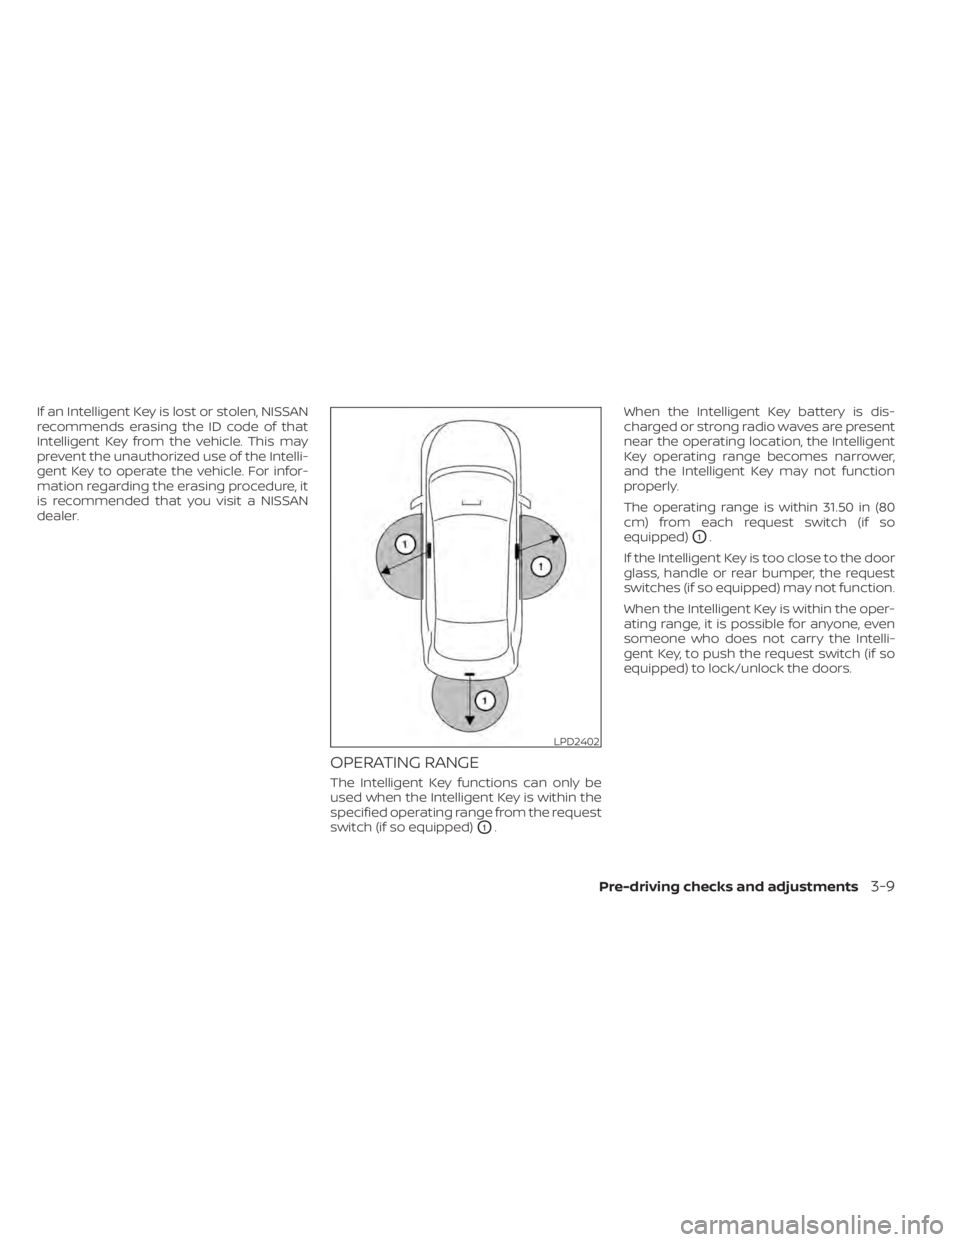
OPERATING RANGE
The Intelligent Key functions can only be
used when the Intelligent Key is within the
specified operating range from the request
switch (if so equipped)
O1.When the Intelligent Key battery is dis-
charged or strong radio waves are present
near the operating location, the Intelligent
Key operating range becomes narrower,
and the Intelligent Key may not function
properly.
The operating range is within 31.50 in (80
cm) from each request switch (if so
equipped)
O1.
If the Intelligent Key is too close to the door
glass, handle or rear bumper, the request
switches (if so equipped) may not function.
When the Intelligent Key is within the oper-
ating range, it is possible for anyone, even
someone who does not carry the Intelli-
gent Key, to push the request switch (if so
equipped) to lock/unlock the doors.
LPD2402