wheel bolts NISSAN TIIDA 2010 Service User Guide
[x] Cancel search | Manufacturer: NISSAN, Model Year: 2010, Model line: TIIDA, Model: NISSAN TIIDA 2010Pages: 3745, PDF Size: 73.67 MB
Page 2446 of 3745

ENGINE STAND SETTINGEM-87
< DISASSEMBLY AND ASSEMBLY > [HR16DE]
C
D
E
F
G H
I
J
K L
M A
EM
NP
O
DISASSEMBLY AND ASSEMBLY
ENGINE STAND SETTING
SettingINFOID:0000000005398078
NOTE:
Explained here is how to disassemble with engine stand supporting transmission surface. When using differ-
ent type of engine stand, note with difference in steps and etc.
1. Remove the engine and the transaxle assembly from
the vehicle, and separate the transaxle from the
engine. Refer to EM-82, "
Exploded View".
2. Remove clutch cover and clutch disc (if equipped). Refer to CL-16, "
Removal and Installation".
3. Remove flywheel or driveplate. • Secure flywheel or driveplate with Tool, and remove bolts.
CAUTION:
• Never disassemble flywheel.
• Never place flywheel or driveplate with signal plate facing down.
• When handling signal plate, take car e not to damage or scratch it.
• Handle signal plate in a manner that prevents it from becoming magnetized.
4. Lift the engine with a hoist to install it onto widely use engine stand. CAUTION:
• Use the engine stand that has a load capacity [approximately 135 kg (298 lb) or more] large
enough for supporting the engine weight.
• If the load capacity of stand is not adequate, remove the following parts beforehand to reduce the poten-
tial risk of overturning stand.
- Intake manifold: Refer to EM-28, "
Exploded View".
- Exhaust manifold: Refer to EM-31, "
Exploded View".
- Rocker cover: Refer to EM-46, "
Exploded View".
NOTE:
The figure shows an example of widely use engine stand that
can support mating surface of transaxle with flywheel or drive-
plate removed.
CAUTION:
Before removing the hanging chains, make sure the engine
stand is stable and there is no risk of overturning.
5. Drain engine oil. Refer to LU-8, "
Draining".
6. Drain engine coolant by removing water drain plug (1) from RH side of the engine. Tool number : KV11105210 (J-44716)
PBIC0085E
: Engine front
PBIC3742E
Revision: January 20102010 Versa
Page 2455 of 3745

EM-96
< DISASSEMBLY AND ASSEMBLY >[HR16DE]
CYLINDER BLOCK
• Using Tool (A) or suitable tool, install piston with the front mark
on the piston head facing the front of the engine.
CAUTION:
• Be careful not to damage matching surface with con-necting rod cap.
• Be careful not to damage the cylinder wall and crank-
shaft pin, resulting from an interference of the connect-
ing rod big end.
12. Install connecting rod cap. • Match the stamped cylinder number marks (C) on connectingrod with those on connecting rod cap to install.
13. Inspect outer diameter of c onnecting rod cap bolts. Refer to EM-97, "
Inspection".
14. Tighten connecting rod bolt with the following procedure:
a. Apply new engine oil to the threads and seats of connecting rod bolts.
b. Tighten connecting rod bolts in several steps.
c. Then turn all bolts 60 degrees clockwise (angle tightening). CAUTION:
Confirm the tightening angle by using Tool (A) or protractor.
Avoid judgment by visual inspection without the tool.
• After tightening connecting rod bolts, make sure that crankshaft rotates smoothly.
• Check the connecting rod side clearance. Refer to EM-97, "
Inspection".
15. Install oil pan (upper). Refer to EM-42, "
Removal and Installation".
NOTE:
Install the rear oil seal after installing the oil pan (upper).
16. Install rear oil seal. Refer to EM-71, "
REAR OIL SEAL : Removal and Installation".
17. Install flywheel. • Secure crankshaft with Tool, and tighten bolts crosswise over several times.Tool number : EM03470000 (J-8037)
PBIC3765E
A : Front mark
B : Oil hole
D : Connecting rod big end grade
JPBIA0537ZZ
: 19.6 N·m (2.0 kg-m, 14 ft-lb)
Tool number : KV10112100 (BT-8653-A)
PBIC3753E
Tool number : KV11105210 (J-44716)
Revision: January 20102010 Versa
Page 2488 of 3745

PREPARATIONEM-129
< SERVICE INFORMATION > [MR18DE]
C
D
E
F
G H
I
J
K L
M A
EM
NP
O
Valve guide reamer
(1): Reaming valve guide inner hole
(2): Reaming hole for oversize valve guide
(J-43897-18)
(J-43897-12)
Oxygen sensor thread cleaner Reconditioning the exhaust system threads
before installing a new oxygen sensor (Use
with anti-seize lubricant shown below.)
a: J-43897-18 (18 mm dia.) for zirconia ox-
ygen sensor
b: J-43897-12 (12 mm dia.) for titania oxy-
gen sensor
Anti-seize lubricant (Permatex 133AR
or equivalent meeting MIL specifica-
tion MIL-A-907) Lubricating oxygen sensor thread cleaning
tool when reconditioning exhaust system
threads
E20 Torx® Socket
(J-45816) Removing and installing drive plate and fly-
wheel bolts
(Kent-Moore No.)
Tool name
Description
PBIC4013E
AEM488
AEM489
LBIA0285E
Revision: January 20102010 Versa
Page 2503 of 3745

EM-144
< SERVICE INFORMATION >[MR18DE]
OIL PAN
3. Remove flywheel (M/T models) or drive plate (CVT or A/T models). Refer to
EM-195, "Component".
4. Remove oil filter using Tool.
CAUTION:
When removing, prepare a shop cloth to ab sorb any engine oil leakage or spillage.
5. Remove oil pan (lower) bolts in reverse order as shown.
6. After removing the bolts and nuts, separate the mating surface and remove the sealant using Tool.
• Slide (2) the Tool by tapping (1) its side with a hammer toremove the oil pan (lower) from the oil pan (upper).
CAUTION:
Be careful not to damage the mating surfaces.
7. Remove the following parts: • Front cover, timing chain, oil pump drive chain. Refer to EM-156
.
8. Remove oil pump. • Loosen bolts in reverse order as shown.
9. Remove oil pan (upper) bolts in reverse order as shown. Tool number : KV10115801 ( — )
: Engine front
PBIC3146J
Tool number : KV10111100 (J-37228)
WBIA0566E
1 : Oil pump
2 : Oil pan (upper)
: Engine front
PBIC3532J
: Engine front
PBIC3533J
Revision: January 20102010 Versa
Page 2550 of 3745

ENGINE ASSEMBLYEM-191
< SERVICE INFORMATION > [MR18DE]
C
D
E
F
G H
I
J
K L
M A
EM
NP
O
ENGINE ASSEMBLY
ComponentINFOID:0000000005398143
Removal and InstallationINFOID:0000000005398144
WARNING:
• Situate the vehicle on a flat and solid surface.
• Place chocks at front and back of rear wheels.
• Attach proper slingers and bolts described in P
ARTS CATALOG if engine slingers are not equipped.
CAUTION:
• Always be careful to work safely, avoid forceful or uninstructed operations.
• Do not start working until exhaust system and coolant are cool enough.
• If items or work required are not covered by th e engine section, follow the applicable procedures.
• Always use the support poin t specified for lifting.
1. Engine mounting Insulator (RH) 2. Engine mounting shim (RH) (if equipped) 3. Engine mounting bracket (RH)
4. Bracket 5. Rear torque rod 6. Engine through bolt
7. Engine mounting bracket (LH) 8. Engine mounting insulator (LH) 9. Torque rod (RH)
A. Front mark B. Silicone lubricant
WBIA0846E
Revision: January 20102010 Versa
Page 2555 of 3745

EM-196
< SERVICE INFORMATION >[MR18DE]
CYLINDER BLOCK
Disassembly and Assembly
INFOID:0000000005398146
DISASSEMBLY
1. Remove engine and transaxle assembly from vehicle, separate transaxle from engine. Refer to EM-191.
2. Install engine to engine stand as follows;
a. Remove flywheel (M/T models) or drive plate (1) (A/T or CVT models).
• Secure flywheel (M/T models) or drive plate (A/T or CVT mod-els) using Tool (A), and remove bolts.
CAUTION:
Be careful not to damage or scratch drive plate (A/T or CVT
models) and contact surface for clutch disc of flywheel (M/T
models).
NOTE:
Figure shows drive plate (1) (A/T or CVT models)
b. Lift the engine with a hoist to install it onto widely use engine stand. CAUTION:
• Use the engine stand that has a load capacity [approximately 135 kg (298 lb) or more] large
enough for supporting the engine weight.
• If the load capacity of stand is not adequate, remo ve the following parts beforehand to reduce the poten-
tial risk of overturning stand.
- Exhaust manifold; Refer to EM-140
.
- Rocker cover; Refer to EM-149
.
NOTE:
The figure shows an example of widely used engine stand (A)
that can support mating surface of transaxle with flywheel (M/T
models) or drive plate (A/T or CVT models) removed.
CAUTION:
Before removing the hanging chains, make sure the engine
stand is stable and there is no risk of overturning.
3. Remove oil pan (upper and lower). Refer to EM-143
.
4. Remove cylinder head. Refer to EM-181
.
5. Remove thermostat housing. Refer to CO-46
.
6. Remove knock sensor. CAUTION:
Carefully handle knock sensor avoiding shocks.
7. Remove crankshaft position sensor (POS) cover and crankshaft position sensor (POS).
7. Oil pressure switch8. Top ring 9. Second ring
10. Oil ring 11. Snap ring 12. Piston
13. Piston pin 14. Connecting rod 15. Thrust bearing
16. Connecting rod bearing upper 17. Main bearing upper 18. Crankshaft key
19. Main bearing lower 20. Connecting rod bearing lower 21. Connecting rod bearing cap
22. Connecting rod bolt 23. Main bearing cap 24. Main bearing cap bolt
25. Crankshaft 26. Pilot converter (A/T or CVT models) 27. Signal plate
28. Rear oil seal 29. Drive plate (A/T or CVT models) 30. Reinforcement plate (A/T or CVT
models)
31. Flywheel (M/T models) 32. Block heater (Canada only) A. Refer to EM-196
Tool number : KV 11105210 (J-44716)
PBIC3226J
PBIC3227J
Revision: January 20102010 Versa
Page 2563 of 3745

EM-204
< SERVICE INFORMATION >[MR18DE]
CYLINDER BLOCK
26. Install flywheel (M/T models) or drive plate (1) (A/T or CVT mod-
els).
• Secure crankshaft using Tool (A), and tighten bolts crosswiseover several times.
NOTE:
A/T model shown CVT and M/T similar.
• Install pilot converter (3), drive plate (1) and reinforcement plate (2) as shown (A/T or CVT models).
• Using a suitable tool of 33 mm (1.30 in) in diameter, press-fit pilot converter into the end of crankshaft until it stops (A/T or
CVT models).
NOTE:
M/T models have no pilot converter and reinforcement plate.
27. Install knock sensor (1) with connector facing toward the rear of engine.
CAUTION:
• Never tighten bolts while holding the connector.
• If any impact by dropping is applied to knock sensor,replace it with a new one.
NOTE:
• Make sure that there is no foreign material on the cylinder
block mating surface and the back surface of knock sensor.
• Make sure that knock sensor does not interfere with other parts.
28. Install crankshaft position sensor (POS) and crankshaft position sensor (POS) cover. CAUTION:
• Avoid impacts such as a dropping.
• Keep it away from metal particles.
• Never place sensor in a location where it is exposed to magnetism.
29. Install oil filter (for intake valv e timing control) (1) in the direction
shown.
• Make sure that the oil filter does not protrude from the upper surface of cylinder block (2) after installation.
30. Assembly is in the reverse order of disassembly. Tool number : KV11105210 (J-44716)
PBIC3998E
A : Crankshaft rear end
B : Rounded
C : Chamfered
PBIC3259J
A : Cylinder block left side
: Engine front
PBIC3246J
PBIC3260J
Revision: January 20102010 Versa
Page 2609 of 3745

FAX-4
< SERVICE INFORMATION >
PREPARATION
PREPARATION
Special Service ToolINFOID:0000000005397121
The actual shapes of Kent-Moore tools may differ from those of special service tools illustrated here.
Commercial Service ToolINFOID:0000000005397122
Tool number
(Kent-Moore No.)
Tool name Description
KV40107300
(—)
Boot Band crimping tool Installing boot bands
KV38105500
(J-33904)
Differential side oil seal protector Installing drive shaft LH
a: 40 mm (1.57 in) dia.
KV38106700
(J-34296)
Differential side oil seal protector Installing drive shaft RH
a: 36 mm (1.42 in) dia.
HT72520000
(J-25730-A)
Ball joint remover Removing steering outer socket
ZZA1229D
ZZA0835D
ZZA0835D
NT146
Tool name
Description
Power tool • Removing wheel nuts
• Removing torque member bolts
• Removing hub lock nut
PBIC0190E
Revision: January 20102010 Versa
Page 2612 of 3745
FRONT WHEEL HUB AND KNUCKLEFAX-7
< SERVICE INFORMATION >
CEF
G H
I
J
K L
M A
B
FA X
N
O P
2. Without disassembling the hydraulic lines, remove the torque member bolts using power tool. Then repo- sition the torque member and brake caliper assembly aside with wire. Refer to BR-25
.
CAUTION:
Do not depress brake pedal while brake caliper is removed.
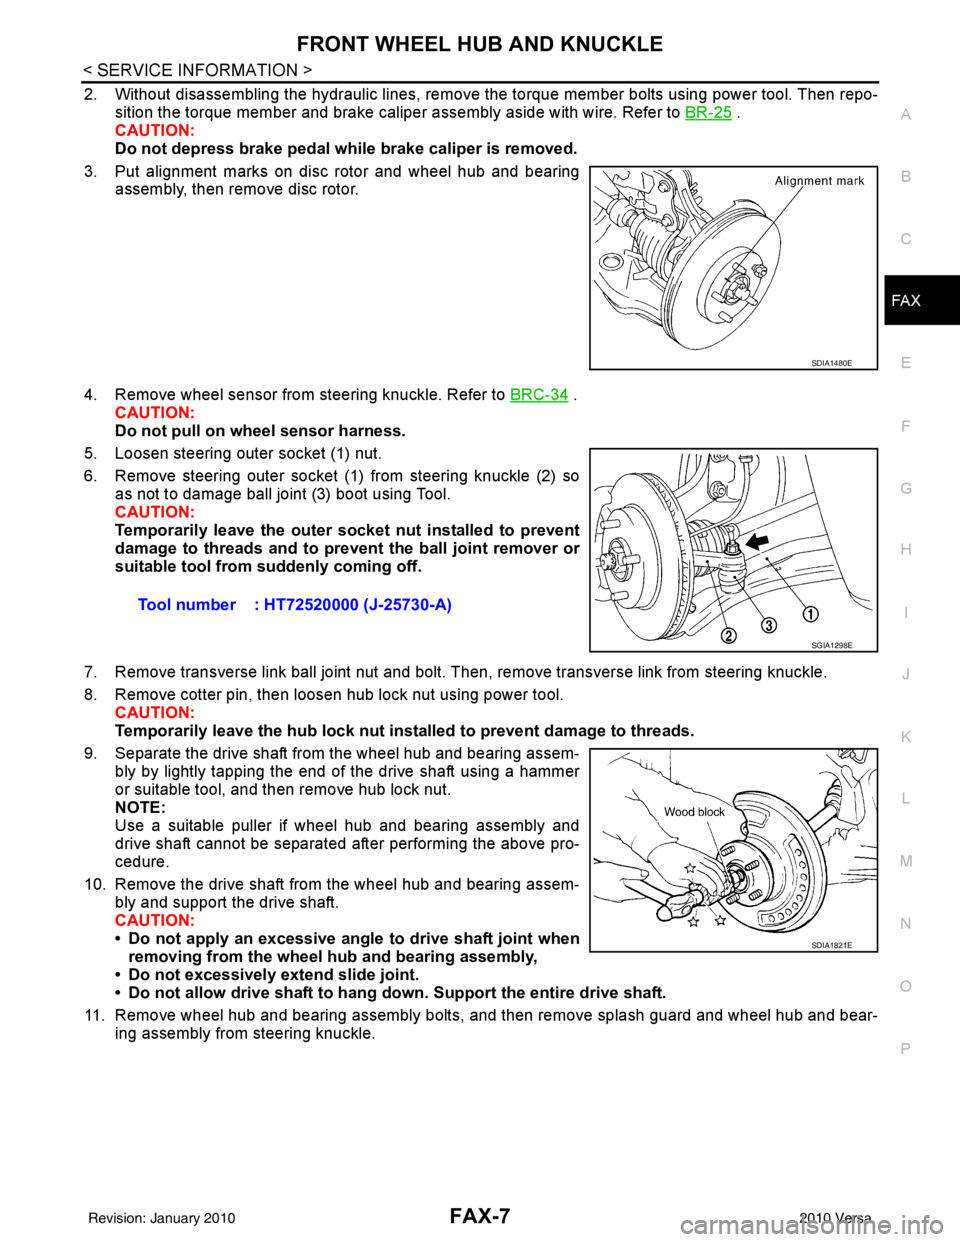
3. Put alignment marks on disc rotor and wheel hub and bearing assembly, then remove disc rotor.
4. Remove wheel sensor from steering knuckle. Refer to BRC-34
.
CAUTION:
Do not pull on wheel sensor harness.
5. Loosen steering outer socket (1) nut.
6. Remove steering outer socket (1) from steering knuckle (2) so as not to damage ball joint (3) boot using Tool.
CAUTION:
Temporarily leave the outer socket nut installed to prevent
damage to threads and to prevent the ball joint remover or
suitable tool from suddenly coming off.
7. Remove transverse link ball joint nut and bolt. Then, remove transverse link from steering knuckle.
8. Remove cotter pin, then loosen hub lock nut using power tool. CAUTION:
Temporarily leave the hub lock nut inst alled to prevent damage to threads.
9. Separate the drive shaft from the wheel hub and bearing assem- bly by lightly tapping the end of the drive shaft using a hammer
or suitable tool, and then remove hub lock nut.
NOTE:
Use a suitable puller if wheel hub and bearing assembly and
drive shaft cannot be separated after performing the above pro-
cedure.
10. Remove the drive shaft from the wheel hub and bearing assem- bly and support the drive shaft.
CAUTION:
• Do not apply an excessive angle to drive shaft joint when
removing from the wheel hub and bearing assembly,
• Do not excessively extend slide joint.
• Do not allow drive shaft to hang do wn. Support the entire drive shaft.
11. Remove wheel hub and bearing assembly bolts, and then remove splash guard and wheel hub and bear- ing assembly from steering knuckle.
SDIA1480E
Tool number : HT72520000 (J-25730-A)
SGIA1298E
SDIA1821E
Revision: January 20102010 Versa
Page 2613 of 3745
FAX-8
< SERVICE INFORMATION >
FRONT WHEEL HUB AND KNUCKLE
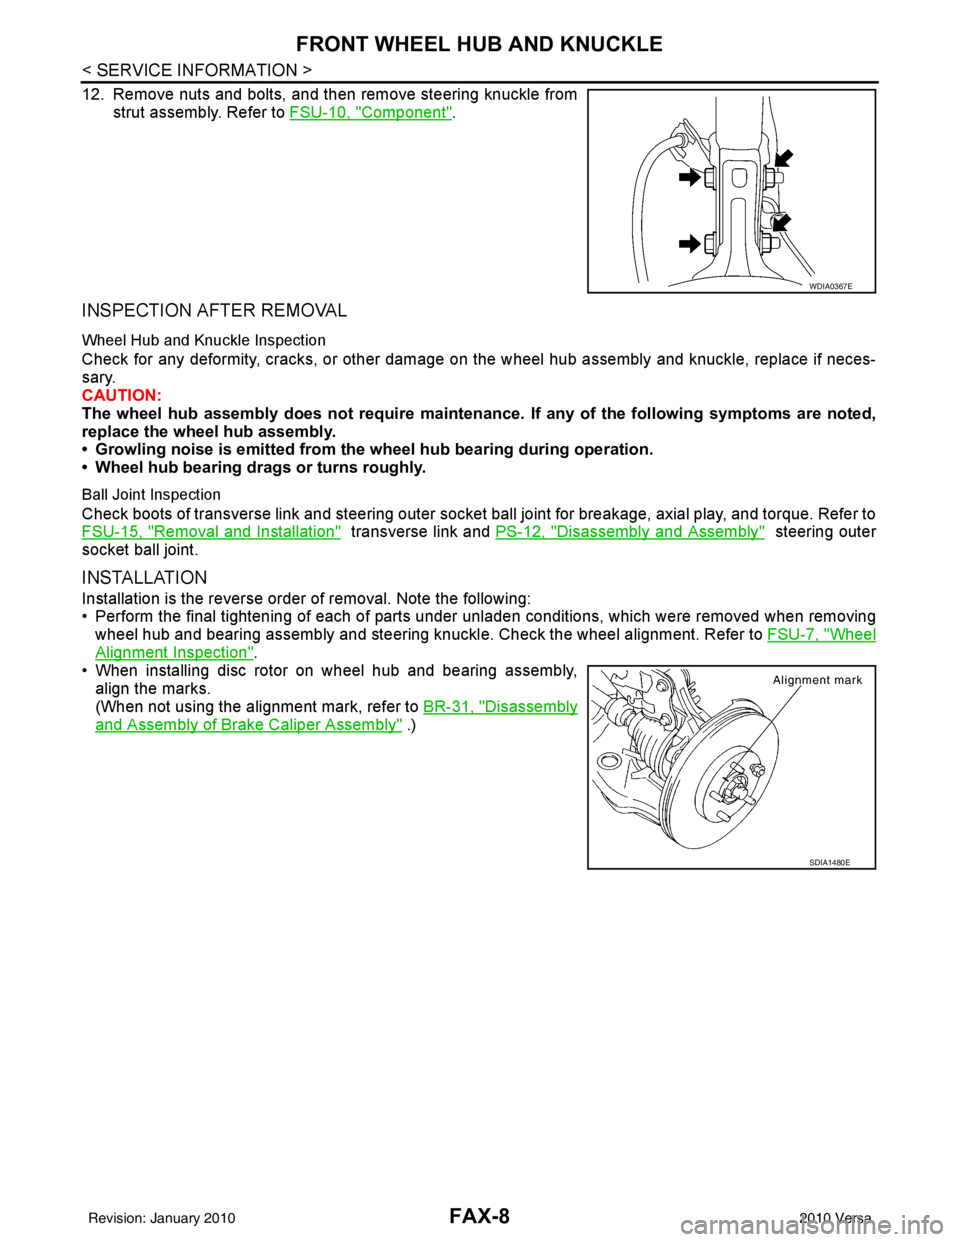
12. Remove nuts and bolts, and then remove steering knuckle fromstrut assembly. Refer to FSU-10, "
Component".
INSPECTION AFTER REMOVAL
Wheel Hub and Knuckle Inspection
Check for any deformity, cracks, or other damage on the wheel hub assembly and knuckle, replace if neces-
sary.
CAUTION:
The wheel hub assembly does not require maintenance. If any of the following symptoms are noted,
replace the wheel hub assembly.
• Growling noise is emitted from the wheel hub bearing during operation.
• Wheel hub bearing drags or turns roughly.
Ball Joint Inspection
Check boots of transverse link and steering outer socket ball joint for breakage, axial play, and torque. Refer to
FSU-15, "
Removal and Installation" transverse link and PS-12, "Disassembly and Assembly" steering outer
socket ball joint.
INSTALLATION
Installation is the reverse order of removal. Note the following:
• Perform the final tightening of each of parts under unladen conditions, which were removed when removing wheel hub and bearing assembly and steering knuckl e. Check the wheel alignment. Refer to FSU-7, "
Wheel
Alignment Inspection".
• When installing disc rotor on wheel hub and bearing assembly,
align the marks.
(When not using the alignment mark, refer to BR-31, "
Disassembly
and Assembly of Brake Caliper Assembly" .)
WDIA0367E
SDIA1480E
Revision: January 20102010 Versa