clock NISSAN TITAN 2008 Owners Manual
[x] Cancel search | Manufacturer: NISSAN, Model Year: 2008, Model line: TITAN, Model: NISSAN TITAN 2008Pages: 408, PDF Size: 6.08 MB
Page 129 of 408
GROCERY HOOKS (if so equipped)
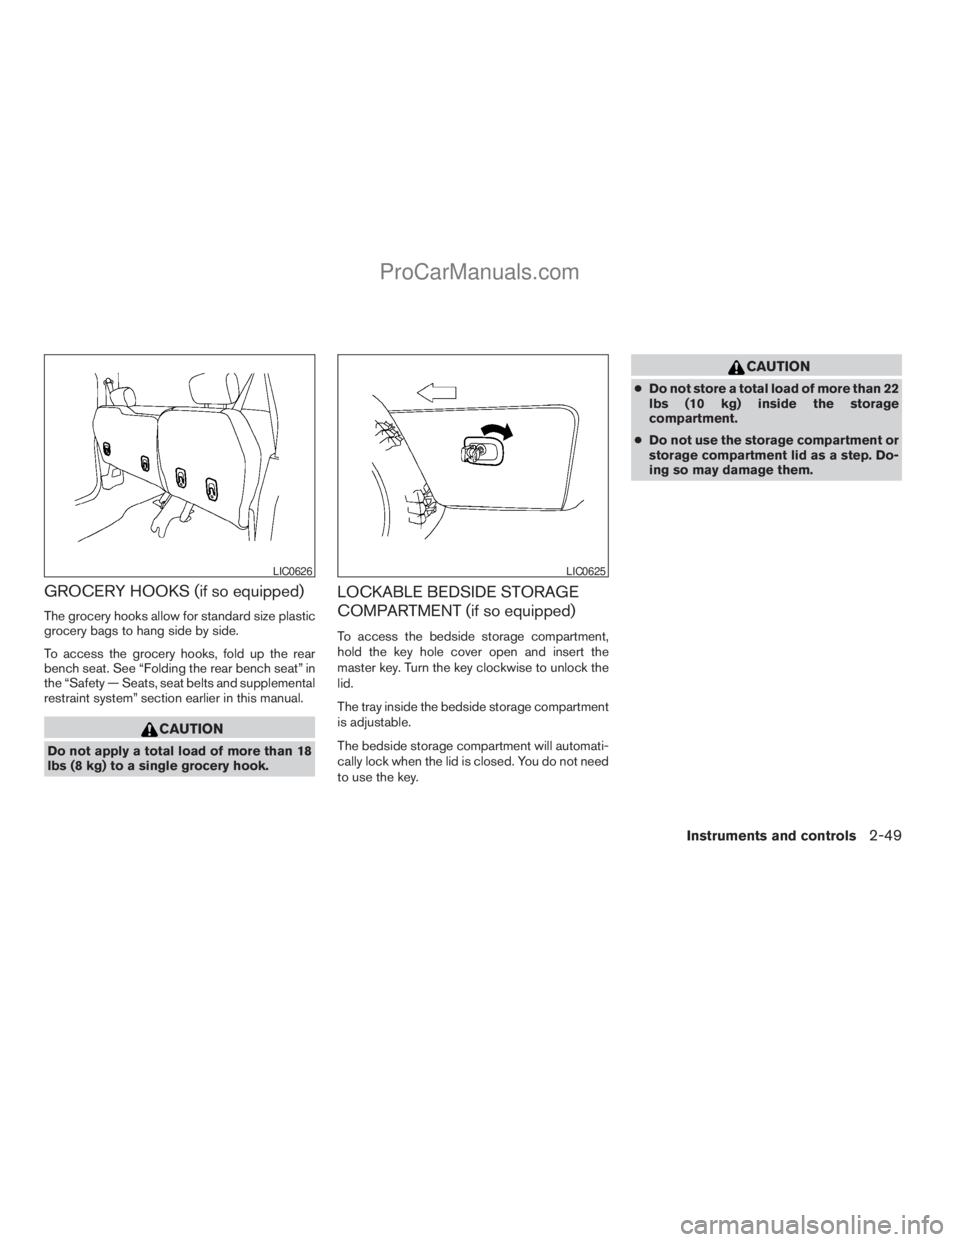
The grocery hooks allow for standard size plastic
grocery bags to hang side by side.
To access the grocery hooks, fold up the rear
bench seat. See “Folding the rear bench seat” in
the “Safety — Seats, seat belts and supplemental
restraint system” section earlier in this manual.
CAUTION
Do not apply a total load of more than 18
lbs (8 kg) to a single grocery hook.
LOCKABLE BEDSIDE STORAGE
COMPARTMENT (if so equipped)
To access the bedside storage compartment,
hold the key hole cover open and insert the
master key. Turn the key clockwise to unlock the
lid.
The tray inside the bedside storage compartment
is adjustable.
The bedside storage compartment will automati-
cally lock when the lid is closed. You do not need
to use the key.
CAUTION
cDo not store a total load of more than 22
lbs (10 kg) inside the storage
compartment.
cDo not use the storage compartment or
storage compartment lid as a step. Do-
ing so may damage them.
LIC0626LIC0625
Instruments and controls2-49
ZREVIEW COPYÐ2008 Titan(tzw)
Owners ManualÐUSA_English(nna)
10/11/07Ðdebbie
X
ProCarManuals.com
Page 150 of 408
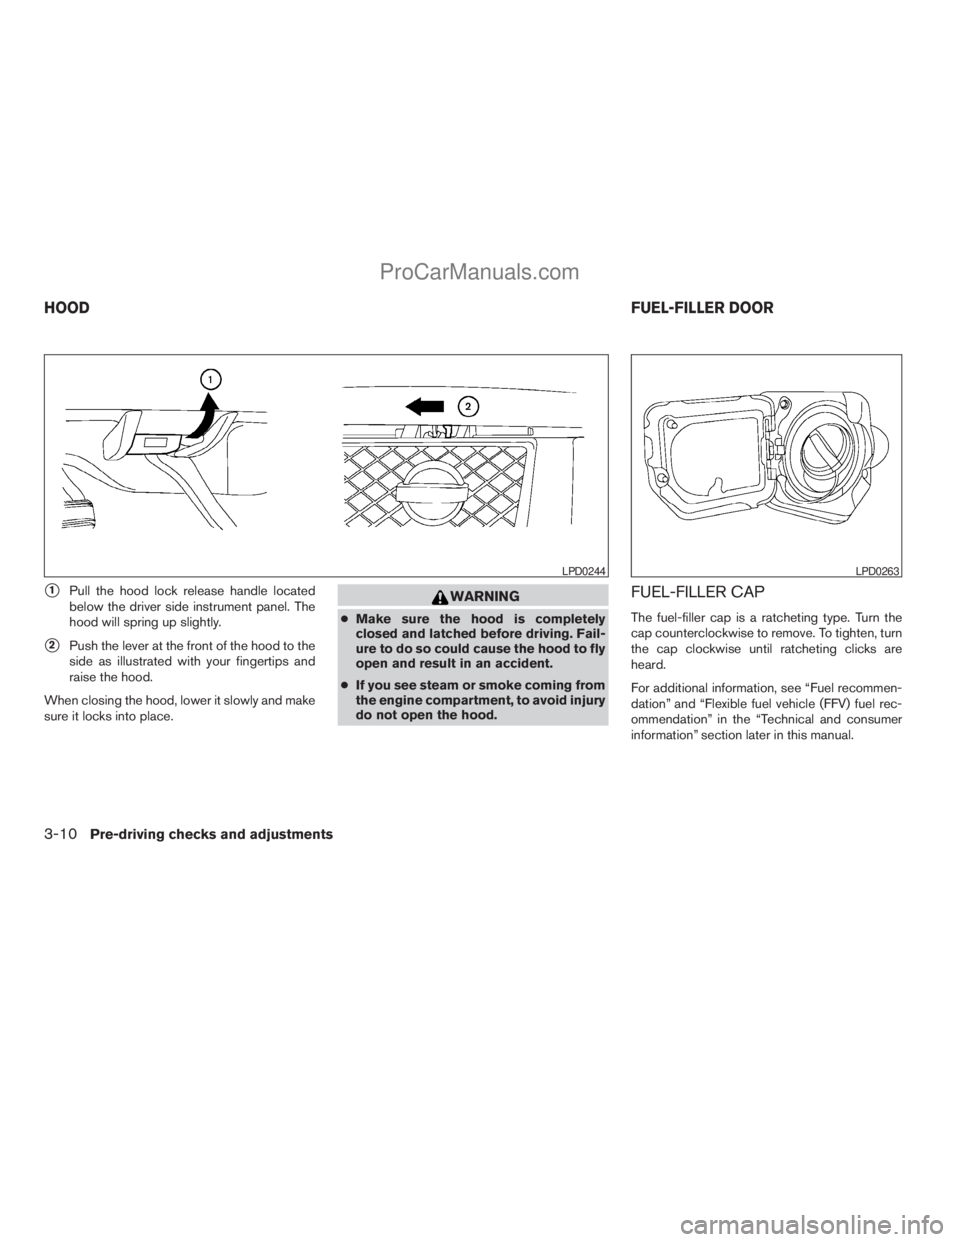
s1Pull the hood lock release handle located
below the driver side instrument panel. The
hood will spring up slightly.
s2Push the lever at the front of the hood to the
side as illustrated with your fingertips and
raise the hood.
When closing the hood, lower it slowly and make
sure it locks into place.
WARNING
cMake sure the hood is completely
closed and latched before driving. Fail-
ure to do so could cause the hood to fly
open and result in an accident.
cIf you see steam or smoke coming from
the engine compartment, to avoid injury
do not open the hood.
FUEL-FILLER CAP
The fuel-filler cap is a ratcheting type. Turn the
cap counterclockwise to remove. To tighten, turn
the cap clockwise until ratcheting clicks are
heard.
For additional information, see “Fuel recommen-
dation” and “Flexible fuel vehicle (FFV) fuel rec-
ommendation” in the “Technical and consumer
information” section later in this manual.
LPD0244LPD0263
HOODFUEL-FILLER DOOR
3-10Pre-driving checks and adjustments
ZREVIEW COPYÐ2008 Titan(tzw)
Owners ManualÐUSA_English(nna)
10/11/07Ðdebbie
X
ProCarManuals.com
Page 175 of 408
Clock
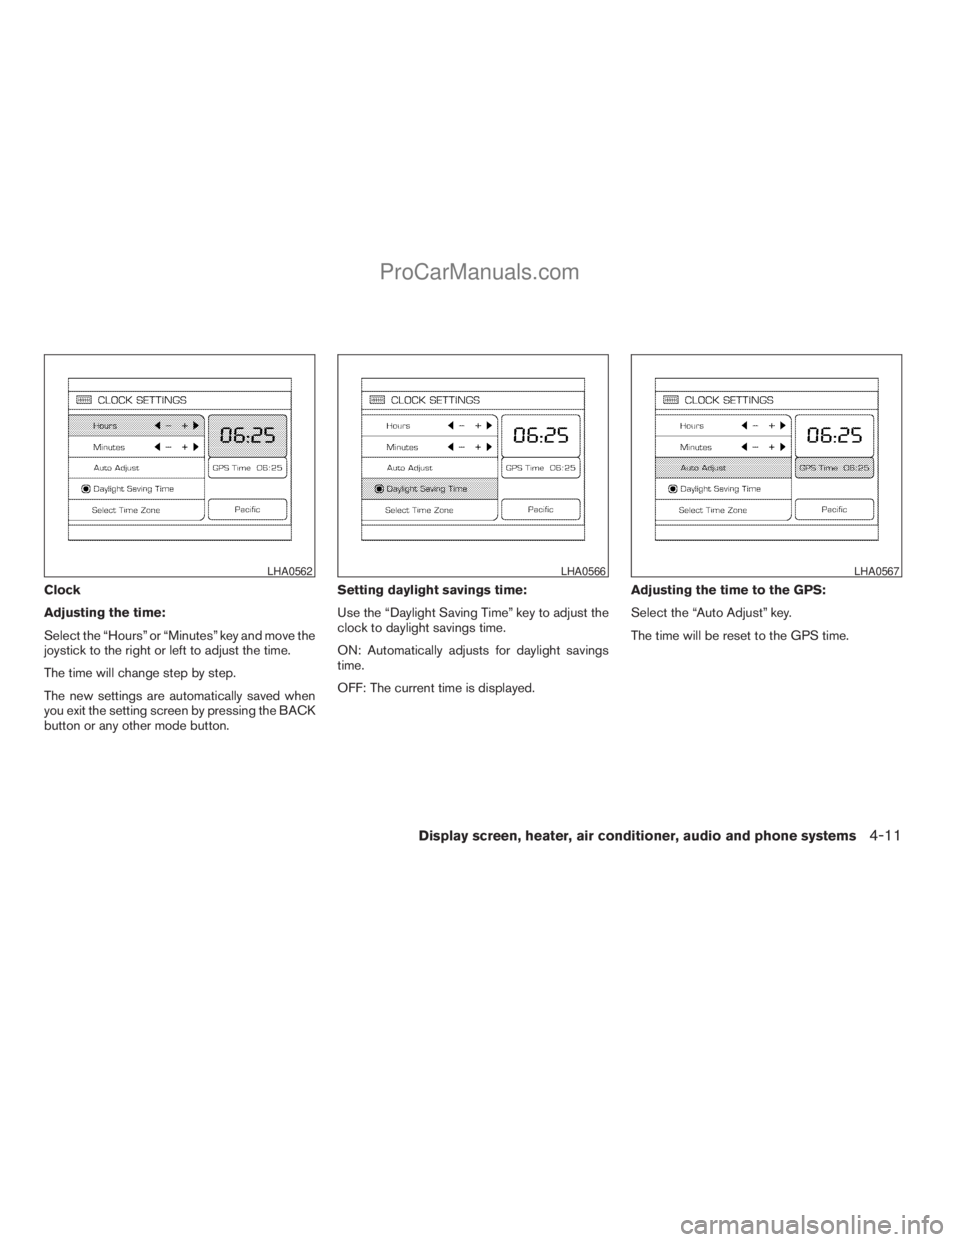
Adjusting the time:
Select the “Hours” or “Minutes” key and move the
joystick to the right or left to adjust the time.
The time will change step by step.
The new settings are automatically saved when
you exit the setting screen by pressing the BACK
button or any other mode button.Setting daylight savings time:
Use the “Daylight Saving Time” key to adjust the
clock to daylight savings time.
ON: Automatically adjusts for daylight savings
time.
OFF: The current time is displayed.Adjusting the time to the GPS:
Select the “Auto Adjust” key.
The time will be reset to the GPS time.
LHA0562LHA0566LHA0567
Display screen, heater, air conditioner, audio and phone systems4-11
ZREVIEW COPYÐ2008 Titan(tzw)
Owners ManualÐUSA_English(nna)
10/11/07Ðdebbie
X
ProCarManuals.com
Page 176 of 408
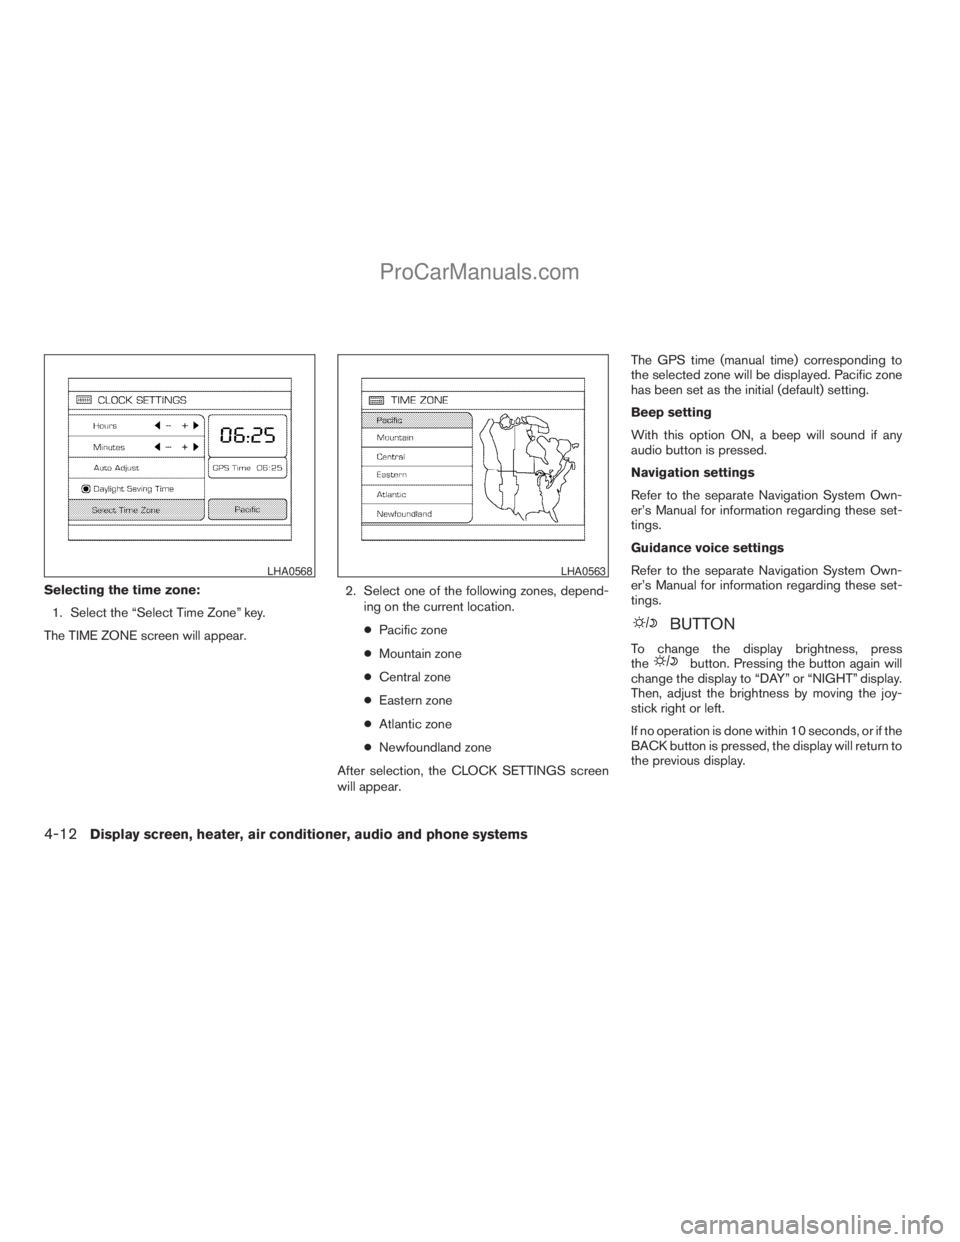
Selecting the time zone:
1. Select the “Select Time Zone” key.
The TIME ZONE screen will appear.2. Select one of the following zones, depend-
ing on the current location.
cPacific zone
cMountain zone
cCentral zone
cEastern zone
cAtlantic zone
cNewfoundland zone
After selection, the CLOCK SETTINGS screen
will appear.The GPS time (manual time) corresponding to
the selected zone will be displayed. Pacific zone
has been set as the initial (default) setting.
Beep setting
With this option ON, a beep will sound if any
audio button is pressed.
Navigation settings
Refer to the separate Navigation System Own-
er’s Manual for information regarding these set-
tings.
Guidance voice settings
Refer to the separate Navigation System Own-
er’s Manual for information regarding these set-
tings.
BUTTON
To change the display brightness, press
thebutton. Pressing the button again will
change the display to “DAY” or “NIGHT” display.
Then, adjust the brightness by moving the joy-
stick right or left.
If no operation is done within 10 seconds, or if the
BACK button is pressed, the display will return to
the previous display.
LHA0568LHA0563
4-12Display screen, heater, air conditioner, audio and phone systems
ZREVIEW COPYÐ2008 Titan(tzw)
Owners ManualÐUSA_English(nna)
10/11/07Ðdebbie
X
ProCarManuals.com
Page 208 of 408
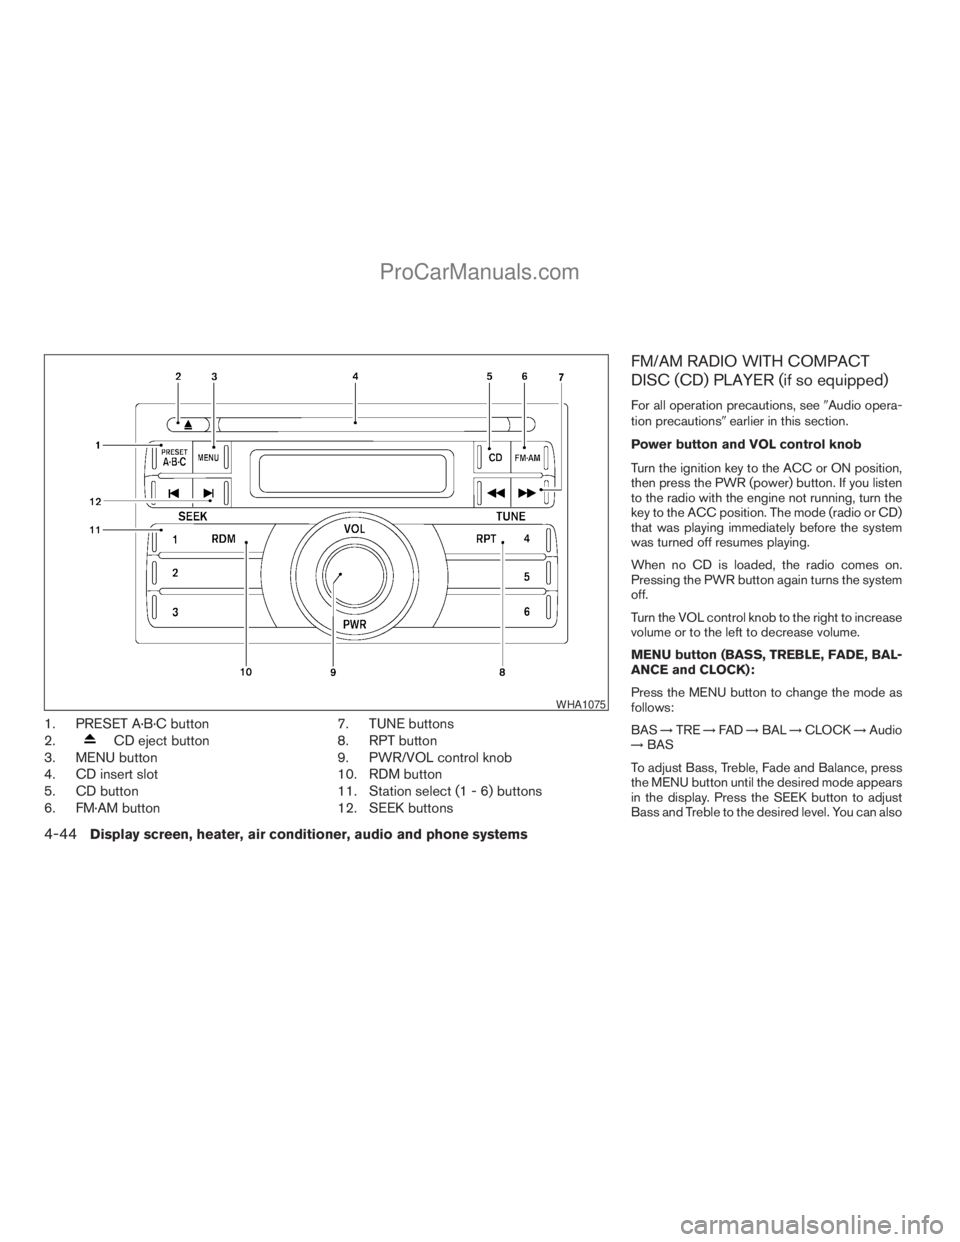
1. PRESET A·B·C button
2.
CD eject button
3. MENU button
4. CD insert slot
5. CD button
6. FM·AM button7. TUNE buttons
8. RPT button
9. PWR/VOL control knob
10. RDM button
11. Station select (1 - 6) buttons
12. SEEK buttons
FM/AM RADIO WITH COMPACT
DISC (CD) PLAYER (if so equipped)
For all operation precautions, see9Audio opera-
tion precautions9earlier in this section.
Power button and VOL control knob
Turn the ignition key to the ACC or ON position,
then press the PWR (power) button. If you listen
to the radio with the engine not running, turn the
key to the ACC position. The mode (radio or CD)
that was playing immediately before the system
was turned off resumes playing.
When no CD is loaded, the radio comes on.
Pressing the PWR button again turns the system
off.
Turn the VOL control knob to the right to increase
volume or to the left to decrease volume.
MENU button (BASS, TREBLE, FADE, BAL-
ANCE and CLOCK):
Press the MENU button to change the mode as
follows:
BAS!TRE!FAD!BAL!CLOCK!Audio
!BAS
To adjust Bass, Treble, Fade and Balance, press
the MENU button until the desired mode appears
in the display. Press the SEEK button to adjust
Bass and Treble to the desired level. You can also
WHA1075
4-44Display screen, heater, air conditioner, audio and phone systems
ZREVIEW COPYÐ2008 Titan(tzw)
Owners ManualÐUSA_English(nna)
10/12/07Ðdebbie
X
ProCarManuals.com
Page 209 of 408
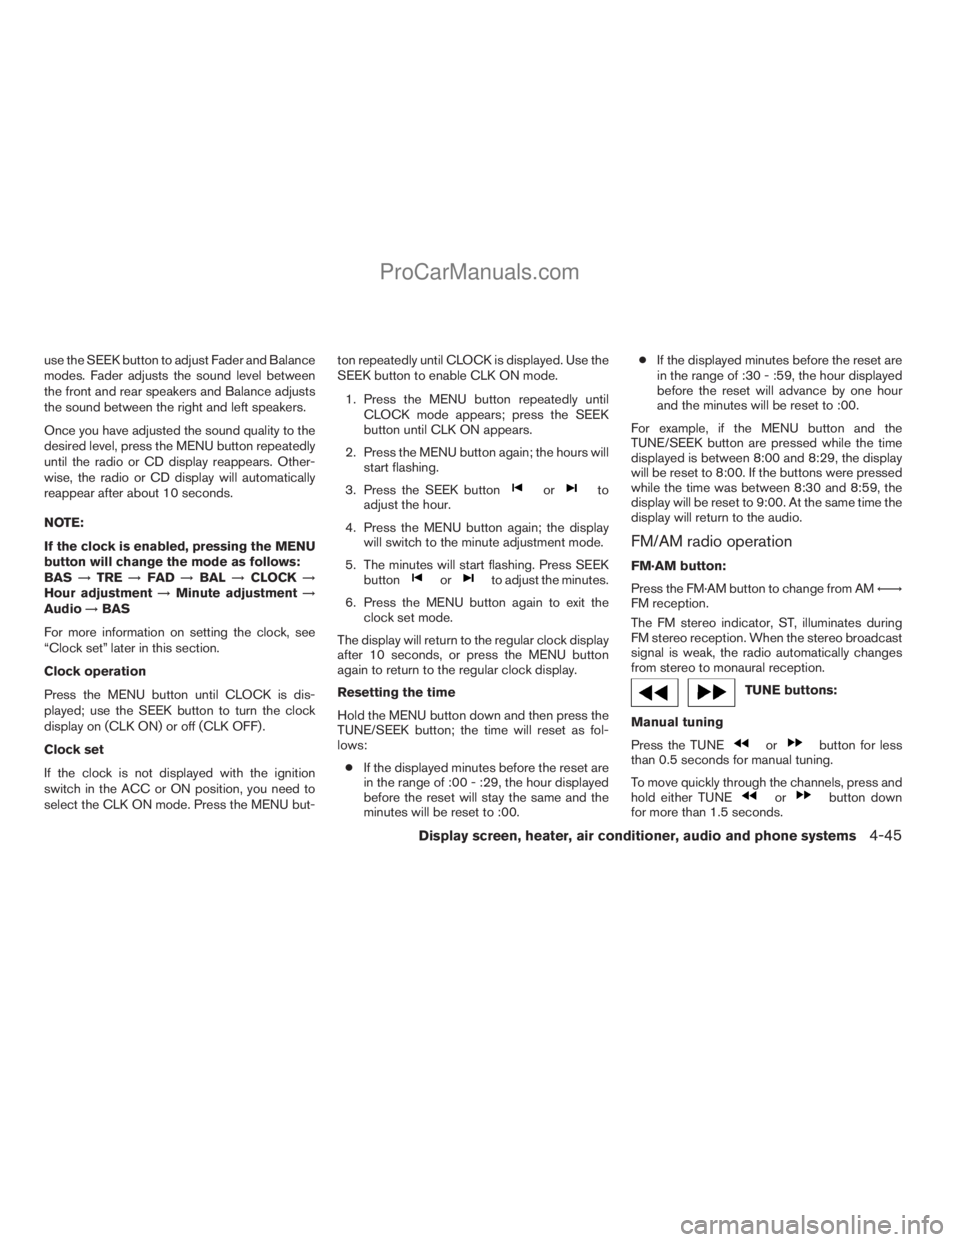
use the SEEK button to adjust Fader and Balance
modes. Fader adjusts the sound level between
the front and rear speakers and Balance adjusts
the sound between the right and left speakers.
Once you have adjusted the sound quality to the
desired level, press the MENU button repeatedly
until the radio or CD display reappears. Other-
wise, the radio or CD display will automatically
reappear after about 10 seconds.
NOTE:
If the clock is enabled, pressing the MENU
button will change the mode as follows:
BAS!TRE!FAD!BAL!CLOCK!
Hour adjustment!Minute adjustment!
Audio!BAS
For more information on setting the clock, see
“Clock set” later in this section.
Clock operation
Press the MENU button until CLOCK is dis-
played; use the SEEK button to turn the clock
display on (CLK ON) or off (CLK OFF) .
Clock set
If the clock is not displayed with the ignition
switch in the ACC or ON position, you need to
select the CLK ON mode. Press the MENU but-ton repeatedly until CLOCK is displayed. Use the
SEEK button to enable CLK ON mode.
1. Press the MENU button repeatedly until
CLOCK mode appears; press the SEEK
button until CLK ON appears.
2. Press the MENU button again; the hours will
start flashing.
3. Press the SEEK button
orto
adjust the hour.
4. Press the MENU button again; the display
will switch to the minute adjustment mode.
5. The minutes will start flashing. Press SEEK
button
orto adjust the minutes.
6. Press the MENU button again to exit the
clock set mode.
The display will return to the regular clock display
after 10 seconds, or press the MENU button
again to return to the regular clock display.
Resetting the time
Hold the MENU button down and then press the
TUNE/SEEK button; the time will reset as fol-
lows:
cIf the displayed minutes before the reset are
in the range of :00 - :29, the hour displayed
before the reset will stay the same and the
minutes will be reset to :00.cIf the displayed minutes before the reset are
in the range of :30 - :59, the hour displayed
before the reset will advance by one hour
and the minutes will be reset to :00.
For example, if the MENU button and the
TUNE/SEEK button are pressed while the time
displayed is between 8:00 and 8:29, the display
will be reset to 8:00. If the buttons were pressed
while the time was between 8:30 and 8:59, the
display will be reset to 9:00. At the same time the
display will return to the audio.
FM/AM radio operation
FM·AM button:
Press the FM·AM button to change from AMÃ!
FM reception.
The FM stereo indicator, ST, illuminates during
FM stereo reception. When the stereo broadcast
signal is weak, the radio automatically changes
from stereo to monaural reception.
TUNE buttons:
Manual tuning
Press the TUNE
orbutton for less
than 0.5 seconds for manual tuning.
To move quickly through the channels, press and
hold either TUNE
orbutton down
for more than 1.5 seconds.
Display screen, heater, air conditioner, audio and phone systems4-45
ZREVIEW COPYÐ2008 Titan(tzw)
Owners ManualÐUSA_English(nna)
10/12/07Ðdebbie
X
ProCarManuals.com
Page 214 of 408
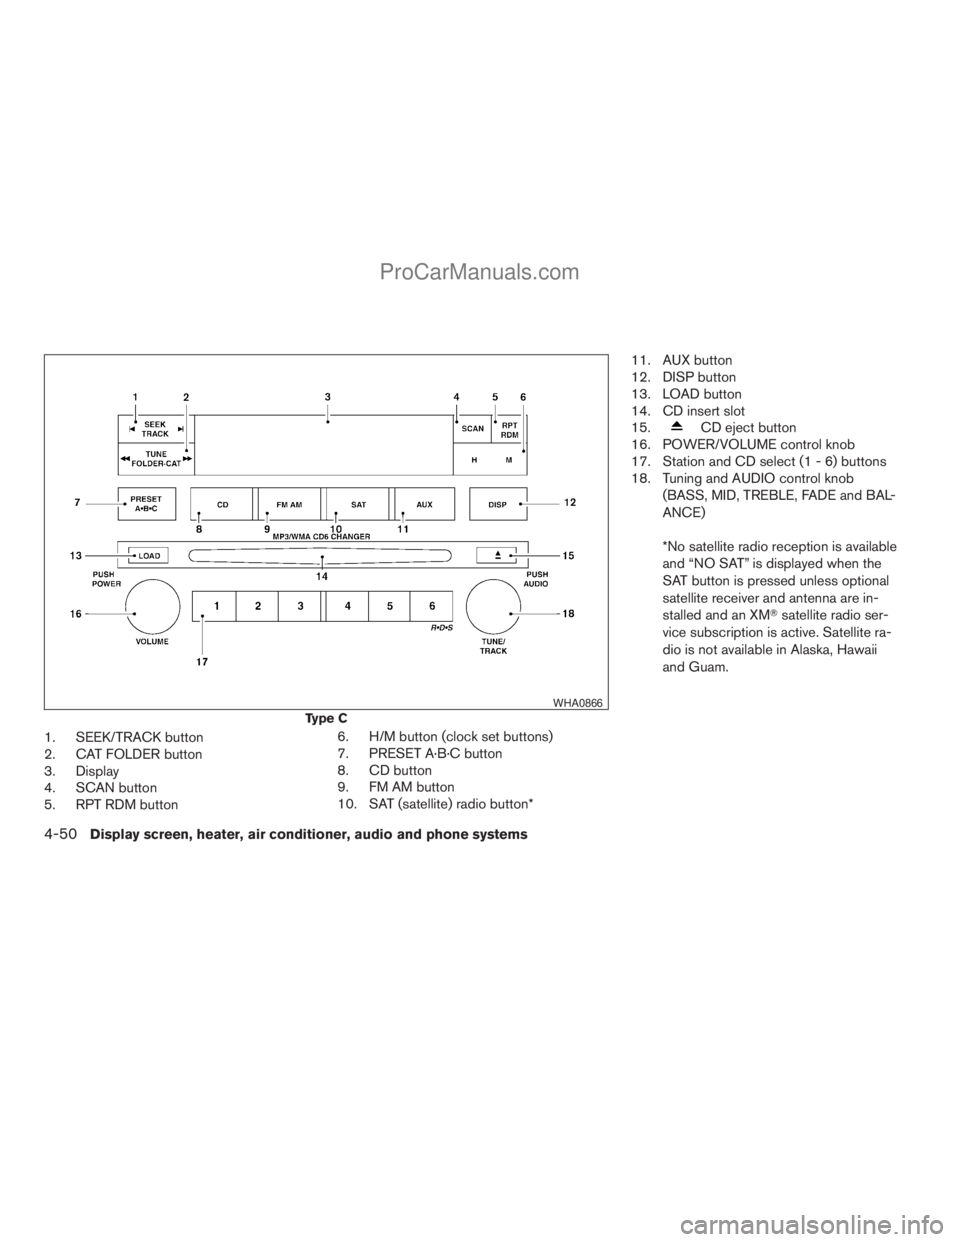
1. SEEK/TRACK button
2. CAT FOLDER button
3. Display
4. SCAN button
5. RPT RDM button6. H/M button (clock set buttons)
7. PRESET A·B·C button
8. CD button
9. FM AM button
10. SAT (satellite) radio button*11. AUX button
12. DISP button
13. LOAD button
14. CD insert slot
15.
CD eject button
16. POWER/VOLUME control knob
17. Station and CD select (1 - 6) buttons
18. Tuning and AUDIO control knob
(BASS, MID, TREBLE, FADE and BAL-
ANCE)
*No satellite radio reception is available
and “NO SAT” is displayed when the
SAT button is pressed unless optional
satellite receiver and antenna are in-
stalled and an XMTsatellite radio ser-
vice subscription is active. Satellite ra-
dio is not available in Alaska, Hawaii
and Guam.
Type C
WHA0866
4-50Display screen, heater, air conditioner, audio and phone systems
ZREVIEW COPYÐ2008 Titan(tzw)
Owners ManualÐUSA_English(nna)
10/12/07Ðdebbie
X
ProCarManuals.com
Page 215 of 408
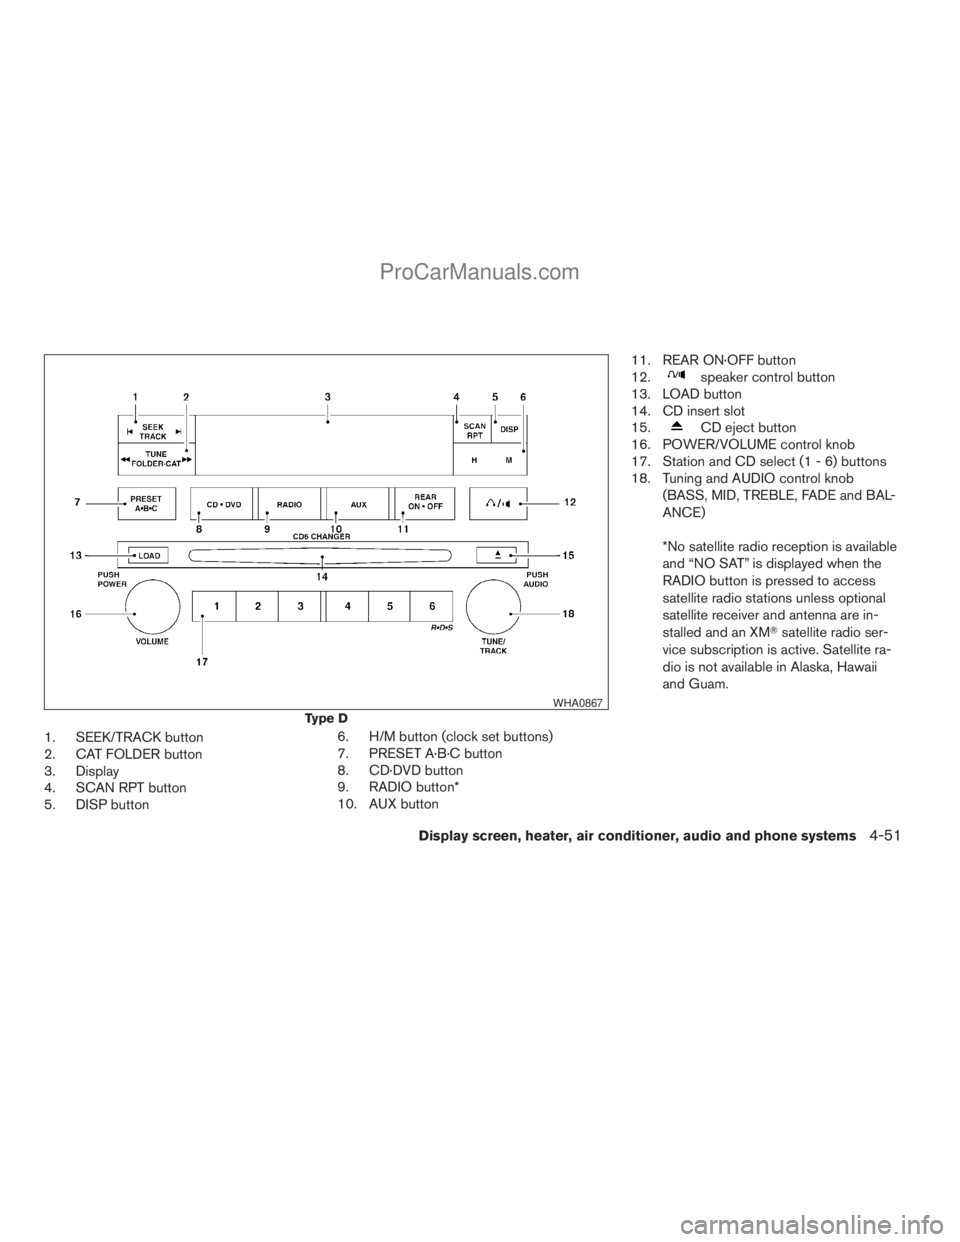
1. SEEK/TRACK button
2. CAT FOLDER button
3. Display
4. SCAN RPT button
5. DISP button6. H/M button (clock set buttons)
7. PRESET A·B·C button
8. CD·DVD button
9. RADIO button*
10. AUX button11. REAR ON·OFF button
12.
speaker control button
13. LOAD button
14. CD insert slot
15.
CD eject button
16. POWER/VOLUME control knob
17. Station and CD select (1 - 6) buttons
18. Tuning and AUDIO control knob
(BASS, MID, TREBLE, FADE and BAL-
ANCE)
*No satellite radio reception is available
and “NO SAT” is displayed when the
RADIO button is pressed to access
satellite radio stations unless optional
satellite receiver and antenna are in-
stalled and an XMTsatellite radio ser-
vice subscription is active. Satellite ra-
dio is not available in Alaska, Hawaii
and Guam.
Type D
WHA0867
Display screen, heater, air conditioner, audio and phone systems4-51
ZREVIEW COPYÐ2008 Titan(tzw)
Owners ManualÐUSA_English(nna)
10/12/07Ðdebbie
X
ProCarManuals.com
Page 216 of 408
FM/AM/SAT RADIO WITH
COMPACT DISC (CD) CHANGER
(Type A, B, C and D) (if so equipped)
For all operation precautions, see “Audio opera-
tion precautions” earlier in this section.
No satellite radio reception is available and “NO
SAT” is displayed when the SAT or RADIO button
is pressed to select satellite radio stations unless
optional satellite receiver and antenna are in-
stalled and an XMTsatellite radio service sub-
scription is active. Satellite radio is not available
in Alaska, Hawaii and Guam.
Audio main operation
POWER/VOLUME control:
Turn the ignition key to ACC or ON, and then
push the POWER/VOLUME control knob while
the system is off to call up the mode (radio or CD)
which was playing immediately before the system
was turned off.
To turn the system off, press the
POWER/VOLUME control knob.
Turn the POWER/VOLUME control knob to ad-
just the volume.
This vehicle may be equipped with Speed Sen-
sitive Volume (SSV) for audio. The audio volume
changes as the driving speed changes.AUDIO knob (Bass, Treble, Fade and Bal-
ance):
Press the AUDIO knob to change the mode as
follows:
Bass!Treble!Fade!Balance
To adjust Bass, Treble, Fade and Balance, press
the AUDIO knob until the desired mode appears
in the display. Turn the Tuning knob to adjust
Bass and Treble to the desired level. You can also
use the Tuning knob to adjust Fader and Balance
modes. Fader adjusts the sound level between
the front and rear speakers and Balance adjusts
the sound between the right and left speakers.
Once you have adjusted the sound quality to the
desired level, press the AUDIO knob repeatedly
until the radio or CD display reappears. Other-
wise, the radio or CD display will automatically
reappear after about 10 seconds.
Clock set (type C and D only)
1. Press and hold the H button to advance
hours.
2. Press and hold the M button to advance
minutes.
For setting the clock on type A and B audio
systems see “Adjusting the time” earlier in this
section.DISP (display) button:
The DISP (display) button will show text about
MP3, SAT or CD information in the audio display.
CD display mode
To change the text displayed while playing a CD
with text, press the DISP button. The DISP button
will allow you to scroll through CD text as follows:
Disc titleÃ!Track title.
To change the default display mode, press the
AUDIO knob repeatedly until DISPLAY MODE
appears on the display, then rotate the knob to
select the following display modes:
Type A and B:Disc numberÃ!Folder number.
Type C and D:Disc titleÃ!Track numberÃ!
Track title.
Once the display mode is selected, press the
AUDIO knob again to store the setting. If the
AUDIO knob is not pressed within 8 seconds, the
display will refresh with the last selected display
mode setting.
cDisc number mode displays the current disc
number playing in the changer.
cFolder number mode displays the selected
folder number and the track number that is
currently being played.
4-52Display screen, heater, air conditioner, audio and phone systems
ZREVIEW COPYÐ2008 Titan(tzw)
Owners ManualÐUSA_English(nna)
10/12/07Ðdebbie
X
ProCarManuals.com
Page 224 of 408
REAR AUDIO CONTROLS (if so
equipped)
Press the REAR ON·OFF button on the front
radio control panel to turn the rear controls on.
Push the button again to turn the rear controls off.
The headphones symbol illuminates on the front
display when the rear audio controls are on. Two
headphone jacks are provided so two rear seat
passengers may listen to the audio system pri-
vately.
The rear volume controls can only increase the
volume to the level at which the front radio volume
control is set.
One or two infrared headphones are included if
the vehicle is equipped with the DVD entertain-
ment system. Most portable radio headphones
work with the rear audio controls.
For vehicles equipped with the FM/AM/SAT radio
with compact disc player, if the rear passengers
turn off the rear speakers and are using head-
phones they may choose to listen to a different
media than the front passengers. The rear pas-
sengers can listen to the radio along with the
front passengers or they can listen to a CD or
SAT radio (if so equipped) .
VOL (volume) button:
The VOL button allows the rear passengers to
adjust the headphone volume level. The vehicle
volume can also be changed if the REAR CTRL is
enabled and the rear audio mode is the same as
the front.
(SPEAKER CONTROL) button:
Press this
button to turn the rear speakers
off and headphones on. Press thisbutton
again to turn rear seat speakers back on and
headphones off.
MODE button:
The MODE button allows the rear passengers to
change between AM, FM, CD, DVD and AUX.
The media options are listed on the face plate of
the rear audio controls. When a source of media
is selected, the media label will be illuminated.
SEEK button:
In AM or FM mode, the SEEK button allows the
rear seat passengers to find the next radio station
up or down the station band frequency.
In CD mode, the SEEK button allows the rear
passengers to find the next or previous selection
on the CD.NEXT button:
When the NEXT button is pressed while in AM or
FM mode, the radio will change to the next preset.
The NEXT button does not function while in SAT
radio mode or when playing a DVD or CD.
ANTENNA
The antenna cannot be shortened, but can be
removed. When you need to remove the antenna,
turn the antenna rod counterclockwise.
To install the antenna rod, turn the antenna clock-
wise. Tighten the antenna rod to specification
using a suitable tool such as an open-end
wrench. The antenna rod tightening specification
is 3.4 – 3.6 N·m (30 – 32 in-lb) . Do not use pliers
to tighten the antenna as they can leave marks on
the antenna surface. The antenna rod cannot be
hand tightened to the proper specification.
CAUTION
Always properly tighten the antenna rod
during installation or the antenna rod may
break during vehicle operation.
4-60Display screen, heater, air conditioner, audio and phone systems
ZREVIEW COPYÐ2008 Titan(tzw)
Owners ManualÐUSA_English(nna)
10/12/07Ðdebbie
X
ProCarManuals.com