key NISSAN TITAN 2014 1.G Quick Reference Guide
[x] Cancel search | Manufacturer: NISSAN, Model Year: 2014, Model line: TITAN, Model: NISSAN TITAN 2014 1.GPages: 24, PDF Size: 1.19 MB
Page 6 of 24
4
WIDE OPEN DOOR (King Cab models only)
Do not open the driver’s side Wide Open Door to the full open position while the fuel-filler
door is open; only open it as far as the first detent.
Opening the door to the full open position may damage the fuel-filler \
door and W ide Open Door.
For more information, refer to the “Pre-driving checks and adjustments (section 3)” of your Owner’s Manual.
ESSE NTIAL I N FOR MATION
FUEL-FILLER DOOR
The fuel-filler door is located on the driver’s side
of the vehicle.
To open the fuel-filler door, pull the lid open.
For more information, refer to the “Pre-driving checks and adjustments
(section 3)” of your Owner’s Manual.
CLOCK SET/ADJUSTMENT
To adjust the time and the appearance of the clock on the display:
1. Press the
MENU button
01.
2. T
ouch the “Settings” key.
3. T
ouch the “System” key.
4. T
ouch the “Clock Settings” key.
The following settings can be adjusted:
•
T
ime Format: The clock can be set to 12 hours
or 24 hours.
•
Date F
ormat: The date can be changed to one of 5 different formats.
•
Clock Mode: From here, the clock mode options are:
·
Manual: Allows for the option “Set Clock
Manually”. Touch this to begin setting the clock
manually using the “+” or “–“ to adjust the
hours and minutes up or down.
·
Time Zone: Touch the “Time Zone” key
02
to choose from the applicable time zone list,
and/or touch “Daylight Savings Time” to switch
between on and off.
·
Auto: Automatically sets the clock to the vehicles current location.
Press the BAC K button
03 to return to the previous screen.
For more information, refer to the “Monitor, climate, audio, phone and voice recognition systems (section 4)” of your
Owner’s Manual.
03
01
02
1590746_14b_Titan_QRG_020414.indd 42/4/14 10:34 AM
To view detailed instructional videos regarding these and other features, please go\
to www.nissanownersinfo.mobi.
Page 7 of 24
5
OPENING THE TAILGATE
Pull the tailgate handle 01 upward and lower the
tailgate. Support cables hold the tailgate open.
For more information, refer to the “Pre-driving checks and adjustments
(section 3)” of your Owner’s Manual.
01
POWER SEAT ADJUSTMENTS (if so equipped)
To slide the seat forward or bac kward, push the
control switch
01 forward or backward.
To adjust the angle of the seatback, push the switch
02 forward or backward.
SEAT LIFTER (if so equipped for driver’s seat)
To adjust the angle and height of the seat cushion,
push the front or rear end of the switch
01 up or down.
MANUAL LUMBAR SUPPORT (if so equipped for driver’s seat)
To adjust the lumbar area, move the lever
03 up or down.
For more information, refer to the “Safety –– Seats, seat belts and supplemental restraint system (section 1)”\
of your
Owner’s Manual.
REMOTE KEYLESS ENTRY SYSTEM (if so equipped)
The Remote Keyless Entry System allows you to lock or
unlock your vehicle and turn on the interior lights.
To lock the vehicle, press the button on your key fob.
To unlock the driver’s door, press the
button on
your key fob.
Press the button again within 5 seconds and all
doors will unlock.
For more information, refer to the “Pre-driving checks and adjustments
(section 3)” of your Owner’s Manual.
0102
03
FIRST DRIVE FEATURES
1590746_14b_Titan_QRG_020414.indd 52/4/14 10:34 AM
To view detailed instructional videos regarding these and other features, please go\
to www.nissanownersinfo.mobi.
Page 8 of 24
6
STARTING/STOPPING THE ENGINE
Depress the brake pedal.
Move the shift lever to the P (PARK) position.
Turn the ignition switch to the START position.
TURNING THE ENGINE OFF
Move the shift lever to the P (PARK) position, apply the parking brake and turn the ignition
switch to the LOCK position.
For more information, refer to the “Starting and driving (section 5)” of your Owner’s Manual.
FIRST DRIVE FEATURES
OUTSIDE MIRROR CONTROL SWITCH (if so equipped)
The outside mirror control switch is located on the
driver’s side door panel.
To select the left or right mirror, move the switch 01.
Adjust each mirror to the desired position using
the switch
02.
To prevent accidentally moving the mirror, move this
switch
01 to the center (neutral) position.
POWER FOLDING OUTSIDE MIRRORS (if so equipped)
To open or close the mirrors, push the switch 03.
For more information, refer to the “Pre-driving checks and adjustments (section 3)” of your Owner’s Manual.
02
01
0203
AUTOMATIC DRIVE POSITIONER (if so equipped)
Two positions for the driver’s seat, accelerator and
brake pedals and outside mirrors can be stored in
the automatic drive positioner memory.
Follow these procedures to set the memory positions:
• Confirm the shift lever is in the
P (PARK) position.
• Place the ignition switc
h in the ON position.
•
Adjust the driver
’s seat, accelerator and brake pedals and outside mirrors to the desired
positions using the adjusting switches for each feature.
•
Push the
SET switch and within 5 seconds, push the memory switch (1 or 2) for at least
1 second.
• T
he indicator light on the memory switch you select will illuminate for approximately 5 seconds.
•
T
he driver’s seat, accelerator and brake pedals and outside mirror positions are no\
w set to
your preference.
These memorized positions can also be linked to your NISSAN Intelligent Key®.
For more information, refer to the “Pre-driving checks and adjustments (section 3)” of your Owner’s Manual.
1590746_14b_Titan_QRG_020414.indd 62/4/14 10:34 AM
To view detailed instructional videos regarding these and other features, please go\
to www.nissanownersinfo.mobi.
Page 12 of 24
10
FM/AM/SiriusXM®* SATELLITE RADIO WITH CD PLAYER
(if so equipped)
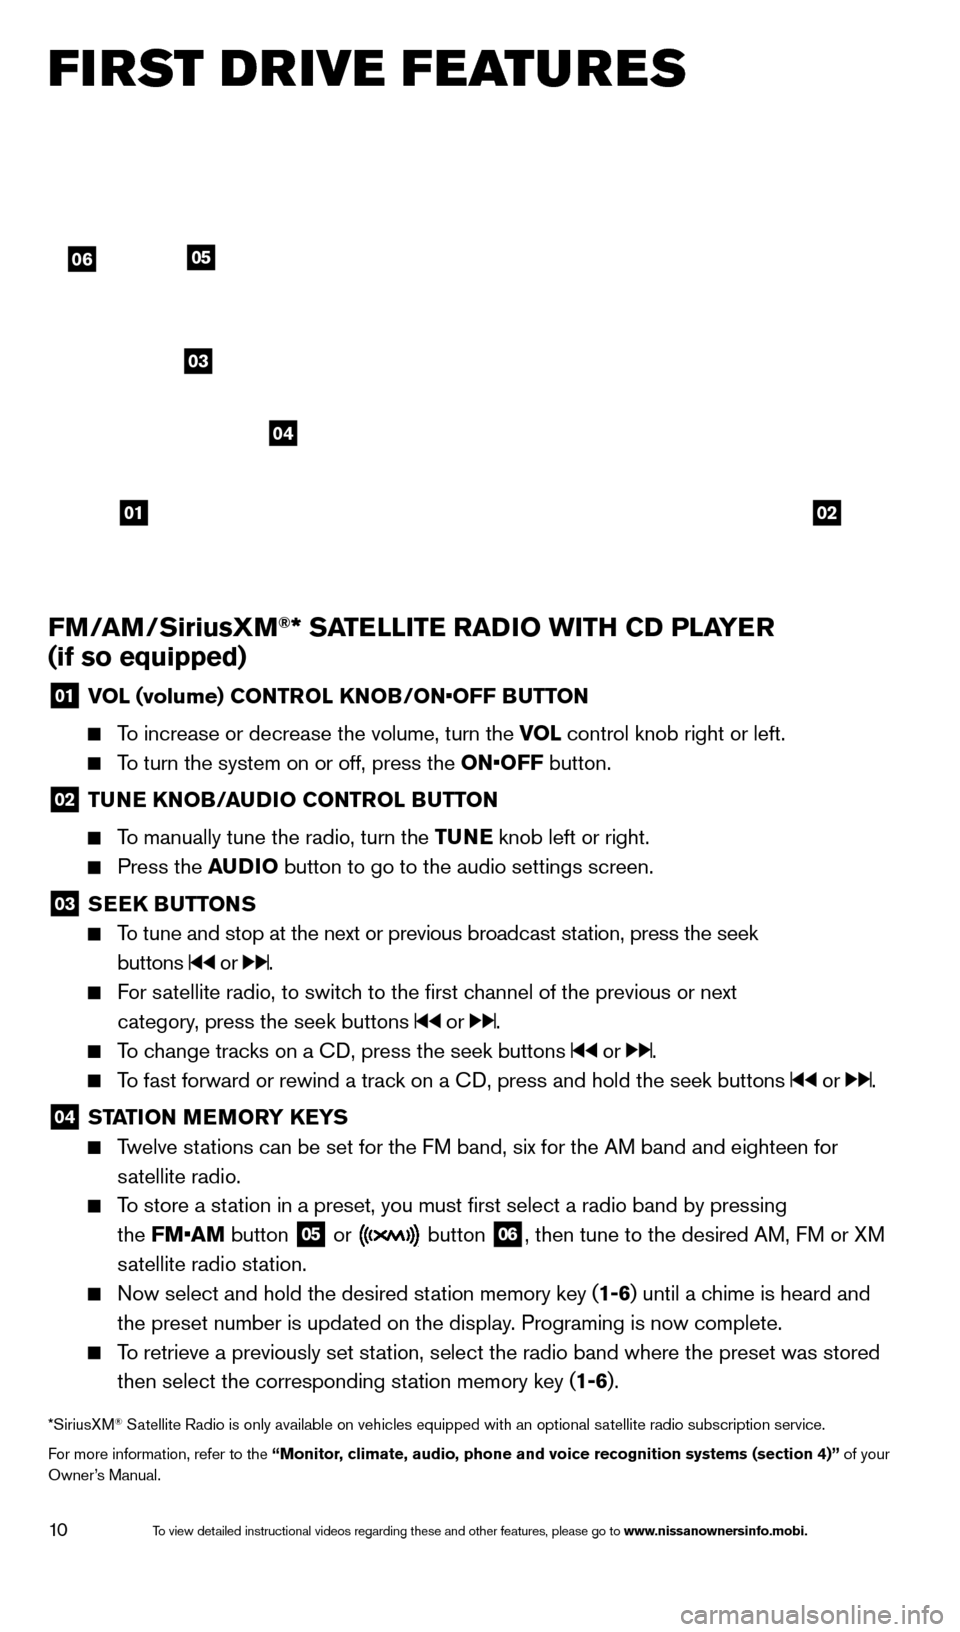
01 V OL (volume) CONTROL KNOB/ON•OFF BUTTON
To increase or decrease the volume, turn the VOL
control knob right or left.
To turn the system on or off, press the ON•OFF button.
02 TUNE KNOB/AUDIO CONTROL BUTTON
To manually tune the radio, turn the TUNE
knob left or right.
Press the AUDIO button to go to the audio settings screen.
03 SEEK BUTTONS
To tune and stop at the next or previous broadcast station, press the seek
buttons
or .
For satellite radio, to switch to the first channel of the previous or next
category, press the seek buttons
or .
To change tracks on a CD, press the seek buttons or .
To fast forward or rewind a track on a CD, press and hold the seek buttons or .
04 ST ATION MEMORY KEYS Twelve stations can be set for the FM band, six for the AM band and eighteen for
satellite radio.
To store a station in a preset, you must first select a radio band by pressing
the FM•AM button
05 or button
06, then tune to the desired AM, FM or XM
satellite radio station.
Now select and hold the desired st ation memory key (1-6)
until a chime is heard and
the preset number is updated on the display. Programing is now complete.
To retrieve a previously set station, select the radio band where the preset was stored then select the corresponding station memory key (1-6).
*SiriusXM® Satellite Radio is only available on vehicles equipped with an optional s\
atellite radio subscription service.
For more information, refer to the “Monitor, climate, audio, phone and voice recognition systems (section 4)” of your
Owner’s Manual.
FI RST DRIVE FEATURES
0102
06
03
04
05
1590746_14b_Titan_QRG_020414.indd 102/4/14 10:34 AM
To view detailed instructional videos regarding these and other features, please go\
to www.nissanownersinfo.mobi.
Page 16 of 24

14
To increase or decrease the volume of the voice prompts, push the volume \
control switches
or
on the steering wheel or turn the volume control dial on the audio syste\
m while the
system is responding.
If the Voice Recognition system does not recognize your voice commands, train th\
e system using the Speaker Adaptation Mode. See your Owner’s Manual for detailed information.
For more detailed information and instructions, refer to your cellular phone Owner’s Manual and visit www.nissanusa.com/bluetooth.
BLUETOOTH® SYSTEM WITHOUT NAVIGATION* (if so equipped)
CONNECTING PROCEDURE
The vehicle must be stationary when connecting the phone.
1.
Press the
button on the steering wheel. The system announces the available commands.
2.
S
ay: “Connect phone”. The system acknowledges the command and announces the next set
of available commands.
3.
S
ay: “Add phone”. The system acknowledges the command and asks you to initiate connecting
from the phone handset.
4.
Initiate connecting from the phone:
The connecting procedure varies according to each cellular phone model.
For detailed connecting instructions and compatible phones, please visit
www.nissanusa.com/bluetooth.
When prompted for a Passkey code, enter “1234” from the handset. (The Passkey code is assigned by NISSAN and cannot be changed.)
5.
S
ay a name for the phone when the system asks you to provide one. You can give the phone
a name of your choice.
PHONEBOOK SETUP
Depending on your cell phone, the system may automatically download your\
cell phone’ s
entire phonebook to the vehicle’s Bluetooth system.
If the phonebook does not download automatically, 40 entries can be individually downloaded.
To manually download entries:
1. Push the button on the steering wheel.
2. After the tone, s
ay “Phonebook”.
3.
After the next tone, s
ay “Transfer Entry”. The system acknowledges the command and
asks you to initiate the transfer from the phone handset. The new contact phone number
will be transferred from the cellular phone to the vehicle.
SYS T E M GUIDE
*Some jurisdictions prohibit the use of cellular telephones while drivin\
g.
1590746_14b_Titan_QRG_020414.indd 142/4/14 10:34 AM
To view detailed instructional videos regarding these and other features, please go\
to www.nissanownersinfo.mobi.
Page 18 of 24
16
SYS T E M GUIDE
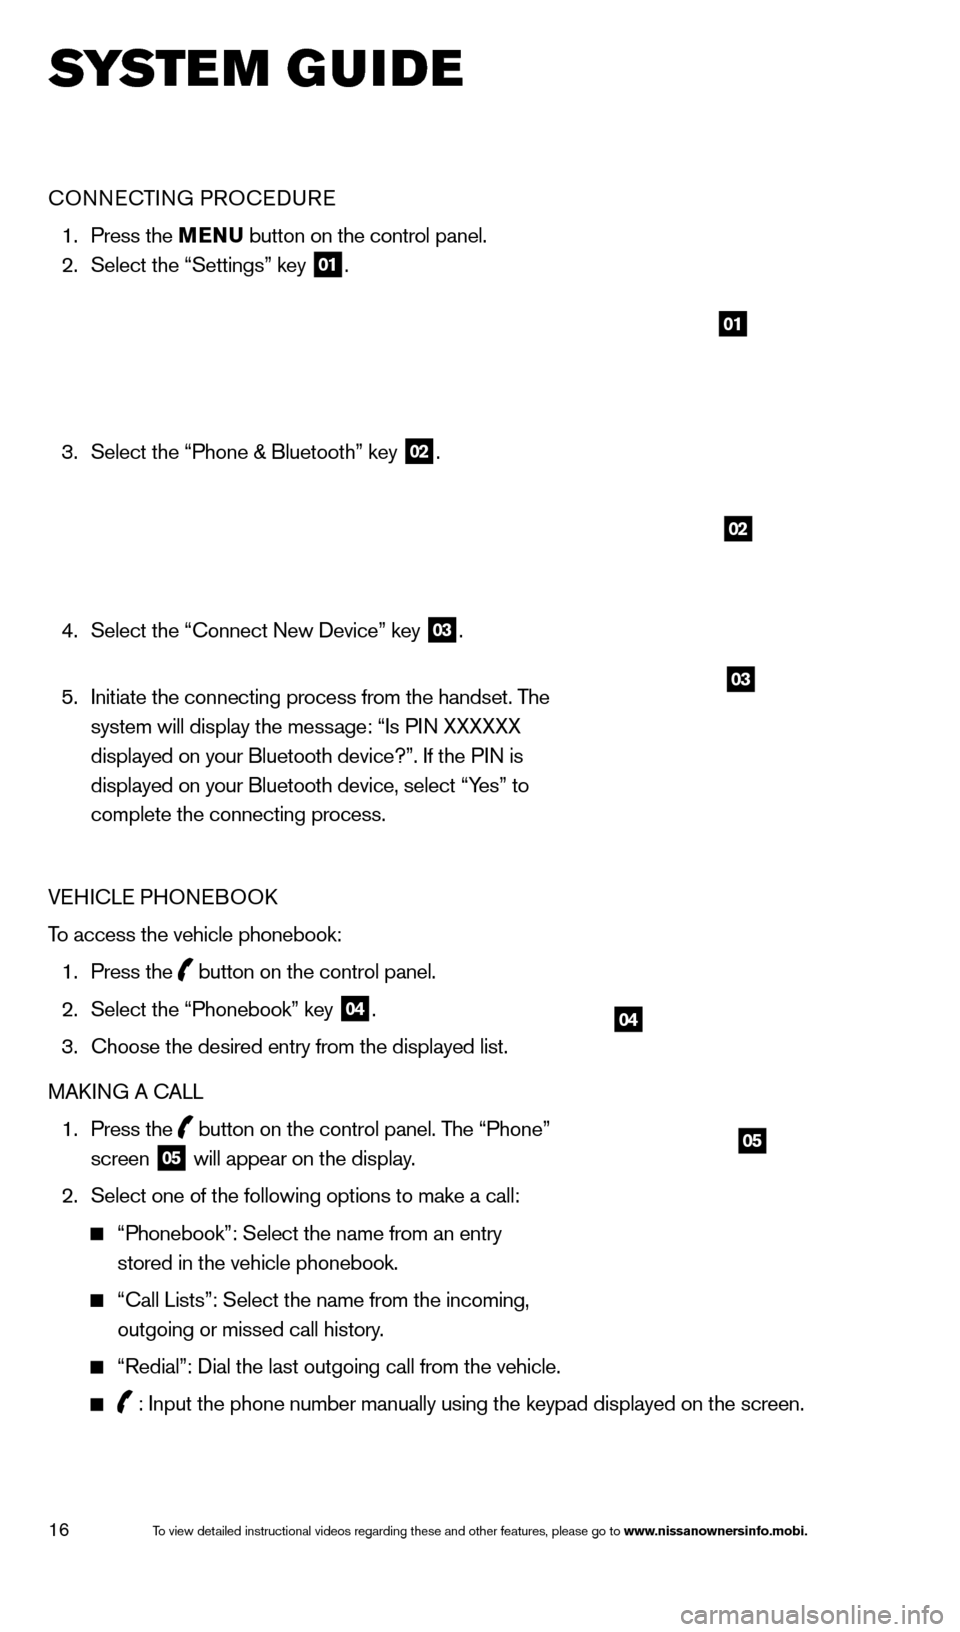
CONNECTING PROCEDURE
1. Press the MENU button on the control panel.
2.
Select the “Settings” key 01.
3.
Select the “Phone & Bluetooth” key 02.
4.
Select the “Connect New Device” key 03.
5.
Initiate the connecting process from the handset. T
he
system will display the message: “Is PIN XXXXXX
displayed on your Bluetooth device?”. If the PIN is
displayed on your Bluetooth device, select “Yes” to
complete the connecting process.
VEHICLE PHONEBOOK
To access the vehicle phonebook:
1.
Press the button on the control panel.
2.
Select the “Phonebook” key 04.
3.
Choose the desired entry from the displayed list.
MAK
ING A CALL
1.
Press the
button on the control panel. The “Phone”
screen 05 will appear on the display.
2.
Select one of the following options to make a call:
“Phonebook”: Select the name from an entry
stored in the vehicle phonebook.
“Call Lists”: Select the name from the incoming,
outgoing or missed call history.
“Redial”: Dial the last outgoing call from the vehicle.
: Input the phone number manually using the keypad displayed on the scre\
en.
01
02
03
04
05
1590746_14b_Titan_QRG_020414.indd 162/4/14 10:34 AM
To view detailed instructional videos regarding these and other features, please go\
to www.nissanownersinfo.mobi.
Page 20 of 24
18
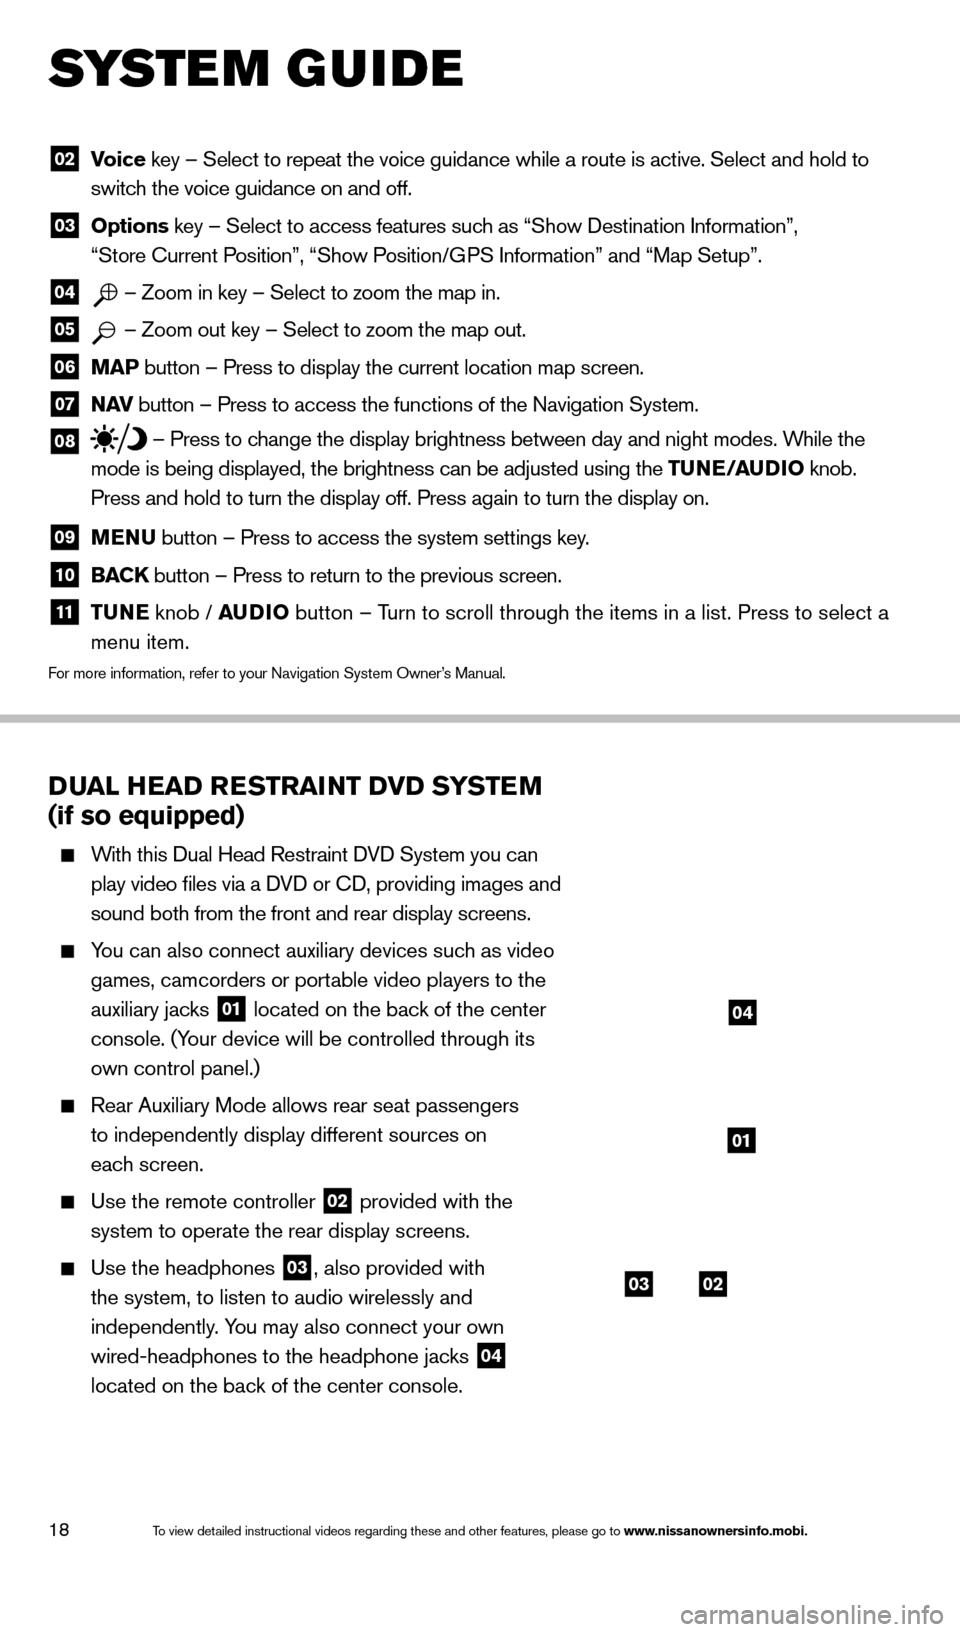
DUAL HEAD RESTRAINT DVD SYSTEM
(if so equipped)
With this Dual Head Restraint DVD System you can
play video files via a DVD or CD, providing images and
sound both from the front and rear display screens.
You can also connect auxiliary devices such as video games, camcorders or portable video players to the
auxiliary jacks
01 located on the back of the center
console. (Your device will be controlled through its
own control panel.)
Rear Auxiliary Mode allows rear seat passengers
to independently display different sources on
each screen.
Use the remote controller 02 provided with the
system to operate the rear display screens.
Use the headphones 03, also provided with
the system, to listen to audio wirelessly and
independently. You may also connect your own
wired-headphones to the headphone jacks
04
located on the back of the center console.
02 V oice key – Select to repeat the voice guidance while a route is active. S\
elect and hold to
switch the voice guidance on and off.
03 Options key – Select to access features such as “Show Destination Information”,
“Store Current Position”, “Show Position/GPS Information” and “Map Setup”.
04 – Zoom in key – Select to zoom the map in.
05 – Zoom out key – Select to zoom the map out.
06 MAP button – Press to display the current location map screen.
07 NAV
button – Press to access the functions of the Navigation System.
08 – Press to change the display brightness between day and night modes. While the
mode is being displayed, the brightness can be adjusted using the TUNE/AUDIO knob.
Press and hold to turn the display off. Press again to turn the display \
on.
09 MENU button – Press to access the system settings key .
10 BACK
button – Press to return to the previous screen.
11 T UNE
knob / AUDIO button – Turn to scroll through the items in a list. Press to select a
menu item.
For more information, refer to your Navigation System Owner’s Manual.
SYS T E M GUIDE
0302
01
04
1590746_14b_Titan_QRG_020414.indd 182/4/14 10:34 AM
To view detailed instructional videos regarding these and other features, please go\
to www.nissanownersinfo.mobi.