display NISSAN TITAN 2016 2.G Quick Reference Guide
[x] Cancel search | Manufacturer: NISSAN, Model Year: 2016, Model line: TITAN, Model: NISSAN TITAN 2016 2.GPages: 40, PDF Size: 2.64 MB
Page 14 of 40
12
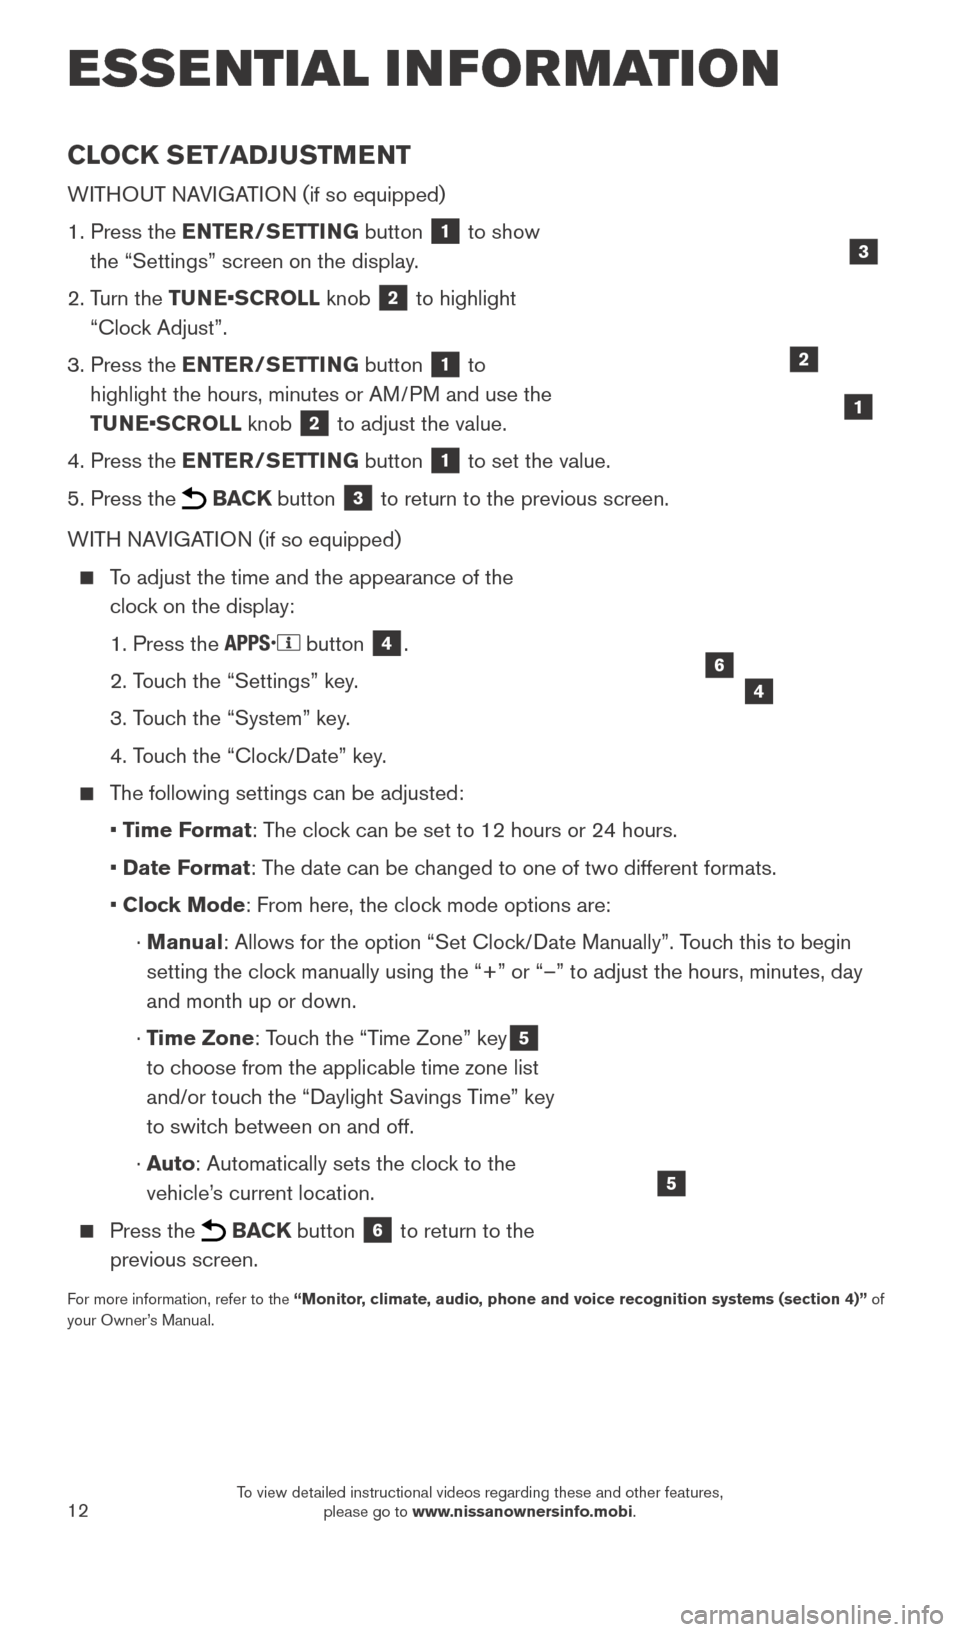
CLOCK SET/ADJUSTMENT
WITHOUT NAVIGATION (if so equipped)
1.
Press the
ENTER/SETTING button
1 to show
the “Settings” screen on the display.
2.
T
urn the TUNE•SCROLL knob
2 to highlight
“Clock Adjust”.
3.
Press the
ENTER/SETTING button
1 to
highlight the hours, minutes or AM/PM and use the
TUNE•SCROLL knob
2 to adjust the value.
4.
Press the
ENTER/SETTING button
1 to set the value.
5.
Press the BACK button 3 to return to the previous screen.
WITH NAVIGATION (if so equipped)
To adjust the time and the appearance of the clock on the display:
1. Press the button 4.
2. T
ouch the “Settings” key.
3. T
ouch the “System” key.
4. T
ouch the “Clock/Date” key.
The following settings can be adjusted:
•
T
ime Format: The clock can be set to 12 hours or 24 hours.
•
Date F
ormat: The date can be changed to one of two different formats.
• Cloc
k Mode: From here, the clock mode options are:
·
Manual: Allows for the option “Set Clock/Date Manually”. Touch this to begin
setting the clock manually using the “+” or “–” to adjust the hours, minu\
tes, day
and month up or down.
·
T
ime Zone: Touch the “Time Zone” key
5
to choose from the applicable time zone list
and/or touch the “Daylight Savings Time” key
to switch between on and off.
·
Auto: Automatically sets the clock to the
vehicle’s current location.
Press the BACK button 6 to return to the
previous screen.
For more information, refer to the “Monitor, climate, audio, phone and voice recognition systems (section 4)” of
your Owner’s Manual.
5
2
ESSE NTIAL I N FOR MATION
1
46
3
2027886_16b_Titan_US_pQRG_010716.indd 121/7/16 2:02 PM
To view detailed instructional videos regarding these and other features, please go to www.nissanownersinfo.mobi.
Page 21 of 40
19
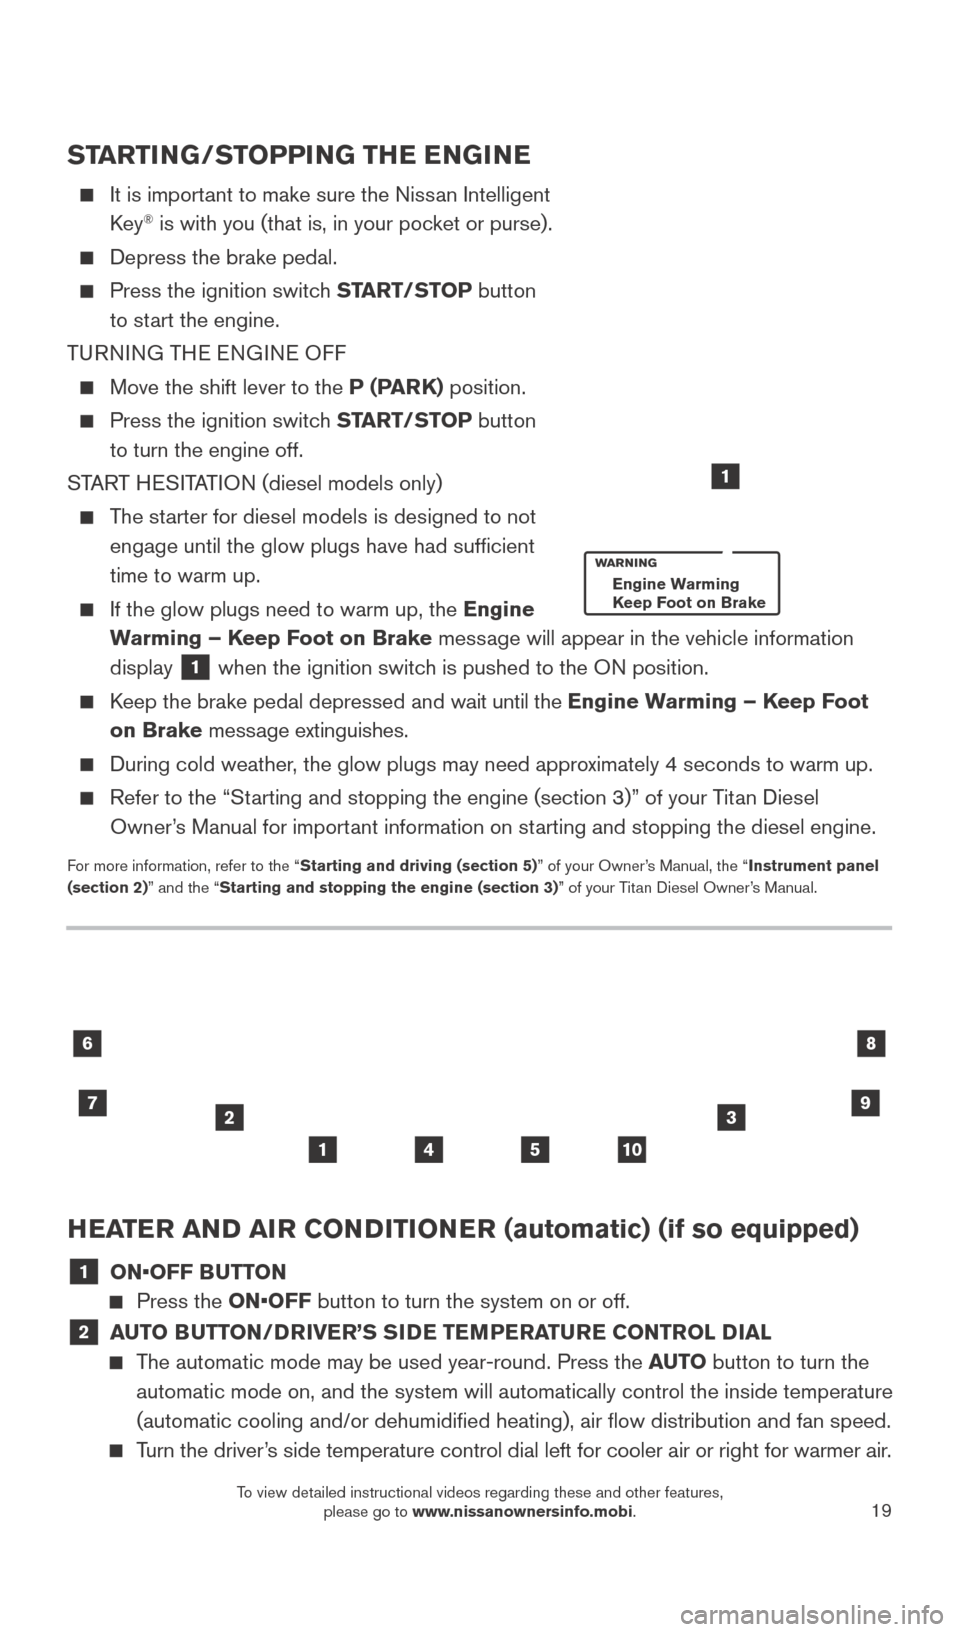
HEATER AND AIR CONDITIONER (automatic) (if so equipped)
1 ON•OFF BUTTON
Press the ON•OFF button to turn the system on or off.
2 AUTO BUTTON/DRIVER’S SIDE TEMPERATURE CONTROL DIAL
The automatic mode may be used year-round. Press the AUTO button to turn the
automatic mode on, and the system will automatically control the inside \
temperature
(automatic cooling and/or dehumidified heating), air flow distribu\
tion and fan speed.
Turn the driver’s side temperature control dial left for cooler air or right for warmer \
air.
23
10
6
7
8
541
9
STARTING/STOPPING THE ENGINE
It is import ant to make sure the Nissan Intelligent
Key® is with you (that is, in your pocket or purse).
Depress the brake pedal.
Press the ignition switc h START/STOP button
to start the engine.
TURNING THE ENGINE OFF
Move the shift lever to the P (PARK) position.
Press the ignition switch START/STOP button
to turn the engine off.
START HESITATION (diesel models only)
The starter for diesel models is designed to not engage until the glow plugs have had sufficient
time to warm up.
If the glow plugs need to warm up, the Engine
Warming – Keep Foot on Brake message will appear in the vehicle information
display
1 when the ignition switch is pushed to the ON position.
Keep the brake pedal depressed and wait until the Engine Warming – Keep Foot
on Brake message extinguishes.
During cold weather , the glow plugs may need approximately 4 seconds to warm up.
Refer to the “Starting and stopping the engine (section 3)” of your Titan Diesel
Owner’s Manual for important information on starting and stopping the diesel engine.
For more information, refer to the “Starting and driving (section 5)” of your Owner’s Manual, the “Instrument panel
(section 2)” and the “Starting and stopping the engine (section 3)” of your Titan Diesel Owner’s Manual.
1
Engine Warming
Keep Foot on Brake
2027886_16b_Titan_US_pQRG_010716.indd 191/7/16 2:03 PM
To view detailed instructional videos regarding these and other features, please go to www.nissanownersinfo.mobi.
Page 23 of 40
21
FM/AM/SiriusXM®* SATELLITE RADIO WITH CD PLAYER
(if so equipped)
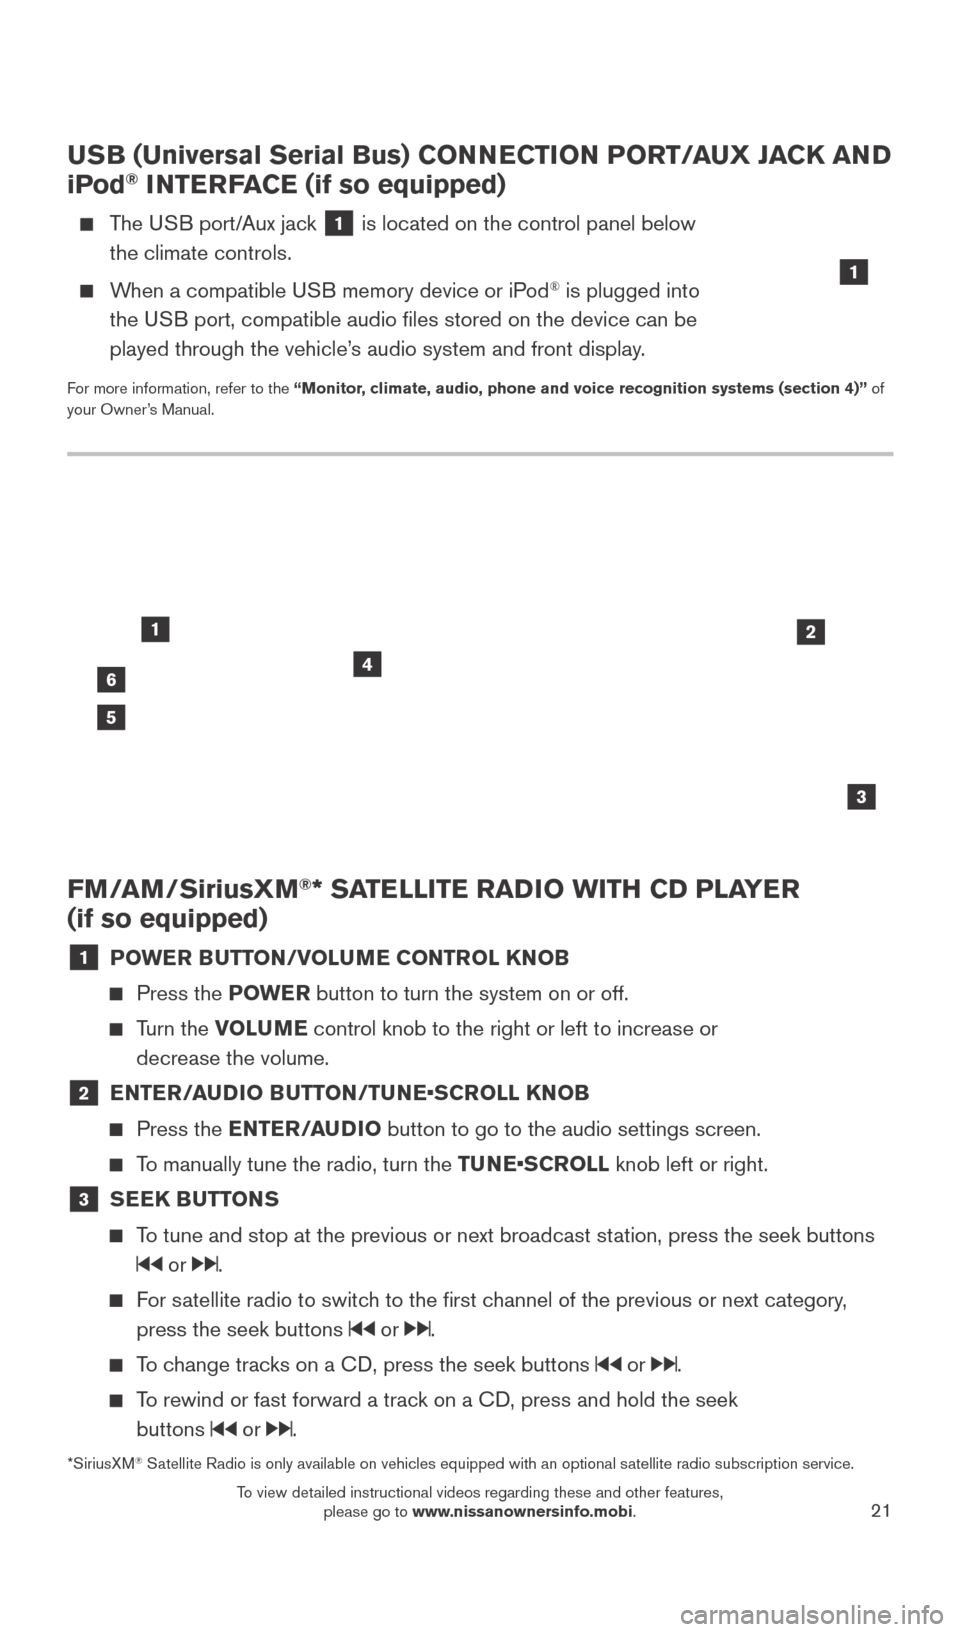
1 POWER BUTTON/VOLUME CONTROL KNOB
Press the POWE R button to turn the system on or off.
Turn the VOLUME control knob to the right or left to increase or
decrease the volume.
2 E NTER/AUDIO BUTTON/TUNE•SCROLL KNOB
Press the
ENTER/AUDIO button to go to the audio settings screen.
To manually tune the radio, turn the TUNE•SCROLL knob left or right.
3 SEEK BUTTONS
To tune and stop at the previous or next broadcast station, press the seek buttons
or .
For satellite radio to switch to the first channel of the previous or next category,
press the seek buttons
or .
To change tracks on a CD, press the seek buttons or .
To rewind or fast forward a track on a CD, press and hold the seek buttons
or .
46
2
3
1
5
USB (Universal Serial Bus) CONNECTION PORT/AUX JACK AND
iPod® INTERFACE (if so equipped)
The USB port/Aux jack 1 is located on the control panel below
the climate controls.
When a compatible USB memory device or iPod® is plugged into
the USB port, compatible audio files stored on the device can be
played through the vehicle’s audio system and front display.
For more information, refer to the “Monitor, climate, audio, phone and voice recognition systems (section 4)” of
your Owner’s Manual.
1
*SiriusXM® Satellite Radio is only available on vehicles equipped with an optional s\
atellite radio subscription service.
2027886_16b_Titan_US_pQRG_010716.indd 211/7/16 2:03 PM
To view detailed instructional videos regarding these and other features, please go to www.nissanownersinfo.mobi.
Page 24 of 40

22
4 STATION SELECT KEYS
Twelve stations can be set for the FM band, six for the AM band and 18 for
satellite radio.
To store a station in a preset, you must first select a radio band by pressing the \
FM•AM button
5 or SXM button 6 then tune to the desired FM, AM or
satellite radio station.
Next touch and hold the desired station select key (1-6) until a beep is heard and the sound is briefly muted. The channel indicator will appear on the display, and the
sound will resume. Programing is now complete.
To retrieve a previously set station, select the radio band where the preset was stored then touch the corresponding station select button (1-6).
For more information, refer to the “Monitor, climate, audio, phone and voice recognition systems (section 4)” of
your Owner’s Manual.
CRUISE CONTROL
The cruise control system enables you to set a
constant cruising speed once the vehicle has
reached 25 mph (40 km/h).
The system will automatically maintain the set speed until you tap the brake pedal, accelerate,
cancel or turn the system off.
To activate the cruise control, push the ON/OFF switch
1 on the steering wheel. The CRUISE
indicator light in the vehicle information display
will illuminate.
To set a cruising speed, accelerate the vehicle to the desired speed, pus\
h the COAST/SET switch
2 on the steering wheel and release. The SET indicator light in
the vehicle information display will illuminate. Take your foot off the accelerator pedal.
Your vehicle will maintain the set speed.
To reset at a faster cruising speed, push up and hold the ACCEL/RES switch 3 on
the steering wheel. When the vehicle attains the desired speed, release the switch.
To reset at a slower cruising speed, push down and hold the COAST/SET switch 2
on the steering wheel. Release the switch when the vehicle slows to the desired speed.
To cancel the preset speed, tap the brake pedal or push the CANCEL switch 4 on
the steering wheel.
To turn off cruise control, push the ON/OFF switch 1 on the steering wheel. Both
the CRUISE indicator light and SET indicator light in the vehicle information display
will extinguish.
For more information, refer to the “Starting and driving (section 5)” of your Owner’s Manual.
4
3
2
1
FIRST DRIVE FEATURES
2027886_16b_Titan_US_pQRG_010716.indd 221/7/16 2:03 PM
To view detailed instructional videos regarding these and other features, please go to www.nissanownersinfo.mobi.
Page 26 of 40
24
VEHICLE INFORMATION DISPLAY
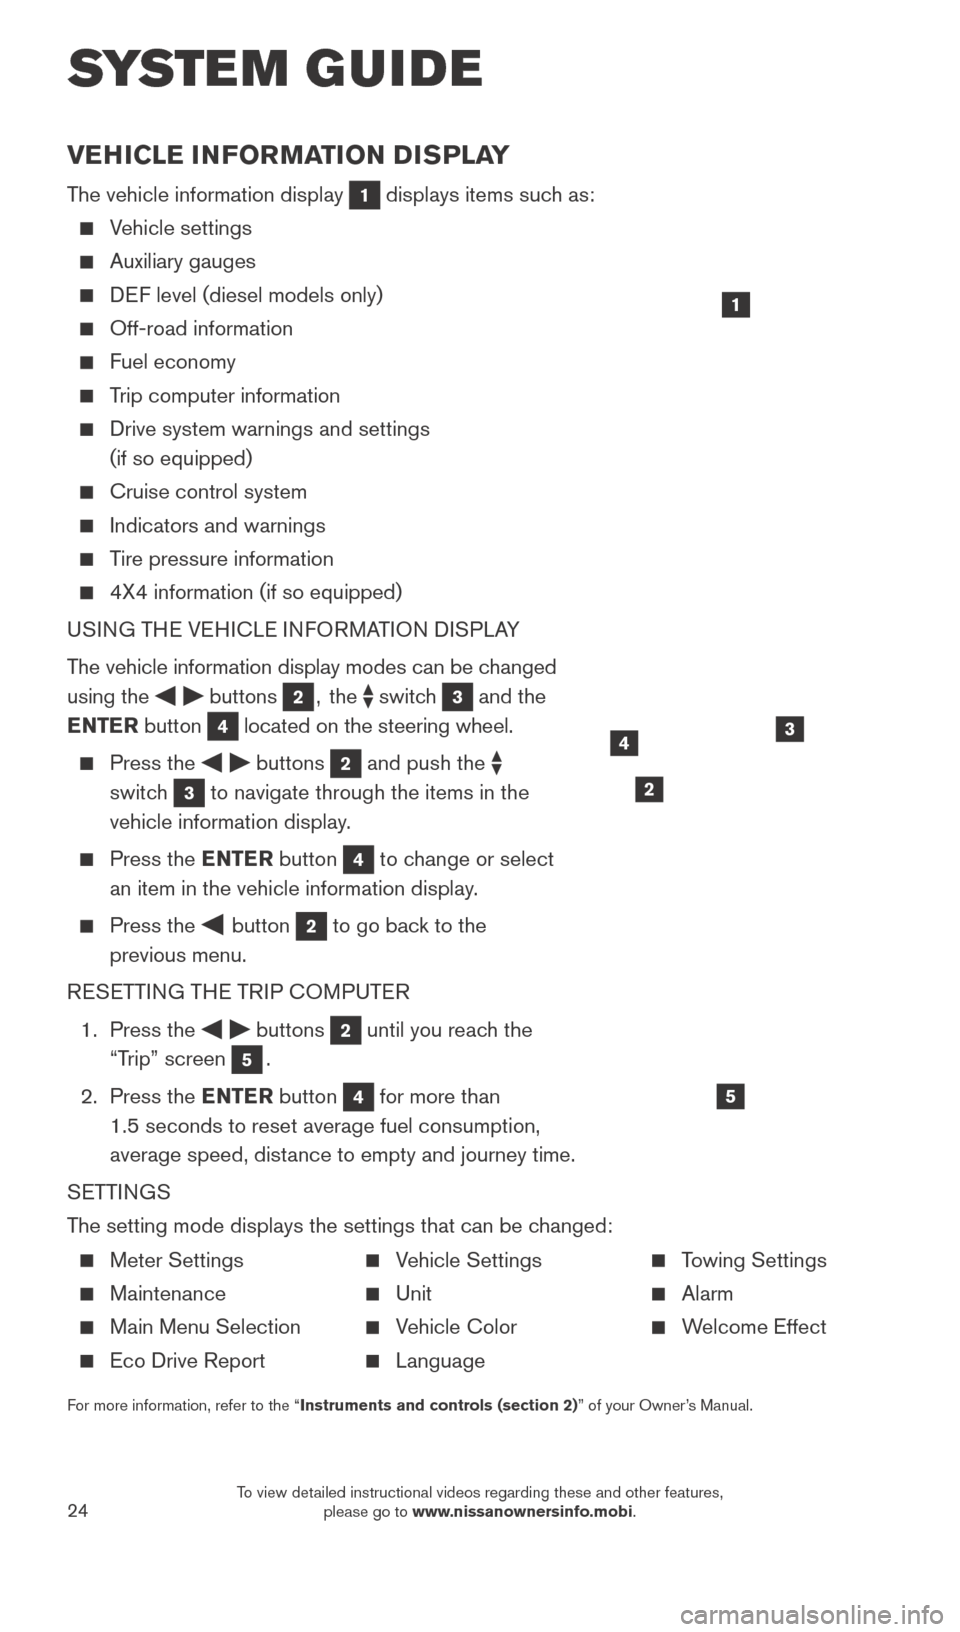
The vehicle information display 1 displays items such as:
Vehicle settings
Auxiliary gauges
DEF level (diesel models only)
Off-road information
Fuel economy
Trip computer information
Drive system warnings and settings
(if so equipped)
Cruise control system
Indicators and warnings
Tire pressure information
4X4 information (if so equipped)
USI NG THE VEHICLE INFORMATION DISPLAY
The vehicle information display modes can be changed
using the
buttons 2, the switch 3 and the
ENTER button
4 located on the steering wheel.
Press the buttons 2 and push the
switch
3 to navigate through the items in the
vehicle information display.
Press the E NTER button 4 to change or select
an item in the vehicle information display.
Press the button 2 to go back to the
previous menu.
RESETTING THE TRIP COMPUTER
1.
Press the
buttons 2 until you reach the
“Trip” screen
5.
2.
Press the ENTER button
4 for more than
1.5 seconds to reset average fuel consumption,
average speed, distance to empty and journey time.
SETTINGS
The setting mode displays the settings that can be changed:
1
34
5
2
SYS T E M GUIDE
Meter Settings
Maintenance
Main Menu Selection
Eco Drive Report
Vehicle Settings
Unit
Vehicle Color
Language
Towing Settings
Alarm
Welcome Effect
For more information, refer to the “Instruments and controls (section 2)” of your Owner’s Manual.
2027886_16b_Titan_US_pQRG_010716.indd 241/7/16 2:04 PM
To view detailed instructional videos regarding these and other features, please go to www.nissanownersinfo.mobi.
Page 27 of 40
25
HANDS-FREE TEXT MESSAGING ASSISTANT1,2 (if so equipped)
This system allows for sending and receiving text messages through the vehicle’s interface.
Using predefined or custom mess ages, send a
text to a name or phone number stored in your
Bluetooth
® Hands-free Phone System3.
Once enabled, the text mess age, sender and
delivery time are shown on the control panel
display when the vehicle speed is less than 5 mph (8 km/h).
Text messages have the option of being read aloud at all vehicle speeds.
Many cellular phones may require special permission to enable text mess aging.
Check the cellular phone’s screen during Bluetooth®,3 pairing. For some cellular
phones, you need to enable “Notifications” in the cellular phone\
’s Bluetooth®,3 menu
for text messages to appear on the touch-screen display. For more information and
instructions, refer to your cellular phone’s Owner’s Manual.
Text message integration requires that the cellular phone support Message Access Profile (MAP) for both receiving and sending text messages. Some cellular phones may
not support all text messaging features. Please see www.NissanUSA.com/bluetooth
for compatibility information as well as your device’s Owner’s Manual.
1 Laws in some jurisdictions may restrict the use of “T ext-to-Speech”. Some of the applications and features, such
as social networking and texting, may also be restricted. Check local regulations for any requirements before using
these features.
2 Compatible smartphone required. Text rates and/or data usage may apply.
3 Availability of specific features is dependent upon the phone’s Bluetooth® support. Please refer to your phone owner’s
manual for details. Bluetooth® word mark and logos are owned by Bluetooth SIG, Inc., and any use of such marks by
NISSAN is under license. See www.NissanUSA.com/bluetooth for details.
For more information, refer to the “Monitor, climate, audio, phone and voice recognition systems (section 4)”
of your Owner’s Manual.
2027886_16b_Titan_US_pQRG_010716.indd 251/7/16 2:04 PM
To view detailed instructional videos regarding these and other features, please go to www.nissanownersinfo.mobi.
Page 30 of 40
28
BLUETOOTH® SYSTEM WITHOUT NAVIGATION1,2
(if so equipped)
CONNECTING PROCEDURE3
The vehicle must be stationary when connecting the cellular phone.
1.
Press the
button on the steering wheel. The system announces the
available commands.
2.
S
ay: “Add Phone”. The system acknowledges the command and asks you to initiate
connecting from the cellular phone handset.
3.
Initiate connecting from the cellular phone:
The connecting procedure varies according to each cellular phone model. For detailed connecting instructions and a list of compatible cellular phones, \
please
visit www.NissanUSA.com/bluetooth.
When prompted, confirm that the PIN on the display matches the PIN shown on the handset. If your handset does not support Secure Simple Pairing and \
requests
you to input a PIN, enter “1234” from the handset.
PHONEBOOK SETUP
The phonebook stores up to 1,000 entries for each cellular phone paired with the system.
Depending on your cellular phone, the system may automatically download \
your
cellular phone’ s entire phonebook to the vehicle’s Bluetooth®,2 system.
MAKING A CALL FROM THE PHONEBOOK
1.
Press the button on the steering wheel.
2.
After waiting for the tone, s
ay “Call” followed by the name of a phonebook entry. For
example, “Call Michael Smith”.
3.
Confirm the correct name is recognized by s
aying “Dial” after the tone.
MAKING A CALL BY PHONE NUMBER
1.
Press the button on the steering wheel. A tone will sound.
2.
S
ay: “Phone”. The system acknowledges the command and announces the next set of
available commands.
3.
S
ay: “Dial Number”. The system acknowledges the command and announces the next
set of available commands.
4.
S
ay the number you wish to call starting with the area code in single digit format.
5.
W
hen you have finished speaking the phone number, the system repeats it back and
announces the available commands.
6.
S
ay: “Dial”. The system acknowledges the command and makes the call.
SYSTEM GUIDE
2027886_16b_Titan_US_pQRG_010716.indd 281/7/16 2:04 PM
To view detailed instructional videos regarding these and other features, please go to www.nissanownersinfo.mobi.
Page 31 of 40
29
RECEIVING/ENDING A CALL
When you receive a phone call, a ring tone sounds through the audio syste\
m.
To accept the call, press the button on the steering wheel.
To reject the call, press the button on the steering wheel.
To hang up the cellular phone at the end of a call or to disconnect durin\
g call placement, press the
button on the steering wheel.
1 Some jurisdictions prohibit the use of cellular telephones while drivin\
g.2 Availability of specific features is dependent upon the phone’s Bluetooth® support. Please refer to your phone owner’s
manual for details. Bluetooth® word mark and logos are owned by Bluetooth SIG, Inc., and any use of such marks by
NISSAN is under license. See www.NissanUSA.com/bluetooth for details.
3 Laws in some jurisdictions may restrict the use of “T ext-to-Speech”. Some applications and features, such as social
networking and texting, may also be restricted. Check local regulations for any requirements before using these features.
Compatible smartphone required. Text rates and/or data usage may apply.
To view detailed instructional videos regarding these and other features, please go\
to www.nissanownersinfo.mobi.
For more information, refer to the “Monitor, climate, audio, phone and voice recognition systems (section 4)” of
your Owner’s Manual.
BLUETOOTH® SYSTEM WITH NAVIGATION1,2 (if so equipped)
Send predefined or custom text mess ages3 through your vehicle’s Bluetooth®,2 system.
Receive texts through your vehicle’s Bluetooth®,2 system that can be read to you.
Bluetooth®,2 Streaming Audio allows you to use a
compatible Bluetooth®,2 device to play audio files
on your device. Your compatible device can be
connected to the vehicle’s audio system, allowing
audio files to play through the vehicle’s speakers.
CONNECTING PROCEDURE
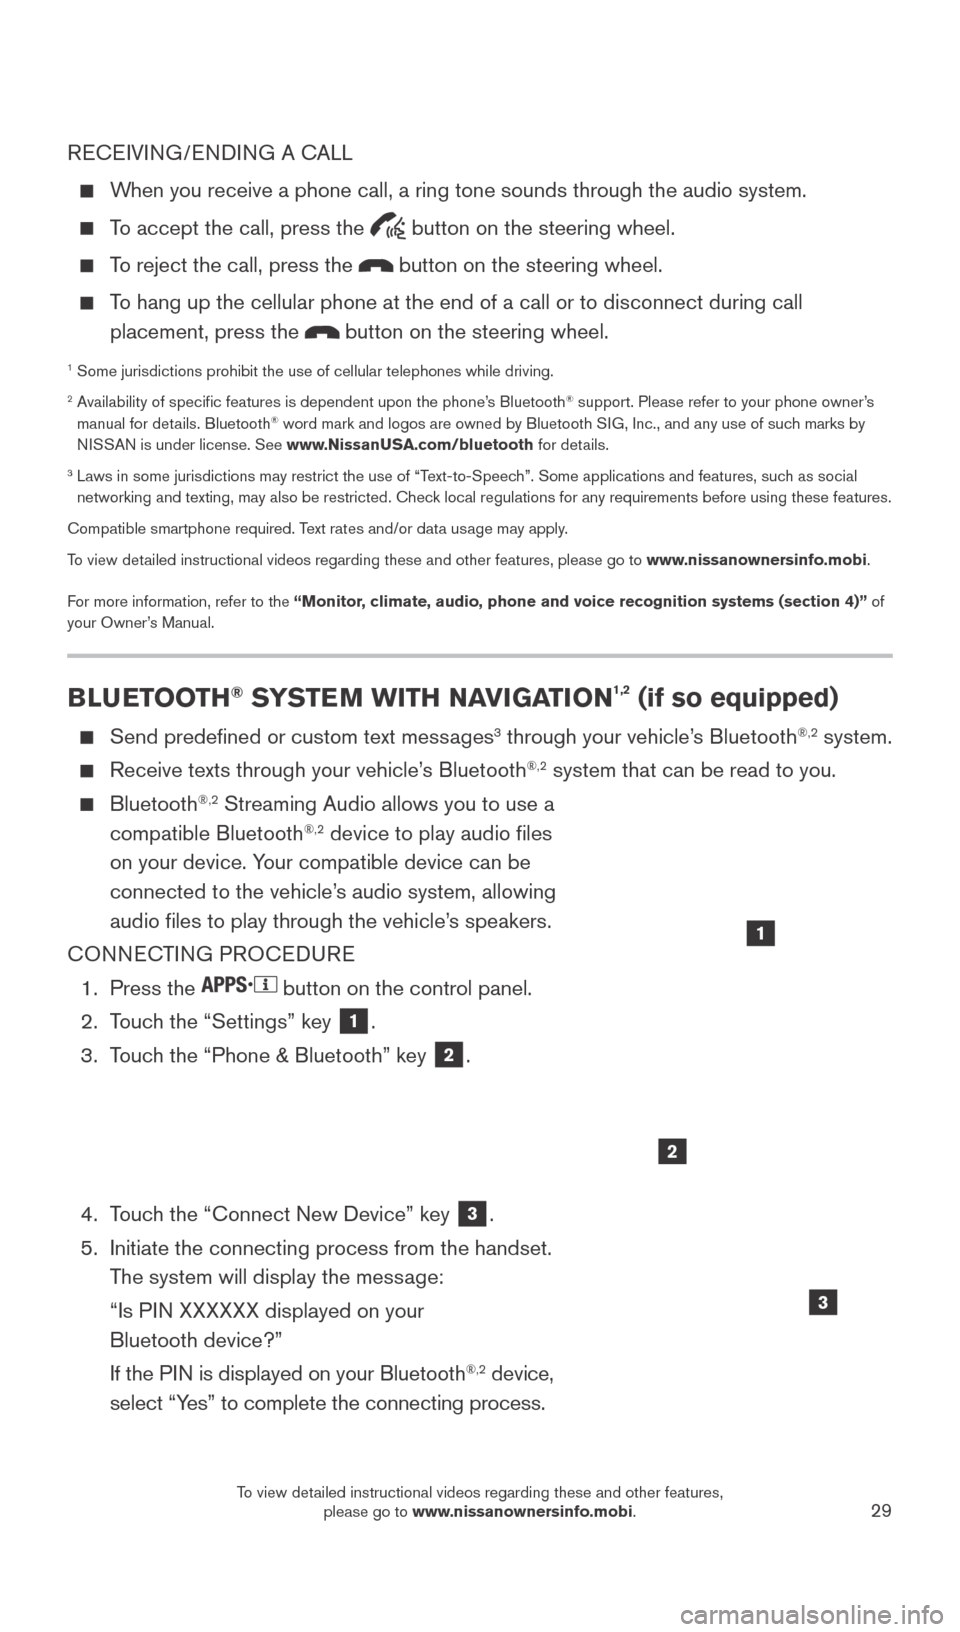
1.
Press the button on the control panel.
2.
T
ouch the “Settings” key
1.
3.
T
ouch the “Phone & Bluetooth” key
2.
4.
T
ouch the “Connect New Device” key
3.
5.
Initiate the connecting process from the handset.
T
he system will display the message:
“Is P
IN XXXXXX displayed on your
Bluetooth device?”
If the P
IN is displayed on your Bluetooth
®,2 device,
select “Yes” to complete the connecting process.
1
2
3
2027886_16b_Titan_US_pQRG_010716.indd 291/7/16 2:04 PM
To view detailed instructional videos regarding these and other features, please go to www.nissanownersinfo.mobi.
Page 32 of 40
30
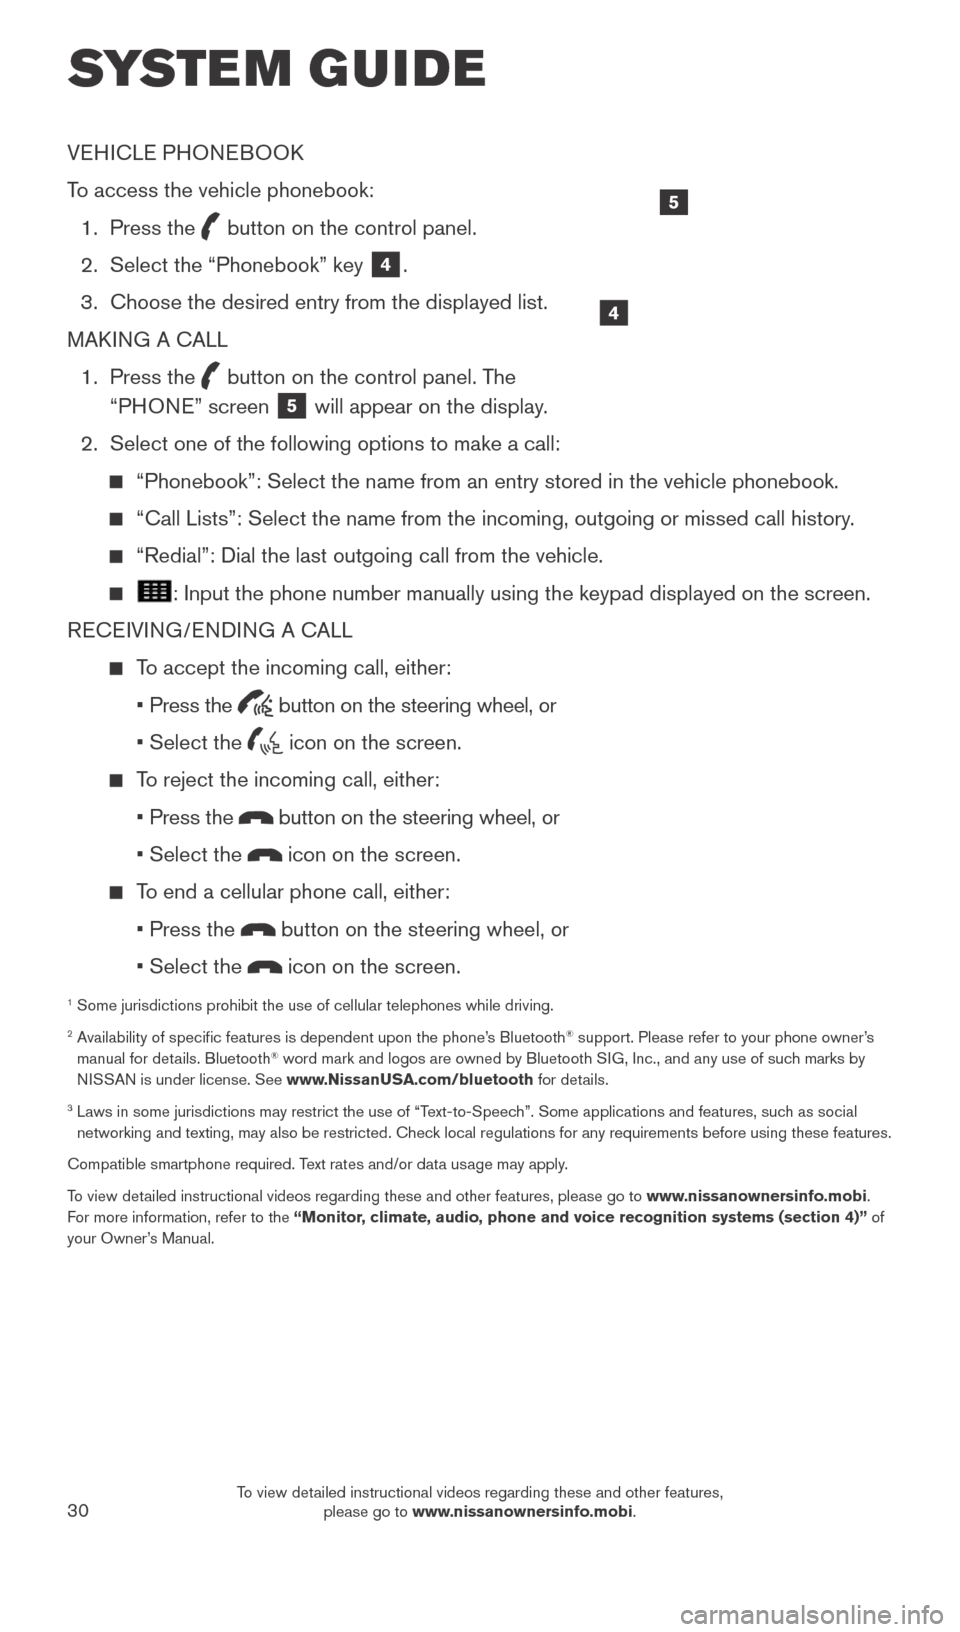
VEHICLE PHONEBOOK
To access the vehicle phonebook:
1.
Press the button on the control panel.
2.
Select the “Phonebook” key 4.
3.
Choose the desired entry from the displayed list.
MAK
ING A CALL
1.
Press the
button on the control panel. The
“PHONE” screen 5 will appear on the display.
2.
Select one of the following options to make a call:
“Phonebook”: Select the name from an entry stored in the vehicle p\
honebook.
“Call Lists”: Select the name from the incoming, outgoing or misse\
d call history .
“Redial”: Dial the last outgoing call from the vehicle.
: Input the phone number manually using the keypad displayed on the scre\
en.
RECEIVING/ENDING A CALL
To accept the incoming call, either:
•
Press the
button on the steering wheel, or
• Select the icon on the screen.
To reject the incoming call, either:
•
Press the
button on the steering wheel, or
• Select the icon on the screen.
To end a cellular phone call, either:
• Press the button on the steering wheel, or
• Select the icon on the screen.
1 Some jurisdictions prohibit the use of cellular telephones while drivin\
g.2 Availability of specific features is dependent upon the phone’s Bluetooth® support. Please refer to your phone owner’s
manual for details. Bluetooth® word mark and logos are owned by Bluetooth SIG, Inc., and any use of such marks by
NISSAN is under license. See www.NissanUSA.com/bluetooth for details.
3 Laws in some jurisdictions may restrict the use of “T ext-to-Speech”. Some applications and features, such as social
networking and texting, may also be restricted. Check local regulations for any requirements before using these features.
Compatible smartphone required. Text rates and/or data usage may apply.
To view detailed instructional videos regarding these and other features, please go\
to www.nissanownersinfo.mobi.
For more information, refer to the “Monitor, climate, audio, phone and voice recognition systems (section 4)” of
your Owner’s Manual.
4
5
SYSTEM GUIDE
2027886_16b_Titan_US_pQRG_010716.indd 301/7/16 2:04 PM
To view detailed instructional videos regarding these and other features, please go to www.nissanownersinfo.mobi.
Page 33 of 40
31
NISSAN MOBILE ENTERTAINMENT SYSTEM (MES)
(if so equipped)
With the MES, you can play DVD videos, video CDs or CDs that contain music or sound
content. Images will display on the corresponding
monitor. Sound will play from the vehicle’s audio
system (or wireless headphones provided in
the kit) or your own wired headphones after
connecting them to the headphone jacks of the
corresponding DVD player.
1.
Place the ignition switc
h in the ACC or
ON position.
2.
Press the
(power) button 1 on each monitor
control panel to power on.
3.
Insert a D
VD (label facing to the rear of the
vehicle) into either monitor.
4.
Press the
button 2 to begin playing the DVD if it does not
begin automatically.
5.
T
o eject a DVD:
•
Press the button 3 on the corresponding monitor control panel, or
•
Press the corresponding monitor control button (
DVD–A or DVD–B)
on the remote control and then press the
button 3.
6.
T
o turn the DVD system off:
•
Press the (power) button 1 on the corresponding monitor control panel, or
•
Press the corresponding monitor control button (
DVD–A or DVD–B) on the remote
control and then press the
(power) button 1.
You can also connect auxiliary devices, such as video games, camcorders, portable
video players or USB devices, to the auxiliary jacks located on the corresponding
monitor control panel. (Your device will be controlled through its own control panel.)
The system provides a priority for each of the following device inputs:
•
R
CA ports, USB port, disc player
•
A device connected through the R
CA connections will override play of the disc
player and USB port.
Use the remote control provided with the system or the buttons on the co\
rresponding
monitor control panel to operate the rear display screens.
Press the AU X button on the factory radio to listen to the audio through the
vehicle’s speakers.
3
21
2027886_16b_Titan_US_pQRG_010716.indd 311/7/16 2:04 PM
To view detailed instructional videos regarding these and other features, please go to www.nissanownersinfo.mobi.