ECO mode NISSAN TITAN 2017 2.G Owners Manual
[x] Cancel search | Manufacturer: NISSAN, Model Year: 2017, Model line: TITAN, Model: NISSAN TITAN 2017 2.GPages: 671, PDF Size: 7.96 MB
Page 3 of 671
For descriptions specified for 4-wheel drive
models, amark is placed at the begin-
ning of the applicable sections/items.
As with other vehicles with features for
off-road use, failure to operate 4-wheel
drive models correctly may result in loss of
control or a collision. For additional infor-
mation, refer to “Driving safety precau-
tions” in the “Starting and driving” section
of this manual.
ON-PAVEMENT AND OFF-ROAD DRIV-
ING
This vehicle will handle and maneuver
differently from an ordinary passenger
car because it has a higher center of
gravity for off-road use. As with other
vehicles with features of this type, fail-
ure to operate this vehicle correctly may
result in loss of control or an accident.
For additional information, refer to “On-
pavement and off-road driving
precautions”, “Avoiding collision and
rollover” and “Driving safety precau-
tions” in the “Starting and driving” sec-
tion of this manual.
MODIFICATION OF YOUR VEHICLE
This vehicle should not be modified.
Modification could affect its
performance, safety, emissions or dura-
bility and may even violate governmental
regulations. In addition, damage or per-
formance problems resulting from modi-
fications may not be covered under
NISSAN warranties.
WARNING
Installing an aftermarket On-Board Diag-
nostic (OBD) plug-in device that uses the
port during normal driving, for example
remote insurance company monitoring,
remote vehicle diagnostics, telematics or
engine reprogramming, may cause inter-
ference or damage to vehicle systems. We
do not recommend or endorse the use of
any aftermarket OBD plug-in devices, un-
less specifically approved by NISSAN. The
vehicle warranty may not cover damage
caused by any aftermarket plug-in device This manual includes information for all features
and equipment available on this model. Features
and equipment in your vehicle may vary depend-
ing on model, trim level, options selected, order,
date of production, region or availability. There-
fore, you may find information about features or
equipment that are not included or installed on
your vehicle.
All information, specifications and illustrations in
this manual are those in effect at the time of
printing. NISSAN reserves the right to change
specifications, performance, design or compo-
nent suppliers without notice and without obliga-
tion. From time to time, NISSAN may update or
revise this manual to provide Owners with the
most accurate information currently available.
Please carefully read and retain with this manual
all revision updates sent to you by NISSAN to
ensure you have access to accurate and up-to-
date information regarding your vehicle. Current
versions of vehicle Owner’s Manuals and any
updates can also be found in the Owner section
of the NISSAN website at
https://owners.nissanusa.com/nowners/
navigation/manualsGuide. If you have ques-
tions concerning any information in your Owner’s
Manual, contact NISSAN Consumer Affairs. For
contact information, refer to the NISSAN CUS-
TOMER CARE PROGRAM page in this Owner’s
Manual.
WHEN READING THE MANUAL
Page 13 of 671
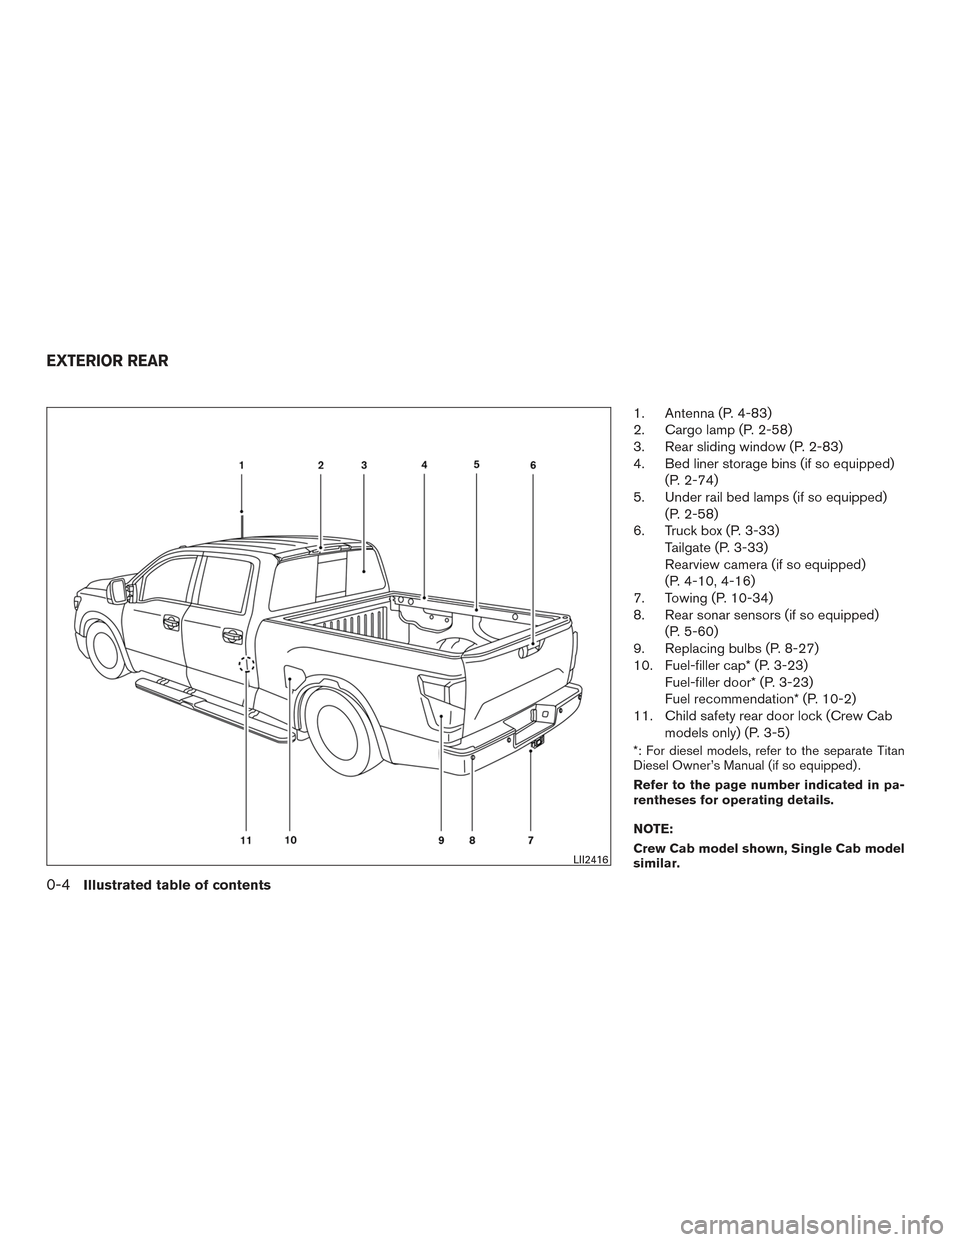
1. Antenna (P. 4-83)
2. Cargo lamp (P. 2-58)
3. Rear sliding window (P. 2-83)
4. Bed liner storage bins (if so equipped)(P. 2-74)
5. Under rail bed lamps (if so equipped) (P. 2-58)
6. Truck box (P. 3-33) Tailgate (P. 3-33)
Rearview camera (if so equipped)
(P. 4-10, 4-16)
7. Towing (P. 10-34)
8. Rear sonar sensors (if so equipped) (P. 5-60)
9. Replacing bulbs (P. 8-27)
10. Fuel-filler cap* (P. 3-23) Fuel-filler door* (P. 3-23)
Fuel recommendation* (P. 10-2)
11. Child safety rear door lock (Crew Cab models only) (P. 3-5)
*: For diesel models, refer to the separate Titan
Diesel Owner’s Manual (if so equipped) .
Refer to the page number indicated in pa-
rentheses for operating details.
NOTE:
Crew Cab model shown, Single Cab model
similar.
LII2416
EXTERIOR REAR
0-4Illustrated table of contents
Page 42 of 671
●Do not allow children to play with the
seat belts. Most seating positions are
equipped with Automatic Locking Re-
tractor (ALR) mode seat belts. If the seat
belt becomes wrapped around a child’s
neck with the ALR mode activated, the
child can be seriously injured or killed if
the seat belt retracts and becomes
tight. This can occur even if the vehicle
is parked. Unbuckle the seat belt to
release the child. If the seat belt cannot
be unbuckled or is already unbuckled,
release the child by cutting the seat belt
with a suitable tool (such as a knife or
scissors) to release the seat belt.
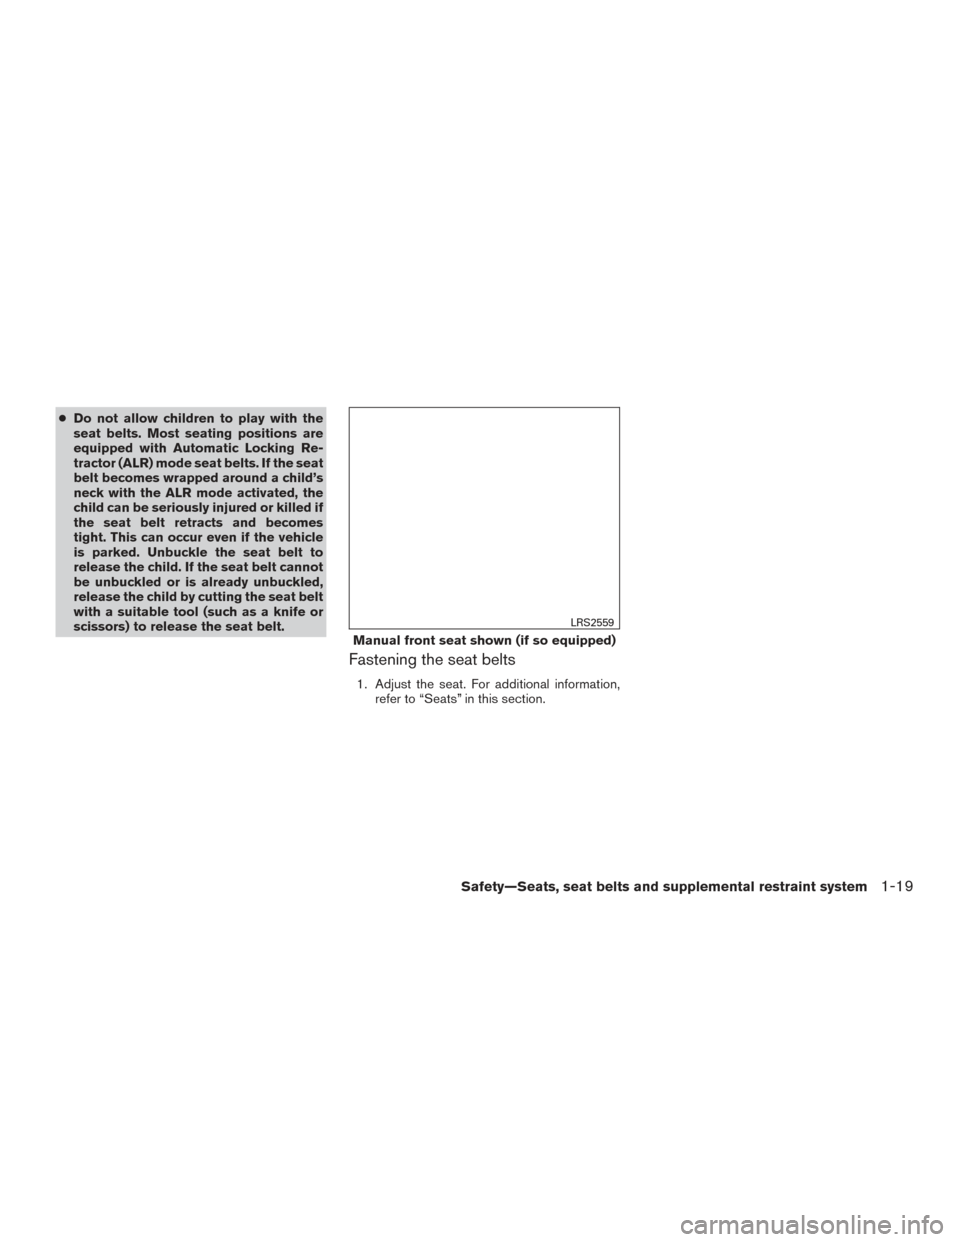
Fastening the seat belts
1. Adjust the seat. For additional information, refer to “Seats” in this section.
Manual front seat shown (if so equipped)
LRS2559
Safety—Seats, seat belts and supplemental restraint system1-19
Page 47 of 671
WARNING
Do not allow children to play with the seat
belts. Most seating positions are
equipped with Automatic Locking Retrac-
tor (ALR) mode seat belts. If the seat belt
becomes wrapped around a child’s neck
with the ALR mode activated, the child can
be seriously injured or killed if the seat
belt retracts and becomes tight. This can
occur even if the vehicle is parked. Un-
buckle the seat belt to release the child. If
the seat belt cannot be unbuckled or is
already unbuckled, release the child by
cutting the seat belt with a suitable tool
(such as a knife or scissors) to release the
seat belt.
Children need adults to help protect them.
They need to be properly restrained.
In addition to the general information in this
manual, child safety information is available from
many other sources, including doctors, teachers,
government traffic safety offices, and community
organizations. Every child is different, so be sure
to learn the best way to transport your child.
There are three basic types of child restraint
systems: ● Rear-facing child restraints ●
Forward-facing child restraints
● Booster seats
The proper restraint depends on the child’s size.
Generally, infants up to about 1 year and less
than 20 lbs (9 kg) should be placed in rear-facing
child restraints. Forward-facing child restraints
are available for children who outgrow rear-
facing child restraints and are at least 1 year old.
Booster seats are used to help position a vehicle
lap/shoulder belt on a child who can no longer
use a forward-facing child restraint.
WARNING
Infants and children need special protec-
tion. The vehicle’s seat belts may not fit
them properly. The shoulder belt may
come too close to the face or neck. The lap
belt may not fit over their small hip bones.
In an accident, an improperly fitting seat
belt could cause serious or fatal injury.
Always use appropriate child restraints.
All U.S. states and Canadian provinces or territo-
ries require the use of approved child restraints
for infants and small children. For additional infor-
mation, refer to “Child restraints” in this section. A child restraint may be secured in the vehicle by
using either the LATCH (Lower Anchors and
Tethers for CHildren) system or with the vehicle
seat belt. For additional information, refer to
“Child restraints” in this section.
NISSAN recommends that all pre-teens
and children be restrained in the rear seat
(if so equipped) . Studies show that children
are safer when properly restrained in the
rear seat than in the front seat.
This is especially important because your
vehicle has a supplemental restraint sys-
tem (air bag system) for the front passen-
ger. For additional information, refer to
“Supplemental Restraint System (SRS)” in
this section.
INFANTS
Infants up to at least 1 year old should be placed
in a rear-facing child restraint. NISSAN recom-
mends that infants be placed in child restraints
that comply with Federal Motor Vehicle Safety
Standards or Canadian Motor Vehicle Safety
Standards. You should choose a child restraint
that fits your vehicle and always follow the manu-
facturer’s instructions for installation and use.
CHILD SAFETY
1-24Safety—Seats, seat belts and supplemental restraint system
Page 51 of 671
CAUTION
A child restraint in a closed vehicle can
become very hot. Check the seating sur-
face and buckles before placing a child in
the child restraint.
Vehicles equipped with rear seats are equipped
with a universal child restraint anchor system,
referred to as the LATCH (Lower Anchors and
Tethers for CHildren) system. Some child re-
straints include rigid or webbing-mounted at-
tachments that can be connected to these an-
chors. For additional information, refer to “LATCH
(Lower Anchors and Tethers for CHildren) sys-
tem” in this section.
If you do not have a LATCH compatible child
restraint, the vehicle seat belts can be used.
Several manufacturers offer child restraints for
infants and children of various sizes. When se-
lecting any child restraint, keep the following
points in mind: ● Choose only a restraint with a label certifying
that it complies with Federal Motor Vehicle
Safety Standard 213 or Canadian Motor
Vehicle Safety Standard 213.
● Check the child restraint in your vehicle to be
sure it is compatible with the vehicle’s seat
and seat belt system. ●
If the child restraint is compatible with your
vehicle, place your child in the child restraint
and check the various adjustments to be
sure the child restraint is compatible with
your child. Choose a child restraint that is
designed for your child’s height and weight.
Always follow all recommended procedures.
● If the combined weight of the child and child
restraint is less than 65 lbs (29.5 kg) , you
may use either the LATCH anchors or the
seat belt to install the child restraint (not both
at the same time) .
● If the combined weight of the child and child
restraint is greater than 65 lbs (29.5 kg) , use
the vehicle’s seat belt (not the lower an-
chors) to install the child restraint.
● Be sure to follow the child restraint manufac-
turer’s instructions for installation.
All U.S. states and Canadian provinces or
territories require that infants and small
children be restrained in an approved child
restraint at all times while the vehicle is
being operated. Canadian law requires the
top tether strap on forward-facing child re-
straints be secured to the designated an-
chor point on the vehicle.
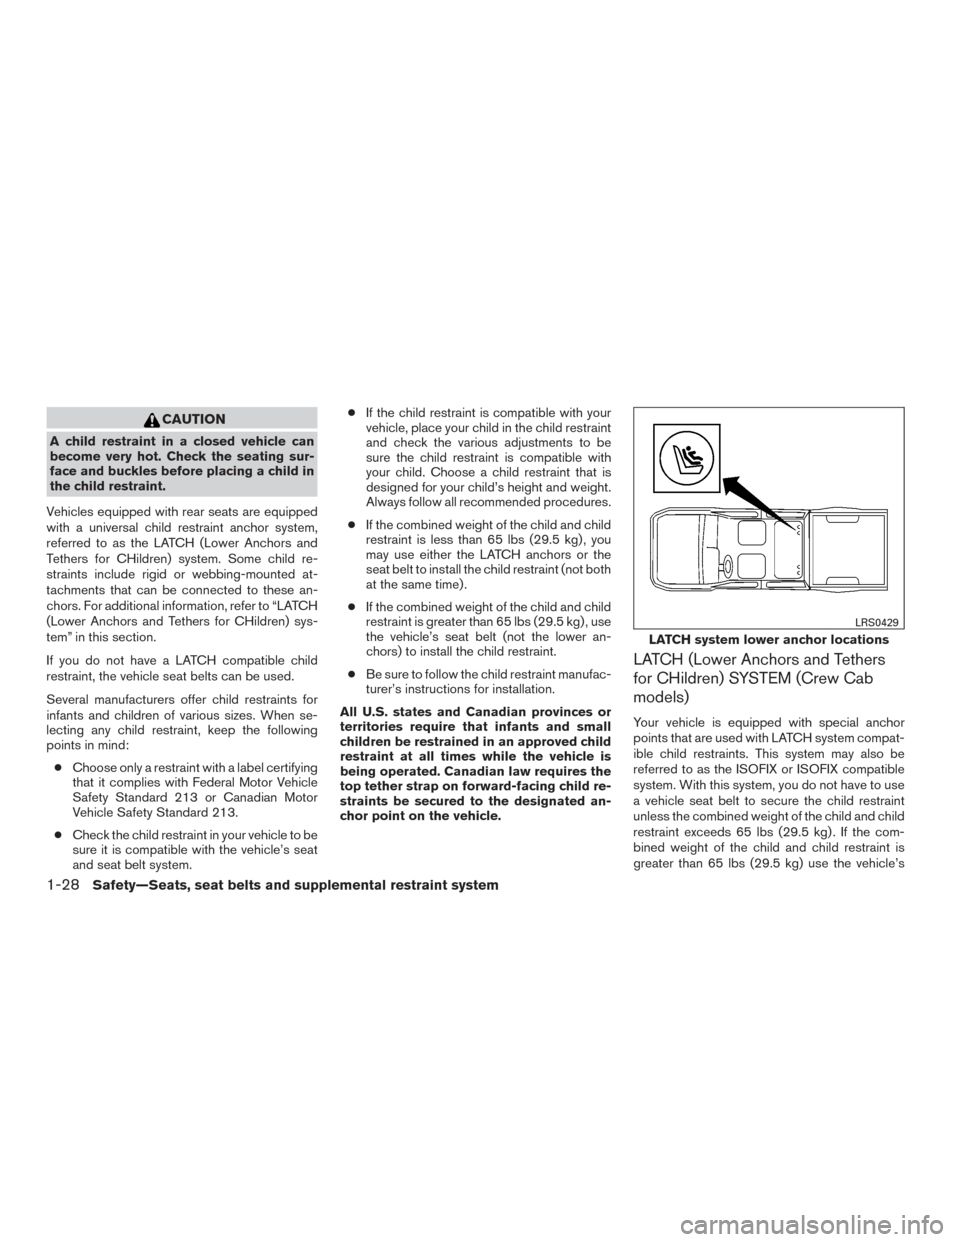
LATCH (Lower Anchors and Tethers
for CHildren) SYSTEM (Crew Cab
models)
Your vehicle is equipped with special anchor
points that are used with LATCH system compat-
ible child restraints. This system may also be
referred to as the ISOFIX or ISOFIX compatible
system. With this system, you do not have to use
a vehicle seat belt to secure the child restraint
unless the combined weight of the child and child
restraint exceeds 65 lbs (29.5 kg) . If the com-
bined weight of the child and child restraint is
greater than 65 lbs (29.5 kg) use the vehicle’s
LATCH system lower anchor locations
LRS0429
1-28Safety—Seats, seat belts and supplemental restraint system
Page 62 of 671
Rear bench seat
OUTBOARD SEATING POSITIONS1. Remove the head restraint/headrest and store it in a secure place. Be sure to reinstall
the head restraint/headrest when the child
restraint is removed. For additional informa-
tion, refer to “Head restraints/headrests” in
this section for head restraint/headrest ad-
justment, removal and installation informa-
tion.
2. Position the top tether strap over the seat- back.
3. Secure the tether strap to the tether anchor point on the back side of the seatback be-
hind the child restraint.
4. Tighten the tether strap according to the manufacturer’s instructions to remove any
slack.
If you have any questions when installing a
top tether strap, it is recommended that
you visit a NISSAN dealer for this service.WARNING
Child restraint anchorages are designed
to withstand only those loads imposed by
correctly fitted child restraints. Under no
circumstances are they to be used to at-
tach adult seat belts, or other items or
equipment to the vehicle. Doing so could
damage the child restraint anchorages.
The child restraint will not be properly
installed using the damaged anchorage,
and a child could be seriously injured or
killed in a collision.
FORWARD-FACING CHILD
RESTRAINT INSTALLATION USING
THE SEAT BELTS — REAR BENCH
SEAT (Crew Cab models)
WARNING
The three-point seat belt with Automatic
Locking Retractor (ALR) must be used
when installing a child restraint. Failure to
use the ALR mode will result in the child
restraint not being properly secured. The
restraint could tip over or be loose and
cause injury to a child in a sudden stop or
collision. For additional information, refer to all Warnings
and Cautions in the “Child safety” and “Child
restraints” sections of this manual before install-
ing a child restraint.
Do not use the lower anchors if the combined
weight of the child and the child restraint exceeds
65 lbs (29.5 kg) . If the combined weight of the
child and the child restraint is greater than 65 lbs
(29.5 kg) , use the vehicle’s seat belt (not the
lower anchors) to install the child restraint. Be
sure to follow the child restraint manufacturer’s
instructions for installation.
Follow these steps to install a forward-facing
child restraint using the vehicle seat belt in the
rear seats:
1. If you must install a child restraint in
the front seat, it should be placed in a
forward-facing direction only. Move
the seat to the rearmost position. Child
restraints for infants must be used in
the rear-facing direction and therefore
must not be used in the front seat.
2. Position the child restraint on the seat. Al- ways follow the child restraint manufactur-
er’s instructions.
The back of the child restraint should be
secured against the vehicle seatback.
Safety—Seats, seat belts and supplemental restraint system1-39
Page 66 of 671
Rear bench seat
OUTBOARD SEATING POSITIONS1. Remove the head restraint/headrest and store it in a secure place. Be sure to reinstall
the head restraint/headrest when the child
restraint is removed. For additional informa-
tion about head restraint/headrest adjust-
ment, removal and installation, refer to
“Head restraints/headrests” in this section.
2. Position the top tether strap over the seat- back.
3. Secure the tether strap to the tether anchor point on the back side of the seatback be-
hind the child restraint.
4. Tighten the tether strap according to the manufacturer’s instructions to remove any
slack.
CENTER SEATING POSITION 1. Position the top tether strap over the seat- back.
2. Secure the tether strap to the tether anchor point on the back side of the seatback be-
hind the child restraint.
3. Tighten the tether strap according to the manufacturer’s instructions to remove any
slack. If you have any questions when installing a
top tether strap, it is recommended that
you visit a NISSAN dealer for this service.
WARNING
Child restraint anchorages are designed
to withstand only those loads imposed by
correctly fitted child restraints. Under no
circumstances are they to be used to at-
tach adult seat belts, or other items or
equipment to the vehicle. Doing so could
damage the child restraint anchorages.
The child restraint will not be properly
installed using the damaged anchorage,
and a child could be seriously injured or
killed in a collision.
FORWARD-FACING CHILD
RESTRAINT INSTALLATION USING
THE SEAT BELTS — PASSENGER
SEAT AND CENTER SEAT (Single
Cab models)
WARNING
The three-point seat belt with Automatic
Locking Retractor (ALR) must be used
when installing a child restraint. Failure to
use the ALR mode will result in the child
restraint not being properly secured. The
restraint could tip over or be loose and
cause injury to a child in a sudden stop or
collision. Also, it can change the operation
of the front passenger air bag. For addi-
tional information, refer to “Front passen-
ger air bag and status light” in this section.
For additional information, refer to all Warnings
and Cautions in the “Child safety” and “Child
restraints” sections of this manual before install-
ing a child restraint.
Do not use the lower anchors if the combined
weight of the child and the child restraint exceeds
65 lbs (29.5 kg) . If the combined weight of the
child and the child restraint is greater than 65 lbs
(29.5 kg) , use the vehicle’s seat belt (not the
lower anchors) to install the child restraint. Be
Safety—Seats, seat belts and supplemental restraint system1-43
Page 72 of 671
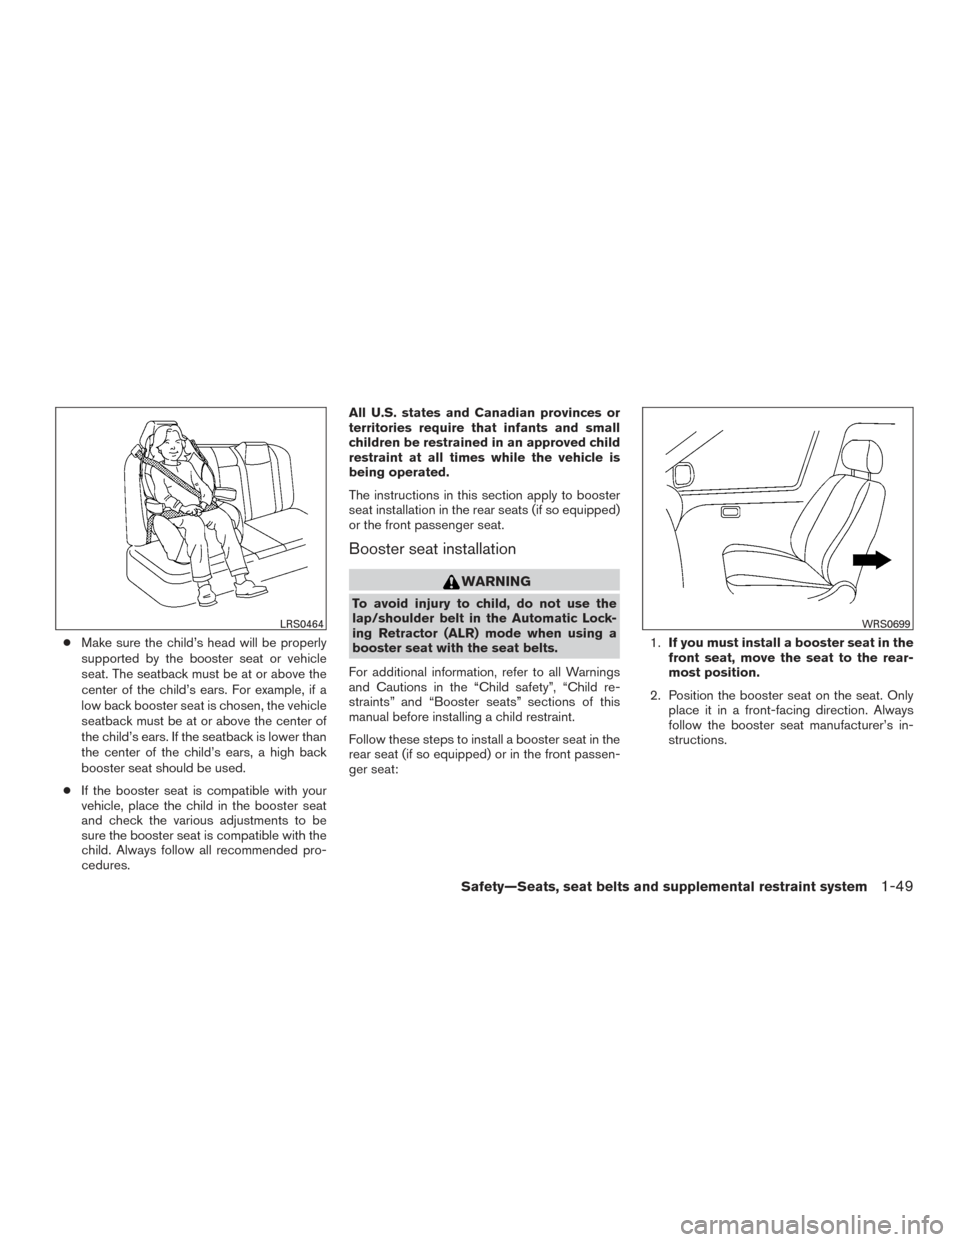
●Make sure the child’s head will be properly
supported by the booster seat or vehicle
seat. The seatback must be at or above the
center of the child’s ears. For example, if a
low back booster seat is chosen, the vehicle
seatback must be at or above the center of
the child’s ears. If the seatback is lower than
the center of the child’s ears, a high back
booster seat should be used.
● If the booster seat is compatible with your
vehicle, place the child in the booster seat
and check the various adjustments to be
sure the booster seat is compatible with the
child. Always follow all recommended pro-
cedures. All U.S. states and Canadian provinces or
territories require that infants and small
children be restrained in an approved child
restraint at all times while the vehicle is
being operated.
The instructions in this section apply to booster
seat installation in the rear seats (if so equipped)
or the front passenger seat.
Booster seat installation
WARNING
To avoid injury to child, do not use the
lap/shoulder belt in the Automatic Lock-
ing Retractor (ALR) mode when using a
booster seat with the seat belts.
For additional information, refer to all Warnings
and Cautions in the “Child safety”, “Child re-
straints” and “Booster seats” sections of this
manual before installing a child restraint.
Follow these steps to install a booster seat in the
rear seat (if so equipped) or in the front passen-
ger seat: 1.
If you must install a booster seat in the
front seat, move the seat to the rear-
most position.
2. Position the booster seat on the seat. Only place it in a front-facing direction. Always
follow the booster seat manufacturer’s in-
structions.
LRS0464WRS0699
Safety—Seats, seat belts and supplemental restraint system1-49
Page 85 of 671
properly for the most effective protection by the
seat belt and supplemental air bag.
NISSAN recommends that pre-teens and chil-
dren be properly restrained in a rear seat (if so
equipped) . NISSAN also recommends that ap-
propriate child restraints and booster seats be
properly installed in a rear seat (if so equipped) . If
this is not possible, the occupant classification
sensor is designed to operate as described
above to turn the front passenger air bag OFF for
specified child restraints as required by the regu-
lations. Failing to properly secure child restraints
and to use the ALR mode may allow the restraint
to tip or move in a collision or sudden stop. This
can also result in the passenger air bag inflating
in a crash instead of being OFF. For additional
information about proper use and installation,
refer to “Child restraints” in this section.
If the front passenger seat is not occupied, the
front passenger air bag is designed not to inflate
in a crash. However, heavy objects placed on the
seat could result in air bag inflation, because of
the object’s weight detected by the occupant
classification sensor. Other conditions could also
result in air bag inflation, such as if a child is
standing on the seat, or if two children are on the
seat, contrary to the instructions in this manual.
Always be sure that you and all vehicle occupants
are seated and restrained properly.Using the front passenger air bag status light, you
can monitor when the front passenger air bag is
automatically turned OFF with the seat occupied.
The light will not illuminate when the front pas-
senger seat is unoccupied.
If an adult occupant is in the seat but the front
passenger air bag status light is illuminated (indi-
cating that the air bag is OFF) , it could be that the
person is a small adult, or is not sitting on the seat
properly or not using the seat belt properly.
If a child restraint must be used in the front seat,
the front passenger air bag status light may or
may not be illuminated, depending on the size of
the child and the type of child restraint being
used. Always make sure that the child restraint is
installed properly, the seat belt is used properly
and the occupant is positioned properly.
If necessary, a NISSAN dealer can check system
operation by using a special tool. Until you have
confirmed with a dealer that your air bag is work-
ing properly, reposition the occupant or child
restraint in a rear seat (if so equipped) . Do not
use the front seat or transport a child in the
vehicle (Single Cab) .
The NISSAN Advanced Air Bag System and front
passenger air bag status light will take a few
seconds to register a change in the front passen-
ger seat status. For example, if a large adult who
is sitting in the front passenger seat exits thevehicle, the front passenger air bag status light
will go from OFF to ON for a few seconds and
then to OFF. This is normal system operation and
does not indicate a malfunction.
If a malfunction occurs in the front passenger air
bag system, the supplemental air bag warning
light
, located in the meter and gauges area
of the instrument panel, will blink. Have the sys-
tem checked. It is recommended that you visit a
NISSAN dealer for this service.
Normal operation
In order for the occupant classification sensor
system to classify the front passenger based on
weight, please follow the precautions and steps
outlined below:
Precautions
● Make sure that there are no objects weigh-
ing over 2.2 lbs (1 kg) hanging on the seat or
placed in the seatback pocket.
● Make sure that a child restraint or other
object is not pressing against the rear of the
seatback.
● Make sure that a rear passenger is not push-
ing or pulling on the back of the front pas-
senger seat.
1-62Safety—Seats, seat belts and supplemental restraint system
Page 116 of 671
OFF-ROAD MONITOR (if so
equipped)
The off-road monitor displays the various slopes
of the vehicle.
The Pitch Gauge (left) indicates the angle of the
vehicle position up or down. The value will be
displayed below the gauge while the vehicle
graphic will rotate to indicate condition pointed
up or down.
The Tire Angle (center) indicates the angle of the
tires based on turning of the steering wheel. The
graphic image will show the actual vehicle tire
position while the angle is to be displayed below
as reference.The Roll Gauge (right) indicates the angle of the
vehicle position left and right. The value will be
displayed below the gauge while the vehicle
graphic will rotate to indicate condition of the
vehicle leaning to the left or right.
TRIP COMPUTER (if so equipped)
When the ignition switch is placed in the ON
position, the modes of the trip computer can be
selected by pressing the
buttons on the
steering wheel. The following modes can be se-
lected:
● Range
● Average fuel economy
● Average speed
● Time
● Tire info
● Settings
Range
The range mode provides you with an estimation
of the distance that can be driven before refuel-
ing. The range is constantly being calculated,
based on the amount of fuel in the fuel tank and
the actual fuel economy which will depend on
driving conditions. Dashes (—) indicate that fuel
remaining volume cannot be read by the fuel
pump and should be refilled as soon as possible.
The display is updated every 30 seconds.
LIC3417LIC3504
Instruments and controls2-13