climate settings NISSAN TITAN 2017 2.G Quick Reference Guide
[x] Cancel search | Manufacturer: NISSAN, Model Year: 2017, Model line: TITAN, Model: NISSAN TITAN 2017 2.GPages: 40, PDF Size: 2.22 MB
Page 7 of 40

5
When the vehicle’s outside mirrors are extended for towing, you may see the
mirrors in the bird’s-eye view or the front-side view.
For information regarding how to access additional viewing cycles, please see your Owner’s Manual.
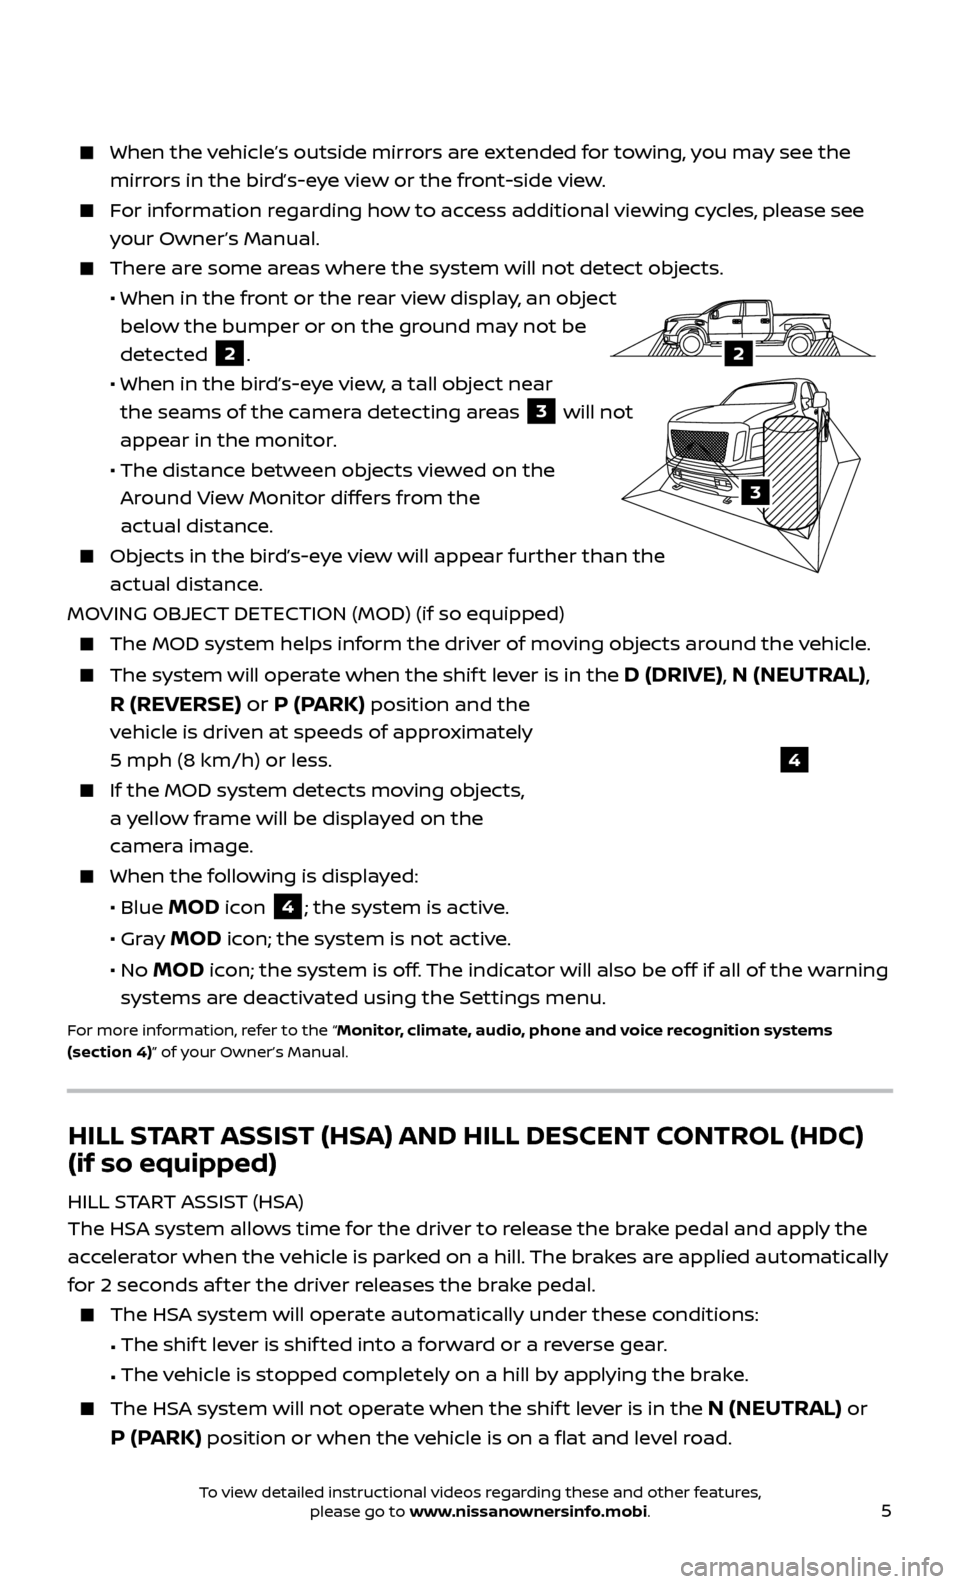
There are some areas where the system will not detect objects.
• When in the fr
ont or the rear view display, an object
below the bumper or on the ground may not be
detected
2.
• When in the bir
d’s-eye view, a tall object near
the seams of the camera detecting areas
3 will not
appear in the monitor.
• The distanc
e between objects viewed on the
Around View Monitor differs from the
actual distance.
Objects in the bird’s-eye view will appear further than the actual distance.
MOVING OBJECT DETECTION (MOD) (if so equipped)
The MOD system helps inf orm the driver of moving objects around the vehicle.
The system will operate when the shif t lever is in the D (DRIVE), N (NEUTRAL),
R (REVERSE) or P (PARK)
position and the
vehicle is driven at speeds of approximately
5 mph (8 km/h) or less.
If the MOD system detec ts moving objects,
a yellow frame will be displayed on the
camera image.
When the f ollowing is displayed:
• Blue MOD icon 4; the system is active.
• Gr
ay
MOD icon; the system is not active.
•
No
MOD icon; the system is off. The indicator will also be off if all of the warning
systems are deactivated using the Settings menu.
For more information, refer to the “Monitor, climate, audio, phone and voice recognition systems
(section 4)” of your Owner’s Manual.
4
HILL START ASSIST (HSA) AND HILL DESCENT CONTROL (HDC)
(if so equipped)
HILL START ASSIST (HSA)
The HSA system allows time for the driver to release the brake pedal and apply the
accelerator when the vehicle is parked on a hill. The brakes are applied automatically
for 2 seconds af ter the driver releases the brake pedal.
The HSA system will operate automatically under these conditions:
•
The shif
t lever is shif ted into a forward or a reverse gear.
•
The v
ehicle is stopped completely on a hill by applying the brake.
The HSA system will not operate when the shif t lever is in the N (NEUTRAL) or
P (PARK) position or when the vehicle is on a flat and level road.
LHA3807
2A
2
3
To view detailed instructional videos regarding these and other features, please go to www.nissanownersinfo.mobi.
Page 14 of 40

12
CLOCK SET/ADJUSTMENT
WITHOUT NAVIGATION (if so equipped)
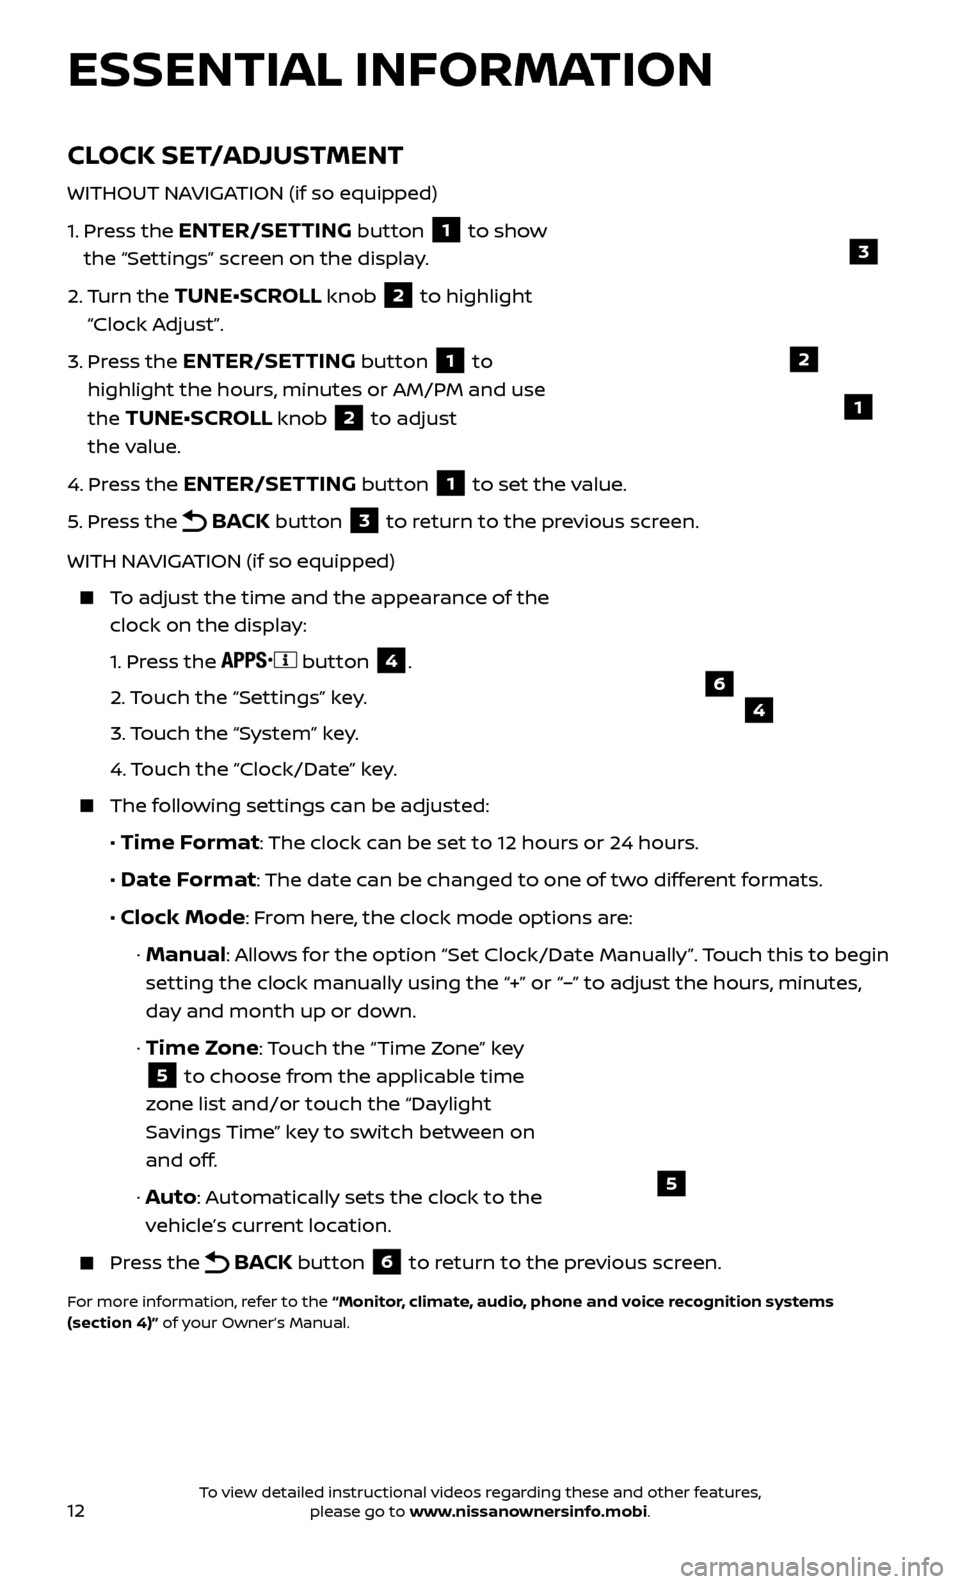
1.
Pr
ess the
ENTER/SETTING button 1 to show
the “Settings” screen on the display.
2.
Turn the
TUNE•SCROLL knob 2 to highlight
“Clock Adjust”.
3.
Pr
ess the
ENTER/SETTING button 1 to
highlight the hours, minutes or AM/PM and use
the
TUNE•SCROLL knob 2 to adjust
the value.
4.
Pr
ess the
ENTER/SETTING button 1 to set the value.
5.
Pr
ess the
BACK button 3 to return to the previous screen.
WITH NAVIGATION (if so equipped)
To adjust the time and the appearance of the clock on the display:
1.
Press the
button 4.
2.
Touch the “Settings” key.
3.
Touch the “System” key.
4.
Touch the “Clock/Date” key.
The following settings can be adjusted:
•
Time Format: The clock can be set to 12 hours or 24 hours.
•
Date Format: The date can be changed to one of two different formats.
• Clock Mode: From here, the clock mode options are:
· Manual: Allows for the option “Set Clock/Date Manually”. Touch this to begin
setting the clock manually using the “+” or “–” to adjust the hours, minutes,
day and month up or down.
·
Time Zone: Touch the “Time Zone” key
5 to choose from the applicable time
zone list and/or touch the “Daylight
Savings Time” key to switch between on
and off.
· Auto: Automatically sets the clock to the
vehicle’s current location.
Press the BACK button 6 to return to the previous screen.
For more information, refer to the “Monitor, climate, audio, phone and voice recognition systems
(section 4)” of your Owner’s Manual.
5
2
ESSENTIAL INFORMATION
1
46
3
To view detailed instructional videos regarding these and other features, please go to www.nissanownersinfo.mobi.
Page 22 of 40

20
6 DEFROSTING/DEFOGGING FRONT AND SIDE WINDOWS
Press the front defroster button to turn the system on. The A/C
automatically turns on when the front defroster mode is selected. This
feature removes humidity from the air.
Set the temper ature control dial 2 and the fan speed control button 4 to
their maximum settings.
7 REAR WINDOW AND/OR OUTSIDE MIRROR DEFROSTER SWITCH
(if so equipped)
Push the r ear window defroster switch to turn the system on or off.
The rear window defroster automatically turns off af ter approximately
15 minutes.
8 FRESH AIR INTAKE CONTROL BUTTON
Press the fresh air intake control button to draw outside air into the
passenger compartment. The indicator light on the button will illuminate.
9 AIR RECIRCULATION BUTTON
Press the air recirculation button to recirculate air inside the vehicle.
The indicator light on the button will illuminate. This system is used to avoid
certain outside odors and to help adjust the inside vehicle temperature
more effectively.
Press the air recirculation button again to turn air recirculation off. This
allows outside air to be drawn into the passenger compartment to prevent
fogging in the front defroster, floor or front defroster/floor mode.
The air recirculation mode cannot be activated when the climate control system is in the front defroster mode
.
10 A/C BUTTON
Press the A/C button to manually turn the A/C on or off.
For more information, refer to the “Instruments and controls (section 2)” and the “Monitor, climate,
audio, phone and voice recognition systems (section 4)” of your Owner’s Manual.
USB (Universal Serial Bus) CONNECTION PORT/AUX JACK AND
iPod ®
INTERFACE1
The USB por t/Aux jack 1 is located on the control panel
below the climate controls.
When a c ompatible USB memory device or iPod ®
is plugged
into the USB port, compatible audio files stored on the device
can be played through the vehicle’s audio system and
front display.
1 Driving is serious business and r equires your full attention. If you have to use the
connected device while driving, exercise extreme caution at all times so full attention may be given to
vehicle operation. External device not included.
For more information, refer to the “Monitor, climate, audio, phone and voice recognition systems
(section 4)” of your Owner’s Manual.
1
FIRST DRIVE FEATURES
To view detailed instructional videos regarding these and other features, please go to www.nissanownersinfo.mobi.
Page 23 of 40

21
FM/AM/SiriusXM®
* SATELLITE RADIO WITH CD PLAYER
(if so equipped)
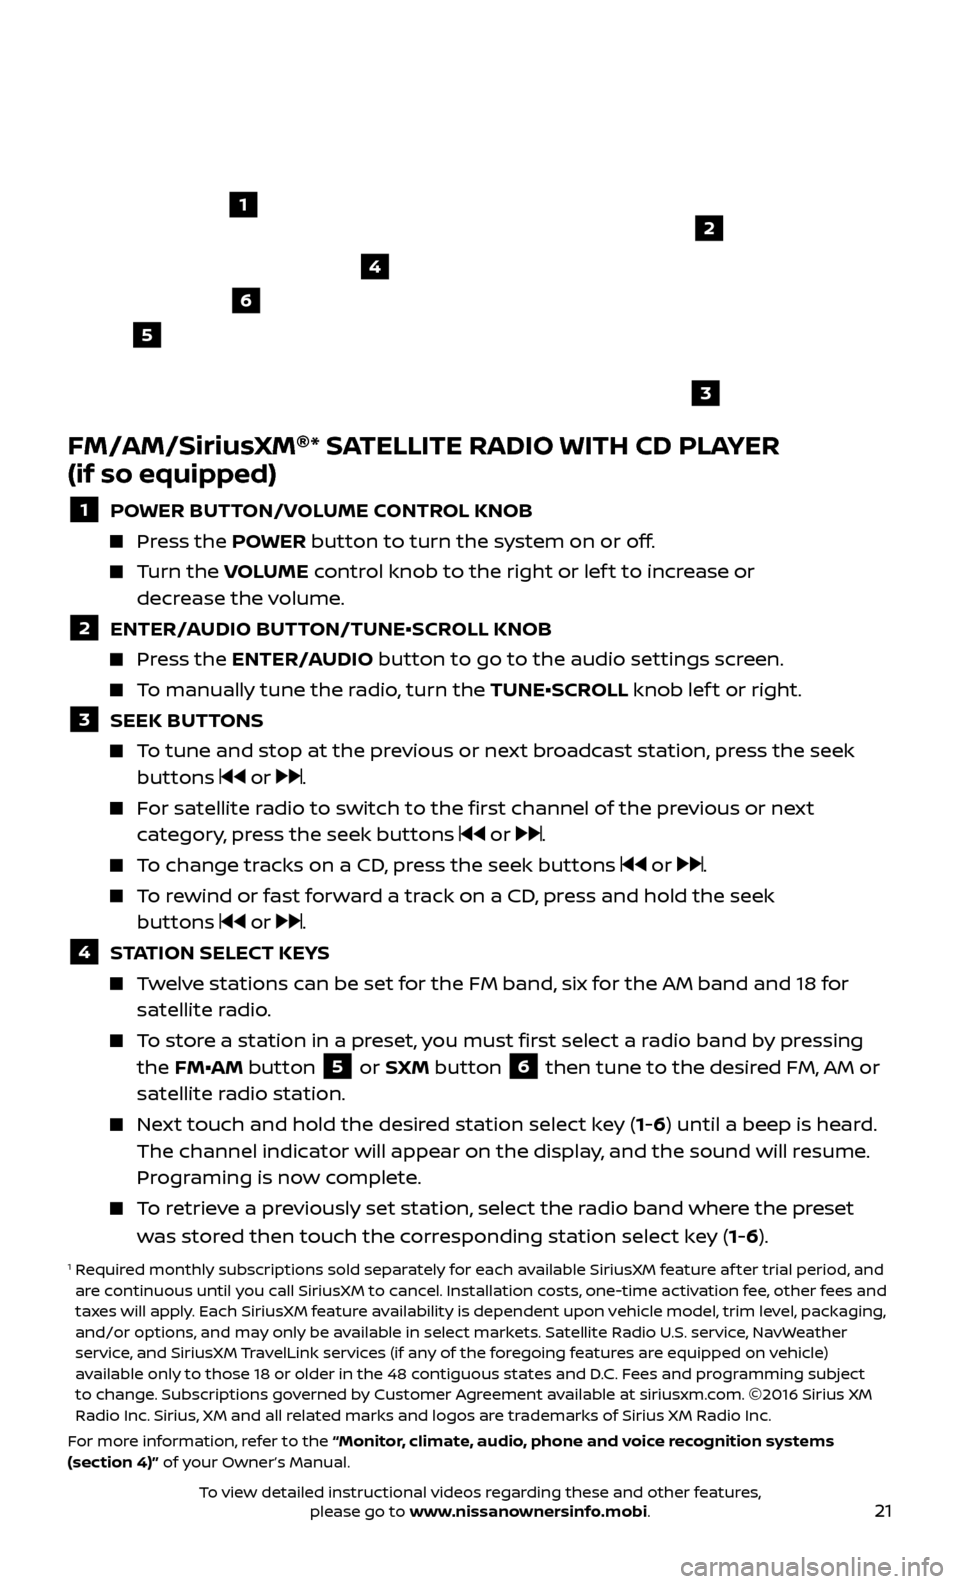
1 POWER BUTTON/VOLUME CONTROL KNOB
Press the POWER button to turn the system on or off.
Turn the V OLUME control knob to the right or lef t to increase or
decrease the volume.
2 ENTER/A UDIO BUTTON/TUNE•SCROLL KNOB Press the ENTER/AUDIO button to go to the audio settings screen.
To manually tune the radio, turn the TUNE•SCROLL knob lef t or right.
3 SEEK BUT TONS To tune and stop at the previous or next broadcast station, press the seek
buttons or .
For satellite radio to switch to the first channel of the previous or next category, press the seek buttons or .
To change tracks on a CD, press the seek buttons or .
To rewind or fast forward a track on a CD, press and hold the seek buttons or .
4 S TATION SELECT KEYS Twelve stations can be set for the FM band, six for the AM band and 18 for
satellite radio.
To store a station in a preset, you must first select a radio band by pressing the FM•AM button 5 or SXM button 6 then tune to the desired FM, AM or
satellite radio station.
Next touch and hold the desired station select key (1-6) until a beep is heard. The channel indicator will appear on the display, and the sound will resume.
Programing is now complete.
To retrieve a previously set station, select the radio band where the preset was stored then touch the corresponding station select key (1-6).
1 Required monthly subscriptions sold separately for each available SiriusXM feature af ter trial period, and are continuous until you call SiriusXM to cancel. Installation costs, one-time activation fee, other fees and
taxes will apply. Each SiriusXM feature availability is dependent upon vehicle model, trim level, packaging,
and/or options, and may only be available in select markets. Satellite Radio U.S. service, NavWeather
service, and SiriusXM TravelLink services (if any of the foregoing features are equipped on vehicle)
available only to those 18 or older in the 48 contiguous states and D.C. Fees and programming subject
to change. Subscriptions governed by Customer Agreement available at siriusxm.com. ©2016 Sirius XM
Radio Inc. Sirius, XM and all related marks and logos are trademarks of Sirius XM Radio Inc.
For more information, refer to the “Monitor, climate, audio, phone and voice recognition systems
(section 4)” of your Owner’s Manual.
4
6
2
3
1
5
To view detailed instructional videos regarding these and other features, please go to www.nissanownersinfo.mobi.
Page 31 of 40

29
RECEIVING/ENDING A CALL
When you receive a cellular phone call, a ring tone sounds through the audio system.
To accept the call, press the button on the steering wheel.
To reject the call, press the button on the steering wheel.
To hang up the cellular phone at the end of a call or to disconnect during call placement, press the
button on the steering wheel.
1 Some jurisdictions prohibit the use of cellular telephones while driving.2 Availability of specific features is dependent upon the phone’s Bluetooth ®
support. Please refer to your
phone owner’s manual for details. Bluetooth ®
word mark and logos are owned by Bluetooth SIG, Inc., and
any use of such marks by NISSAN is under license. See www.NissanUSA.com/bluetooth for details.
3 Laws in some jurisdictions may restrict the use of “Text-to-Speech”. Some applications and features, such as social networking and texting, may also be restricted. Check local regulations for any requirements
before using these features.
Compatible smartphone required. Text rates and/or data usage may apply.
To view detailed instructional videos regarding these and other features, please go to
www.nissanownersinfo.mobi.
For more information, refer to the “Monitor, climate, audio, phone and voice recognition systems
(section 4)” of your Owner’s Manual.
BLUETOOTH ®
SYSTEM WITH NAVIGATION1, 2, 3 (if so equipped)
Send predefined or custom text messages4
through your vehicle’s Bluetooth ®,2 system.
Receive texts through your vehicle’s
Bluetooth ®,2 system that can be read to you.
Bluetooth®,2 Streaming Audio allows you to
use a compatible Bluetooth ®,2 device to play
audio files on your device. Your compatible
device can be connected to the vehicle’s
audio system, allowing audio files to play
through the vehicle’s speakers.
CONNECTING PROCEDURE
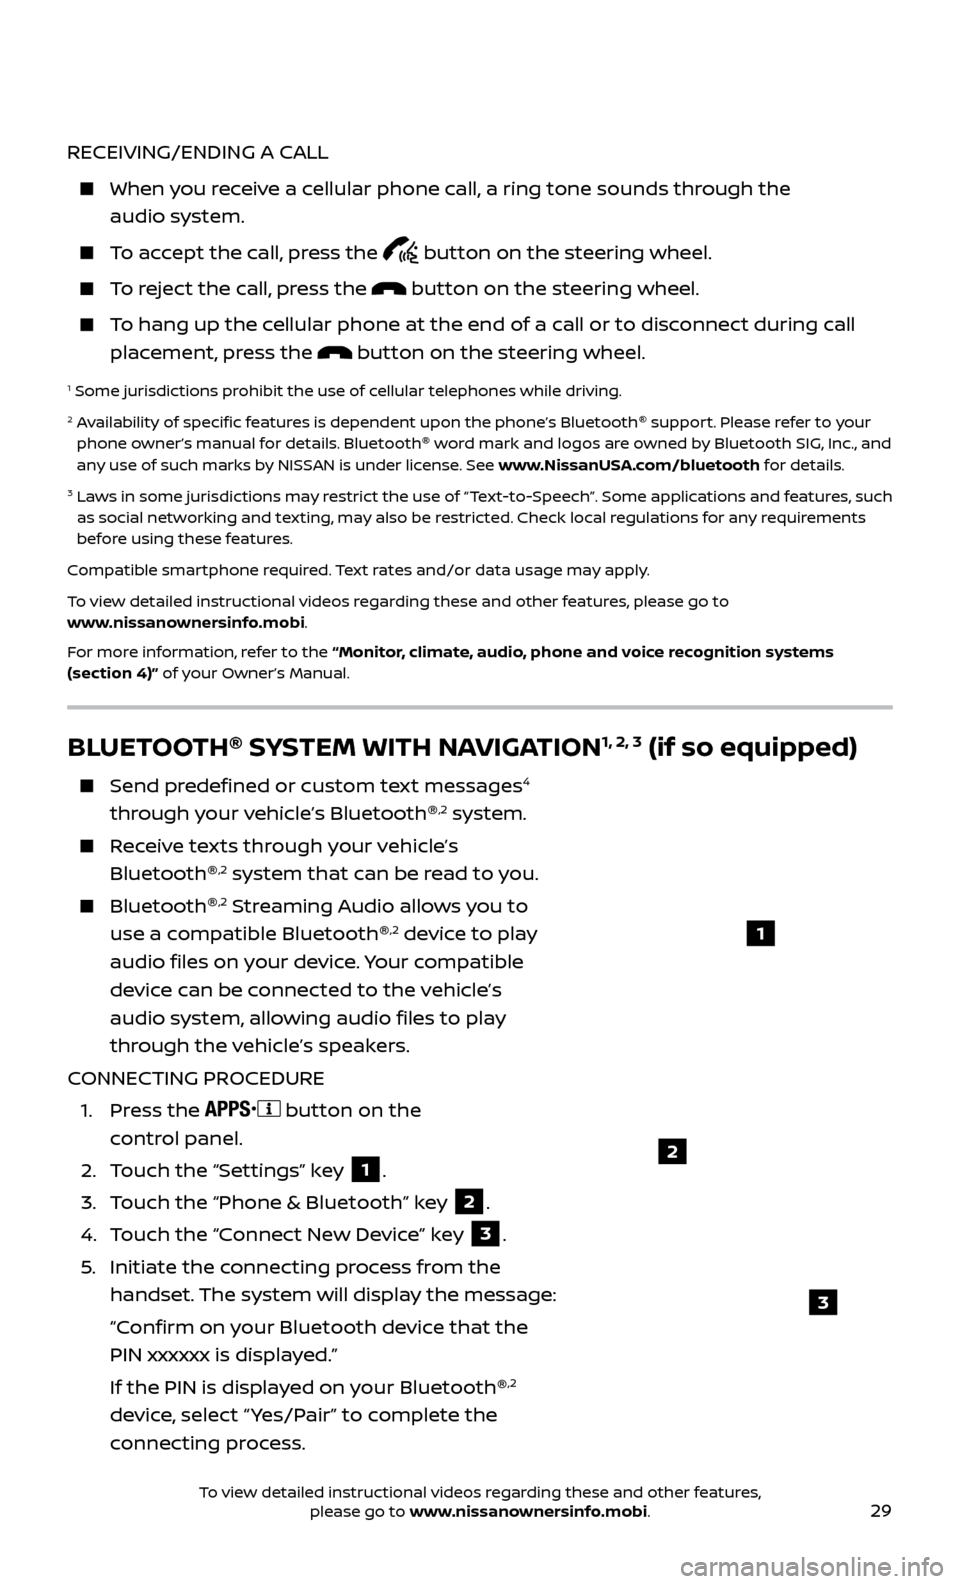
1.
Press the
button on the
control panel.
2.
T
ouch the “Settings” key
1.
3.
T
ouch the “Phone & Bluetooth” key
2.
4.
T
ouch the “Connect New Device” key
3.
5
.
Initiate the c
onnecting process from the
handset. The system will display the message:
“C
onfirm on your Bluetooth device that the
PIN xxxxxx is displayed.”
If the PIN is displa
yed on your Bluetooth ®
,2
device, select “ Yes/Pair” to complete the
connecting process.
1
2
3
To view detailed instructional videos regarding these and other features, please go to www.nissanownersinfo.mobi.
Page 35 of 40

33
To help promote safe driving, some functions cannot be operated or have limited operation when the vehicle speed is above 5 mph (8 km/h). The
on-screen text and keys for these restricted functions will be “grayed-out”
or muted and cannot be selected while driving. These functions will become
available again when the vehicle speed is reduced to 5 mph (8 km/h). Voice
commands may be available for some of the restricted functions. For more
information, refer to the “Monitor, climate, audio, phone and voice recognition
systems (section 4)” of your Owner’s Manual.
1 NAV button – Press to access the functions of the Navigation System.
2 MAP button – Press to display the current location map screen.
3 VOL control knob – Turn right to increase the volume or lef t to decrease
the volume.
4 key – Select to zoom the map in.
5 key – Select to zoom the map out.
6 button – Press to access SiriusXM Traffic, MyApps, Settings, SiriusXM
Travel Link, Voice Commands, and NissanConnectSM Services.
7 button – Press to change the display brightness between day and night
modes. While the mode is being displayed, the brightness can be adjusted using
the
TUNE•SCROLL knob. Press and hold to turn the display off. Press again to
turn the display on.
8 BACK button – Press to return to the previous screen.
9 TUNE•SCR OLL knob – Turn to navigate the items in a list. Press to select a
menu item.
10 Touch-screen display
11 SD-card location – An SD-card with map data must be inserted here for map functions to operate.
1 Never program while driving. GPS mapping may not be detailed in all areas or reflect current road status.
For more information, refer to your Navigation System Owner’s Manual.
To view detailed instructional videos regarding these and other features, please go to www.nissanownersinfo.mobi.