park NISSAN TITAN 2018 Owner´s Manual
[x] Cancel search | Manufacturer: NISSAN, Model Year: 2018, Model line: TITAN, Model: NISSAN TITAN 2018Pages: 650, PDF Size: 7.54 MB
Page 20 of 650
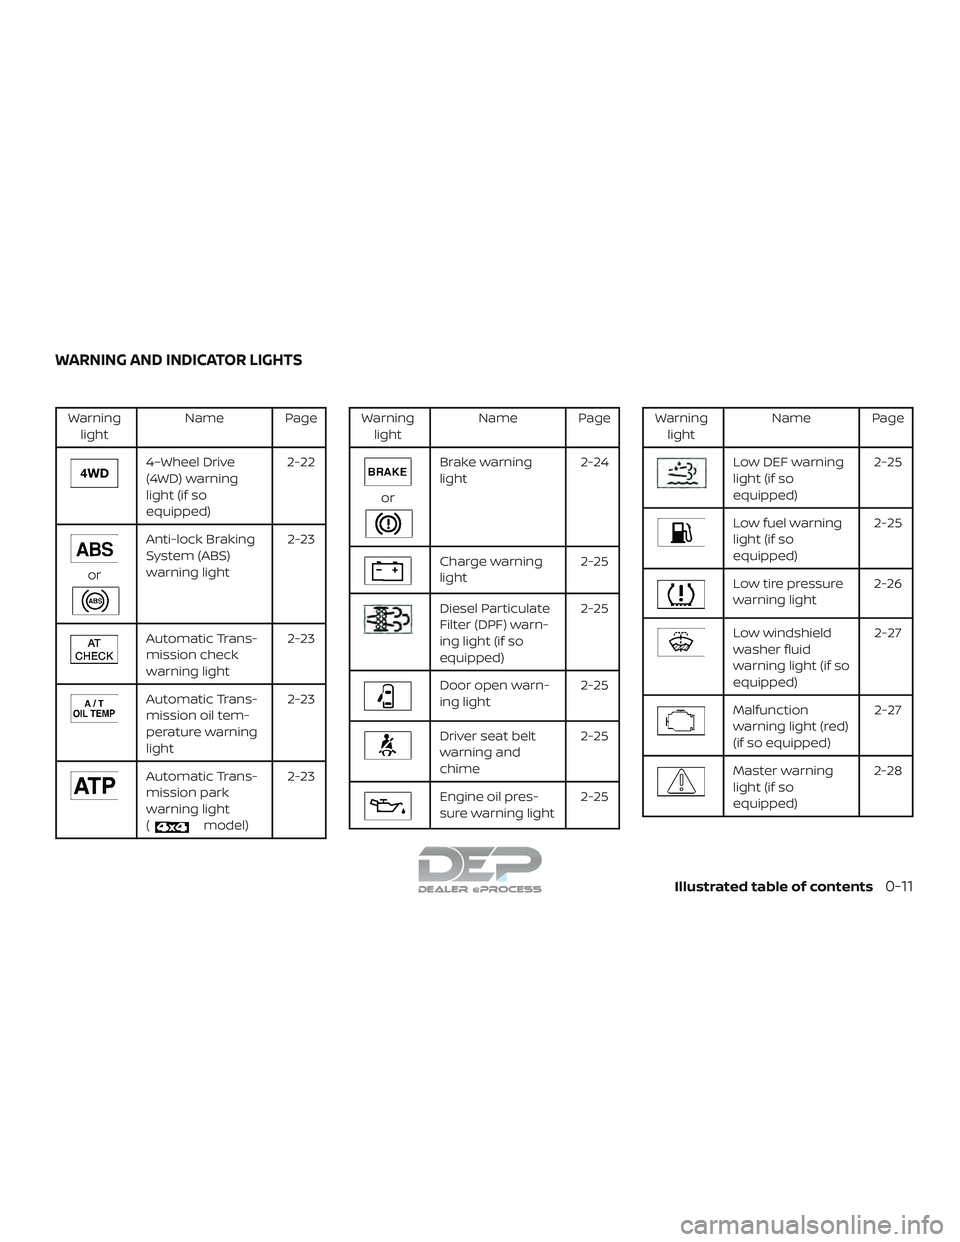
Warninglight Name Page
4–Wheel Drive
(4WD) warning
light (if so
equipped) 2-22
or
Anti-lock Braking
System (ABS)
warning light
2-23
Automatic Trans-
mission check
warning light2-23
Automatic Trans-
mission oil tem-
perature warning
light2-23
Automatic Trans-
mission park
warning light
(
model)2-23
Warning
light Name Page
or
Brake warning
light 2-24
Charge warning
light 2-25
Diesel Particulate
Filter (DPF) warn-
ing light (if so
equipped)2-25
Door open warn-
ing light
2-25
Driver seat belt
warning and
chime2-25
Engine oil pres-
sure warning light
2-25
Warning
light Name Page
Low DEF warning
light (if so
equipped) 2-25
Low fuel warning
light (if so
equipped)2-25
Low tire pressure
warning light
2-26
Low windshield
washer fluid
warning light (if so
equipped) 2-27
Malfunction
warning light (red)
(if so equipped)
2-27
Master warning
light (if so
equipped)2-28
WARNING AND INDICATOR LIGHTS
Illustrated table of contents0-11
Page 26 of 650
CAUTION
When adjusting the seat positions, be
sure not to contact any moving parts to
avoid possible injuries and/or damage.
FRONT MANUAL BENCH SEAT
ADJUSTMENT (Single Cab models
and if so equipped for King Cab®
and Crew Cab models)
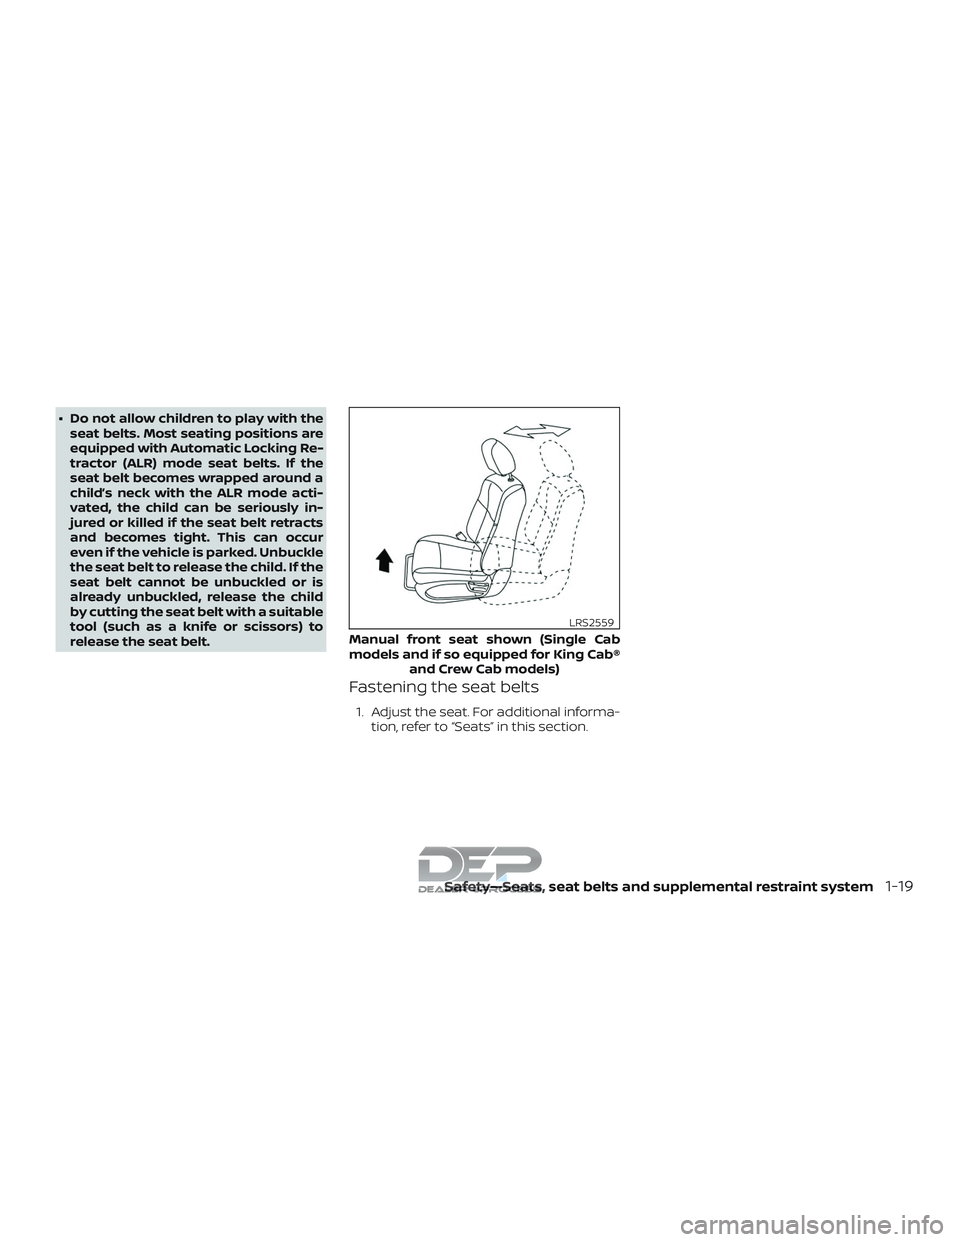
Your vehicle seats can be adjusted manu-
ally. For additional information about ad-
justing the seats, refer to the steps outlined
in this section.
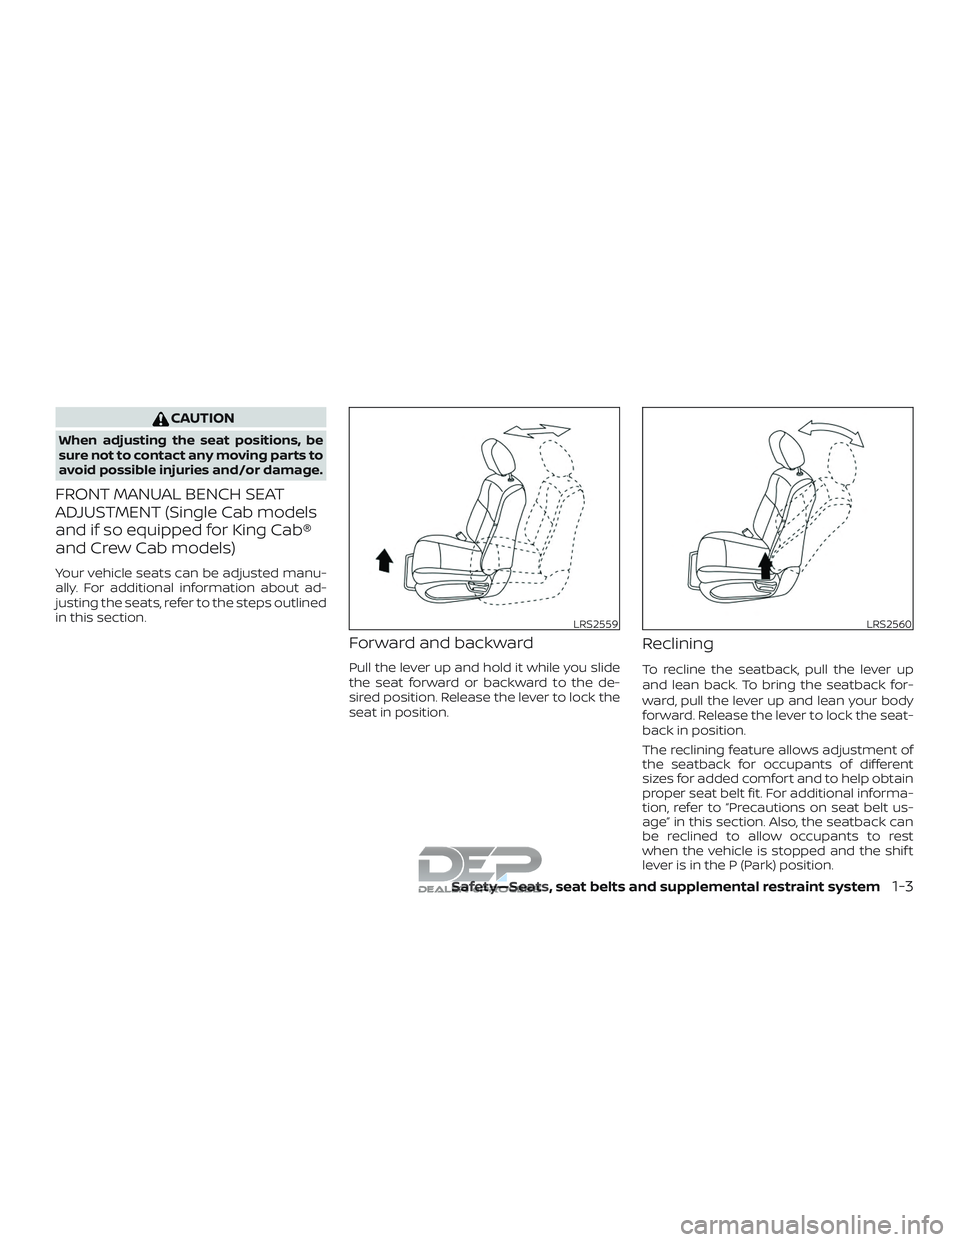
Forward and backward
Pull the lever up and hold it while you slide
the seat forward or backward to the de-
sired position. Release the lever to lock the
seat in position.
Reclining
To recline the seatback, pull the lever up
and lean back. To bring the seatback for-
ward, pull the lever up and lean your body
forward. Release the lever to lock the seat-
back in position.
The reclining feature allows adjustment of
the seatback for occupants of different
sizes for added comfort and to help obtain
proper seat belt fit. For additional informa-
tion, refer to “Precautions on seat belt us-
age” in this section. Also, the seatback can
be reclined to allow occupants to rest
when the vehicle is stopped and the shif t
lever is in the P (Park) position.
LRS2559LRS2560
Safety—Seats, seat belts and supplemental restraint system1-3
Page 28 of 650
Reclining
To recline the seatback, pull the lever up
and lean back. To bring the seatback for-
ward, pull the lever up and lean your body
forward. Release the lever to lock the seat-
back in position.
The reclining feature allows adjustment of
the seatback for occupants of different
sizes for added comfort and to help obtain
proper seat belt fit. For additional informa-
tion, refer to “Precautions on seat belt us-
age” in this section. Also, the seatback can
be reclined to allow occupants to rest
when the vehicle is stopped and the shif t
lever is in the P (Park) position.
FRONT POWER CAPTAIN’S CHAIR
SEAT ADJUSTMENT (if so equipped
for Crew Cab and King Cab®
models)
Operating tips
∙ The power seat motor has an auto-reset overload protection circuit. If the
motor stops during operation, wait
30 seconds then reactivate the switch.
∙ Do not operate the power seat switch for a long period of time when the en-
gine is off. This will discharge the bat-
tery. For additional information, refer to “Auto-
matic drive positioner” in the “Pre-driving
checks and adjustments” section of this
manual.
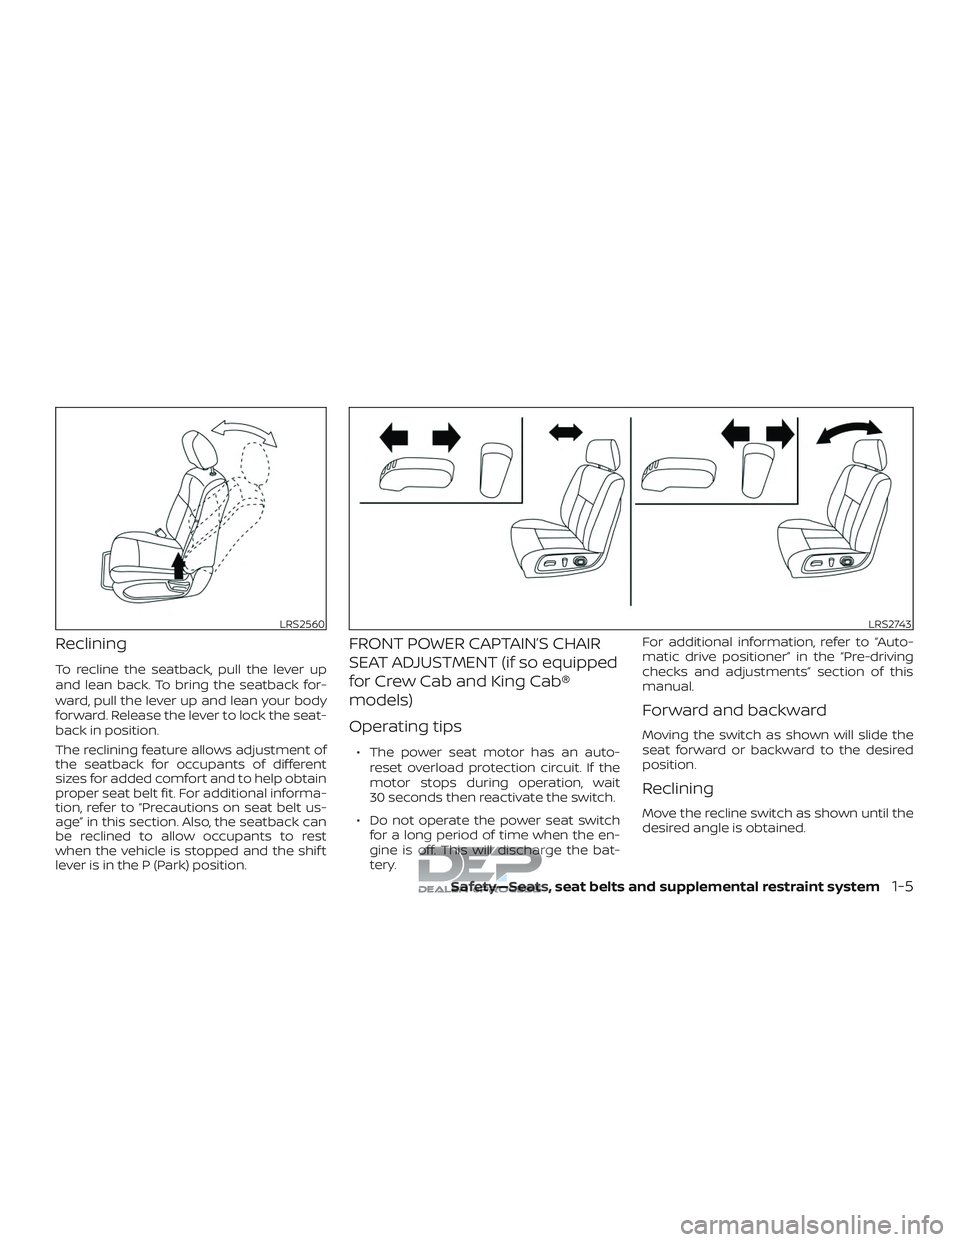
Forward and backward
Moving the switch as shown will slide the
seat forward or backward to the desired
position.
Reclining
Move the recline switch as shown until the
desired angle is obtained.
LRS2560LRS2743
Safety—Seats, seat belts and supplemental restraint system1-5
Page 29 of 650
The reclining feature allows adjustment of
the seatback for occupants of different
sizes for added comfort and to help obtain
proper seat belt fit. For additional informa-
tion, refer to “Precautions on seat belt us-
age” in this section. Also, the seatback can
be reclined to allow occupants to rest
when the vehicle is stopped and the shif t
lever is in P (Park).
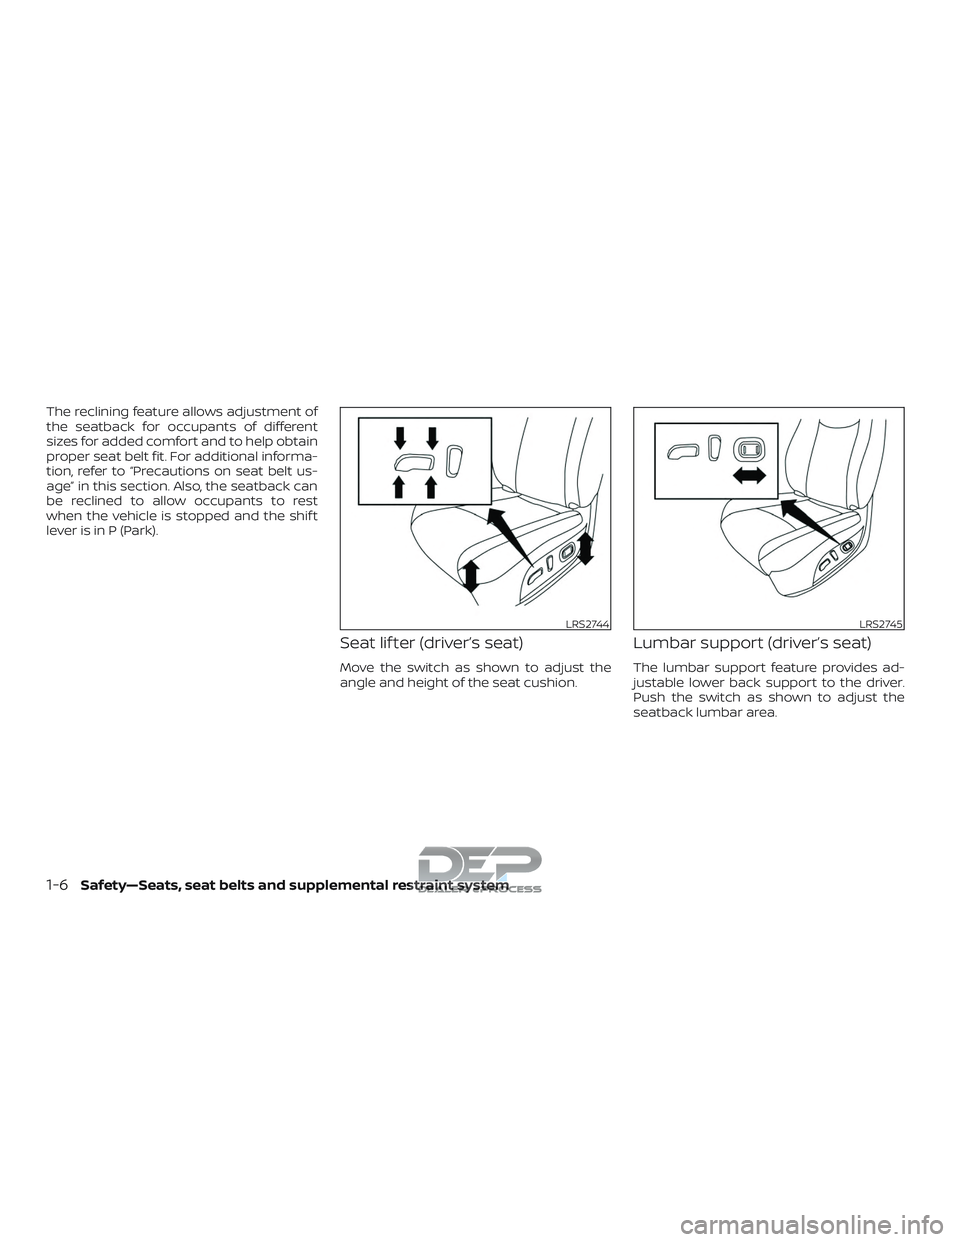
Seat lif ter (driver’s seat)
Move the switch as shown to adjust the
angle and height of the seat cushion.
Lumbar support (driver’s seat)
The lumbar support feature provides ad-
justable lower back support to the driver.
Push the switch as shown to adjust the
seatback lumbar area.
LRS2744LRS2745
1-6Safety—Seats, seat belts and supplemental restraint system
Page 42 of 650
∙ Do not allow children to play with theseat belts. Most seating positions are
equipped with Automatic Locking Re-
tractor (ALR) mode seat belts. If the
seat belt becomes wrapped around a
child’s neck with the ALR mode acti-
vated, the child can be seriously in-
jured or killed if the seat belt retracts
and becomes tight. This can occur
even if the vehicle is parked. Unbuckle
the seat belt to release the child. If the
seat belt cannot be unbuckled or is
already unbuckled, release the child
by cutting the seat belt with a suitable
tool (such as a knife or scissors) to
release the seat belt.
Fastening the seat belts
1. Adjust the seat. For additional informa- tion, refer to “Seats” in this section.
Manual front seat shown (Single Cab
models and if so equipped for King Cab® and Crew Cab models)
LRS2559
Safety—Seats, seat belts and supplemental restraint system1-19
Page 47 of 650
WARNING
Do not allow children to play with the
seat belts. Most seating positions are
equipped with Automatic Locking Re-
tractor (ALR) mode seat belts. If the seat
belt becomes wrapped around a child’s
neck with the ALR mode activated, the
child can be seriously injured or killed if
the seat belt retracts and becomes
tight. This can occur even if the vehicle
is parked. Unbuckle the seat belt to re-
lease the child. If the seat belt cannot be
unbuckled or is already unbuckled, re-
lease the child by cutting the seat belt
with a suitable tool (such as a knife or
scissors) to release the seat belt.
Children need adults to help protect
them. They need to be properly re-
strained.
In addition to the general information in
this manual, child safety information is
available from many other sources, includ-
ing doctors, teachers, government traffic
safety offices, and community organiza-
tions. Every child is different, so be sure to
learn the best way to transport your child. There are three basic types of child re-
straint systems:
∙ Rear-facing child restraints
∙ Forward-facing child restraints
∙ Booster seats
The proper restraint depends on the child’s
size. Generally, infants up to about 1 year
and less than 20 lbs. (9 kg) should be placed
in rear-facing child restraints. Forward-
facing child restraints are available for chil-
dren who outgrow rear-facing child re-
straints and are at least 1 year old. Booster
seats are used to help position a vehicle
lap/shoulder belt on a child who can no
longer use a forward-facing child restraint.
WARNING
Infants and children need special pro-
tection. The vehicle’s seat belts may not
fit them properly. The shoulder belt may
come too close to the face or neck. The
lap belt may not fit over their small hip
bones. In an accident, an improperly fit-
ting seat belt could cause serious or fa-
tal injury. Always use appropriate child
restraints. All U.S. states and Canadian provinces or
territories require the use of approved child
restraints for infants and small children. For
additional information, refer to “Child re-
straints” in this section.
A child restraint may be secured in the ve-
hicle by using either the LATCH (Lower An-
chors and Tethers for CHildren) system or
with the vehicle seat belt. For additional
information, refer to “Child restraints” in this
section.
NISSAN recommends that all pre-teens
and children be restrained in the rear
seat (if so equipped). Studies show that
children are safer when properly re-
strained in the rear seat than in the front
seat.
This is especially important because
your vehicle has a supplemental re-
straint system (air bag system) for the
front passenger. For additional informa-
tion, refer to “Supplemental Restraint
System (SRS)” in this section.
CHILD SAFETY
1-24Safety—Seats, seat belts and supplemental restraint system
Page 126 of 650
4–Wheel Drive (4WD) warning light (if so
equipped)Low fuel warning light (if so equipped)Front fog light indicator light
(if so equipped)
orAnti-lock Braking System
(ABS) warning lightLow tire pressure warning lightFront passenger air bag status light
(if so equipped)
Automatic Transmission check warning
lightLow windshield washer fluid warning light
(if so equipped)High beam indicator light (blue)
Automatic Transmission oil temperature
warning lightMalfunction warning light (red) (if so
equipped)Hill descent control system ON indicator
light (if so equipped)
Automatic Transmission park warning
light (model)Master warning light (if so equipped)Malfunction Indicator Light (MIL) (yellow)
orBrake warning lightNISSAN Intelligent Key® warning light
(if so equipped)Security indicator light
Charge warning lightP position selecting warning light
(if so equipped)Side light and headlight indicator light
(green) (if so equipped)
Diesel Particulate Filter (DPF) warning
light (if so equipped)Passenger seat belt warning light
(if so equipped)Slip indicator light
Door open warning lightSupplemental air bag warning lightTOW mode ON indicator light
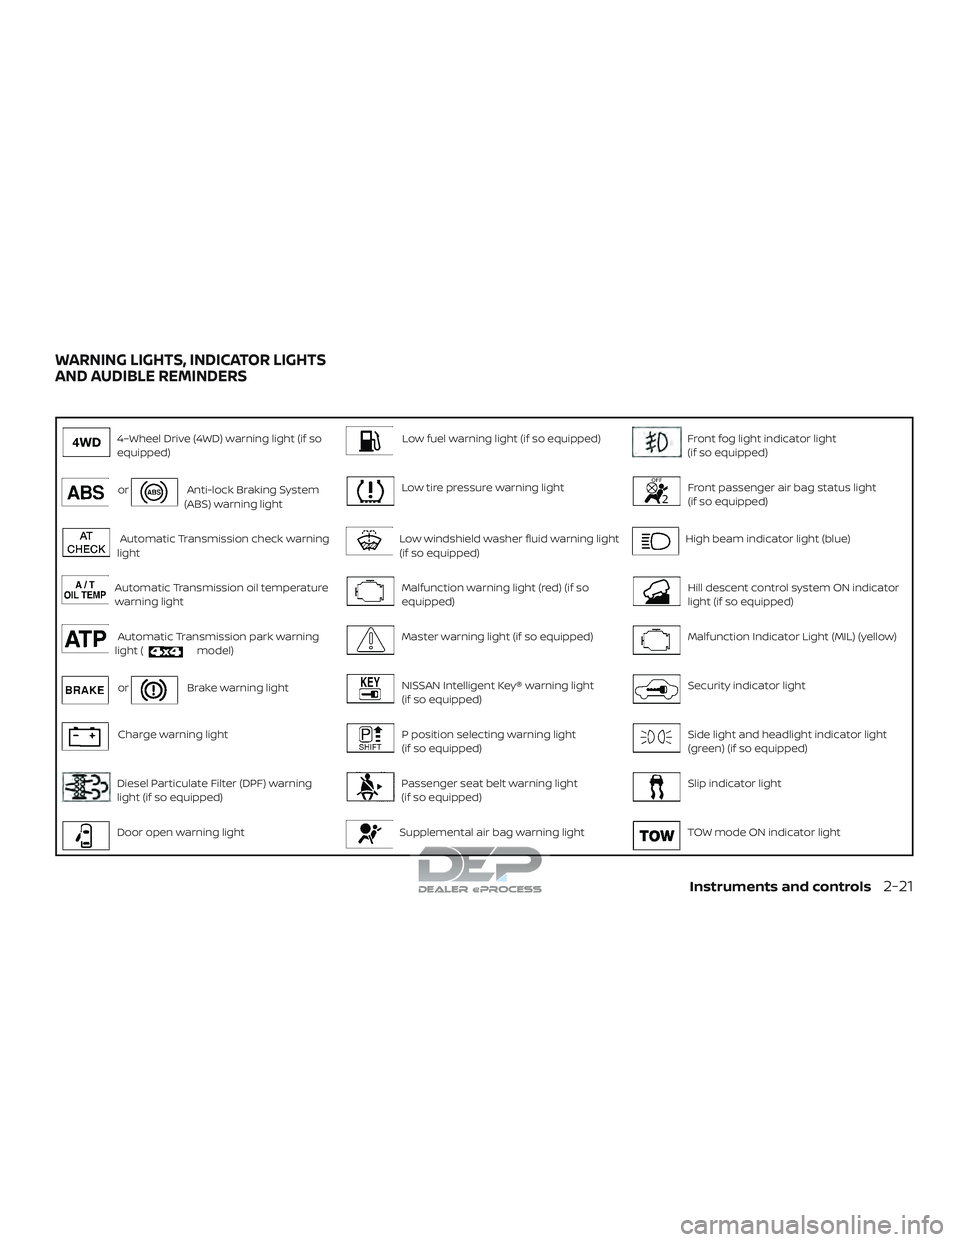
WARNING LIGHTS, INDICATOR LIGHTS
AND AUDIBLE REMINDERS
Instruments and controls2-21
Page 127 of 650
Driver seat belt warning light and chimeWater in Fuel warning light
(if so equipped)Turn signal/hazard indicator lights
Engine oil pressure warning lightElectronic locking rear differential (E-Lock)
system ON indicator light (if so equipped)Vehicle Dynamic Control (VDC) OFF
indicator light
Low DEF warning light (if so equipped)Engine start operation indicator light
(if so equipped)
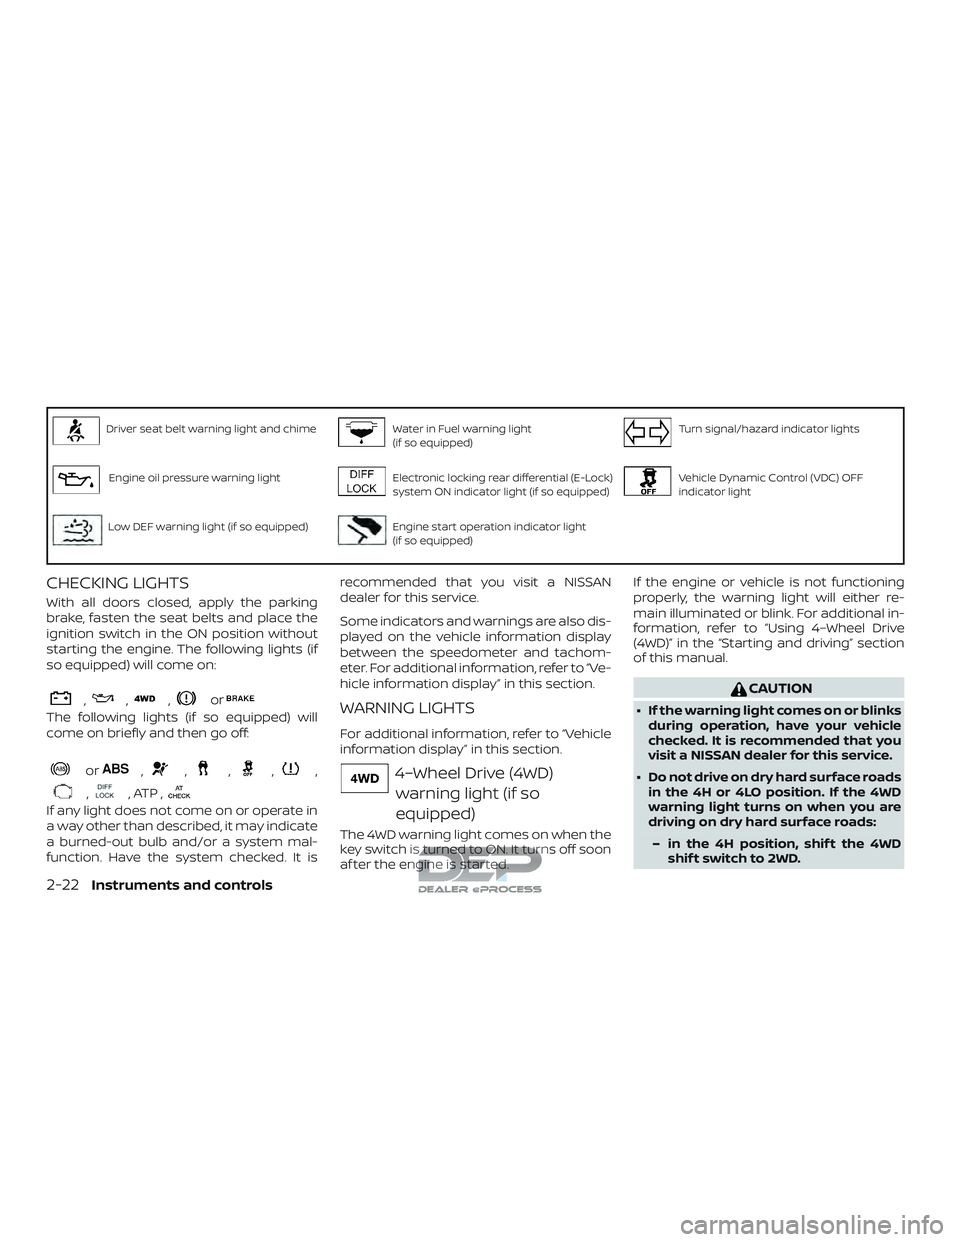
CHECKING LIGHTS
With all doors closed, apply the parking
brake, fasten the seat belts and place the
ignition switch in the ON position without
starting the engine. The following lights (if
so equipped) will come on:
,,,or
The following lights (if so equipped) will
come on briefly and then go off:
or,,,,,
,, ATP ,
If any light does not come on or operate in
a way other than described, it may indicate
a burned-out bulb and/or a system mal-
function. Have the system checked. It isrecommended that you visit a NISSAN
dealer for this service.
Some indicators and warnings are also dis-
played on the vehicle information display
between the speedometer and tachom-
eter. For additional information, refer to “Ve-
hicle information display” in this section.
WARNING LIGHTS
For additional information, refer to “Vehicle
information display” in this section.
4–Wheel Drive (4WD)
warning light (if so
equipped)
The 4WD warning light comes on when the
key switch is turned to ON. It turns off soon
af ter the engine is started. If the engine or vehicle is not functioning
properly, the warning light will either re-
main illuminated or blink. For additional in-
formation, refer to “Using 4–Wheel Drive
(4WD)” in the “Starting and driving” section
of this manual.
CAUTION
∙ If the warning light comes on or blinks
during operation, have your vehicle
checked. It is recommended that you
visit a NISSAN dealer for this service.
∙ Do not drive on dry hard surface roads in the 4H or 4LO position. If the 4WD
warning light turns on when you are
driving on dry hard surface roads:
– in the 4H position, shif t the 4WD shif t switch to 2WD.
2-22Instruments and controls
Page 128 of 650
– in the 4LO position, stop the ve-hicle, move the shif t lever to the N
(Neutral) position with the brake
pedal depressed, and shif t the
4WD shif t switch to 2WD.
∙ If the warning light is still on af ter the above operation, have your vehicle
checked. It is recommended that you
visit a NISSAN dealer for this service as
soon as possible.
orAnti-lock Braking
System (ABS)
warning light
When the ignition switch is placed in the ON
position, the ABS warning light illuminates
and then turns off. This indicates the ABS is
operational.
If the ABS warning light illuminates while
the engine is running or while driving, it
may indicate the ABS is not functioning
properly. Have the system checked. It is
recommended that you visit a NISSAN
dealer for this service.
If an ABS malfunction occurs, the anti-lock
function is turned off. The brake system
then operates normally but without anti-
lock assistance. For additional information, refer to “Brake system” in the “Starting and
driving” section of this manual.
Automatic Transmission
check warning light
When the ignition switch is placed in the ON
position, the light comes on for about
2 seconds. If the light comes on at any
other time, it may indicate the automatic
transmission system is not functioning
properly. Have the system checked. It is
recommended that you visit a NISSAN
dealer for this service.
Automatic Transmission oiltemperature warning light
This light comes on when the automatic
transmission oil temperature is too high. If
the light comes on while driving, reduce the
vehicle speed as soon as safely possible
until the light turns off.
CAUTION
Continued vehicle operation when the
A/T oil temperature warning light is on
may damage the automatic
transmission.
Automatic Transmissionpark warning light (
model)
WARNING
∙ If the 4WD mode indicator is off or the ATP warning light is on, this indicates
that the automatic transmission P
(Park) position will not function and
could result in the vehicle moving un-
expectedly, causing serious personal
injury or property damage. Always set
the parking brake. For additional in-
formation, refer to “Using 4–wheel
drive (4WD)” in the “Starting and driv-
ing” section of this manual.
∙ If the ATP light is on, this indicates that the automatic transmission P (Park)
position will not function and the
transfer case is in neutral.
∙ When parking, always make sure that the 4WD shif t indicator light illumi-
nates and the parking brake is set.
Failure to engage the transfer posi-
tion in 2WD, 4H or 4LO could result in
the vehicle moving unexpectedly, re-
sulting in serious personal injury or
property damage.
Instruments and controls2-23
Page 129 of 650
∙ Shif t the 4WD switch into the 2WD, 4Hor 4LO position again to turn off the
ATP warning light when the shif t lever
is in the P position and the ATP warn-
ing light is on. (Before shif ting the
4WD switch into the 4LO position,
move the shif t lever to the N position
once, shif t the shif t lever into P again
and make sure the ATP warning light
is off.)
This light indicates that the automatic
transmission parking function is not en-
gaged. If the transfer control is not secured
in any drive position while the shif t lever is
in the P (Park) position, the transmission will
disengage and the drive wheels will not
lock.
orBrake warning light
This light functions for both the parking
brake and the foot brake systems.
Parking brake indicator
When the ignition switch is placed in the ON
position, the light comes on when the park-
ing brake is applied. Low brake fluid warning light
When the ignition switch is placed in the ON
position, the light warns of a low brake fluid
level. If the light comes on while the engine
is running, with the parking brake not ap-
plied, stop the vehicle and perform the fol-
lowing:
1. Check the brake fluid level. Add brake fluid as necessary. For additional infor-
mation, refer to “Brake fluid” in the “Do-
it-yourself ” section of this manual.
2. If the brake fluid level is correct, have the warning system checked. It is rec-
ommended that you visit a NISSAN
dealer for this service.
WARNING
∙ Your brake system may not be work-ing properly if the warning light is on.
Driving could be dangerous. If you
judge it to be safe, drive carefully to
the nearest service station for repairs.
Otherwise, have your vehicle towed
because driving it could be
dangerous. ∙ Pressing the brake pedal with the en-
gine stopped and/or a low brake fluid
level may increase your stopping dis-
tance and braking will require greater
pedal effort and pedal travel.
∙ If the brake fluid level is below the MINIMUM or MIN mark on the brake
fluid reservoir, do not drive until the
brake system has been checked. It is
recommended that you visit a NISSAN
dealer for this service.
Anti-lock Braking System (ABS) warning
indicator
When the parking brake is released and the
brake fluid level is sufficient, if both the
brake warning light and the ABS warning
light illuminate, it may indicate the ABS is
not functioning properly. Have the brake
system checked and, if necessary, repaired.
It is recommended that you visit a NISSAN
dealer for this service. Avoid high-speed
driving and abrupt braking. For additional
information, refer to “Anti-lock Braking Sys-
tem (ABS) warning light” in this section.
2-24Instruments and controls