remote control NISSAN TITAN 2020 Owner´s Manual
[x] Cancel search | Manufacturer: NISSAN, Model Year: 2020, Model line: TITAN, Model: NISSAN TITAN 2020Pages: 657, PDF Size: 5.1 MB
Page 7 of 657
For descriptions specified for 4-wheel drive
models, amark is placed at the be-
ginning of the applicable sections/items.
As with other vehicles with features for
off-road use, failure to operate 4-wheel
drive models correctly may result in loss
of control or a collision. For additional
information, refer to “Driving safety pre-
cautions” in the “Starting and driving”
section of this manual.
ON-PAVEMENT AND OFF-ROAD DRIVING
This vehicle will handle and maneuver
differently from an ordinary passenger
car because it has a higher center of
gravity for off-road use. As with other
vehicles with features of this type, fail-
ure to operate this vehicle correctly may
result in loss of control or an accident.
For additional information, refer to “On-
pavement and off-road driving precau-
tions”, “Avoiding collision and rollover”
and “Driving safety precautions” in the
“Starting and driving” section of this
manual.
MODIFICATION OF YOUR VEHICLE
This vehicle should not be modified.
Modification could affect its perfor-
mance, safety, emissions or durability
and may even violate governmental
regulations. In addition, damage or per-
formance problems resulting from
modifications may not be covered un-
der NISSAN warranties.
WARNING
Installing an af termarket On-Board Di-
agnostic (OBD) plug-in device that uses
the port during normal driving, for ex-
ample remote insurance company
monitoring, remote vehicle diagnos-
tics, telematics or engine reprogram-
ming, may cause interference or dam-
age to vehicle systems. We do not
recommend or endorse the use of any
af termarket OBD plug-in devices, un-
less specifically approved by NISSAN.
The vehicle warranty may not cover
damage caused by any af termarket
plug-in device. This manual includes information for all
features and equipment available on this
model. Features and equipment in your ve-
hicle may vary depending on model, trim
level, options selected, order, date of pro-
duction, region or availability. Therefore,
you may find information about features or
equipment that are not included or in-
stalled on your vehicle.
All information, specifications and illustra-
tions in this manual are those in effect at
the time of printing. NISSAN reserves the
right to change specifications, perfor-
mance, design or component suppliers
without notice and without obligation.
From time to time, NISSAN may update or
revise this manual to provide Owners with
the most accurate information currently
available. Please carefully read and retain
with this manual all revision updates sent
to you by NISSAN to ensure you have ac-
cess to accurate and up-to-date informa-
tion regarding your vehicle. Current ver-
sions of vehicle Owner's Manuals and any
updates can also be found in the Owner
section of the NISSAN website at
https://
owners.nissanusa.com/nowners/
navigation/manualsGuide . If you have
questions concerning any information in
WHEN READING THE MANUAL
Page 116 of 657
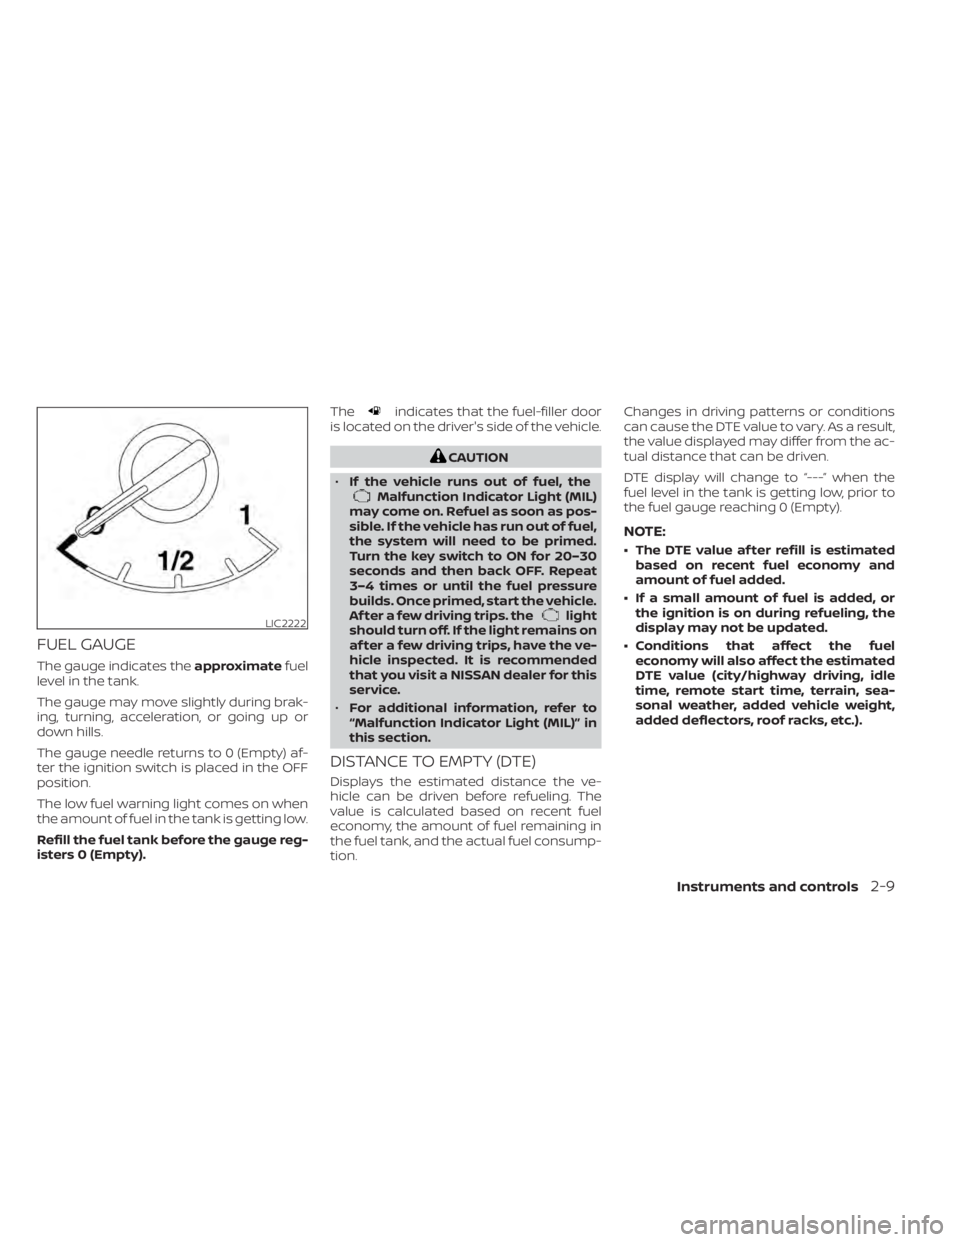
FUEL GAUGE
The gauge indicates theapproximatefuel
level in the tank.
The gauge may move slightly during brak-
ing, turning, acceleration, or going up or
down hills.
The gauge needle returns to 0 (Empty) af-
ter the ignition switch is placed in the OFF
position.
The low fuel warning light comes on when
the amount of fuel in the tank is getting low.
Refill the fuel tank before the gauge reg-
isters 0 (Empty). The
indicates that the fuel-filler door
is located on the driver's side of the vehicle.
CAUTION
• If the vehicle runs out of fuel, the
Malfunction Indicator Light (MIL)
may come on. Refuel as soon as pos-
sible. If the vehicle has run out of fuel,
the system will need to be primed.
Turn the key switch to ON for 20–30
seconds and then back OFF. Repeat
3–4 times or until the fuel pressure
builds. Once primed, start the vehicle.
Af ter a few driving trips. the
light
should turn off. If the light remains on
af ter a few driving trips, have the ve-
hicle inspected. It is recommended
that you visit a NISSAN dealer for this
service.
• For additional information, refer to
“Malfunction Indicator Light (MIL)” in
this section.
DISTANCE TO EMPTY (DTE)
Displays the estimated distance the ve-
hicle can be driven before refueling. The
value is calculated based on recent fuel
economy, the amount of fuel remaining in
the fuel tank, and the actual fuel consump-
tion. Changes in driving patterns or conditions
can cause the DTE value to vary. As a result,
the value displayed may differ from the ac-
tual distance that can be driven.
DTE display will change to “---” when the
fuel level in the tank is getting low, prior to
the fuel gauge reaching 0 (Empty).
NOTE:
• The DTE value af ter refill is estimated
based on recent fuel economy and
amount of fuel added.
• If a small amount of fuel is added, or the ignition is on during refueling, the
display may not be updated.
• Conditions that affect the fuel economy will also affect the estimated
DTE value (city/highway driving, idle
time, remote start time, terrain, sea-
sonal weather, added vehicle weight,
added deflectors, roof racks, etc.).
LIC2222
Instruments and controls2-9
Page 140 of 657
1. Door Open
2. Release Parking Brake
3. Range XX miles
4. Low Fuel
5. AT (Automatic Transmission) CHECK
6. AT (Automatic Transmission) Error: SeeOwner’s Manual
7. Tire Pressure Low - Add Air
8. Low Tire Pressure Error — Info
9. Flat Tire
10. Shipping Mode On Push Storage Fuse
11. Push brake and start button to drive
12. Remote Engine Start Mode (if so equipped)
13. Brightness indicator
14. Shif t to Park
15. Low Washer Fluid
16. Cruise control indicator (if so equipped)
17. 4WD shif t indicators (if so equipped)
18. FRT & RR tire size difference: See Own- er’s Manual (if so equipped)
19. Push Ignition to OFF 20. Headlight System Error: See Owner’s
Manual (if so equipped)
21. Key ID Incorrect
22. No Key Detected
23. Key System Error: See Owner’s Manual
24. Key Battery Low
25. Power will turn off to save the battery
26. Power turned off to save the battery
27. Reminder: Turn OFF Headlights
28. 4WD Error: See Owner’s Manual (if so equipped)
29. Battery Voltage Low Charge battery
30. Maintenance indicators
31. Parking Sensor Error: See Owner’s Manual
32. TPMS Error: See Owner’s Manual
33. 4WD MODE SHIFTING (if so equipped)
34. Loose Fuel Cap (if so equipped)
35. Blind Spot Warning (BSW)/ Rear Cross Traffic Alert (RCTA) indicator
36. Malfunction
37. Unavailable Side Radar Obstruction 38. Rear Door Alert is activated (if so
equipped)
39. Check Rear Seat For All Articles (if so equipped)
40. Driver Attention Alert — Malfunction
41. Driver Attention Alert — Take a Break?
42. Automatic Emergency Braking (AEB) with Pedestrian Detection emergency
warning indicator
43.
Lane Departure Warning (LDW) indicator
44. Rear Automatic Braking (RAB) indicator
45. Vehicle ahead detection indicator
46. System fault See Owner’s Manual
47. Parking Sensor
48. Not Available High Camera Temp
49. Intelligent Cruise Control (ICC) indica- tors (if so equipped)
50. Speed Limit Sign indicator (if so equipped)
51. Service AT
52. When parked apply parking brake
53. Currently unavailable (if so equipped)
54. Not Available Front Radar Blocked
Instruments and controls2-33
Page 142 of 657
Push brake and start button to drive
This indicator appears when the shif t lever
is in the P (Park) position.
This indicator means that the engine will
start by pushing the ignition switch with
the brake pedal depressed. You can start
the engine from any position of the ignition
switch.
Remote Engine Start Mode (if so
equipped)
This warning appears in the vehicle infor-
mation display when the vehicle has been
started using the remote start function. To
start the vehicle, apply the brake and place
the ignition switch in the ON position.
Brightness indicator
This indicator appears when the vehicle
information display screen brightness is
being adjusted.
Shif t to Park
This warning illuminates when the ignition
switch is in the ACC or OFF position and the
shif t lever is not in the P (Park) position. Also,
a chime sounds when the ignition switch is
in the ACC or OFF position.If this warning illuminates, move the shif t
lever to the P (Park) position and start the
engine.
Low Washer Fluid
This warning illuminates when the
windshield-washer fluid is at a low level.
Add windshield-washer fluid as necessary.
For additional information, refer to
“Windshield-washer fluid” in the “Do-it-
yourself ” section of this manual.
Cruise control indicator (if so
equipped)
This indicator shows the cruise control sys-
tem status.
For additional information, refer to “Cruise
control” in the “Starting and driving” section
of this manual.
4WD shif t indicators (if so equipped)
These indicators show which 4WD mode is
selected. For additional information, refer
to “Using 4–wheel drive (4WD)” in the “Start-
ing and driving” section of this manual.
FRT & RR tire size difference: See
Owner’s Manual (if so equipped)
This warning may appear if there is a large
difference between the diameters of the
front and rear wheels. Pull off the road in asafe area, with the engine idling. Check that
all the tire sizes are the same, that the tire
pressure is correct and that the tires are
not excessively worn. For additional infor-
mation, refer to “Wheels and tires” in the
“Technical and consumer information” of
this manual.
Push Ignition to OFF
Af ter the Push ignition to OFF warning illu-
minates, the warning will illuminate if the
ignition switch is placed in the ACC position
when the shif t lever is moved to the P (Park)
position.
To turn off the Push warning, place the ig-
nition switch in the ON position and then in
the LOCK position.
Headlight System Error: See Owner’s
Manual (if so equipped)
This warning appears when the LED head-
lights are not functioning properly.
If this warning appears, have your system
checked. It is recommended that you visit a
NISSAN dealer for this service.
Instruments and controls2-35
Page 212 of 657
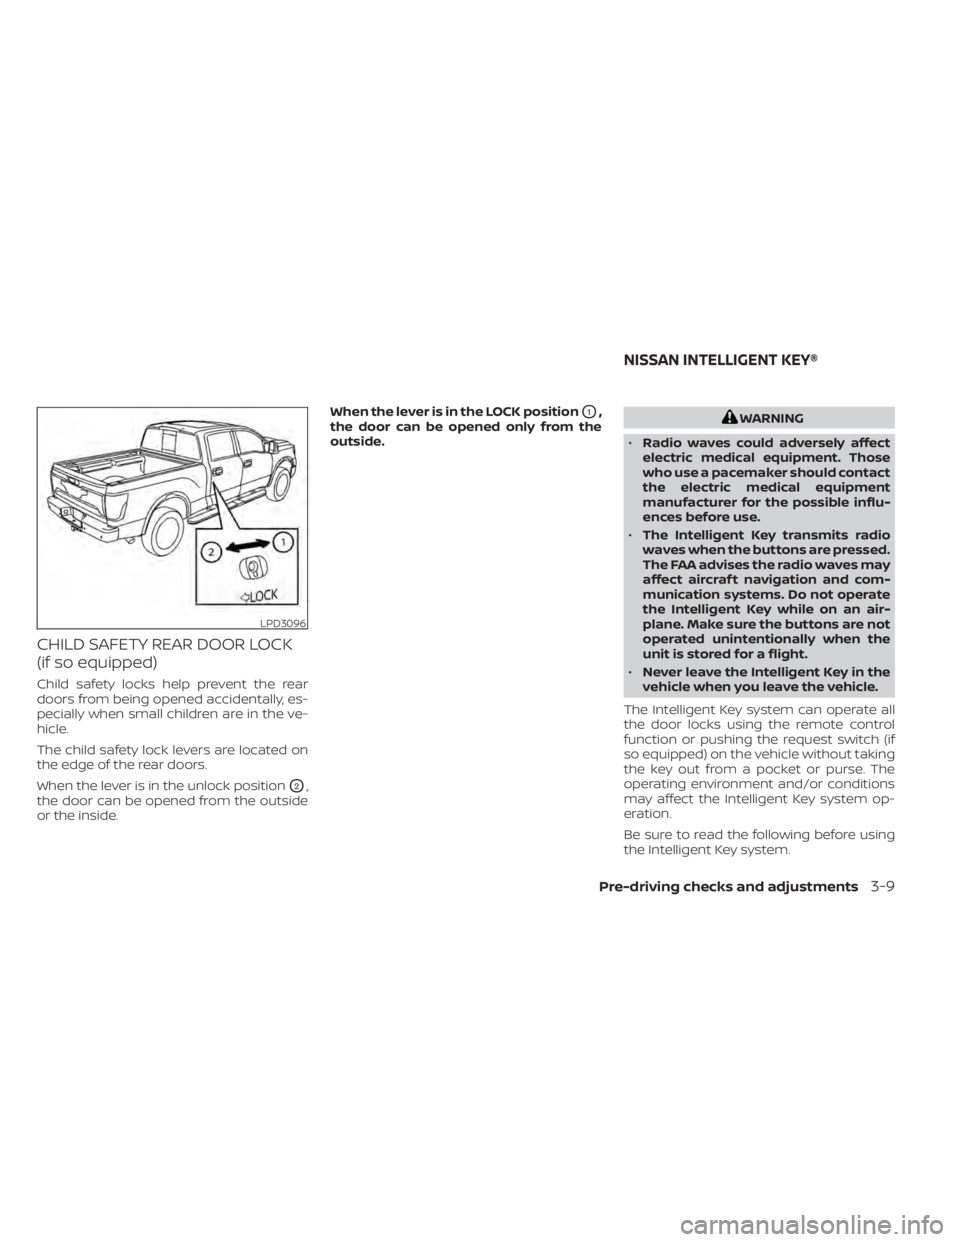
CHILD SAFETY REAR DOOR LOCK
(if so equipped)
Child safety locks help prevent the rear
doors from being opened accidentally, es-
pecially when small children are in the ve-
hicle.
The child safety lock levers are located on
the edge of the rear doors.
When the lever is in the unlock position
O2,
the door can be opened from the outside
or the inside. When the lever is in the LOCK position
O1,
the door can be opened only from the
outside.WARNING
• Radio waves could adversely affect
electric medical equipment. Those
who use a pacemaker should contact
the electric medical equipment
manufacturer for the possible influ-
ences before use.
• The Intelligent Key transmits radio
waves when the buttons are pressed.
The FAA advises the radio waves may
affect aircraf t navigation and com-
munication systems. Do not operate
the Intelligent Key while on an air-
plane. Make sure the buttons are not
operated unintentionally when the
unit is stored for a flight.
• Never leave the Intelligent Key in the
vehicle when you leave the vehicle.
The Intelligent Key system can operate all
the door locks using the remote control
function or pushing the request switch (if
so equipped) on the vehicle without taking
the key out from a pocket or purse. The
operating environment and/or conditions
may affect the Intelligent Key system op-
eration.
Be sure to read the following before using
the Intelligent Key system.
LPD3096
NISSAN INTELLIGENT KEY®
Pre-driving checks and adjustments3-9
Page 213 of 657
CAUTION
Be sure to carry the Intelligent Key with
you when operating the vehicle.
The Intelligent Key is capable of receiving
and transmitting radio waves. The Intelli-
gent Key system transmits weak radio
waves from various distances. Environ-
mental conditions may interfere with the
operation of the Intelligent Key system un-
der the following operating conditions:
• When operating near a location where strong radio waves are transmitted, such
as a TV tower, power station and broad-
casting station.
• When in possession of wireless equip- ment, such as a cellular telephone, trans-
ceiver, or a CB radio.
• When the Intelligent Key is in contact with or covered by metallic materials.
• When any type of radio wave remote con- trol is used nearby.
• When the Intelligent Key is placed near an electric appliance such as a personal
computer.
• When the vehicle is parked near a parking meter. In such cases, correct the operating condi-
tions before using the Intelligent Key func-
tion or use the mechanical key.
Although the life of the battery varies de-
pending on the operating conditions, the
battery’s life is approximately two years. If
the battery is discharged, replace it with a
new one.
When the Intelligent Key battery is low, an
indicator light illuminates with the mes-
sage “Warning, Key ID Incorrect” in the ve-
hicle information display. When the Intelli-
gent Key battery is low, the NISSAN
Intelligent Key® warning light (if so
equipped) will blink. For additional informa-
tion, refer to “Vehicle information display
warnings and indicators” in the “Instru-
ments and controls” section of this manual.
Since the Intelligent Key is capable of re-
ceiving radio waves, if the key is lef t near
equipment which transmits strong radio
waves, such as signals from a TV and per-
sonal computer, the battery life may be-
come shorter.
For additional information, refer to “Battery
replacement” in the “Do-it-yourself ” section
of this manual.
As many as four Intelligent Keys can be
registered and used with one vehicle. For
information about the purchase and use of
additional Intelligent Keys, it is recom-
mended that you visit a NISSAN dealer.
3-10Pre-driving checks and adjustments
Page 218 of 657
If a door handle is pulled while unlocking
the doors, that door may not be unlocked.
Returning the door handle to its original
position will unlock the door. If the door
does not unlock af ter returning the door
handle, push the door handle request (if so
equipped) switch to unlock the door.
All doors will be locked automatically un-
less one of the following operations is per-
formed within one minute af ter pushing
the request switch (if so equipped).
• Opening any door.
• Pushing the ignition switch.
The interior light timer illuminates for a pe-
riod of time when a door is unlocked and
the interior light switch is in the ON posi-
tion.
The interior light can be turned off without
waiting by performing one of the following
operations.
• Placing the ignition switch in the ON po-sition.
• Locking the doors with the remote con- trol.
• Switching the interior light switch to the OFF position For additional information,
refer to “Interior lights” in the “Instruments
and controls” section on this manual.HOW TO USE THE REMOTE
KEYLESS ENTRY FUNCTION
The remote keyless entry function can op-
erate all door locks using the remote key-
less function of the Intelligent Key. The re-
mote keyless function can operate at a
distance of 33 f t (10 m) away from the ve-
hicle. The operating distance depends
upon the conditions around the vehicle.
The remote keyless entry function will not
function under the following conditions:
• When the Intelligent Key is not within theoperational range.
• When the Intelligent Key battery is dis- charged.
• When the doors are open or not closed securely.
• Switching the interior light switch to the OFF position. For additional information,
refer to “Interior lights” in the “Instruments
and controls” section of this manual.
CAUTION
When locking the doors using the Intel-
ligent Key, be sure not to leave the key
in the vehicle.
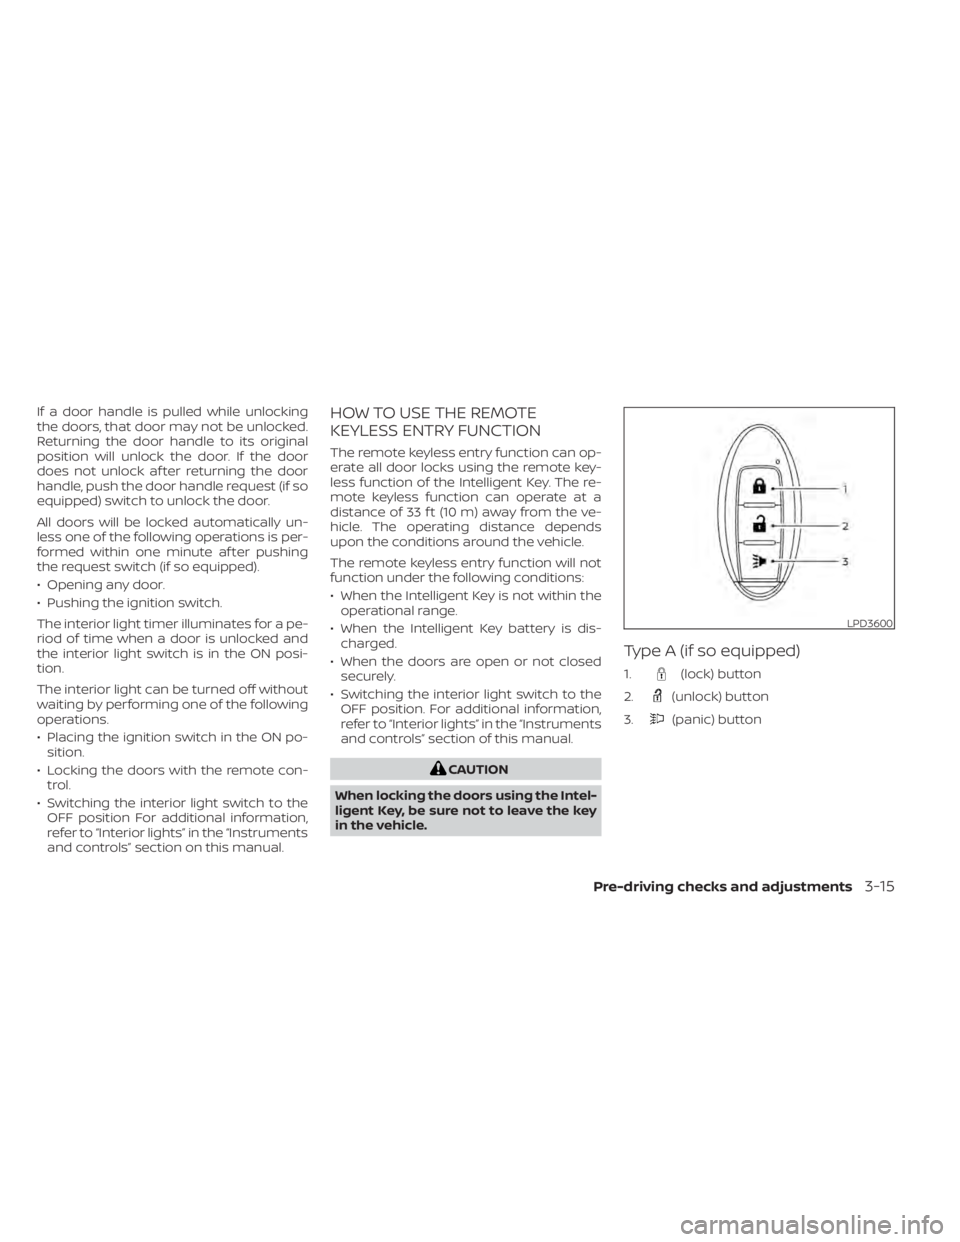
Type A (if so equipped)
1.(lock) button
2.
(unlock) button
3.
(panic) button
LPD3600
Pre-driving checks and adjustments3-15
Page 220 of 657
Using the panic alarm
If you are near your vehicle and feel threat-
ened, you may activate the panic alarm to
call attention by pressing and holding the
button on the Intelligent Key forlon-
ger than 0.5 seconds.
The panic alarm and headlights will stay on
for a period of time.
The panic alarm stops when:
• It has run for a period of time.
• Any button is pressed on the Intelligent Key.
• The request switch (if so equipped) on the driver or passenger door is pushed and
the Intelligent Key is in range of the door
handle.
Trailer light check (if so equipped)
This functionality allows the customer to
confirm trailer light operation, without the
need of a second person to press the brake
pedal or activate each turn signal light. The
trailer light check can be performed by the
Intelligent Key or through the Vehicle Set-
tings in the vehicle information display. For
additional information, refer to “Vehicle in-
formation display” in the “Instruments and
controls” section of this manual. To activate the trailer light check function
with your Intelligent Key, perform the fol-
lowing:
1. Aim the Intelligent Key at the vehicle.
2. Press and release the
LOCK
button.
3. Within 2 seconds, press and hold the
LOCK button again for at least 2
seconds, until the horn beeps once and
the park lights turn on.
The following events will occur:
• The lef t turn signal light on the vehicle and the trailer will flash for 5 seconds.
• The right turn signal light on the vehicle and the trailer will flash for 5 seconds.
• The brake lights on the vehicle and the trailer will turn ON for 5 seconds.
NOTE:
If the ignition switch is in the OFF po-
sition, the park lights will turn off af-
ter the events above occur. If ignition
switch is in the ON position, lights will
stay on for 45 seconds af ter trailer
light check. If the trailer lights do not
work properly, check the connections
and bulbs. If the vehicle lights do not
turn on, check the bulbs. If the trailer
light check routine fails to start, en-
sure the following vehicle conditions:
• The vehicle is NOT moving, 0 mph (0 km/h)
• Brake switch is NOT depressed
• Lef t or right flasher is OFF
• Trailer light check configuration is NOT disabled and available in the meter
towing settings
• The hazard switch is NOT turned ON
• The shif t position is fully in P (Park) po- sition
• Vehicle is within Remote Keyless Entry range
Pre-driving checks and adjustments3-17
Page 224 of 657
Thebutton will be on the NISSAN
Intelligent Key® if the vehicle has Remote
Engine Start. This feature allows the engine
to start from outside the vehicle.
Vehicles with an automatic climate control
system will default to either heating or
cooling mode. For additional information,
refer to “Remote Engine Start with Intelli-
gent Climate Control” in the “Monitor, cli-
mate, audio, phone and voice recognition
systems” section of this manual.
Laws in some local communities may re-
strict the use of remote starters. For ex-
ample, some laws require a person using Remote Engine Start to have the vehicle in
view. Check local regulations for any re-
quirements.
Other conditions may affect the function of
the Remote Engine Start feature. For addi-
tional information, refer to “Conditions the
Remote Engine Start will not work” in this
section.
Other conditions can affect the perfor-
mance of the Intelligent Key transmitter.
For additional information, refer to “NISSAN
Intelligent Key®” in this section.
REMOTE ENGINE START
OPERATING RANGE
WARNING
To help avoid risk of injury or death
through unintended operation of the
vehicle and/or its systems, including
entrapment in windows or inadvertent
door lock activation, do not leave chil-
dren, people who require the assis-
tance of others or pets unattended in
your vehicle. Additionally, the tempera-
ture inside a closed vehicle on a warm
day can quickly become high enough
to cause a significant risk of injury or
death to people and pets.
CAUTION
When the Intelligent Key battery is dis-
charged or other strong radio wave
sources are present near the operating
location, the Intelligent Key operating
range becomes narrower, and the Intel-
ligent Key may not function properly.
The Remote Engine Start function can only
be used when the Intelligent Key is within
the specified operating range from the ve-
hicle.
The Remote Engine Start operating range
is approximately 197 f t (60 m) from the ve-
hicle.
REMOTE STARTING THE VEHICLE
To use the Remote Engine Start feature to
start the engine perform the following:
1. Aim the Intelligent Key at the vehicle.
2. Press the
button to lock all doors.
3. Within 5 seconds press and hold the
button until the turn signal lights
flash and the tail lamps turn on. If the
vehicle is not within view press and hold
the
button for at least 2 seconds.
LPD2995
REMOTE ENGINE START (if so
equipped)
Pre-driving checks and adjustments3-21
Page 225 of 657
The following events will occur when the
engine starts:
• The parking lights will turn on and remainon as long as the engine is running.
• The doors will be locked and the climate control system may come on.
• The engine will continue to run for 10 min- utes. Repeat the steps to extend the time
for an additional 10 minutes. For addi-
tional information, refer to “Extending en-
gine run time” in this section.
Depress and hold the brake then push the
push-button ignition switch to the ON po-
sition before driving. For additional infor-
mation, refer to “Driving the vehicle” in the
“Starting and driving” section of this
manual.
EXTENDING ENGINE RUN TIME
The Remote Engine Start feature can be
extended one time by performing the
steps listed in “Remote starting the vehicle”
in this section. Run time will be calculated
as follows:
• The first 10 minute run time will start when the Remote Engine Start function is
performed. • The second 10 minutes will start immedi-
ately when the Remote Engine Start
function is performed again. For example,
if the engine has been running for 5 min-
utes, and 10 minutes are added, the en-
gine will run for a total of 15 minutes.
• Extending engine run time will count to- wards the two Remote Engine Start limit.
A maximum of two Remote Engine Starts,
or a single Remote Engine Start with an
extension, are allowed between ignition
cycles. The ignition switch must be cycled
to the ON position and then back to the
OFF position before the Remote Engine
Start procedure can be used again.
CANCELING A REMOTE ENGINE
START
To cancel a Remote Engine Start, perform
one of the following:
• Aim the Intelligent Key at the vehicle and press
until the parking lights turn off.
• Turn on the hazard warning flashers.
• Cycle the ignition switch on and then off.
• The extended engine run time has ex- pired.
• The first 10 minute timer has expired.
• The engine hood has been opened.
• The shif t lever is moved out of park. • The alarm sounds due to illegal entry into
the vehicle.
• The ignition switch is pushed without an Intelligent Key in the vehicle.
• The ignition switch is pushed with an In- telligent Key in the vehicle but the brake
pedal is not depressed.
CONDITIONS THE REMOTE ENGINE
START WILL NOT WORK
The Remote Engine Start will not operate if
any of the following conditions are present:
• The ignition switch is placed in the ONposition.
• The hood is not securely closed.
• The hazard warning lights are on.
• The engine is still running. The engine must be completely stopped. Wait at
least 6 seconds if the engine goes from
running to off. This is not applicable when
extending engine run time.
• The
button is not pressed and held
for at least 2 seconds.
• The
button is not pressed and held
within 5 seconds of pressing the lock but-
ton.
• The brake is pressed.
• The doors are not closed and locked.
3-22Pre-driving checks and adjustments