glove box NISSAN TITAN 2022 Owners Manual
[x] Cancel search | Manufacturer: NISSAN, Model Year: 2022, Model line: TITAN, Model: NISSAN TITAN 2022Pages: 635, PDF Size: 7.78 MB
Page 13 of 635
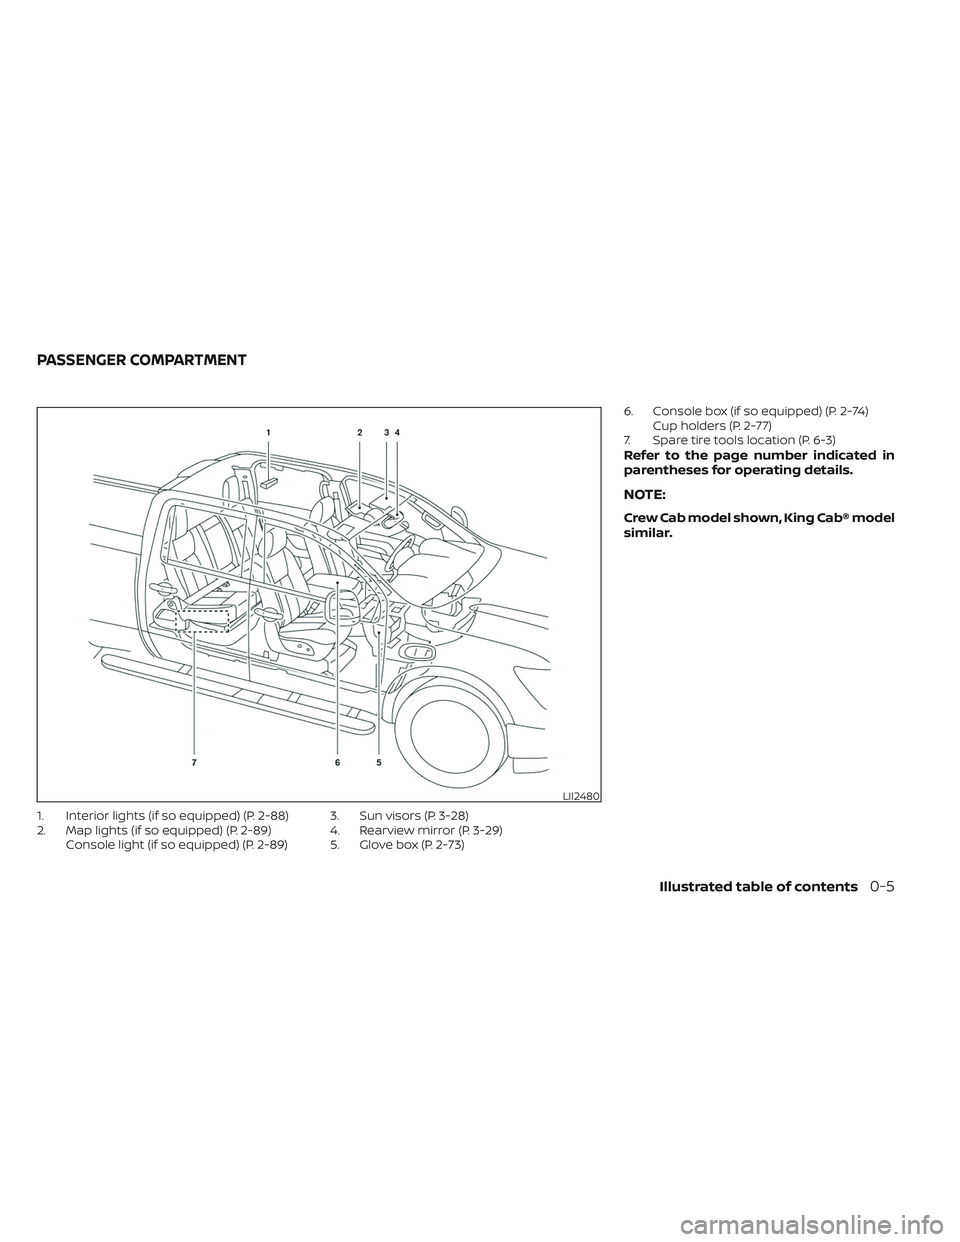
1. Interior lights (if so equipped) (P. 2-88)
2. Map lights (if so equipped) (P. 2-89)Console light (if so equipped) (P. 2-89) 3. Sun visors (P. 3-28)
4. Rearview mirror (P. 3-29)
5. Glove box (P. 2-73) 6. Console box (if so equipped) (P. 2-74)
Cup holders (P. 2-77)
7. Spare tire tools location (P. 6-3)
Refer to the page number indicated in
parentheses for operating details.
NOTE:
Crew Cab model shown, King Cab® model
similar.
LII2480
PASSENGER COMPARTMENT
Illustrated table of contents0-5
Page 14 of 635
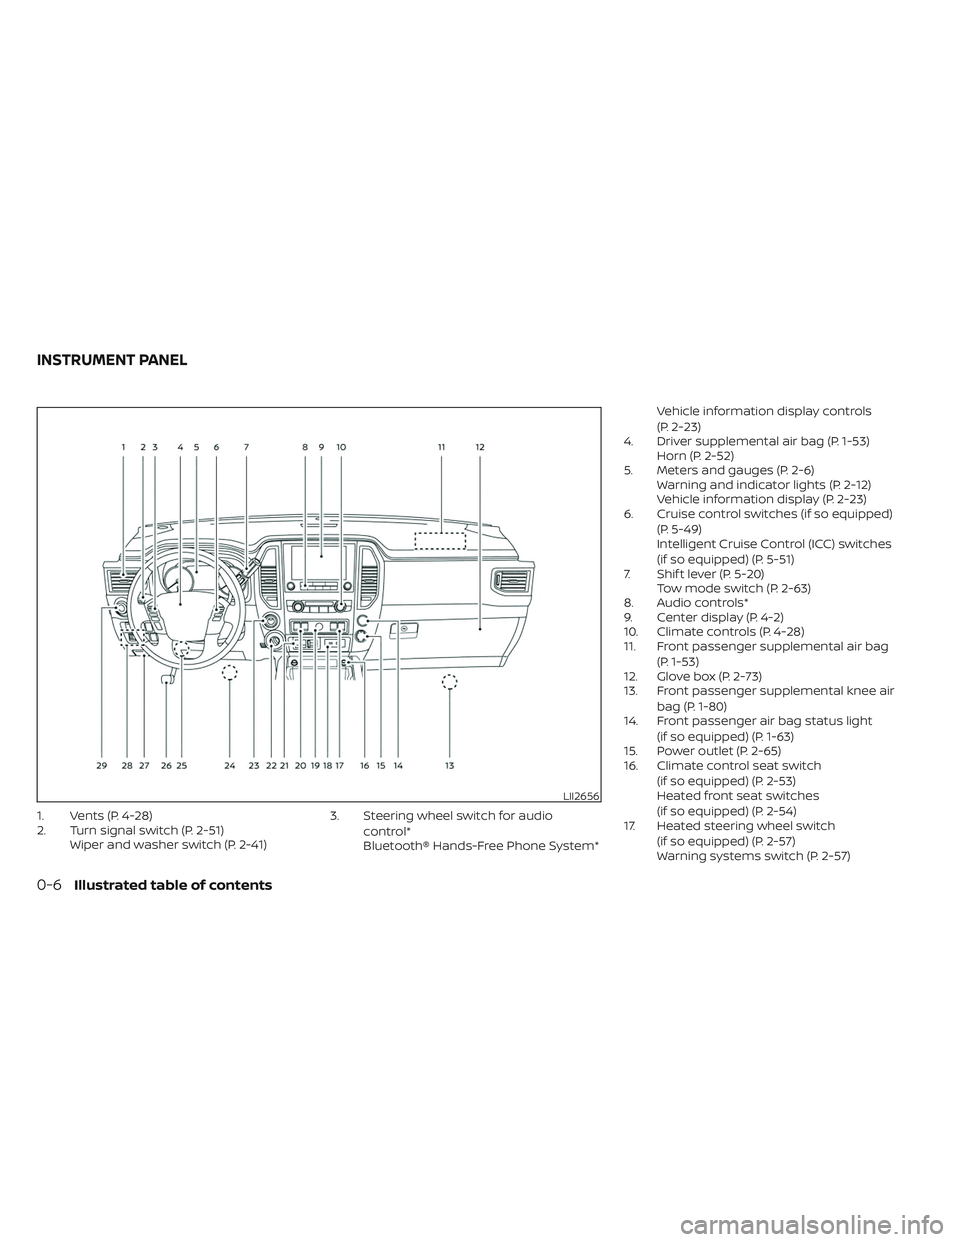
1. Vents (P. 4-28)
2. Turn signal switch (P. 2-51)Wiper and washer switch (P. 2-41) 3. Steering wheel switch for audio
control*
Bluetooth® Hands-Free Phone System* Vehicle information display controls
(P. 2-23)
4. Driver supplemental air bag (P. 1-53) Horn (P. 2-52)
5. Meters and gauges (P. 2-6) Warning and indicator lights (P. 2-12)
Vehicle information display (P. 2-23)
6. Cruise control switches (if so equipped)
(P. 5-49)
Intelligent Cruise Control (ICC) switches
(if so equipped) (P. 5-51)
7. Shif t lever (P. 5-20) Tow mode switch (P. 2-63)
8. Audio controls*
9. Center display (P. 4-2)
10. Climate controls (P. 4-28)
11. Front passenger supplemental air bag
(P. 1-53)
12. Glove box (P. 2-73)
13. Front passenger supplemental knee air
bag (P. 1-80)
14. Front passenger air bag status light
(if so equipped) (P. 1-63)
15. Power outlet (P. 2-65)
16. Climate control seat switch
(if so equipped) (P. 2-53)
Heated front seat switches
(if so equipped) (P. 2-54)
17. Heated steering wheel switch
(if so equipped) (P. 2-57)
Warning systems switch (P. 2-57)
LII2656
INSTRUMENT PANEL
0-6Illustrated table of contents
Page 81 of 635

WARNING
To ensure proper operation of the pas-
senger’s NISSAN Advanced Air Bag Sys-
tem, please observe the following
items.
• Do not allow a passenger in the rear
bench seats to push or pull on the
seatback pocket.
• Do not place heavy loads heavier
than 9.1 lbs. (4 kg) on the seatback,
head restraint or in the seatback
pocket.
• Make sure that there is nothing
pressing against the rear of the seat-
back, such as a child restraint in-
stalled in the rear seat or an object
stored on the floor.
• Make sure that there is no object
placed under the front passenger
seat.
• Make sure that there is no object
placed between the seat cushion and
center console, or between the seat
cushion and the door. •
If a forward-facing child restraint is
installed in the front passenger seat,
do not position the front passenger
seat so the child restraint contacts
the instrument panel. If the child re-
straint does contact the instrument
panel, the system may determine the
seat as occupied and the front pas-
senger air bag and front passenger
supplemental knee air bag may de-
ploy in a collision. Also the front pas-
senger air bag status light may not
illuminate. For additional informa-
tion, see “Child restraints” (P. 1-28).
• Confirm the operating condition with
the front passenger air bag status
light.
• If you notice that the front passenger
air bag status light is not operating
as described in this section, get the
occupant classification system
checked. It is recommended that you
take your vehicle to a NISSAN dealer
for this service.
• Until you have confirmed with a
dealer that your passenger seat oc-
cupant classification system is work-
ing properly, position the occupants
in the rear seating positions. •
Do not position the front passenger
seat so it contacts the rear bench
seats. If the front seat does contact
the rear bench seats, the air bag sys-
tem may determine a sensor mal-
function has occurred and the front
passenger air bag status light may
illuminate and the supplemental air
bag warning light may flash.
This vehicle is equipped with the NISSAN
Advanced Air Bag System for the driver and
front passenger seats. All of the informa-
tion, cautions and warnings in this
manual still apply and must be followed.
The driver supplemental front-impact air
bag is located in the center of the steering
wheel. The front passenger supplemental
front-impact air bag is mounted in the
dashboard above the glove box. The front
air bags are designed to inflate in higher
severity frontal collisions, although they
may inflate if the forces in another type of
collision are similar to those of a higher
severity frontal impact. They may not in-
flate in certain frontal collisions. Vehicle
damage (or lack of it) is not always an indi-
cation of proper front air bag system
operation.
Safety-Seats, seat belts and supplemental restraint system1-61
Page 97 of 635
The driver supplemental front-impact air
bag is located in the center of the steering
wheel. The front passenger supplemental
front-impact air bag is mounted in the
dashboard above the glove box. The
supplemental front air bags are designed
to inflate in higher severity frontal collisions,
although they may inflate if the forces in
another type of collision are similar to
those of a higher severity frontal impact.
They may not inflate in certain frontal colli-
sions. Vehicle damage (or lack of it) is not
always an indication of proper front air bag
system operation.
The supplemental air bag system moni-
tors information from the crash zone sen-
sor, the Air bag Control Unit (ACU) and seat
belt buckle sensors that detect if the seat
belts are fastened. Inflator operation is
based on the severity of a collision and
whether the seat belts are being used. Only
one front air bag may inflate in a crash,
depending on the crash severity and
whether the front occupants are belted or
unbelted. This does not indicate improper
performance of the system. If you have any
questions about the performance of your
air bag system, it is recommended that you
visit a NISSAN dealer to obtain information
about the system.If you have any questions about your air
bag system, it is recommended that you
visit a NISSAN dealer to obtain information
about the system. If you are considering
modification of your vehicle due to a dis-
ability, you may also contact NISSAN. Con-
tact information is contained in the begin-
ning of this Owner's Manual.
When a front air bag inflates, a fairly loud
noise may be heard, followed by the re-
lease of smoke. This smoke is not harmful
and does not indicate a fire. Care should be
taken to not inhale it, as it may cause irrita-
tion and choking. Those with a history of a
breathing condition should get fresh air
promptly.
Front air bags, along with the use of seat
belts, help to cushion the impact force on
the face and chest of the driver and right
front passenger. They can help save lives
and reduce serious injuries. However, an
inflating front air bag may cause facial
abrasions or other injuries. Front air bags,
other than the driver’s and front passen-
ger’s supplemental knee air bags, do not
provide restraint to the lower body.
Seat belts should be correctly worn and the
driver and passenger seated upright as far
as practical away from the steering wheel
or instrument panel. The front air bags in-flate quickly in order to help protect the
front occupants. Because of this, the force
of the front air bag inflating can increase
the risk of injury if the occupant is too close
to, or is against, the front air bag module
during inflation.
The front air bags deflate quickly af ter a
collision.
The front air bags operate only when the
ignition switch is in the ON position.
Af ter placing the ignition switch in the
ON position, the supplemental air bag
warning light illuminates. The supple-
mental air bag warning light will turn off
af ter about 7 seconds if the system is
operational.
WARNING
• Do not place any objects on the
steering wheel pad or on the instru-
ment panel. Also, do not place any
objects between any occupant and
the steering wheel or instrument
panel. Such objects may become
dangerous projectiles and cause in-
jury if the front air bag inflates.
Safety-Seats, seat belts and supplemental restraint system1-77
Page 108 of 635
Hill descent control switch (if so equipped).....2-59
Electronic locking rear differential (E-Lock)
system switch (if so equipped) .................2-60
Power inverter switch (if so equipped) ..........2-61
Parking Aids system switch ....................2-62
Tow mode switch .............................. 2-63
Emergency call (SOS) button (if so equipped) . . . 2-63
Trailer Brake Controller Unit (TBCU)
(if so equipped) ................................. 2-63
Rear Door Alert ................................. 2-64
Power outlets .................................. 2-65
12v Outlets .................................. 2-65
120v outlets (if so equipped) .................2-66
USB/iPod® charging ports (if so equipped) ......2-68
Extended storage switch .......................2-69
Storage ........................................ 2-70
Front-door pockets ......................... 2-70
Rear-door pockets .......................... 2-70
Console side pockets (if so equipped) .......2-70
Seatback pockets ........................... 2-71
Under-seat storage (if so equipped) .........2-71
Console box storage trays
(if so equipped) .............................. 2-73
Cell phone storage tray (if so equipped) .....2-73
Glovebox ................................... 2-73Console box (if so equipped)
................2-74
Center armrest storage (if so equipped) .....2-75
Under front seat storage bin
(if so equipped) .............................. 2-76
Overhead sunglasses storage
(if so equipped) .............................. 2-76
Cup holders ................................. 2-77
Grocery hooks (if so equipped) ..............2-80
Bed liner storage bins (if so equipped) .......2-80
Cargo hooks (if so equipped) ................2-81
C-Channel cargo hooks (if so equipped) .....2-81
Windows ....................................... 2-82
Power windows ............................. 2-82
Rear power window switch
(if so equipped) .............................. 2-84
Rear sliding window (if so equipped) .........2-85
Moonroof (if so equipped) ......................2-86
P
ower moonroof ............................ 2-86
Interior lights ................................... 2-88
Console light (if so equipped) ................2-89
Map lights (if so equipped) ...................2-89
Personal Lights (if so equipped) .............2-90
HomeLink® Universal Transceiver
(if so equipped) ................................. 2-90
Programming HomeLink® ...................2-91
Page 110 of 635
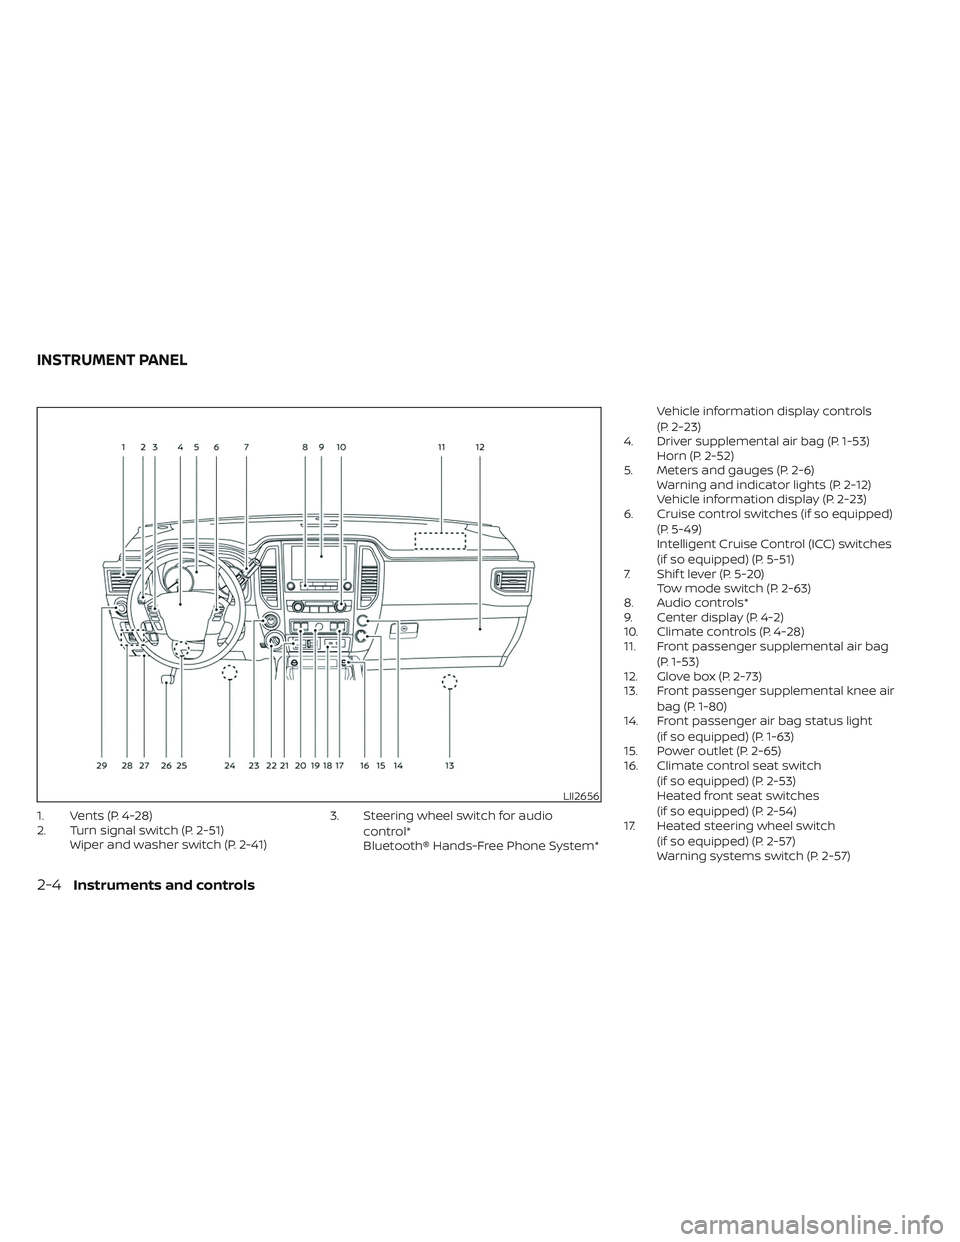
1. Vents (P. 4-28)
2. Turn signal switch (P. 2-51)Wiper and washer switch (P. 2-41) 3. Steering wheel switch for audio
control*
Bluetooth® Hands-Free Phone System* Vehicle information display controls
(P. 2-23)
4. Driver supplemental air bag (P. 1-53) Horn (P. 2-52)
5. Meters and gauges (P. 2-6) Warning and indicator lights (P. 2-12)
Vehicle information display (P. 2-23)
6. Cruise control switches (if so equipped)
(P. 5-49)
Intelligent Cruise Control (ICC) switches
(if so equipped) (P. 5-51)
7. Shif t lever (P. 5-20) Tow mode switch (P. 2-63)
8. Audio controls*
9. Center display (P. 4-2)
10. Climate controls (P. 4-28)
11. Front passenger supplemental air bag
(P. 1-53)
12. Glove box (P. 2-73)
13. Front passenger supplemental knee air
bag (P. 1-80)
14. Front passenger air bag status light
(if so equipped) (P. 1-63)
15. Power outlet (P. 2-65)
16. Climate control seat switch
(if so equipped) (P. 2-53)
Heated front seat switches
(if so equipped) (P. 2-54)
17. Heated steering wheel switch
(if so equipped) (P. 2-57)
Warning systems switch (P. 2-57)
LII2656
INSTRUMENT PANEL
2-4Instruments and controls
Page 175 of 635
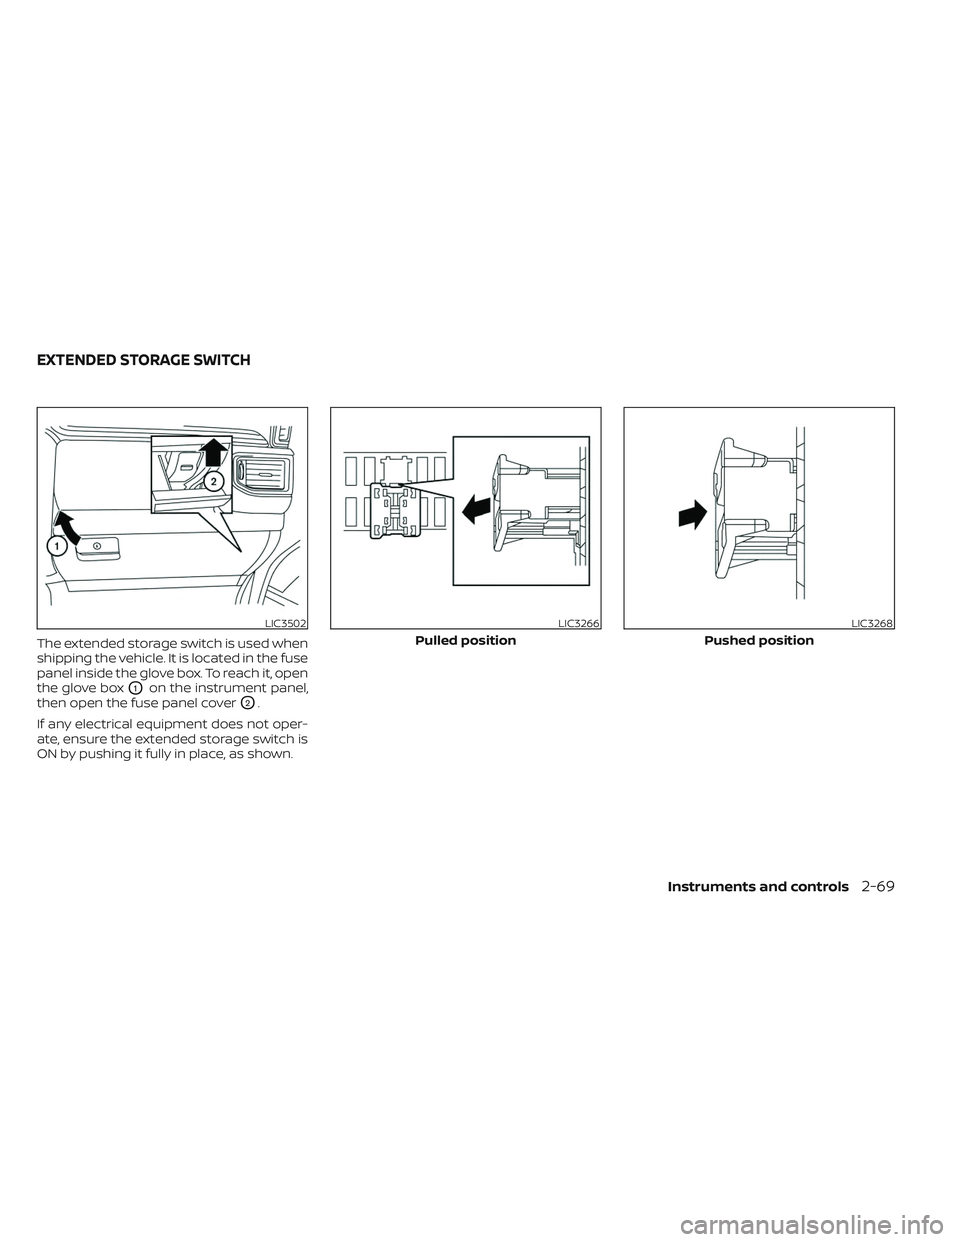
The extended storage switch is used when
shipping the vehicle. It is located in the fuse
panel inside the glove box. To reach it, open
the glove box
O1on the instrument panel,
then open the fuse panel cover
O2.
If any electrical equipment does not oper-
ate, ensure the extended storage switch is
ON by pushing it fully in place, as shown.
LIC3502LIC3266
Pulled position
LIC3268
Pushed position
EXTENDED STORAGE SWITCH
Instruments and controls2-69
Page 179 of 635
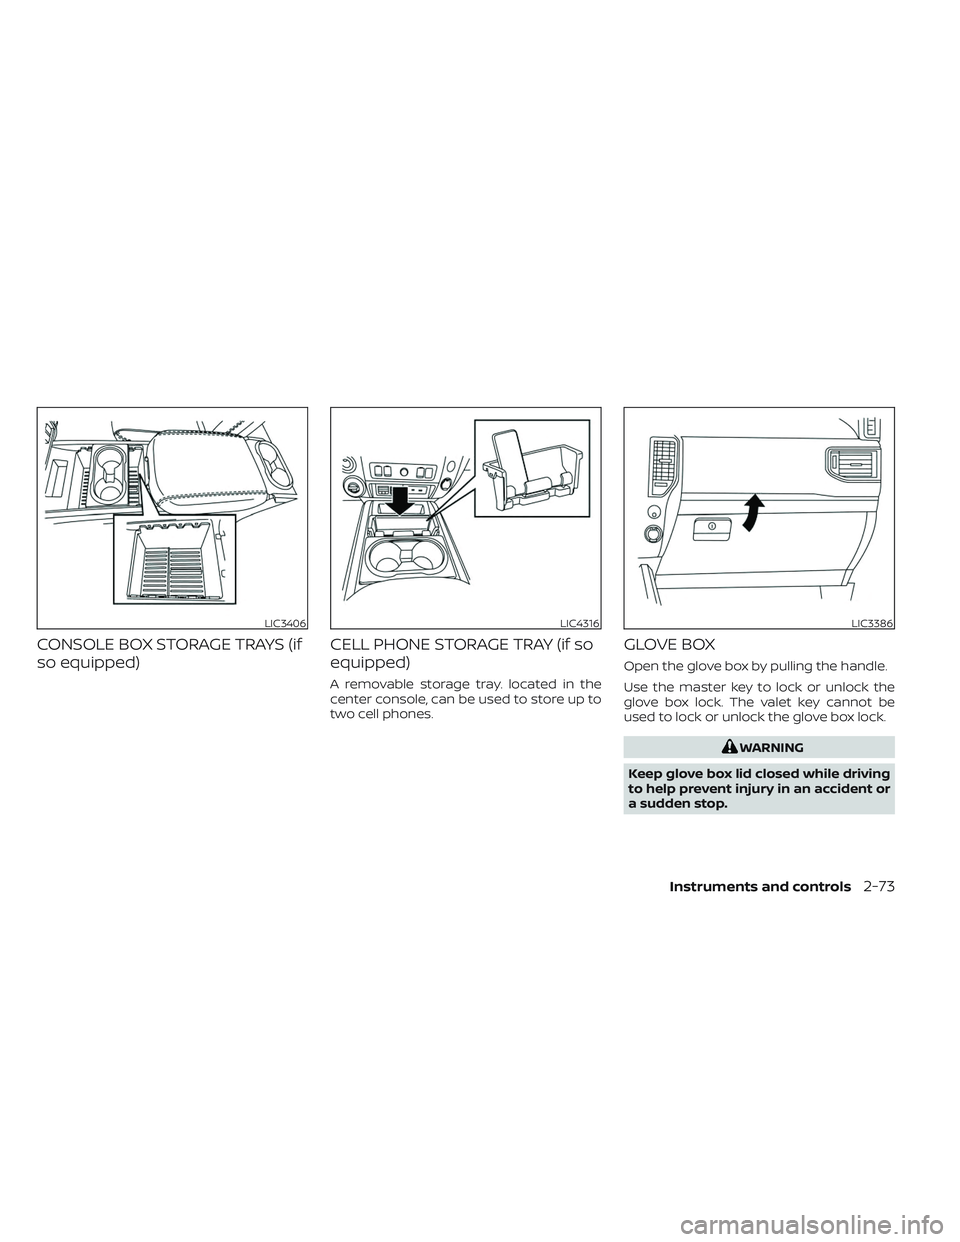
CONSOLE BOX STORAGE TRAYS (if
so equipped)CELL PHONE STORAGE TRAY (if so
equipped)
A removable storage tray. located in the
center console, can be used to store up to
two cell phones.
GLOVE BOX
Open the glove box by pulling the handle.
Use the master key to lock or unlock the
glove box lock. The valet key cannot be
used to lock or unlock the glove box lock.
WARNING
Keep glove box lid closed while driving
to help prevent injury in an accident or
a sudden stop.
LIC3406LIC4316LIC3386
Instruments and controls2-73
Page 203 of 635
•Do not strike the Intelligent Key
sharply against another object.
• Do not change or modif y the Intelli-
gent Key.
• Wetting may damage the Intelligent
Key. If the Intelligent Key gets wet,
immediately wipe until it is com-
pletely dry.
• Do not place the Intelligent Key for an
extended period in an area where
temperatures exceed 140°F (60°C).
• Do not attach the Intelligent Key with
a key holder that contains a magnet.
• Do not place the Intelligent Key near
equipment that produces a magnetic
field, such as a TV, audio equipment
and personal computers.
If an Intelligent Key is lost or stolen, NISSAN
recommends erasing the ID code of that
Intelligent Key from the vehicle. This may
prevent the unauthorized use of the Intelli-
gent Key to operate the vehicle. For infor-
mation regarding the erasing procedure, it
is recommended that you visit a NISSAN
dealer.
Mechanical key
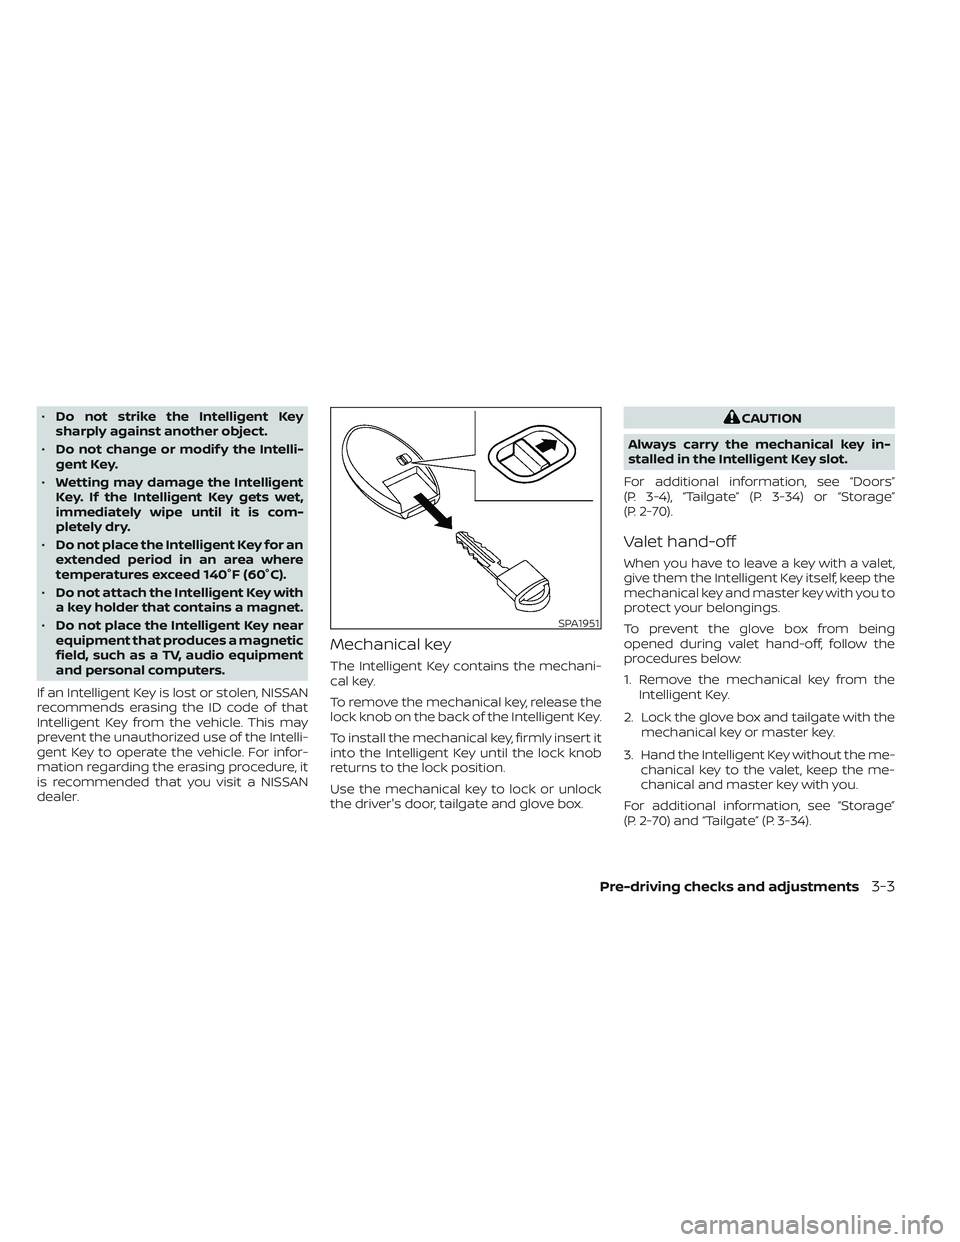
The Intelligent Key contains the mechani-
cal key.
To remove the mechanical key, release the
lock knob on the back of the Intelligent Key.
To install the mechanical key, firmly insert it
into the Intelligent Key until the lock knob
returns to the lock position.
Use the mechanical key to lock or unlock
the driver's door, tailgate and glove box.
CAUTION
Always carry the mechanical key in-
stalled in the Intelligent Key slot.
For additional information, see “Doors”
(P. 3-4), “Tailgate” (P. 3-34) or “Storage”
(P. 2-70).
Valet hand-off
When you have to leave a key with a valet,
give them the Intelligent Key itself, keep the
mechanical key and master key with you to
protect your belongings.
To prevent the glove box from being
opened during valet hand-off, follow the
procedures below:
1. Remove the mechanical key from the Intelligent Key.
2. Lock the glove box and tailgate with the mechanical key or master key.
3. Hand the Intelligent Key without the me- chanical key to the valet, keep the me-
chanical and master key with you.
For additional information, see “Storage”
(P. 2-70) and “Tailgate” (P. 3-34).
SPA1951
Pre-driving checks and adjustments3-3
Page 213 of 635
• Doors and the tailgate lock (if soequipped) do not lock with the door
handle request switch (if so equipped)
if the Intelligent Key is inside the ve-
hicle. A beep will sound to warn you.
However, when an Intelligent Key is in-
side the vehicle, doors can be locked
with another Intelligent Key.
WARNING
Af ter locking the doors using the re-
quest switch (if so equipped), make
sure that the doors have been securely
locked by operating the door handles.
Failure to follow these instructions may
result in inadvertently unlocking the
doors, which may decrease the safety
and security of your vehicle.
CAUTION
• When locking the doors using the re-
quest switch (if so equipped), make
sure to have the Intelligent Key in
your possession before operating
the request switch (if so equipped) to
prevent the Intelligent Key from be-
ing lef t in the vehicle. •
The request switch (if so equipped) is
operational only when the Intelligent
Key has been detected by the Intelli-
gent Key system.
Lockout protection
To prevent the Intelligent Key from being
accidentally locked in the vehicle, lockout
protection is equipped with the Intelligent
Key system.
When any door is open, the doors are
locked, and then the Intelligent Key is put
inside the vehicle and all the doors are
closed; a chime will sound and the lock will
automatically unlock.
NOTE:
The doors may not lock when the Intelli-
gent Key is in the same hand that is op-
erating the request switch (if so
equipped) to lock the door. Put the Intel-
ligent Key in a purse, pocket or your
other hand.
CAUTION
The lockout protection may not func-
tion under the following conditions:
• When the Intelligent Key is placed on
top of the instrument panel.
• When the Intelligent Key is placed in-
side the glove box or a storage bin.
• When the Intelligent Key is placed in-
side the door pockets.
• When the Intelligent Key is placed in-
side or near metallic materials.
Pre-driving checks and adjustments3-13